


|
Supplemental: The Dark Priest, Enki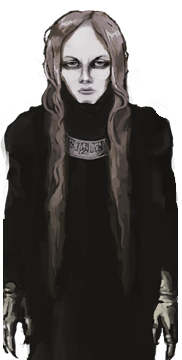 "I got a large, stuffed crust pizza with extra cheese, extra bacon, onions, jalapenos and anchovies, yes..." Woops, wrong quote. "Huh? You are with a sane mind still? Please leave me. I'm not here to make acquaintances and I fail to see what worth chatting with you would bring. As a Character: Enki was born one half a set of twins to a convent of Dark Priests. Interestingly, unlike the other characters we never really learn what part of the world Enki is from specifically, just that he lived in some sort of temple. The life of a Dark Priest is a brutal restrictive one, requiring total dedication to the occult. While the world of Fear & Hunger is very much steeped in religion due to the overt presence of the Old and New Gods, Dark Priests themselves are still considered to be fringe zealots due to their absolute devotion to the Gods. Enki completed the rites set before him in order to become a proper Dark Priest, but his final challenge proved to be problematic for him. Enki was forced into a duel to the death with his own twin sister using ritual daggers. Enki was born frail and struggled with physical tasks, resulting in him suffering a swift defeat. This is the only backstory with a huge diverging point, and it's not really clear if Enki did backstab his sister when she relented and spared him, or if he accepted his defeat and eked out a miserable existence in a well for a time. Regardless, Enki was set on becoming a Dark Priest as a means of proving himself, devoting his studies wholly to the Gods of old. His studies would lead him across scriptures detailing a prophesized individual destined to unite the Western World. Enki was skeptical of such a prophecy, but at the same time was curious at what such a man could know and how it could further his own knowledge of the world around him. He quickly discovers the man the prophecies speak of is most likely the Captain of The Knights of the Midnight Sun, Le'garde, who has recently been interred in the Dungeons of Fear and Hunger. Enki sets out on his own quest to rescue the captain and pick his brain for any greater knowledge he may posses. It's worth noting that Enki's actual motives seem to vary depending on what part of the game you're seeing him in. His backstory when starting as him indicates that his presence in the dungeons is a result of an investigation he conducted, and came to the ill conceived conclusion that Le'garde possessed knowledge he desired. The flashback in the Endless Tower dream indicates that Enki was suicidal and dissatisfied with the world, offering himself up in sacrifice to Alll-mer until a vision from the Gods (which ones, I can't say for sure) indicated deeper meaning awaited him in the dungeons. As an NPC within the dungeons, Enki purely seems to be there in the interest of studying tomes that can only be found within the dungeons. While Enki isn't the only character who doesn't have a direct connection to Le'garde that inspires him to enter the dungeons, his reasons are by far the vaguest of the protagonists. Enki is the nominal hero of the cast, being self-centered and anti-social. Too many attempts to talk to him permanently sour his disposition towards you, rendering him unrecruitable, and he has no interest in allying with anyone in the dungeons if he feels there's nothing in it for him. He isn't outwardly antagonistic, and he doesn't seem to have malicious goals in mind, but he certainly couldn't care less about others. Despite his aloof nature, like all the others, the dungeon is more than willing to break him, and he laments how he isn't strong enough to resist it as he had hoped if he begins to succumb. Enki's greater awareness of the darkness the unlucky explorers of the dungeon find themselves faced with does pay off in in his own ending though, where he manages to find true enlightenment within the dungeons and the secrets to an indefinite life. Enki's legacy ends up being the strongest of anyone come Termina. As your Protagonist: Enki's Enlightened Soul offers him the following skills, Counter-Magic: Enki starts with this, and it's an odd skill to say the least. It can be used on the field to unlock magically sealed doors, which is something that can only be done twice. In battle, it can be used to disrupt magic. This prevents weaker enemies from casting spells and instantly defeats products of Necromancy without them getting a chance to attack at all. It does not work on magic casting boss monsters, who are too powerful to be thrown off by a simple mantra. It's pretty whatever, but it is a free skill for him so may as well use it against the occasional ghoul. Greater Blood Magic: This is a passive skill that offers upgrades to 3 specific Gro-goroth skills should you know them. If you know Hurting, you can cast Greater Hurting. Greater Hurting deals the same damage as regular Hurting, but only at the cost of 10 mind instead of the way too high 40. If you know Blood Golem, you can cast Greater Blood Golem which only costs 5 Body to activate instead of 20. If you know Necromancy, the spell will now succeed without the need for a coin flip, though it still costs 30 mind to use. This is actually a very good passive, especially if you plan to create an undead team, so it's worth picking up for that alone. The fact that Enki can access this skill from the word go is one of two reasons to play as him. Enki is the only protagonist to have equipment restrictions. Enki is incapable of using two-handed weapons such as the Iron Spear, Claymore, Crude Sword or the Sergal Spear. Additionally, he cannot wear Heavy armor. This includes items such as the Plate Mail, the Gaunt equipment, the Iron Cuirass, and most unfortunately the Arm Guards and Leg Guards. Thankfully Enki can still use shields, including the very strong Eagle Crest Shield. Enki's backstory offers him the following, 1.)Necromancy but you lose access to Dash OR Mastery Over Insects 2.)Only if you choose Mastery over Insects, you can then choose Pyromancy Trick but you lose access to Dash OR Alchemilla Vol. 1 3.)Max affinity with a God of your choosing. Gro-goroth and God of The Depths are the best choice for this in my, and most others, opinion. 4.)A Soul Stone OR a Pipe and an Opium Powder OR a Blue Vial and 2 Cloth Fragments OR Dash if you selected Mastery Over Insects and Alchemilla Vol. 1. Alternatively, you can skip his backstory and obtain, 1.)Necromancy and Needle Worm Actually that's it. In general you should never skip the backstory, but this starting load out is especially trash in comparison. Enki starts with the Counter-Magic skill already unlocked, meaning he only has one skill tied to his Soul he needs the Hexen to unlock. His starting robes are notable for being one of the few Otherworldly resisting armors in the game, granting an extra 10% resistance. Enki's short sword is the worst non-dagger weapon in the game, providing a piddling +10 attack power. It's as strong as the short bow without the field applications and Ragnvaldr can perform the same damage by punching enemies. I'm just going to cut to the chase and let you know that Enki sucks. While the inability to use two-handed weapons isn't that big a deal since most of the best weapons are one handers anyway, his limited armor choices are a huge problem to contend with in fights. Additionally, he has the worst combat by a mile starting out, with his short sword being the worst weapon in the game. While he can have max Gro-Goroth affinity starting out, Enki then has to deal with the issue of Soul Stones. There just aren't that many available until you get into the Ancient City, and a good chunk of the ones that are available depend on RNG to obtain in some form or another. That's not even getting into the struggles you may come across finding things he can kill to secure those Lesser Souls, plus the already existing things you'd like to get with them such as Blood Portal and Loving Whispers. The fact that he wants to pick up Greater Blood Magic to get the most out of his spells adds to the ongoing resource problem. Attack magic itself is just not that good in this game, costing Mind to utilize compared to the 0 price tag of physical attacks, and not really doing more damage to justify the cost. Enki is mostly good as a protagonist for his fringe perks. Starting with Alchemilla gives him good healing early on, being the only character who has the guaranteed ability to craft the herbs you find in the early stages of the game into better healing items. Additionally, having that book gives you a chance of rolling multiple items on the bookshelves in the dungeons since it's a unique book. (Sadly this bug doesn't happen with Ma'habre bookshelves where Alchemilla dupes can be obtained.) Since he's able to pick up Necromancy faster than anyone else, he also has the ability to utilize the conventionally useless Ghouls in a Marriage ritual, going from a terrible party member to a great one for no real cost. You can even have Enki and the Ghoul get their arms sawn off for free material for the Sergal Spear, since the Marriage forms with all limbs intact. That being said, I don't really think it's a good look for a character that one of their main draws is "I can turn them into a completely different character that isn't junk if I route things correctly". On his own merits, Enki is easily the worst protagonist in the game. All of the pros I've mentioned require good game knowledge to appreciate, a first time player would really struggle to do anything effective with this guy. He's kind of like Karin from Termina, on paper he has the material for a fantastic early game, but a mixture of missing a critical piece of the kit starting out and the mechanics of the game working against him results in someone who's just kind of bad at everything for no boons in return. As a Recruitable Party Member: Enki doesn't come across much better here. To recruit Enki, you must talk to him in the Inner Hall library once, asking either of the questions available. This will flag him to move onto his next location when you leave the screen. Do not talk to him 3 times in the Inner Hall, or he will become irate with you a refuse to join later. You can find him again in the Level 7 Catacombs by the Ritual Circle. He's more willing to talk in this situation if you hadn't angered him previously, but can only be recruited at this point if you have the Eclipse Talisman from the Yellow Mages. He'll request it from you, and you must refuse him. He will then change his offer and join you. What do you get for this complex set of steps? Not much really. Enki has the same equipment restrictions as a party member, making him flatly worse in physical combat than almost anyone else you could have grabbed at this point. He has Hurting, Needle Worm and Counter-Magic in his skill list, which are either bad or of limited use. Due to a bug, he cannot use Greater Hurting if you have a scroll to teach him Greater Blood Magic. I'd say the main use for him is to have him tank hits from Valteil if you don't have the Eastern Silk robes, otherwise he's substantially worse than Le'garde who is just one room down from him. Due to bugs in the game's code, Enki has the amusing problem of crashing the game if he attempts to form a Marriage with anyone other than a Ghoul or Cahara. On T&S mode, Should you venture too deep into the ancient city without recruiting Enki, he will eventually form an Abominable Marriage with two ghouls, and will no longer be recruitable. The deformed Enki will be prowling around the Catacombs ritual circle room, though like the Infected Ragnvaldr, getting into a fight with him has no battle data due to a glitch and you just automatically win after a black screen. This particular event is pretty buggy in general, you can run into Marriage Enki even if you did recruit him, if you killed him before hand, and I've heard he can sometimes appear even if you're playing as Enki. The spaghetti code is strong with this one.
|
 #
?
Jan 22, 2024 18:54
#
?
Jan 22, 2024 18:54
|
|


|

|
| # ? May 18, 2024 13:58 |
|
|
Supplemental: Difficulty Levels Since we've finally hit the point in the LP where we are moving to a new difficulty level, I figured it'd be appropriate to dedicate a mechanics post to each level and layout what to expect from each of them. While there are some number inflations in the enemy HP stats, Fear & Hunger otherwise does not do difficulty by numbers and instead the higher difficulties introduce a bunch of mechanical changes in an effort to break dominant strategies or punish mistakes more. There are 3 proper difficulty levels in the game, as well as a joke mode that masquerades as a difficulty level. Fear & Hunger Mode: This is the standard mode of the game and what we've been playing on until Part 9. Do not mistake this for an easy mode simply because it's the first on the list, the game is just as sadistic on its base setting and you can quickly find yourself dead or incapacitated if you are careless. Fear & Hunger mode was known as Normal Mode in earlier versions of the game, where there were only two proper difficulty settings, Normal and Hard. Originally there was no difference between Normal and Hard save for the special conditions of Hard Mode we'll go over later, but as of the current version of the game Hard mode uses Terror & Starvation as a base for its difficulty. As far as differences between Fear & Hunger mode and Normal Mode, there's not really that much besides the presence of things like Torches and Lucky Coins, which were not in the game until later patches. Prior to Torches being added to the game, the vision range in the game was always at the range a fully lit torch gives you, in both Normal and Hard mode. Terror & Starvation Mode: The intermediate difficulty of the game, for when Fear & Hunger mode becomes too stale. There are less changes than you'd expect, but the things that do change are quite prominent and can quickly spell an end to your run if you approach this mode exactly how you approach Fear & Hunger. To break it down, Torches: Originally just a means to extend your vision range and blunt mind loss from the darkness, Torches are made essential in Terror & Starvation. The natural vision field around your character is removed, and ambient lights sources are dim in many areas and non-existent in others, meaning you need torches to see what the hell you are doing. You start with 3 torches and can pick up 4 or 5 extras in the Mines, but you are otherwise dependent on loot and crafting materials in order to make more. This mechanic is a serious pain, as the guaranteed torches are nowhere near enough to carry you through an average playthrough. Torches only burn at max light for around 2 minutes and fizzle out after about 3, so you will be going through them quickly. If the RNG is unkind with torches, you could very well end up in a run where you have none left. The game essentially becomes unplayable at this point as you cannot see anything in the deeper levels of the dungeon. I'm not a fan of this mechanic due to the RNG involved with it. Moonscorch was annoying to deal with in Termina, but at least that depended on efficient routing and map knowledge to avoid problems with. Enemy HP Increases: Most though not all enemies see increases in HP to their Torsos or equivalent body parts, as well as their attacking limbs. The Guard is a good index for this, going from a 325 break value for his torso to 625, as well as his Arms and Stinger going from 20 HP to 250 HP. The general rule of thumb is that a standard enemy will have around double or slightly more Torso HP in this mode while their attacking limbs will have HP close in value to their F&H Torso, making it much harder to destroy them in a single shot. By contrast, the limbs enemies rely on to stay on balance (usually the legs) as well as their heads will see no HP increase most of the time, making that a more appealing method to take them out. For bosses, usually they just get around 1,000 or so extra HP to their major pieces, though some like Crow Mauler get surprisingly little extra HP. I made sure to note all the HP differences for enemies in the supplemental enemy posts if you're curious to see what the exact changes for everything is. As mentioned previously, not every enemy gets HP buffs, guys like the Dark Priests and Trortur are exactly the same. The game mostly reserves this bonus for enemies that are legitimate threats if you approach them in a poorly thought out manner, and gears it toward blocking early game strategies such as the Safety Loop against a Guard. Contrary to popular belief, enemies do not deal more damage on this mode. New Traps to catch the unwary: A number of new traps are introduced in this mode, with the express intent of throwing you off your game if you don't see them coming. (Which you won't.) Here's a list of all the ones that I know of. -Hounds follow you into the Entrance. Should you enter the Dungeon via the Entrance Hall, two hound enemies will tail you inside after a couple seconds, heading straight for you if they have a clear line of sight. Contrary to what people assume, this event always happens even if you enter the dungeon before hearing the barks in the distance. It can be circumvented by going through the Level 2 Basement, but you may find yourself blocked by a locked door 50% of the time on that route. -Rats occupy certain coin flip bookshelves, and will leap out and deliver an infecting bite if you fail the coin toss. -Crow Mauler can burst through certain walls if he is active. The most notable place he can do this is right outside Le'garde's cell, throwing you into a fight if you're not careful approaching it. -Bear traps are strewn about the Present Tomb of The Gods. These will destroy both your legs if you walk over them. Don't do that. -If you have The Girl in your party, she can be abducted by a Harvestman when walking through the path to the Library District in Past Ma'habre. You will find her in the alleyway just past the Bug Eyed Figurine and can rescue her by killing the Harvestman. -The Present Grand Library has Pentagrams in various parts of it that spawn in the Black Witch if you approach them. The Black Witch is a much more threatening enemy in this mode, making her pretty dangerous if you're alone. On the upside, killing her in the Grand Library lets you collect her soul. -Ragnvaldr and Enki have time limits on recruiting them. Venture too deep into the Ancient City, and they will become infected with a brain flower in the thicket and form an Abominable Marriage respectively. They're supposed to be enemies in these states, but due to a bug getting into a fight with them results in an automatic victory. The main thing you lose out on is good party members. (Well, good in Ragnvaldr's case) -A new boss awaits you in The Void, just before either your ascended form or the Yellow King depending on what route you are on. If you don't have the right skill and a good supply of Mind restoratives, this boss is easily one of the toughest fights in the game. Escape Chances for the Run Skill are reduced: The Run skill gets a 5-10% reduction in success rate for just about every enemy in the game it works on. This does not affect Escape Plan, indirectly making the skill stronger in this mode. Duds are introduced to the loot tables: Crates, Urns and Barrels have a chance to provide nothing about 15% of the time, and Barrels also have a 25% chance of pulling from the Rotten Food table on top of that. Rotten food has high chances of poisoning you when consumed, and rotten meat items can also inflict the Parasites status. That's all the changes I can think of off hand. There may be some minor ones I'm missing, but these are the big things you can expect to see in T&S. Torches are by far the biggest problem introduced, creating a time limit for the game of variable length depending on how generous the RNG is. Definitely do not tackle this mode if you don't know your routes inside and out. Hard Mode: Hard Mode has all the features of Terror & Starvation mode with 3 major changes. 2 of these are in the interest of making the game harder, while the last one is your potential reward for completing the mode in certain ways. There are no party members save for Ghouls, the Blood Golem and Skeletons: All party members not obtainable through blood magic are flatly removed from the dungeons of Fear & Hunger. No other protagonist character enters the dungeon except your own, The Girl's cage is empty, Moonless cannot be pacified, Nas'hrah is absent, Demon Seed does nothing, and Le'garde is dead from the moment you start the run. Your only options for allies are the sacrificial ghouls, the strong but random skeletons, and the debatably useful Blood Golem. This means that getting Gro-Goroth affinity or at the very least Necromancy is just about mandatory for survival. As a consequence of this, Ending C and Ending A are not available in this mode, as both of those endings require a specific recruitable character to be in your party. You Cannot Save: This is probably the bigger one that makes the Hard Mode live up to its name. All forms of saving are disabled. You cannot use beds to save, the Book of Enlightenment is removed from its fixed spots and cannot be found from coin flip bookshelves, and the game will bluntly deny you if you attempt to Empty Scroll a Book of Enlightenment. You cannot save scum and any mistake you make you have to either live with or give up. Knowledge of how to get through the dungeon is essential for this mode because of this, as well as good improvisational skills as there are not many guarantees in the game. Each Protagonist has a Special Ending, obtainable through unique methods: This is the reward I mentioned before. Each Protagonist has a unique ending they can get in this mode by fulfilling specific objectives exclusive to them. Some of these objectives result in considerably shorter runs than you'd see in any other ending route save for Ending E, while some of them are the ultimate challenges the game has to offer. Hard mode has a pretty interesting history. In the earliest versions of the game, it actually did not have the special endings. Orange figured the conditions he set for it made it unwinnable, but since Necromancy could still be used people were indeed able to clear the mode. (People have in fact done solo clears of Hard mode, though several points of such runs do hinge on outright RNG) Starting from the 1.2 versions of the game, each character gets a couple extra lines at the end of their backstories when starting Hard Mode that hint at what they need to do in order to get their S Ending. Prior to the introduction of T&S, Hard Mode was identical to F&H mode save for the lack of party members and saving, making certain sections much easier than they are in the current version of the game. If you're curious to see a time capsule of how the game used to be, the channel Priscilla Poodle has S-Ending runs for the game as it was in version 1.2.2. It's interesting to see what changed in the span of a couple years of updates! Dungeon Nights: Orange thought it would be funny to lock a mode behind a code and have it turn out to be a parody dating sim. We'll go over Dungeon Nights purely in video form as to not ruin any surprises. CullenDaGaDee fucked around with this message at 13:06 on Jan 29, 2024 |
|
#
?
Jan 23, 2024 02:42
|
|
|
What are ending C and A again? Those sentences would make more sense with a bit of description.
|
|
#
?
Jan 23, 2024 15:03
|
|

|
VictualSquid posted:What are ending C and A again? Those sentences would make more sense with a bit of description. We have yet to see ending A, but we got ending C at the end of D'arce's run. Ending C requires you to have Le'garde in the party when going to the Void, and if he's auto-dead... well, can't have that ending trigger, right? Suffice it to say that both endings require party members, and are thus a little difficult to obtain when they're all gone. Materant fucked around with this message at 15:28 on Jan 23, 2024 |
|
#
?
Jan 23, 2024 15:16
|
|


|
VictualSquid posted:What are ending C and A again? Those sentences would make more sense with a bit of description. I�m planning on making a dedicated post for each ending requirement, but I will make it more clear what I mean by this. Like Materant said, ending C requires Le�garde to enter The Void, and he can�t really do that while dead. Ending A requires reaching the end of The Gauntlet, which is an are we haven�t seen yet, with The Girl in your party. CullenDaGaDee fucked around with this message at 15:31 on Jan 23, 2024 |
|
#
?
Jan 23, 2024 15:22
|
|
|
An update on the polls for our Dungeon Nights date! Currently Crow Mauler has a commanding lead, being the number one most popular in his poll. D'arce and Ragnvaldr are tied and a bit behind Crow in popularity. The macho mass of muscle tissue that is Tormented One is right behind Ragnvaldr and D'arce. Nilvan is barely in 5th place, with Cahara and Pocketcat at a tie right behind her. Sadly Le'garde's bad boy energy has failed him and he is in dead last. These polls will close tomorrow, and the final poll with the 4 most popular choices will go live right after. Vote now if you haven't already! https://www.youtube.com/post/UgkxU_6G4X_W8-wDq61-yb5rYDNLsEUeBxgY https://www.youtube.com/post/UgkxGtX3xZsYrXktcVgNVkrWCxAZMXpaInVJ
|
|
#
?
Jan 24, 2024 01:21
|
|
|
Supplemental: Blood Golem, Ghouls, Skeletons, Marriage and Abominable Marriage We got a slew of new party options in our run as Enki, so I think it's time we broke down each one of them to see who's hot and who's not. Blood Golem 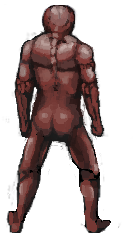 *Blood Golem can only be active in battle without glitches, and thus does not have a proper portrait. As a Character: He's a golem created from your character's blood if you cast his titular spell. Not too much to say about him though you've probably noticed he has a passing resemblance to the Tormented One. In the demo of the game, there is actually sprite data associated with the Golem that is recognizably the Tormented One in the final game. See here if you're curious. As a Party Member: The Blood Golem is a temporary party member that is created by casting Blood Golem or Greater Blood Golem in battle (These spells cost 20 Body and 5 Body respectively). He cannot be active out of battle, though for some reason there is a bug involving the Old Knight where if you summon a golem and run from the battle, he is then added to your party and will be present from the first turn in subsequent fights. The Blood Golem has 200 Body as opposed to 100, no phobias, and an attack power of 80 meaning he'll generally hit for around 300 damage. Pretty solid attributes, and he can soak up quite a bit of punishment even though he has default physical resistances. He is an AI controlled character, though, so his attacks are slung at completely random targets. Blood Golem is good in a vacuum, but the fact you have to spend a turn setting him up and then another turn casting Pheromones to redirect attacks to him makes him questionably worthwhile. Most enemies in Fear & Hunger are attacking at full blast from the word go, and if you lack the proper protections you can get hit with some seriously debilitating afflictions if you waste time setting up a Golem and hoping it gets attacked. Still, he has his uses and he can certainly come in clutch on Hard Mode if a Skeleton gets taken out before the end of a run. One other thing to note is that while the Golem is vulnerable to standard ailments, since he can't be taken out of battle he is completely unaffected by losing his limbs. Remember, losing limbs carries no stat penalties, just field and equipment penalties. Ghouls 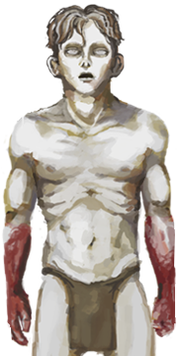 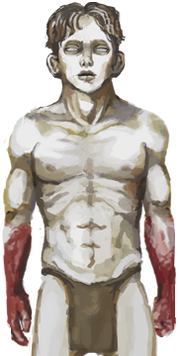 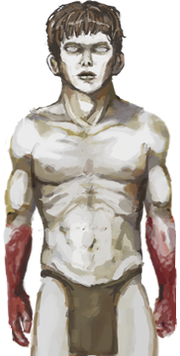 As Characters: Believe it or not, despite being revenants brought about by blood magic within the dungeons of Fear & Hunger, each Ghoul does have a backstory should you attempt to talk to them and the game files reveals each one has a name. Luckily, Tormentpedia has catalogued these so I don't have to look them up myself! The Entrance Hall Prisoner was a guard who was killed by Dark Priests as a blood sacrifice to Gro-goroth. The Level 3 Prison Prisoner was a guard who starved to death after locking himself in a cell to avoid the horrors the other guards committed against each other. The Mutilated body in Ma'habre was a farmer who resorted to graverobbing in desperate times, only to succumb to the dungeon. Their living names were Geringo, Hubert and Jann respectively. ~useless trivia~ As Party Members: Ghouls in battle are AI controlled party members. They cannot use equipment, they do not have any status immunities save for not having phobias, they need to be fed to stay in top form, and they only hit from around 40-50 damage. As far as battle goes, Ghouls are little more than pre-deployed meat shields, either giving a chance to draw random fire or being ideal targets for Pheromones. Like Blood Golems, they are largely unaffected by losing limbs since they can't equip anything anyway. For the purpose of soaking hits, the fact they are available as punching bags from the start of a battle does give them some situational use over something like the Blood Golem, if you're dealing with something that throws out really nasty attacks with permanent afflictions like Crow Mauler, Valteil, or even the simple Guard. Outside of that though, they are worthless, and Ragnvaldr with War Cry and the proper equipment is the game's ultimate tank. What makes Ghouls valuable is their sacrificial uses. They can literally be sacrificed to Gro-Goroth for one last level of Affinity, they can have their limbs sawn off for the Sergal Spear table as well as emergency rations (yes you can cannibalize your party members) and since they suck in fights anyway, they are great for forming Marriages as they will always agree to it. (We'll disregard the ethics of railing a reanimated corpse that is completely subservient to you) If you want, you can even have your main character get his limbs sawn off alongside a Ghoul and then immediately form a Marriage, getting your arms back and having all you need to collect the Sergal Spear. Unless you have a specific tanking strategy in mind, this is probably the best use for Ghouls. One last annoying thing to note, Hubert and Jann are always in the game, while Geringo is a random spawn and isn't always in the Entrance Hall. It's not a huge deal since you really only need the two for everything you could want to do with Ghouls, but the lack of consistency annoys me. Skeletons  As Characters: They are skeletons. They enjoy a good dance and would prefer if you don't rattle their bones. They can be found in the following locations, Level 2 Basement Level 7 Catacombs Ancient City Back Alleys, in the room that leads to the overpass with the Beacon of The Depths As Party Members: Like all Blood Magic products, Skeletons are AI controlled. They actually have quite a bit going for them to make up for this though. Naturally since they lack flesh and blood, they are immune to bleeding, infection, poison, blindness since they also have no eyes, and the Ruin attack from Miner Spectres. In addition to that, they have no phobias and no penalty for losing mind, as well as not needing to be fed. They do have some drawbacks though. I've already mentioned the AI control, but they also have a lower base attack power, possessing only 16 attack as opposed to the usual 30. They are also incapable of using most two-handed weapons, the Bone Shears being the sole exception. Thankfully they have no armor restrictions, so they are just as defensively capable as a normal character, and their host of immunities make them surprisingly effective tanks. One other equipment restriction they have is the inability to form a Marriage, though you wouldn't want to use them for that anyway. One last random perk, because Miasma is a one hander, Skeletons can wield it and will not suffer the possession scene if they hold it. They also cannot be slaughtered if the player wields Miasma as they lack sprite data for being killed in that situation. We take positive oversights like that! Skeletons have enough pros that it's debatably useful to use one in a normal run. The main thing people use these guys for though is Hard Mode, where alongside Ghouls and the Blood Golem they are your only options for party members. They are essential to actually winning in that mode, and securing their assistance is always a high priority for runs that require fighting the bosses. Marriage 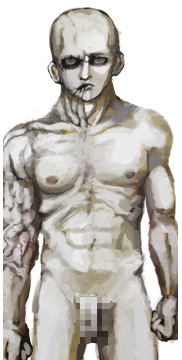 As a Character: A Marriage of the flesh is the physical embodiment of love between two individuals, or at the very least Sylvian's highly sexual interpretation of love. When two individuals Show Love in Sylvian's name upon a ritual circle, they will merge into the slightly deformed but immensely capable Marriage. The fusing nature of the ritual results in a completely new person for all intents and purposes, and creating the Marriage does prompt you to name it, on top of giving you a fresh character with no limbs lost even if the participants had lost them. Tragically, there aren't really any special dialogue interactions you can get with a Marriage. It is worth noting that if you have negative affinity with Sylvian (obtained by either praying multiple times to her at a single circle or praying to her at the wrong statue) or if you Show Love on a circle you already prayed to her at, the Marriage will fail and you will become a heavily deformed blob of an individual. This results in a game over. The following characters can form a Marriage, Cahara Enki, though he his heavily bugged. D'arce and Ragnvaldr usually just refuse him no matter what, while also crashing the game if they're protagonists and Enki is a party member. He can do it just fine with Ghouls and Cahara though. D'arce Ragnvaldr Ghouls Every other character either refuses, can't be selected, or in the case of Nas'hrah, will light you on fire. For the protagonist characters, you do need to have them in your party for a period of time before they'll accept the offer to Show Love. It's not exactly clear how long it takes, but it's probably a matter of minutes tracked in game time. Cahara is the exception, he's got a bit of nymphomania streak and will always accept the offer. You cannot form a Marriage if you're in the Penance Armor, as it mangles your genitals (and most of the rest of your body) beyond usability. As a Party Member: The Marriage is basically the ultimate character in the game. They have no equipment restrictions, even if they were formed off of the physically frail Enki. They inherit the soul of the main character and carry over all skills the main character learned. They form completely fresh, with no ailments and no limbs lost, indirectly making them a way to restore limbs. They also have a base attack power of 50, stronger than Ragnvaldr and considerably stronger than the rest of the cast. Now I wouldn't recommend using two protagonists to form a Marriage, as two capable characters is way more effective than one extra capable character. Using a Ghoul to form one, on the other hand, is an excellent idea since Ghouls are trash fighters anyway. Enki especially benefits from becoming a Marriage as it eliminates his equipment restrictions and brings him on par with the rest of the main cast. Despite their deformities, the Marriage is also capable of wearing the Penance Armor, creating a highly damaging character that is also immune to limb loss and has extremely high resistances. One major drawback of the Marriage, however, is that you cannot use them to obtain the Hard Mode exclusive endings. The characters must stay themselves to obtain those endings. Frustrating, but understandable as otherwise there would be no reason not to form a Marriage in Hard Mode. The Abominable Marriage 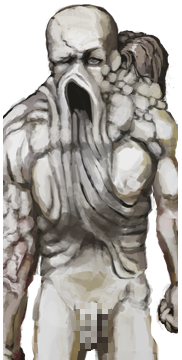 As a Character: Proof that two's company but three's a crowd, if a Marriage attempts to show love to a willing partner, this is the end result. The Abominable Marriage is just barely functional as an amalgam of three people, but has many problems to contend with. While you do get the restorative perks of a regular Marriage from becoming an Abominable, there are way too many cons to the process for anyone sane to even consider becoming one. As a result, the only ones who will agree to it are the completely subservient Ghouls. And Cahara. Also the severe deformities have rendered the Abominable Marriage impotent. This is actually important to know. As a Party Member: While becoming a Marriage is a flat upgrade for at least one character, the Abominable Marriage isn't quite as lucky. The Abominable Marriage boasts a tremendous attack stat of 70, second only to the Blood Golem! That's where the positives end, because the Abominable Marriage is so deformed and off balance, they can barely using anything. The only weapons they can use are the Claymore, Crude Sword and Sergal Spear. Good weapons, but if the Abominable Marriage loses an arm their offense tanks to being barely better than a Long Sword. That's a very real concern because the Abominable Marriage CANNOT EQUIP ANY ARMOR OR ACCESSORIES. The lack of armor could be worked around, but losing accessories sucks majorly. The Abominable Marriage is a major glass cannon if they have weapons they can use, and you really need to be able to take heat off of them if you plan you use them. Make sure you have Pheromones and a good punching bag, or Ragnvaldr with War Cry. As mentioned previously, the Abominable Marriage has been rendered impotent. They can no longer Show Love (probably for the best) and they cannot participate in the Bunny Mask orgy. Their heavily warped proportions also renders them incapable of using the Penance Armor, I guess sparing them additional agony. One upside of the deformities is that Guards will ignore you, as your heavily disfigured appearance results in them recognizing you as kin. Use extreme consideration with forming an Abominable Marriage.
|
|
#
?
Jan 24, 2024 04:49
|
|
|
admittedly this is totally an 'in theory' thing, since I haven't played, but I actually like some characters being stronger than others. It creates interesting scenarios if you choose to play as them, a pseudo-challenge mode, as it were. Granted, I'm not a super min-maxer like some gamers, though. So I actually don't mind Enki, or from what I've read about Termina, Levi and Karin being 'low tier', as it were.
|
|
#
?
Jan 24, 2024 05:05
|
|

|
I think in any game where characters have distinct traits, tiers will inevitably form. It's actually really difficult to balance a game and make sure every idea you have for a distinct character is equally usable, particularly when you're a one person dev team that throws in every idea you have. For what it's worth, I don't think it's as important in Termina, and I actually find Levi and Karin really fun to use because of the different approaches you have to take to get good results with them. Levi is even one of my favorite characters and was the first one I beat Maso mode with. It sticks out a bit more to me for Fear & Hunger 1 because the game is a lot more sadistic from the jump and I partially want to give out recommendations to people who are inspired to try the game that will make the early going easier. Also in general I just think all the mechanics Enki ties himself to are poorly implemented and a chore to make use of for not that much in returns, so I just don't find him to be a very fun character to use.
|
|
#
?
Jan 24, 2024 05:12
|
|
|
'Penance Armor' may be a goofy reference to the superhero character of the same name, who was kind of a bit player in the Civil War in Marvel comics. Speedball was a superhero who bounced kinetically off stuff. He accidentally surprised and detonated another superpowered character who was... explosive. Speedball survived the incident but his powers warped to now be powered by his own pain. He took up the name of 'Penance' and wore a suit with hundreds of spikes inside it. As one of the silliest, edgiest things imaginable, and also because of a tendency for big-two superhero comics to return to status quo instead of being interesting, he eventually went back to being Speedball.
|
|
#
?
Jan 24, 2024 05:23
|
|


|
It is possible, the games are pretty loaded with references both the obvious and the obscure. I�m one of the few people who noticed the reference to the band The Darkness when you talk to the Man in Black in Termina. (He asks you your thoughts on the concept of darkness and one of the choices is �I believe in a thing called love�)
|
|
#
?
Jan 24, 2024 15:50
|
|
|
I have caught up on the videos. I have enjoyed your LP so far. Very easy to watch because you are commenting over the gameplay and that makes me a lot less tense as poo poo when I'm watching this. Seriously, watching F&H makes me scared. The game is really interesting and I look forward to learning more about the setting and the characters.
|
|
#
?
Jan 24, 2024 17:51
|
|
|
Glad to hear! I�ve mostly steeled my nerves against this game at this point so I can usually keep a breezy tone throughout no problem. I do occasionally get caught off guard though like when I went into a full panic when I realized the Purified Eastern Sword didn�t work on the Miner Spectres.
|
|
#
?
Jan 24, 2024 18:01
|
|
|
I appreciate the voice-over work, personally. I watched the videos fully during the first time on Ragnvaldr's run to get an idea of the dungeons visuals and such. But on the subsequent runs, since it's running through most of the same places, it's convenient to be able to simply listen since I know generally where you are in the dungeon from what you're saying, and the dungeon does admittedly get visually repetitive the more we go through it.
|
|
#
?
Jan 25, 2024 00:39
|
|
|
I've doing my best to section off bits of unique content for each playthrough, since it's inevitable that there will be some repetitive content in game's that require multiple playthroughs to see everything. We'll likely be seeing super cut segments in the next two videos since there's a lot of things where I've said everything I could about them at this point.
|
|
#
?
Jan 25, 2024 01:06
|
|
|
The first round of polls for the Dungeon Nights date have been closed, and we have our final poll live now! Leading the poll off is our most popular pick from the first round, Crow Mauler! Hard to tell if it was his pecs or his pecks that made the people go wild for him. Next in line is the hunky Ragnvaldr, who I think needs no further elaboration. Your third option is the "I can fix her" queen, D'arce! And the final choice is the sturdy yet squishy Tormented One! Vote now for your personal favorite, and secure them the chance for a wild romance with the bony big man on campus, Enki! https://www.youtube.com/post/UgkxvqyiGly1N6lkWjLHHX9pXW0bsnTf6RiV
|
|
#
?
Jan 25, 2024 02:10
|
|
|
Supplemental: Endings Like so many RPG and Horror games, Fear & Hunger has a variety of endings for you to obtain. I feel like since we've gotten 4 of them at this point in the LP, it's as good a time as any to lay out how many there are and how you get them. There are 6 endings available in Fear & Hunger and Terror & Starvation mode, while Hard mode removes the ability to obtain 3 of the said endings while adding in 4 special character exclusive endings that require each protagonist to fulfill unique objectives to obtain. For the benefit of not giving too much away on what each ending entails ahead of time, most of the methods for obtaining them will be spoilered out, and it'll be up to those who might be playing along on their own if they want to take a peak at how to get a certain ending. Ending E - Escape?: More of a fancy game over than a real ending, nevertheless it does have an ending card and awards you the Dungeon Nights codes should you obtain it. To obtain this ending, all you need to do is locate the captain of the Knights of the Midnight Sun, Le'garde. Le'gardless of what condition he is in when you do find him, returning to the entrance courtyard of the dungeons will allow you to leave through the mists surrounding the dungeon and attempt to escape. This is the fastest ending to obtain in the game, and is a favorite of speed runners. The current world record for this ending is eighteen seconds and it was gotten by fishing for an Empty Scroll and Quill from the starting crates and learning the Phase skill to warp past the text trigger that usually prevents you from leaving until you find Le'garde. It is a 0.004% chance you'll get those two specific items from the first two crates you search, so I can only imagine how many resets this took. Ending D - A New God: You must obtain the Enlightened, Endless and Tormented souls in order to fight against the Nameless Figurine in the present day Ancient City. Whether you obtain these by defeating their respective New God, by killing and using a soul stone on the associated protagonist character, or simply Empty Scrolling them into your inventory doesn't matter, and this is true for any ending where you need these souls. Obtain the King's Passage Key from Francois of the present inside the Golden Temple just past Nameless, and return to the Past of Ma'habre. Defeat Francois of the Past and sit upon his throne in order to enter the void. Locate the Ascended form of your protagonist in the Void, and talk with them to get your ending. The dialogue chose when speaking to your Ascended character postulates one of 4 different fates for your character, but the actual ending remains the same. Your character is effectively dead, and none of their party escaped the dungeon even if reunited in the Void. In F&H mode, Francois serves as the final boss for this ending, while T&S and Hard mode add a battle against the Traces of Sylvian just before you reach your ascended protagonist as one final challenge. Ending C-II - The Prophecy: Same requirements as Ending D, but Le'garde must be in your party before sitting upon the Throne of Ascension. Le'garde will enter The Void ahead of the rest of your party and take the spot of the ascended protagonist. When talking to him, you must choose to kneel before him. This will end the game and result in an ending where Le'garde returns to the world as an influential New God. Like Ending D, Francois is the final boss of this route on F&H mode, while the Traces of Sylvian serves as your final boss on the harder difficulties. The C endings are notable for being the only endings available in F&H and T&S where anyone can actually escape the dungeons, as well as the only endings in the game where multiple characters make it out of the dungeons. Given the deep mental scars the mere act of even being in the dungeon inflicted, this is a less cheery outcome than you'd expect. Ending C - The Yellow King: Everything required for Ending C-II is the same for this ending, with the exception that you choose to fight against Le'garde rather than submit to him. He will serve as your final boss, the titular Yellow King. Kill him and you get an ending where no major changes are made to the world and your character is stricken with severe PTSD. Yay? Ending B - The Older One: This ending takes you to a different final area compared to the previous endings. Once again you must obtain the necessary souls to fight Nameless, but rather than getting the King's Passage Key from Francois of the present, you only need to do this to slice open the organ that occupies the throne room of the present day Ancient City. You must also slice the organs in the Level 6 Thicket and the Level 7 Catacombs. Once you have done so, the maw of the God of The Depths that is just past the Cave Dwellers Village will open up and you will be able to go into it to enter the final Level of the Dungeons: the Gauntlet. Should you reach the end of this harrowing area, you will come face to face with the Traces of Gro-Goroth. "Defeat" him and you will have your hard earned extreme downer of an ending. Ending A - The God of Fear & Hunger: The same conditions as Ending B apply to this ending with one notable difference. You must have The Girl in your party when you reach the end of the Gauntlet. Rather than facing off against Gro-goroth's remnants, The Girl will become one with the essence of the God of The Depths, and ascend as the God of Fear & Hunger. "Defeat" the ascended Girl, and you will have your ending that's no less a downer than the last one but has greater implications for the world at large. Ending S - Happy Ending: Cahara's exclusive ending in Hard Mode. To obtain this ending, you must buy (NOT loot) the treasure maps from Isayah. After locating both of them, Isayah will ambush you and attempt to claim the rewards you got. Kill him in this encounter, and when you loot him he will have a third treasure map. Follow this map into the Old Passage, and locate the King's Crown at the dig point it leads to. Afterwards, confirm Le'garde's death and you will be allowed to leave the dungeon with your treasure in tow and get this sarcastically named ending. Ending S - The True God of Fear And Hunger: D'arce's exclusive ending in Hard Mode. To obtain this ending, you must find the three Torn Instructions items inside the Grand Library of the past. The first is located in the bottom right pillar of the entrance foyer of the Library, the second is found in a bookcase to the right of the next to last ladder leading to Valteil, and the final one will be in the journal of a caged prisoner in the chamber below the cloning tank room in the south east of the Library. Assembling these instructions will allow you to craft the book that teaches Rebirth of the Beloved, a special Sylvian skill. Use this skill on Le'garde in his cell, and you'll have the ultimate in simp endings. Ending S - The Enlightenment: Enki's exclusive ending in Hard Mode. This one is a little weird and has some misinformation floating around about the requirements, so I'll simply list what I know for certain will lead to getting this ending. When first encounter Nosramus in the mines, be sure to step out and introduce yourself to him. You do not need to talk to him in his hideout, which is commonly and incorrectly listed as a requirement. The next critical step is talking to Valteil in the present after defeating him in the past. In this instance, he will mention a critical topic for getting this ending. Locate Nosramus in his second hideout, and relay to him the information Valteil gave you. Following the conversation to its conclusion, Nosramus will provide you the Spirit Anchor accessory. From here, complete the game as if you were getting Ending D. Since it's Hard Mode, you'll have to fight Sylvian in the Void. After defeating her, equip your Spirit Anchor and talk to Ascended Enki. Your choices in the dialogue do not matter, so long as you have the Spirit Anchor equipped, you will get Enki's S Ending instead of Ending D. This is notably the only S Ending in the game where you don't have to confirm Le'garde's status at any point, you can ignore him entirely. Ending S - The God of Ultra-Violence: Ragnvaldr's exclusive ending in Hard Mode. This is the combat challenge ending, requiring you to defeat every boss in the game that awards a unique soul, and actually obtaining these souls as proof of your kill. Amusingly, this does mean you can Empty Scroll these souls into your inventory, and that counts as "killing" the associated enemy. Naturally it is a nice feather in the average Funger player's cap to say they got this ending with all souls obtained legitimately. For an itemized breakdown of who you need to kill, -Black Witch (amusingly when this Ending was first added, the Black Witch Soul could only be obtained through an Empty Scroll, meaning one was required to get this ending) -Iron Shakespeare -Crow Mauler (be mindful of the Ancient City despawn trigger, will need to Empty Scroll this soul if you despawn him since you can't use his bed to fight him in Hard Mode) -Cavemother -Salmonsnake -White Angel -Old Guardian -Tormented One -Valteil -Skin Granny (She doesn't have a Soul but you need to kill her to get the Endless Soul) -Francois Additionally, you must obtain the Butterfly soul, which is spawned when you slice the organ in the throne room of the Present Day Golden Temple. (You only need to slice this specific organ and none of the others) At any point during this hunting trip or after, you must also confirm Le'garde's death. Once all is squared away, you may leave the dungeon and get this kind of metal ending. This is easily the hardest ending to get in the game and you need to have a good route going into it to obtain it. This is not something you can wing it on and hope for the best.
|
|
#
?
Jan 25, 2024 03:24
|
|
|
Can't wait until I can click on those spoilers.
|
|
#
?
Jan 25, 2024 22:23
|
|
|
To my surprise, I've more or less run out of supplemental topics to discuss until I make more videos that the posts can actually be supplemental to. Naturally, if there's anything unclear or you'd like me to explain in greater detail, don't hesitate to ask. I did consider making a post on the various recipe books but there's really not much to say about them. You get them and they let you craft a variety of poo poo depending on what book it is. That said, there are plenty of smaller topics not worth a huge text write up or a dedicated block of the let's play, but are fairly interesting regardless. Going forward I'll probably drop random trivia related to stuff accomplished in the videos but is difficult or just not worth the time to go out of my way to show off. In the current 1.4.1 version of the game, there are several battle scenarios involving potential party members that do not work properly for no obvious reason. The most notable of these are the Miasma possession battles, where attempting to take these on should a party member be under the sword's thrall results in an endless black screen that soft locks the game. In the prior 1.4.0 version of the game, these battles worked properly and luckily for us, an archive of that version was discovered awhile back and video exists of how these battles are supposed to work! https://www.youtube.com/watch?v=GLoGQJW8lE4 Like I said, it's really unclear why these events are busted in the current version of the game. I did go through the patch notes available on Steam, and apparently the vanilla version of 1.4 was extremely crash prone, particularly causing crashes when looting crates (which you do a lot of). In the process of fixing those crashes, Orange unwittingly introduced them else where. Standard programming stories. Also apparently torches were even harder to get a good supply of, so I'd gladly sacrifice these battles to not have to grapple with a more sadistic version of that mechanic. (Unrelated, up until version 1.4.1, Blue Sin was a troll by Orange that you couldn't actually obtain without dying. The most current version of the game allows you to save yourself from the collapse of the mines with the Passages of Ma'habre.) There are fan made patches that correct bugs like this, but at present Orange's efforts for updating his games are focused squarely on Termina. It remains to be seen if an official fix for these bugs will ever be rolled out.
|
|
#
?
Jan 26, 2024 01:12
|
|
|
Are we certain that the coin tosses are really 50/50? It feels like they're made to go against the player like.... 80% of the time.
|
|
#
?
Jan 26, 2024 10:37
|
|

|
Feliday Melody posted:Are we certain that the coin tosses are really 50/50? Normally we'd call that perception bias. It's probably still perception bias here, but I couldn't say for certain.
|
|
#
?
Jan 26, 2024 11:13
|
|
|
I could absolutely accept perception bias. But I watched all the videos for game 1 and 2. And wow do the coins go against the player a lot.
|
|
#
?
Jan 26, 2024 12:33
|
|
|
I did see someone on the Steam message boards claim the odds were closer to 49/51 for Heads/Tails, though they were probably trolling. Personally, I do think it�s a genuine coin flip, it�s just very easy to notice all the failures because quite a lot is staked on it. The tried and true let�s players curse is also a factor, I�ve had plenty of personal runs where I�ve succesfully called most flips and got a lot of good stuff out of it.
|
|
#
?
Jan 26, 2024 12:55
|
|
|
Can I watch your other F&H LP safely without fear of spoiling myself for this one?
|
|
#
?
Jan 26, 2024 21:34
|
|
|
bman in 2288 posted:Can I watch your other F&H LP safely without fear of spoiling myself for this one? I would say that you should watch this one first. And then the F&H 2 video series. A lot of stuff is explained in this one that makes the other one make more sense.
|
|
#
?
Jan 26, 2024 21:37
|
|
|
The plots of the games are fairly independent of each other, but yeah there are certain elements in Termina that make a lot more sense if you�re fully aware of what happens in the first game. The full extent of the events of the first game aren�t really spoiled, but certain things will be rendered as foregone conclusions if you check out Termina first. I�ll be covering the remaining two standard endings of the game this weekend, and I�d say those are the remaining required viewing to fully get everything in Termina.
|
|
#
?
Jan 26, 2024 22:07
|
|
|
Feliday Melody posted:I would say that you should watch this one first. And then the F&H 2 video series. A lot of stuff is explained in this one that makes the other one make more sense. What 2-video series?
|
|
#
?
Jan 27, 2024 02:56
|
|
|
bman in 2288 posted:What 2-video series? I have a currently on hiatus LP series for the sequel to this game, Fear & Hunger Termina. It's a fairly comprehensive LP of the most current version of that game, and I'm currently waiting for the next major update to it to continue it. Termina itself has an independent plot that doesn't need knowledge of this game to understand, but there are several elements in it that are tied to the endings of Fear & Hunger 1 that reveal the ultimate fates of most of the characters.
|
|
#
?
Jan 27, 2024 03:02
|
|
|
Hmm... Okay. I understand now. I'll finish this LP first and then flying headbutt into the next one.
|
|
#
?
Jan 27, 2024 03:11
|
|
|
Random bonus post for the day, as mentioned in the supplemental post detailing the Marriage, the ritual can fail in one of two circumstances. The first is if you Show Love on a circle that had already been used to pray to Sylvian specifically. Sylvian seems to take offense to the attempt at double dipping on affinity, and the ritual backfires which causes a game over. The second scenario it can fail in is if you have negative affinity with Sylvian, which can only be obtained by praying to her at improper statues or praying to her multiple times at a single circle. This is notably the only time you can be punished for having negative affinity with a God that isn't just the normal penalty of being set back on getting the next affinity level. The failed Marriage actually has distinct graphics for every combination of protagonists that can make it. You can see them in this video, https://www.youtube.com/watch?v=8e9nz_vI4bY Notably, there are graphics for Le'garde and the Penance Armor in the failed Marriage. While I already mentioned Le'garde having sprite animations typically reserved for main characters in the game data, the Penance Armor is something of an oddity since the wearer is incapable of having sex due to the mutilation it inflicts. If I had to guess, it's simply there for the off chance the game screws up and lets the Marriage attempt go through or perhaps as handling for if someone modifies the game files.
|
|
#
?
Jan 27, 2024 03:12
|
|
|
Having read a post you made earlier, will Le'garde and The Girl make it into the party together?
|
|
#
?
Jan 27, 2024 03:28
|
|
|
Tails never fails! *tails then fails a lot*
|
|
#
?
Jan 27, 2024 03:29
|
|


|
It really feels like this game will make you fail coin flips a lot.
|
|
#
?
Jan 27, 2024 03:34
|
|
|
bman in 2288 posted:Having read a post you made earlier, will Le'garde and The Girl make it into the party together? That is going to depend entirely on if I get an Explosive Vial on Level 1 of the Ending A playthrough or not. If I don't, then yes. If I do, then no.
|
|
#
?
Jan 27, 2024 03:52
|
|
|
CullenDaGaDee posted:The most current version of the game allows you to save yourself from the collapse of the mines with the Passages of Ma'habre. I'm actually partially responsible for this one! I tried everything to get Blue Sin back in an old version, including suicide and Passages of Ma'habre. Back then, using Passages looked like it saves you, but my hopes were dashed when it warped you back to your death. Orange liked the idea so much he made it the real way to get it a few months later. I was pretty chuffed. Tallgeese fucked around with this message at 06:38 on Jan 27, 2024 |
|
#
?
Jan 27, 2024 06:35
|
|


|
Cool stuff friend! It�s neat to see stuff that the players accomplish inspire changes to the game. I know if Tolomeo hadn�t streamed his clears of the Hard mode in the earliest versions of the game, we might not have the S endings today.
|
|
#
?
Jan 27, 2024 14:05
|
|
|
https://www.youtube.com/watch?v=pvbHX24HXzA Part 10 is out! Enki's journey comes to an end, where describing it as merely unceremonious would be the understatement of the century. Truly this ending hammers in the lesson "Be careful what you wish for." It's a good thing Enki got voted our protagonist for Dungeon Nights, as the fact that he quickly made way for a skeevy fusion dance result meant he didn't get too much floor time this run. Granted, he'll also have his chance once Hard Mode rolls around. That all being said, let's get on with the extra notes! Unique Equipment Available War Scythe: I'm glad the Tormentpedia wasn't pulling my leg when it said there was a guaranteed drop for this, I was worried we'd get through the whole game without seeing this weapon. (The wiki lists its location as "Found on the Dragon corpse" without actually saying where the hell that is) Anyway, the War Scythe is one of the most unique weapons in the game, being pretty much the only consistent source of AOE damage in the game. The scythe is a two handed weapon that, when swung, hits all available targets in battle. Sounds great but of course there are some catches that take the wind out of that sail. First and foremost, the scythe is weak. It's only +18 attack power, meaning it's barely stronger than a Long Sword when a Marriage swings it and much weaker than that when used by most of the cast. Even if you can look past that, the second drawback pretty quickly squashes this weapon. The Scythe has an absolutely pathetic 30% accuracy, and given that nearly every target in the game has a flat 5% chance to evade, this means it only connects with any limb about a quarter of the time. Now this can be offset, the Eyeglasses accessory (which we did get this run) gives a plus 80% to your accuracy, completely offsetting the penalty and making it so you only have to contend with the enemy's evasion rate. (Remember, your accuracy check and the enemy's evasion check are separate things in this game) There are no guaranteed spawns for Eyeglasses though, and I wouldn't really say they're worth an Empty Scroll, so rarely will you be able to do much of anything with this weapon. In earlier versions of the game, this weapon was completely busted in a good way. Not only did it have much higher attack power, it had a 97% accuracy rate. Combined with enemies having the same HP in Normal and Hard mode, getting this weapon essentially won you almost all fights in the game. It was one of the first things nerfed when Orange began patching the game. Extra Notes -We've been doing Isayah dirty this whole let's play, but I'll admit I may have gone a bit too far in this video. -Demon Seed is really only worth getting through an Empty Scroll, and even that's questionable since you could just Scroll the item you'd get from trading the Kid Demon to Pocketcat. The Kid Demon is identical to The Girl in every way, so it's not really a great party member beyond the fact you can make a new one if it dies. -The Baby Demon gets a flat 50% reduction to all damage except untyped damage. It can be a remarkably good tank because of this. -Demon Seed seems to have powers beyond just enchanting your sperm (There's a rare sentence), as D'arce can use the skill in the exact same fashion the male characters and the potentially intersex Marriage can. -Pocketcat's rubbing animation only happens when you trade a child to him. Relax, he's just going to eat them. -Should the Kid Demon be traded away or dies, you can make a new one. The newly created Kid Demon will have the same skills as the previous one if it was taught any, but will not have the equipment. Pocketcat will not accept more than one Kid Demon, so you can only trade with him twice if you're willing to sacrifice The Girl. -Note that while a recreated Kid Demon will know the skills of a deceased or traded one, should you teach any skills to the Baby Demon they will not transfer to the Kid Demon and will be lost forever. Naturally, don't do that. -You can guide Jeanne back to the Basement if Buckman and Seymor made the failed Marriage, but she'll be left with nothing to do but sit and go crazy in the dark. I'm actually not sure if you can reunite her with Seril in this case, haven't actually tried that. -If I was unable to get an Empty Scroll to learn Fast Attack in time for the Skin Granny, I would have gone back to kill D'arce for the Domination soul. Unlike Enki and Ragnvaldr, she has no death state for her recruitment in this mode unless you witness her assault and leave, which is also the case in F&H mode. -I don't see this mentioned often, but in addition to her arms having a lot more HP on T&S mode, the Skin Granny trades one of her legs for an extra arm in her midsection. This additional arm is a little buggy in whether or not the game will actually let you see it. -This video features a lot of things involving potential misinformation from the wiki, the wiki claims that if you slay the Black Witch in the Grand Library, there's only a 70% chance of a corpse being left behind to Soul Stone. I have never seen the corpse fail to appear, so I'm pretty sure that's not true. -There are Pentagrams throughout various locations in the present day Ancient City, but only the ones in the Library really pose any threat of assault from the Black Witch. -While the Ancient Book and Book of Forgotten Memories are useless in this run for what they do when used, having them does increase the chance we'll get multiple Empty Scrolls from coin flip shelves due to Loot Looping. I explain it extremely poorly in the video, so I'd recommend checking out a better explanation here. -Tormented One on the wheels seems to have a unique trait of taking double damage when his outer wheels are jammed that isn't tied to his physical resistances. Works out great if you have the Sergal Spear like I do. -White Angel didn't really end up being necessary to kill, but it was fun to get a lucky heart shot from my skeletons. -Again, I didn't need to burn Francois since the Jaggedjaws he releases will never catch you, it was just funny to do so. -The War Scythe can be gotten safely and early if you so desire, but like I said it's pretty useless without Eyeglasses. Even if you do have them, the damage is so low you're not liable to actually cripple anything with it in T&S mode, making it pretty undesirable to use. Could have potential in taking out the final bosses eyes though now that I think about it. -Definitely make a separate save when entering the Gauntlet. If you lack the resources or equipment to succeed, you are quickly trapped inside it and the run is hosed at that point. -Never willingly fight the Double Headed Crow Mauler. You need two red vials to make sure Peck doesn't ruin your day, and since he has Death Throes he has plenty of opportunities to nail you with Blindness and Fracture. -Probably should have mentioned this in the previous video's notes, but don't forget to unequip characters participating in a Marriage as any equipment they had will be destroyed by the ritual. Not that I would have continued anyway since a skeleton died, but being unable to block or cure blind would have killed the run stone dead if I wanted to continue regardless. -While the Double Headed Crow Mauler is an alternative way to get the Crow Mauler soul if you missed it, he's definitely not a good one since you get trapped in the Gauntlet after entering. -Aside from the floor spikes, all traps in the Gauntlet are fatal. It is a huge relief that none of the Hard mode endings require you to come here, as one mistake on these at the tail end of the run would be a real keyboard smasher. -Due to a bug in the current version of the game, Nas'hrah's scene with the final boss of Ending B always occurs, regardless of whether he's actually in the party or not. He'll be invisible until the end of it if he isn't in the party. -Apologies, I got a little too into the role of Nas'hrah and ended up peaking the microphone at the end. I pray you'll understand, he's a fun character to vocalize. -The curse status the final boss inflicts on you is pretty buggy if you attempt to cure it with a Purifying Talisman and I've heard it can soft lock the game. Thankfully, if you poison him right away he'll usually die before the counter expires so it shouldn't be too much of an issue. -The eyes on the boss only have 100 HP when opened, so regardless of anything the War Scythe with Eyeglasses could destroy them. It's something at least. Next time on Fear & Hunger, we will be getting the final standard ending of the game!  "If I could smoke fear away, I'd roll that mother fucker up, and then I'd take two puffs..." *Art by Tagentrina CullenDaGaDee fucked around with this message at 15:42 on Jan 28, 2024 |
|
#
?
Jan 28, 2024 00:30
|
|
|
Did you ever explain weather there is a connection between Moonless and the Moonless Guards? Also, is there something special if you bring Moonless into the Moonless place?
|
|
#
?
Jan 28, 2024 13:09
|
|
|
I did mention the enemies we were seeing in the Gauntlet were Marriages, though I didn�t explicitly layout the connection between Moonless Guards and Moonless. Presumably, the Moonless we recruit isn�t one of a kind and there are several others. Who were boned by Guards on ritual circles at some point.
|
|
#
?
Jan 28, 2024 14:05
|
|
|
|
| # ? May 18, 2024 13:58 |
|
|
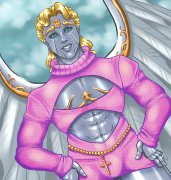
Supplemental: Enemies Pt. 10 We've almost seen everything there is to in the game. Outside of the enemies seen in this video, there are just two final bosses remaining that we've yet to see who will get their own posts. For the enemies featured in the most recent video, Skeleton  Phobia(s) Triggered: Necrophobia 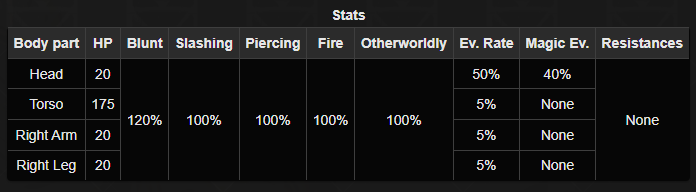 Alright so this guy wasn't featured in the last video but we're not going to get another chance to talk about him in a supplemental post so may as well do so now. If you fail the coin toss for Necromancy on a Skeleton, they will still revive but will attack you instead. They're mostly just annoying. Their Arm, Leg, and Torso are all capable of launching attacks that do around 10-12 damage each. The Arm also has a chance of causing infection. They have Death Throes, so you'll be eating some attacks from them no matter what, unless you dispatch them with Counter-Magic. If you have the means to treat infection, it's probably better to just destroy the torso outright and just take the incoming barrage of hits. If you don't, take out the arm first and then the torso. Again, Counter-Magic is the best way to deal with them since it kills them without triggering Death Throes, but only Enki is guaranteed to have that. Skeletons only become hostile on the first failed Necromancy attempt, you can go right back to trying to revive them after with no worry of retaliation if you fail, though obviously you'll be burning through a lot of mind if you keep failing. Lizardmage 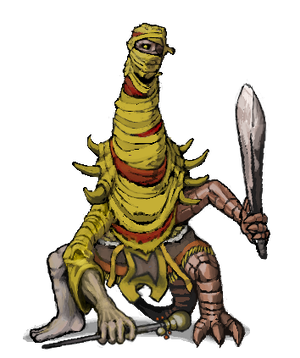 Phobia(s) Triggered: Teratophobia, Zoophobia 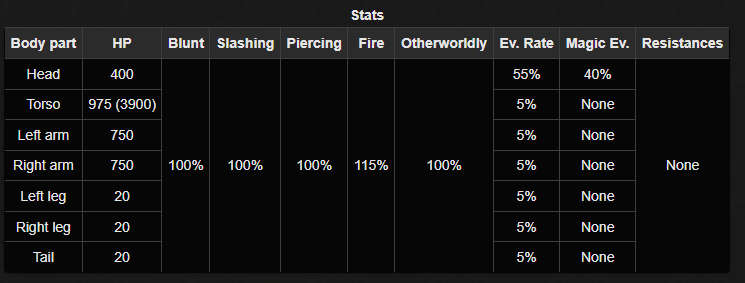 Proof that love can bloom, even on the battlefield, the Lizardmage is a Marriage of the flesh between a Lizardman and a Yellow Mage. I way underestimated this thing in the video because I'm used to fighting it with a fully controllable party. If you have that, you can just blast its torso since it doesn't have Death Throes. If you don't, all parts of it are pretty nasty and durable and the fight can go sideways in a hurry. The sword arm can hack you for arm destruction while the staff arm can stun your whole party with Locust Swarm. You can make their head vulnerable by destroying the legs and tail, though since that's so many targets it's not really that practical. Do your best to avoid these guys if braving the Gauntlet with a skeleton crew, as they can really mess you up if given the chance. Double Headed Crow Mauler 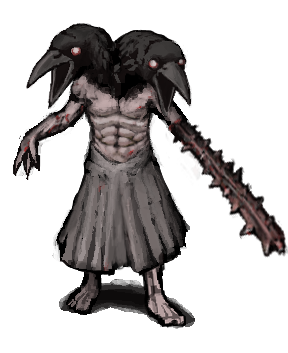 Phobia(s) Triggered: Teratophobia, Zoophobia 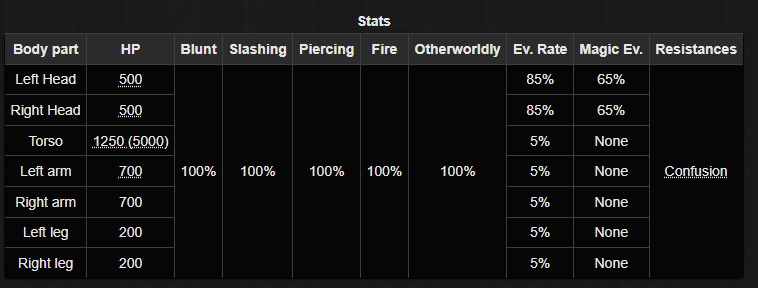 *On T&S/Hard Mode, the heads have 900 HP, the torso has 1750(7000) HP, and the left arm has 900 HP Your punishment for falling through a hole in the floor in the Gauntlet, and the final major screw you of the dungeon. The Double Headed Crow Mauler is identical to the single headed version except he has two heads. This means double the chance to peck and use flock of crows, and also double the resources needed to blind him and avoid trouble from those attacks. Since DH Crow Mauler also has Death Throes like the regular Crow Mauler, you really do want to blind both heads for absolute safety. Just avoid this guy at all costs, he's not worth the risk to fight. One amusing bug with him is that he seems to share an enemy ID with the standard Crow Mauler and can enter the fight with no Maul arm if that was destroyed on the normal Crow Mauler. Still not worth risking an engagement with him over because he yields the exact same rewards as the normal Crow Mauler. Traces of Gro-Goroth 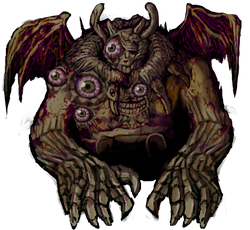 Phobia(s) Triggered: Erotophobia, Teratophobia 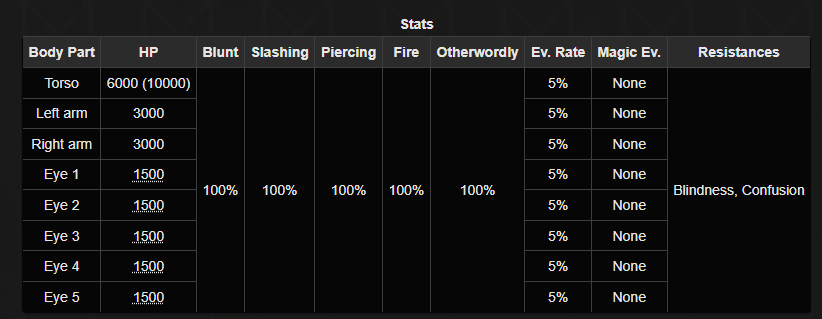 *The eyes have 100 HP when open The final boss of Ending B and generally agreed to be one of the most dangerous enemies in the game, at least in terms of damage. The lingering remnants of Gro-Goroth accost you in the depths of the Dungeon and thrust you into a fight that is pretty much impossible to escape unscathed. His arms claw at you for about 35 damage each and a 100% chance to remove an arm if you lack limb protection, while he also opens two of his eyes which spew out molten goo that also deal around 35 fire damage. At the start of the fight, he also curses a random character who will die instantly when the counter on the curse depletes fully. To make matters worse, if you had Nas'hrah in your party he is killed before the fight starts and it leaves you under staffed for the ensuing battle. This is a highly precarious fight with only skeletons to back you up, as you cannot guide them to take out the eyes on Gro-Goroth and he can easily focus fire someone and delete them with no issue. It's also basically impossible to escape this fight without someone losing arms since the arms of Gro-Goroth are way too durable to be destroyed before he gets a chance to make several whacks at your party. It's not too much of an issue broadly speaking since this is the final fight, but it does mean your offense rapidly tanks as the fight drags on. DoT is always a strong option, but it is essentially mandatory for this fight as otherwise you will quickly be left dealing miniscule damage with most of your characters reduced to shoulder checking the old one. Should you survive the battle, you come to realize Gro-Goroth was merely toying with you, and this isn't even his true body regardless. Then you get probably the single biggest downer ending in the game. A'int life grand?
|
|
#
?
Jan 28, 2024 15:15
|
|