


|
Seriously, that is really rad! And despite the mistakes you said you've made, it's looking pretty good so far.
|
 #
?
Aug 17, 2014 04:35
#
?
Aug 17, 2014 04:35
|
|


|

|
| # ? May 28, 2024 07:33 |
|
|
So picking up where I left off, trimmed the excess off the poop deck planking, sanded to the edge, and the deck planking was then complete, except for the scoring and nail holes. I used an Xacto type knife for the scoring, and a pin-punch for the nail holes. Not completely happy with the results, but they'll do for my first attempt. Note that they are terribly poorly aligned. This doesn't surprise me, as I'm unable to draw a straight stick-figure, free hand stuff is not my strength. 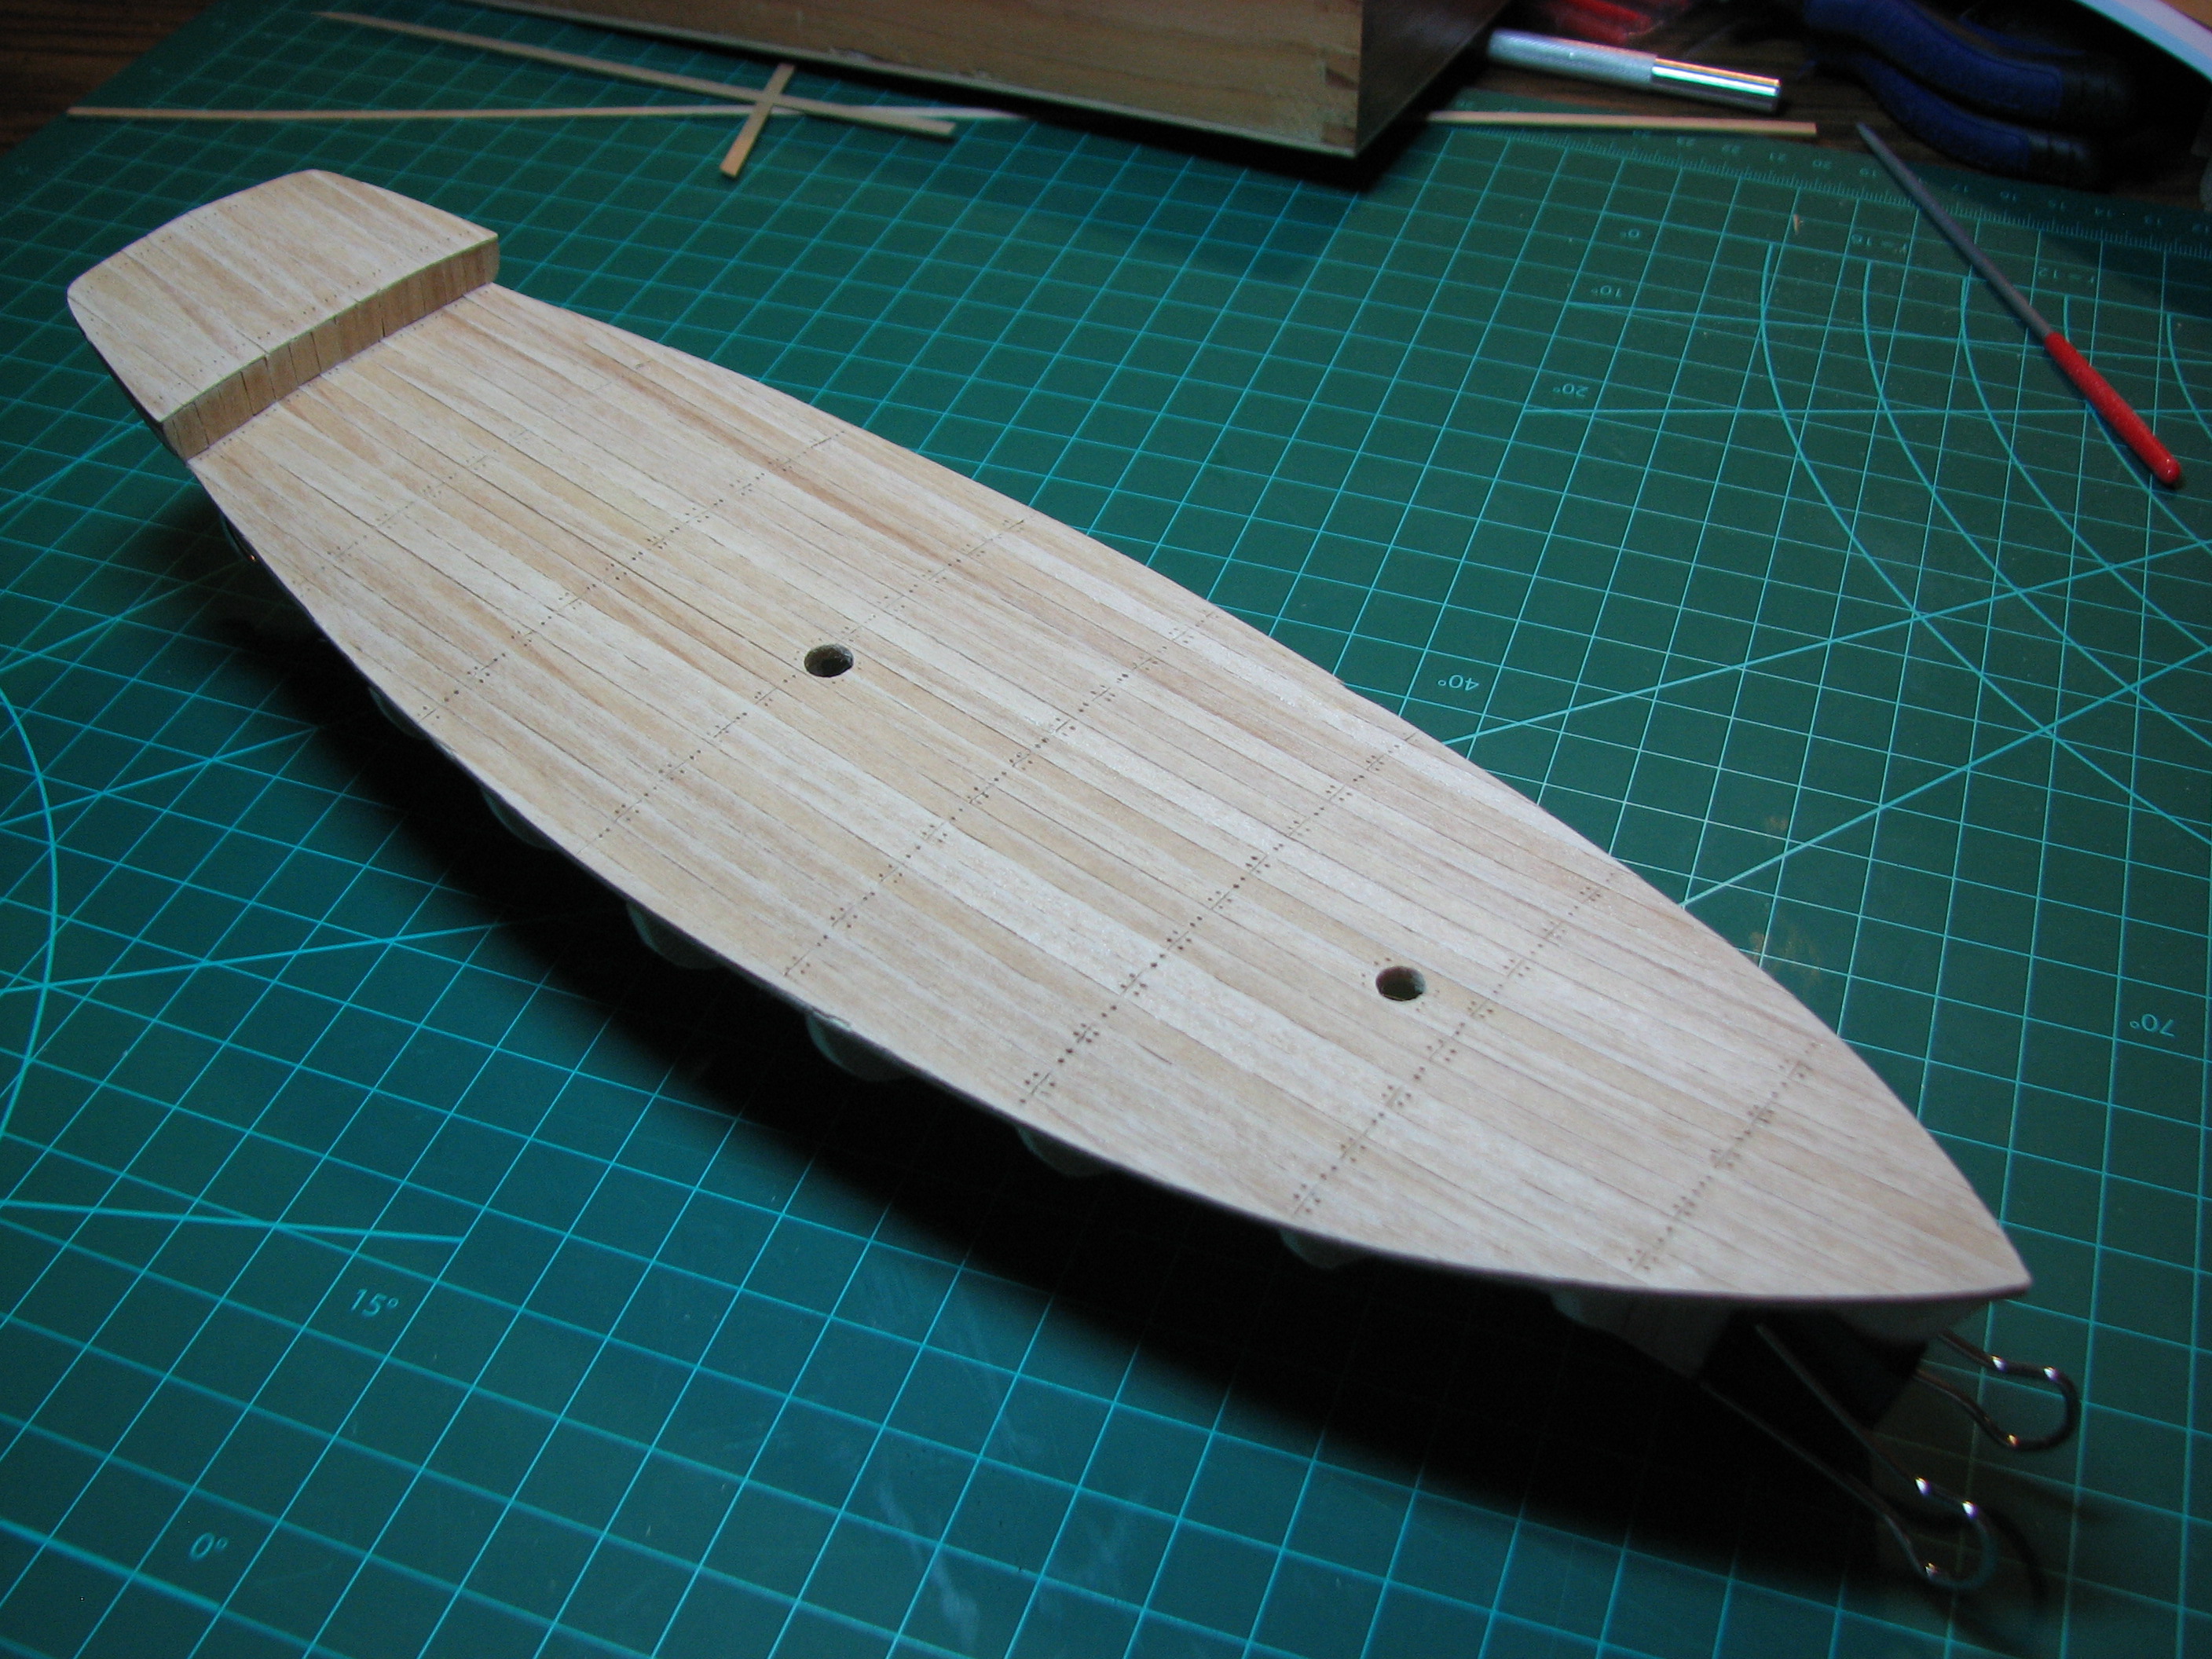 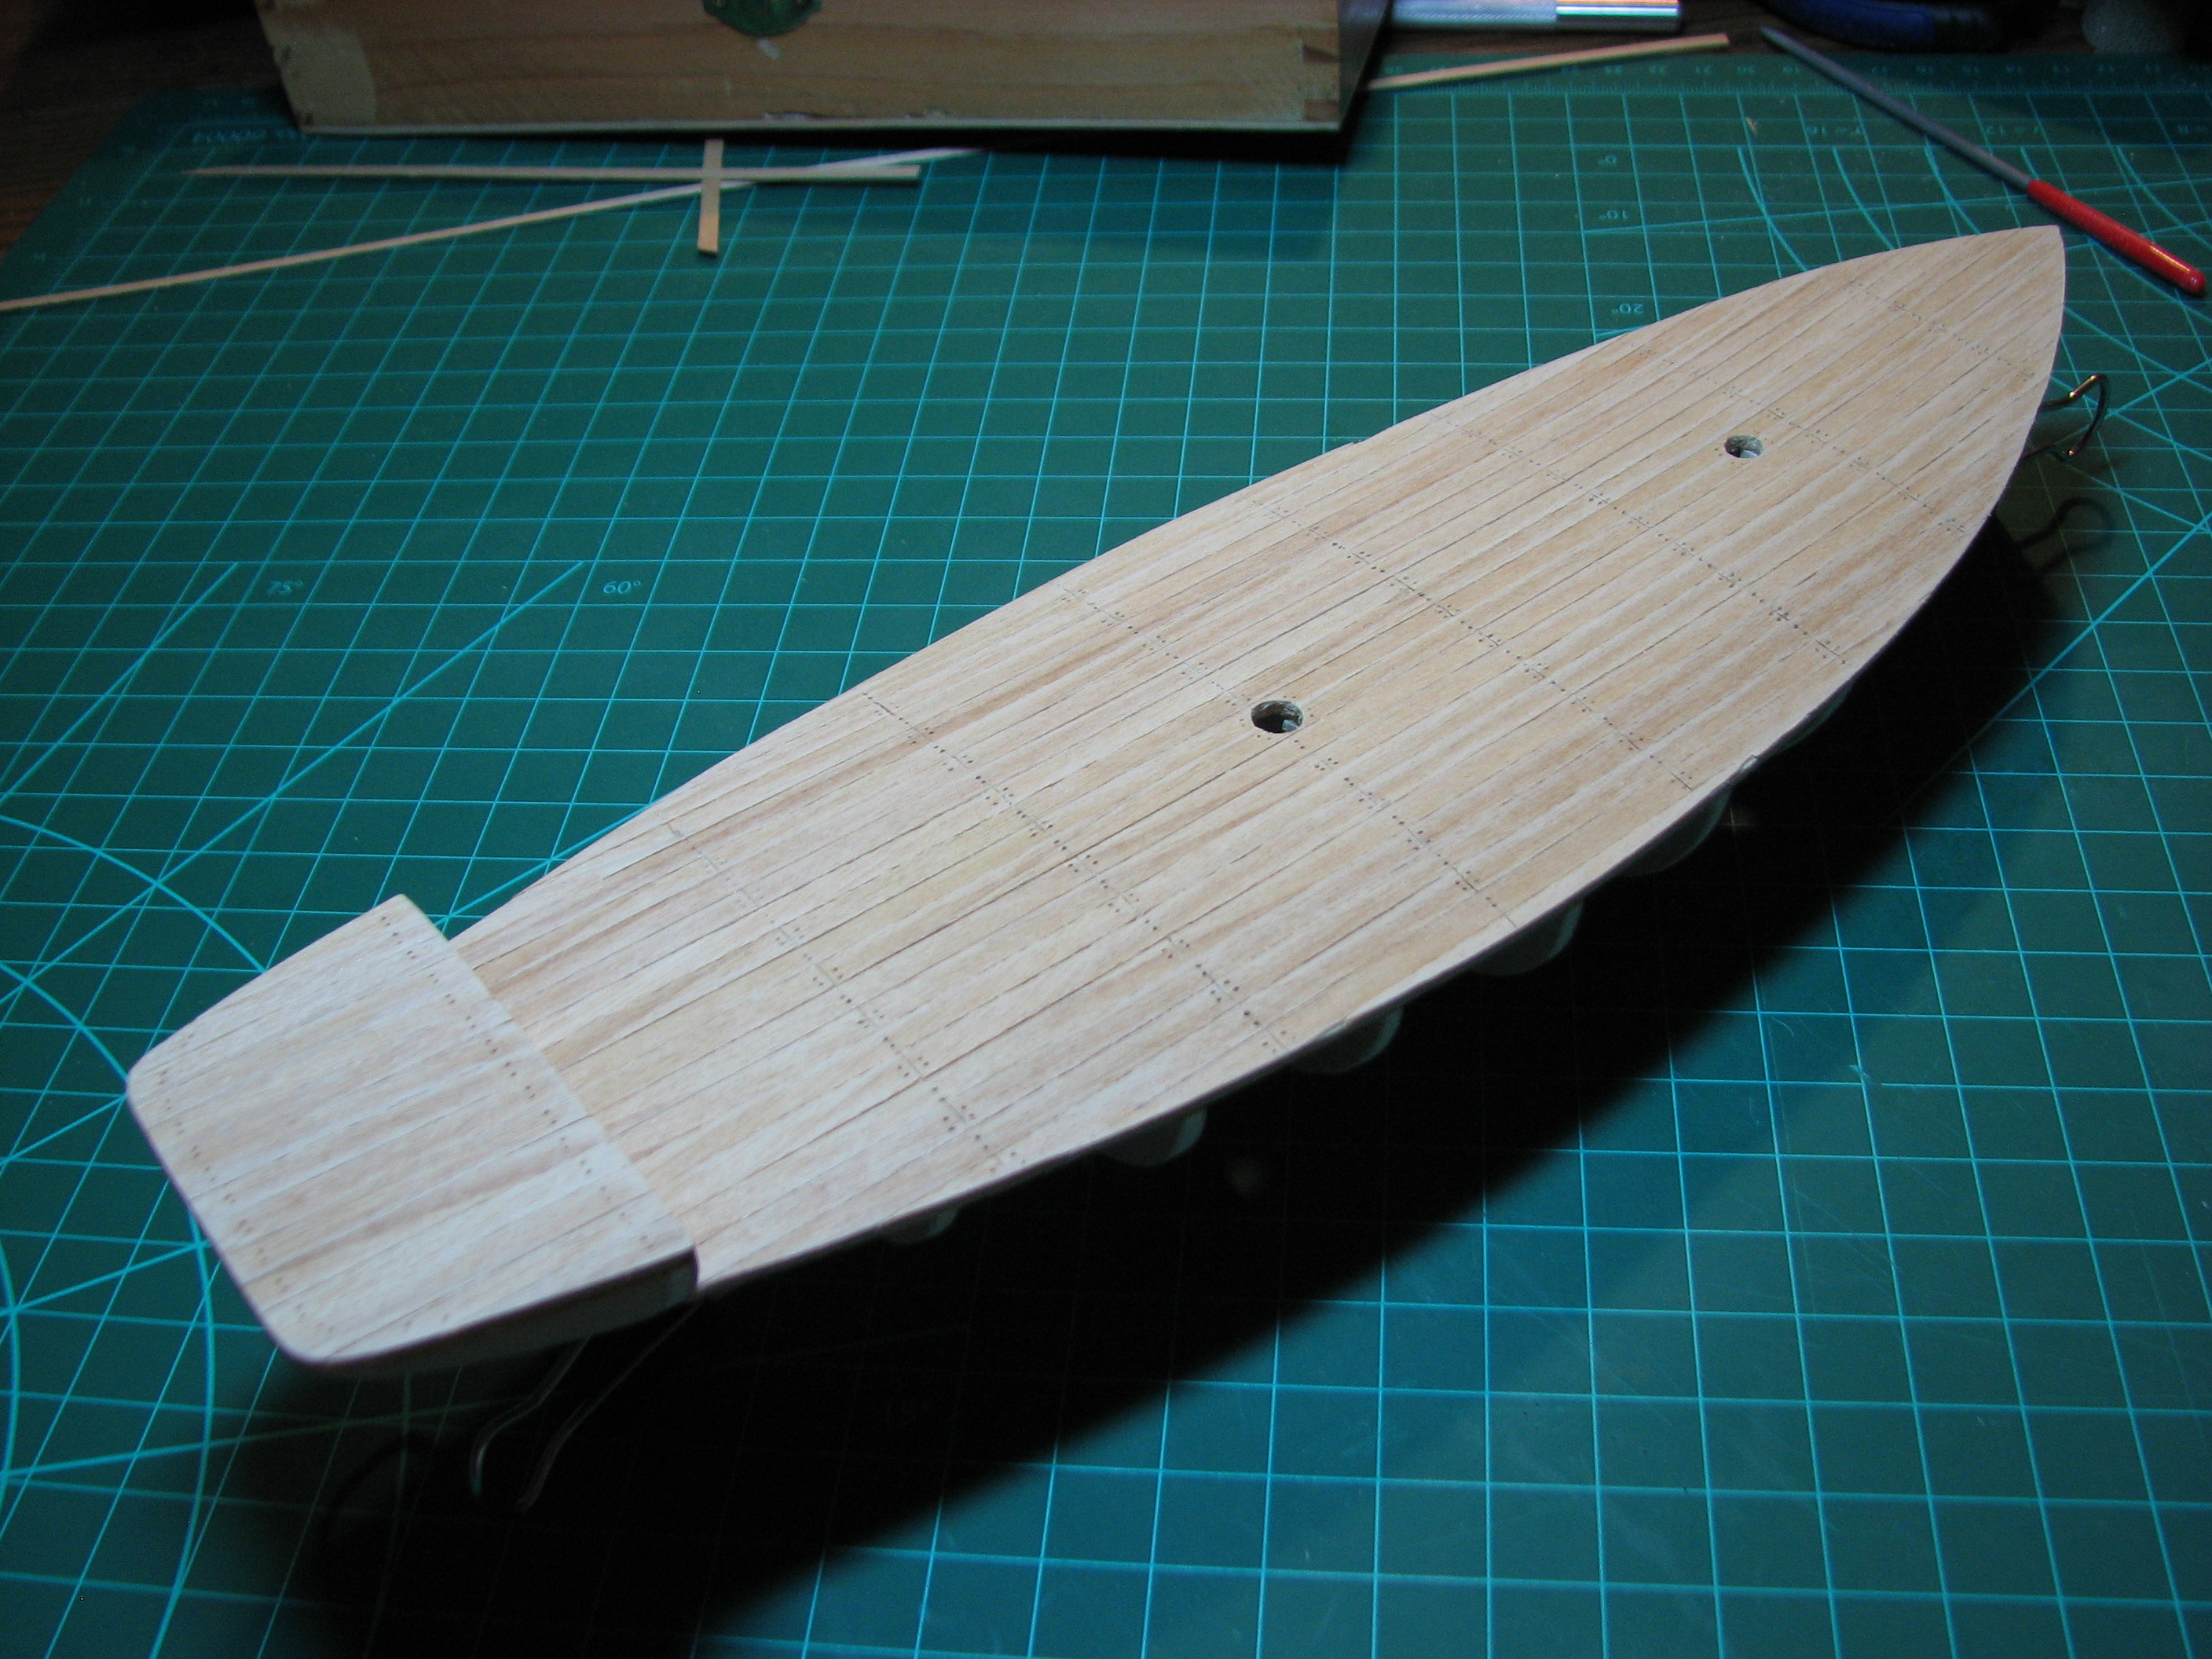 I then did some light sanding of the deck prior to starting to work on the stringers. The stringers were a pain in the rear end. They have to be bent against the thick measurement of the wood, and they *really* didn't want to bend at all. This particular type of wood is really hard and stiff. I soaked the boards in near-boiling water for 25 minutes, and they *still* wouldn't bend right at the stem. I clamped down everything but the last inch or two, and then kept re-wetting and bending/clamping over a couple hours until I finally had the bend in place except for the very ends at the stem, which I couldn't figure out how to hold in place to allow them to dry into shape. 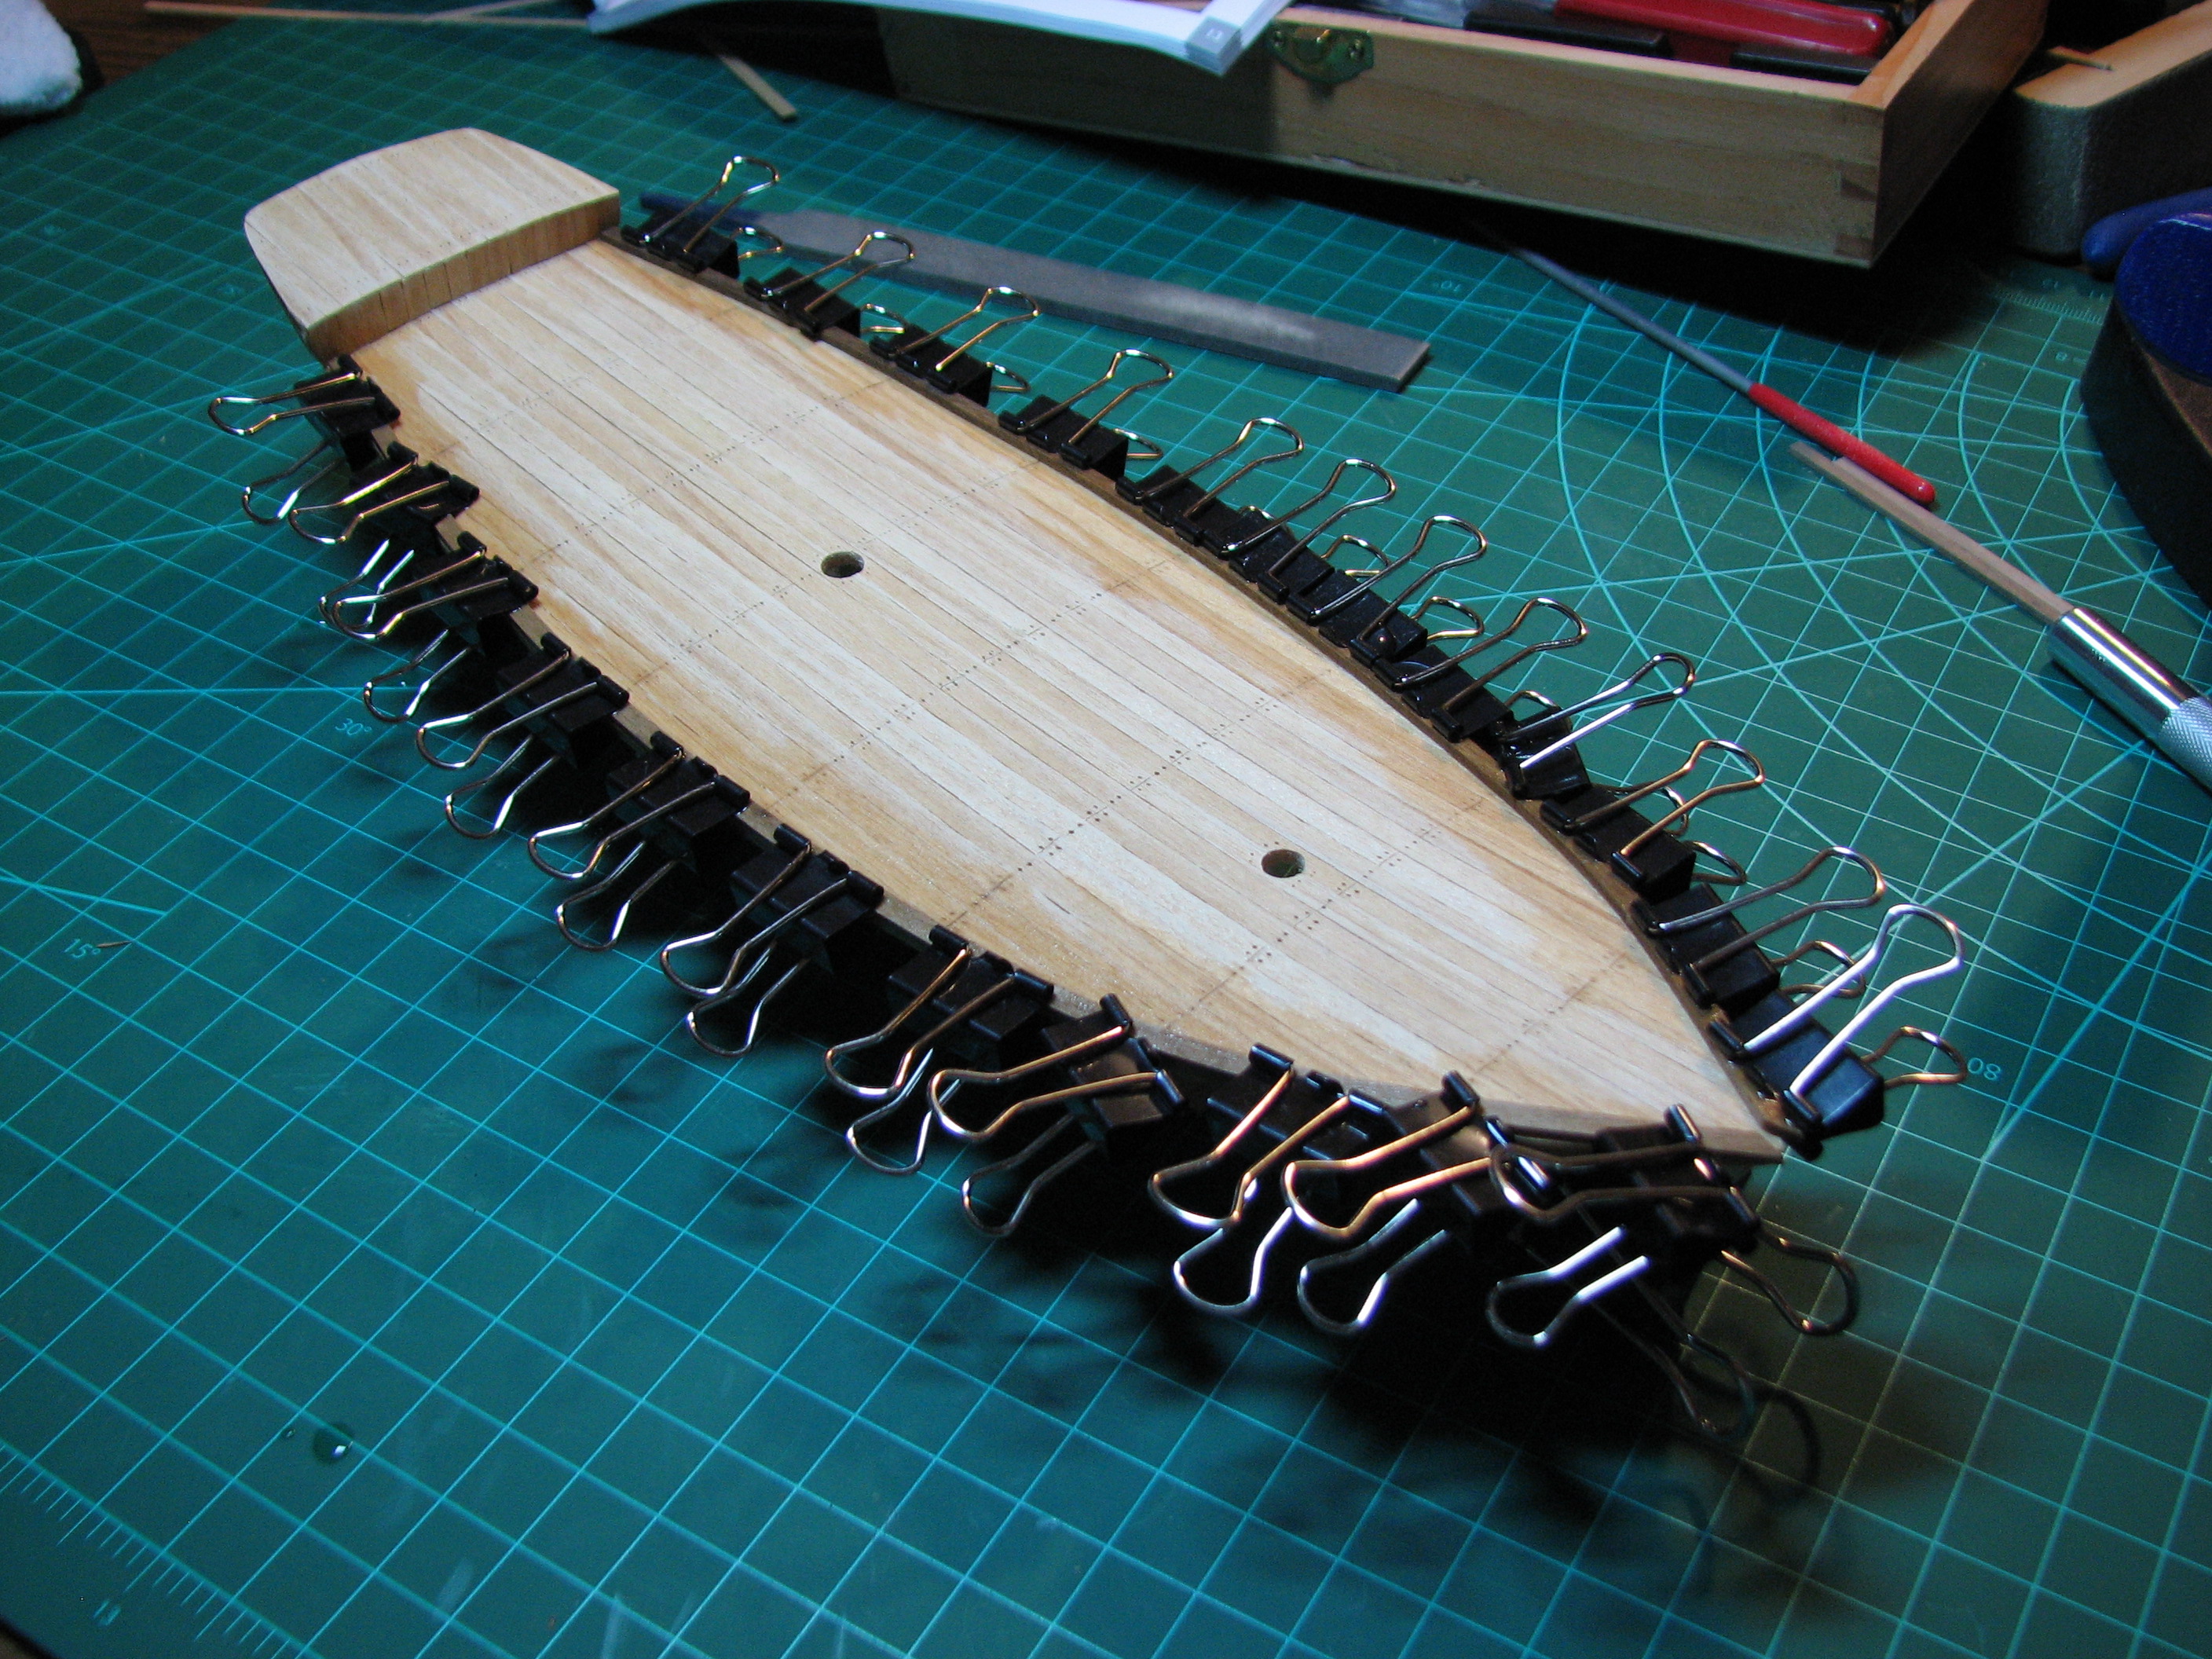 After messing around with various clamps and tools, I found that a pair of flat bladed 'square' pliers would hold the stringers together nicely, but that meant I would have to sit there and hold it for who knows how long, and I wanted to let it dry in place overnight. After messing around with all sorts of things, the actual solution was really pretty simple. Just let some rubber bands take my place on the pliers. Tada! 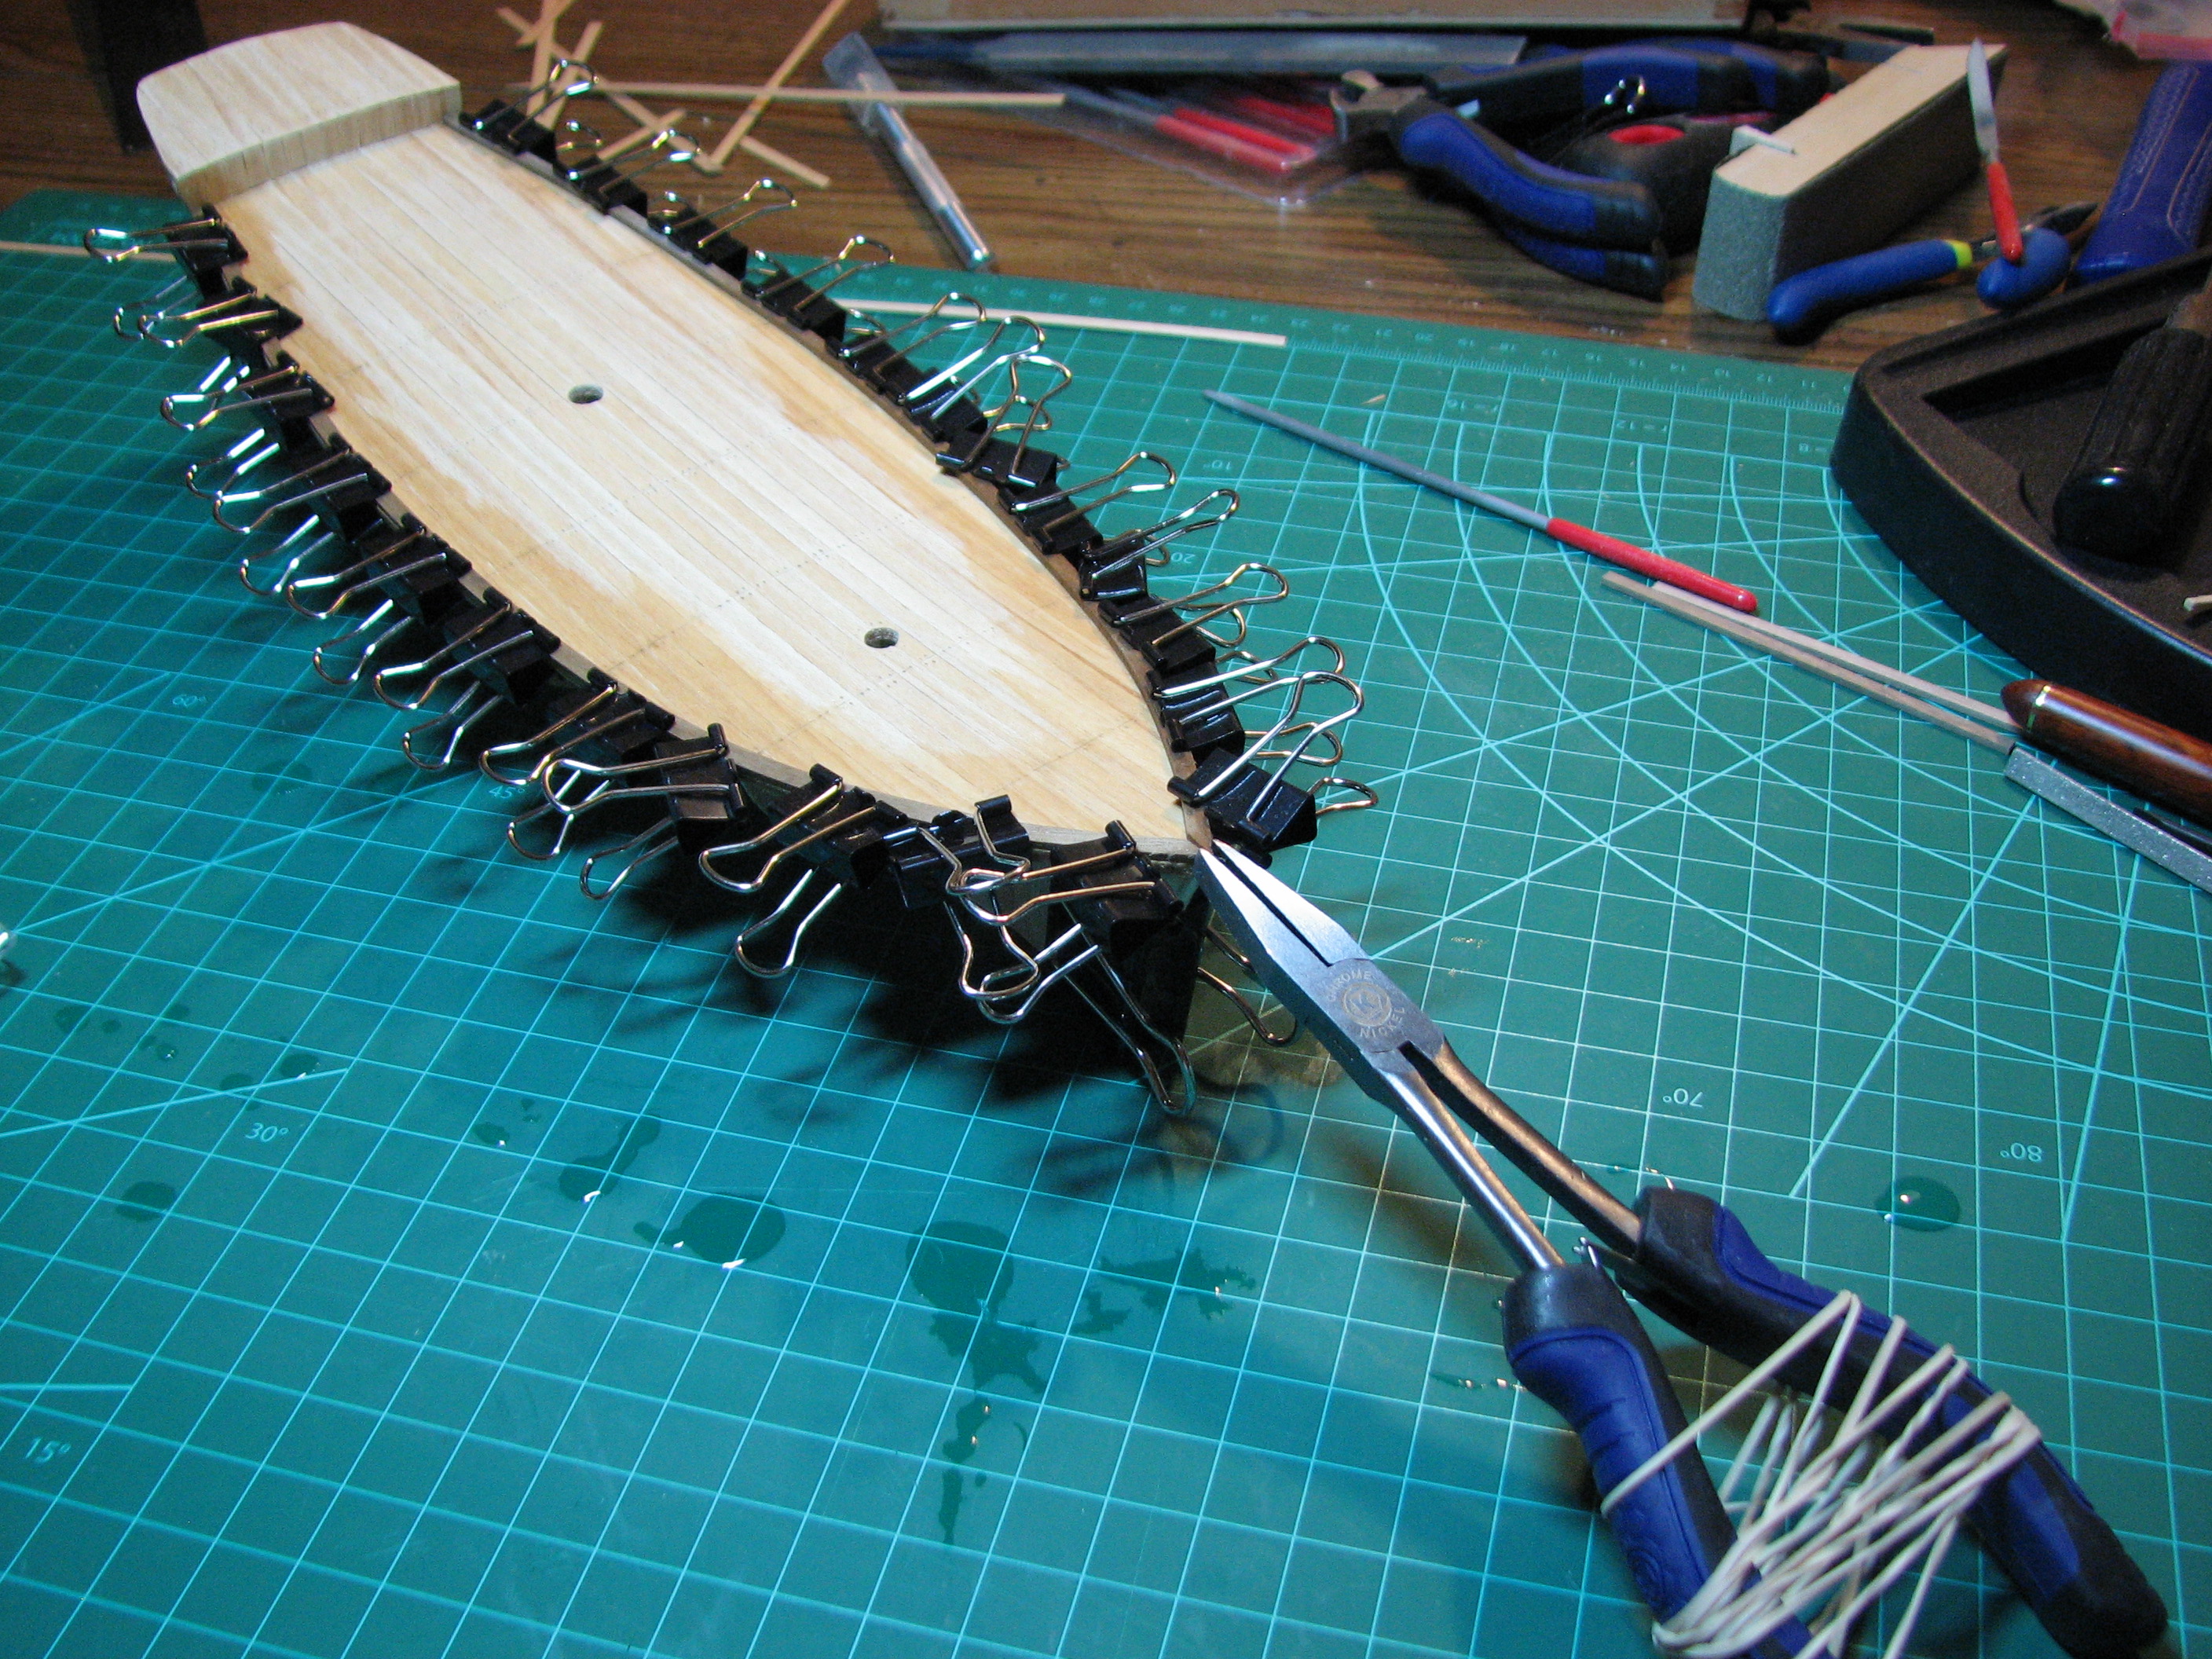 This morning, everything looked good, the stringers were dry, and everything had held in place. 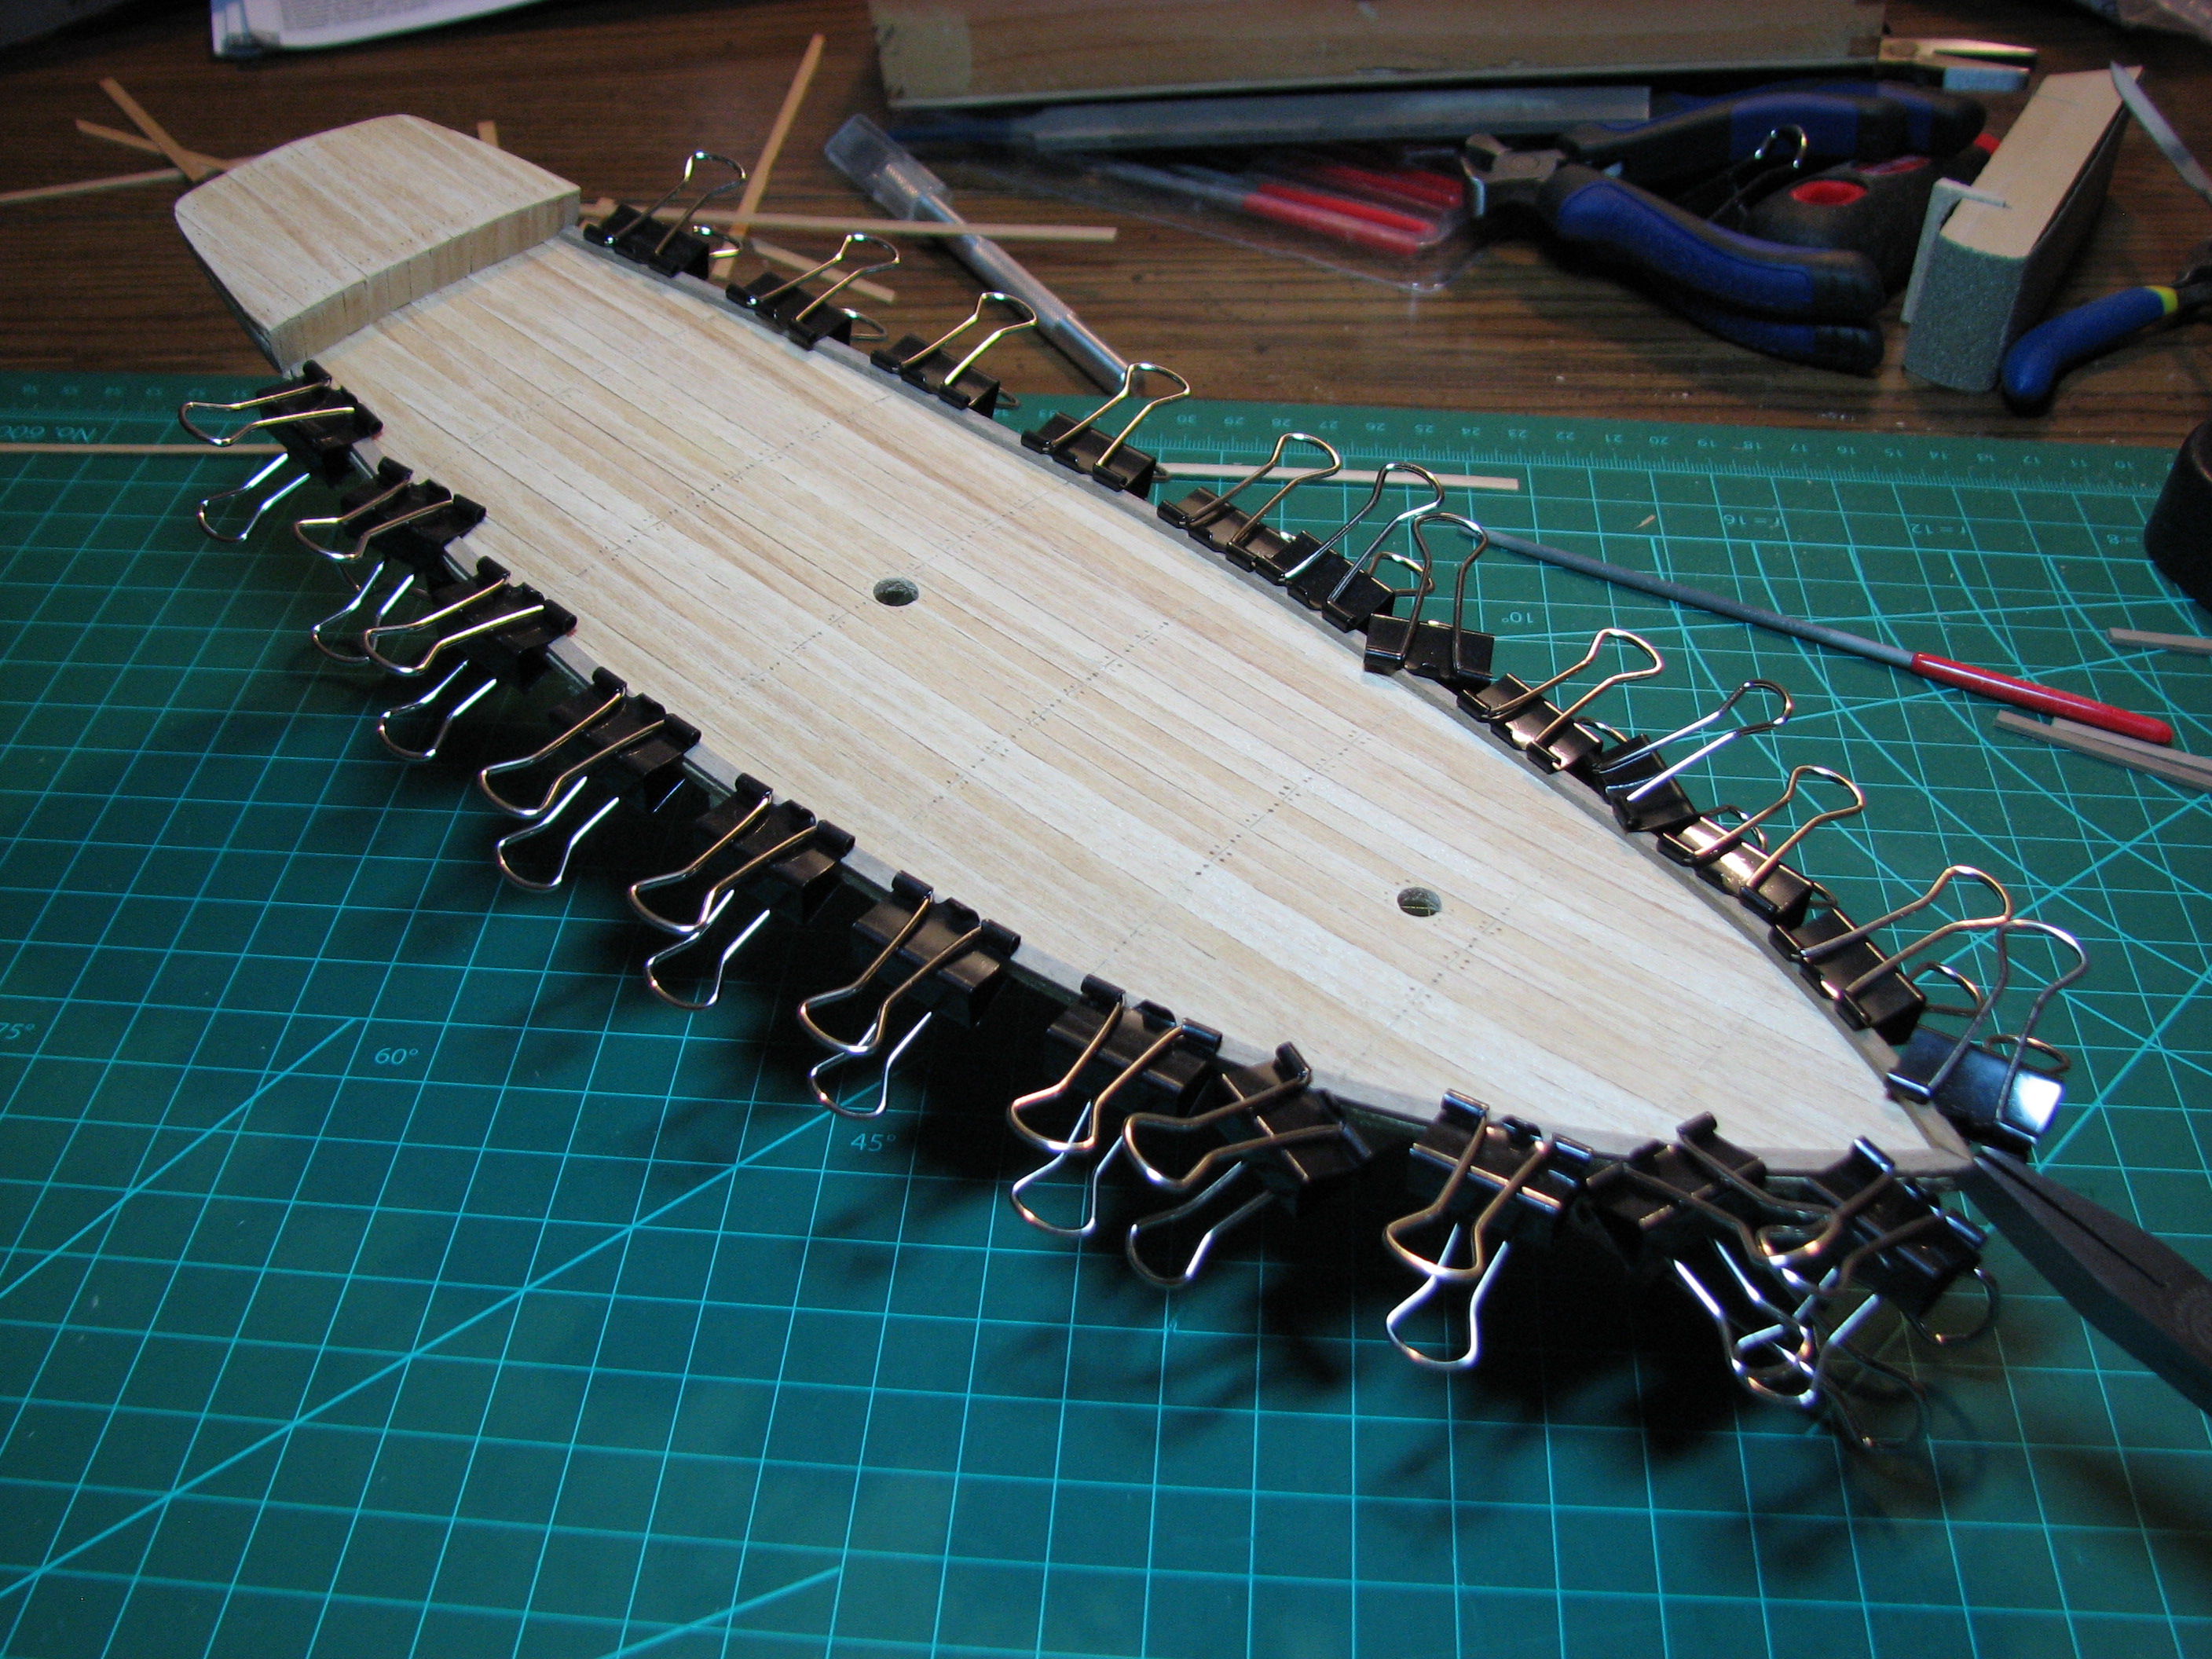 I crossed my fingers and began removing clamps. Holy crap, it worked! There is no glue holding the stringers at all here. 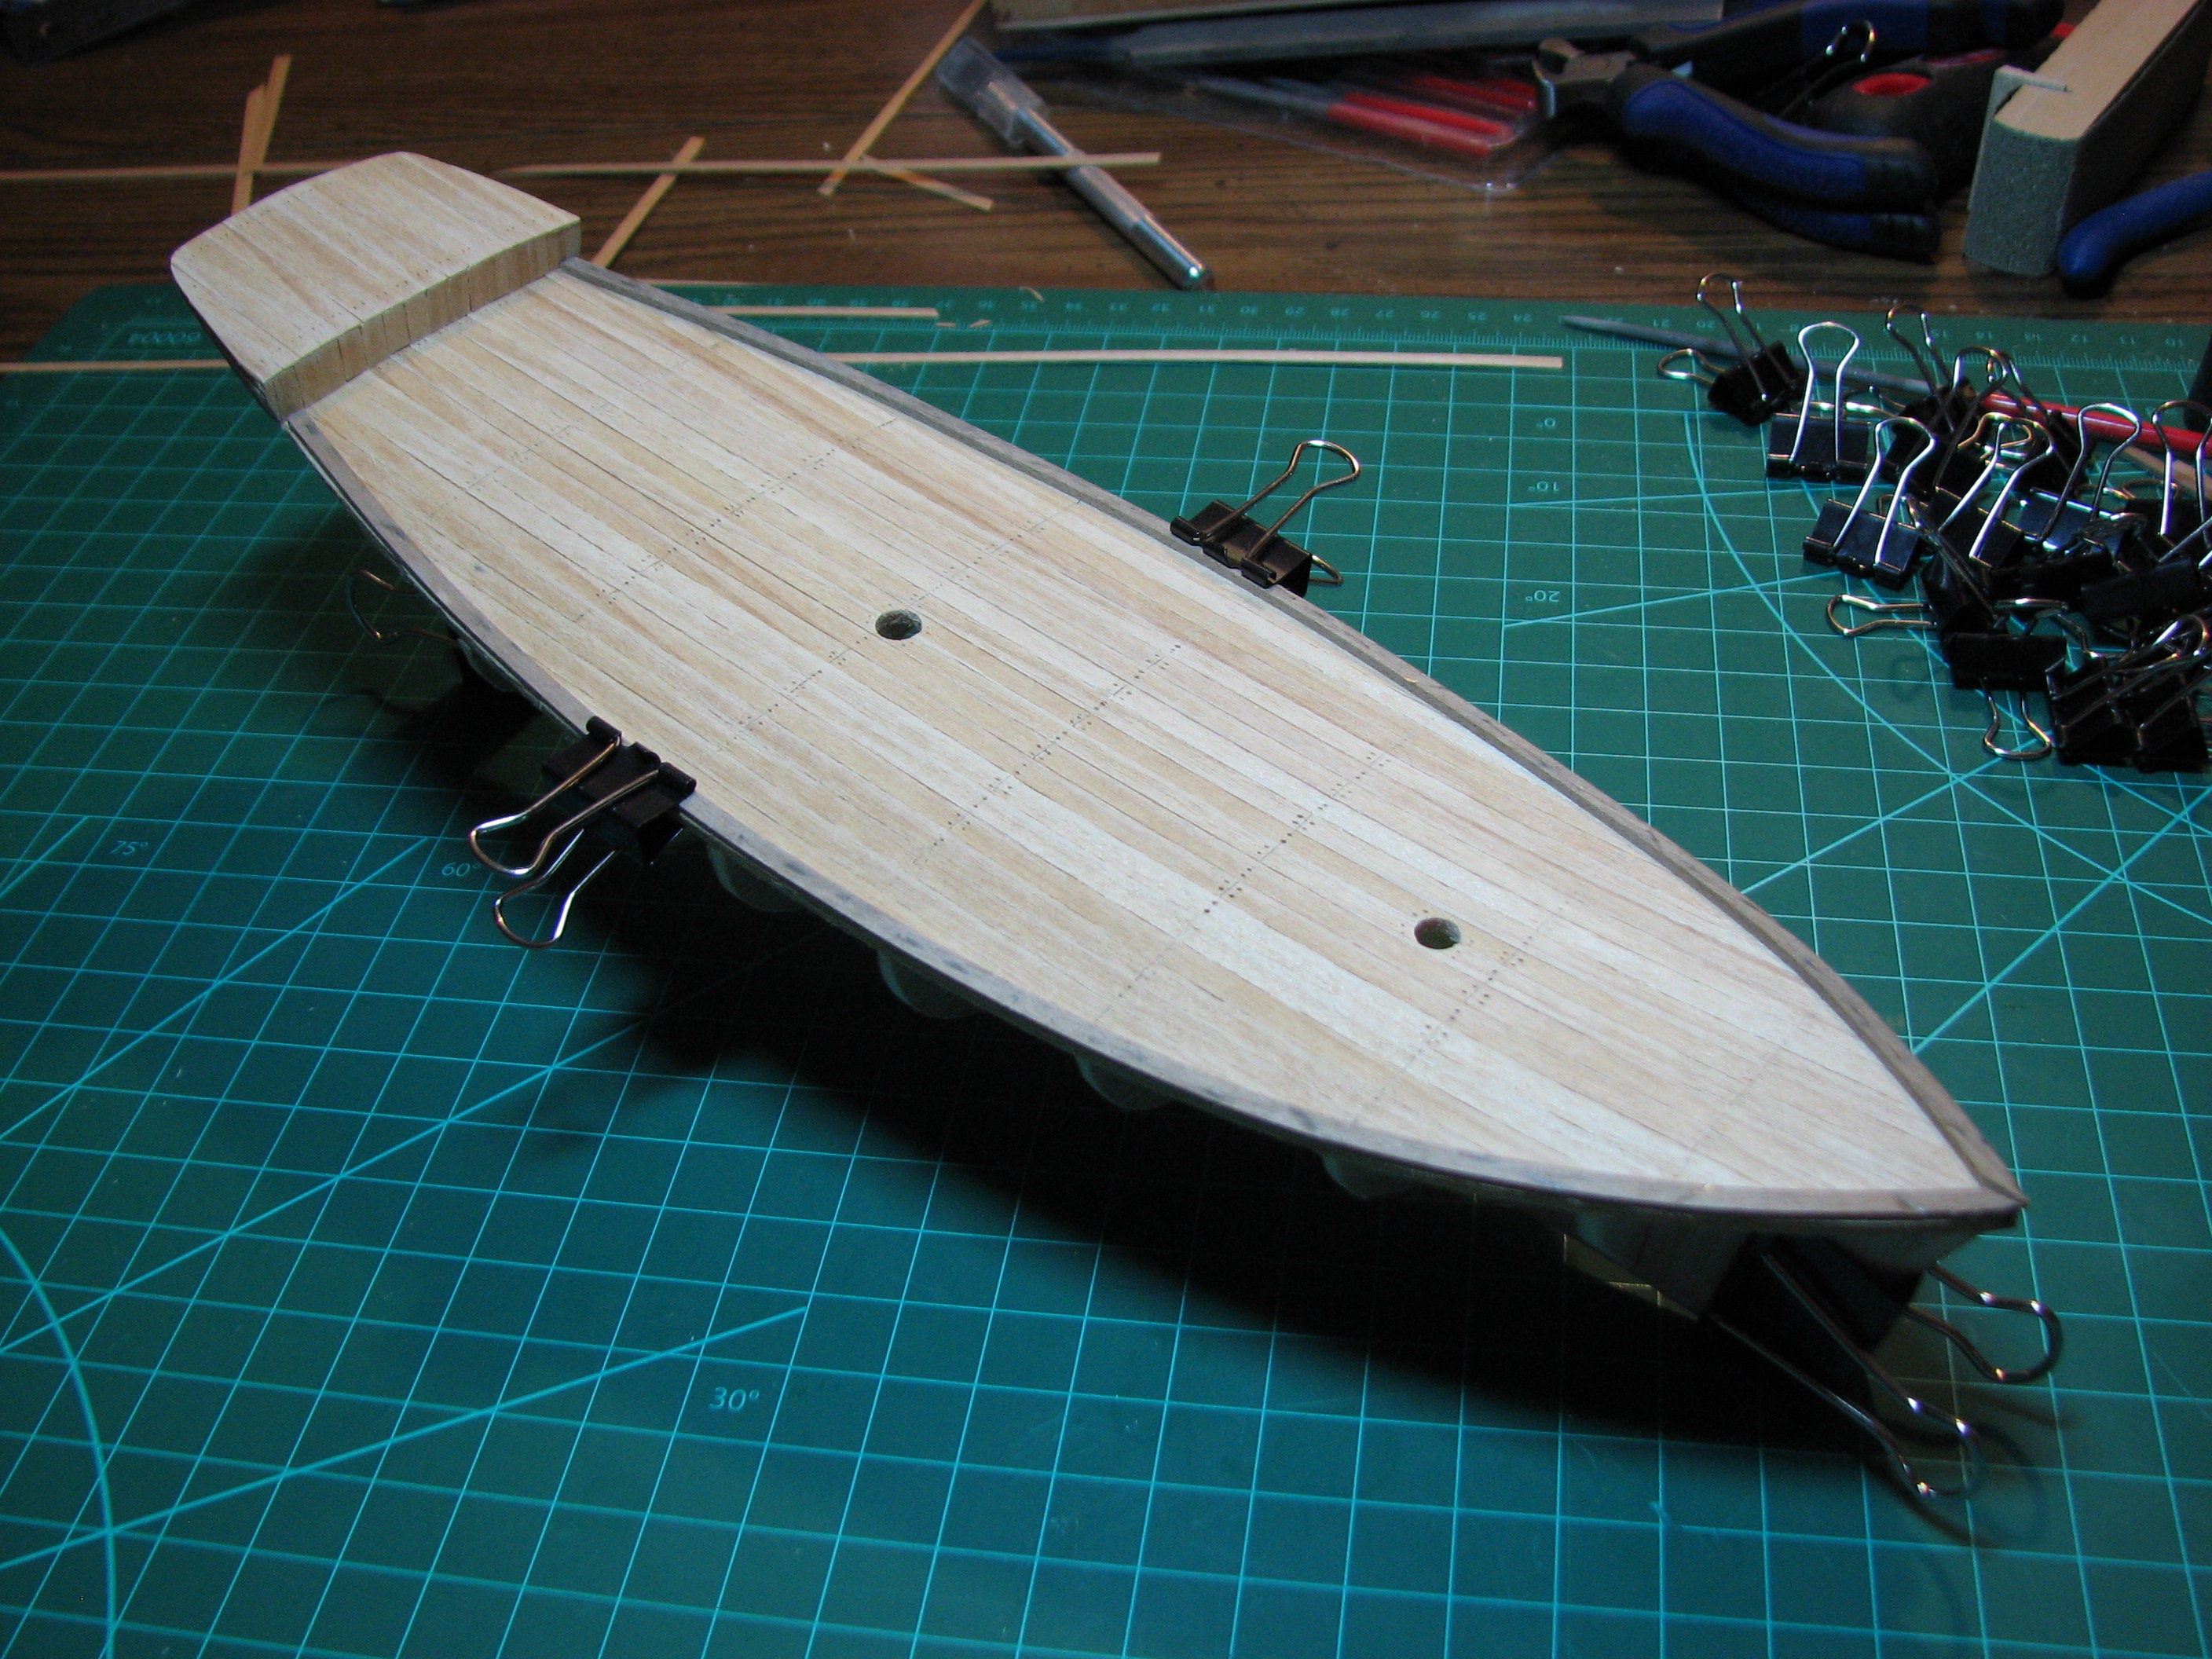 When I removed the final two clamps I found that the stringers were actually 'stuck' to the deck, and I ended up having to use a tiny blade and pry them apart. I removed a single stringer, and while the shape didn't hold perfectly, it was very close, so I went ahead and applied glue to the entire stringer, placed it starting at the stem and clamping as I worked my way towards the stern. Repeated the process on the other stringer.  At the stern, the stringers are supposed to hang off the deck about 1/2 way, this gives a surface to sand to adjust the bulwarks later on. Off to the store to get groceries and run some errands. Next the hull planking begins, and each one of those planks is the same thickness and type of wood as the stringers, but wider, so this is where I get to break out the water and heat and start hand forming things.
|
|
#
?
Aug 17, 2014 19:14
|
|


|
Don't be so hard on yourself regarding the planking and nails. Whatever imperfections exist at this stage stand out because they are the only details added to this point; when you get more features on the deck, I doubt anyone will notice. That said, I think they look just fine!
|
|
#
?
Aug 17, 2014 21:45
|
|


|
Fearless posted:Don't be so hard on yourself regarding the planking and nails. Whatever imperfections exist at this stage stand out because they are the only details added to this point; when you get more features on the deck, I doubt anyone will notice. My own worst critic. ") I'm not really being hard on myself, so much as I'm trying to pay attention to where I can improve if I take this up as a long-term hobby. Things like the nail holes are where I should probably spend more time and care so that those little details look better on the finished product. I'm really not unhappy with how things are progressing, and think that it is looking fairly good so far, especially given how fast I'm going relative to the build logs I've read. Most of those guys would have spent the entire first weekend just getting the false keel and bulkheads perfect (or building a jig of some sort to hold it all). I've mentioned before that I am by nature, somewhat impatient and like to see things right now, so I'm unlikely to ever get to that level of methodical building. Having said that, I'm on the hull planking now, and I'm going to have no choice but to go somewhat slow. I've got the first plank in place, but the little nails the instructions say to use to hold the planks in place while building cause this wood to split, which means that if I wanted to use them I'd need to get a super tiny drill and drill pilot holes for each nail (one per bulkhead). I may have to do that as I progress, but I managed to get the first plank to fit really well by just getting it bent right to fit. That process is slow too. Pre-fit the plank and then wet a section of it, and hold a bend over a hot soldering iron until it dries. Repeat as needed to get the entire plank to fit along all the bulkheads while laying flat. Before I can even start on the plank bending, first I have to lay the plank along the bulkheads, and then sand the bulkheads to the proper angle to accept the plank 'flat', so that the glue has something to bond to. So my first plank it now on, glued, and held in place by a plethora of rubber bands, and a couple nails at the stern that I put in next to the plank and caught it with the heads. Now I wait for the glue to set, because with the rubber bands around the hull, I obviously can't work on the next plank. The planks for the hull start at the deck, and then alternate sides, because if you put them all on one side first, it's very likely to induce a twist in the hull. I need to get on Amazon and order a set of micro-drills and collet, so that if I do need to start going with pilot holes, I'll have some way to do it!
|
|
#
?
Aug 17, 2014 23:05
|
|
|
And the first two planks are on.  The beginning, fitting the first plank when it had only minor shaping done. It's a process of test fitting, sanding of the bulkheads and/or wetting and bending the plank, repeat until it fits. 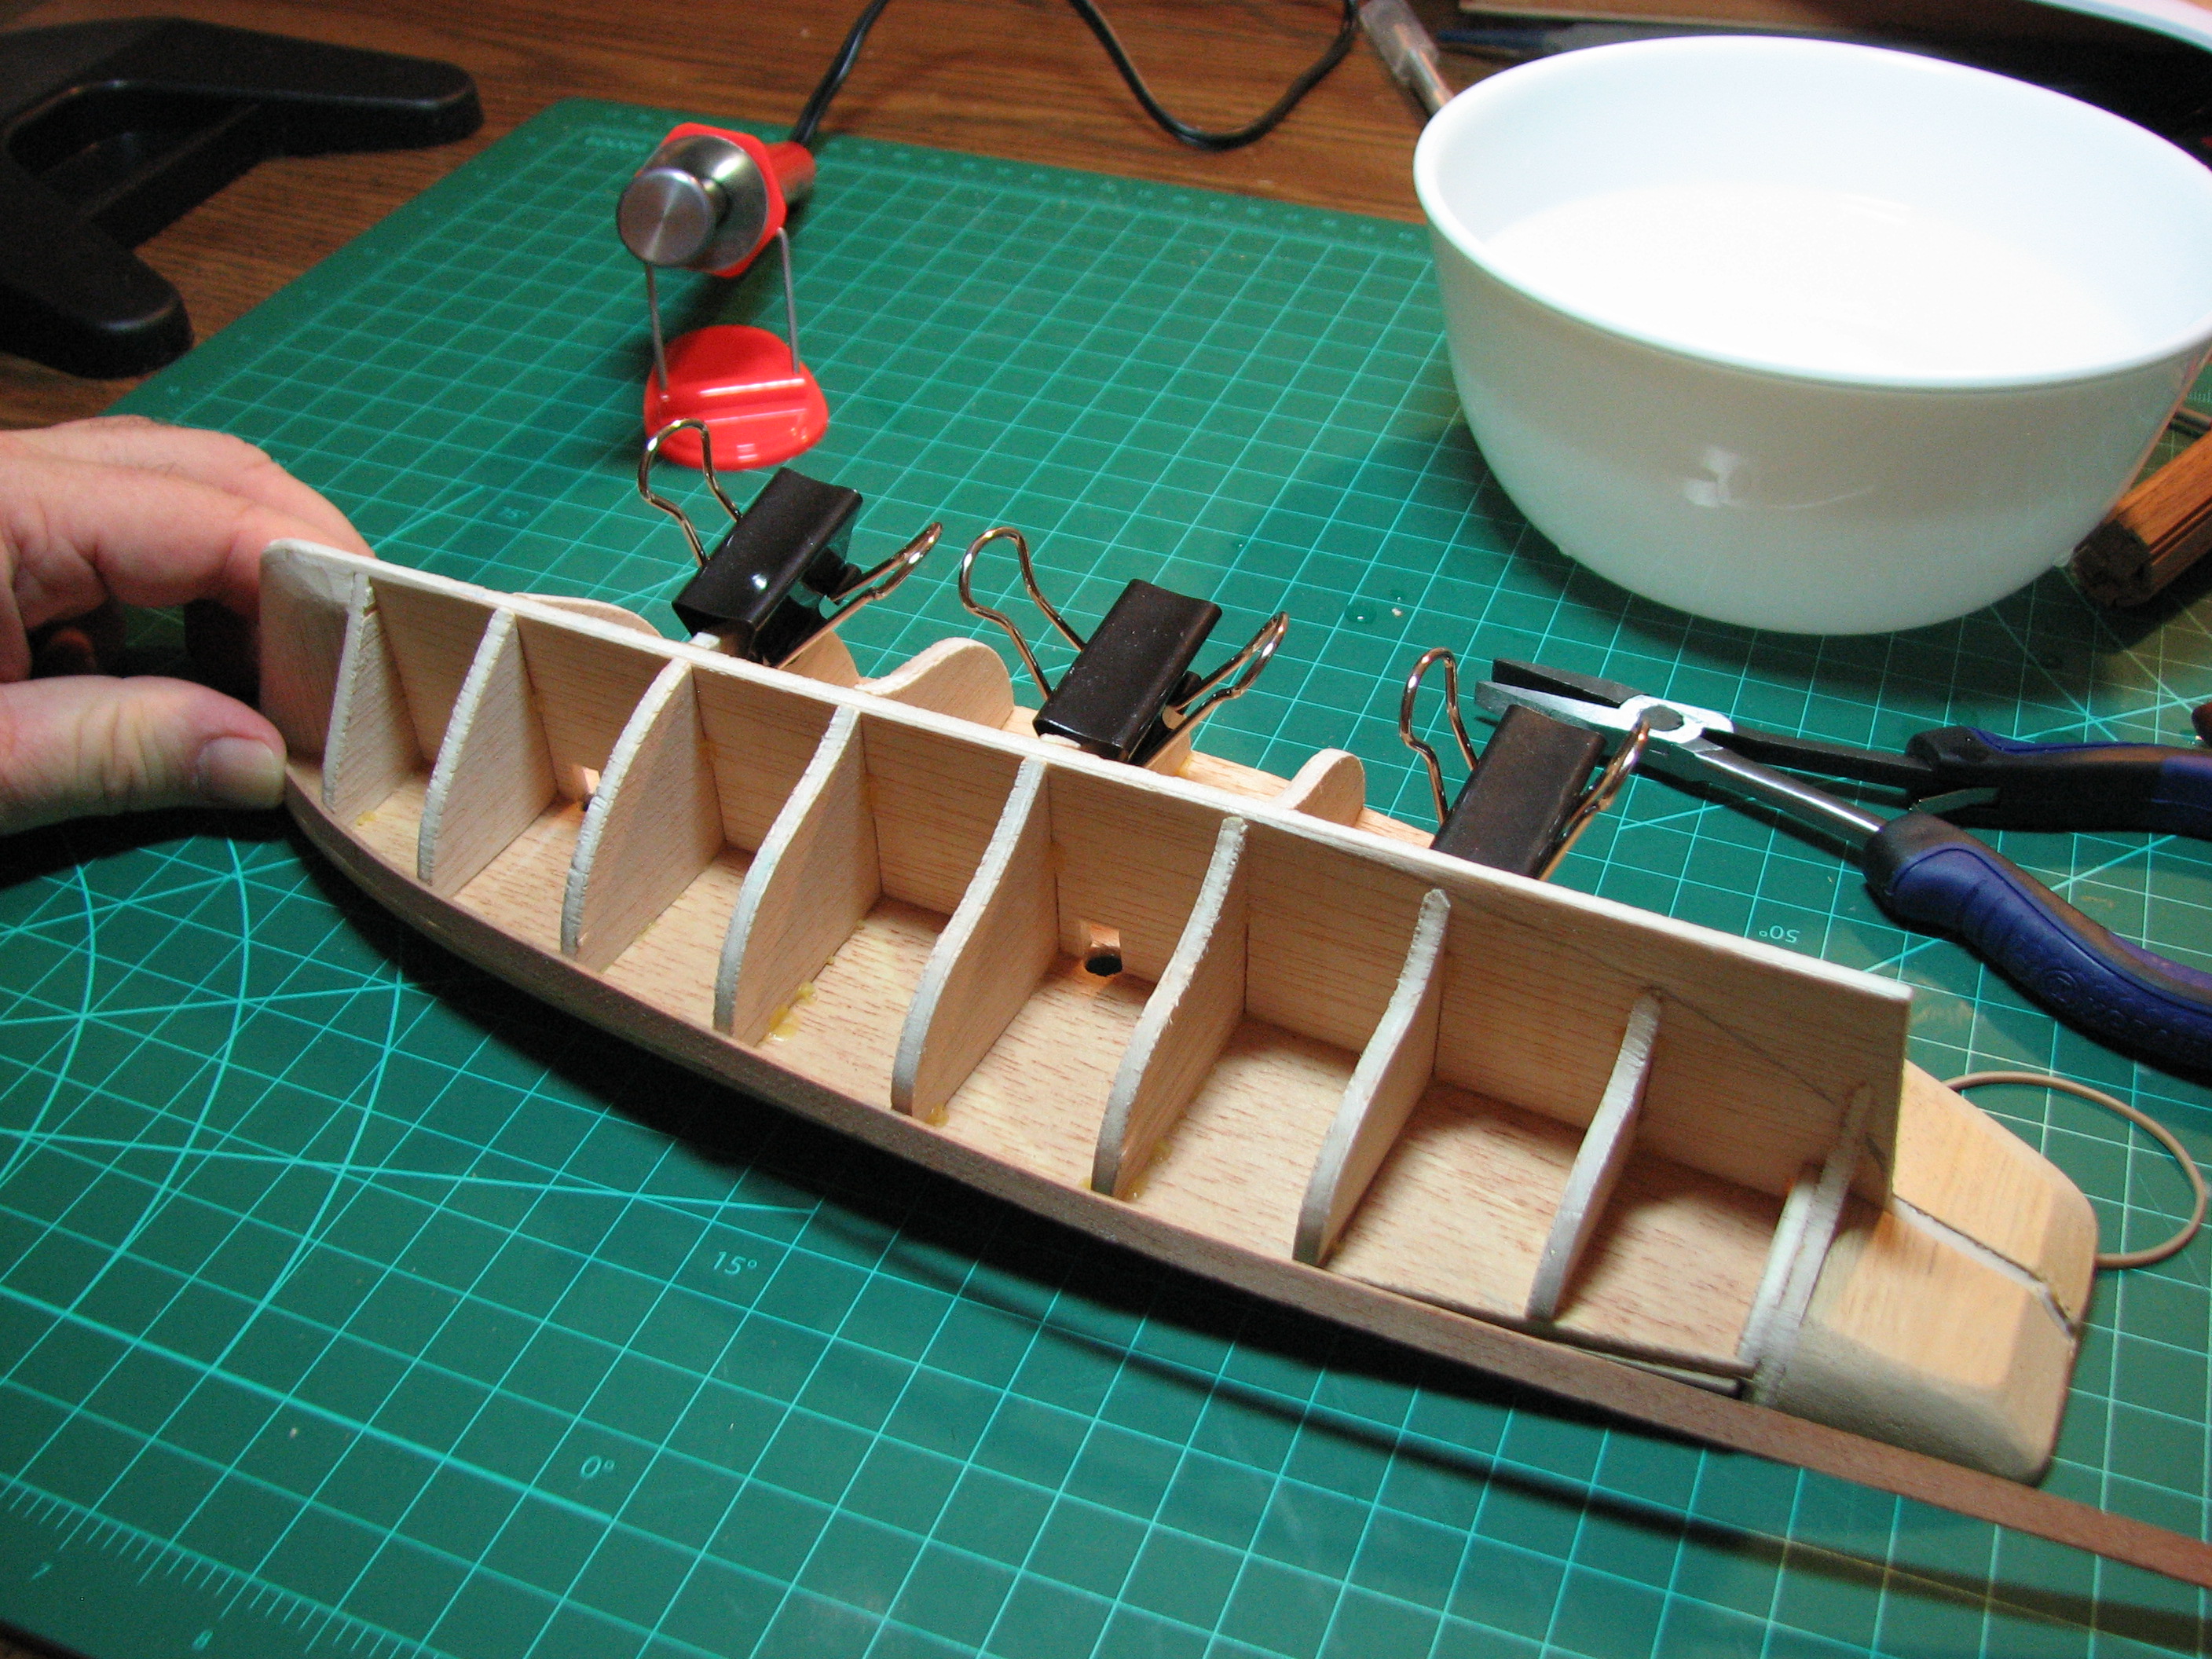 The shaping process - after test fitting, figure out where you need a bend, wet that section of the plank, then hold it over the heat source (soldering iron) and hold in place until it's heat dried. Obviously I had to use one hand to take this picture, but both hands are used to hold the bend doing this. 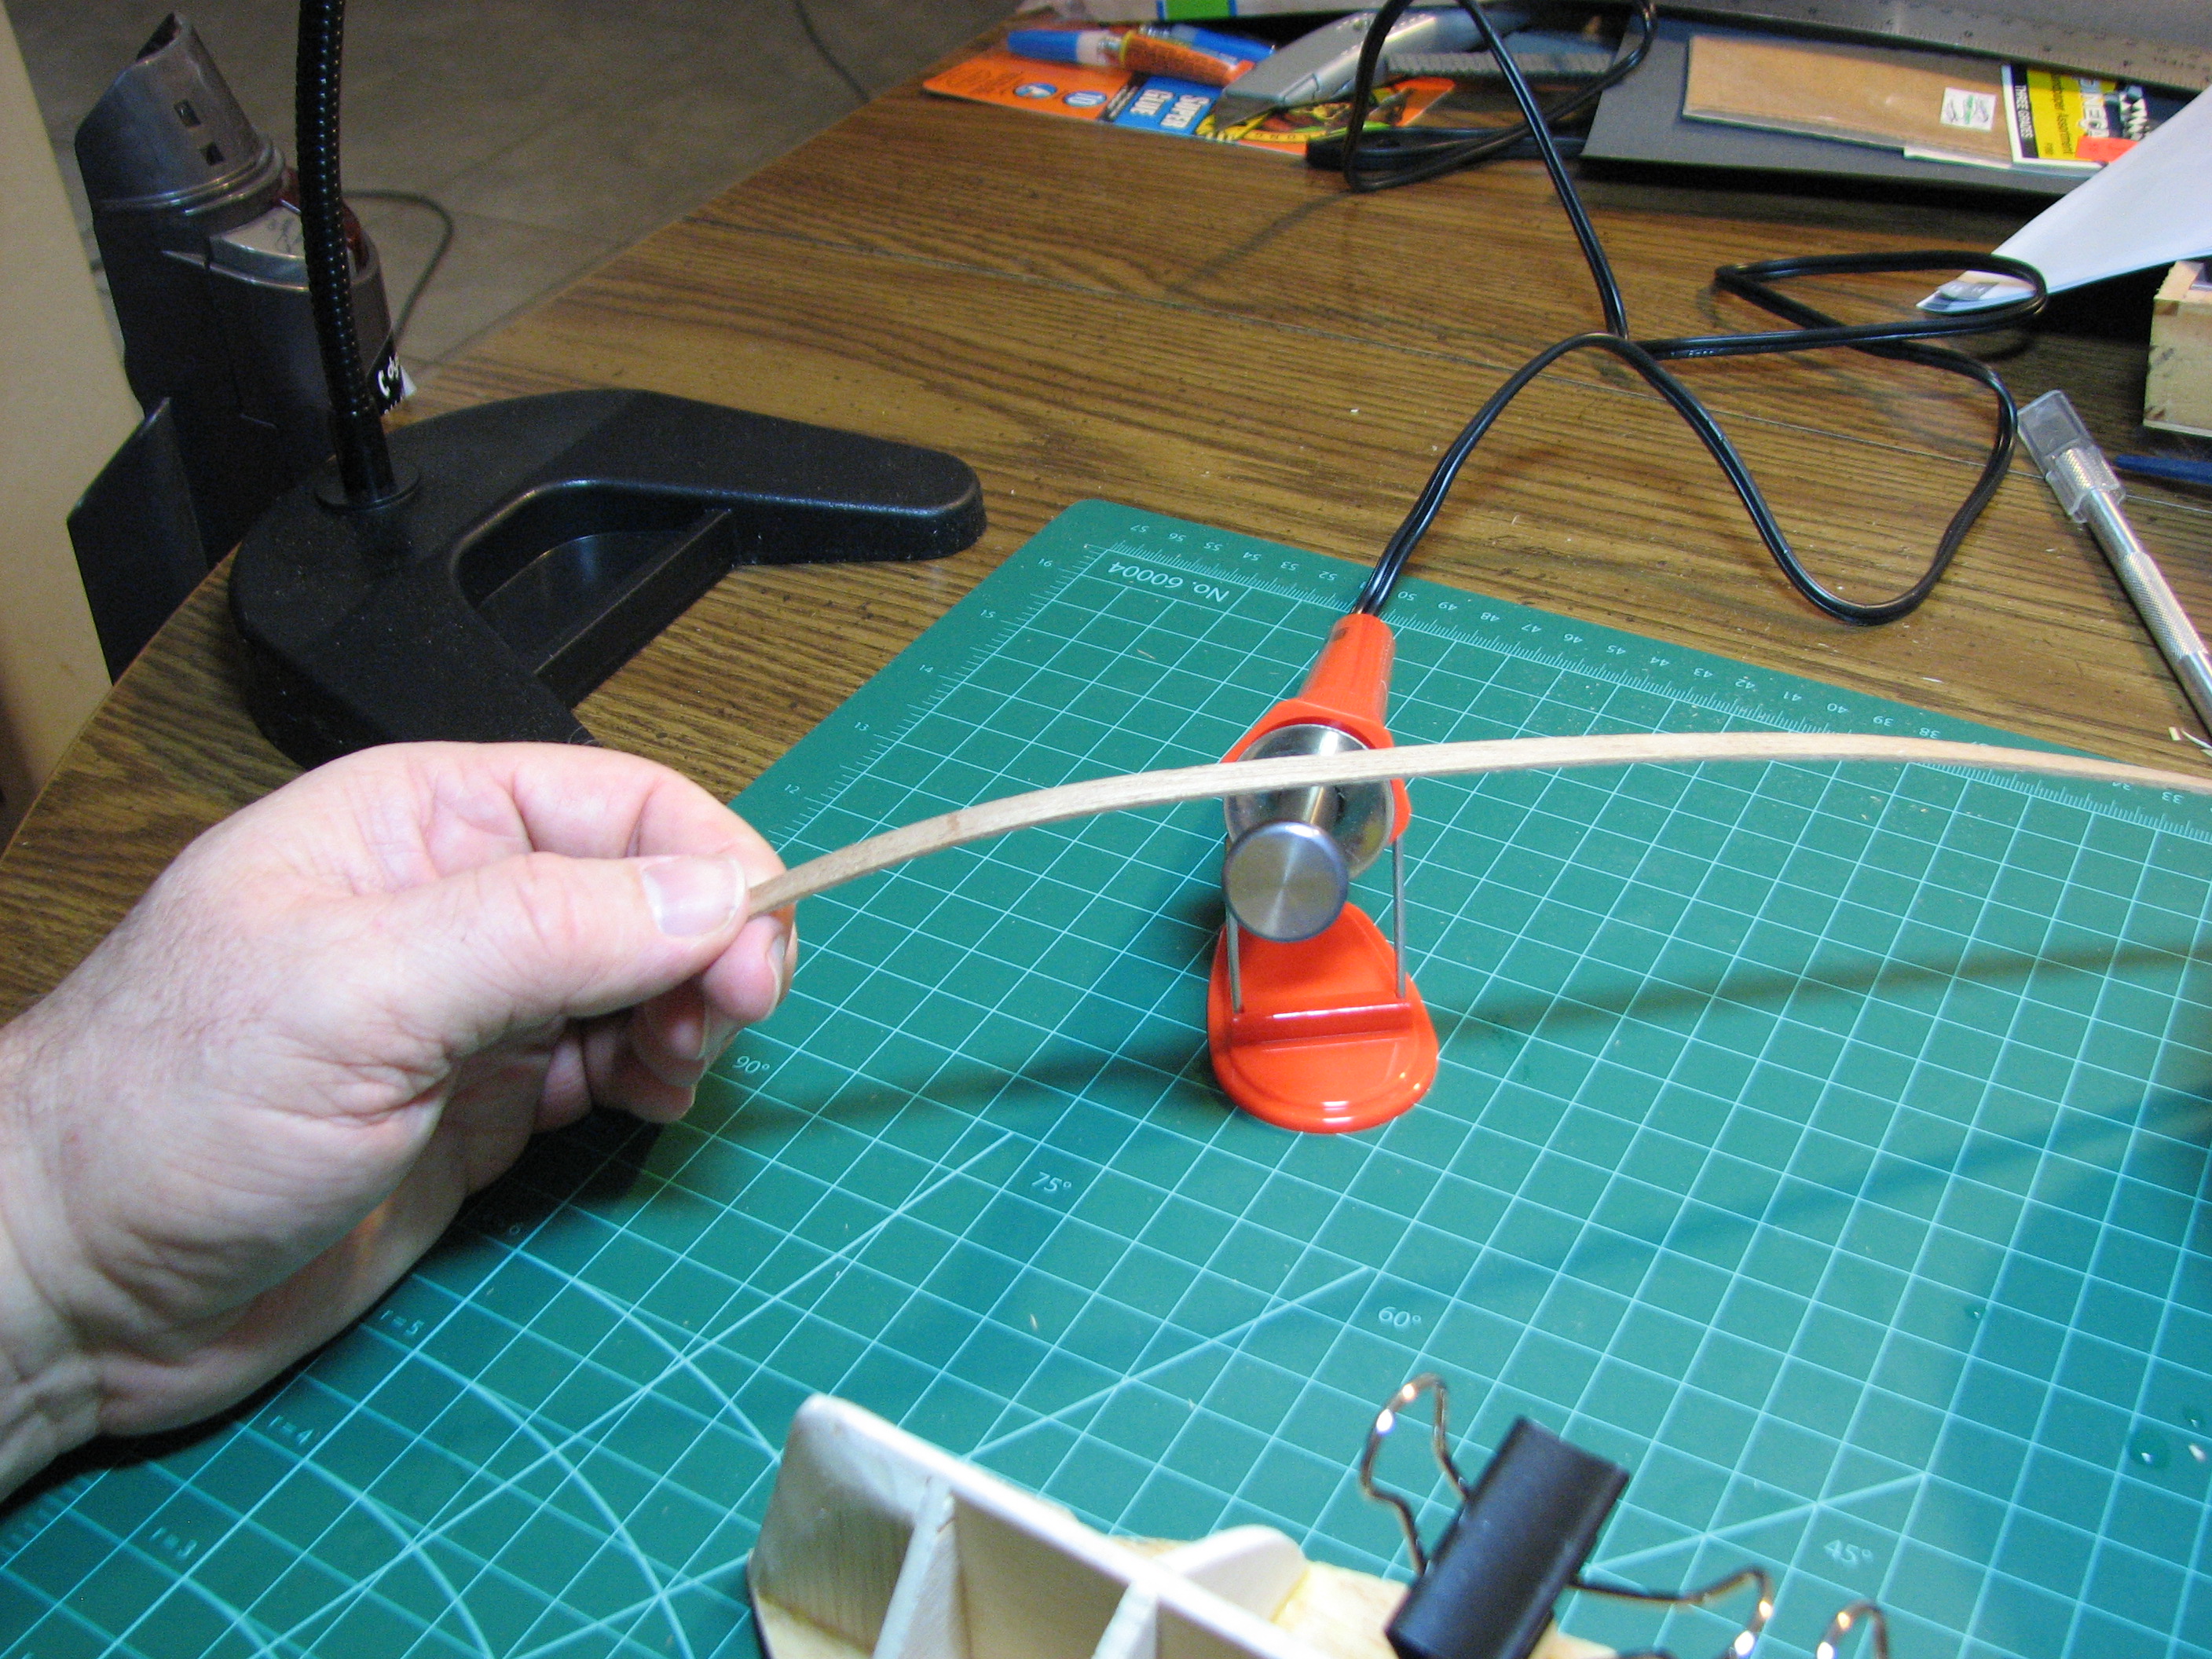 The rubber-band system in action. I used the small nails on the stern to 'catch' the plank with the nail heads, and I'll be using nails in the bulkheads to help with positioning etc, but I'm going to try to avoid using nails to hold the planks. We'll see how well that goes in a week or so when I get to the areas of the hull that I won't be able to get pressure on the planks from the bands. I've ordered a micro-drill set that will be here Tuesday or Wednesday, as I expect I'll have to break down and do it that way. 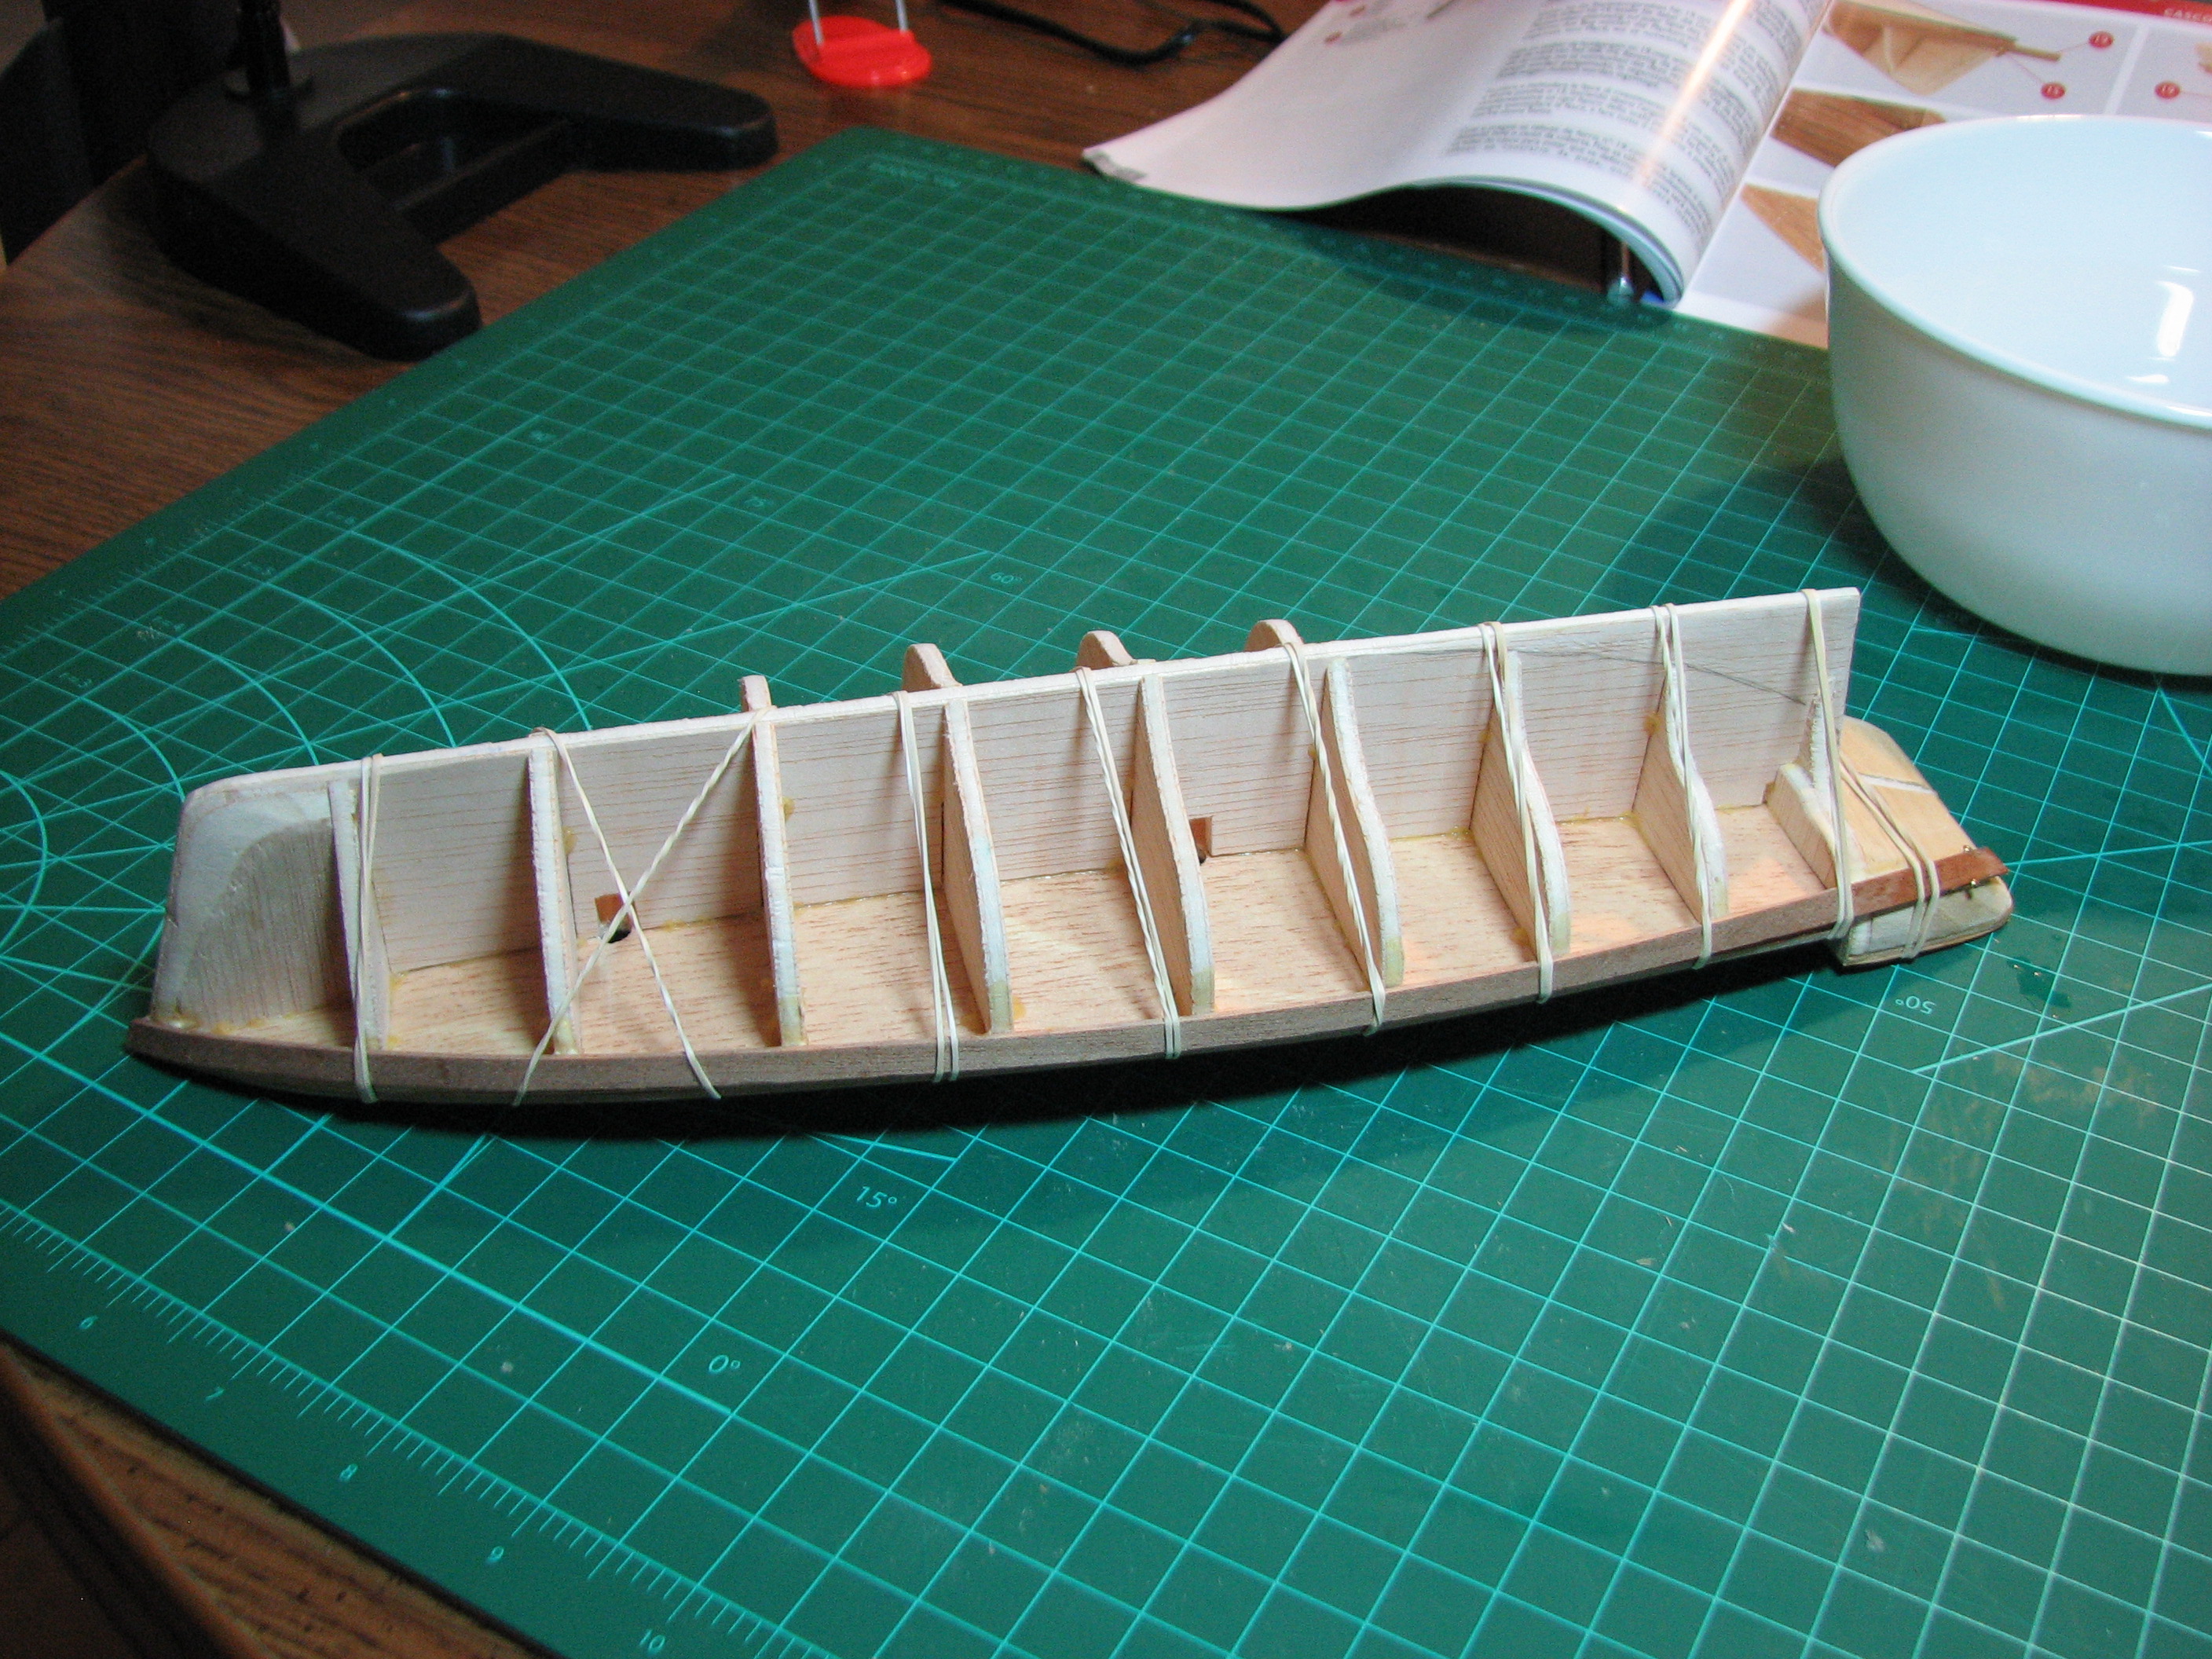 Took a picture of the first plank on the other side of the boat to give you an idea of how much bending/twisting of the plank is involved. This isn't quite complete as pictured, but it's fairly close. 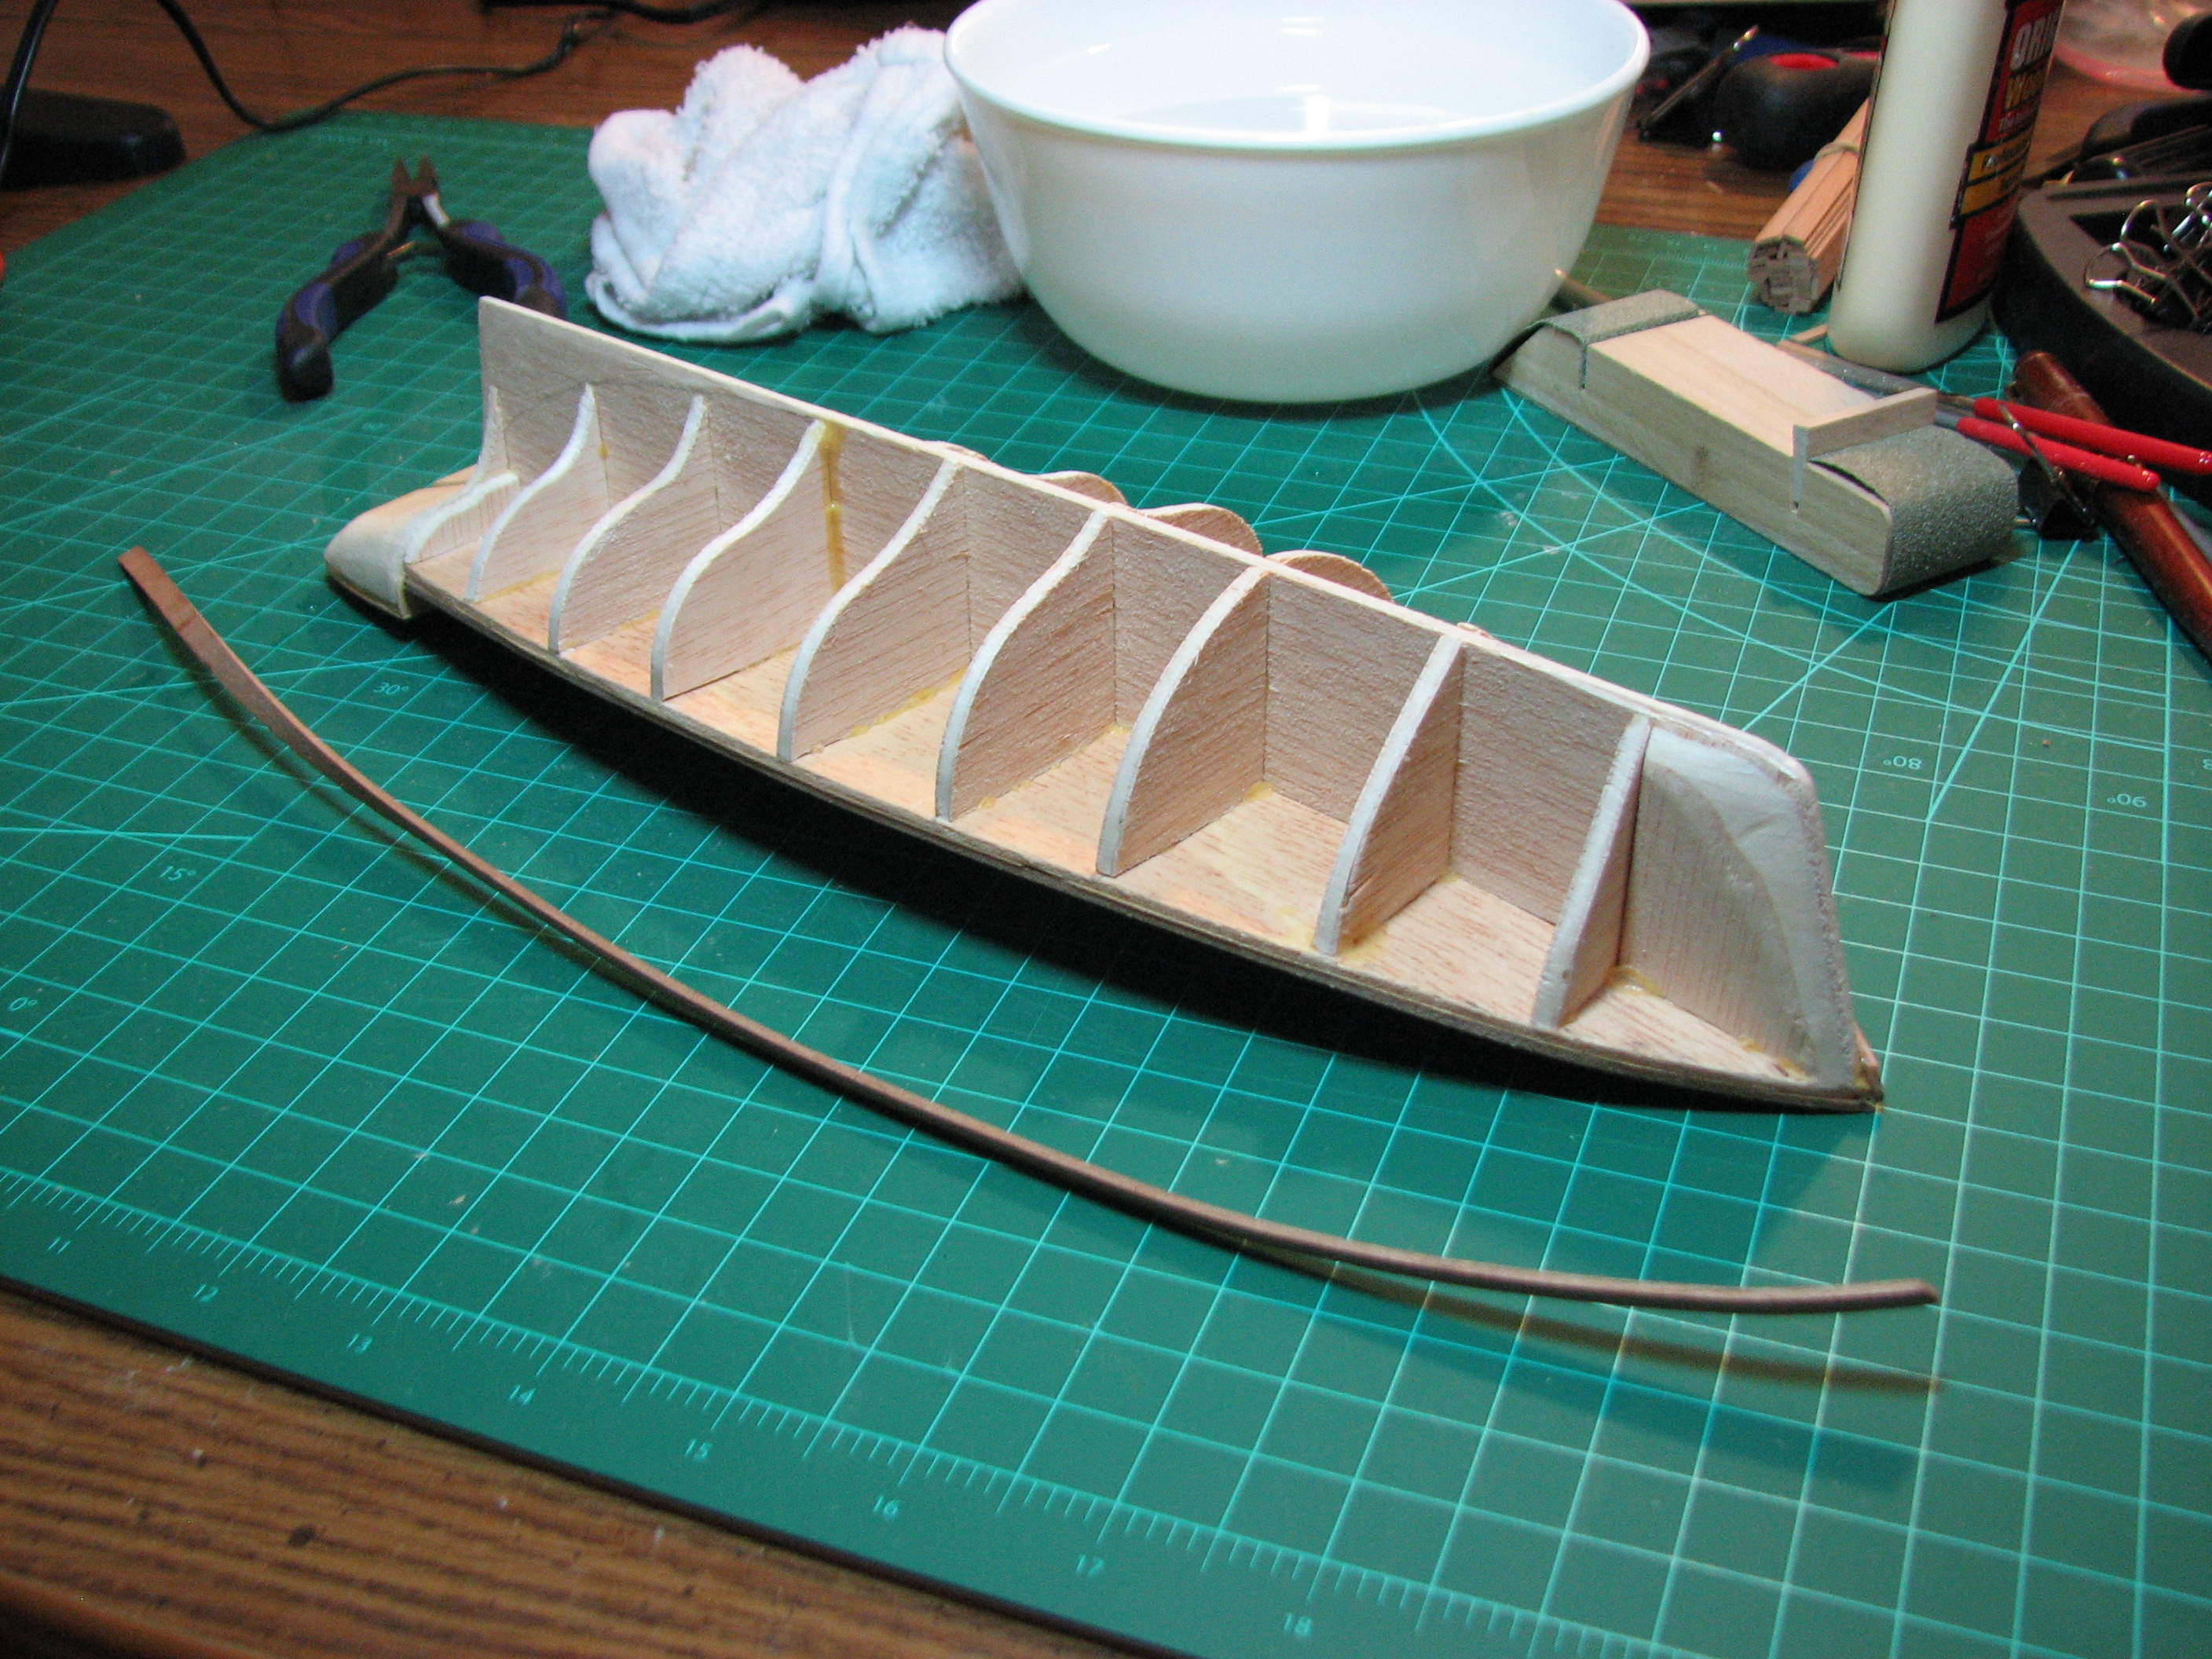 For final shaping, I tried a system I read on a build log. I rubber-banded the plank into place, using the nails to hold it in the right position, and with the bands forcing the plank into shape, applied water with an eye-dropper every 15 minutes or so for an hour, then let it dry. Worked ok, but probably would have been faster just to use the wet/heat shaping off the hull. 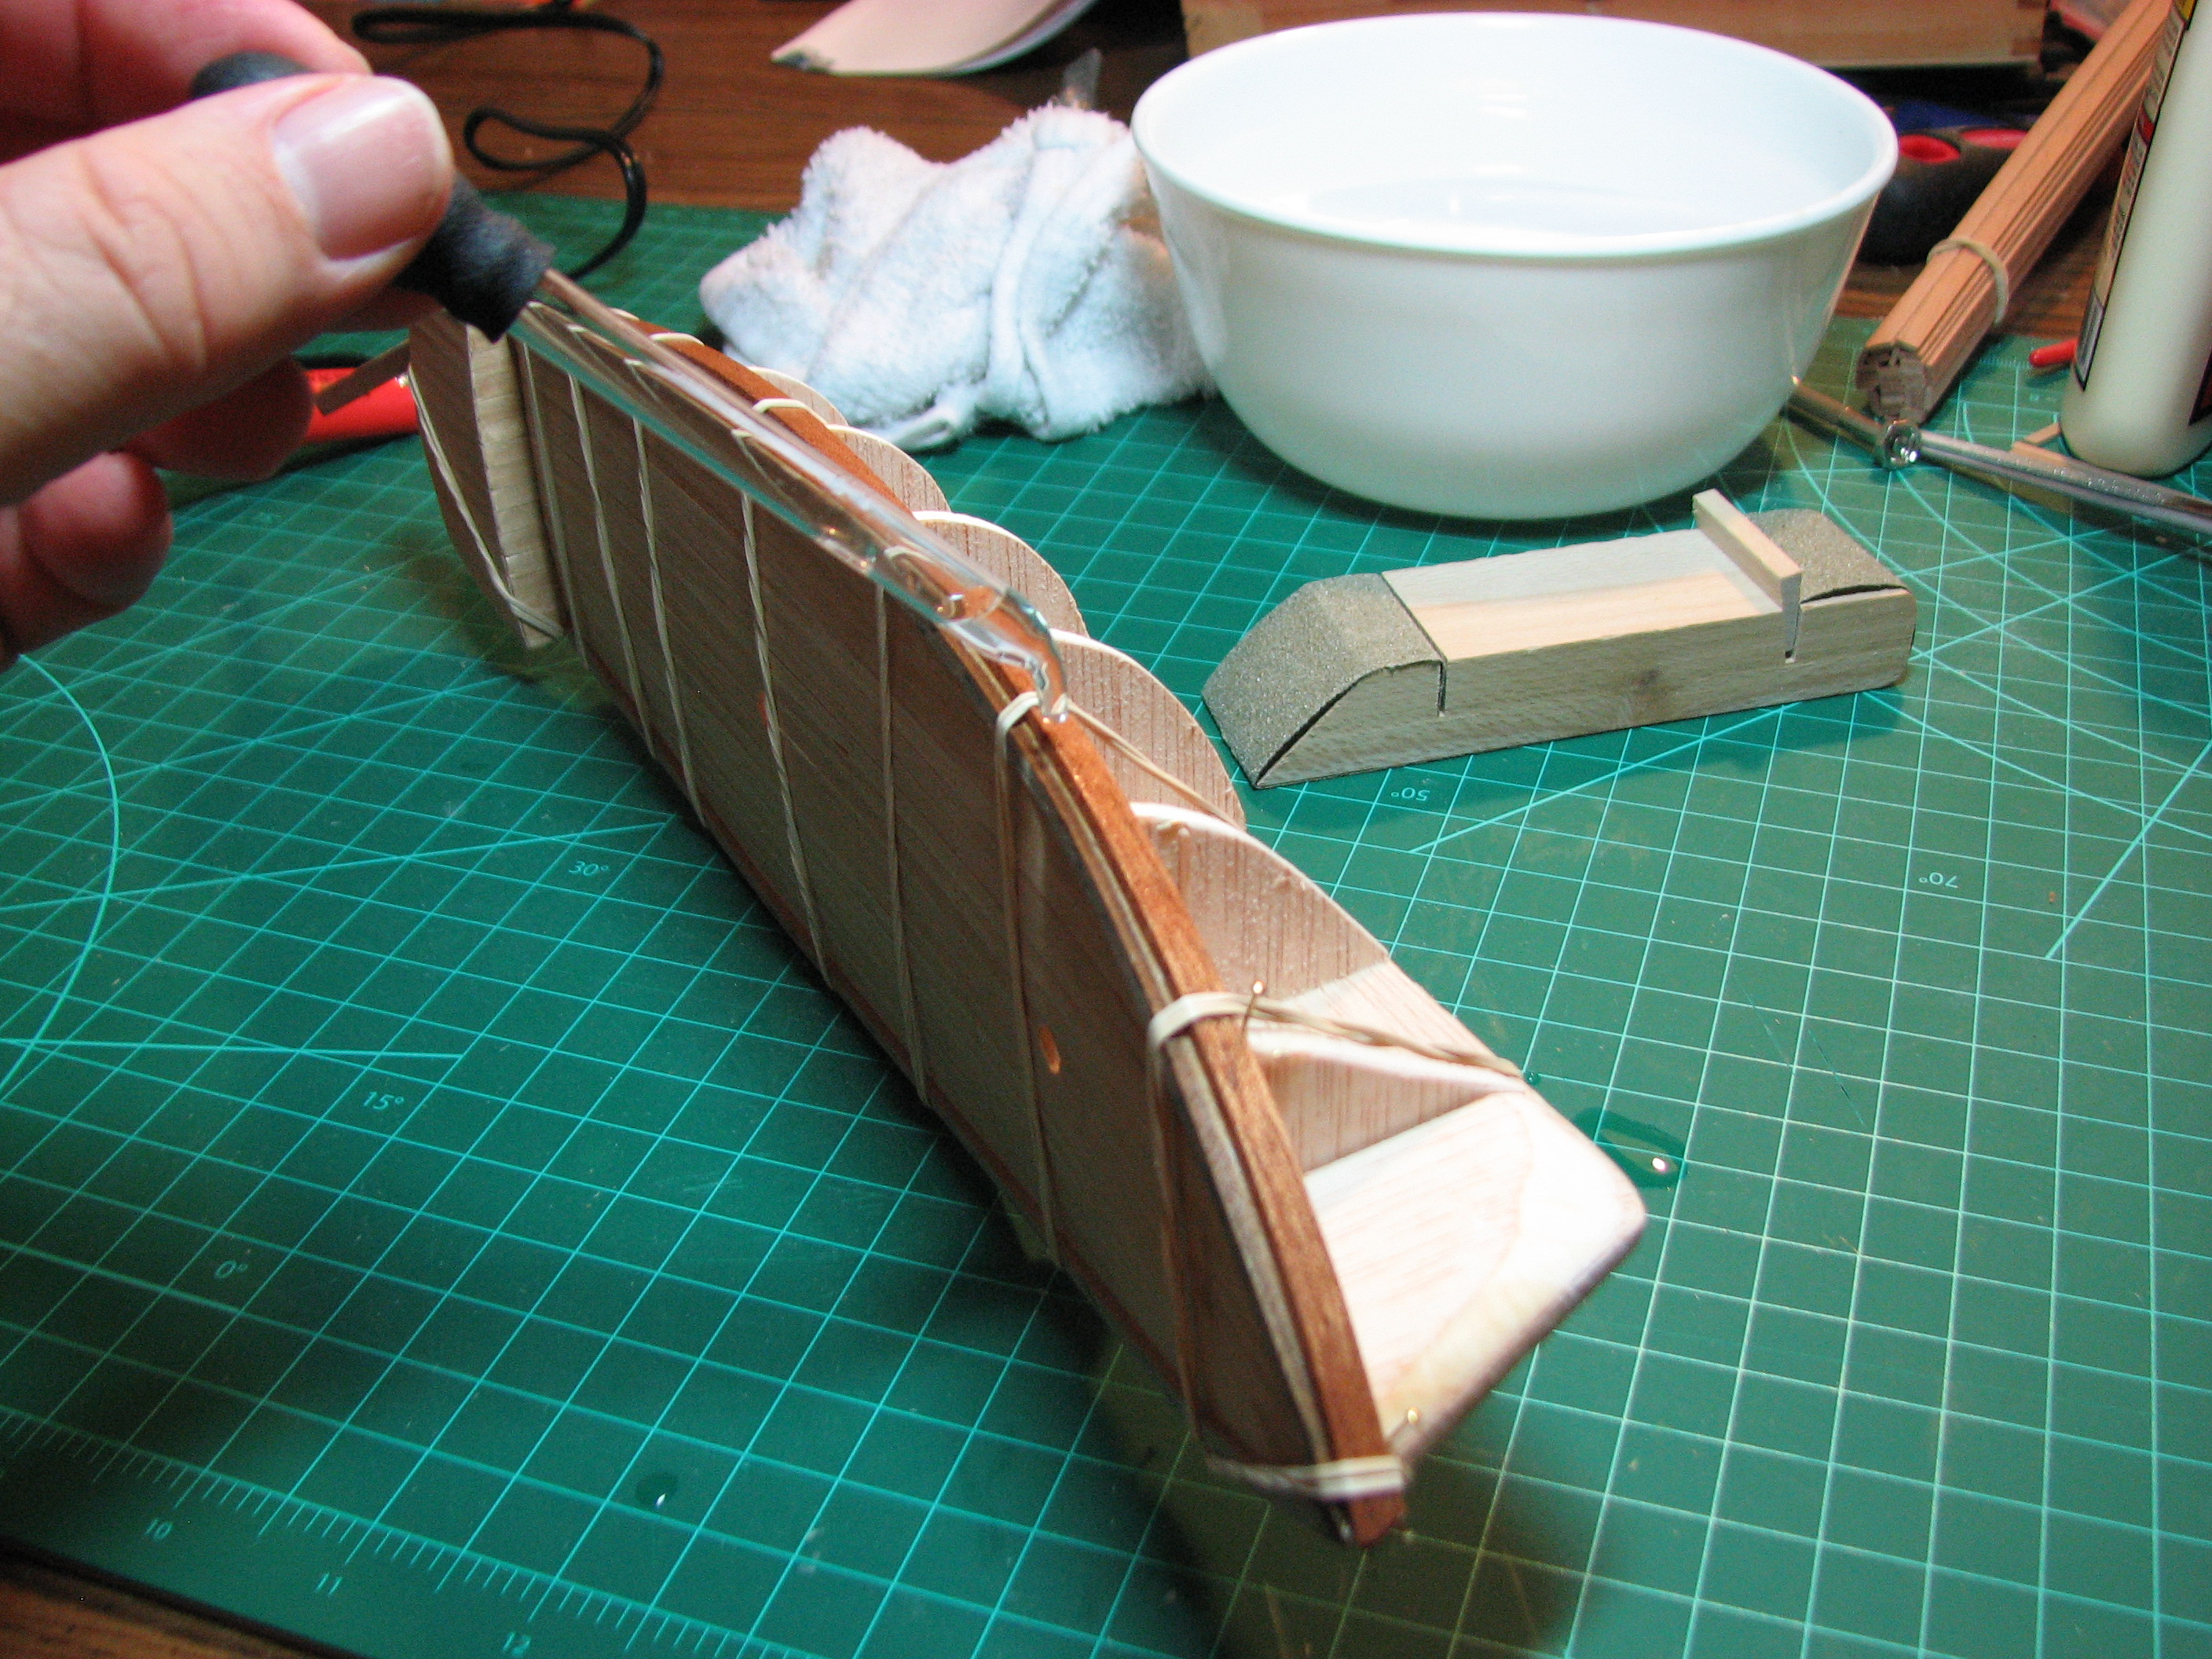 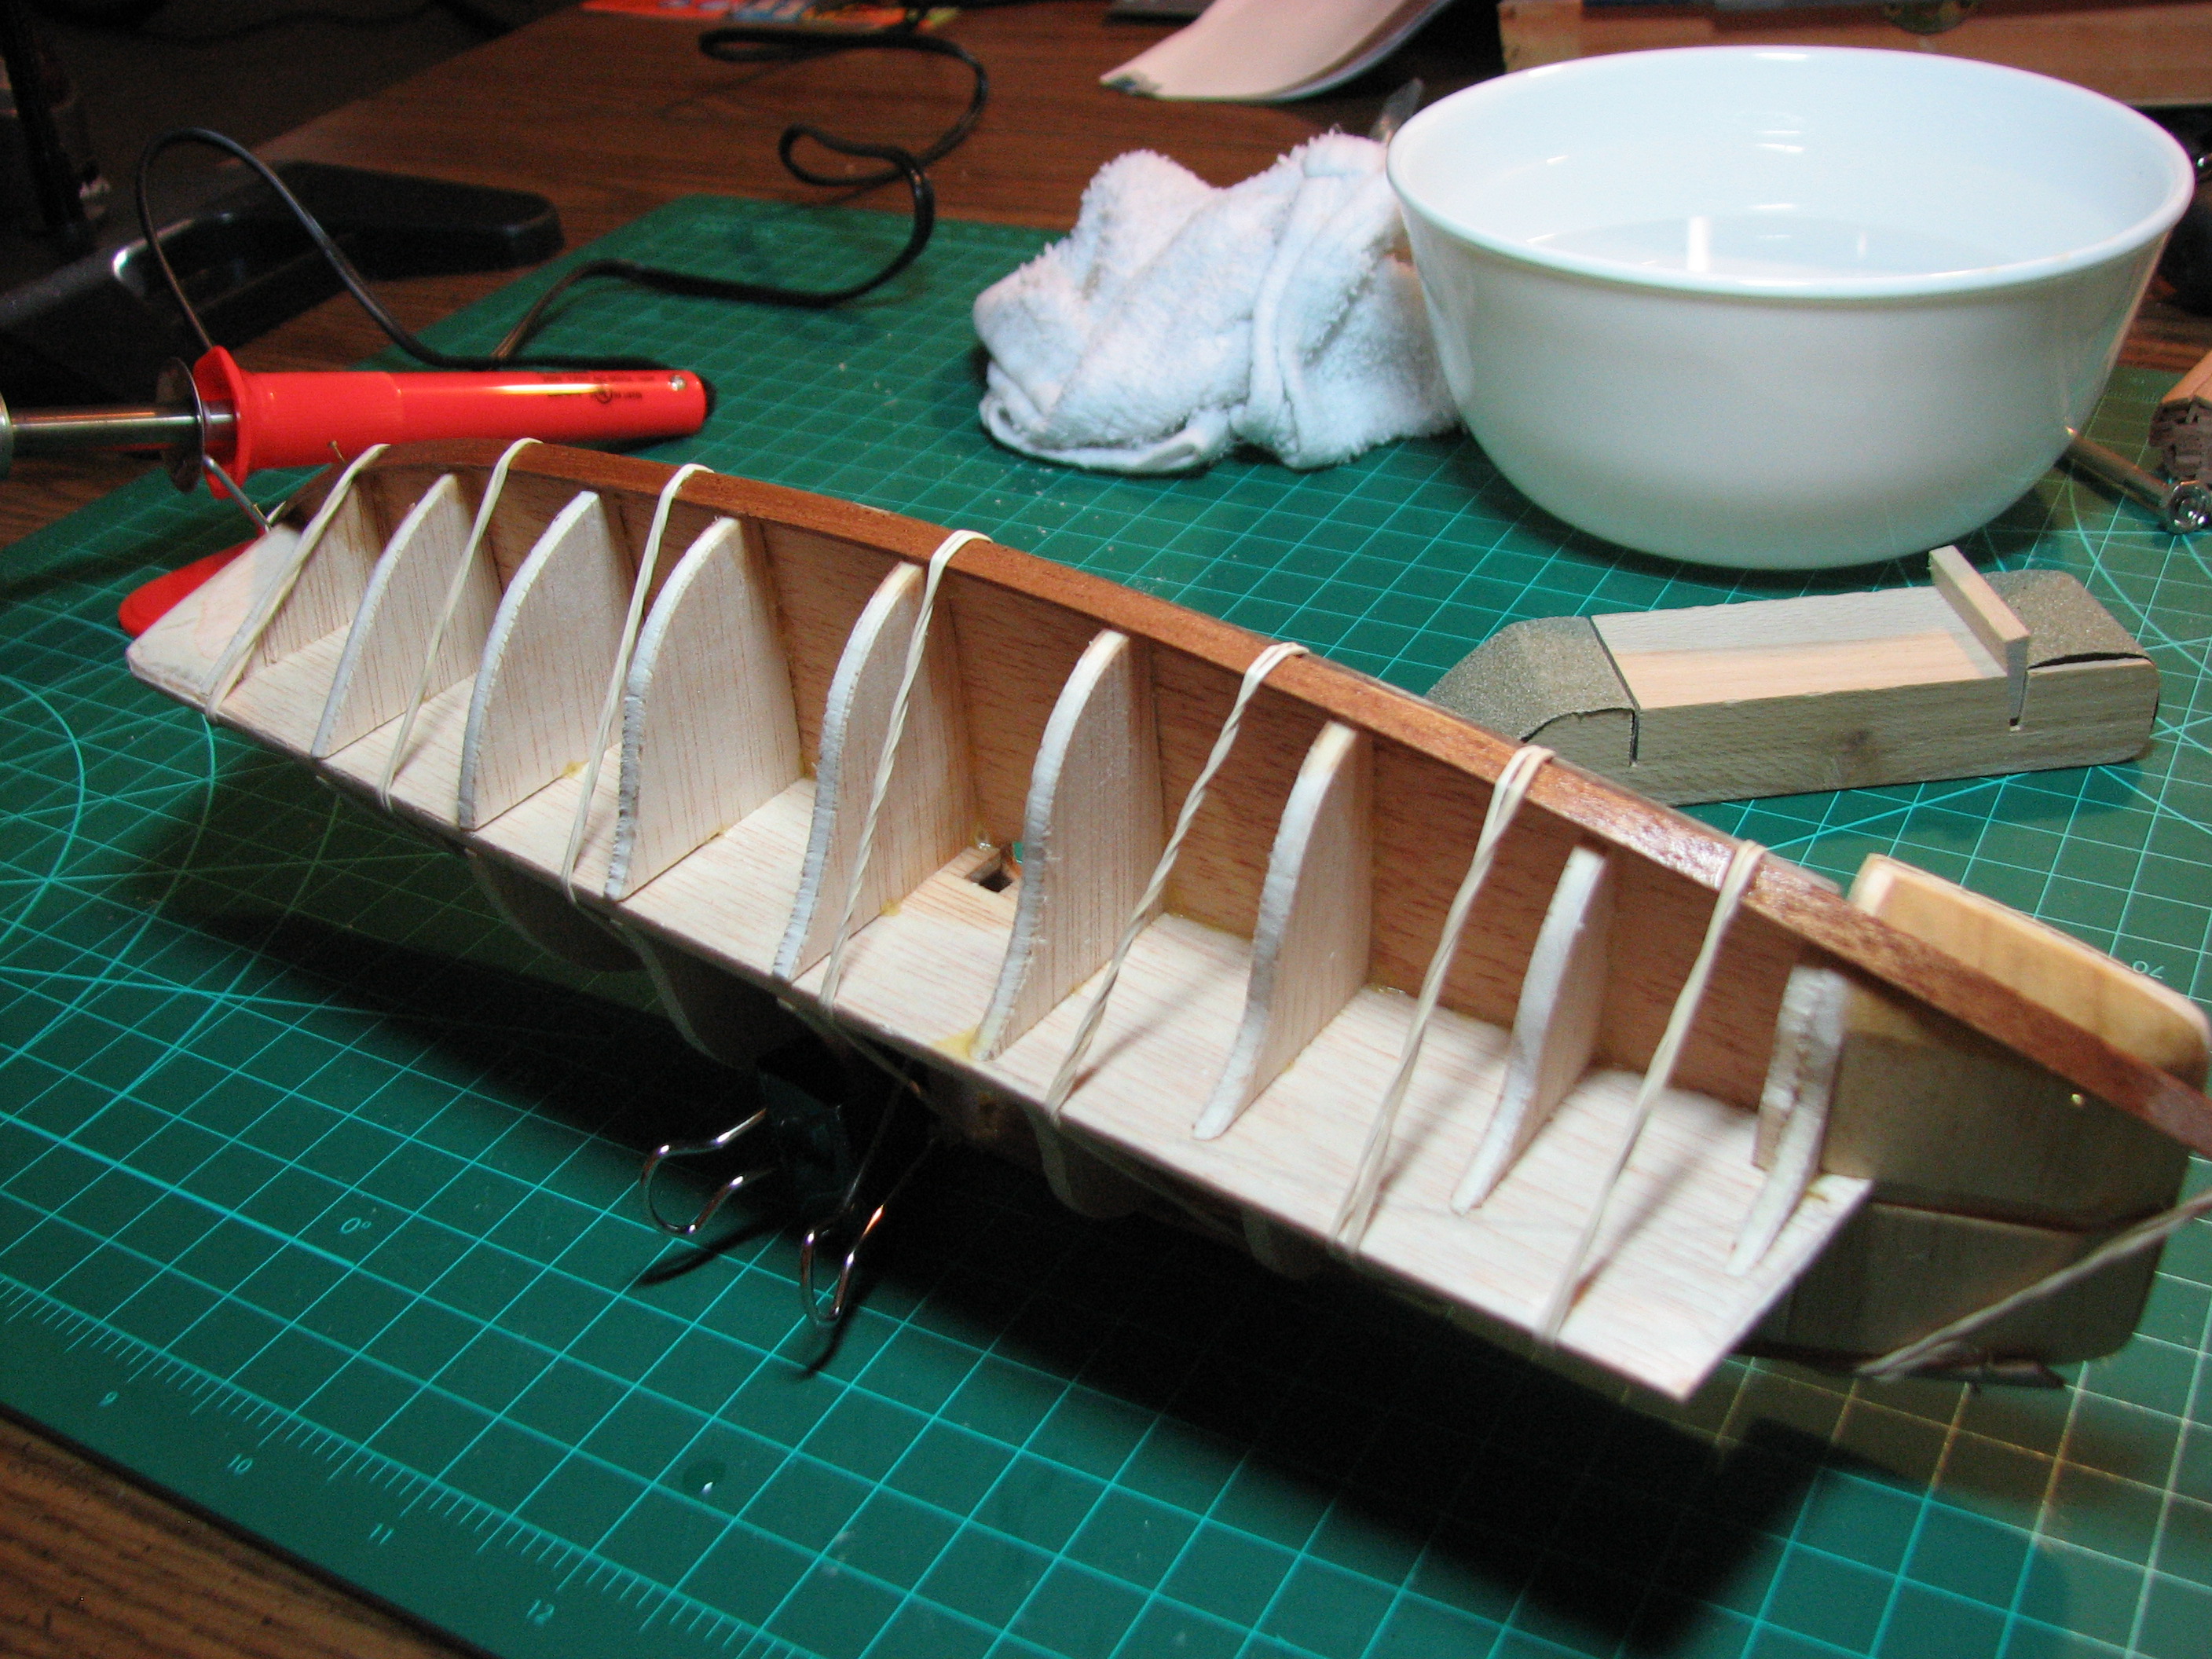 And finally, the 2nd plank glued in place and held with the rubber bands. You can see where I used some nails to allow the bands to pull at odd angles on the ends to hold the plank up against the stem and stern. 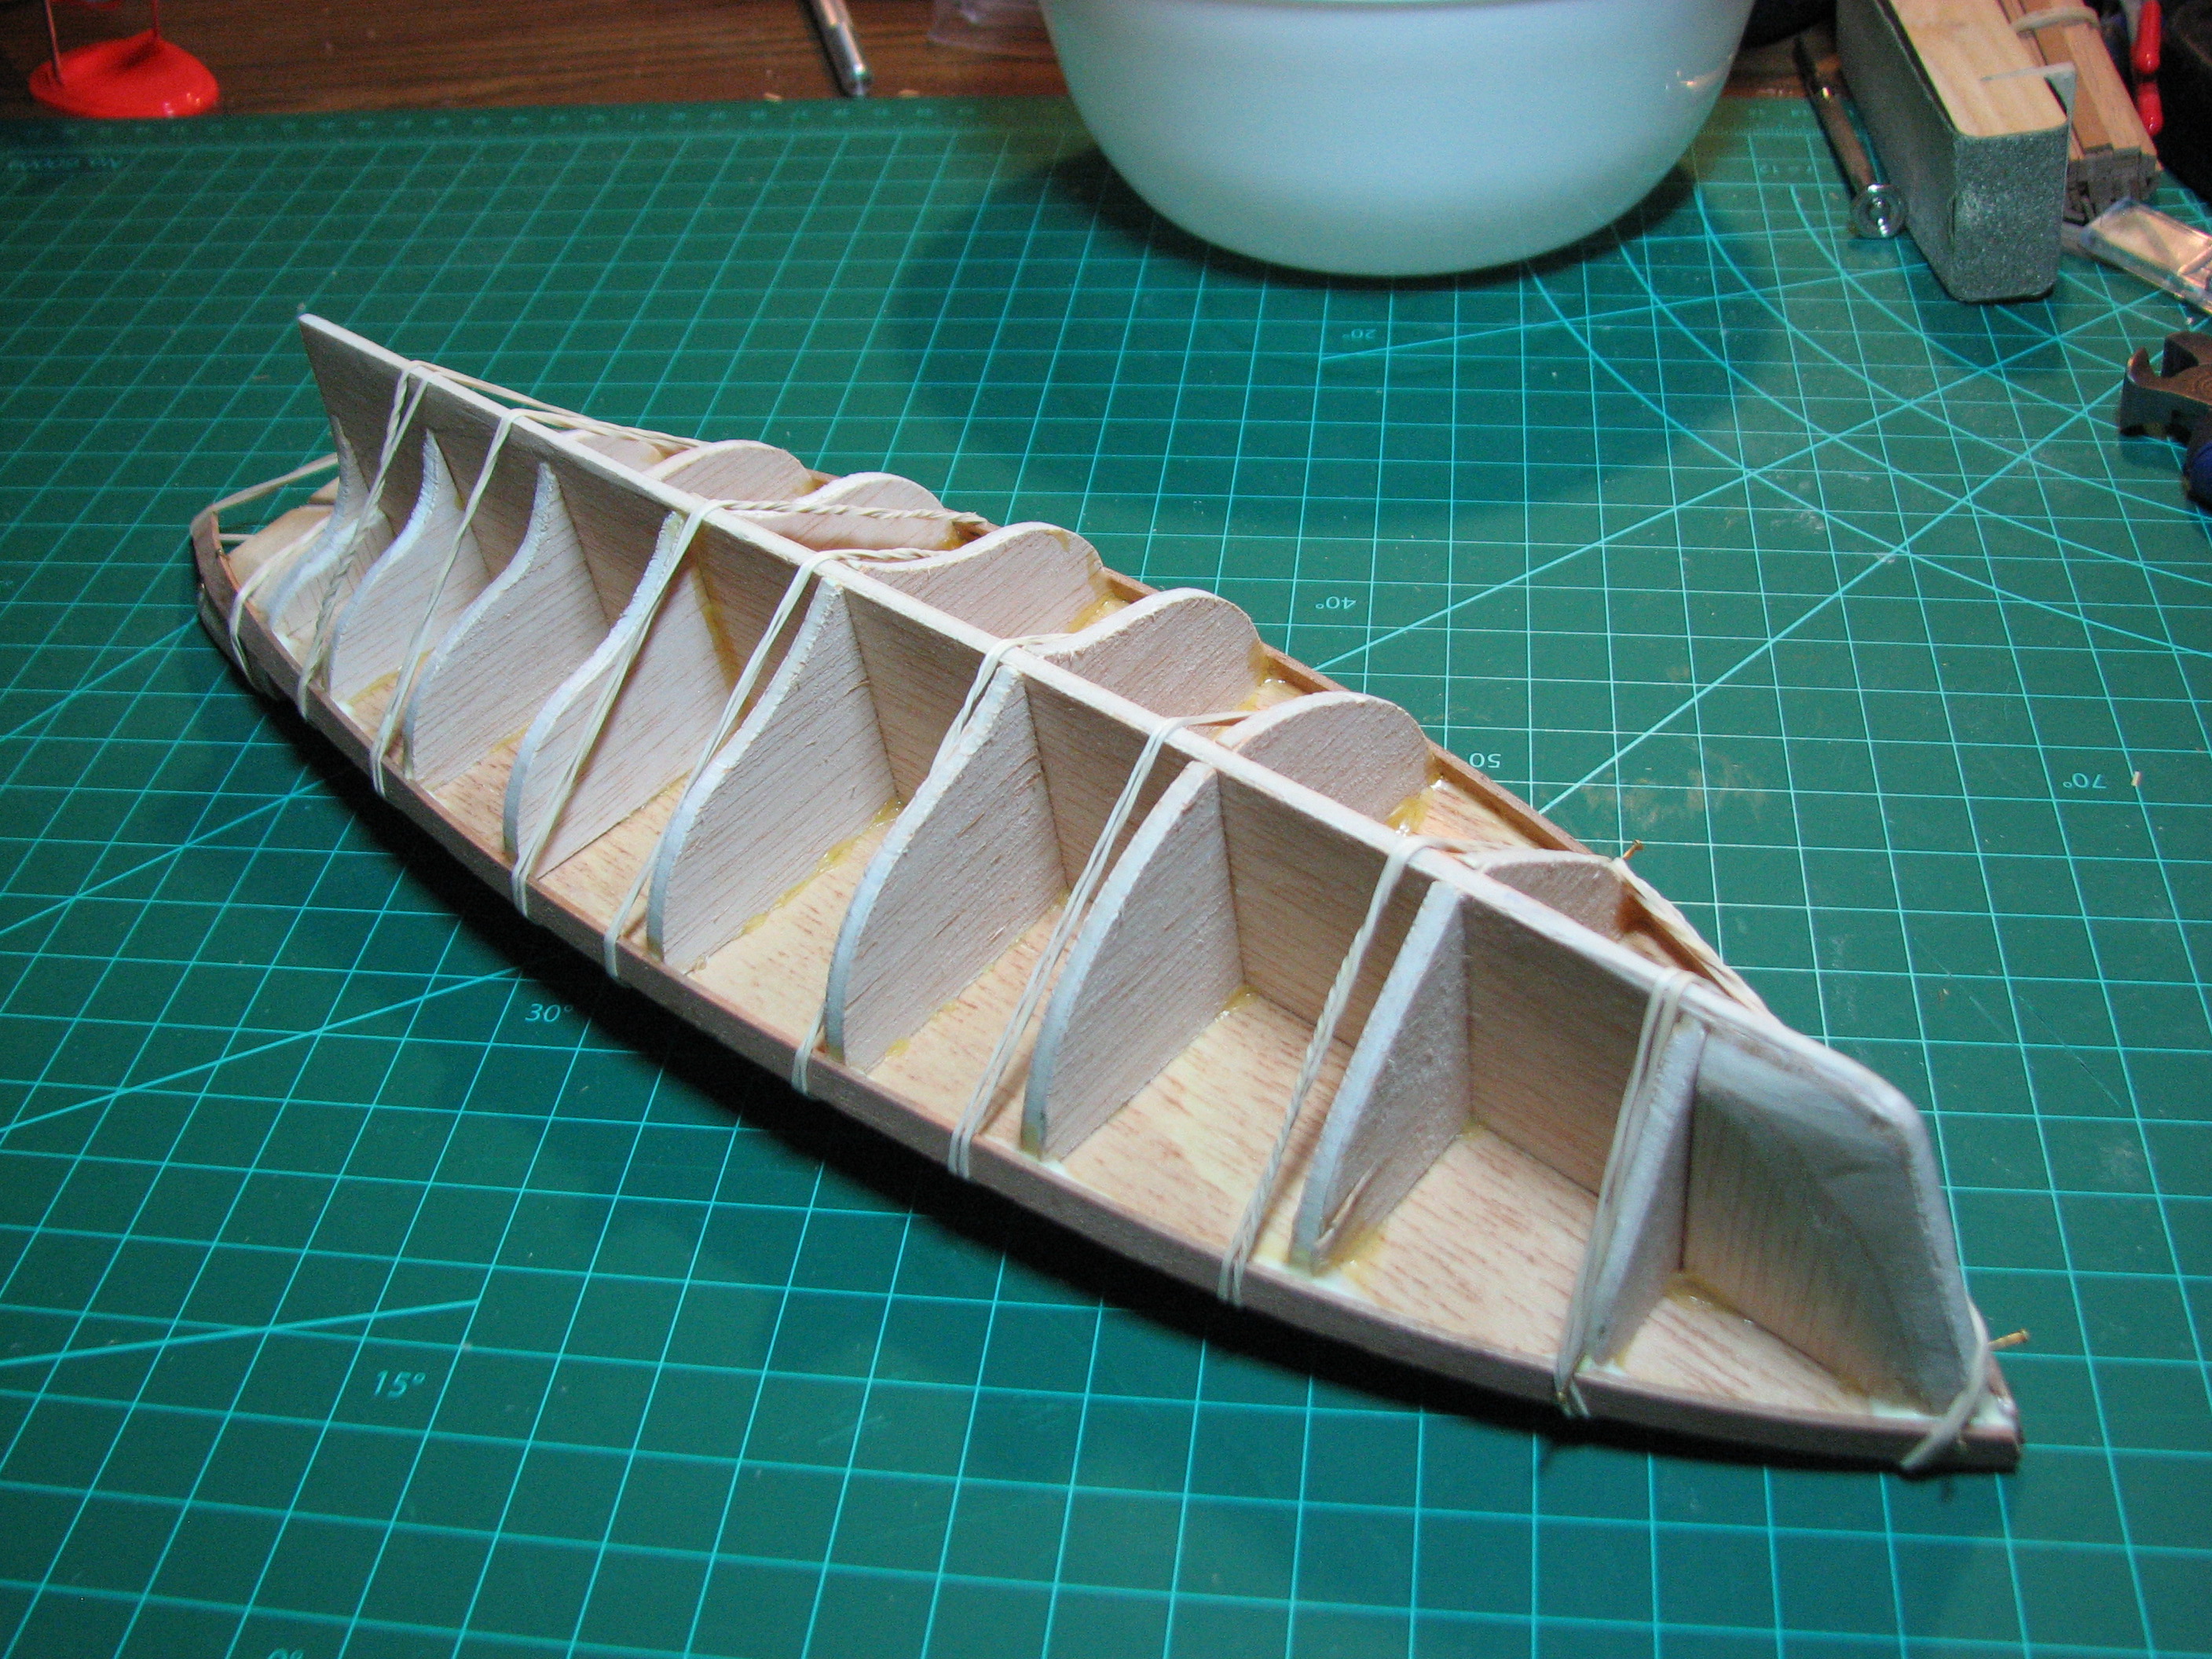 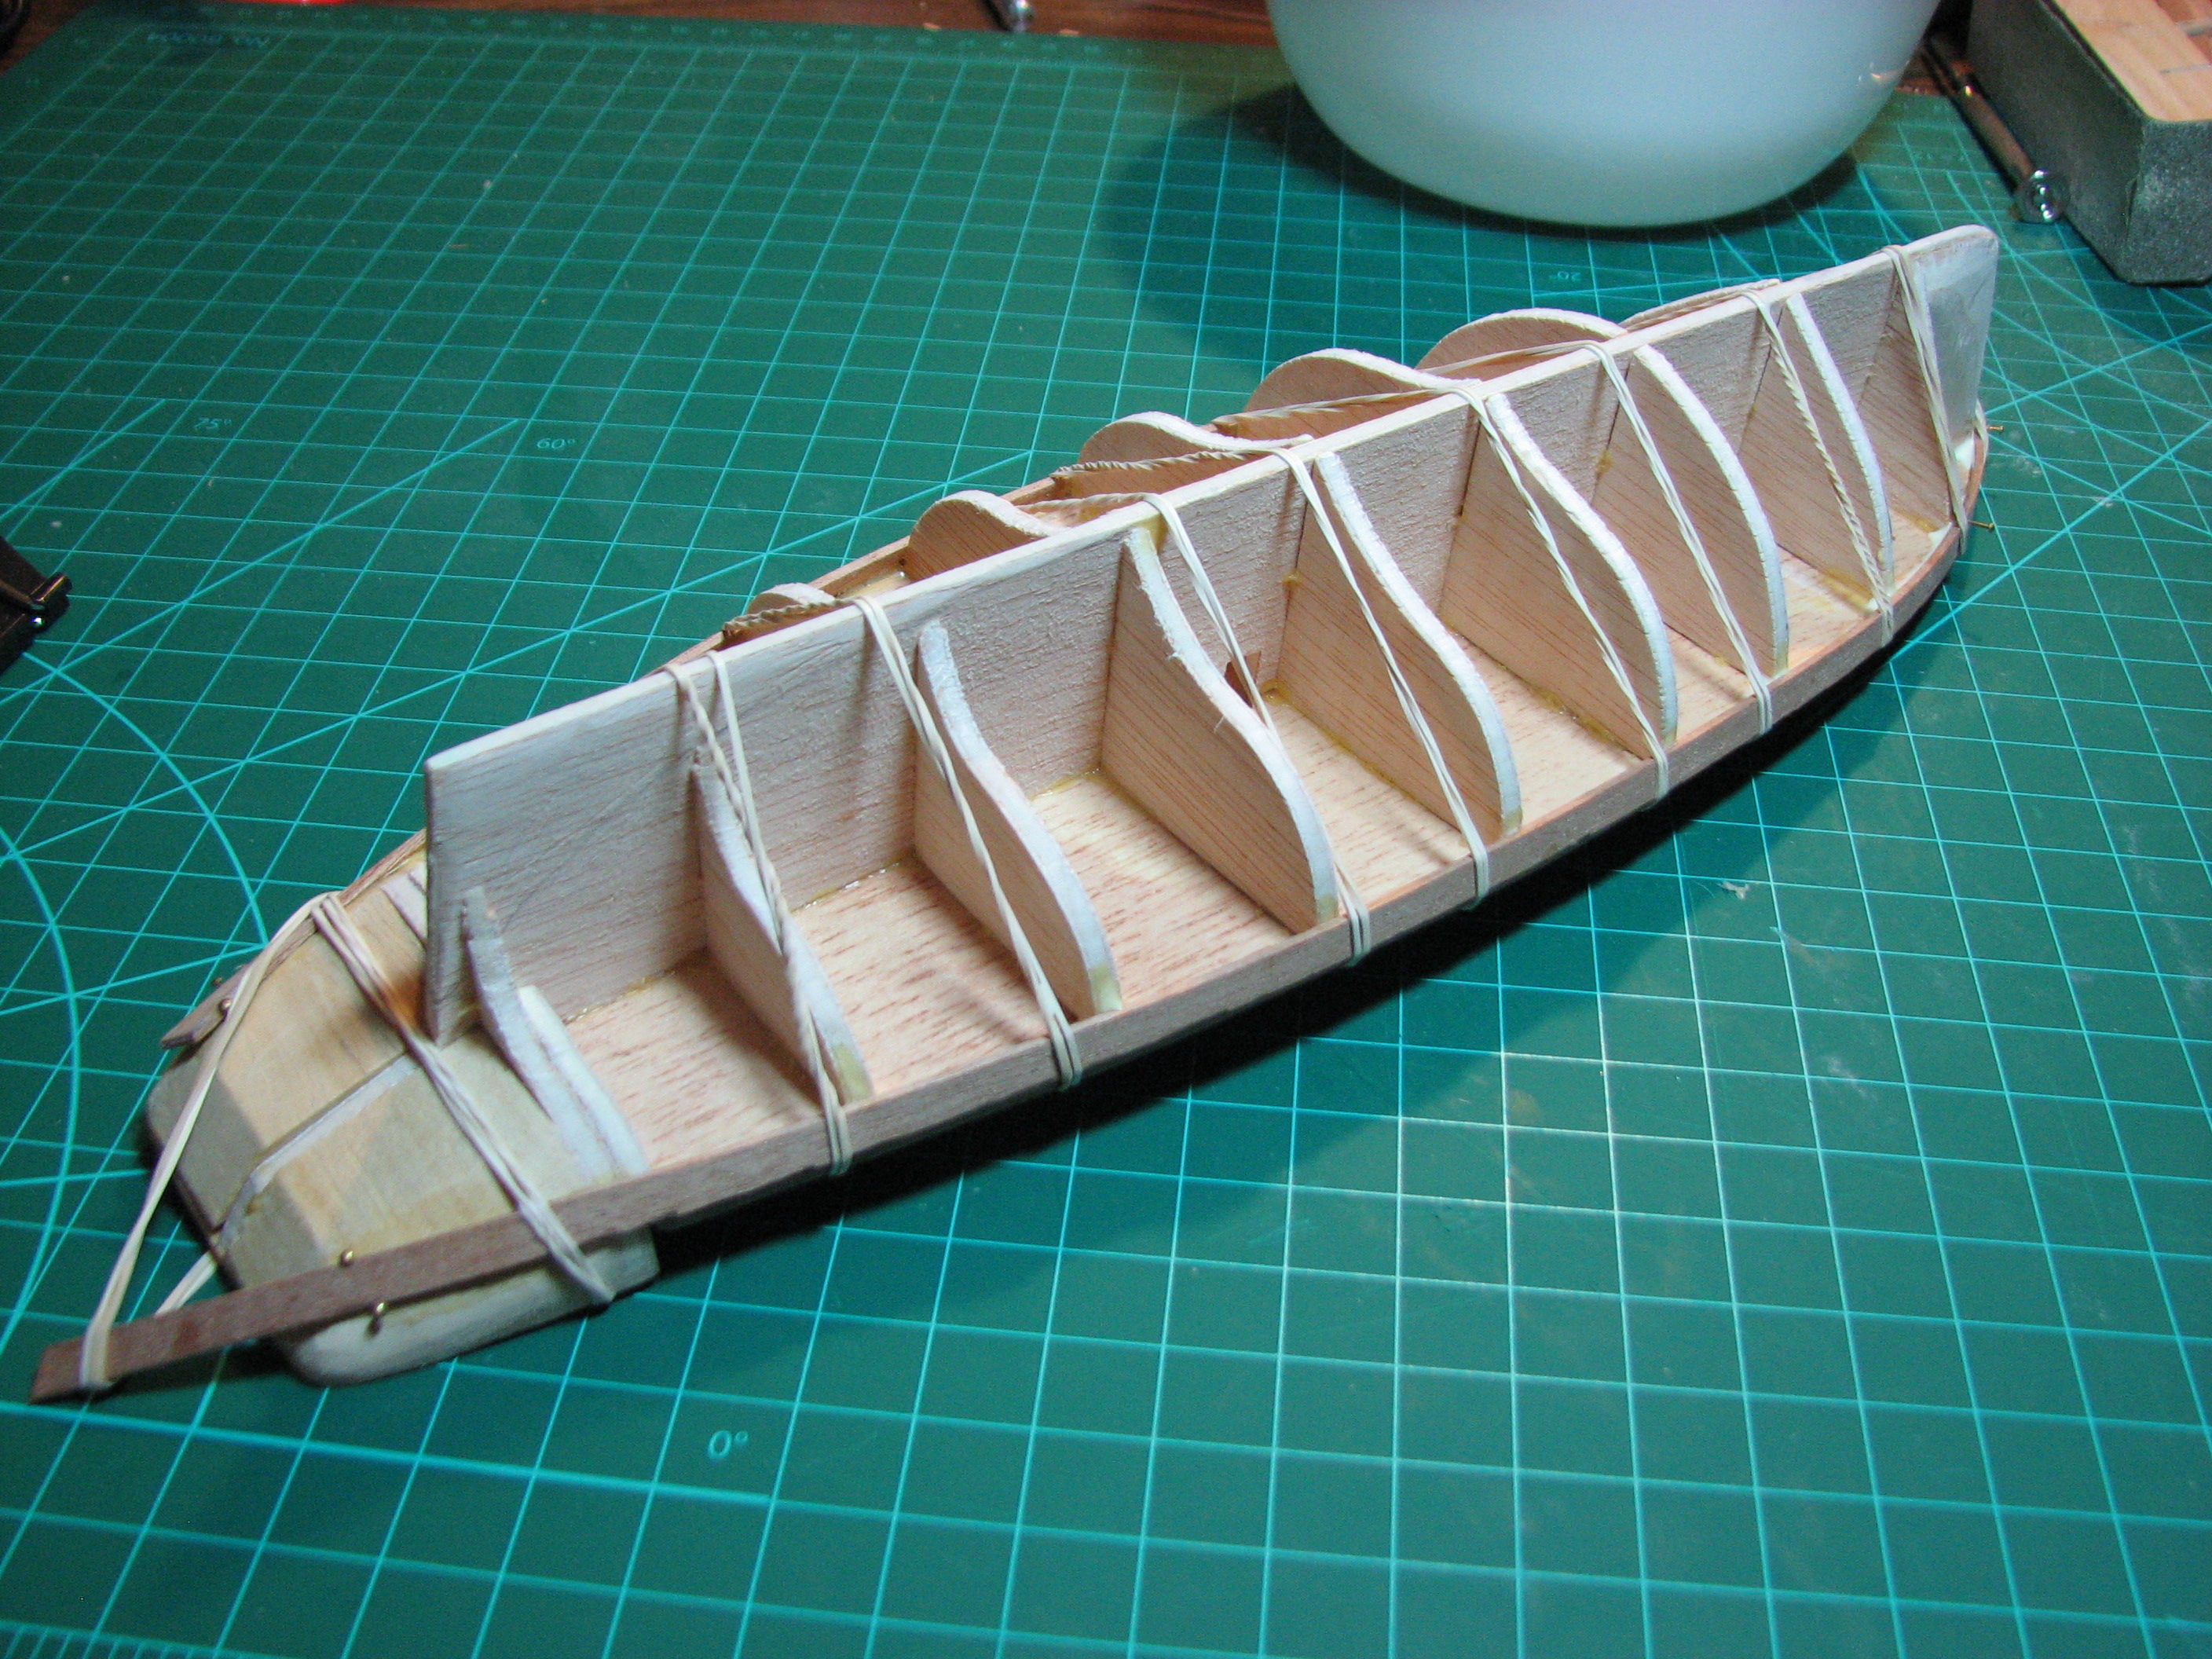 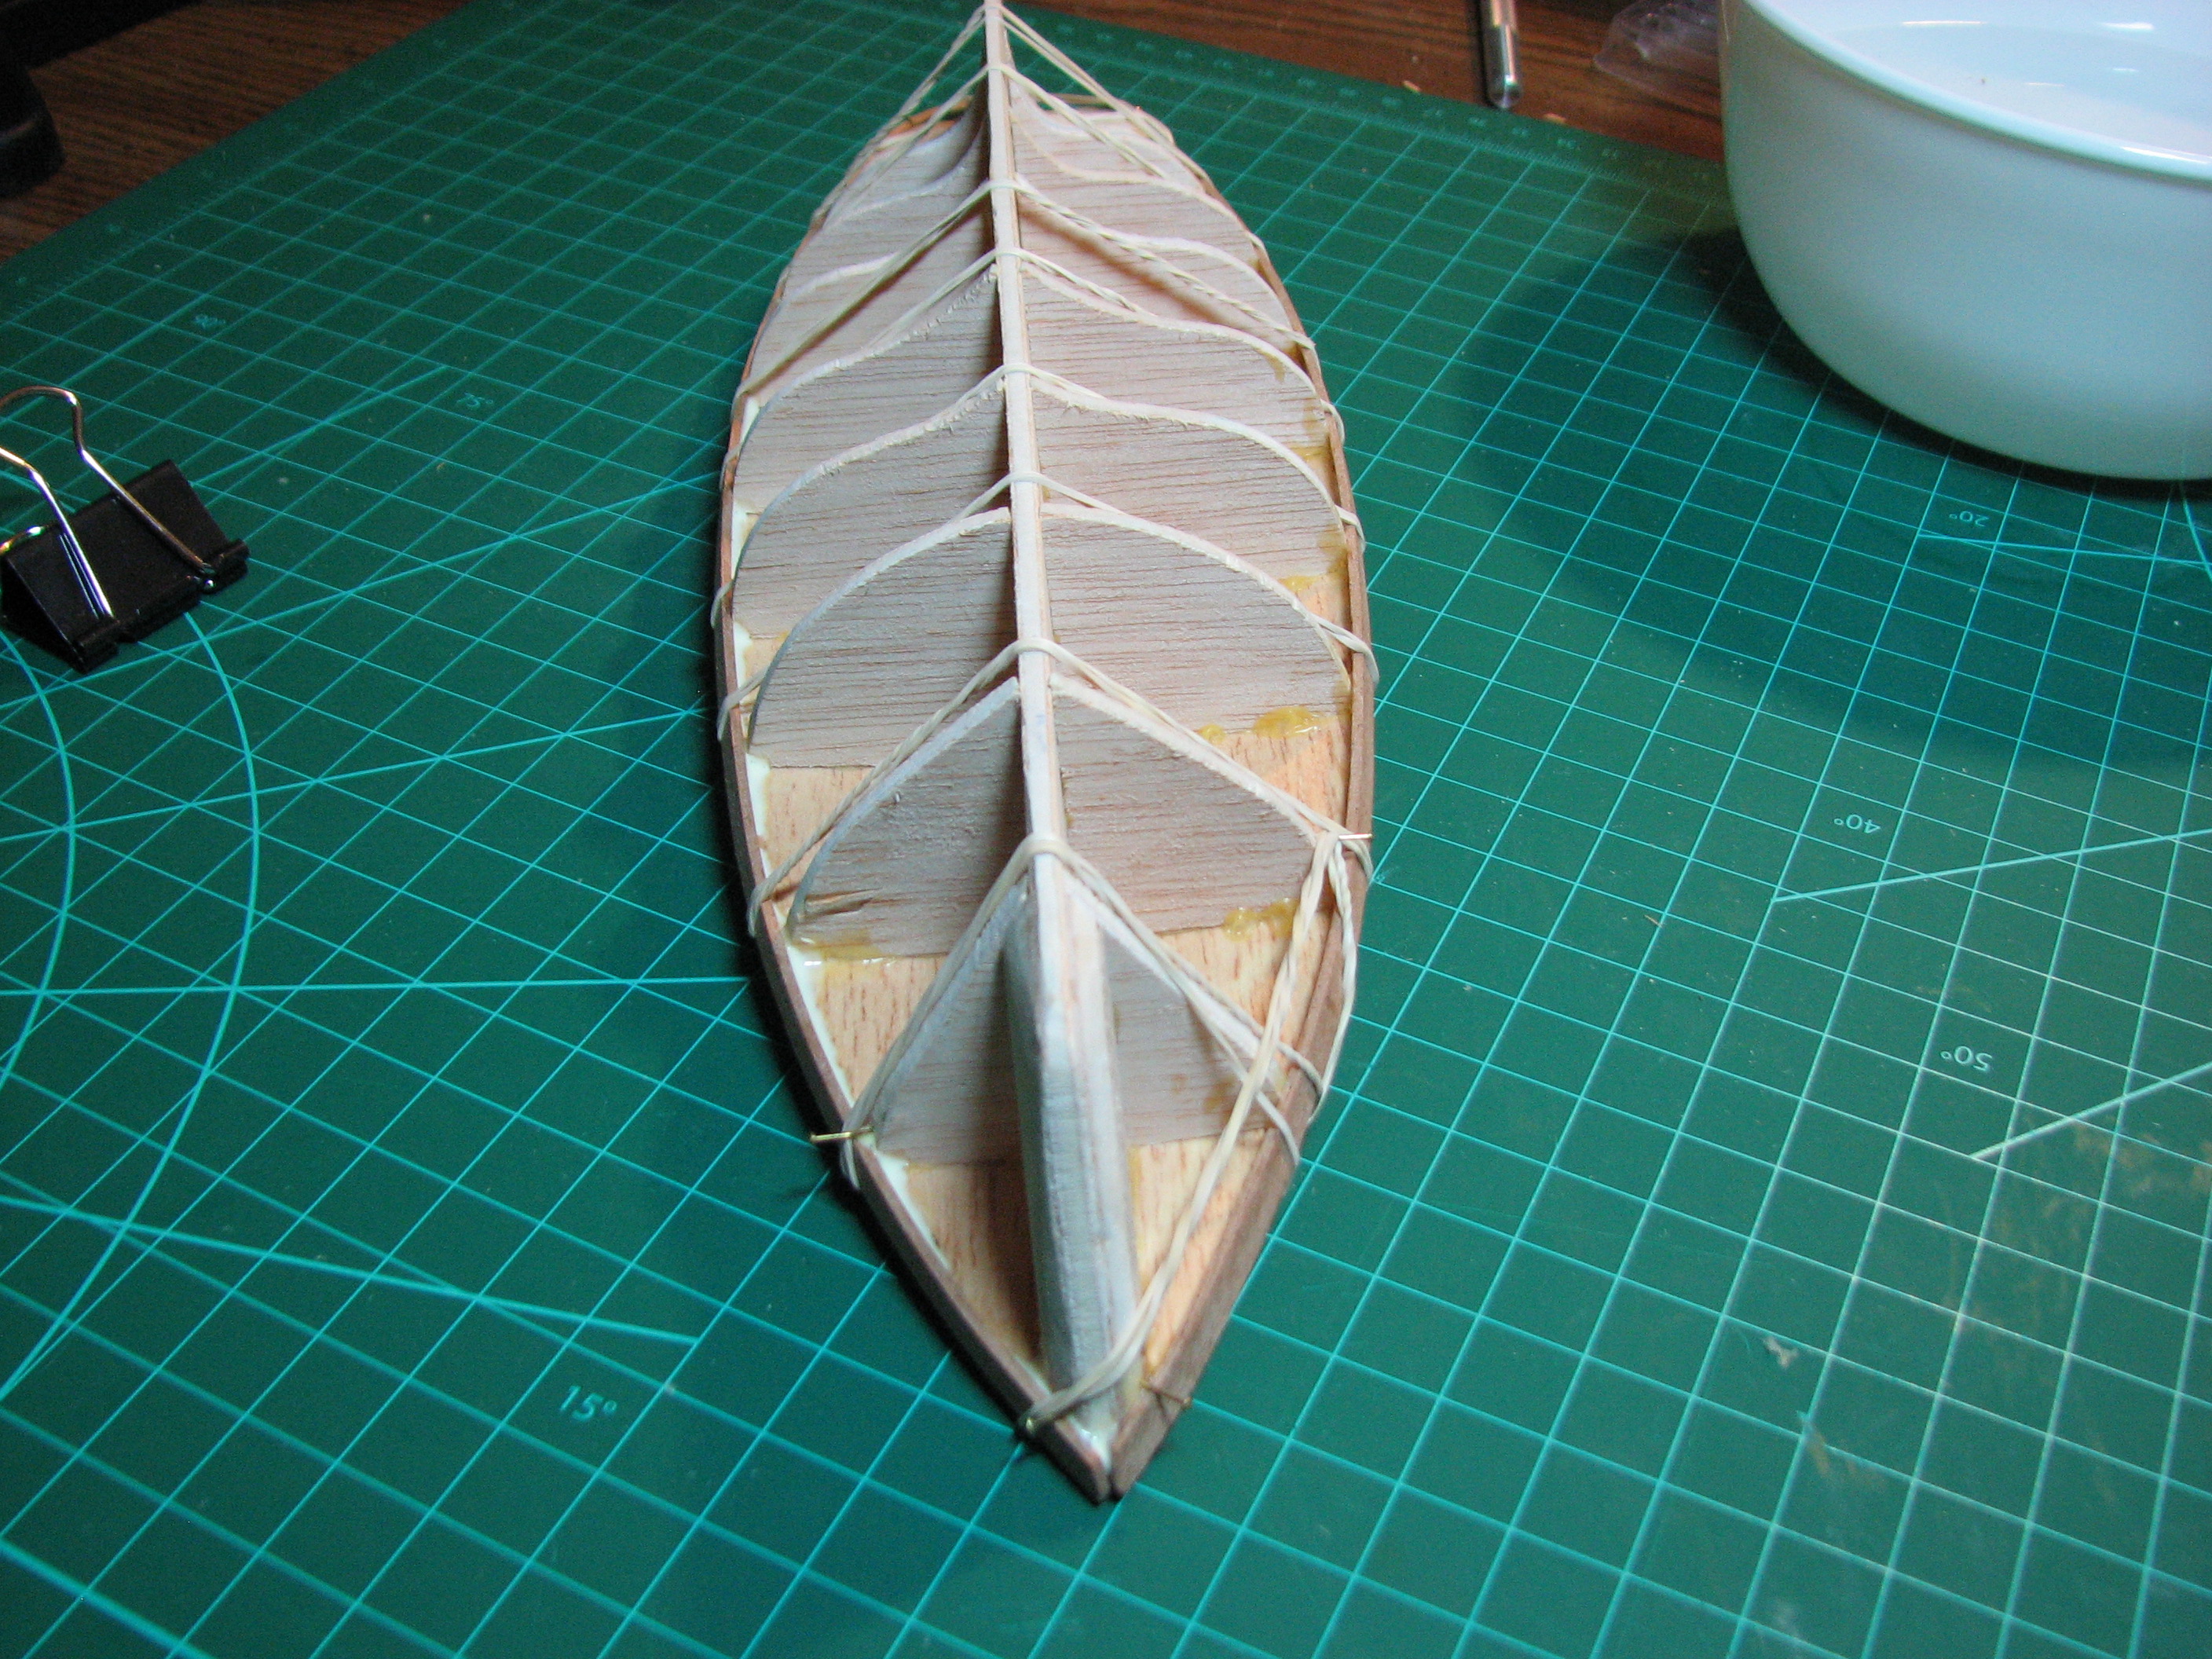 The planking will continue this way for quite a while. On a normal work-day I doubt I'll get more than a single plank on per night. Maybe two if I end up nailing instead of rubber banding. Since I've got meetings 2 nights this week, the pace will obviously be slow. It looks like there are 13 planks per side to complete, but that doesn't take into account all the trimming and inserts I'll need as the hull shape causes strange things to happen at the stern as I move down the hull. So 2 weeks? Maybe more, to do the hull planking.
|
|
#
?
Aug 18, 2014 02:43
|
|
|
Model Expo has some nifty clamps for planking. If you're handy you might be able to replicate the general action: http://www.modelexpo-online.com/product.asp?ITEMNO=MX104 I've done a bit of planking. One of them was a Billings kit for the Oseberg (Viking longboat). The planks were all scroll-saw cutouts so they actually were pre-curved in one dimension so you'd twist them into place. It worked OK but was very delicate and the grain just looks weird at the ends because it gets short instead of running the length of the plank. My dad built a big-assed wooden tugboat, plank-on-bulkhead. He used CA as the hull finish. It polished up very nicely and is obscenely hard and durable.
|
|
#
?
Aug 18, 2014 16:43
|
|
|
Dielectric posted:Model Expo has some nifty clamps for planking. If you're handy you might be able to replicate the general action: Those clamps are neat. I have an idea on how to make my cheapo Office Depot clamps work like this with some superglue and sticks. Edit: Ghetto clamps are bloody awesome. Took a wooden tongue depressor type stick (hobby sticks, whatever they are actually called), chopped it up into pieces, applied super glue and stuck them into binder clips. Bam.. plank clamps! Thank you so much for the link to give me the concept. 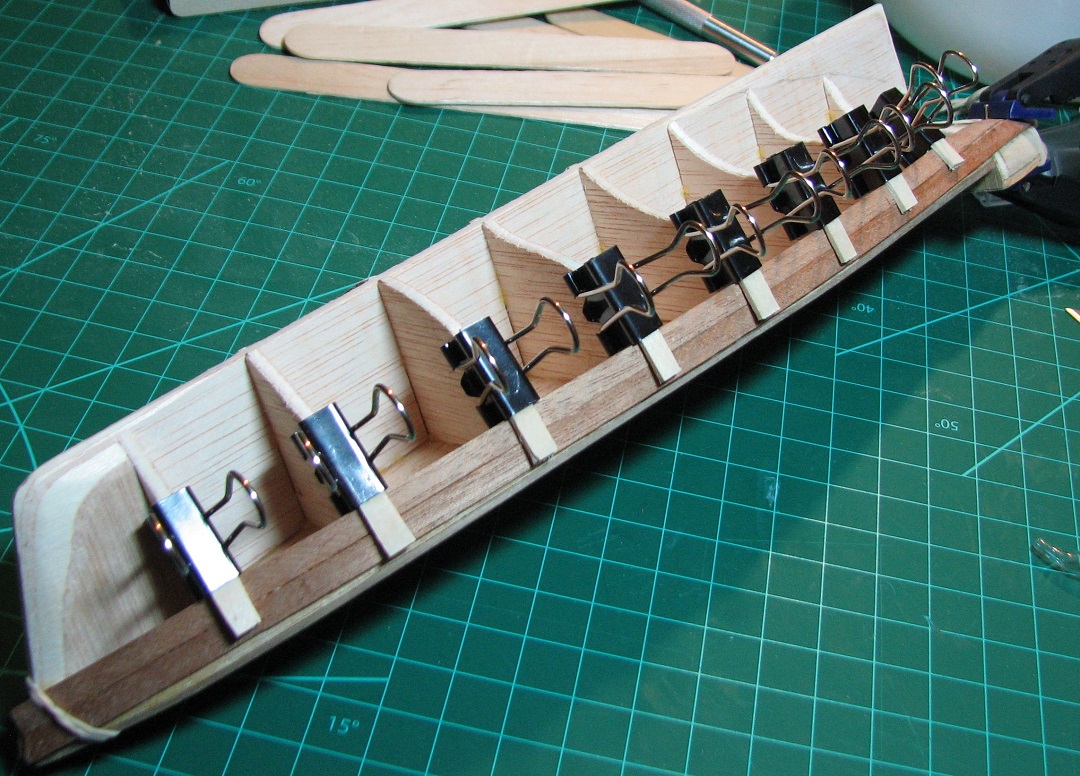 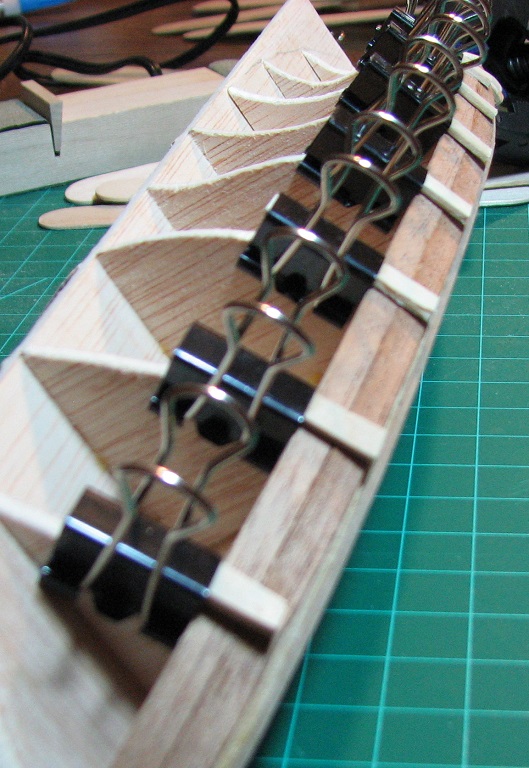 Also, what is the "CA" hull finish you mention? The Locator fucked around with this message at 04:48 on Aug 19, 2014 |
|
#
?
Aug 19, 2014 03:14
|
|
|
The Locator posted:Also, what is the "CA" hull finish you mention? I think he means he finished it in Cyanoacrylate, aka superglue? An odd choice, but I guess it would make the hull hard as a rock.
|
|
#
?
Aug 19, 2014 06:54
|
|

|
Bloody Hedgehog posted:I think he means he finished it in Cyanoacrylate, aka superglue? An odd choice, but I guess it would make the hull hard as a rock. Yes, cyanoacrylate. Many bottles of Zap-a-Gap (green label IIRC). He bought the big 4oz bottles, I don't even know how many he used up. It polished up really well with pumice powder in a slurry. Neat clip adaptations, glad it worked out for you.
|
|
#
?
Aug 19, 2014 17:48
|
|
|
I wish I had the patience to build model ships, they're so impressive. Looks to be coming along great and its cool to see how its done. I've been working a lot of OT lately so haven't really had time/energy for modeling. I did use some of my skrilla to stock up though, I think I will finally start tackling the subjects that I've really wanted to do, I've always been interested in the third world conflicts of the cold war. I found a source for national flags for various scales (they're on white so I'll have to be really careful using them, the seller is an ebayer that makes their own, I was very pleased with the print quality and colors though), now I will just have to figure out how to handle the unit/military insignias. I did order some archer transfers with lebanese civil war graffiti so that may help out (I really want to do up some oddball technicals, I found a great source of reference photos from the 70s/80s of every sort of truck and APC mounted with all sorts of crazy weapons combos... like an S-10 chevy with a zpu-4 and a m113 with a ZU-23), but it seems like finding decals of actual insignias for non-major powers is very hit or miss and comes down to something like whether some obscure AN-2 kit happened to cover a similar livery that can be scavenged.   I'm not sure where to begin. I'm thinking I might build up the SU-22 in a libyan scheme (easy flag and roundel to paint at 1/144 ha). But maybe something Cuban? I do know that M113 is probably going to end up burnt up with some "modern urban resisters (terrorists)" (which are really nice sculpts at 1/72) celebrating their victory on it. I keep hoping I can find a cheap 1/72 M1114/M1151 (I saw dragon had a 2-pack that went for 10 bucks but it got discontinued and now there's nothing but what appears to be home-cast resin kits) to do up an ISIS diorama but somebody with more skill has probably already done one. John Denver Hoxha fucked around with this message at 04:09 on Aug 20, 2014 |
|
#
?
Aug 20, 2014 04:07
|
|

|
That M113 kit has a decently detailed engine compartment and internals, so you can probably do something cool with the RPG dude you got in the "Urban Resistors" box. The Zvezda stuff is pushing the bar up for 20mm plastics too. Good choices for the scale.
|
|
#
?
Aug 20, 2014 05:20
|
|

|
I've not built a model plane since I was about 13 years old. Lets do this. Also does anyone know the best way to mask off and paint aircraft canopies?
|
|
#
?
Aug 20, 2014 18:08
|
|


|
Ludicro posted:I've not built a model plane since I was about 13 years old. Tamiya tape (or any low adhesive painter's masking tape) and a sharp scalpel work well for me.
|
|
#
?
Aug 20, 2014 20:26
|
|
|
I just let the paint dry a bit and do it freehand. Because I am crazy.
|
|
#
?
Aug 20, 2014 21:47
|
|
|
Dielectric posted:Yes, cyanoacrylate. Many bottles of Zap-a-Gap (green label IIRC). He bought the big 4oz bottles, I don't even know how many he used up. It polished up really well with pumice powder in a slurry. FYI zap-a-gap is expensive as hell, at least where I got it. Loc-tite makes a quick set formula that is way cheaper than zap-a-gap at walmart at least.
|
|
#
?
Aug 20, 2014 21:55
|
|


|
Alternatively just use water.
|
|
#
?
Aug 20, 2014 22:03
|
|
|
Super jealous of that Fw-190, love those planes. I keep thinking it'd be fun to put together a P-38 Lightning kit, as they're seriously my favorite plane of all time alongside the P-61 Black Widow and A-10, but you guys have seen my painting skills, I'd never be able to do one justice 
|
|
#
?
Aug 21, 2014 01:08
|
|
|
T1g4h posted:Super jealous of that Fw-190, love those planes. I keep thinking it'd be fun to put together a P-38 Lightning kit, as they're seriously my favorite plane of all time alongside the P-61 Black Widow and A-10, but you guys have seen my painting skills, I'd never be able to do one justice TBH isn't the P-61 dark navy blue? That sounds fairly doable.
|
|
#
?
Aug 21, 2014 01:26
|
|


|
Nebakenezzer posted:TBH isn't the P-61 dark navy blue? That sounds fairly doable. Hmm... Point, it'd be hard for me to really screw up a P-61. I may give one a try later this year then. I managed to make the Huey look decent enough using nothing but dry brushing with cheap brushes and enamel paint, I suppose I could handle a Black Widow.
|
|
#
?
Aug 21, 2014 01:53
|
|
|
T1g4h posted:Super jealous of that Fw-190, love those planes. I keep thinking it'd be fun to put together a P-38 Lightning kit, as they're seriously my favorite plane of all time alongside the P-61 Black Widow and A-10, but you guys have seen my painting skills, I'd never be able to do one justice You can make smaller airplane models (I did mostly 1/72 scale stuff) look really good at anything other than up-close inspection distance with free-hand air-brushing. If the model itself is clean, it's really hard to screw up a basic airbrush job, even if you want to do a camo pattern. Hang the model from the tail-wheel (I used bent paper-clips) and spray the top with the top color or camo pattern, then change to your under-color and paint the bottom. Even if it's not perfect, it looks great to the average person. Downside - you need an airbrush, so there is a monetary barrier to this.
|
|
#
?
Aug 21, 2014 02:40
|
|
|
Yeah, that's my biggest issue. I'd love to get an airbrush setup one day and do proper painting like you guys do, it's just not super high priority right now. It's why my Skyline is still hand painted with drybrush, my real car needs the money more than my model one
|
|
#
?
Aug 21, 2014 02:47
|
|
|
Pro-tip for camo patterns on planes: build plane, paint in one colour, take pencil, sit plane beside instructions sheet, copy camo pattern in pencil, paint. Worst comes to worst you just have to tidy up with an eraser.
|
|
#
?
Aug 21, 2014 02:55
|
|
|
Arquinsiel posted:Pro-tip for camo patterns on planes: build plane, paint in one colour, take pencil, sit plane beside instructions sheet, copy camo pattern in pencil, paint. Worst comes to worst you just have to tidy up with an eraser. I've actually seen people (in magazines) double down on this strategy - they scan the instructions, then blow them up to make them the same size as the subject. Then, they cut out the camo bits and use them as a mask. I'm not sure if that's just being fancy for no reason.
|
|
#
?
Aug 21, 2014 04:47
|
|
|
Nebakenezzer posted:I've actually seen people (in magazines) double down on this strategy - they scan the instructions, then blow them up to make them the same size as the subject. Then, they cut out the camo bits and use them as a mask. I'm not sure if that's just being fancy for no reason. That works but good grief. Unless you're trying to duplicate an object that actually existed at a certain point in time (like "here's an exact duplicate of the tank in this picture"), you can take some license with the exact size and shape of the stripes and blobs.
|
|
#
?
Aug 21, 2014 05:14
|
|


|
Midjack posted:That works but good grief. Unless you're trying to duplicate an object that actually existed at a certain point in time (like "here's an exact duplicate of the tank in this picture"), you can take some license with the exact size and shape of the stripes and blobs.
|
|
#
?
Aug 21, 2014 05:38
|
|
|
Nebakenezzer posted:I've actually seen people (in magazines) double down on this strategy - they scan the instructions, then blow them up to make them the same size as the subject. Then, they cut out the camo bits and use them as a mask. I'm not sure if that's just being fancy for no reason. Most of the camo patterns that I painted were WWII era aircraft, and they were 'soft' camo, in that the edges were all fuzzy and blended into the next color. Masking would make the pattern look wrong. Like this: 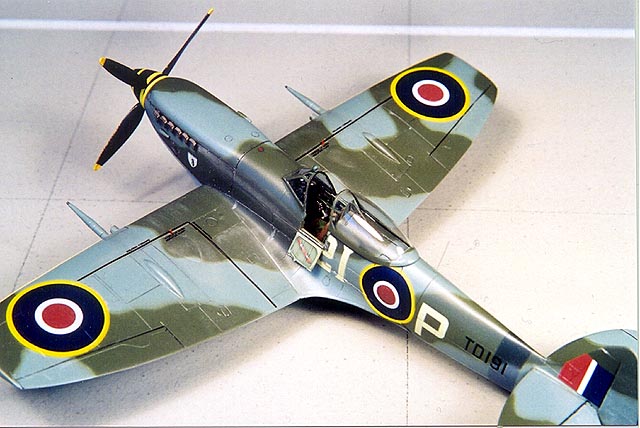 A decent airbrush can easily make the edges feathered even less than this, although I tended to go with a 'softer' edge myself. Sadly I no longer have any of the aircraft, or any pictures of them because I've never been a 'picture taker' type for whatever reason. The only masking I did was areas that weren't supposed to get the paint. Edit: Changed link to my own hosting. The Locator fucked around with this message at 05:59 on Aug 21, 2014 |
|
#
?
Aug 21, 2014 05:56
|
|
|
Arquinsiel posted:TBH it actually makes it a lot easier to just copy an existing pattern. I am really really bad at making camo not look poo poo by myself. Oh yeah yeah yeah it does - the pencil mimicry is a really good way to do it! Blowing up pictures and cutting them out as masks is what I'm saying is Too Much.
|
|
#
?
Aug 21, 2014 06:23
|
|
|
I just do it freehand. For every camo pattern lovingly applied with an airbrush there was one hurriedly scribbled with a paintbrush in the field by a peasant conscript with as much artistic talent as his pigs. It's historically accurate!
|
|
#
?
Aug 21, 2014 14:44
|
|

|
The Locator posted:Most of the camo patterns that I painted were WWII era aircraft, and they were 'soft' camo, in that the edges were all fuzzy and blended into the next color. Masking would make the pattern look wrong. You can use Silly Putty to raise the mask a little bit so you will get soft edges.
|
|
#
?
Aug 21, 2014 20:44
|
|


|
I'm still poo poo at painting brick but I'm happy with these earthquake braces.  
|
|
#
?
Aug 23, 2014 02:22
|
|


|
Baronjutter posted:I'm still poo poo at painting brick but I'm happy with these earthquake braces. I think if you weathered the top portion of the building a little more to match the bottom especially the center column itd look great (might just be a trick of lighting). Also maybe work in a tiny bit more of darker pigments on the crust to build on the feel of pollution/grime build up. I like the overall sort of chipping weathered brick look though, and the braces look great.
|
|
#
?
Aug 23, 2014 03:00
|
|
|
Yea, the bricks look good, but if they don't meet your standards maybe a little weathering would do. Maybe some dark pigment/paint, lightly sponged on. Seriousuly, I've sponges for this sort of work. Great for subtle skin patterns as well.
|
|
#
?
Aug 23, 2014 03:40
|
|
|
I guess the problem is that the two sections have totally different brick textures and were painted with different paint and just my colour blind eyes trying to get close. The idea though is that the bottom was maybe built in the late 1800's and the top part 10-20 years later, then upgraded in the 80's or 90's. I've got another addition planned for the top and the side. Going for a whole stacked jumble of eras and going to cover it with all sorts of industrial junk. PS If any of you guys need any laser cut parts for projects let me know and if it's simple I can try!
|
|
#
?
Aug 23, 2014 04:24
|
|
|
Van Dis posted:Any recommendations for good Star Wars models? At the. Moment fine molds are the best. Bandai has picked up the rights to do new kits but they're not out yet
|
|
#
?
Aug 23, 2014 07:03
|
|


|
So I decided that the boat project probably can't live on the kitchen table for the months it will likely take to complete, so I got a new work-bench. Took a day off of boat building and put it together and moved all the crap over to it. 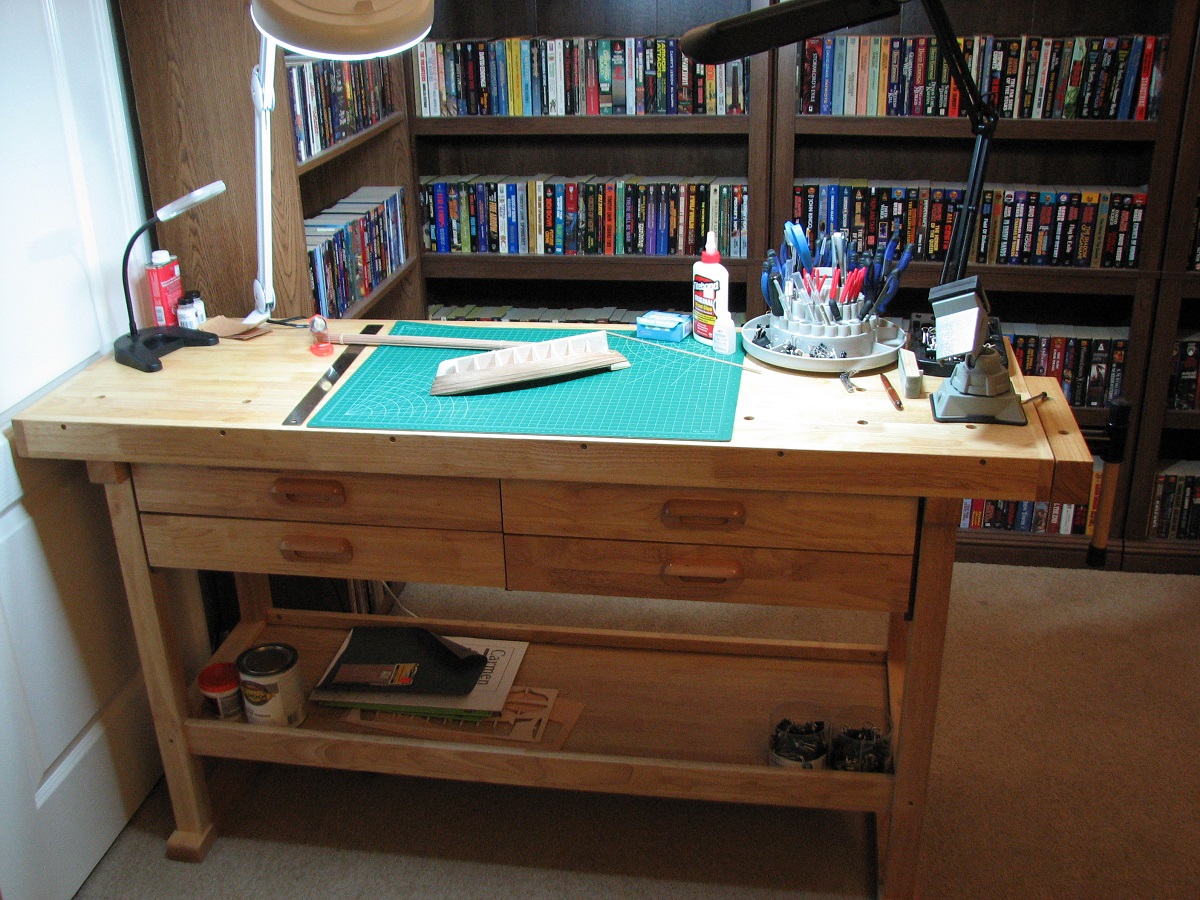 Living in the library/office for now, eventually I need to clean out the room my reloading bench lives in, and turn that room into a hobby room. Bonus is it would allow me to actually start reloading again, since right now the room is just a storage room and is too full of crap to use the reloading bench. Back to small scale wood working tomorrow. The Locator fucked around with this message at 09:53 on Aug 23, 2014 |
|
#
?
Aug 23, 2014 09:51
|
|
|
Got the next sections drawn up for the laser, hope they actually fit together. Here's a rough elevation of what it will more or less look like when done.
|
|
#
?
Aug 23, 2014 19:44
|
|
|
That's pretty rad looking! What's the tower bit on the right? It looks cool. EDIT: This was posted in the Awesome AI car poo poo thread, and it's more r/c than scale modelling, but I thought you guys could appreciate the work involved in this: https://www.facebook.com/photo.php?v=826386624054067 T1g4h fucked around with this message at 22:07 on Aug 23, 2014 |
|
#
?
Aug 23, 2014 21:54
|
|
|
T1g4h posted:That's pretty rad looking! What's the tower bit on the right? It looks cool. Scratch building is amazing to me. As someone who can't draw a straight line to save his life, watching that guy do the free-hand scribing of the seats was pretty much like watching voodoo or pure loving magic. The entire process of creating that thing with nothing but a photograph for plans.. just astounding to me. Thanks for linking it.
|
|
#
?
Aug 24, 2014 04:53
|
|
|
T1g4h posted:That's pretty rad looking! What's the tower bit on the right? It looks cool. Something like a really big cooling tower. 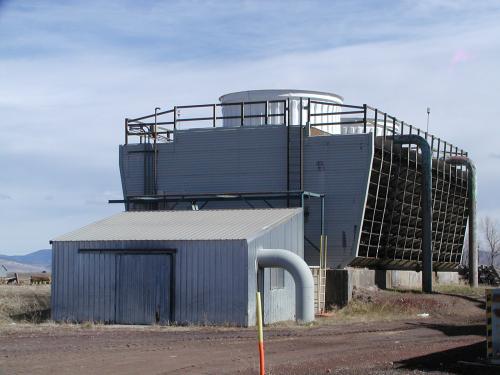 It will have the overhang slant on it too.
|
|
#
?
Aug 24, 2014 05:34
|
|
|

|
| # ? May 28, 2024 07:33 |
|
|
Last stealer (plank cut to a wedge to fill a gap at the stern) set and drying on this side of the hull. Bottom half of the other side still to go. I screwed up how the planks were laid, so ended up having to do a lot of little filler planks in the middle, when that should have been happening at the ends, so it's a little rough, but I think most of it will fill and sand well and look ok when it's done. 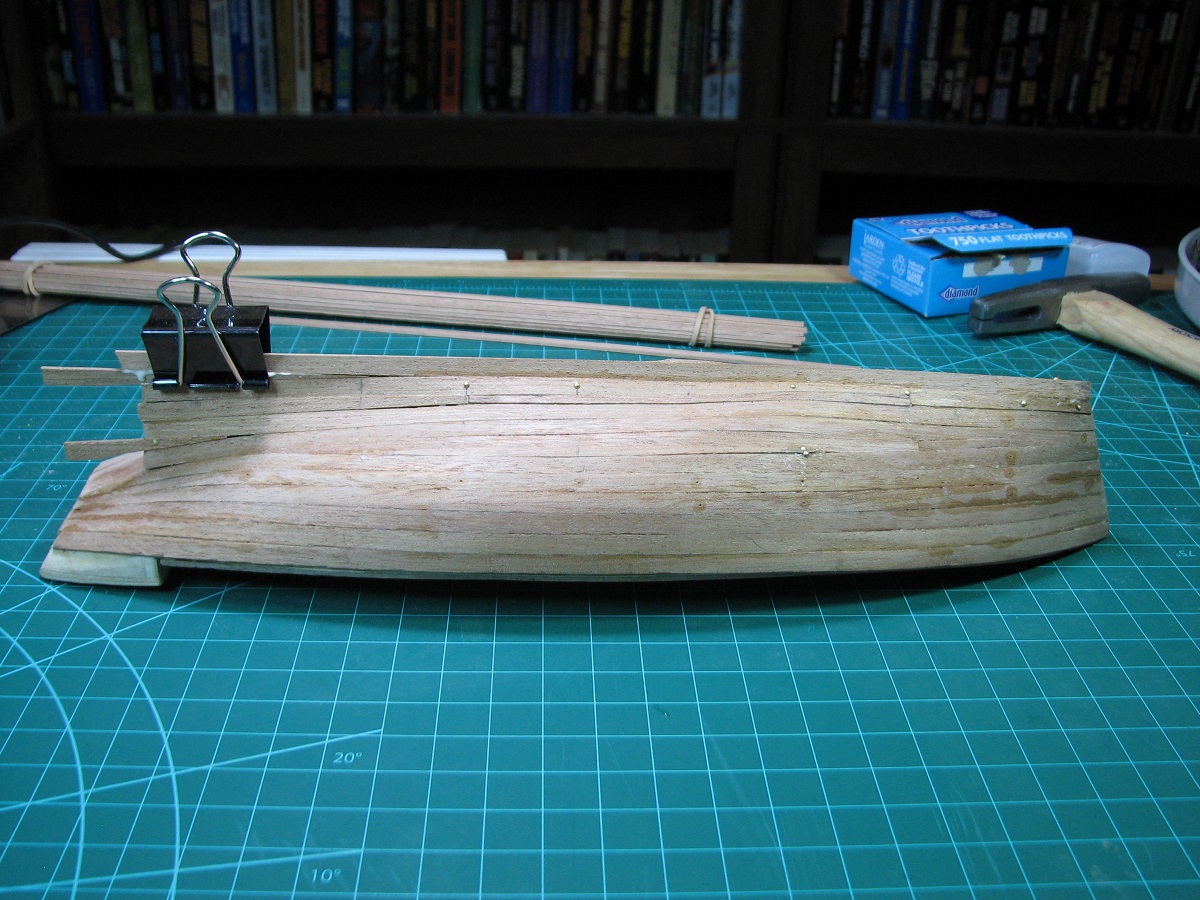
|
|
#
?
Aug 25, 2014 05:31
|
|