


|
Bad Munki posted:As in the original picture, compressing a 2x4 is pretty hard and the fasteners are just there to hold it in place, whereas stretching it (if it were angled the other way) would put all the strain on the fasteners, which are more likely to fail/tear out/etc. and then your gate goes all droopy. Yep. Lumber -as a substance- has rather decent tensile properties, but it is the connecting it in the real world that hose you. Unless you have some crazy big member sizes and crazy bolt diagrams, you'll always just get block shear failure at the connection. Wood just can't handle shear parallel to the grain. drat you, lumber non-isotropy! 
|
 #
?
May 15, 2015 17:30
#
?
May 15, 2015 17:30
|
|


|

|
| # ? May 28, 2024 03:28 |
|
|
Awesome, thanks for the info! It's one of those things that made pretty good sense in my mind, but obviously had trouble putting the right words to.
|
|
#
?
May 15, 2015 17:38
|
|

|
Ooh, nifty! My under rail deck lighting survived the winter, and actually works the way I wanted. I had previously only had these on for about 30 seconds, in the rain, in early November.  
|
|
#
?
May 16, 2015 13:59
|
|

|
Raised by Hamsters posted:Ooh, nifty! My under rail deck lighting survived the winter, and actually works the way I wanted. I had previously only had these on for about 30 seconds, in the rain, in early November. What are the light sources? It is nice and subdued, I like it.
|
|
#
?
May 16, 2015 15:33
|
|


|
Looks like standard indoor/outdoor rope lighting. Always a good choice for low, spread out light that won't totally kill your night vision.
|
|
#
?
May 16, 2015 16:21
|
|

|
These things: http://www.amazon.com/gp/product/B006079BCK/ref=oh_aui_detailpage_o01_s00?ie=UTF8&psc=1 They do have random dead bulbs, which you can see in someone's stair photo on the amazon page. But, being recessed like they are on my deck, it's totally unnoticeable. Thought I had some photos of putting these things in but I can't find them now. Basically your balusters have to end about 1 - 1.5" below the bottom inside of the top of your railing. 1/2" hole drilled through the top of the 4x4 rail posts was a complete pain in the rear end, but if I hadn't been an idiot I would have done that before putting the top of the railing on. Then the lights stick to the underside of the rail. I used some wire staples too, to hold it up, but so far the glue has held through winter. Actually as I think about this now, were I clever I would have not only cut the hole in the top of the 4x4s before putting the cap on, but I would have just routed a 1/2"x1/2" notch through them, instead of drilling anything. Oh well. Probably the most annoying part is that all of the 2x4s that make up the inside rim of the top of the railing have been ripped into a wedge shape, like so (click for big):  The wedge is what lets the light cast onto the deck for the ~2' path around the rim. Keeping the position of the light strip consistent is really important, otherwise you will end up with irregular lighting. Brown silicone was used on both the inner and outer railing rim boards to make sure you can't see lights between gaps in the boards. The power lines run up into the railing through balusters that I ripped in half, hollowed out with my router, and then glued back together. Basically what I'm saying is that it was kind of a giant pain in the rear end, but the subdued, hidden effect is exactly what I was going for.
|
|
#
?
May 16, 2015 16:38
|
|
|
Raised by Hamsters posted:
Holy poo poo, that's a pro job right there. Nice detail work.
|
|
#
?
May 16, 2015 17:08
|
|
|
Panthrax posted:So hey, while we're talking about fences... Anyone mind if I ask how to start a project? These gates are a disaster. There's 6 or 7 holes all over the place whre someone kept trying to fix it, and obviously failing miserably. I assume those push/screw in things are awful, and totally not the right thing to use for what seems like decently heavy gates. I want to replace the hinge with the kind that's on captainblastum's gate, on the face so it doesn't pull out, but should I screw that into the steel? Or can I jump over the steel and just screw into the wood past the metal? Should I (can I?) just replace the gate? There are a couple of different hinge options and orientations that you can use - the hinges that I used will technically swing in both directions, but the way that I've used them the lumber prevents them from swinging out (which is fine in my case, I want the gates to open into my yard and not out into the alley). The hinges on your gate are in bad shape, but you could use that style again (with a properly built gate) to allow it to swing in both directions (Old timey example and Roy plug: http://video.pbs.org/video/1772044886/). If it were me, I would decide how the gate needs to open, select the hardware, and then built a new gate to fit, and reposition the hinges to avoid the old beat up locations on the posts. I also made the gates very tight so that if one wants to sag the other holds it up. It works in my head so I'm going with it. It's about as humid as possible right now around here, so if there's any movement it should be shrinkage...
|
|
#
?
May 17, 2015 04:15
|
|


|
Part way through a dresser, one day I'll finish it. Almost to just drawers -
|
|
#
?
May 17, 2015 04:19
|
|


|
I restored an early 20th-century electric lamp today. Got it yesterday at a flea market for $2. A little polish, a new globe, and a new cloth cord and it's back and shining. It's a really neat design, based off an old gas light. It even has a reflector and a hole to hang it on a wall.
|
|
#
?
May 19, 2015 03:13
|
|


|
I recently finished a special guitar for myself that I'm fairly proud of. I had never tried EMG Pickups, so I figured I might as well throw together a guitar with a set of them. It looks good on the wall with the rest of them.  Album: http://imgur.com/a/0YOYD/all
|
|
#
?
May 22, 2015 08:53
|
|

|
Got my fireplace patio done* *Certain definitions of "done" do not include installing wall caps, landscape lighting, final grading, grass seeding, repairing the garden behind the wall, or designing and building the actual fireplace. But in any case the absolute pain in the rear end portion is done. After the pavers were installed, the plate compactor was able to smooth them out more than I thought would be possible. Really happy with how this turned out. Most importantly, this project saw a good tool haul, including an angle grinder and two of my favorite hammers: the deadblow, and a 3 pound drilling hammer.
|
|
#
?
May 22, 2015 21:23
|
|
|
A small project I am doing right now is trying to restore this old induction motor, ran into a snag today when going over it with an angle grinder: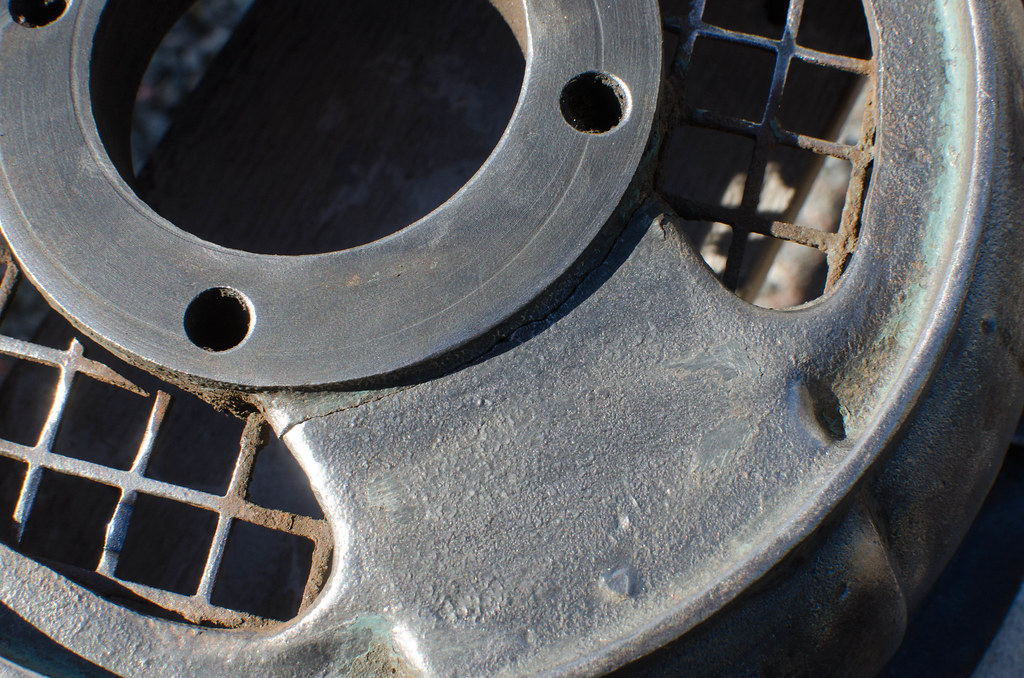 Gonna need to find someone who can weld cast iron now. I made an album where I'll put all the stuff regarding this restoration, it's not finished yet; https://www.flickr.com/photos/82846378@N07/sets/72157652922372128
|
|
#
?
May 23, 2015 21:27
|
|

|
Rather than quote all of the recent posts -- that's genuinely cool stuff by everyone. I am currently raging at ground loop bullshit making me buy an isolator for my custom bluetooth speaker thing. Why do I insist on making the kind of poo poo where I complicate my life with both wood and electronics? Pics to follow later this next week. Unless in a fit of rage I turn the whole thing into firewood.
|
|
#
?
May 24, 2015 06:49
|
|


|
holttho posted:That's it. The weight of the far end of the gate is vertically downward, and can't be handled by the horizontals, so it has to go into some supporting member. Either the brace goes like the lumber example and is in compression, or goes like the cable example and is in tension. Many cases the one you choose is just a matter of preference/cost/aesthetics, but there are also many situations where one is definitely better than the other. It's me, I'm the guy with a wimpy 2x4 for tension on my gate:  Rental, so I didn't do that. I could complain to the landlord, but it was like that when we moved in, and I'm kind of taking the approach of "I'll take care of the small stuff, you can trust me" to earn some goodwill with the landlord etc etc... It was bad enough that when a friend came over to catsit while I was on vacation, I got this frantic text about the back late being locked. No, not locked, you just had to manhandle it to actually get it open. Anyway, $15 and some thinking, I got it fixed up:  Little snag, placement of the hinges prevented me from using the bracket on the upper right corner. The bolts attaching the hinge to the gate are pretty thick, so I just loosened them and wrapped the cable on that end around them.
|
|
#
?
May 24, 2015 07:55
|
|

|
Protip for fixing one of those, chop through the tension 2x4, jack the gate up level, attach a new compression 2x4 going the right way.
|
|
#
?
May 24, 2015 09:34
|
|


|
His Divine Shadow posted:Gonna need to find someone who can weld cast iron now. Cast iron is an absolute bitch to weld, and requires special technique (pre heating and very precise temperature management). Whoever you find, get them to show you some work they've done before. If they haven't, bring two pieces of scrap cast iron and see if they can make them stick together. Sometimes nickel stainless rod sticks better than cast iron rod. Ymmv; gl hf dd! Cakefool posted:Protip for fixing one of those, chop through the tension 2x4, jack the gate up level, attach a new compression 2x4 going the right way. this
|
|
#
?
May 24, 2015 17:31
|
|

|
froward posted:Cast iron is an absolute bitch to weld, and requires special technique (pre heating and very precise temperature management). Whoever you find, get them to show you some work they've done before. If they haven't, bring two pieces of scrap cast iron and see if they can make them stick together. My dad's a welder by trade but he only owns a MIG after his stick welder died on him, otherwise he could've done it he said. The key is to heat it and let it cool slowly afterwards, talking to history / mechanical buffs around here they used to let cast iron cool by burying it in sawdust, in other places I hear they used dry sand. I got a lead on two guys that have reputations for being good at this kind of work, one way to do it as my dad also said, is to only weld a little a time and many times over, that way you never let the material get too hot. It's a joint made of a lot of starts and stops so it's not as strong, but it should be plenty strong if done right. Another project is my 20" impeller, cutting vanes from some thick 400mm plastic pipe: 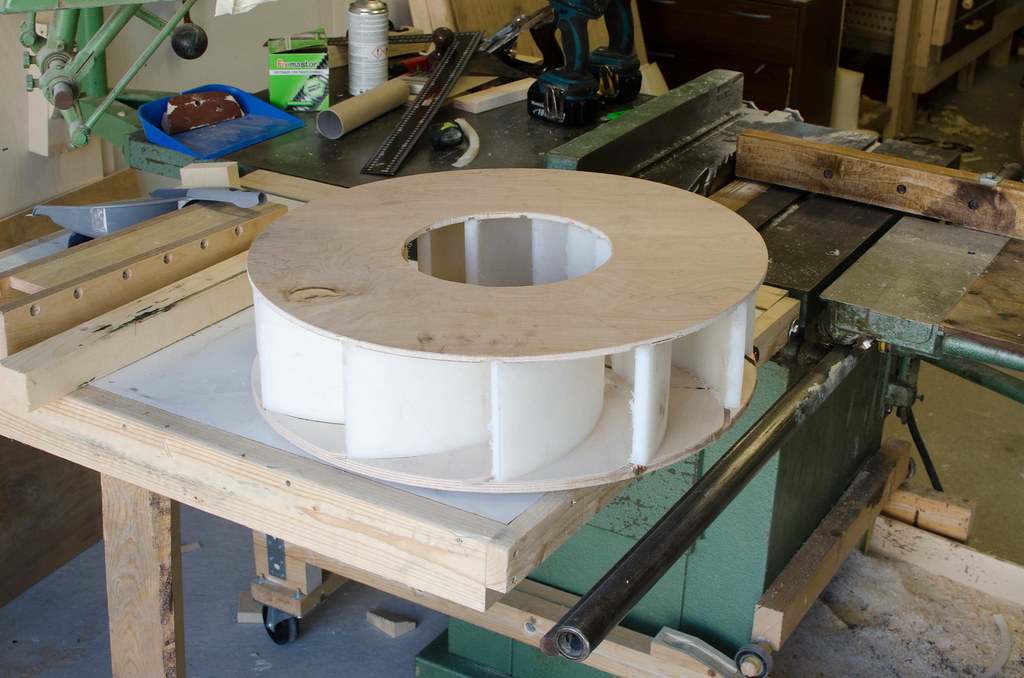 Need to enlarge the grooves, I got two potential router bits for making the grooves, some testing ahead.
|
|
#
?
May 24, 2015 18:42
|
|
|
His Divine Shadow posted:A small project I am doing right now is trying to restore this old induction motor, ran into a snag today when going over it with an angle grinder: How thick is that piece of cast? If its thick enough you can get it stitched, off the top of my head I think 4mm is required?
|
|
#
?
May 25, 2015 22:24
|
|
|
Is stitched the same as welded? Taking it to a local guy and letting him look at it anyhoo.
|
|
#
?
May 26, 2015 20:36
|
|
|
Nope, metal stitch is a cold process. I'll grab some photos of a repair at work tomorrow, it's a little hard to describe.
|
|
#
?
May 26, 2015 22:25
|
|
|
OK I've never heard of it before, sounds interesting. In other news, I made a new disc for my impeller, the new thicker vanes with their smaller radius made it a neccessity, wasn't possible to just wide the old groves as they where made for a larger diameter vane. These are now epoxied and then screwed into place from below with 2 screws per vane. Should hold well when cured. I will also be adding polyurethane construction adhesive (sikaflex fc-11) and smearing it out to create a smooth rounded transition between the vanes and disc, and also to fill in gaps. 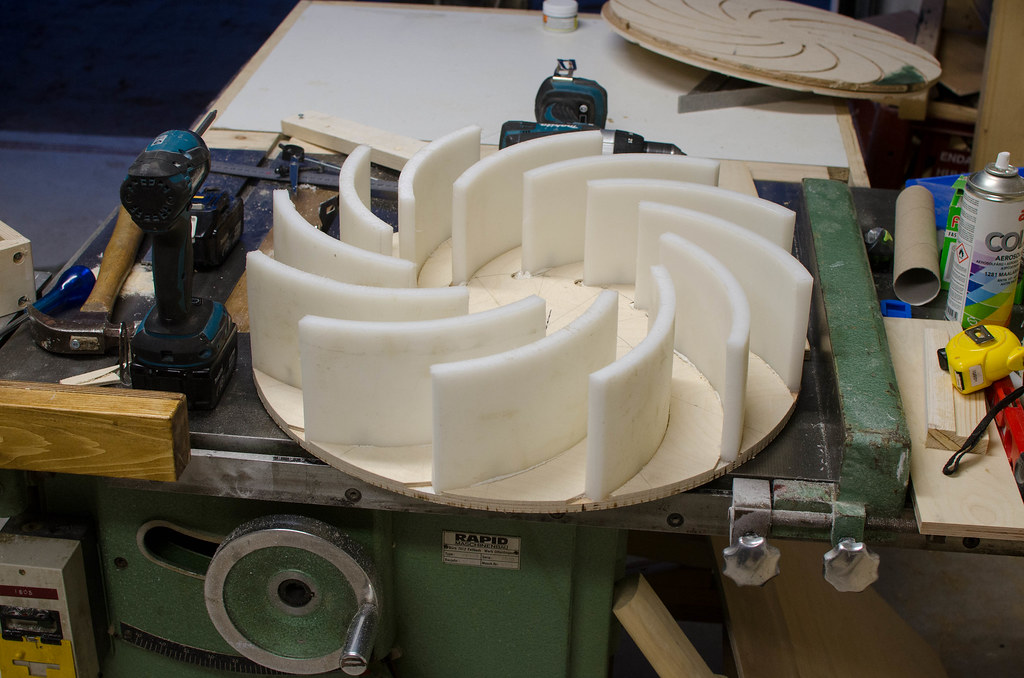 The angle on these vanes came out more extreme than I had intended but it should only make it more efficient, it almost looks like an airfoil design... Now for a tricky part, balancing...
|
|
#
?
May 27, 2015 07:00
|
|
|
^^soooo, I have no idea what THAT thing is, but it looks cool as hell. I finally finished construction on my haunted Halloween dollhouse. All I have to do is put the shingles on before construction is complete, and then work on the wiring.  After that, I'm going to paint/wallpaper/carpet the interior before starting on the exterior or bothering with furnishings (though I will work on furnishings and decor off and on the whole time). My Pinterest is stuffed full of ideas, but I'd love to hear from you guys if you think of anything that would be good in a haunted house. It's got two bedrooms, a kitchen, a bathroom, an attic, and a teeny tower room, as well as a living area. I'm thinking of a mad scientist lab in the bathroom, a little girl ghost/Exorcist type scenario in one of the bedrooms (maybe with clowns or creepy dolls), a ghost walking through the wall, a ghost coming through the mirror, maybe a dungeon (there's no basement but it could be in the attic or tower). I could also make the tower room into a padded room, OR create a scene that can be viewed only through the windows and then seal up the tower room. As it is now, you can lift the top of the turret off and peer into the tower room, but if I glue it shut when it's finished it can only be seen through the two tiny oval windows. There's a lot of ideas on Pinterest about witchy or wizard stuff, but the alchemy stuff is a little too whimsical. I really want it to be dark and spooky. Anyway, open for suggestions! I'll post more as I work on it.
|
|
#
?
May 31, 2015 07:56
|
|
|
Maggie Fletcher posted:I finally finished construction on my haunted Halloween dollhouse. All I have to do is put the shingles on before construction is complete, and then work on the wiring. That is looking sweet. Can't wait to see it with shingles and lights.
|
|
#
?
May 31, 2015 08:08
|
|

|
Maggie Fletcher posted:My Pinterest is stuffed full of ideas, but I'd to hear from you guys if you think of anything that would be good in a haunted house. Glowing goo creeping out from under closet drawers, skeletal hands clawing their way out of odd places, dirty shovel next to a copy of beginners guide to necromancy. I have seen someone cut the eyes out of paintings on the walls, then place the eyes on another piece set slightly back inside to give them depth. Real subtle.
|
|
#
?
May 31, 2015 09:05
|
|
|
Cakefool posted:Glowing goo creeping out from under closet drawers, skeletal hands clawing their way out of odd places, dirty shovel next to a copy of beginners guide to necromancy. I have seen someone cut the eyes out of paintings on the walls, then place the eyes on another piece set slightly back inside to give them depth. Real subtle. Awesome suggestions, thank you! Edit: Shingles are on! It looks much better with them, and it was a lot easier than I expected. Some of these will get broken off or chipped to make it look more run-down. Also I do plan on trimming the overlap, I was just tired when I finished.  Also, I decided to have someone falling down the stairs, or maybe landing at the bottom. I wasn't familiar with the kit so I didn't paint any of the pieces before assembling since the instructions said to electrify before painting, and so I neglected to paint some of the interior first, and now I can't reach some of the pieces to paint them. But if I can't see them to paint them, no one can tell they exist, so a small chunk of the interior--namely, part of the staircase--is going to stay unfinished. Now all I have to do is figure out how to wire it up and build some light fixtures, and then the fun part of painting, carpeting, furnishing, and adding effects can begin. If I'm feeling really ambitious I may try to rig up a timer to play some spooky sounds. But I can add that later--first, lighting! Some of the haunted dollhouses I've seen online use wilted clapboards or crooked siding for the outside. I was thinking brick, but I think the Victorian element requires siding. Thoughts? I would also love suggestions for exterior color. I was thinking red brick with a lot of black stains, but now I'm thinking grey siding with black streaks. I just don't think brick really goes with the style of the house. I think the shingles will definitely be black, possibly streaked with red or grey. Maggie Fletcher fucked around with this message at 21:08 on Jun 1, 2015 |
|
#
?
May 31, 2015 19:54
|
|
|
Made a Bluetooth/3.5mm line-in speaker: 
|
|
#
?
Jun 2, 2015 03:55
|
|
|
That's gorgeous. Good job!
|
|
#
?
Jun 2, 2015 08:24
|
|


|
Great work! What was the process you used to add in the lettering/symbols?
|
|
#
?
Jun 2, 2015 09:28
|
|


|
Thank you :-)freelop posted:What was the process you used to add in the lettering/symbols? Woodburning! I printed out the lettering/symbols, placed the paper on the wood, and traced the outline with an exacto knife to leave shallow lines/dimples in the front plate. I then followed those with a woodburning iron. To be honest, I should made the burn marks thicker or deeper or something, because the wood grain and colour are just so dominant that the symbols get a little lost. But I'll take it for my first attempt.
|
|
#
?
Jun 2, 2015 15:39
|
|
|
My neighbor got a dog recently and my dog is ecstatic that he has someone to play with now. Instead of running dogs back and forth around the fence, we decided to put a little doggy door in. At this point I still need to do some edge moulding, looks a bit out of place as is. Regardless, it'll stand out until the cedar starts to weather. The fence itself has seen better days, all the supports are half rotten, might be time to do some work on that too. Happy puppy   Bonus "why are you making me pose for this instead of opening the door" 
|
|
#
?
Jun 2, 2015 17:53
|
|
|
bimmian posted:My neighbor got a dog recently and my dog is ecstatic that he has someone to play with now. Instead of running dogs back and forth around the fence, we decided to put a little doggy door in. Holy poo poo, this is beautiful both in execution and concept.
|
|
#
?
Jun 2, 2015 18:55
|
|

|
Awesome idea. I live in an attached home and all the yards have human sized gates between like that so you can move in larger items, like a BBQ, without having to go through your house. It would be super convenient for that idea, but sadly neither of my neighbours have dogs  My poor pup has no friends. My poor pup has no friends.I recently inherited some old Delta tools from my Grandfather. Bandsaw, Drill press, and a scroll saw. Looks like they are from 1995. Not sure how great they are, but they beat my cheap Ryobi ones so it';s a big upgrade for me regardless. They are super dirty and grimey from years of sitting in an old shed. What products do you guys who restore tools recommend I clean them up with. I found the manual for the drill press and it recommends kerosene under the cleaning section, which just seems like an insane idea... I'll post some pics of them when I get a chance. I inherited his entire shop so now I just have a poo poo ton of tools everywhere I need to find homes for in my shop.
|
|
#
?
Jun 2, 2015 19:14
|
|


|
I use a citrus degreaser to clean old machines; a wire wheel for rust.
|
|
#
?
Jun 2, 2015 22:05
|
|
|
Raised by Hamsters posted:These things: http://www.amazon.com/gp/product/B006079BCK/ref=oh_aui_detailpage_o01_s00?ie=UTF8&psc=1 This is neat. I have a small project (especially by this threads standards) that is involving something similar. I am renting a small apartment room and am trying to figure out a nice way of putting mood lighting in that isn't just dorm-room-Christmas-lights with dimmer. (Although I might do that eventually because it's just so easy and I have the dimmer already). Here's my quick layout:  Most of the sexy stuff I see are sconces (which I cannot do) or other light source set at around 50%-75% up from the floor toward the ceiling. I have basically not useable wall space due to doors opening and windows, except for on the orange wall. My initial hope was to put those HitLights on the top part of the orange wall. I would install a wall-length ~4" barrier against the far support column to create a space behind it, so that the light would have that subdued effect down the wall. I just want sex-lighting in my room tell me the best way to do it and I'll do it.
|
|
#
?
Jun 3, 2015 04:00
|
|


|
JIZZ DENOUEMENT posted:This is neat. I have a small project (especially by this threads standards) that is involving something similar. I am renting a small apartment room and am trying to figure out a nice way of putting mood lighting in that isn't just dorm-room-Christmas-lights with dimmer. (Although I might do that eventually because it's just so easy and I have the dimmer already). Not sure if you want to put a few nails in the wall but you could do something like this. The picture makes it slightly brighter than it actually is. Worked great in the bar/lounge I built. Buy 1x1s and ceiling trims and then nail them up like \_ so there is a shelf for the rope light, leave about 2in from the ceiling. 
|
|
#
?
Jun 3, 2015 16:43
|
|

|
wormil posted:I use a citrus degreaser to clean old machines; a wire wheel for rust. I've never heard of a citrus degreaser, I'll check it out. Here are some pics. They aren't awful, but definitely grimey from a decade in an old leaky woodshop up north. I believe they were all bought together in 1995. Not sure how good they are, but as I said they are big upgrades for me. Drill Press (Delta 11-980C)     Scroll Saw (Delta 40-130C)   Band Saw (No idea the model, it has no plate/sticker)  The Drill Press and Scroll Saw def need some work. Both seem to work though. The Band Saw is in the best condition from the looks of it. Haven't had a chance to see how it works though. I need to buy a new blade (the one in there now is broken). And I got this Woden plane as well. No idea if its any good or what size it is as I know nothing about planes, but drat is the sole rusty. Regardless I'm sure it's better than my Mastercraft one. Any tips for cleaning this up as well?   
keep it down up there! fucked around with this message at 18:06 on Jun 3, 2015 |
|
#
?
Jun 3, 2015 18:04
|
|
|
BUGS OF SPRING posted:And I got this Woden plane as well. No idea if its any good or what size it is as I know nothing about planes, but drat is the sole rusty. Regardless I'm sure it's better than my Mastercraft one. Any tips for cleaning this up as well? Woden is an excellent brand according to Paul Sellers. That looks like a Stanley #4 equivalent. The model number should be in the casting by the front knob or the back handle. Wire wheel on a bench grinder is good for cleaning all the parts except the sole of the plane. You can also just use sandpaper by hand but it's more work. For the sole you want sandpaper on a flat surface. I use the stuff that comes in rolls with adhesive backing from amazon and stick it to a piece of glass or a mirror. 250 grit is fine. I like a little water or windex to float the crud off and keep the sandpaper from clogging up too much.
|
|
#
?
Jun 3, 2015 19:00
|
|

|
BUGS OF SPRING posted:I've never heard of a citrus degreaser, I'll check it out. There are tonnes of youtube vids out there on plane restoration e.g. https://www.youtube.com/watch?v=gp6k-3TfpHk
|
|
#
?
Jun 3, 2015 19:58
|
|

|
|
| # ? May 28, 2024 03:28 |
|
|
BUGS OF SPRING posted:And I got this Woden plane as well. No idea if its any good or what size it is as I know nothing about planes, but drat is the sole rusty. Regardless I'm sure it's better than my Mastercraft one. Any tips for cleaning this up as well? I'll third that - fixing and tuning up planes is easy. I did several of them by hand, with sandpaper. Took a while, but they are now some of my favorite tools.
|
|
#
?
Jun 4, 2015 03:49
|
|
