


|
bobua posted:This is my table saw, and I was sad to find out it won't take a dado blade. Didn't even know what a dado blade was when I bought it. Luckily, I have a nice router. Luckily most lumber comes in sizes which are 1 on 1 available as router bits. The only fidgety size is 3mm ply for drawer bottoms. But nothing that can't be handled with a 2.4mm kerf resaw blade and some sanding.
|
 #
?
Dec 12, 2015 15:30
#
?
Dec 12, 2015 15:30
|
|

|

|
| # ? May 31, 2024 14:38 |
|
|
I finally finished my guitar so I took some glamour shots. Full album here. I also only just realised how misaligned the machine heads are, I really should have spent more time lining them up, although I think the wonky joint for the neck/headstock really exaggerates it http://imgur.com/a/08fyd
|
|
#
?
Dec 13, 2015 07:12
|
|
|
screaden posted:I finally finished my guitar so I took some glamour shots. Nice. Real nice, in fact.
|
|
#
?
Dec 13, 2015 16:41
|
|


|
screaden posted:I finally finished my guitar so I took some glamour shots. That's very beautiful.
|
|
#
?
Dec 14, 2015 01:01
|
|

|
I'm going to be making a thing out of mdf, and then painting it white. I would like it to have a smooth almost plastic-y feeling when done. Any specific ideas on how to accomplish that? I'm thinking several super thick coats of poly, trying to build up a layer of plastic on there, sanding that smooth, repeating the process several times, and then priming and painting the final white, probably with a rattle can. Thoughts?
|
|
#
?
Dec 14, 2015 03:30
|
|


|
Why put a finish on if you're going to paint over it? Just paint the MDF directly. A few coats of semi-gloss should make for a pretty durable surface.
|
|
#
?
Dec 14, 2015 04:21
|
|

|
I wasn't sure if I'd be able to get a sufficiently smooth/glossy surface directly on the mdf. Although I suppose if I put primer on a little thick and smoothed that, it should get nice and slick with a spray enamel as the final coating.
|
|
#
?
Dec 14, 2015 04:32
|
|
|
I've filled and sanded with wall putty or bondo before painting to get that smooth finish in the past. Works well.
|
|
#
?
Dec 14, 2015 05:04
|
|
|
Bad Munki posted:I wasn't sure if I'd be able to get a sufficiently smooth/glossy surface directly on the mdf. Although I suppose if I put primer on a little thick and smoothed that, it should get nice and slick with a spray enamel as the final coating. The quality of your brushstrokes is the only thing that's going to matter with respect to how smooth the surface is.
|
|
#
?
Dec 14, 2015 05:09
|
|
|
For Christmas I'm gonna get my dad this brad nailer and air compressor. Brad Nailer Compressor Neither tool seems to come with a hose and I can't tell if there is a certain size I shoulder order. Can anyone help point me in the right direction? There also appears to be a higher PSI compressor that comes with accessories and if that's cheaper in the long run, maybe that's a better option? Thanks!
|
|
#
?
Dec 14, 2015 12:24
|
|

|
screaden posted:I finally finished my guitar so I took some glamour shots. That looks great. Can you talk a little bit about how the process was? What kind of resources were the most helpful, what was harder/easier than you thought it would be, that sort of thing. I'm kind of gearing up to build an acoustic as well so any kind of insight would be helpful ") Also, that dog looks goddam magnificent.
|
|
#
?
Dec 14, 2015 13:22
|
|

|
bred posted:I've filled and sanded with wall putty or bondo before painting to get that smooth finish in the past. Works well. This. Spackle, bondo, or whatever.
|
|
#
?
Dec 14, 2015 14:54
|
|

|
A quick coat of shellac will also help with painting a huge amount.
|
|
#
?
Dec 14, 2015 17:46
|
|


|
Pondex posted:That looks great. Ha, magnificent is hardly the word I'd use to describe her, I'm amazed I got a picture of her without a big doofusy smile on her face. I can do a little write up when I get back from work, but unfortunately I don't think I'll be much help. This was my first ever woodworking project so I had the benefit of someone else's tools, jigs, moulds and someone to watch over every step (here if you're interested) I took a bunch of pictures of the process which I linked earlier in the thread, but I haven't completely updated it, at that stage I was about halfway through
|
|
#
?
Dec 14, 2015 22:15
|
|
|
nosleep posted:For Christmas I'm gonna get my dad this brad nailer and air compressor. I have this compressor, which is only $40 more than the one you linked. It's served me well and can do more than that little pancake. Most compressors worth your time won't come with a hose/accessories, but you can usually pick up an accessory kit for not too much that will come with a light-duty hose that would handle that brad nailer as well as your standard quick connects and stuff to inflate tires/kiddie pools/river tubes.
|
|
#
?
Dec 15, 2015 00:29
|
|
|
Gluing up another cutting board, this one will be a long grain board, ash and walnut. I decided to make a cutting board gluing jig since I think I will be making more in the future. Basically it uses just two wedges to provide clamping pressure. I am thinking of building some kind of integrated clamping cauls for keeping the board flat as well so I won't need any clamps at all to glue up a board in the future.
|
|
#
?
Dec 15, 2015 07:57
|
|

|
I'm working on my first woodworking project that is using a joint more complicated than "nail two things together". I'm making a 6' ladder for my kid's tree fort out of pressure treated 2x4s. I've cut mortise and tenons for all of the steps and everything fits in nice and snug. I was about to do the final assembly but then started having some crippling doubts and was hoping for some advice. As it dries, will the pressure treated do something bad to those joints? Can I glue them?
|
|
#
?
Dec 15, 2015 14:38
|
|

|
Gounads posted:I'm working on my first woodworking project that is using a joint more complicated than "nail two things together". I've never heard of gluing wet pressure treated lumber. Or dry. Screw them, don't glue them.
|
|
#
?
Dec 15, 2015 16:29
|
|
|
Mr. Mambold posted:I've never heard of gluing wet pressure treated lumber. Or dry. Screw them, don't glue them. If it's a water-borne treatment (most likely) gluing won't be a problem; however you'll want to use a water-resistant glue -- general wood glue won't cut it. If it's going to be exposed to weather, look up Resorcinol glue. It's more expensive and will take time to cure, but will provide a weatherproof bond. e: http://www.thewoodwhisperer.com/articles/gluing-treated-wood/ ee: Actually, it looks like regular Gorilla glue would be a good bet as well. It's waterproof and has the added benefit of expanding as it cures, so it would really pressure-lock your tenons in as well as binding the fibers. eee: Or go to the underside of the ladder, drill out some #8 pocket holes, and screw the tenons in place. You could even do this after you glue to really make it secure, If you want to hide the objectionable metal hardware in your hand-crafted ladder, you could shove some dowels in after to plug the hole over the screw. Hubis fucked around with this message at 17:06 on Dec 15, 2015 |
|
#
?
Dec 15, 2015 16:58
|
|

|
Mr. Mambold posted:I've never heard of gluing wet pressure treated lumber. Or dry. Screw them, don't glue them. You could also change to through tenons and use a wedge or dowel to secure the rungs.
|
|
#
?
Dec 15, 2015 18:40
|
|

|
nosleep posted:For Christmas I'm gonna get my dad this brad nailer and air compressor. I grabbed this combo from home depot the other day... http://www.homedepot.com/p/Porter-Cable-6-Gal-150-PSI-Air-Compressor-and-16-Gauge-Nailer-Combo-Kit-PCFP72671/204369377 appears to be the nailer\compressor you're buying as a combo with hose for $10 dollars cheaper. Edit: just realized home depots web prices might be zip code based. I'm seeing the combo for $159.99 and that's the price i payed in store. It's the 150 psi compressor. Double edit: Looks like you were looking for the 18 gauge... http://www.homedepot.com/p/Porter-Cable-6-Gal-Portable-Electric-Air-Compressor-and-18-Gauge-Brad-Nailer-Combo-Kit-PCFP12236/203471324 $199. But F that, the the 16g, 18g, and stapler package for the same price http://www.homedepot.com/p/Porter-C...12234/203471431 bobua fucked around with this message at 19:59 on Dec 15, 2015 |
|
#
?
Dec 15, 2015 19:54
|
|


|
Cutting board from the earlier picture, currently soaking in raw linseed oil: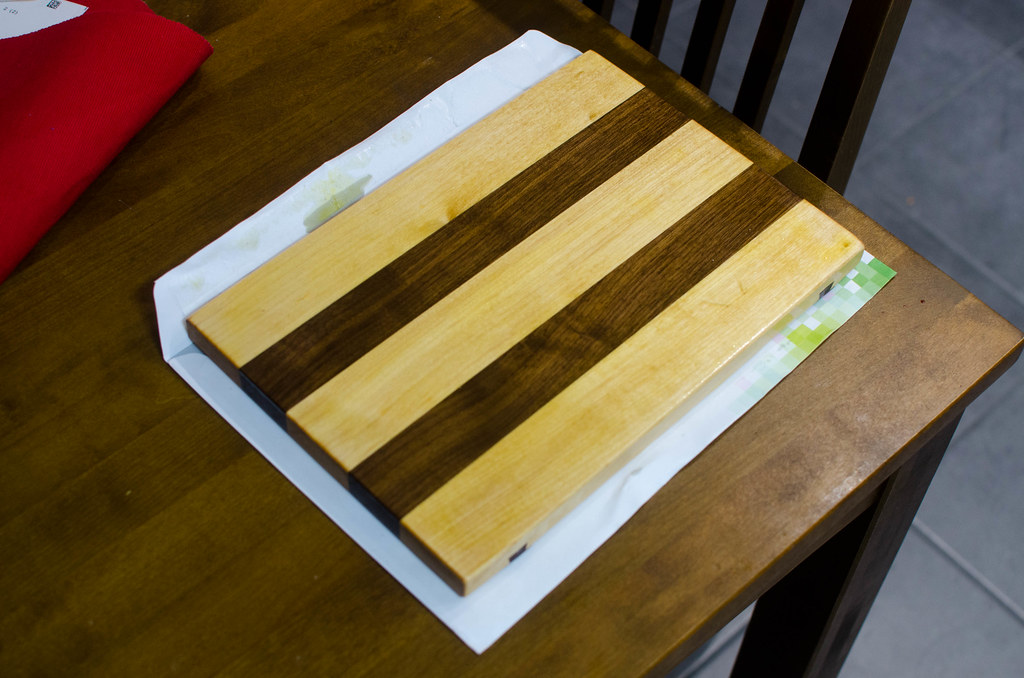 Shallow feet in a sliding dovetail: 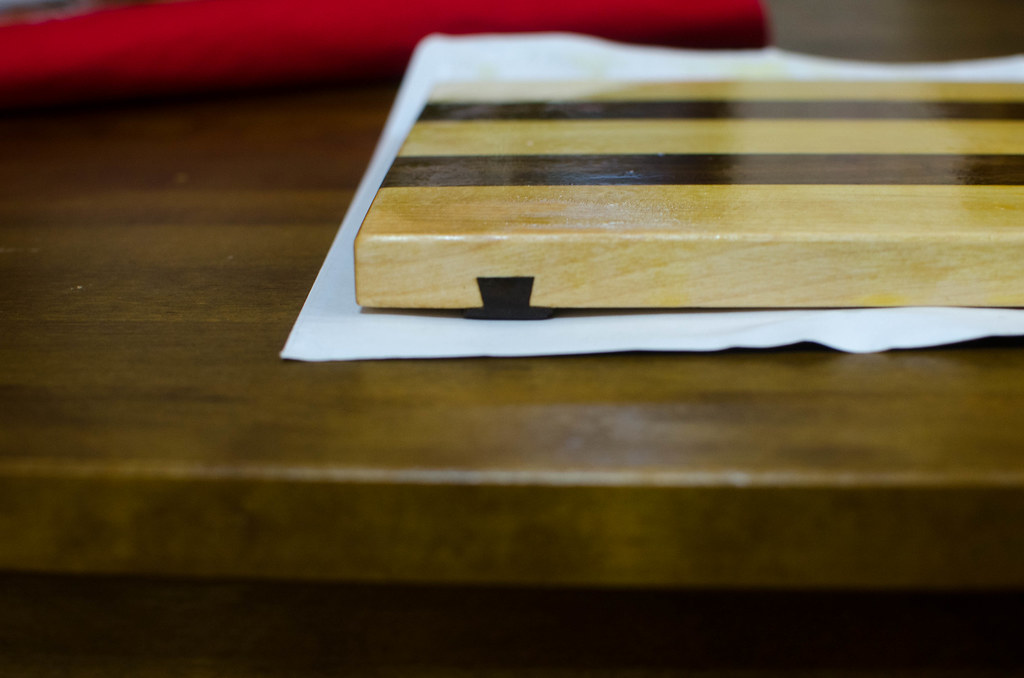
|
|
#
?
Dec 15, 2015 20:44
|
|
|
That sliding dovetail foot is awesome!
|
|
#
?
Dec 15, 2015 22:16
|
|

|
bobua posted:I grabbed this combo from home depot the other day... http://www.homedepot.com/p/Porter-Cable-6-Gal-150-PSI-Air-Compressor-and-16-Gauge-Nailer-Combo-Kit-PCFP72671/204369377 drat! I would've probably gotten this one. I did go with the nailer I linked and a 6 gal 150 PSI porter cable compressor. It came to about 200 dollars by itself. I could've gone to my home depot down the street and grabbed this combo. I guess I could return it.. poo poo I may have to do that. Thanks!
|
|
#
?
Dec 16, 2015 01:24
|
|
|
Anyone recognize this model plane? It showed up in my local craigslist and I'm probably going to grab it unless its some Chinese knockoff.
|
|
#
?
Dec 16, 2015 02:50
|
|


|
TheDon01 posted:Anyone recognize this model plane? It showed up in my local craigslist and I'm probably going to grab it unless its some Chinese knockoff. I have seen them before, they are cheap knockoffs but I can't tell you the origin. Honestly I wouldn't pay  for it. Reason being is that you will have to put a lot of work into tuning it and at the end you'll still have a crappy plane. If you want a good bargain in planes, look for wood bodies or better, Stanley Transitionals. <== Not a recommendation, it's just the first transitional I found on ebay. Also, never buy a plane if they don't show you the bottom. for it. Reason being is that you will have to put a lot of work into tuning it and at the end you'll still have a crappy plane. If you want a good bargain in planes, look for wood bodies or better, Stanley Transitionals. <== Not a recommendation, it's just the first transitional I found on ebay. Also, never buy a plane if they don't show you the bottom.
|
|
#
?
Dec 16, 2015 08:02
|
|
|
I'm building a basic bookcase as a starter project, out of pine as it's cheap, like me. When I'm finished I'd like to finish it in white, but not solid paint, more like a wash? What can I use or should I be shopping for? I'm in the UK.
|
|
#
?
Dec 16, 2015 23:53
|
|


|
I used this stuff to repaint a couple of (shameful ikea) cabinets: http://www.anniesloan.com/annie-sloan-products/paints.html It's chalk-based, so it remains a bit rough to the touch which I like.
|
|
#
?
Dec 17, 2015 00:02
|
|

|
Cakefool posted:I'm building a basic bookcase as a starter project, out of pine as it's cheap, like me. When I'm finished I'd like to finish it in white, but not solid paint, more like a wash? What can I use or should I be shopping for? I'm in the UK. Look for the term 'pickled' white
|
|
#
?
Dec 17, 2015 00:03
|
|
|
Cakefool posted:I'm building a basic bookcase as a starter project, out of pine as it's cheap, like me. When I'm finished I'd like to finish it in white, but not solid paint, more like a wash? What can I use or should I be shopping for? I'm in the UK. I did something similar for my wife's display last year and just used standard paint thinned down.
|
|
#
?
Dec 17, 2015 00:10
|
|

|
Thanks, that's pointed me in the right direction.
|
|
#
?
Dec 17, 2015 11:25
|
|
|
Unpigmented milk paint 
|
|
#
?
Dec 17, 2015 13:58
|
|

|
Is there a general rule to follow for leg placement on tables? I'm making my girlfriend a reclaimed wood coffee table for Christmas and I'm getting ready to put the legs on. I found a piece of old school peg board that was hanging up in a barn, so it was basically wood slats with a ton of eye hooks and right angle screws in it (which I have since taken out). I made a small frame underneath the peg board using .75" thick furring strips to draw all of the planks level, then ran 2 of those furring strips down the middle for added support. I'm making the legs out of 1" floor flanges and 1" x 18" threaded pipe and was just wondering if there are basic guidelines to follow in regard to where legs should be placed.
|
|
#
?
Dec 18, 2015 00:45
|
|

|
Stupid Dick posted:Is there a general rule to follow for leg placement on tables? I'm making my girlfriend a reclaimed wood coffee table for Christmas and I'm getting ready to put the legs on. Traditionally they go underneath the table in a fashion such that the table doesn't fall over. You're welcome, that'll be For a coffee table? Go with whatever fits your design / looks good and keeps it stable imo. Just don't leave excessive overhang unless your design takes it into account (eg splayed legs), otherwise it can be a tipping hazard. Typically on a standard table you want the legs to form a rectangle that's proportional to the top, golden ratio and all that good stuff.
|
|
#
?
Dec 18, 2015 14:57
|
|
|
I'm making a few beer bottle openers for Christmas gifts and I'm wondering what I should finish them with. https://www.instagram.com/p/_Z2gF6PDdI/ I recently did an edge grain cutting board for a friend and used some of the same Padauk as the openers. https://www.instagram.com/p/_ac6TYvDX4 I love the look of it after just a mineral oil finish while it's still wet and glossy, so I wan't to recreate that. Generally I'd use some spray lacquer, but I'm all out so now is a great time to try something new. I mostly just use spray laquer these days, but I've tried a wipe on poly in the past as well. Neither seem appropriate though. Any ideas?
|
|
#
?
Dec 18, 2015 20:25
|
|

|
BUGS OF SPRING posted:I'm making a few beer bottle openers for Christmas gifts and I'm wondering what I should finish them with. How about shellac with paste wax buffed on top?
|
|
#
?
Dec 18, 2015 21:56
|
|

|
Cpt.Wacky posted:How about shellac with paste wax buffed on top? I finish everything like this. Shellac is so nice to work with and a coat of wax buffs out beautifully.
|
|
#
?
Dec 18, 2015 22:04
|
|

|
I already have paste wax so that's easy. I'll give that a try, thanks!
|
|
#
?
Dec 19, 2015 00:02
|
|
|
How do I cut straight? I'm an utter novice. I have been building radiator covers for my home out of 3/4 inch plywood. I finished the rough work on the first and was pretty happy with it. I'd like to improve a few things on the next one but the problem is that I can't cut straight. I am making plunge cuts and have a skillsaw and a jigsaw capable of doing it. I have straight lines on the wood and a straight cutting guard. When I start to cut I've measured the distance to the shoe and theoretically everything should work. I've mostly tried with the jigsaw - I drill a pilot hole and make my way to the edge. What happens is that the blade bends or comes off the guide but keeps cutting. I've gotten a less flexible blade but it still works. I have less experience with the skillsaw but the one time I tried it I ended up also being crooked. So what's the secret to cutting straight on a plunge cut? I've looked at videos and guides but would love some help.
|
|
#
?
Dec 19, 2015 00:56
|
|

|

|
| # ? May 31, 2024 14:38 |
|
|
Invicta{HOG}, M.D. posted:How do I cut straight? Clamp a straightedge on the piece that's as far away from your line as the plate of your saw and ride the saw up against that.
|
|
#
?
Dec 19, 2015 01:04
|
|