|
um excuse me posted:I have to post this somewhere. Anywhere. The world must see. gently caress off with that. Mudfly posted:I have some 8ft 2x4's which are bowed and a bench top jointer (just purchased). I ran them through a few times and they are still bowed. Any tips? Do I need a bigger jointer? That jointer's bed is on the short side, so you may have to cheat your way to straight. Take some sort of 8' straightline and mark the 2x4's- on the bow-in side like Bad Munki said. You'll have maybe a 1/4" to nothing from each end if it's a 1/2" bow. Then you're gonna whittle each end down with a few passes until it's close. Then try a full length pass or 2.
|
 #
?
May 7, 2017 14:24
#
?
May 7, 2017 14:24
|
|


|

|
| # ? May 30, 2024 04:24 |
|
|
With basic technique a jointer can flatten a board approximately twice it's length. Like Bad Munki mentioned, make sure the concave side is down against the jointer table. Mr. Mambold made a more useful post while I was writing this one, do what he said.
|
|
#
?
May 7, 2017 14:42
|
|

|
um excuse me posted:I have to post this somewhere. Anywhere. The world must see. Get the gently caress outta here, 65$?! Haha did you laugh out loud?
|
|
#
?
May 7, 2017 17:23
|
|

|
You folks are aware that Anthropologie is a store right? And that "shabby chic" is a completely played out but still present aesthetic amongst the tasteless? And that some people make lots of money and then spend it in questionable ways? We should be celebrating this comrade's attempt at efficiently recouping resources from the petty bourgeoisie.
|
|
#
?
May 7, 2017 17:35
|
|
|
Started putting the lathe back together today: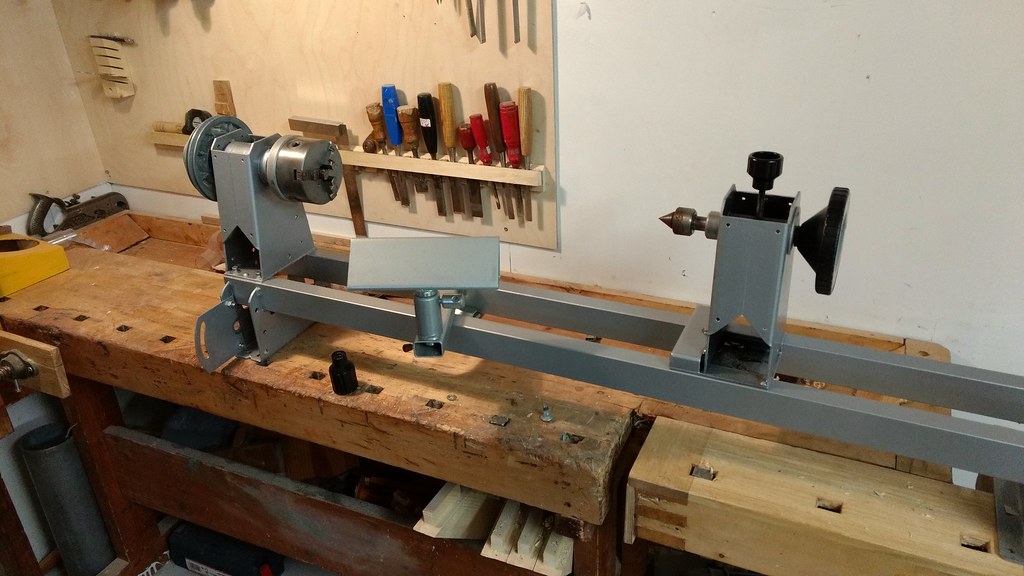 With the covers on, I'm not sure if I like it more with or without the covers on. 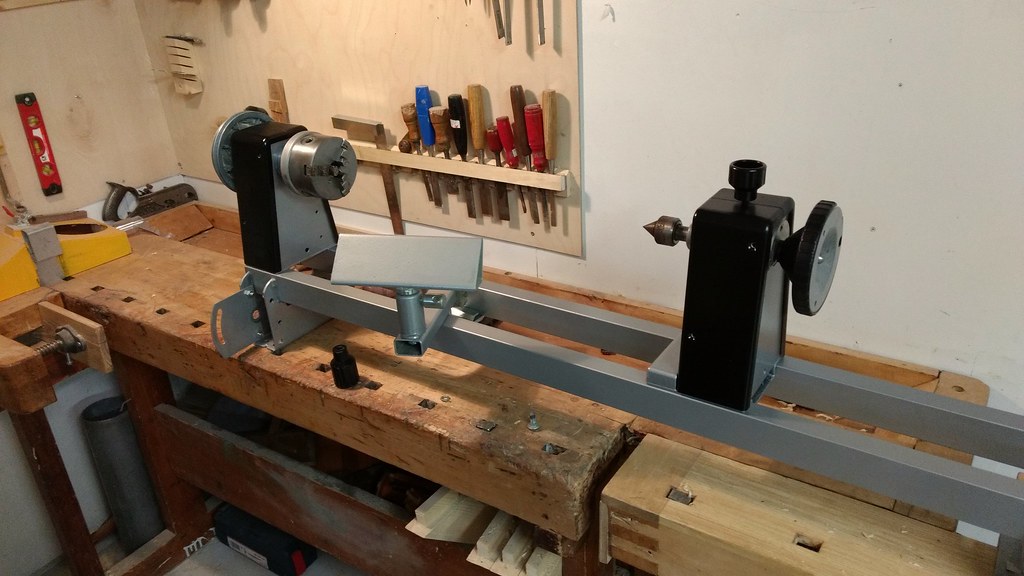 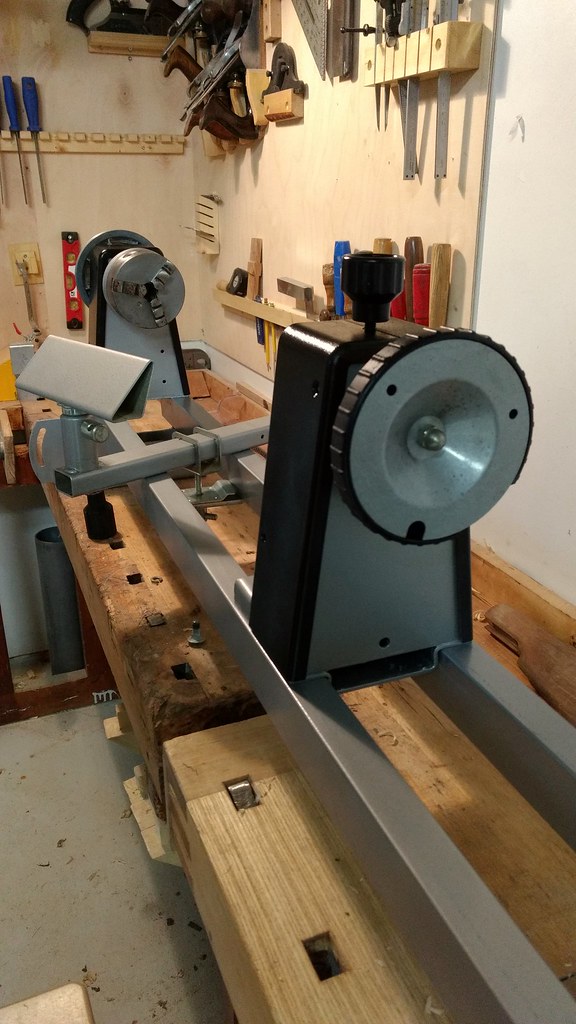
|
|
#
?
May 7, 2017 18:50
|
|

|
I made a flip-top tool cart for my router table and thickness planer.  I think I overkilled it on the rotation and "latching" systems. Here's a test fit of a section of 1" rigid metal conduit (steel pipe made from ~3/16"-thick steel) going through the center of the top:  And here's how I did the latches: 3/8" eye bolts around 1"-thick dowels that have been screwed and epoxied to the plywood:  I also did full-width through tenons for the base and one side of the cart:  In its new home (which used to store leftover plywood before I used it all to make the cart):  I spent probably six hours in the shop on this yesterday, and another two and a half today. But it works, it's solid, and it'll make my planer and router table both a lot more pleasant to use. The side cabinet (a simple plywood box) is an easy place to store router bits, wrenches, the blade extractor for the planer, etc.
|
|
#
?
May 7, 2017 20:40
|
|

|
GEMorris posted:We should be celebrating this comrade's attempt at efficiently recouping resources from the petty bourgeoisie. Pretty much that.
|
|
#
?
May 7, 2017 21:11
|
|


|
TooMuchAbstraction posted:I made a flip-top tool cart for my router table and thickness planer. Nice work, I like that latching mechanism, simple and strong. Quick to engage too I bet.
|
|
#
?
May 7, 2017 21:31
|
|
|
TooMuchAbstraction posted:I made a flip-top tool cart for my router table and thickness planer. Dude, sick as hell. Great work!
|
|
#
?
May 7, 2017 21:52
|
|

|
Upside to running two projects at once: you seem like a superhuman woodworker when you finish both of them in the same weekend. Put the raised panel into the top and painted the Dutch toolchest today. This was my first time working with milk paint and I loved it. It doesn't stink like cancer, you can mix up just as much as you need, I had almost no down time because it dries super fast, cleanup was dead easy. If you want to paint your project, this is the paint to use. Note for future self: 1 cup of paint was exactly enough for two coats of the toolchest (about 30 sq ft total).   
|
|
#
?
May 8, 2017 00:41
|
|

|
Posting this to share a technique I'm trying, maybe give others ideas or hear what you think of the approach. I've got a plan to make some salad bowls with a copper inlay. The idea is to mix copper powder with a clear epoxy and get a metal paste to spread into a groove cut on the outside of the bowl, then turn it down to be flush with the bowl. Basically this, except with copper and without the embellishments. Anyway, tried the technique on a cup... thing I turned quickly out of laminated pine boards so I wouldn't waste my walnut blanks. The pine did not stand up to turning after a while (thank you, faceshield) but I got one good groove before it all went flying:    Learnings:
Turning is so much fun ")
|
|
#
?
May 8, 2017 02:53
|
|


|
That's a cool idea. Does it polish well with the plastic in there? Going for a brushed look may be an alternative if not.
|
|
#
?
May 8, 2017 03:13
|
|
|
Bad Munki posted:You're running them through concave side down, right? Like an upside down U? Yep, I wonder if I was adjusting the jointer to take off too much at once or something. Do you start with a small cut then get larger?
|
|
#
?
May 8, 2017 03:59
|
|

|
ColdPie, very nice job on the Dutch Tool Chest, I didn't do a raised lid on mine but I'm really liking the look
|
|
#
?
May 8, 2017 04:47
|
|
|
I did my first thing! I inherited a poorly made table that did real bad moving from Arizona to San Diego then back to Arizona. The table top has an apron and a framework of boards attached underneath that are attached by nails and glue. The top is warped pretty bad and it cracked a lot. Repairing the table for real is way beyond my skill so I just finished the sanding, filled the cracks with west system epoxy and put some poly on it. I didn't do anything to the pedestal. The cracks aren't great, but they're the least of this table's problems. The top is warped really bad, but hopefully I can get some use out of it before it has any crazy problems, and in the mean time I got to get some experience finishing a table top poorly and learning from mistakes! https://goo.gl/photos/2nXgZMwqJEwUWg128
|
|
#
?
May 8, 2017 05:51
|
|


|
Speaking of finishing tables... I've been to a few restaurants that have what I assume is epoxy finishes on the tables (clear, thick and hard). However I've been to a few where the surface is a bit rubbery feeling, like you can actually dig a fingernail into the surface and it will spring back when you let go. Is that just a bad epoxy job or is it something else? I ate at a place today that had cedar plank tables with a super hard glassy surface. And they were outside. That seems like a recipe for disaster to me. Wouldn't the wood movement, especially in a soft wood outside in the Pacific Northwest just tear that surface apart in short order? They appeared to be just epoxied on the top and around the sides of the tables. Not sealed at all in the gaps between the planks or on the underside. Am I under estimating the strength of epoxy here or is the restaurant going to be refinishing these things annually? Whoever did it did a fine job of getting the surface glass clear and super smooth but you could see the runs down in the gaps between the planks.
|
|
#
?
May 8, 2017 06:16
|
|

|
Trabant posted:Posting this to share a technique I'm trying, maybe give others ideas or hear what you think of the approach. I haven't added metal to the resin but i've used it to fill voids in a plater I was turning. It stuck decently well and polished alright with the finishing products I was using at the time. The only part that sucked was getting the resin flat with what I'd turned before the resin pour. It tends to be a little sharp in the side of the hand. I can post pics if you wish to see it.
|
|
#
?
May 8, 2017 12:44
|
|
|
Granite Octopus posted:Ohh i need to do this. I didn't want to because I was worried about the reduced effectiveness when cutting deep mortices but I am getting sick of having hundreds of tiny cuts from those incredibly sharp edges. Awesome thank you for the advice. Nope not breaking bits, just getting dull since I've had them forever, and they were super cheap. I'll admit I need to learn how to sharpen bits instead of just buying new ones, but I figured I would start with a decent set first. Do you remember where you snagged the step drills from? I saw a set on Grizzly that looked pretty good once I need them. ColdPie posted:I've been using the HSS brad point bits from Lee Valley. They're real nice. I got the general purpose 12 bit set, and they've got a much wider selection if you have specific needs. They've also got HCS bits for considerably cheaper. Is that their 5/64 - 1/4" set for $52? That seems pretty fair priced for a great bit set. I wish it had a bit more range, but I can start there and add to it.
|
|
#
?
May 8, 2017 16:29
|
|

|
ColdPie posted:That's a cool idea. Does it polish well with the plastic in there? Going for a brushed look may be an alternative if not. It does OK when using a small amount of Brasso on a paper towel, but it certainly doesn't have the shine of pure copper. I think my next test will include a finer finish and a different polishing compound -- the Brasso had been sitting in a garage for more than 5 years and was... clumpy. Dr. Garbanzo posted:I haven't added metal to the resin but i've used it to fill voids in a plater I was turning. It stuck decently well and polished alright with the finishing products I was using at the time. The only part that sucked was getting the resin flat with what I'd turned before the resin pour. It tends to be a little sharp in the side of the hand. I can post pics if you wish to see it. Please do! Resin (both with and without material X) is very interesting to me as both a repair and decoration method, so I'd love to see how it worked on your end. ===== unrelated fe: this is amazing: https://www.youtube.com/watch?v=fSWLSskBLWo Some more details here: http://www.instructables.com/id/Sphere-Chess-Board/
|
|
#
?
May 8, 2017 16:45
|
|
|
My uncle upgraded his table saw so I grabbed his old contractor 10inch belt driven Craftsman table saw. Great condition, cast iron and sturdy. Everything I'm reading online says this a decent table saw, may have some fence issues but I've done some cuts and the fence is fine.I even got a couple dado blades with it My dad thinks I'm a sucker. I don't have a table saw. AM I SUCKER? 
|
|
#
?
May 8, 2017 18:13
|
|
|
I struggle with these thoughts as well: the difference between rationalization and being rational. I try to compare productivity. For example: Are you a more productive woodworker with this saw than before? Does it make you less productive in other aspects of life like now you have to park a block away because it took your garage spot?
|
|
#
?
May 8, 2017 18:25
|
|
|
Harry Potter on Ice posted:My uncle upgraded his table saw so I grabbed his old contractor 10inch belt driven Craftsman table saw. Great condition, cast iron and sturdy. Everything I'm reading online says this a decent table saw, may have some fence issues but I've done some cuts and the fence is fine.I even got a couple dado blades with it You got a free table saw. Maybe your dad is a sucker. Tools used to work in the past too, pops.
|
|
#
?
May 8, 2017 18:34
|
|


|
bred posted:I struggle with these thoughts as well: the difference between rationalization and being rational. I try to compare productivity. For example: Thats how I try and look at it. I have access to some pretty decent lumber and already ripped some down to make a gorgeous cedar 3tier plant stand for my girlfriend. My other options were either buy a used one from craigslist sight unseen hoping it cuts decent or spend $300 for the bosch portable 10 inch. I'd like to redo some cabinets so I figured the wider work space/sturdy stand would be amazing for my solo work environment. I've spent the last few months cleaning, selling poo poo and organizing his workshop so this will be a nice new centerpiece for it haha. How the hell do you have a shop and no table saw jeez Cannon_Fodder posted:You got a free table saw. Oh we're a used tool family for sure, we're just a little too willing to try and fix something up. Like that old 2 stroke motor we need to finish working on for a scooter I found at the dump that I moved for this here table saw 
|
|
#
?
May 8, 2017 18:41
|
|
|
Cannon_Fodder posted:You got a free table saw. Maybe the table saw is haunted and you got tricked into assuming the curse
|
|
#
?
May 8, 2017 18:42
|
|

|
Skippy Granola posted:Maybe the table saw is haunted and you got tricked into assuming the curse I did think it was odd my uncle was giving me the bird insead of waving goodbye but he looked really happy??
|
|
#
?
May 8, 2017 18:43
|
|
|
I got to play with my table saw last weekend. I took a pretty bog-standard doug fir 4x4 and I'm working on making myself a guitar stand. I've based the design on a korean joinery video I found on youtube. https://www.youtube.com/watch?v=k4lOeUYoDME I was able to make some progress away from the shop. I made the basic dimensioning and layouts, then tried to get into the cuts with hand-tools. Mostly done with the structural cuts, I had time to hit the shop and I'm adding some cosmetic cuts so it doesn't look so bland. I'm still poo poo but my work seems to be improving.
|
|
#
?
May 8, 2017 19:23
|
|
|
Cannon_Fodder posted:I got to play with my table saw last weekend. I took a pretty bog-standard doug fir 4x4 and I'm working on making myself a guitar stand. I've based the design on a korean joinery video I found on youtube. That is so cool. You should post pictures when you're done of the process, I'd love to try that for some ideas. How sturdy is it? My next project is a cat scratching post/tower and I'd love to over complicate and over engineer it
|
|
#
?
May 8, 2017 19:37
|
|
|
Harry Potter on Ice posted:That is so cool. You should post pictures when you're done of the process, I'd love to try that for some ideas. How sturdy is it? My next project is a cat scratching post/tower and I'd love to over complicate and over engineer it I'm pretty embarrassed about my fuckups. I've got a couple of progress pics. There will be an album once I have a finished product but I work super goddamn slowly. I'm on a sports team, I brew every week, I work away from home 3 days a week, and I'm trying to bike to stay in shape so everything takes for loving ever to finish.
|
|
#
?
May 8, 2017 19:57
|
|
|
Are you trying to tell me it doesn't look as good as the woodporn video you posted? Bullshit. But I feel you, the last 20-30% is so hard to finish
|
|
#
?
May 8, 2017 20:14
|
|
|
Harry Potter on Ice posted:How the hell do you have a shop and no table saw jeez It's not that hard as long as you have one tool for straight line ripping. What's a pain is having no table saw AND no jointer.
|
|
#
?
May 8, 2017 20:21
|
|
|
Hand sawing builds character And calluses
|
|
#
?
May 8, 2017 20:30
|
|
|
It depends on what the meaning of the word "straight" is.
|
|
#
?
May 8, 2017 20:56
|
|
|
ColdPie posted:Upside to running two projects at once: you seem like a superhuman woodworker when you finish both of them in the same weekend. Looks great! I like that green, too. How long did it take you roughly and any hot tips that aren't covered in the article/plans? I'm still struggling to grab the last bits of kit for my set up, but sooooooon!
|
|
#
?
May 8, 2017 21:06
|
|

|
ColdPie posted:It depends on what the meaning of the word "straight" is. You follow up the sawing with jointing.
|
|
#
?
May 8, 2017 21:12
|
|
|
um excuse me posted:I have to post this somewhere. Anywhere. The world must see. Looks like a Flea Market Flip outtake.
|
|
#
?
May 8, 2017 22:23
|
|

|
I'm just mad I didn't think of it first and instead bought into the Cult of Schwarz, all hand cutting dovetails like a chode. There's a guy in my neighbourhood selling mitred barn wood butt-jointed into chevrons for about $45 a pop as folk decorations.
|
|
#
?
May 8, 2017 22:35
|
|
|
Phone posted:Looks great! I like that green, too. How long did it take you roughly and any hot tips that aren't covered in the article/plans? Thanks! It's Lexington Green from the Old Fashioned Milk Paint Company. I wanted a forest green and it turned out more of a green-blue, but it still looks great. I was wondering about the coverage of a bag of paint, but I've still got loads and loads left. I'm planning to write up an article sometime, but I'll dump some thoughts here. I bought the supplies in the middle of January, while my table project was on hold because January in Minnesota. It was usable about five weeks later in mid-February. I finished up the chisel rack and combination square rack a few weeks after that, then basically stopped until the weather got nice enough to paint it. You can see some in-progress pics in this thread if you filter by my posts. Give up on finding 12+ inch wide boards and just glue up narrow boards into panels. The back is four boards, the top is three, the sides and bottom are two. It's good practice anyway. I forgot about grain direction while gluing up, but thankfully pine is forgiving. I also think it's a great project for babby's first dovetails. Doesn't really matter how they look, since it's just a tool chest, and it's cheap wood. If you've never dovetailed before, do at least one practice joint in scrap. The wood's all clear pine, and the tool dividers in the top are 1/4" plywood. Runners along the bottom are white oak left over from the table. I think materials cost including wood and hardware was on the order of $200? I made my chest extra wide in order to fit full-size hand saws and my No 8 plane. I'm not sure yet whether I regret that. It's too wide/heavy to really lift and walk around with, though I can deadlift the sucker off the floor if I don't have to move it. But it would be nice if it was truly portable like I had intended it to be. I may acquire some panel saws and build another, portable one in the distant future. I dunno. This was my first time working with cut nails, and it shows. My pilot holes were mostly fine, but the ones near the edges split off the end grain of the back board. Those pilot holes should have been bigger. I was surprised that the screws that come with the handles that Chris recommends are too long to bed into 4/4 material. I ended up gluing some pieces of scrap to the inside of the chest for the screws to go into. Also, try to figure out how the lid hinges will attach and function before you attach them. I did mine a little wrong, so there's a sizable gap under the lid in the back. Figuring out how to do the raised panel with just a marking gauge and my rabbet block plane was fun. Took two practice boards before I was confident to try it on the real thing.
|
|
#
?
May 8, 2017 22:42
|
|
|
Harry Potter on Ice posted:My uncle upgraded his table saw so I grabbed his old contractor 10inch belt driven Craftsman table saw. Great condition, cast iron and sturdy. Everything I'm reading online says this a decent table saw, may have some fence issues but I've done some cuts and the fence is fine.I even got a couple dado blades with it If the fence is fine, then you're fine, all is fine. We're fine. Fence was always the weak point on the Sears saws, but the older ones were built like a tank. By 'older', I mean pre 70s. Also, you can always spend $ and upgrade the fence.
|
|
#
?
May 8, 2017 22:46
|
|
|
Discovered a 30'+ hand hewn beam sitting in a barn. Unfortunately it's mostly destroyed (packed with bugs and racoon poo poo, bottom side is fully rotten from sitting on concrete for 20 years, most of the outer 1"+ is dry rotted on account of being 150+ years old). I forgot to get a picture of the beam, but I've got 10+ hours of chainsaw work left to do so I'll have plenty of time later. I milled out some test pieces to see how sound it is inside. Working on the upper two quadrants above the pith can pretty easily yield some 6x6+ pieces.    Coated pretty heavily with linseed to make sure no larva escape alive. Most of the wormholes are very very old, but some of the others still had larva in the holes within an inch of the surface. It's very difficult to tell if it's red or white oak because it's so wormy and generally old. At first I thought it was american chestnut, but I found ray flecks pretty quickly. I don't see significantly open pores in the endgrain even after handplaning, so it's possibly white. I need to test with sodium nitrate to be sure. Unfortunately, the rot/dry rot/unsalvageable insect damage sort of spirals through the beam. I'm not going to get anything longer than about 6-8' at a time. I think that's probably still fine, because by the time I'm done processing all the usable lumber from this beam, I'll have enough to build a workbench base out of it without feeling like I'm wasting it.
|
|
#
?
May 9, 2017 02:27
|
|


|

|
| # ? May 30, 2024 04:24 |
|
|
bred posted:I struggle with these thoughts as well: the difference between rationalization and being rational. I try to compare productivity. For example: I really need to build some sort of mobility into the stand I built for my "table saw" because I have to park in the driveway whenever I want to use it (and it's too heavy to move without disassembling so I've been parking in the driveway for a few weeks)
|
|
#
?
May 9, 2017 02:47
|
|