|
OscarDiggs posted:
Your having a pretty standard 1st Gunpla experience and you've already found some limitations from when you start out. (I told you it's a money pit! ") ) ) Stickers : not much you can do really most foil stickers are a pain. If you use tweezers and then manouver the piece into place with a toothpick that normally does the trick. The only real way to do stickers properly is to not do them at all and paint your kit, but that's a whole other, but satisfying, kettle of fish. Sanding nubs : you want to be removing the nub as close to the piece and then sanding it down. Use progressively higher grits and finish off with one of those 4 sided womens nail polishing blocks. It will give it a polished sheen. You've pro a ly seen people talking about single sided side cutters as they get almost close enough to be a flush cut that requires no sanding. A matte spray top coat can also hide sanding marks. Knifes : what knife did you buy? Was it an exato or box cutter style? Loose parts : a small amount of super glue or clear nail polish around the male part of the connection, let it dry without asseming the piece will tighten up most loose pieces. This works for any joint pieces as well.
|
 #
?
Jan 30, 2019 20:22
#
?
Jan 30, 2019 20:22
|
|


|

|
| # ? May 26, 2024 10:22 |
|
|
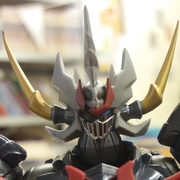
My main tools are a simple knife with the breakaway replaceable blades, and a cheap nipper. My nippers used to have a bendy metal rod that acted as a spring, but that snapped a few years ago. Still works though. In other news, I finished building the Moderoid Godmars so perhaps it is time to give a bit of a review? I'll try to upload some pictures to go with it. First time using the camera on my phone and imgur, so fingers crossed. There's a bunch of them and they're all huge, so I think I'll put down links instead of throwing the image itself into the post. I would have done only a single picture of the final model, but seeing as how Godmars is a combiner formed of six smaller bots, I think it would be nicer to show the individual components as well. (final result) https://imgur.com/ac157Aa The instructions have you build each robot separately, then a separate leaflet explains how to combine. It took me a bit more than three of my regular build-sessions to get everything done, so let's call it 9 hours and 15 minutes or so. When I was done, I was left with six little robots of various brickyness, and an assortment of separate parts which will come in use later. In no particular order, these parts are leg-frame X2 arm frame X2 covers that seal a hole in the shoulder X2 side-bits to make the torso wider a neck-piece a head a beltbuckle 2 hands (not counting the ones already on the arm frames) and finally, one honking big sword. (Spinx and Gaia) https://imgur.com/mKxUJGP Moving right on to the first two bots, here are Sphinx (the big one) and Gaia (the little one). These form Godmars' torso and tiny stickman cowering inside respectively. Unfortunately, this kit does not allow you to put Gaia inside. Like with all the bots, the eyepieces came prepainted. The painting isn't perfect though, and I had to scrape away some excess here and there with my knife. For Gaia, I also painted the red dot on its belly, and the red on the thighs. Sphinx's arms can go up surprisingly far, further than Gaia's, but Gaia has elbows and knees to make up for its poor shoulders. It can't be seen on the photo, but the dark blue on Gaia's chest is a clear piece. I put some reflective foil behind it which gives a nice shimmering effect with the right lighting. Sphinx also has a windshield of the same material. Gaia's upper body is already molded into the chest-piece though you can't see it at all. I had to use flash on my phone and even then you can only barely make out something behind the windshield. Sphinx' beltbuckle is also the wrong colour. I believe there is a sticker for it, but there's a far better beltbuckle so I didn't bother. (Sphinx up close. Also, my fat finger. Oops) https://imgur.com/o00CEkE (Gaia up close) https://imgur.com/lkpibcw (Uranus and Titan) https://imgur.com/MOujmL2 Next up we have the arm-bros. Uranus (white), and Titan (green). While they look different, they're identical mechanically speaking. Uranus' eyes were prepainted, but the black and red on the chest, beltbuckle and head I did myself. Same deal with the red on Titan's belt. Both lack knees or elbows, but they have Sphinx' impressive shoulders. (a demonstration of Titan's articulation) https://imgur.com/bPLfRJR (Ra and Sin) https://imgur.com/PnqGSfi Finally, we come to the leg-bros. Ra (yellow-blue) and Sin? (black). That's what it says on the manual, though I've got the feeling it is actually supposed to be Shin. Anyway, Sin/Shin's head is missing some yellow and red lines but by this point I'd come to the conclusion I was going to display it as Godmars anyway so I didn't bother. I did slap some yellow onto the beltbuckle as usual though. Ra and Sin can do the spread-armed pose and add in a torso-joint as well which forms Godmars knee. Other than that joint, they're mechanically identical to their smaller arm-siblings. The shoulder slots into the torso in a slightly different and imo inferior manner, but that's all. (Sin's weird-looking torso-joint.) https://imgur.com/oRrV4CH One fun fact. The foot for the combined form is bigger than what you'd get if you stuck the two regular feet together. But now for the important bit. The transformation!....it's a partsformer. In the show Sphinx would open up and allow Gaia to stand inside but since this kit doesn't have that, you start by ignoring Gaia. The real first step is to brutally dismember everyone. Take off their legs, their arms and their heads. Also get rid of Sphinx' beltbuckle. The next step is to plug the torso-extenders where Sphinx' arms used to be. Plug the arm-frames and leg-frames into the appropriate bots' waist. Some attention needs to be paid that you pick the right arm-colour and the right foot to go with the bots. Although since they're all mechanically identical, you could swap left and right limbs if you so desire. Hell, if it wasn't for the square sockets on Ra and Sin versus the round sockets on Uranus and Titan, you could probably have an arm-bot act as a leg and a leg-bot as an arm! Plug the new arms and legs into Sphinx' mutilated body and you get something like this. (Godmars half-done) https://imgur.com/E4qqenu I think it's nice to see how they did the outer shell of the limbs in this kit. As shown in the following pic, the bots only have the inner side of their legs. The outer halves come off and are then placed together on the leg-frame. The exact same method is used with the arms. https://imgur.com/rABOpu9 It works, I guess. But the end result leaves me with a pile of leftover pieces even larger than before I started the combination. (So many parts) https://imgur.com/1TEucU9 Pop in the better beltbuckle on Sphinx and the new neck and head and there's Godmars in all its glory. https://imgur.com/LlHBjXs It's a pretty beefy machine. Gaia clocks in at about 8cm tall and Godmars is easily twice that at about 20cm. It's articulation is primitive compared to the average Bandai high-grade. The elbows can extend a bit, but the beltbuckles get in the way of any real bend. Also the green arm's shoulder is too loose on mine, so I can only let it dangle downward. The knees are surprisingly good though, and the skirtflaps can move so the hips aren't too bad either. Still. if you were looking for a kung-fu pose, I'd suggest to look elsewhere. There's two sets of hands. Simple fists, and holding hands. The only accessory it can hold is the sword though, and it's a pretty loose fit. One nice detail is that there is another Gaia-head molded into Godmars' mouth. Gaia decapitates itself as part of the combination sequence and its head (and thus cockpit I presume) moves up into Godmars' head. So a final verdict. Can I recommend it? Honestly...unless you really love Godmars or blocky 80s robots but don't want to empty your wallet for a Soul of Chogokin, I'd advise you to go get something else instead. I don't regret buying it now that it's standing on my shelf. It still needs a touch-up on the head, but I do like its general look and sturdy presence. I'm a bit disappointed that Gaia doesn't go inside, but that would require a completely different design on Sphinx and it does add some oomph to Godmars when I see how tiny Gaia is next to it. No, the real issue I have with the kit which nearly damns it, is that it's so boring. I built the exact same bot 4 times and it wasn't all that interesting even the first time around. I had to push myself to even start on the third and final build-session, I was this close to just saying no more and go look for something more interesting to build. Only the realization that I'd then have a nearly complete kit sitting in my backlog for possibly years, mocking me, made me bite the bullet and finish the drat thing. I also don't like how I now have this big pile of plastic bits stuffed in a bag.
|
|
#
?
Jan 30, 2019 20:26
|
|
|
finished building the SN Wing and god drat this this is large and heavy, probably going to have to add some nail polish to the stand so it can support the thing in an air pose. But besides that and a few screwups I did (breaking the waist cover parts, cutting a thum part wrong then ruining it trying to fix it) it's pretty good. Not sure when Im going to decal and coat it, still need to decal and coat the SN Heavyarms.
|
|
#
?
Jan 31, 2019 03:58
|
|


|
asterioth posted:finished building the SN Wing and god drat this this is large and heavy, probably going to have to add some nail polish to the stand so it can support the thing in an air pose. But besides that and a few screwups I did (breaking the waist cover parts, cutting a thum part wrong then ruining it trying to fix it) it's pretty good. Not sure when Im going to decal and coat it, still need to decal and coat the SN Heavyarms. Glad you enjoyed building it...I WISH I HAD MINE!  It's been stuck at "International item has left originating country and is en route to Canada" since the 12th...
|
|
#
?
Jan 31, 2019 05:46
|
|

|
Question about the HGUC Ground Gundam (I think the second version), is this ball joint that attaches the chest piece to the abdomen supposed to feel like it's going to pop out? And is the midpiece on the abdomen supposed to free float?
|
|
#
?
Jan 31, 2019 09:17
|
|
|
LibrarianCroaker posted:Question about the HGUC Ground Gundam (I think the second version), is this ball joint that attaches the chest piece to the abdomen supposed to feel like it's going to pop out? And is the midpiece on the abdomen supposed to free float? Mostly yes, I think. It's really not the best version of that system.
|
|
#
?
Jan 31, 2019 11:44
|
|

|
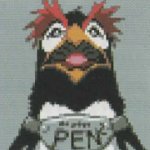
 An arm-ey boy, plus the knife I use. It's not an exacto knife, more like an off brand one. You can also see a bit of nub on the right hand, but I'm hesitant to sand or cut any more in case I mark the plastic even more. Next is the legs. Not as complex as I had feared on day 2; fiddly as hell though. Eyes are getting a bit more used to it.
|
|
#
?
Jan 31, 2019 15:06
|
|

|
OscarDiggs posted:
If it makes you feel better I can only do it for a hour or two at a time. On the other hand, the HG 00 Sky [HWS] gave me a whole week of fun.
|
|
#
?
Jan 31, 2019 15:51
|
|

|
OscarDiggs posted:
Not sure if you're interested in panel lining at all, but I put together a sort of novice/intermediate building tutorial a while back to show my friends who have never done Gundam stuff how I do my thing. I don't put in nearly as much effort as some of the super skilled people in this thread, but this might be useful to you as a beginner. My approach is basically low-cost/minimal effort/pretty decent result. All the tools I use can be bought locally for a low price (microns, q-tips and a pencil eraser) or obtained from Amazon or similar retailers for pretty cheap (mid-level sprue cutters, gundam markers). It's a good way to improve results without investing too much in the hobby imo. https://imgur.com/gallery/kNXggLR Hope you find this useful if you continue with the hobby!
|
|
#
?
Jan 31, 2019 16:40
|
|
|
why the hell isnt there a taquila gundam kit?
|
|
#
?
Jan 31, 2019 17:17
|
|


|
you thought P-Bandai kits were hard to get a hold of, I hope you don't want the Gundam variant available only at Softbank Hawks home games
|
|
#
?
Jan 31, 2019 18:18
|
|

|
JoeGlassJAw posted:Hope you find this useful if you continue with the hobby! It is! And it looks like I can do most of it even though the model is part way done. Thanks!
|
|
#
?
Jan 31, 2019 18:28
|
|
|
I don't know how I'm going to get my hands on the Carps Gundam, but I will.
|
|
#
?
Jan 31, 2019 18:37
|
|

|
OscarDiggs posted:It is! No problem! Glad it helps. And yeah you can do it while building or when done, I know a lot of people in this thread alone do it after the build is done. I like doing it beforehand for a lot of reasons but mainly so that when I snap everything together it's just done. The only investment outside stuff you can get at a craft store that I would definitely recommend is the grey gundam marker. For whatever reason a fine tip permanent grey marker is hard to find (I don't think micron makes one, for example) and grey looks great on white plastic - which you're going to have a lot of on the RX-78-2 - as opposed to black which stands out a little too much imo.
|
|
#
?
Jan 31, 2019 18:38
|
|
|
A mechanical pencil also works a treat as well. Bonus you can change how grey with each different type of refills.
|
|
#
?
Jan 31, 2019 20:20
|
|
|
Gripweed posted:you thought P-Bandai kits were hard to get a hold of, I hope you don't want the Gundam variant available only at Softbank Hawks home games I could go for the red and black one. But now I've looked up where Fukuoka is.
|
|
#
?
Jan 31, 2019 23:03
|
|

|
Ranzear posted:I could go for the red and black one. I did the same thing and thought. I'll probably be in Tokyo again this year, let's see where it is....... Oh.
|
|
#
?
Feb 1, 2019 00:08
|
|
|
So what's everyone's opinion on Bandai shutting down Daban, and vowing to go after the rest.
|
|
#
?
Feb 1, 2019 00:18
|
|
|
For the ones doing straight copies then I understand, but the ones releasing different stuff and alternates/detail up ones, maybe leave those ones. Or at least poach their talent so that we get official releases.
|
|
#
?
Feb 1, 2019 00:25
|
|
|
Apparently they�re building a life size Gundam that moves now.
|
|
#
?
Feb 1, 2019 00:30
|
|

|
Gripweed posted:you thought P-Bandai kits were hard to get a hold of, I hope you don't want the Gundam variant available only at Softbank Hawks home games I actually live in that end of Japan so getting to the stadium is no problem but actually going to a game? Eeh, I'll pass.
|
|
#
?
Feb 1, 2019 00:34
|
|
|
I would absolutely go to a Japanese baseball game if the beer is as good and cheap as everywhere else in Japan. Plastic robits are a non-factor. It being 35-38c outside last time I was there would have been an issue though, and next time will be a bit too chilly instead.
|
|
#
?
Feb 1, 2019 00:42
|
|
|
Ranzear posted:I would absolutely go to a Japanese baseball game if the beer is as good and cheap as everywhere else in Japan. Plastic robits are a non-factor. It being 35-38c outside last time I was there would have been an issue though, and next time will be a bit too chilly instead. According to some annoying Canadians, at least one Japanese stadiums has a "Bring wahtever outside drink you want, but we just need to pour it in this cup for you" policy https://www.youtube.com/watch?v=yBiWm4FdMBk
|
|
#
?
Feb 1, 2019 00:53
|
|


|
They don't vend beer at the park? Because I'll tell you right now: You wouldn't need to bring your own if they did. I didn't have a single bad tap there even at the strip mall joint under the hotel. Everything was a decent pale ale or something, usually in adorable 350ml steins. And I am one of those heinous snobs who won't touch anything InBev. Elysian is dead to me after they sold out. I call out Blue Moon for just being carefully craft-branded Coors. You get the picture. Ranzear fucked around with this message at 01:00 on Feb 1, 2019 |
|
#
?
Feb 1, 2019 00:56
|
|
|
Ranzear posted:They don't vend beer at the park? In that video the dude buys a glass of red wine and a 750 yen cup of beer from a concessions lady walking through the stands with a keg on her back.
|
|
#
?
Feb 1, 2019 01:07
|
|
|
Gripweed posted:you thought P-Bandai kits were hard to get a hold of, I hope you don't want the Gundam variant available only at Softbank Hawks home games Top second from the left, the green/white one, that is a cool combination for me.
|
|
#
?
Feb 1, 2019 01:51
|
|


|
They're all pretty awesome to be honest. Gonna store that image and paint them all up. (I won't.)
|
|
#
?
Feb 1, 2019 01:56
|
|
|
I went to a few wrestling shows at the Tokyo Dome and yeah they just poured my outside booze into a cup as I passed through the door. And they had gals running around with kegs strapped to their backs selling all kinds of beer and highballs. At other venues outside food and drink was perfectly ok. Went to a show at Sumo Hall where I shared a booth with a strange family that seemingly brought their entire pantry. Anyway my favorite Gundam is my 1/20 Red Shoulder Custom Scopedog.
|
|
#
?
Feb 1, 2019 05:43
|
|
|
SLUM KING posted:Anyway my favorite Gundam is my 1/20 Red Shoulder Custom Scopedog.  1/20 Rabidly Dog when cmon Bandai you're killing me
|
|
#
?
Feb 1, 2019 05:58
|
|

|
I may be a bit early, but most of these kits will take several weeks to arrive which means I have to get them ordered now. I'm interested in getting one of these next; can anyone else who's done them before speak to their quality and ease of use for a newbie to the hobby? https://www.amazon.co.uk/Bandai-Hobby-Mobility-Commander-Iron-Blooded/dp/B0129DWEJU/ref=sr_1_1?ie=UTF8&qid=1549020103&sr=8-1& https://www.amazon.co.uk/Bandai-Hobby-BAN215630-Gundam-Model/dp/B06XCF1B6N/ref=sr_1_16?ie=UTF8&qid=1549019783&sr=8-16& https://www.amazon.co.uk/Bandai-Hobby-DISTRICTS-Action-Figure/dp/B00030EUPI/ref=sr_1_26?ie=UTF8&qid=1549019828&sr=8-26&
|
|
#
?
Feb 1, 2019 12:25
|
|
|
OscarDiggs posted:I may be a bit early, but most of these kits will take several weeks to arrive which means I have to get them ordered now. The Cold Climate type GM is more than a decade older than any kit you've built before, so prepare for more nubs and seams, worse articulation and color separation, one piece one color beam sabers... you know. A lot less in the way of modern comforts. Still decent, but it'll be a major step down. The other two are IBO kits, so they should be pretty satisfactory. They both have inner frame structures you attach armor to, which should be a change of pace. The Vual has a lot more stickers, though, so go in warned.
|
|
#
?
Feb 1, 2019 12:33
|
|


|
OscarDiggs posted:I may be a bit early, but most of these kits will take several weeks to arrive which means I have to get them ordered now. Generally speaking, anything that isn't an HGUC kit is probably new enough you can automatically assume it's decent, and any HGUC kit with a box number higher than about 162 (The HGAC Wing Gundam) is also new enough you can automatically assume it's good. Not to say the older HG kits aren't mostly good too, that's just when Bandai really locked down a lot of their standardization and quality improvements. That Cold District GM's should be fine, but you're probably not gonna get much poseability compared to the newer kits. If you just want a GM in general, consider looking at the ones in the Build lines; The GM Sniper, The Powered GM Cardigan, and the GM/GM.
|
|
#
?
Feb 1, 2019 12:45
|
|

|
You really don't want the Cold GM, especially after the revive RX-78. It has some really bad choices in seam lines and it has the awful one piece hand/saber/blade. Original GM, Cold GM, GM Command and spacey GM command are all kinda trash but every GM after that is at least half decent. The IBO Graze kits are solid as heck and I would build them all again.
|
|
#
?
Feb 1, 2019 14:49
|
|
|
RillAkBea posted:The IBO Graze kits are solid as heck and I would build them all again. Follow your dreams dude. They pop up once in a while for like $10 a piece. I've got the little dudes all over the place 
|
|
#
?
Feb 1, 2019 15:24
|
|
|
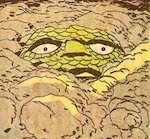
A practically finished boy. Still need to do the beam sabers, shields and so on. Plus maybe the touching up with a proper marker. Still, not bad for 3 days worth of work. Had a lot of fun. "Everyone look at my crotch" 
|
|
#
?
Feb 1, 2019 18:26
|
|
|
Take off the safety nubs on the v-fin. But good work for a first time build!
|
|
#
?
Feb 1, 2019 18:43
|
|

|
Monaghan posted:Take off the safety nubs on the v-fin. But good work for a first time build! Wait, those are safety nubs? So I just put together a Gundam 00 Sky HWS, and while the line and box art shows those nubs cut off, the instructions (page one, #2) don't say anything about trimming those and the build pictures don't have them trimmed either. Is this just a personal taste thing or what?
|
|
#
?
Feb 1, 2019 19:17
|
|
|
Solkanar512 posted:Wait, those are safety nubs? It's just personal taste. HG kits are supposed to be for all ages, so the v fins have nubs on the end to prevent kids from putting their eyes out on them. Whereas Real Grade kits don't, the assumption being that RG kits are so complicated anyone building them will have enough fine motor skill to not stab their eyes out with them  I personally usually don't cut the nubs off. Mainly because I have trouble getting the cut just right, and I think that a v-fin with the tips both being slightly off in an asymmetric way looks worse than the safety nubs
|
|
#
?
Feb 1, 2019 19:33
|
|
|
Solkanar512 posted:Wait, those are safety nubs? Yeah their safety nubs. Their meant so that the v-fins don't break, they're only on hg kits. They're not mandatory to take off, but most modellers I know do. It matches the lineart of the design better.
|
|
#
?
Feb 1, 2019 19:35
|
|
|

|
| # ? May 26, 2024 10:22 |
|
|
Cut 'em off and if they're asymmetrical then you sharpen them by scraping your knife along them until they're not. Beautiful.
|
|
#
?
Feb 1, 2019 21:21
|
|