


|
Dr. Garbanzo posted:The decals I ordered in July last year from Spain that didn't get sent till Feburary have finally landed in the country. I'll have to pick up another kit to make the car though cause the kit that I bought the decals for has been finished in a different livery. I know covid has made things tricky but I didn't expect them to take quite this long to get here. They were stuck in the Suez canal. Snipe edit: My four year old got his first experience painting a model. It was a small F-4 Phantom that he wanted to paint green (his favorite color) I helped clean it up but he did good for his age. The first kit I painted as a kid ended up a kaleidoscope of colors. Darth Brooks fucked around with this message at 05:08 on Apr 2, 2021 |
 #
?
Apr 2, 2021 05:06
#
?
Apr 2, 2021 05:06
|
|


|

|
| # ? Jun 5, 2024 05:33 |
|
|
Ever so slowly, I sometimes actually make a little bit of progress on the little boat.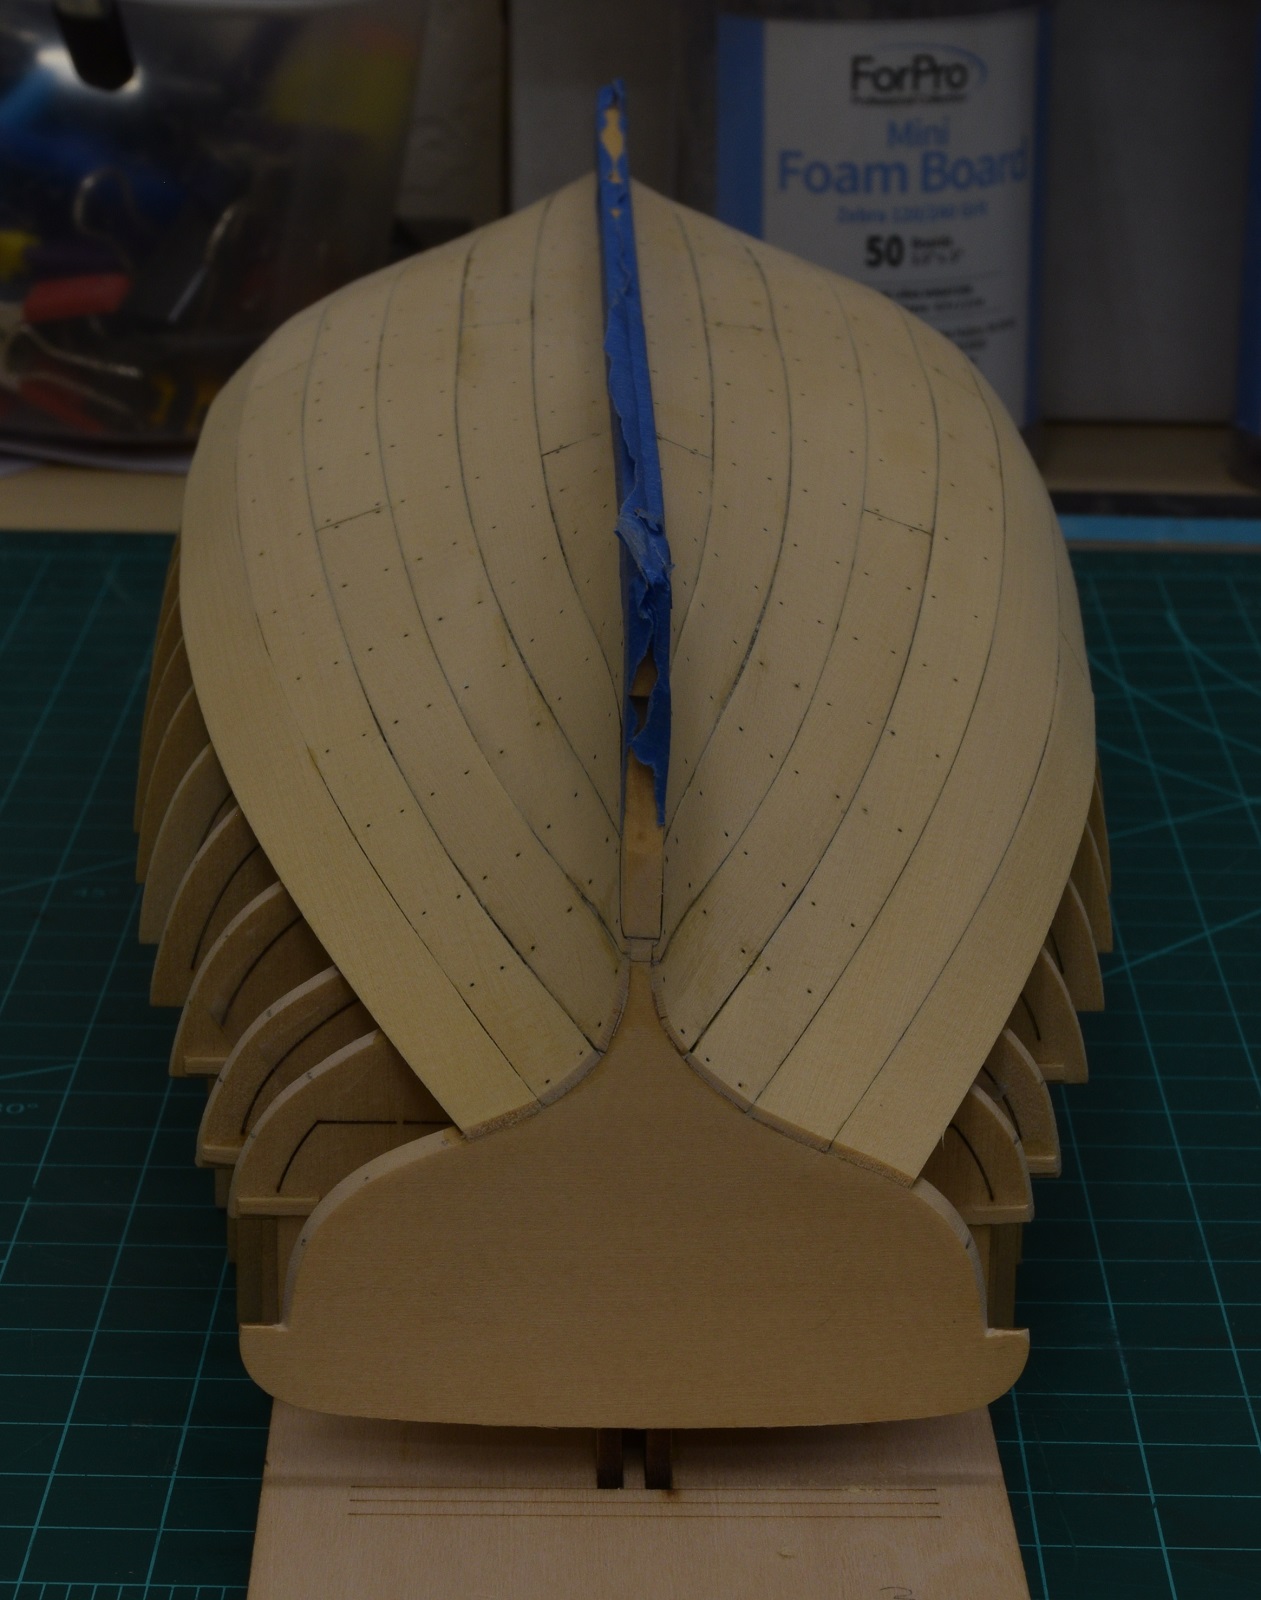 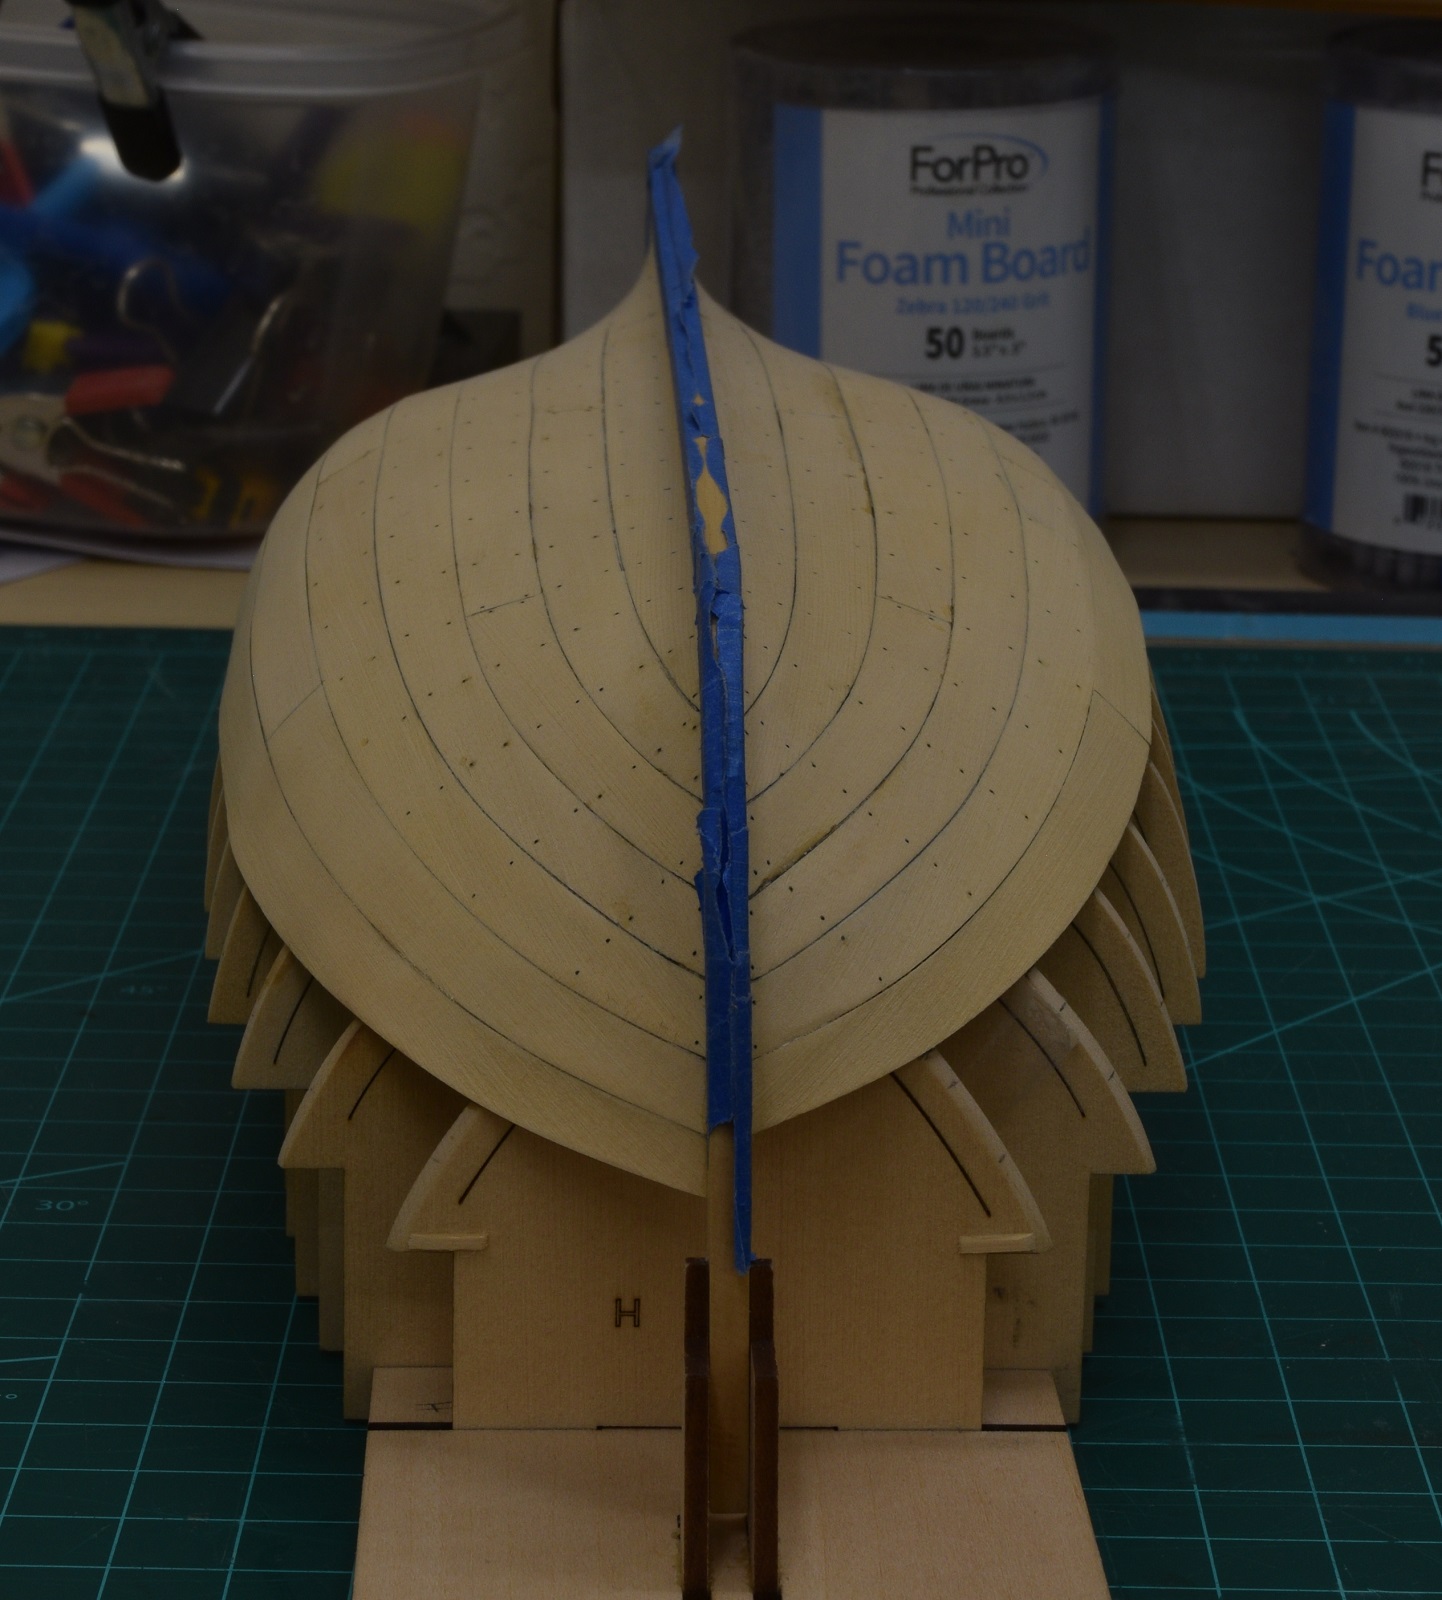 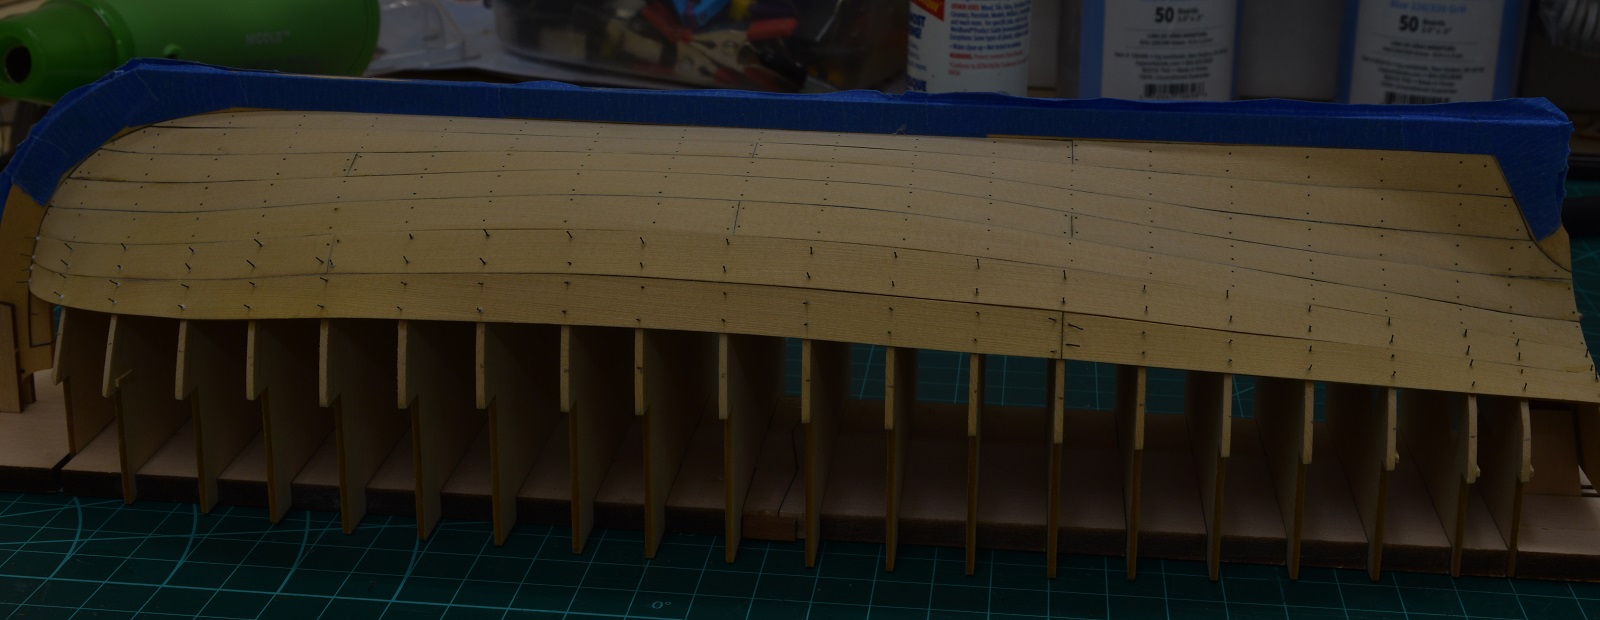 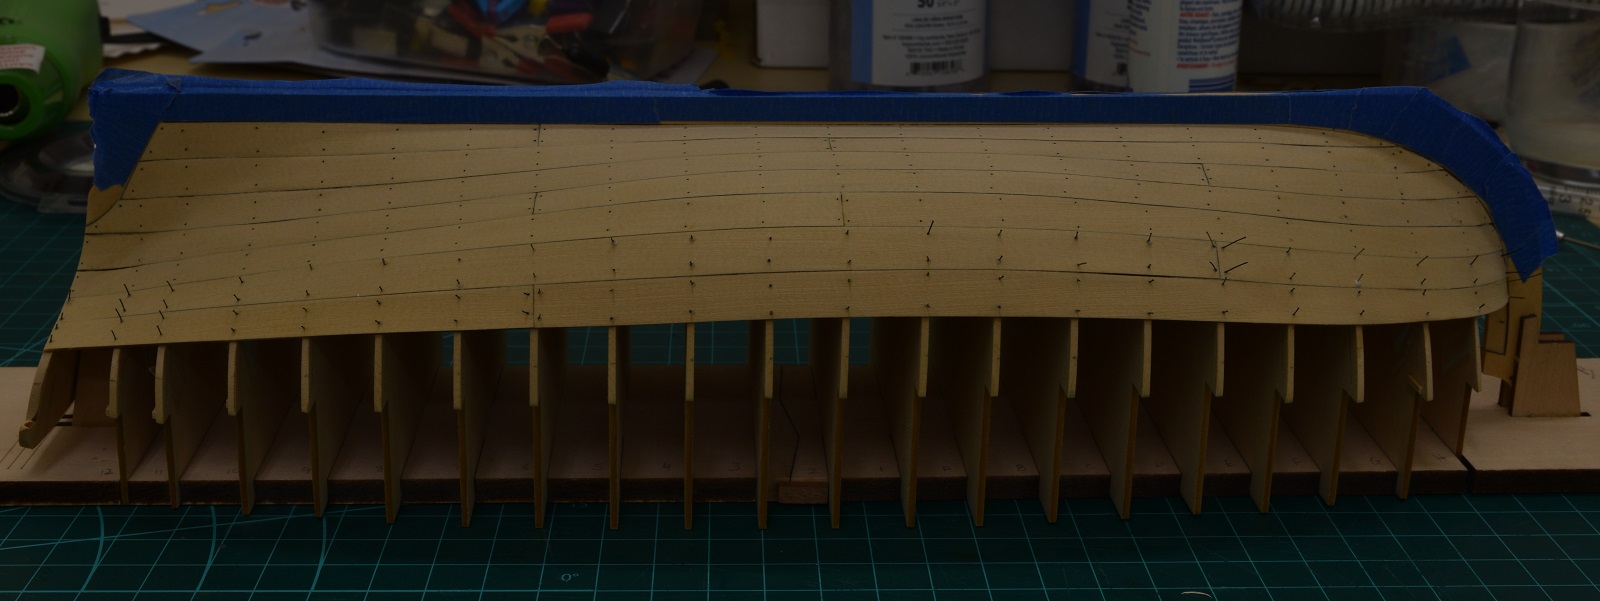 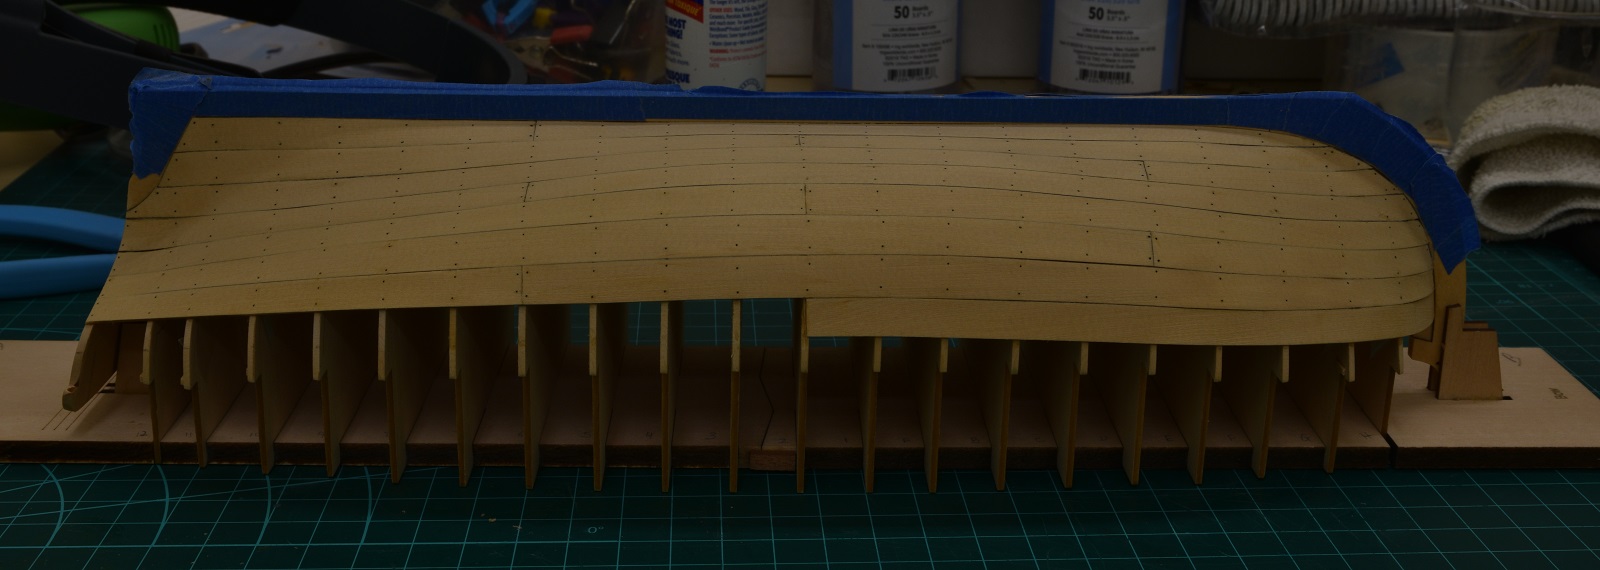 Last plank on the rear of last picture is missing because I screwed it up and started gluing it on the wrong way while I was tired and had to remove it, but I was too slow and it's not usable so I'll have to make a new plank there. So there are three planks to go on that side, and 4 on the other side, then I put the wales over top of those last two rows of planks. After that I think it comes out of the build board and gets the bulkheads all removed, but who knows when I'll get to that at my current pace of almost never working on it!
|
|
#
?
Apr 2, 2021 06:44
|
|


|
Darth Brooks posted:They were stuck in the Suez canal. The first scale model I actually painted was a '57 Corvette, in black and white. I'd painted a couple of Warhammer figures by that point, but obviously there are Warhammer paints and model paints and the two things are completely different. Which meant I absolutely caked this poor car with lovely Testor's enamel. I didn't know thinning was a thing, so I kept trying to even out my paint by applying more of it. Eventually I worked up a kind of wet blend to get it roughly even. If you gave him literally any advice on what he was doing, I'm sure it came out better than most folks' first models.
|
|
#
?
Apr 2, 2021 17:17
|
|

|
I just got back on the model kit 'horse' recently after a 30 year absence. I have a 1-48 Airfix spitfire and Proustian rush coursing through me. It has made me realize one thing, I really want to make a lot of cold war jets, namely a Corsair, Crusasder and maybe a Skyray if I can find one. My biggest issue is I really have no idea what to do with them when I finish, my wife will object to me hanging them off the ceiling. It's nice to be back and nice to see this thread.
|
|
#
?
Apr 3, 2021 22:47
|
|

|
https://www.youtube.com/watch?v=CjjkZ90bCOc What about on a wall instead of the ceiling
|
|
#
?
Apr 3, 2021 23:14
|
|

|
Finished another one of those billy dollhouse kits. I tried some really basic vegetation and had some fun with it. I would love to do a small HO scale diorama for something a bit larger.       
|
|
#
?
Apr 4, 2021 02:51
|
|

|
Granite Octopus posted:Finished another one of those billy dollhouse kits. I tried some really basic vegetation and had some fun with it. I would love to do a small HO scale diorama for something a bit larger. My only experience with those is a Youtube channel where a Japanese person (At least it's all in Japanese) silently builds kits like that for some of their videos. So enjoy when you start going to absurd lengths to add items those kits are missing because this person also fabricates bucks to vacuform tiny dollhouse scale fast food containers and then sculpts tiny food to go into the tiny containers.
|
|
#
?
Apr 4, 2021 03:14
|
|


|
Cthulu Carl posted:My only experience with those is a Youtube channel where a Japanese person (At least it's all in Japanese) silently builds kits like that for some of their videos.
|
|
#
?
Apr 4, 2021 11:59
|
|
|
Pierzak posted:You can't post all that and not link to the channel. OK, yeah, fair. Here's their sliced ham scratchbuild. https://www.youtube.com/watch?v=xydoHxRbsIc
|
|
#
?
Apr 4, 2021 14:53
|
|
|
Granite Octopus posted:Finished another one of those billy dollhouse kits. I tried some really basic vegetation and had some fun with it. I would love to do a small HO scale diorama for something a bit larger. Nice! The craftsmanship is excellent, but I'm pretty sure the vertical flag and the label on the middle tin-can are upside down..
|
|
#
?
Apr 4, 2021 15:26
|
|

|
Kurvi Tasch posted:Nice! The craftsmanship is excellent, but I'm pretty sure the vertical flag and the label on the middle tin-can are upside down.. They are. This reminds me, I have a billy sweet shop dollhouse I need to do....
|
|
#
?
Apr 4, 2021 16:26
|
|

|
I've been interested in getting some Vallejo acrylic polyurethane surface primer. Especially because they offer it in black and while I prefer Tamiya primer it only comes in white and grey. Does anyone have any experience with the Vallejo? Is it ok to use Lacquer paint on top of it? I only do car models and I tend to use Tamiya spray cans which are lacquers.
|
|
#
?
Apr 4, 2021 21:19
|
|
|
Charliegrs posted:I've been interested in getting some Vallejo acrylic polyurethane surface primer. Especially because they offer it in black and while I prefer Tamiya primer it only comes in white and grey. Does anyone have any experience with the Vallejo? Is it ok to use Lacquer paint on top of it? I only do car models and I tend to use Tamiya spray cans which are lacquers. I don't use lacquers, so I dunno how it interacts, but when it comes to primer now, I pretty much just use Vallejo's.
|
|
#
?
Apr 4, 2021 21:27
|
|
|
Charliegrs posted:I've been interested in getting some Vallejo acrylic polyurethane surface primer. Especially because they offer it in black and while I prefer Tamiya primer it only comes in white and grey. Does anyone have any experience with the Vallejo? Is it ok to use Lacquer paint on top of it? I only do car models and I tend to use Tamiya spray cans which are lacquers. I gave up on them. They don't sand well, as they tend to roll into little snakes as you're sanding. And, they don't spray all that impressively. I have turned to Mr Surfacer 1500 cut with Mr Color Leveling Thinner for my primer airbrushing needs.
|
|
#
?
Apr 4, 2021 23:49
|
|
|
Charliegrs posted:I've been interested in getting some Vallejo acrylic polyurethane surface primer. Especially because they offer it in black and while I prefer Tamiya primer it only comes in white and grey. Does anyone have any experience with the Vallejo? Is it ok to use Lacquer paint on top of it? I only do car models and I tend to use Tamiya spray cans which are lacquers. I use a few of their colours, mostly the German Red Brown (73.605) and Russian Green 4BO (73.609). I also went through a bottle of IJA Parched Grass (73.610). They worked very well for me, so I bought a big bottle of their Gloss Black (74.660). It's absolute trash, very bad coverage, stays sticky even after it dries, clogs my airbrush a lot. No idea what's up with that.
|
|
#
?
Apr 5, 2021 00:34
|
|

|
Raskolnikov38 posted:https://www.youtube.com/watch?v=CjjkZ90bCOc That looks like an excellent way of displaying F-104s.
|
|
#
?
Apr 5, 2021 02:00
|
|


|
Gewehr 43 posted:I gave up on them. They don't sand well, as they tend to roll into little snakes as you're sanding. And, they don't spray all that impressively. I have turned to Mr Surfacer 1500 cut with Mr Color Leveling Thinner for my primer airbrushing needs. Same here. I still use a lot of Alclad lacquer primers because I have a few bottles of them to use up, but Mr. Surfacer is definitely the at the top for primers. I'm not a car modeling guy, but from what I have read, enamels give the best gloss finish. If that's the case, then a lacquer based primer is what you want as it is impervious to enamels and their related thinners (mineral spirits, turpentine, turpenoid, etc...).
|
|
#
?
Apr 5, 2021 02:37
|
|


|
Kurvi Tasch posted:Nice! The craftsmanship is excellent, but I'm pretty sure the vertical flag and the label on the middle tin-can are upside down.. thanks! The can is easy to fix, the flag not so much...
|
|
#
?
Apr 5, 2021 03:12
|
|
|
I forgot to post pictures of my latest project that I finished back in January. It is my first 3D printed project with a resin printer and I painted up a Wingman from Apex Legends for my brother-in-law as a housewarming gift. https://www.myminifactory.com/object/3d-print-apex-legends-wingman-86407   Adding real screws for details really makes the model appear much more realistic.
|
|
#
?
Apr 6, 2021 15:02
|
|
|
That's awesome! I initially thought it might be a NERF conversion, but fully 3D printed is even cooler. Great finish on it too. Gotta get a resin printer one of these days, they just keep getting cheaper and the quality keeps going up.
|
|
#
?
Apr 6, 2021 17:18
|
|

|
Old Swerdlow posted:Adding real screws for details really makes the model appear much more realistic. I want to disagree, but then again, I'm not gonna complain to a guy who clearly just uses the gun to kill random assholes and gives no fucks about aesthetics. 
|
|
#
?
Apr 6, 2021 17:23
|
|
|
I�ve completely abandoned my fdm printer since I got my resin one. The higher detail and much easier and less post-processing (sanding layer lines) vastly makes up the slightly higher cost of material. I much prefer 30 minutes to an hour sanding and touch-up of resin versus 20 hours of sanding pla plastic.
|
|
#
?
Apr 6, 2021 17:23
|
|
|
Old Swerdlow posted:I forgot to post pictures of my latest project that I finished back in January. It is my first 3D printed project with a resin printer and I painted up a Wingman from Apex Legends for my brother-in-law as a housewarming gift. Very cool! What's the painting process on this like? I have a 3d printed warhammer prop that I want to paint up but don't know how to get started on something like that. I'm sure having an airbrush will help at least
|
|
#
?
Apr 6, 2021 19:20
|
|

|
Booyah- posted:Very cool! What's the painting process on this like? I have a 3d printed warhammer prop that I want to paint up but don't know how to get started on something like that. I'm sure having an airbrush will help at least I primed with with some automotive filler primer just to fill any layer lines I missed during cleanup. After that I painted it all with acrylic paint through my airbrush. The 3D model was broken up into to component parts so I barely had to do any masking at all.
|
|
#
?
Apr 6, 2021 20:09
|
|
|
Some more work on the KGV. I wans't happy with the look of my small boats mounted on the deck.  So I decided to add on some canvas sheets to give a similiar look to this.   So with some tissue saoked in coloured PVA I think they came out okay. OBVIOUSLY will be washed and weathered in line with the rest of the model.    
|
|
#
?
Apr 6, 2021 21:16
|
|

|
Those tarps turned out fantastically! Great work!
|
|
#
?
Apr 7, 2021 01:03
|
|
|
Yeah those tarps are great. The kind of small detail that makes a model come alive.
|
|
#
?
Apr 7, 2021 22:45
|
|
|
Started a new kit from my stash, the "Posto Di Combattimento" from Panart. A cutaway kit showing the gundeck on a typical 18th century sailing ship.  An interesting kit so far, it feels like an old kit that has been partially updated. It comes with an instruction book with photos, but written instructions are very limited to one word phrases, i.e "glue", "cut". This feels like a concession to updating, because the kit also comes with a huge foldout plan with italian text only, which feels like what the original kit would've come with. Both are still needed though, as the booklet skims over some areas, and completely ignores others. The italian fold-out plan goes into more detail about each piece and subsection, but is looser on the overall dimensions of various pieces and where they go. So you have to use both in concert to work out what goes where, all the while trying to decide which to go with when the plan and booklet actively contradict each other. I'm spending some time feeding the text into Google Translate as well to glean more from the italian instructions.   So far I've got the main framing worked out, and a basic stain applied. I'm using a water-based stain from SamaN, which has great color and coverage, and being water-based means that once it dries, you can still use wood glue over it without reducing the adhesion.   And the beginnings of some gratings that will go on the upper and lower decks. These will get a lighter stain when done, then framed out with walnut to complete them. 
|
|
#
?
Apr 8, 2021 01:14
|
|
|
Well that's unusual to say the least. What does the scale say, 1:23?
|
|
#
?
Apr 8, 2021 02:35
|
|
|
Yep, 1:23. It's about 12" wide, so a nice scale to see all the detail. I was thinking it might be nice to have a figure or two in there, but it's an odd scale to find any nautical figures in.
|
|
#
?
Apr 8, 2021 04:05
|
|
|
So I grabbed the Metal Earth moon lander kit which I think I've seen mentioned in this thread before and holy hell its more difficult than I thought. Anyone have tips on how to get solid connections between pieces and bending flat objects into weird shapes, particularly the RCS thrusters which are supposed to be little cones that I promptly smushed into scrap metal. I'm having trouble applying enough pressure to bend the holding tabs without bending everything around it. But the bigger issue is definitely getting the right cylinder and cone shapes which seem to come up often, and I'm only a few steps in. For reference: https://www.metalearth.com/space/apollo-csm-with-lem I guess its a little reassuring this one is marked as challenging.
|
|
#
?
Apr 8, 2021 15:16
|
|

|
I did that one a while back. For any tricky shapes, trying forming them around something of a similar shape. Those thrust nozzles, you could probably form them around the tip of a blunt pencil. Rods can be formed around a drill bit, that sort of thing. Make sure you use a good pair of needle nose pliers for twisting the tabs once they are in place. I often employed a tiny pair of flat jawed pliers as well, using those to hold the main piece, and the needle nose to twist the tab.
|
|
#
?
Apr 8, 2021 16:02
|
|
|
The tarps look absolutely amazing on those boats. Definitely going to try that on the current build. A question re: paints. I need trans blue for some glass parts on a tank. I have some ordered but it will probably take a week or two to get here, and patience is a word that causes my physical pain to even type*. According to google, it is both possible and impossible to make a normal paint transparent. Modelingguy1 says he did it with perfect results by mixing the paint with Pledge, but Modelingguy2 says that this will invariably cause my airbrush to spontaneously combust and summon eldritch horrors beyond description. Anyone have experience doing this successfully? * I wouldn't mind waiting that much, but it looks like it will be much easier to add it now before completing the kit. And I really want to complete the kit.
|
|
#
?
Apr 8, 2021 17:01
|
|
|
you could try experimenting with the transparent plastic sprues. at worst you�ll just need to give your airbrush a deep clean if the paint goes wrong
|
|
#
?
Apr 8, 2021 17:36
|
|
|
I would honestly just wait for the transparent paints. While you can make any paint "transparent", it's technically a misnomer. You're really just making it translucent, by diluting the pigment particles with a clear binding fluid. It generally works well when you want to apply a thin, translucent layer over another paint layer for blending or altering the overall surface color. It doesn't work amazing when trying to tint clear parts. True transparent paints get their color not from pigment particles, but from a dye. The dye is truly transparent, so when applied to clear parts it tints them without any cloudiness or real reduction in clarity.
|
|
#
?
Apr 8, 2021 19:37
|
|
|
Boaz MacPhereson posted:Now we're talking: The S10 is actually the first kit I built as an adult ") Its a re-hash of a true Syclone kit not originally made by Revell and it shows (but the re-release decals are top notch). Make sure to do a test fit of the suspension to make sure it is to your liking. I left it box stock as I was building a plain Jane S10 but it wound up being monster truck status until I chopped it substantially. Its a re-hash of a true Syclone kit not originally made by Revell and it shows (but the re-release decals are top notch). Make sure to do a test fit of the suspension to make sure it is to your liking. I left it box stock as I was building a plain Jane S10 but it wound up being monster truck status until I chopped it substantially.
|
|
#
?
Apr 8, 2021 19:49
|
|


|
Bloody Hedgehog posted:I'm spending some time feeding the text into Google Translate as well to glean more from the italian instructions. FYI, the google translate app has automatic text recognition-translation-display. It works better for some languages than others, but it's like a magic mirror where the text in your picture swims and then switches over to english (or whatever). It's amazing.
|
|
#
?
Apr 8, 2021 19:51
|
|

|
Vorenus posted:The tarps look absolutely amazing on those boats. Definitely going to try that on the current build. I seem to remember that we diluted Pebeo Vitrail paints with windex and ran those through a spray gun to tint windows for some architectural models at the shop I used to work at. We'd tint the inside of the "glass" and leave the glossy side facing out. The biggest hurdle we had was that we were using plexiglass, which is glued with Weld-on 3 or 4 and which would eat the Pebeo paints unless the glue was applied extremely carefully. This could present some really ugly results on the glass facing of an office building but you would probably be ok with much smaller tank lenses and whatnot.
|
|
#
?
Apr 8, 2021 19:57
|
|
|
Bloody Hedgehog posted:Started a new kit from my stash, the "Posto Di Combattimento" from Panart. A cutaway kit showing the gundeck on a typical 18th century sailing ship. That is pretty neat. Although I keep giggling at the name. COMBAT PLACE
|
|
#
?
Apr 8, 2021 20:11
|
|


|

|
| # ? Jun 5, 2024 05:33 |
|
|
Bloody Hedgehog posted:Those thrust nozzles, you could probably form them around the tip of a blunt pencil. Rods can be formed around a drill bit, that sort of thing. Exactly the tip I needed, thank you!
|
|
#
?
Apr 8, 2021 20:47
|
|