


|
ivantod posted:Thank you both for insights! Wish I would have seen this sooner, I finally stumbled back into this thread after a very long hiatus. Long story short, if you have more questions about what to expect or whatever, ask away. I have one probably 1/3 where stuff went to hell (Covid times, I had it going through eagle moss at the time and they went radio silent) and was thinking of just resuming it and was looking at the pricing now...yikes...basically I would have to start up a long conversation with them on where I'm at now with "Issues" to get it back on track. But yeah, expect a wheel and dashboard one month, next they'll send you a fuel tank. Sort of a hilarious thing I have the display case which they shipped way early and I see they want extra per month for it. Ugh. Scammy of course, but hey just money on stupid things that I could have spent better elsewhere. For a change of topic... On a whim, decided to pick up trying wooden ship modeling a go. Having no effing clue on what's good/what's bad/who or what to avoid, bought an Occre Albatross. Gotta say, it has been enjoyable. Just easy going. It's wood of course...able to fix quite most flaws as you go. Just taking my time, very therapeutic. It is flipping amazing how much you learn as you go and "what I would do different next time".
|
 #
?
Dec 6, 2023 19:57
#
?
Dec 6, 2023 19:57
|
|
 C-Bangin' it
")

|

|
| # ? May 28, 2024 07:36 |
|
|
ColonelJohnMatrix posted:Looking to try a 1/48 tank- is there a Tamiya kit that's generally considered to be a very good one with minimal parts? Doing it as a palette cleanse between some larger scale more intricate builds. Or maybe an airplane at that scale, even? Seconding what others have said, but if you want the absolute minimum number of parts, I would recommend the M4A1 in 1/48th, since the hull is one cast part that you stick all the various gribbly bits onto.
|
|
#
?
Dec 6, 2023 20:53
|
|

|
Colostomy Bag posted:Wish I would have seen this sooner, I finally stumbled back into this thread after a very long hiatus. Occre is a pretty good brand and has instructions that I would rate on the higher end of ship model offerings. I think the best models are the ones designed by Chris Watton, or sold directly from Chris Watton's shop, Vanguard models. One thing to keep in mind about ship models is that if you have a 3d printer you can replace some of the white metal castings that come in some kits with much higher detail prints.
|
|
#
?
Dec 6, 2023 21:20
|
|


|
Colostomy Bag posted:On a whim, decided to pick up trying wooden ship modeling a go. Having no effing clue on what's good/what's bad/who or what to avoid, bought an Occre Albatross. Gotta say, it has been enjoyable. Just easy going. It's wood of course...able to fix quite most flaws as you go. Just taking my time, very therapeutic. It is flipping amazing how much you learn as you go and "what I would do different next time". Welcome to the crazy old man side of the hobby. Lol. Edit: If you haven't already found this site, I highly recommend registering (free) on https://modelshipworld.com/ It is highly likely that you'll find multiple build logs for that specific kit, as well as an amazing amount of general information and helpful people for building wooden ships. The Locator fucked around with this message at 22:33 on Dec 6, 2023 |
|
#
?
Dec 6, 2023 22:31
|
|


|
Skunkduster posted:As Chuck_D said, that style of airbrush booth is pretty much the same from brand to brand. I have one that is 6-7 years old or so and I found out that the plastic it is made of dissolves and gets all gummy when it comes into contact with lacquers. I thin lacquers and clean my airbrush in the booth, so I'm spilling paint and thinner in there all the time. I solved the problem by cutting down a sheet of some sort of polyethylene (HDPE, LDPE, UHMW, etc.) and putting that in there as a base plate. A piece of corrugated cardboard would probably work just as well. I almost never airbrush enamels, but I believe that enamel paints and mineral spirits will not react with the plastic. Cheers, I'll just grab one then. I'm just gonna be using it with Gundam paint markers on Gundam and Moderoid kits, so that shouldn't be an issue in my case.
|
|
#
?
Dec 7, 2023 01:32
|
|

|
I�m also new to model ship building. After building a few flotillas worth of gaming pieces for the Black Seas tabletop game my wife bought me a Model Shipways Phantom kit that she found in a thrift store because �I like making little boats so much.� There�s a lot of helpful build logs online thankfully and it�s been a fairly relaxing experience shaping the hull, but one thing all the logs seem to gloss over is drawing the waterline. Is there a simple trick to drawing an symmetrical line that doesn�t involve buying some kind of laser tool or filling a bathtub with talc?
|
|
#
?
Dec 7, 2023 14:28
|
|

|
IncredibleIgloo posted:Occre is a pretty good brand and has instructions that I would rate on the higher end of ship model offerings. I think the best models are the ones designed by Chris Watton, or sold directly from Chris Watton's shop, Vanguard models. The Locator posted:Welcome to the crazy old man side of the hobby. Lol. Thank you both. Spent the morning on that forum looking at builds. I hope Chris makes money..the R&D/time/production on that stuff is incredible.
|
|
#
?
Dec 7, 2023 16:29
|
|
|
Drunkboxer posted:I�m also new to model ship building. After building a few flotillas worth of gaming pieces for the Black Seas tabletop game my wife bought me a Model Shipways Phantom kit that she found in a thrift store because �I like making little boats so much.� There�s a lot of helpful build logs online thankfully and it�s been a fairly relaxing experience shaping the hull, but one thing all the logs seem to gloss over is drawing the waterline. Is there a simple trick to drawing an symmetrical line that doesn�t involve buying some kind of laser tool or filling a bathtub with talc? Temporarily attach the hull to something that holds it upright and level and allows access to all sides (so like clamp the keel from below). Get a small piece of wood, drill a hold into it and stick one of the dowels or really any other piece of wood into the hole sticking upright. To this, tape or clamp a pencil that you adjust to touch the hull right at the waterline. Move the pencil holder thing around the hull drawing a line. They make actual tools for doing this, but it's something that's pretty easy to rig up with a little bit of imagination. You are trying to make something like this, but simpler and one-time use just for this model. https://vanguardmodels.co.uk/product/waterline-marker/
|
|
#
?
Dec 7, 2023 16:37
|
|
|
Colostomy Bag posted:Thank you both. Spent the morning on that forum looking at builds. I hope Chris makes money..the R&D/time/production on that stuff is incredible. Chris's business is doing well enough that they have outgrown their house and need to find a larger space before he can add another large model kit to his lineup! He has a really cool thread in the marketplace subforum of Model Ship World where he tells everyone what is on his project list for the next year (and even beyond) as well as posting pictures of his projects as he develops them.
|
|
#
?
Dec 7, 2023 16:39
|
|
|
Drunkboxer posted:filling a bathtub with talc? Please tell me no one has actually done this.
|
|
#
?
Dec 7, 2023 16:57
|
|

|
Bloody Hedgehog posted:Please tell me no one has actually done this. Please tell me someone has. 
|
|
#
?
Dec 7, 2023 17:19
|
|


|
One thing I might recommend before going whole hog on a huge ship is to do a cross section to get a handle on the rigging.
|
|
#
?
Dec 7, 2023 17:22
|
|
|
The Locator posted:Temporarily attach the hull to something that holds it upright and level and allows access to all sides (so like clamp the keel from below). Ah yeah, I saw some things like this but when I was looking at the schematic last night I was worried because it didn�t look like the water line was parallel to the keel. Now I get that can adjust for that though with a clamp obviously. I was just being dumb/hoping for an easier method. Thanks. Bloody Hedgehog posted:Please tell me no one has actually done this.  I read it here this morning: I read it here this morning:https://www.modelboatmayhem.co.uk/forum/index.php?topic=68366.0 quote:
quote:
|
|
#
?
Dec 7, 2023 19:08
|
|
|
My reaction to the talc bath method is that there must surely be a more suitable water container than a whole rear end bath tub for this.
|
|
#
?
Dec 7, 2023 21:57
|
|


|
Some model ships are huge, and if you were using this weirdo method, a bathtub would be needed.
|
|
#
?
Dec 7, 2023 22:37
|
|
|
Warmachine posted:My reaction to the talc bath method is that there must surely be a more suitable water container than a whole rear end bath tub for this. The toilet?
|
|
#
?
Dec 7, 2023 23:06
|
|
|
Drunkboxer posted:Ah yeah, I saw some things like this but when I was looking at the schematic last night I was worried because it didn�t look like the water line was parallel to the keel. Now I get that can adjust for that though with a clamp obviously. I was just being dumb/hoping for an easier method. Thanks. Almost none of the older wooden ships actually sit with the keel parallel to the waterline. You need to measure at the bow and stern until you have the correct points at the same level based on the plans and figure out how to hold the ship at that angle to use the pencil moving around the hull method. I skipped this whole problem on my last ship by simply not marking the waterline in any way at all!
|
|
#
?
Dec 8, 2023 00:58
|
|
|
Drunkboxer posted:The toilet? Tried that, drat thing came out dyed blue.
|
|
#
?
Dec 8, 2023 01:22
|
|
|
I'm not a ship building guy, so maybe this is a terrible suggestion. How about placing a light source level with the boat, then using a piece of cardboard as a light mask to cast a shadow along the edge of the boat and using that as a reference for the waterline?
|
|
#
?
Dec 8, 2023 03:24
|
|


|
Warmachine posted:My reaction to the talc bath method is that there must surely be a more suitable water container than a whole rear end bath tub for this. https://youtu.be/6JJWBdelpeA?si=4skw8tCk1oZdTzDz Colostomy Bag posted:Tried that, drat thing came out dyed blue.
|
|
#
?
Dec 8, 2023 03:30
|
|


|
Colostomy Bag posted:Tried that, drat thing came out dyed blue. Flush first. Also drink less Dew.
|
|
#
?
Dec 8, 2023 05:40
|
|
|
I�m fairly new to modeling, started a few months ago and I�ve been working on learning techniques. I am building the Polar Lights Defiant right now, it�s coming out really good. I want to weather it but I have a lot of questions. Right now I use acrylic paints. I prime, then base coat in black, then work up to greys and so on. Then apply a gloss clear coat, apply decals, then seal it all up with a flat clear coat. I use Tamiya paints and TS-13 clear coat and TS-80 flat clear coat. I air brush most of it. So when it comes to weathering I�ve seen a lot of videos where people apply some paint, then work it in/fade it/remove it using a brush dipped in thinner. End result is a thin translucent layer of what really looks like carbon and dirt streaks. Can I do this with acrylics on top of all the acrylics above? I worry about dissolving and destroying the work underneath or screwing up the clear coat. I think I see people use enamel paints and enamel thinner for this step, and I imagine they�re using them on top of acrylics? Does enamel thinner not affect acrylics? It seems like the really high end YouTube model makers layer a lot of different paint types. I�ve seen acrylic/enamel, oil brush pens used on painted models and blended in, I don�t want to work with lacquers I don�t have a respirator. But these techniques are the stuff I want to learn. What all these magic combinations are� Here�s some pics. First model I�ve ever posted pics of:   The detailing in the paint rarely comes through the finished model, there are so many decals. 
|
|
#
?
Dec 8, 2023 06:31
|
|


|
Your concerns and assumptions are all correct. Acrylics are hard to blend as they dry too quickly. Enamels and oils are the way to go there. I recommend oils for a beginner as just a couple earthy and gray tones will fit most needs and oils are very forgiving. If you mess up, just use thinner to wipe them off and start over. Enamels, in my experience, tend to be a little more permanent a little more quickly. Thinners in enamels and oils typically do not attack acrylics, but I still wouldn't slop them onto an acrylic base coat. Use them sparingly. When weathering, less is more and subtlety is key. Also consider getting some pastel chalks from a local hobby store, sanding them down to a powder and using them to enhance exhausts or other dirty areas. They can add a drier looking dirt effect that complements the oils and enamels.
|
|
#
?
Dec 8, 2023 10:34
|
|
|
Even a big hobby/art store like Michael's should have packs of chalk pastels. Can't think of the brand, but you get eight pastel sticks. One pack has earth tones good for rust and dirt, and the other has a range of grays. Got mine decades ago, and they're still going strong. For other colors, you should be able to get a variety of colors as individual sticks. I found getting lighter warm and cool greens really good for fading effects on plane paint jobs. A more specialized art place should have pots of chalk pastel powders, but they're pricy. On topic, I used the rust color and green for the rust ring and streaking on the 1/1000 TOS Enterprise. Looks really good. Just make sure they're chalk pastels and not oil. Totally different animal!
|
|
#
?
Dec 9, 2023 21:57
|
|

|
Quick little review. If anyone is looking to brighten their work area, I bought the below set of two 2ft LED lights, and they are very good. Nice neutral color, very bright. You wouldn't be able to use them to light your entire hobby area, but if you want to increase the light of an airbrush booth or hung underneath a shelf to light your assembly area, they'd work perfectly. Nice and cheap too! https://www.amazon.com/Barrina-Fixt...148&sr=8-5&th=1 
|
|
#
?
Dec 12, 2023 01:49
|
|
|
I love my LED strips but am one of those people who can't stand the AC flickering. LED strips, and specifically COB strips, are great too. Get them with adhesive backing, cut to size, and stick everywhere. Some assembly required. 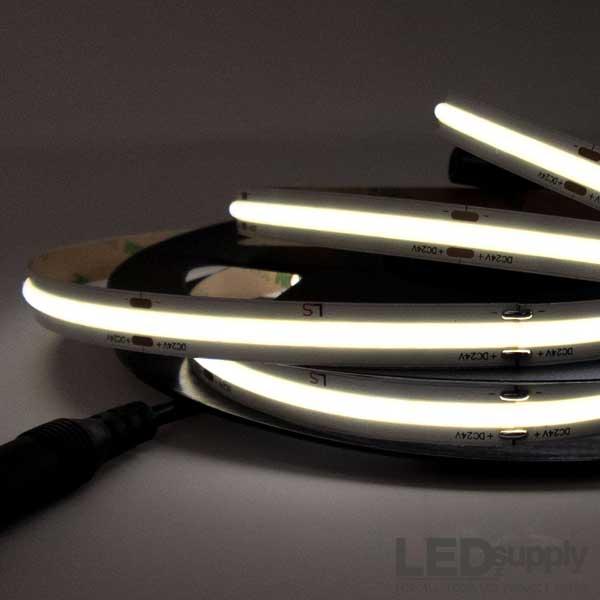 Photo stolen from random seller.
|
|
#
?
Dec 12, 2023 02:13
|
|


|
I'll say it again, in any hobby where fine detail work is a main focus, there is no substitute for more light. I have 11 light bulbs plus a 12' strip of LEDs in my hobby room.
|
|
#
?
Dec 12, 2023 11:51
|
|
|
It's finished and heading off to my brother at      
|
|
#
?
Dec 15, 2023 10:40
|
|


|
Anyone know a good way to darken these machine guns? They were painted with Tamiya gunmetal acrylic. They are a bit too "bright" in my opinion. I have Tamiya smoke (clear black) acrylic maybe if I thin it a bunch and paint over the guns that will work?
|
|
#
?
Dec 16, 2023 00:49
|
|
|
I would imagine GW/Citadel Nuln Oil would be the go to for this situation.
|
|
#
?
Dec 16, 2023 00:54
|
|
|
IncredibleIgloo posted:I would imagine GW/Citadel Nuln Oil would be the go to for this situation. Huh never heard of that stuff. I looked it up, looks like its water based acrylic? Maybe I can just use heavily thinned Vallejo black paint. Because I have it lol. Also Tamiya acrylic paint retarder is pretty amazing stuff. Im used to Tamiya not being great for brush painting because it dries so incredibly fast since it's solvent based. But last night I was brush painting various colors using the retarder and it stayed wet for a long time. I was brush painting Vallejo as well and the Tamiya stayed wet basically the same amount of time. I wasn't brush painting big parts, that might still be too much for Tamiya.
|
|
#
?
Dec 16, 2023 01:17
|
|
|
Fearless posted:It's finished and heading off to my brother at Fantastic stuff, I'm thinking about picking up the Reliant myself. How difficult was the lighting?
|
|
#
?
Dec 16, 2023 01:25
|
|


|
Charliegrs posted:Huh never heard of that stuff. I looked it up, looks like its water based acrylic? Maybe I can just use heavily thinned Vallejo black paint. Because I have it lol. Yeah, it is an acrylic water based wash. Vallejo and Mig I think make some armor specific washes. I just checked and Vallejo makes a specific black wash. Typically the medium is slightly different than water, so a diluted black paint won't behave quite the same as a wash. If you don't have any washes it would be worth investing in Nuln Oil and Agrax Earthshade from Citadel. You can use them effectively on pretty much anything.
|
|
#
?
Dec 16, 2023 01:36
|
|
|
Charliegrs posted:Huh never heard of that stuff. I looked it up, looks like its water based acrylic? Maybe I can just use heavily thinned Vallejo black paint. Because I have it lol. Heavily thinned paint will work fine. If you have something to break the surface tension that will be best. Dish soap was apparently the go to for years but I�ve never tried that, so test first! If you have flow improver for acrylic that�s perfect. Brand names don�t matter too much. With practice this is also a great way of bringing out details on a drab panel. Just pin wash around any gaps or rivets.
|
|
#
?
Dec 16, 2023 23:52
|
|


|
Charliegrs posted:Anyone know a good way to darken these machine guns? i use black mixed with metal
|
|
#
?
Dec 17, 2023 03:34
|
|

|
Any of the dark contrast/speed paints would work as well.
|
|
#
?
Dec 17, 2023 03:55
|
|
|
Can someone please help me airbrushing a decent gloss coat? I have a dual action airbrush and vallejo gloss. I have water, thinner, flow improver. Whatever combination of mixtures/PSI/distance I try I either end up with orange peel or the whole part being flooded. Am I being thick? Is there a better water-based gloss I should be using instead? Should I just give-in and use Tamiya / Mr. Hobby / etc. ? Or aerosol? (I'm UK based)
|
|
#
?
Dec 17, 2023 13:59
|
|

|
Charliegrs posted:Huh never heard of that stuff. I looked it up, looks like its water based acrylic? Maybe I can just use heavily thinned Vallejo black paint. Because I have it lol. Try adding AK drying retarder when you thin out vallejo. it's magic for glazes.
|
|
#
?
Dec 17, 2023 15:50
|
|

|
Southern Heel posted:Can someone please help me airbrushing a decent gloss coat? I have a dual action airbrush and vallejo gloss. I have water, thinner, flow improver. Whatever combination of mixtures/PSI/distance I try I either end up with orange peel or the whole part being flooded. Am I being thick? Is there a better water-based gloss I should be using instead? Should I just give-in and use Tamiya / Mr. Hobby / etc. ? Or aerosol? (I'm UK based) You can also try Alclad Aqua Gloss clear. Despite being from Alclad, it is water-based. Don't thin, don't shake, just put it in the airbrush @15-20psi and spray.
|
|
#
?
Dec 17, 2023 16:28
|
|
|

|
| # ? May 28, 2024 07:36 |
|
|
Southern Heel posted:Can someone please help me airbrushing a decent gloss coat? I have a dual action airbrush and vallejo gloss. I have water, thinner, flow improver. Whatever combination of mixtures/PSI/distance I try I either end up with orange peel or the whole part being flooded. Am I being thick? Is there a better water-based gloss I should be using instead? Should I just give-in and use Tamiya / Mr. Hobby / etc. ? Or aerosol? (I'm UK based) Is this for car models?
|
|
#
?
Dec 17, 2023 20:57
|
|