|
mailmanrob fucked around with this message at 22:09 on Feb 16, 2022 |
 #
?
Apr 20, 2009 00:28
#
?
Apr 20, 2009 00:28
|
|


|

|
| # ? May 21, 2024 14:22 |
|
|
^^^^ Definitely interested in seeing the beer pong tables. That cab is loving awesome, great work.
|
|
#
?
Apr 20, 2009 02:18
|
|
|
Built a new desk this weekend. A bit over 6' wide, 3' deep, 33" tall at the highest point. Still need to make the door for the far end and buy longer cables for the LCDs to get everything where I want it. All 3/4" MDF, unpainted, and never will be.
|
|
#
?
Apr 22, 2009 05:15
|
|
|
Got bored and decided to build a TARDIS out of some wood and light it up. Around 8" tall.   Bonus video: View My Video Think I posted this in 1 of the older project threads.  Also built a Flux Capacitor. Took me over a year cause I got really lazy about actually putting the thing together.  And video (ignore the music, I forgot to turn it off). The flashing is changing frequency because I am turning the dial on the top for speed. View My Video CombatCupcake fucked around with this message at 20:15 on Apr 22, 2009 |
|
#
?
Apr 22, 2009 19:58
|
|
|
widefault posted:Built a new desk this weekend.
|
|
#
?
Apr 22, 2009 22:23
|
|

|
Corla Plankun posted:That unpainted MDF is going to look like a poo poo sandwhich after two weeks of doritos and oily goon. Yep, and I'm okay with that. This will also end up being a work surface for electronics projects, metalwork, etc. Painted or not it'll be rough in a few weeks.
|
|
#
?
Apr 23, 2009 01:05
|
|
|
I need help changing a doorknob. my old knob is a lever style, with a pin-press? style lock, which means I can't lock it from outside. I am changing it to a very similar knob with a lock and keyhole. the problem is, I cannot remove the cover completely. There are no screws on the lever cover, and I really can't figure out what to do. On the side of the handles there's a hole on each one, if that matters, but pressing something in fairly hard did nothing. Any ideas?
|
|
#
?
Apr 23, 2009 02:10
|
|


|
Lord Psychodin posted:I need help changing a doorknob. my old knob is a lever style, with a pin-press? style lock, which means I can't lock it from outside. I am changing it to a very similar knob with a lock and keyhole. the problem is, I cannot remove the cover completely. There are no screws on the lever cover, and I really can't figure out what to do. On the side of the handles there's a hole on each one, if that matters, but pressing something in fairly hard did nothing. There's either a spring pin inside those holes (try sticking something in and moving it around to see if you can catch/pull on anything), or the whole thing screws/unscrews. Also, did you unscrew and remove the end plate (the part on the edge of the door)? Sometimes (though rarely) that part holds the whole mess together.
|
|
#
?
Apr 23, 2009 17:03
|
|

|
JohnnySmitch posted:There's either a spring pin inside those holes (try sticking something in and moving it around to see if you can catch/pull on anything), or the whole thing screws/unscrews. Also, did you unscrew and remove the end plate (the part on the edge of the door)? Sometimes (though rarely) that part holds the whole mess together. OMG thank you for this. I want to redo the door knobs in our house and they are all like this. To do my husband's office, I literally tore the old knob off, bending the metal and such. It took more time than I'm willing to do for any of the other rooms.
|
|
#
?
Apr 23, 2009 18:47
|
|
|
Oh god TFR is leaking    I started out with a Vz. 24 rifle stock that I picked up for Cyrano4747...  ...and hacked the front bit of it off so he could fix some old Nazi junk.  Not wanting to waste a perfectly good piece of European hardwood I hacked away just behind the magazine so I could have a stable base to mount a camera to.   Using a rasp, cross cut hand saw, a bolt with 1/4"-20 UN thread pitch, and pre-existing holes in the stock I managed to get the stock and camera attached.    Not wanting to leave well enough alone, I decided the next step would have to be to attach an "auto focus assist" for those extra dark portraits.  Using a wood refinishing technique outlined by Cyrano4747 in TFR I went ahead and cleaned the cosmoline and grime out of the wood. Unfortunately, I lost the rather attractive red color the grease had imparted into the stock, but at least it wouldn't leave a sticky residue on my face anymore.     I still wasn't satisfied with a simple light so I decided to try and add some more "practical" features but the pine I used to fabricate the mount was too weak to support the weight of the stock and camera and it gave way when I was fiddling around with it.      Using a very inexpensive shutter release I picked up off of Deal Extreme I continued my quest for the ultimate in tactical camera accessories by integrating a trigger into the stock and fabricating a stronger bipod/secondary accessory rail attachment.     At this point I think I can declare this project complete.
|
|
#
?
May 5, 2009 08:34
|
|


|
That cameragun is awesome. ")
|
|
#
?
May 5, 2009 17:30
|
|
|
Miso Beno posted:Tactical Camera Awesome, I just saw this project on the front page of Slashdot. Cool project.
|
|
#
?
May 5, 2009 22:31
|
|

|
Summer Project 2009: Giant Party Jenga  Last year two friends and I built a folding beer pong table. This year, we built a giant game of Jenga with drinking game rules, similar to Kings, on the blocks. You play it like Jenga, except you have to do whatever the blocks say on them.  Click here for the full 845x634 image. Drink X: Drink for that many many seconds. Give X: Give out that many seconds. Shot: Take a shot. Rule: Make up a rule that lasts the whole game. Guys/Girls: That gender drinks. Social: Everybody drinks. 1 More: Pull another block out. Most of the blocks are self explanatory. Yes, there is a high-five block.  Click here for the full 845x634 image. We used a square piece of plywood for the base, and you can turn the legs to level the platform.  Click here for the full 845x634 image. The 54 bricks are made out of 2x3s. They are 7-1/2" long. We sanded them down and rounded the corners. We wanted to do 128 pieces originally, but it would have been too tall and unstable.  Click here for the full 634x845 image. You can see that once you start playing, the game can get to over 3ft tall off of the base.  Click here for the full 845x634 image. We used a wood burning tool to burn the rules into the bricks. It looks a lot better than when we planned on using permanent marker.  Click here for the full 634x845 image. We played our first game today. I can tell it's going to be really fun to play this summer at parties/barbecues. We just need to waterproof the blocks and we'll be ready to go for Memorial Day. zodwallop fucked around with this message at 23:03 on May 17, 2009 |
|
#
?
May 17, 2009 22:53
|
|

|
Holy hell what a great idea. Nice job on the writing and sanding too, love the leveling legs.
|
|
#
?
May 19, 2009 05:24
|
|


|
I made my wife a Potting Bench. She�s been asking for one for a few years and I finally decided to put one together.  I looked at a few pictures and plans on the web, but based most of the design on the dimensions found Here. I made it out of pressure treated wood so it would last outdoors. I decided against cedar because it would have cost just way too much where I live. Basically a 2x4 frame with 2x6�s finishing it out. Also, I used exterior deck screws so the project shouldn�t rust or deteriorate much at all.  It has a potting soil container (trash can) inset in the bench, and it also has a 12" slatted section so that any spillage of soil while working can be easily collected with a container on the bottom shelf.  Nice decorative hooks for garden tools under the top shelf really helps give it a great look. The whole thing cost me about $45 in materials.
|
|
#
?
Jun 14, 2009 05:56
|
|

|
You guys with all your woodworking projects have got me drooling. I really, really wish I had access to a full woodshop. gently caress, living in an apartment means I can't even really use basic tools. Anyways, here's a custom MAME cab I built a few years ago. The main cab is an old Mortal Kombat 2 cab. Stripped it, filled dents, sanded, and then refinished it. The control panel was custom built, woodwork and electronics. All the art was done in Illustrator and then printed off by a well known arcade art shop. I even managed to whip up a custom MAME front end.        
|
|
#
?
Jun 15, 2009 07:13
|
|

|
Bloody Hedgehog posted:You guys with all your woodworking projects have got me drooling. I really, really wish I had access to a full woodshop. gently caress, living in an apartment means I can't even really use basic tools. That is amazing. Have you ever sent jpg'z to any of the Futurama people or fansites?
|
|
#
?
Jun 15, 2009 17:15
|
|

|
Here's a coffee table my dad and I made through rasturbation. Click here for the full 1024x768 image.
|
|
#
?
Jun 16, 2009 06:10
|
|
|
fahrvergnugen posted:That is amazing. Have you ever sent jpg'z to any of the Futurama people or fansites? Hmmm, it never occurred to me, but now you've got me thinking.... Futurama Season 6 DVD Disc 2 - The Coolest Arcade Cab Ever!
|
|
#
?
Jun 16, 2009 08:36
|
|
|
Bloody Hedgehog posted:Hmmm, it never occurred to me, but now you've got me thinking.... Planned for inclusion in the inevitable box set they'll release in late '10 or '11?
|
|
#
?
Jun 16, 2009 17:32
|
|
|
I've been having trouble finding a good display for my artwork to sell on Etsy. I was also going crazy over what to do with this tiny wall in my living room. We shall kill two birds with one stone with my project. Mandatory before shot of bare wall. Some accessories I plan on using for a 'set' are strewn about on the table.  Click here for the full 500x667 image. I scored this fantastic frame from my dad. He was a lifetime employee at a local lithograph company before it got shut down. Sometimes he'd bring home rejected/extra prints and other print-related stuff. One of them was this old frame that I decided to give a second life. In the picture below is the beginning of my ribbon weaving project. It's really transparent and hard to see without light directly on it.  Click here for the full 500x667 image. I used tacky glue to affix the ribbon to the frame, and some super strong 3M Command strips so the frame can remain flush with the wall. I realized the wood became warped and wobbly after years of sitting in a garage. So while my ribbon weaving doesn't look straight, it actually is.  With some of my mom's clothespins as a personal touch I officially completed this project.  Click here for the full 500x667 image. Too many Saturday morning HGTV shows has made me learn how to 'stage' props and other random decorative things. The seashells on the shelf and in the vase have been collecting dust for years before I figured I could make good use of them.  Click here for the full 500x667 image.
|
|
#
?
Jun 20, 2009 05:09
|
|

|
I'm working on a commission for some ne plus ultra audiophile headphone amplifiers. Here's the current case design mockup: 
|
|
#
?
Jun 26, 2009 07:53
|
|
|
Here's something a couple of us are doing over in the Magic the Gathering thread in TGD. Take a bunch of the same card and cut layers out with a scalpel. Add some abacus beads to make a nifty life counter.  https://www.youtube.com/watch?v=BOY0yIFaPDg
|
|
#
?
Jul 7, 2009 20:52
|
|

|
This might count. (sorry if it doesn't! I'll remove it) My girlfriend bought a Toyota 4Runner '94 and we decided to repaint it on a budget. It was the perfect opportunity to try the Tremclad paint method (also knowns as the 50$ dollar paint job, or roller paint etc). The idea is this; you thin the paint down with mineral spirit to make it possible to be applied with a roller. (or in my case, a foam brush) I _think_ my results are promising so far. The surface preparation is definitely 80% of the result thought. Here's the first coat, you can see that it goes on very thin:  Me applying the first coat on one of front fender (I eventually found a better way to keep the fender steady and to make it easier to work on):  I'd show the coats stacking on but you can simply check the photo set, it's French but I'm sure you can manage. This is where I am at, the last coat on the hood (Going to sand it with 1000 then 2000 grit and polish it up to a shine), 2 coats to go on the fenders because I had to sand the fenders back down to bare metal because my surface prep. sucked; 
IsaacNewton fucked around with this message at 13:22 on Jul 9, 2009 |
|
#
?
Jul 7, 2009 21:13
|
|

|
Bloody Hedgehog posted:ARCADEORAMA Fuckin sweet! I just picked up an old cabinet (Arlington Horse Racing) with the same intentions! Where did you buy your buttons and how did you interface them with your PC? Mine's going to be much simpler (2 sticks, 6 buttons, 2 start buttons) as the cabinet is pretty small. Any tips? Also, can you interface the coin slots as well? (I'd like to turn them on at parties haha)
|
|
#
?
Jul 7, 2009 21:35
|
|

|
The Yellow Ant posted:Here's something a couple of us are doing over in the Magic the Gathering thread in TGD. That is *cool*, but I'd feel bad cutting up the cards I happened to keep since 1994 or so haha. I have a large box full when I played back in junior high.
|
|
#
?
Jul 8, 2009 06:13
|
|
|
mafoose posted:Fuckin sweet! I bought the buttons from DiveMaster, a poster over at the Arcade Controls forums. He is a wholesaler for companies like Happ and Ultimarc which make the best North American style arcade controls. Lizard Lick Amusements is another trusted seller that has a wide range of product. If you want japanese style controls, your best bet would be Akihabarashop. He buys direct from the companies in Japan and has excellent prices. For the interface, the two popular options are to use a prexisting JAMMA harness, or the custom made I-Pac interface boards from Ultimarc. I haven't gone the JAMMA route yet, so I can't speak to that, but the I-Pac boards are great. Very simple to hook up with screw terminals, and the included setup software is dead simple.
|
|
#
?
Jul 8, 2009 06:24
|
|
|
optikalus posted:That is *cool*, but I'd feel bad cutting up the cards I happened to keep since 1994 or so haha. I have a large box full when I played back in junior high.
|
|
#
?
Jul 8, 2009 23:54
|
|
|
IsaacNewton posted:My girlfriend bought a Toyota 4Runner '94 and we decided to repaint it on a budget. That looks absolutely amazing for the method used. Here's a direct link to the Rickwreck $50 paint job page for anyone whose interester but can't figure out his menu. I'm so glad you posted this as I've been looking for a way to do cheap automotive style gloss paint on a large scale for one of my own projects, but getting something sprayed looked rediculously expensive. In the forum linked off that guys articles he mentions just using the roller to take out the air bubbles and bumps. How did you end up applying the coats? Were you able to apply the paint onto vertical panels or did you move everything to a horizontal before applying the coats? Now to find out what its called in the UK... v1nce fucked around with this message at 09:29 on Jul 9, 2009 |
|
#
?
Jul 9, 2009 09:26
|
|

|
v1nce posted:Here's a direct link to the Rickwreck $50 paint job page for anyone whose interester but can't figure out his menu. Whoops sorry about that, didn't realize the site had iframes. v1nce posted:In the forum linked off that guys articles he mentions just using the roller to take out the air bubbles and bumps. How did you end up applying the coats? Were you able to apply the paint onto vertical panels or did you move everything to a horizontal before applying the coats? You will find this interesting, the thread goes on forever (quite literally, it's up to 170 or so pages all in all) about this technique. I started off with the fender horizontal but quickly found it cumbersome and dropped it on some workhorses. You shouldn't have too many runs unless either you are applying it too thick or the mix is too thin.
|
|
#
?
Jul 9, 2009 13:20
|
|
|
A tube screamer TS-808 clone. Built inside a directional coupler box. The first pedal i build for my so called guitar pedal company, Hubris. 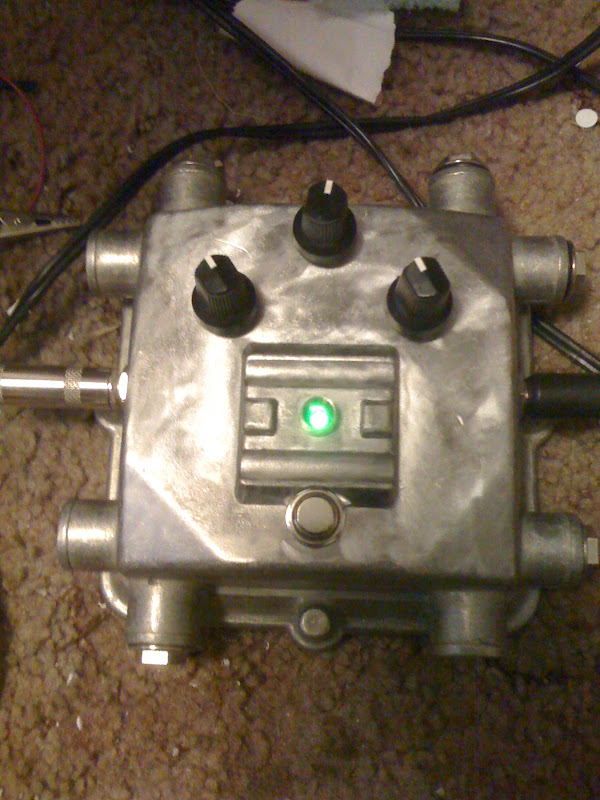 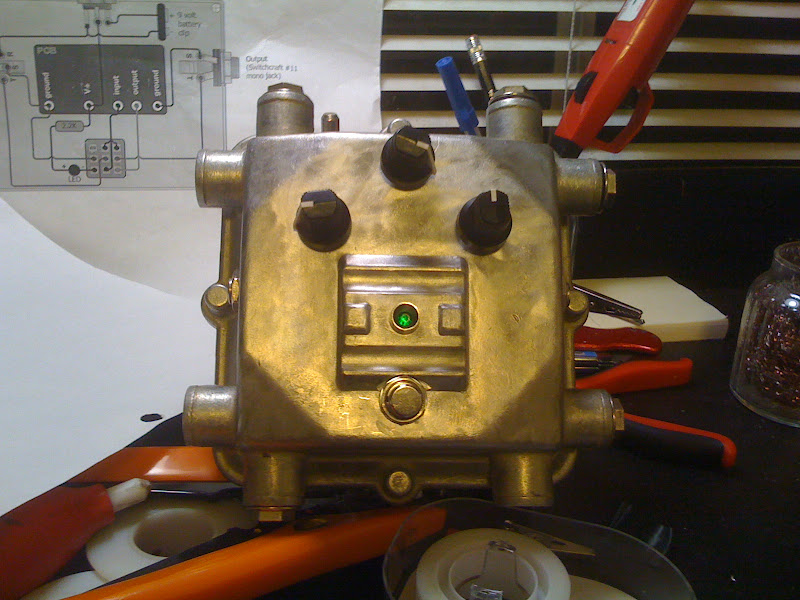 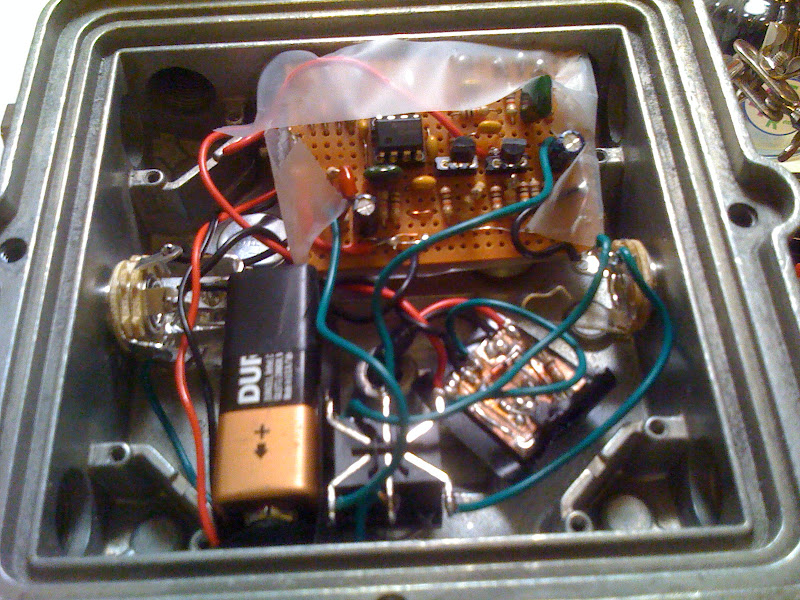 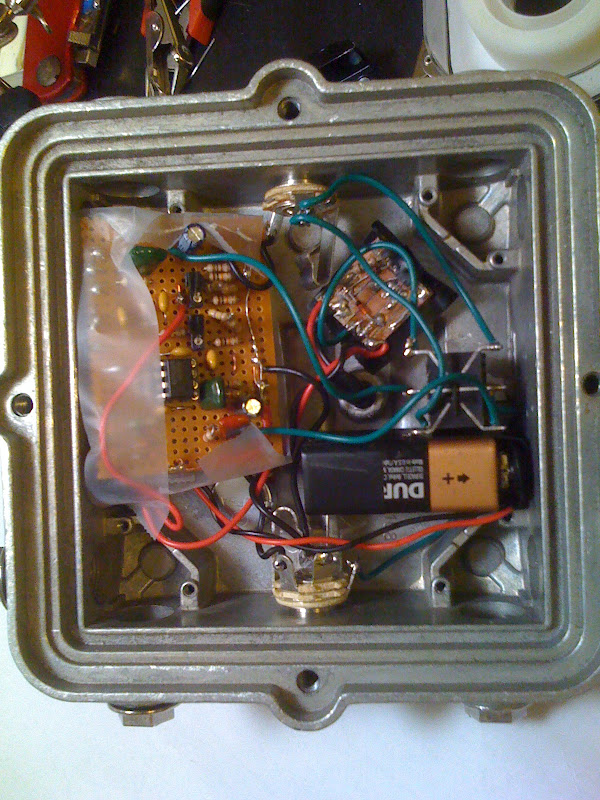
|
|
#
?
Jul 13, 2009 08:55
|
|

|
Got a table and chairs however the chairs looked horrible  Click here for the full 1024x683 image. That would be plastic covering the stained cloth. So I ripped the staples out and removed the nasty old lady cloth (really who uses white) and stapled on some nice clean new cloth.  Click here for the full 1024x683 image.
|
|
#
?
Jul 16, 2009 02:06
|
|

|
For the last three summers I've been working on building a summerhouse on the souther coast of Norway. A little backstory: My uncle has always been the type to start projects but never finish them. This of course lead to him starting to build a summerhouse/cabin close to the other two our family owns along the southern coast of Norway. He started this project early in the 90s but got bored and never got any further than getting the foundation up + walls and a roof. 3 years ago me and my sister bought the cabin + land(approx 4 acres) from him for 1.2m NOK (approx. 200.000$) and continued the work. We're getting close to completion now, but we've taken some pictures every once in a while to see the progress as we worked on it. I'll try to dig up some of the earlier photos, but right now as I'm on an EDGE connection, I only managed to upload two photos of the outside  This is the outside right now, the summerhouse is approximately 900 square feet(85 square meters) inside.  When I get home to a proper connection and manage to dig up all the pictures I might make a thread dedicated to it. If people are interested that is
|
|
#
?
Jul 29, 2009 16:37
|
|

|
Eldjarn posted:If people are interested that is Hell yeah, I am!
|
|
#
?
Jul 29, 2009 17:01
|
|
|
I'm working on my latest teddy bear project. Sorry about the terrible image quality, I only have my camera phone to hand when I'm sewing. I put my finished teds in a light box and my mate photographs them properly at the end. Here is a head and an arm. I use the pliers on the metal cotter pin joints you can see poking out of the arm there. All my bears are jointed this way, it's a bit tricky but gives a really firm study joint.  Here it is stuffed and partly assembled. The nose is hand sewn with silk thread. I sew it really tight, that nose is as hard as as stone. I use glass eyes, in order to pull them firmly into the head I sew them with dentil floss  Here is my bear waiting for me to sew the ears on, at the moment they are only pinned on. I'm at this stage tonight but drank too much wine to tackle it. The pattern for this bear is entirely my own, I'm really pleased with the length of the body and with how its back curves (sad I know). I've been tempted for a while to start a 'how to' thread for bear making, including patterns and step by step instructions. If you can do a basic back stitch and ladder stitch then you have all the skills you need to churn out a sweet little bear. When I first started there was gently caress all online to help people out, seemed everybody wanted to make money and wouldn't post a pattern online for free unless it was utter poo poo. I'm nearly finished with this bear, so I may make a guide with my next project if people fancy it.
|
|
#
?
Jul 29, 2009 20:49
|
|

|
Dr Scoofles posted:I'm really pleased with the length of the body and with how its back curves (sad I know). There's nothing sad about being proud of work you've done with your own two hands.
|
|
#
?
Jul 29, 2009 22:55
|
|


|
Considering the amount of time between us building on the summerhouse, I figured a separate thread for it would be a waste(as it would not get any updates what so ever between august 10th and easter next year when we continue building). Also since this project is really made up of smaller projects I thought I'd split it up. First I'll start with what pictures I've managed to upload(I can get 1-2bars of HSDPA(3G) if I throw my mobile phone outside !) Anyways, let's get this started. How to: Build a fireplace This is what has taken the most amount of time. Me and a buddy of mine dug beneath the house last summer, going down 2meters to get to solid rock for the foundation. I can't find any pictures of that part but believe me it was deep. When this was done, we built up to the floor of the house with LECA. Oh yea, to explain the amount of pain involved in this work, alot of the wood-materials were already in place from the time my uncle started this work back in the 90s, but all of the buildingblocks used in this construction were not. Everything had to be brought in by boat - then carried up the steep slope to the house. Here's a picture of the view to show you how high up it really is.  Yeah...  Anyways, at the start of this summer we started mixing cement to build. According to regulations we had to have fire-resistant boards surrounding the construction as shown here:  ("For floors only" ? Hah, I'll have to photoshop that out for the official documents we'll have to present in case of inspection :P )  My sister the mason. Now I forgot to take pictures for a few weeks unfortunately, but these next few images should show you how many layers of LECA and bricks we had to carry up to make this.    As we were getting closer to the roof, it became harder and harder to reach with our ladders. As we had to finish the roof in that part of the living room anyway, we built our own scaffolding(don't know if this is the right word).    Going through the roof!  Even though we were through we had to build the chimney to spesifications(a certain amount of centimeters above the tallest part of the roof).   Almost complete!   Now the last picture there is how it looks right now, it's still not fully complete, but we have to get a professional to do the rest.
|
|
#
?
Jul 30, 2009 18:53
|
|
|
Eldjarn posted:Now the last picture there is how it looks right now, it's still not fully complete, but we have to get a professional to do the rest. Why, you did all that and can't put flashing on there? http://www.rd.com/17758/article17758.html Awesome job BTW. Edit: Eldjarn posted:certified people cost approximately 1000NOK per hour(160$). drat. IsaacNewton fucked around with this message at 21:57 on Jul 30, 2009 |
|
#
?
Jul 30, 2009 21:30
|
|
|
IsaacNewton posted:Why, you did all that and can't put flashing on there? According to my father it's due to regulations put forth by the local government, alot of poo poo has to be done by people with the proper certifications(certain parts of the wiring, the flashing, some parts of the bathroom etc.) - Norway has alot of strange laws, especially when it comes to building cabins like this. However we're doing everything we can do ourselves, as certified people cost approximately 1000NOK per hour(160$).
|
|
#
?
Jul 30, 2009 21:51
|
|
|

|
| # ? May 21, 2024 14:22 |
|
|
Earlier this spring I began working on an 8'x8' raised playhouse for ShortBus. The source plans were basically scribblings on post-it notes and scraps of paper. I have a pretty limited knowledge of carpentry and am pretty sure that if this was for anything other than a backyard chillout, it'd be condemned. Also, my array of tools is pretty much limited to a chop saw, drills, and a Sawz-all. Right angles? gently caress em', don't need em! "Overall" it's pretty level, but it's full of touches that scream UNPROFESSIONAL! like the windows that don't quite match up and cement at the postbases that contain cig butts and beer cans Sure, go nuts, just keep it within that square.. I sawz-all'd the poo poo out of that window just yesterday, broke the blade twice  From the back. Where the ladder is, is where the ladder/stairs/elevator will be, to the porch area  Across this open side will be a railing. Inside that L-shaped area is gonna be a flat spot for a desk or table or flat surface to color  For size scale. I'm 6'3" and can stand straight up where the roof peaks. 2nd window on this side  I'm sure OSHA would have some issues with this  update: these pics were from 2 weekends ago, yesterday I got the rest of the walls up, as well as the roof. Still to-do: carpeting(gonna go with indoor/outdoor green turf), flashing and roofing, trim pieces around the corners etc, stairs/ladder, windows and a door, and painting it. Not sure if I'll throw up some paneling on the inside or leave it as open studs
|
|
#
?
Aug 3, 2009 20:08
|
|