|
Why would you give up a sweet ramp into your house?? The next time you're moving something heavy or leaving the house on your skateboard, you'll be bummed.
|
 #
?
May 8, 2010 17:51
#
?
May 8, 2010 17:51
|
|


|

|
| # ? May 20, 2024 05:30 |
|
|
I'm trying to youth-enize this place a little bit.
|
|
#
?
May 8, 2010 19:35
|
|

|
Should have converted it to a people mover. Also, seriously, a hollow tube handle on a hammer?  Who thought that was a good idea? Who thought that was a good idea?
|
|
#
?
May 8, 2010 21:25
|
|

|
Nine weeks ago my class was given a project: Build a pedal powered brick breaking machine. We formed groups and set off making these things. The Photos begin March 24th and end earlier today. This is the main frame of the pedal powered half of the machine.  The bikes are mostly attached to the frame.  They're being loaded into my truck and taken to campus to demonstrate that the pedal powered part is functional. Date is March 28th  Construction of 2nd half begins.  Build location changes and more progress is made on the breaker side of the machine.  Breaker side is mostly complete and both halves are now connected. Belt is tensioned by adjusting position of pinned joints between pedal and breaker sides of the machine.  War paint.  The official competition is a week from Tuesday and I'll be getting video. The breaker mechanism is a spinning steel bar measuring 22"x.75"x3.25" and the center hole is offset 2 inches to one side resulting in it acting like a spinning hammer. Counterweights were added to the short side to maintain balance.
|
|
#
?
May 10, 2010 06:42
|
|

|
Here's my latest projects to give my benchtop drill press some love. 
|
|
#
?
May 10, 2010 13:40
|
|
|
MarshallX posted:Here's my latest projects to give my benchtop drill press some love. Nice work. Did you have a set of plans for this (and where can I get them) or just wing it?
|
|
#
?
May 10, 2010 14:01
|
|

|
drewhead posted:Nice work. Did you have a set of plans for this (and where can I get them) or just wing it? The cabinet I just made up as I went along. I'll probably make a door some day. I need a bit more clear pine to band the top, but I was a couple inches short of being able to do it. The table was from a magazine, but I made a really basic version of it. They had a doubled up fence and 20 different kinds of stops. I'll try to see if I can find an online version.
|
|
#
?
May 10, 2010 16:28
|
|
|
Spent seven hours over the last two days building and shooting these cabinets with deft. I should be able to get the face frames on after I sand them on my day off. The new HVLP I got works like a dream.
|
|
#
?
May 11, 2010 03:30
|
|
|
My brother's house is coming along. For the past 2 monthes we have been renovating every weekend, basically starting on a 120 year old house, gutting and rebuilding from scratch. Here is a current picture vs the original:   There is a ton more done, including a brand new bathroom, but this picture highlights the huge change the house has undergone.
|
|
#
?
May 11, 2010 14:00
|
|
|
guitar strap for a fellow named dwight meant to be a gift 
|
|
#
?
May 11, 2010 16:38
|
|

|
 Click here for the full 1200x900 image.  Click here for the full 1000x749 image.  Click here for the full 1200x1436 image. Completed a papercraft Metapod for my bug catcher cosplay at ACEN (Rosemont, IL) this weekend. One of the most frustrating projects I've ever done but I think it turned out well.
|
|
#
?
May 12, 2010 04:27
|
|
|
Walking Spanish posted:guitar strap for a fellow named dwight meant to be a gift Dwight Schrute plays guitar?
|
|
#
?
May 12, 2010 15:36
|
|

|
IsaacNewton posted:Dwight Schrute plays guitar? FACT: yes he does
|
|
#
?
May 12, 2010 15:54
|
|
|
Project update and cross-post: Here is the boat during happier times: 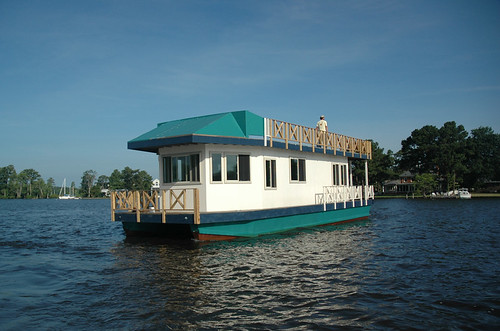 A winter squall brewed up, snapped a bunch of lines, and spent a couple hours smashing the boat against the rocks on the lee side, stove in two hull segments pretty badly.  So, I took a bit of spring vacation to come down and help fix it. Each pontoon is made up of six watertight segments that are bolted together. So, in theory, they can be removed, floated out from under the rest of the boat, and repaired. In practice, this requires a sledgehammer, but really worked pretty much like we thought. Here it is with the forward hull sections unbolted and partly flooded  Losing 1/3rd of the flotation on one side leaves things a tippy. I did come up with a new boat name. Eileen. 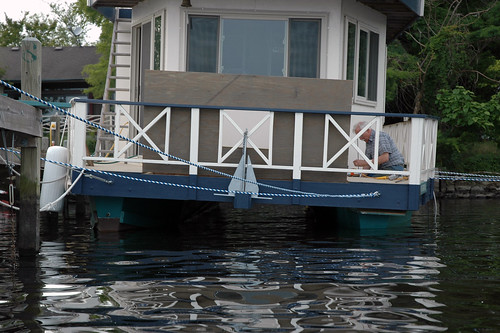 Here are the busted bits  Can't leave the boat tipping over like that, so we built a temporary prosthetic hull: 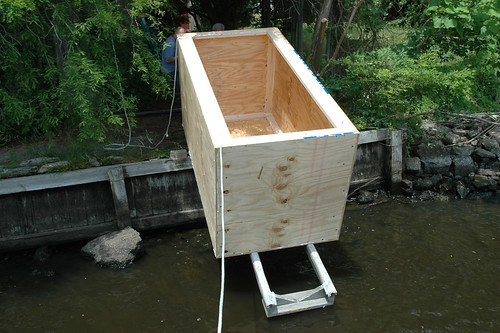 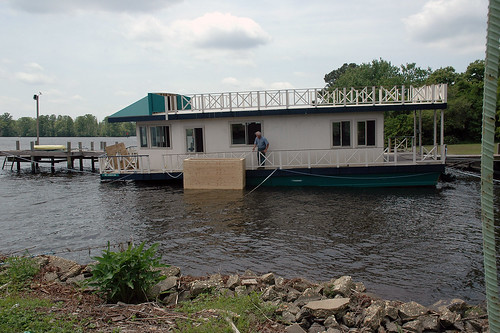 Sunk it:  positioned it: 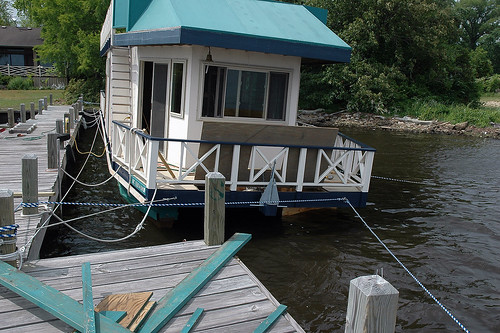 And pumped it back out again: 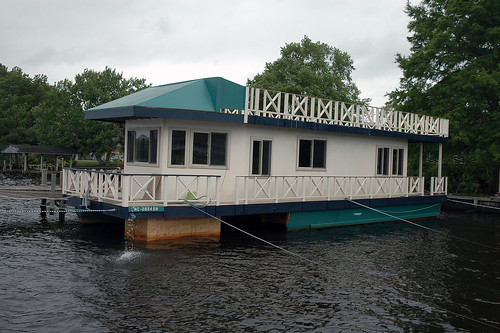 Maybe we should call it "Peggy" instead. And here is what was below the water: 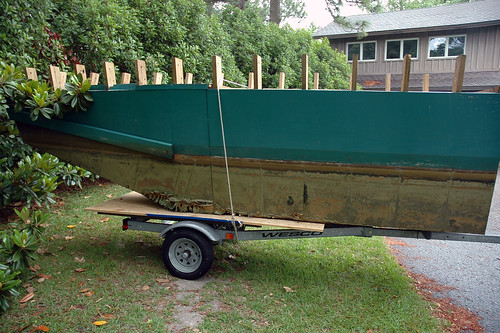 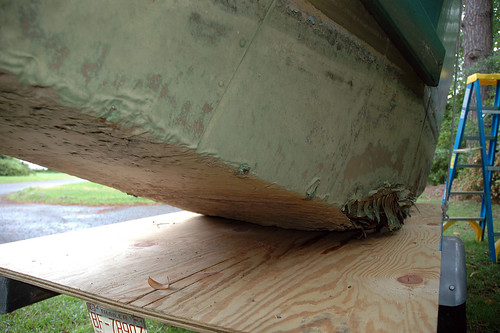 Once dad gets it patched and reskinned, I'll schedule some vacation to put them back in. Here is the web page with the whole build: http://sites.google.com/site/robreiheld/houseboat
|
|
#
?
May 18, 2010 07:22
|
|

|
Brick breaker competition is finished- One round of the competition- 25 bricks in under 2 minutes. http://www.youtube.com/watch?v=5R7juShruTs Quick video tour of the machine. http://www.youtube.com/watch?v=C60I9S0fpN8
|
|
#
?
May 18, 2010 19:25
|
|
|
MikeNCR posted:Brick breaker competition is finished- why was that dude feeding the bricks in so slow? Would it have jammed or something? Just wondering because I've never heard of brick breaking before.
|
|
#
?
May 19, 2010 15:36
|
|
|
Walking Spanish posted:why was that dude feeding the bricks in so slow? Would it have jammed or something? Just wondering because I've never heard of brick breaking before. It was hard to see, but there were chunks of brick flying back out of the hole. I was waiting till after each brick had been hit before I'd start loading the next one so I didn't have to worry about my wrist getting smashed by a flying chunk of brick.
|
|
#
?
May 19, 2010 21:16
|
|
|
Ok, I have done a lot on this saber, but I'll spare you the whole story. Suffice it to say, it's working now after a mishap with the charging circuit.  Everything is trimmed, soldered, heatshrunk and electrical taped. In that order.  There is just enough slack in the wiring to allow the wide plug to come out enough to be able to get hold of for plugging into the grenade section, but not so much wire that it binds up on anything once it's plugged in and set back into the clamp.  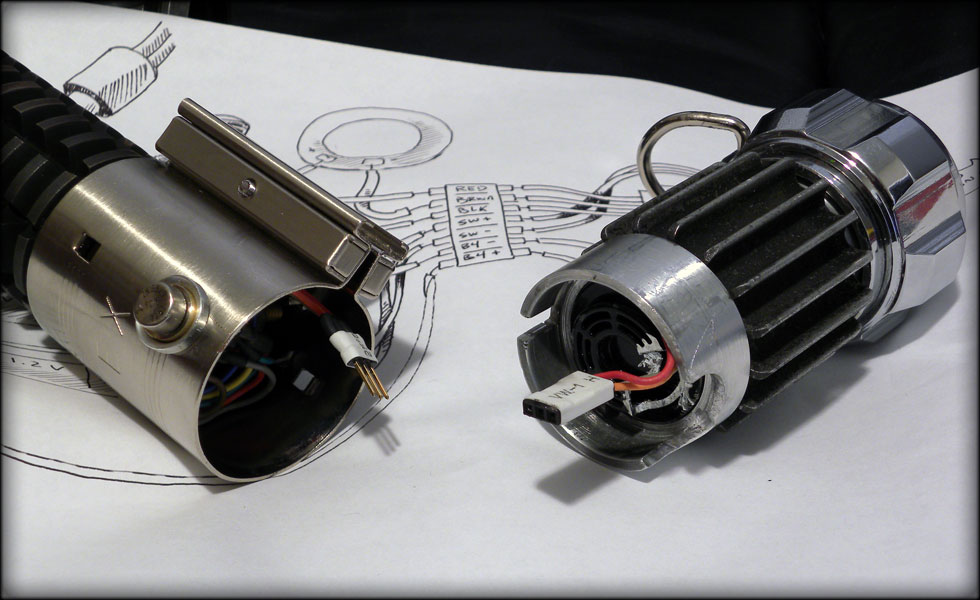 Here is the result of tonight's work. heatshrunk and insulated the batteries, hollowed out the battery compartment a few thousandths of an inch to compensate for insulation thickness, ran a new plug between battery pack and control box, made that plug out of several others ( I wanted the colors to match, so I interchanges the crimped connections inside the plug till I got what I was looking for) I also used the stock MR speaker grille, cut it to fit the inside (so the charge port doesn't touch) and made sure all that was nice and snug. And, set my wires a certain way so that they are retracted when the saber is assembled, but extend when it's not, it's sort of an S coil around the switch, so that when you pull either plug, the wires extend, when you push them in, they retract, keeping everything nice and neat.  And the CHARGING CIRCUIT HASN'T CAUGHT FIRE YET!   
|
|
#
?
May 21, 2010 21:45
|
|

|
I bought a box of Pride and Predjudice and Zombies postcards from Amazon and made 10 of them into blank journals. Well, minus the blood spatters anyway..jpg) .jpg) .jpg) .jpg)
|
|
#
?
May 21, 2010 22:26
|
|
|
NonEntity, A friend of mine was hoping I could build him a lightsaber. I said I'd think about it. His question made me think of you, and now I ask you, how much did the body of yours cost?
|
|
#
?
May 22, 2010 04:52
|
|


|
McBeth posted:I bought a box of Pride and Predjudice and Zombies postcards from Amazon and made 10 of them into blank journals. Well, minus the blood spatters anyway. Really like your zombie journals, nice work
|
|
#
?
May 23, 2010 08:56
|
|

|
My girlfriend and I bought our first house this spring and spent about 2 months doing projects before we moved in to get it ready. The largest and coolest was of course the kitchen. Heres how it was when we bought the house, note the fake metal plastic backsplash, random mismatched cabinets and the gap in the countertop by the stove.  Click here for the full 800x600 image.  Click here for the full 720x540 image. Demolition begins and we find the much older formica backsplash now covered in caulk, as well the original spot for the sink complete with crumbling drywall.  As well as the plumbing access to the bathroom (on the other side of the wall) and the original exhaust vent for the stove.  Click here for the full 720x540 image. Drywall is patched,skimed, primed and painted and the cabinets start to go in.  Click here for the full 720x540 image. New Corian countertops go in as well as the range hood.  Click here for the full 720x540 image. After extended "debate" we finally find and settle on a tile combination we both love.  Click here for the full 720x540 image. The finshed product, backplash, appliances and hardware installed.  Click here for the full 720x540 image. and  Click here for the full 720x540 image. We did the vast majority of the work ourselves, only the countertop and the tile installation was contracted. Overall we absolutely love it and really could not be happier with the outcome. I can't tell you how much happier I am cooking in here than the 7x10 box with barely any storage space and a washer and dryer that was the kitchen in our last apartment.
|
|
#
?
May 25, 2010 15:36
|
|
|
Nice job! Is it just the lighting, or did you switch the brown tiles in the middle of the field for something else in the final design?
|
|
#
?
May 25, 2010 16:50
|
|

|
Richard Noggin posted:Nice job! Richard Noggin posted:Is it just the lighting, or did you switch the brown tiles in the middle of the field for something else in the final design? Ha, I had to go back and look at the pics to see what you mean, I didn't notice that at all until you mentioned it. It's the lighting, the accent tiles are thin ceramic with a stamped Stainless Steel casing on them. They match the appliances, not brown at all.
|
|
#
?
May 25, 2010 16:59
|
|
|
That looks really nice, good job. Where are the buttons for the dish washer?
|
|
#
?
May 25, 2010 23:26
|
|

|
para posted:That looks really nice, good job. On the top of the dishwasher's door.
|
|
#
?
May 26, 2010 01:05
|
|
|
Handmade bible and folding knife sheath    I'll do a step by step one of these days
|
|
#
?
May 26, 2010 01:31
|
|
|
Walking Spanish posted:Handmade bible and folding knife sheath Very cool. It was cooler when I thought it was a bible and folding sheath knife as a single diversely useful item.
|
|
#
?
May 26, 2010 01:38
|
|
|
Back in the day, I got ahold of a bunch of tiny Hitachi CD71 Nixie tubes (manufactured in 1969) and decided to build clocks with them. This is the first working clock I built around 2003, it was built on an etched fiberglass board and has been working in the living room without a hitch ever since. Notice the modest and simple design: as a rule of thumb, nixie tube clocks have an atrocious design, constantly screaming at you; Hey! Look at me! I'm a clock! With NIXIE TUBES! Hey! You! Look at me! Sure the clock looks cool for a few weeks after you've completed the construction, but as soon as your pride in building a clock wears off, the clock itself becomes a tacky eyesore. The simple wooden cabinet I made will look just as good in 20 years as it does now.  This clock is a much-battered test model I'm running in my bedroom. It has survived at least one capacitor explosion and a subsequent fire, and a nixie tube failure - it was repaired, upgraded, downgraded and tinkered with at least fifty times over the past six or seven years. I intended to rebuild this clock on fiberglass with existing components once I was happy with the design, but for one reason or another, I'm still running it on a pre-drilled phenollic board for testing which looks bloody godawful. At least the clock is working reliably now, though.  This is the test clock on the inside, it's a very messy design, with one chip soldered with wires in a "dead bug" fashion just sort of hovering over nothing in particular in the middle of the picture, with the filter around the nixies being made out of cardboard. Need I say that all of this is at the mains potential?  The test clock used to have another board, sandwiched above the "time keeping and tubes" circuit board below. It was supposed to be an alarm clock, with a day-of-the-week indicator on two east-german made 7seg red LED indicators. The time when alarm would have gone off was set by the means of the jumpers on the left side of the board, once all three conditionals were met, it would trigger a triple-AND gate which would in turn trigger a 4017 triggering two 555s which produced a beeping sound. The day indicator is on the lower right and it displayed days of the week in cyrillic. Why? Because I could. In order to do that, I made a custom display driver (diode transistor logic) seen just above the display daughterboard. Most of the components on this board were made in USSR.  I can't believe I had the patience to build this. A single 4017 keeps track of the day-of-the-week, feeds the signal to the resistor network (22k), through the wires to the diodes (which are soldered vertically and are barely seen poking through the PCB in this picture) triggering USSR-made orange NPN transistors which in turn switch power to the individual segments in the 7seg displays. Every string of orange transistors (two in total) drive one of the two display indicators. There are well over 50 components just in the display driver. These tiny russian orange transistors are awesome because they are exactly 0.1" thick, so you can stack them neatly one next to the another. Notice that there are even more resistors on the display daughterboard.  This is the day of the week indicator. It's connected to the DTL network by long strands of wires. The red LED is a "alarm active" signal light.  There are a lot of wires underneath the PCB. It was a nightmare to build this thing, repairing it and getting it to work more or less correctly was even more so. Unfortunately, the alarm clock never worked right and I never got the time and fortitude to repair it. The power supply (a single zener dropper on the bottom PCB) was insufficient to power this beast, so I added a second power supply; a mains transformer just to power the LEDs. Unfortunately, this meant that the whole clock worked with a ridiculous amount of various voltages without a common ground, which I partially rectified by joining the PCBs by the means of optoelectric isolators and making a custom-wound audio transformer and an amplifier for the alarm (the aluminum cylinder). It did work, but for the love of god, it just wouldn't stop motorboating. This was an incredibly complex and shoddy solution and I kept this thing on line for several months before I retired the entire upper board to the dust-gathering compartment. By the way, setting the alarm on mains-powered jumpers fell deeply in the cathegory of a "bad idea". The main PCB was subsequently stripped of all extra components and reduced to an ordinary desktop clock. I really ought to rebuild the entire clock on fiberglass one quiet day. I also made a really nice clock for a friend on fiberglass, but I only have lousy scanner pictures of it, I could post them if anyone is interested. ") edit: oh yes, this:  Poknok fucked around with this message at 19:14 on May 31, 2010 |
|
#
?
May 31, 2010 18:20
|
|

|
Well it looks bloody beautiful in the end..
|
|
#
?
Jun 1, 2010 02:50
|
|

|
After seeing two build threads, I decided "gently caress it! I'm building a guitar!" The neck is being made of black walnut (Don't breathe that dust!) with most likely a rosewood fretboard. I'm thinking maple for the body, but might want to have something a little dense. I want this guitar to be able to growl, and from my understanding, more dense woods bring out the low end. Wood recommendations for the body are welcome! Right now I've only got a template and the neck glued. The hardest part is trying to decide what electronics are going in there. Pickup choices galore! (The fact that I have humbuckers drawn in there doesn't mean that's set in stone, but I am leaning towards them) In the drawing phase  Here's the template (Actually a body template and neck template duct taped together)  Neck glued and clamped  (Yes, I know that clamp setup is probably horrible, but it worked) I just planed the neck yesterday (by hand, no less) and have to glue on two more pieces to accommodate the headstock. Fun. e: Some stuff in parenthesis Rotten Cookies fucked around with this message at 15:58 on Jun 1, 2010 |
|
#
?
Jun 1, 2010 15:55
|
|


|
My mom had one of those patio gazebos. Looked just like this: A windstorm tore the tent to shreds, and the frame was a bit suspect, so she pitched the whole thing. I had a wooden arbor I just trashed, so I thought I might try and repurpose the frame:   I can't decide if I want to paint the leaves green or not. It's top-heavy as hell, so I'm going to put some hanging plants on the outside to try and lower the center of gravity a bit.
|
|
#
?
Jun 1, 2010 22:18
|
|

|
Rotten Cookies posted:After seeing two build threads, I decided "gently caress it! I'm building a guitar!" That's awesome! I'm about halfway through my pinecaster build myself. That looks awesome and I applaud your design abilities. One reccomendation on the neck placement: 
|
|
#
?
Jun 1, 2010 23:44
|
|


|
You know what... I THOUGHT something looked a little funky when I first drew it. I guess I got used to the body looking like that and accepted it. I'm kicking myself looking at your MSrePaint of it now, though. Thanks a ton, and good thing I saw that before I tore through some wood.
|
|
#
?
Jun 2, 2010 05:26
|
|
|
Got some new pictures for y'all, if you're interested. It involves 5 layers of black walnut. I'm worried about leaving enough room for the neck where it meets at the body. Oh yeah, there's a ton of wood to be wasted. It'll be a bolt-on neck, with a double action truss rod. Still don't know what the body is going to be made of. All I can think of is maple, but it doesn't sit right. Well, I've got plenty of time to think about it, since I can't actually buy it until I get my paycheck. Edit: MORE PICTURES.  I made a very rough cutout of the neck today. 7 degree angle on the headstock. I made a a cut a little to close, and went inside the line a little.  Oh wait, that's right, I accounted for me loving up and gave myself some leeway on the lines! Woo! I also fixed the template, and now looks much better.  The bottom cutout cuts in a little more than it does in that picture. Rotten Cookies fucked around with this message at 21:28 on Jun 4, 2010 |
|
#
?
Jun 2, 2010 20:30
|
|
|
Hi, it's me again. I'm back. So my uncle yelled at me to use his shop and make it useful. Here is the shop.  He also happen to have a giant slab of maple for me to use up, lest he throw it out. Here's the slab.  I ran that through the bandsaw to rough shape it, routed straight into it to bring it down to 1.85" (more or less). Then planed it down to 1.75" and routed it out to shape using my nifty aluminum template. Unfortunately, there was a fairly big tearout on the backside of the body, around the centerline. Good thing it was on the back. It's got some wood filler on it now, staring at me and laughing. I still need to do a lot of poo poo, but I would be lying if I said this wasn't loving exciting up to this point.  (yeah it's not sanded or anything.)
|
|
#
?
Jun 6, 2010 02:26
|
|
|
YouDummy posted:That will look super cool covered in ivy or maybe honeysuckle.
|
|
#
?
Jun 7, 2010 15:42
|
|

|
wormil posted:That will look super cool covered in ivy or maybe honeysuckle. It looks super cool already! <  > Already have Variegated ivy growing in the area, and am already working on encouraging it up the arbor. > Already have Variegated ivy growing in the area, and am already working on encouraging it up the arbor.
YouDummy fucked around with this message at 02:51 on Jun 14, 2010 |
|
#
?
Jun 7, 2010 16:08
|
|
|
This is what my yard used to look like:  I bought this house a few months ago, so I figured that it was time to do something about it. There were two rows of hedges in the bed on the right side, and I'm pretty sure that nobody's touched the standalone bed in years. I was worried about that tree in the shrubs on the left getting big enough to wreck my foundation eventually, and I was tired of the gaps in those shrubs too. So, my girlfriend and I attacked it over a weekend:  Some Moonshine, some Asclepias, and something else that I can't remember (Coriopsis?).  I found all kinds of plastic border buried about an inch below the ground while I was trying to edge the beds. I hate whoever did this, however long ago it was.  We bought some lights from Costco, and voila!    Up front with the palm is some peachy Lantana and a couple white Hibiscus. All in all, we transplanted the tree and some hedges from the beds up front to the backyard, moved some hedges so they now make an unbroken line to the side of the house, removed all of the pea gravel from the beds, weeded all 3 beds, planted some new flowers, mulched, and edged around the whole thing. It was a ton of work, but I love my yard now. Also, we epoxied the garage at night while it was too dark to work in the yard. Hooray! Before, after I moved most of the stuff out:  During:  Before clear coating:  Before loading everything back in:  All done!  I used Rustoleum EpoxyShield with a solvent-based clear coat. I get to drive my car inside today, so I'm pretty excited about that. I'm very pleased with how everything turned out. Housewarming party tomorrow - I can't wait to show everything off 
|
|
#
?
Jun 10, 2010 19:54
|
|

|

|
| # ? May 20, 2024 05:30 |
|
|
The Human Cow posted:All done! Nice. I've been thinking about doing my garage with epoxy, but I've never done anything like this before. How long did the job take, what's the drying time, and would you recommend it as a DIY project for a first-timer?
|
|
#
?
Jun 10, 2010 20:09
|
|