


|
I'm working on a wearable computer. The latest thing I did was use my Makerbot 3D printer to print a belt clip for my chording keyboard (a Twiddler 2.1). I've only just started designing my own 3D objects to print and it's a bit fiddly but not as hard as I feared. Sketchup makes it pretty easy to create a design based on a vague idea of a shape and some measurements.  
|
 #
?
Aug 24, 2010 21:57
#
?
Aug 24, 2010 21:57
|
|


|

|
| # ? May 21, 2024 20:28 |
|
|
That wearable computer seems like an awesome idea. Are you going to have a display like a pair of goggles/monocle? As a bit of an update...  Yeah, I'm almost done. All I have to do is clearcoat and install the nut. Then the fun of filing/dressing the frets, and other such stuff that isn't really NECESSARY to play but makes it playable. My mantra this summer has been: I want to get it done, but I don't want to rush.
|
|
#
?
Aug 29, 2010 01:32
|
|


|
I've been working on my halloween costume. Yes it's early. No, I don't know why i do this to myself every year. Sidenote: seeing yourself not-mirrored, but as other people actually see you (my right is on the left of the image, not on the right of the image) is really strange sometimes. This picture looks like a different me, not me. Weird.
|
|
#
?
Aug 29, 2010 04:28
|
|

|
Rotten Cookies posted:That wearable computer seems like an awesome idea. Are you going to have a display like a pair of goggles/monocle?
|
|
#
?
Aug 29, 2010 04:41
|
|

|
Agreed, that came out really well Glad you didn't change the outline of the guitar Why didn't you go with a push-pull pot for the "eye" of the paisley?
|
|
#
?
Aug 29, 2010 07:36
|
|


|
Hadlock posted:Agreed, that came out really well There's also going to be 6 switches in there, so I figured it would be busy anyway. A push-pull pot could still work, though. I actually hadn't thought of that, and will probably order one now. Thanks
|
|
#
?
Aug 29, 2010 16:35
|
|
|
Rotten Cookies posted:That wearable computer seems like an awesome idea. Are you going to have a display like a pair of goggles/monocle? I'm basically following what this guy did, using a monocular display taken from a pair of MyVu iPod video glasses. I'm having the same issue he had, where the internal battery dies and the display stops working even if you supply external power. The whole thing is also a nest of wires at the moment and not very portable; I'm going try finding thinner/shorter cables, removing circuit boards from their cases, and wiring pcbs straight to each other anywhere it makes sense until it can actually be called "wearable" and it's all powered from the same set of batteries.
|
|
#
?
Sep 1, 2010 18:40
|
|
|
Sending away for a new baby gift. It all started with the idea of a baby tramp stamp.
|
|
#
?
Sep 5, 2010 18:34
|
|
|
Nothing too spectacular here, I have a very small bathroom with a medicine cabinet that is just big enough to fit the tiny wall its mounted in. It was in poor shape with rust starting form on the metal and it doesn't seem to be a standard size now, so with that I decided to refresh it. I wish I had taken a picture before I started to refinish it, but I think you all know what rust looks like. I scraped, sanded, primed, lightly re-sanded, and painted it with that Epoxy paint meant for painting metal appliances. Turned out pretty well, but it still needed something. Something to improve its function over the regular cabinet it was before. I remembered I had a bunch of these:  Click here for the full 2008x1336 image. I grab handfulls of these from being thrown out where I work all the time. Its the last foot or so from a long roll of it. So I figured it would look neat to put some right under the glass shelves in the cabinet.  Click here for the full 2048x1536 image. Pretty powerful adhesive back on them, very convenient. Heres the a view of the underside with an mini reed switch and additional led strip to light up the sink right below.  Click here for the full 2048x1536 image. I put the thing back in the wall and I realize there is much less clearance between it and the hole in the wall then I had previously thought. So I had to drill/chisel out a hollow for the battery pack to sit in.  Click here for the full 2048x1536 image. The molex connection leads to an extra long length of wire so I can pull the cab away from the wall to change batteries without damaging the connections. After all that, this cabinet is pretty decent I think. You can just crack it open to use the light below it to illuminate the sink. Pretty handy on those mornings when the regular bathroom light is harsh on the [hungover] eyes.  Click here for the full 1536x2048 image.
|
|
#
?
Sep 6, 2010 01:04
|
|
|
Pfft I'll fix that on one weekend easily Hmm well could be worse 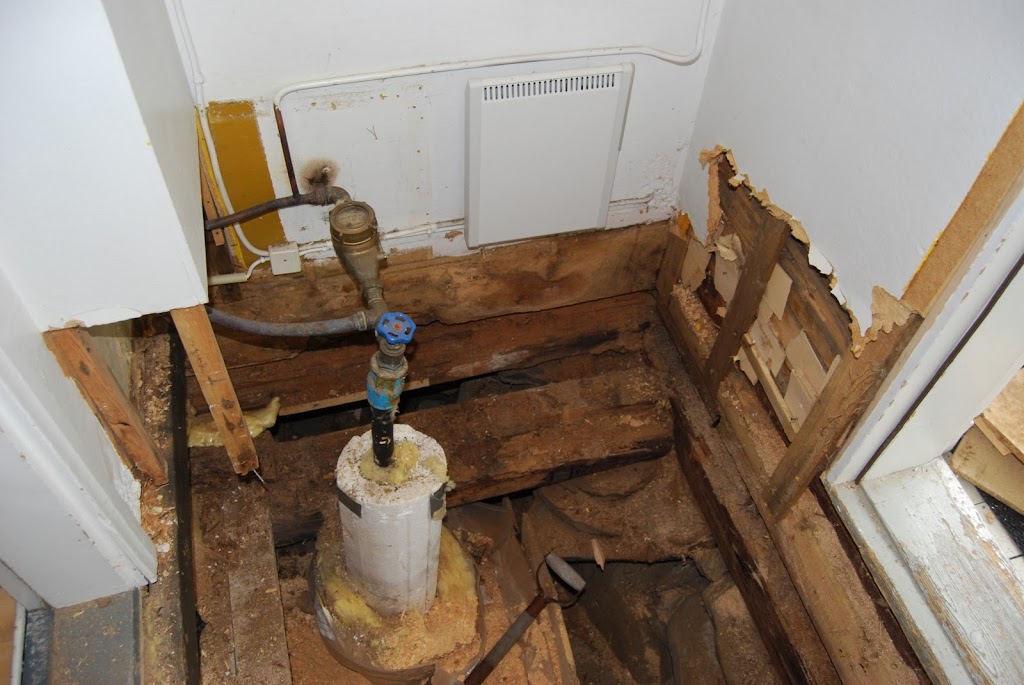   From first glance the room had no problems. Originally my idea was just to get some proper insulation on the water main but this poo poo is a nightmare. Fungus, rotten wood and whichever fucktard made that also emptied the old woodchip insulation to the crawlspace. Been like this for atleast 20 years, possibly longer. drat idiots trying to fix whoever built this house 135 years ago. If I had the money and time I'd rip all the floors open and do it properly.
|
|
#
?
Sep 11, 2010 15:57
|
|
|
I haven't been happy with any media center/tv stand things that I've been able to find, so I decided to make my own... out of an old mid-century console stereo. I found a decent looking Motorola one for $25 (!), with a sort of working radio and broken phonograph. It's not exactly what I wanted (because exactly what I wanted would cost way more and I probably wouldn't feel good tearing it apart), but it'll work well enough. I didn't take any pictures of it before or during disassembly, but here's its current state: My plan is to put front and center channel speakers inside the cabinet, along with my HTPC and receiver. I'm still trying to work out how to make it all fit and work, though. Like, should I have a panel in the front that tips open to access the receiver and dvd drive, or just a small opening for the dvd drive only? And if I do go with a tip-open panel, how would it work? It'll be super cool when it is done!
|
|
#
?
Sep 12, 2010 19:14
|
|


|
Jusupov posted:I'd rip all the floors open and do it properly. Having just gone through this, it might not be as painful as you fear. Although we did rip up our floors, I'm told a good carpenter can do considerable repairs to the structure while leaving the floor intact. It was about $1500 to tear up my kitchen floor, replace the joists and put down a new subfloor.
|
|
#
?
Sep 13, 2010 09:52
|
|

|
wormil posted:Having just gone through this, it might not be as painful as you fear. Although we did rip up our floors, I'm told a good carpenter can do considerable repairs to the structure while leaving the floor intact. It was about $1500 to tear up my kitchen floor, replace the joists and put down a new subfloor. My budget is pretty much zero. The crawlspace is so full of old insulation that it'll take a few weeks with a huge sucking machine to clear enough of it so that you can start putting in repairs. I'm just glad that the house is built on a hill made up of mostly sand, so there is very little if any moisture coming from the ground. Tearing up the floors would mean opening the just renovated sauna/shower areas too which would suck big time. Everything that was opened back then (5 years ago) was in good/great condition with no problems. I'm just going to clear all the wood thats insect poo poo and start putting it back together again, and making it easy to open up again if I stop being so poor some day. There's eu money for fixing old houses but that will be for next year earliest.
|
|
#
?
Sep 13, 2010 18:26
|
|
|
Starting another small run of these. Inside  They're old Civil Defense radiation meters, not geiger counters, converted into a 3.5" hard drive case. Needle moves to show HD activity, here's a video of a file transfer between two cases.
|
|
#
?
Sep 17, 2010 02:05
|
|
|
Cinnamon Bastard posted:I've been working on my halloween costume. Yes it's early. No, I don't know why i do this to myself every year. Whats that made out of?
|
|
#
?
Sep 17, 2010 15:06
|
|

|
widefault posted:Starting another small run of these. This is awesome! Do you sell them?
|
|
#
?
Sep 17, 2010 21:57
|
|

|
widefault posted:Starting another small run of these.
|
|
#
?
Sep 18, 2010 00:19
|
|

|
I do sell them, but most of them end up as gifts for friends and family. These latest ones will be half SATA, half IDE, and without the cooling fan. The drives get hot, but so far I haven't had any issues. Biggest problem I've had is finding the right bridge boards, most pure eSATA ones don't have activity LEDs so I've been limited to USB or firewire. I found most of the ones I've used on ebay, search CDV-715 and there's always a few. Be warned, only certain ones are the right size for hard drive cases. I've pretty much settled on the Landers, Frary & Clark boxes since they're a little oversized. They also have an aluminum lower section, which is a LOT easier to modify than the steel bottoms on most of the others. They are harder to find, but I managed to get a small stash of cases and replacement guages over the years. Pricing is all over the place, usually ~$10 for a non-working unit and going up from there. I've also done a few PCs in these cases using 3.5" embedded single board computers, but I don't know if I'll try that agin. Cool, quiet, and fast; you can only choose two. This is the last one I built, quiet and cool, but a total dog in performance.
|
|
#
?
Sep 18, 2010 06:36
|
|
|
NikonDork posted:Nothing too spectacular here, I have a very small bathroom with a medicine cabinet that is just big enough to fit the tiny wall its mounted in... That is so cool! It looks really well done and professional too. I would pay for a cabinet with glowing shelves.
|
|
#
?
Sep 18, 2010 10:13
|
|

|
Clank posted:Whats that made out of? I talked about this a bit in the GBS halloween thread. When it comes to the helmet, I'm only the detail man so it's a bit of cheating, but that's because i need the time that cheating gives me to make the rest of the costume armor. It's a slush cast plastic resin, urethane i believe. Here's the post from GBS thread, for reference. Cinnamon Bastard posted:... So not completely DIY, but when you add in the rest of the armor i think i deserve a pass ")
|
|
#
?
Sep 18, 2010 18:25
|
|
|
I made a table for our kitchen because we are direly short on usable counter space. Since our kitchen isn't giant either, I made it a drop-leaf table so we can get extra table space when needed. The top is made of two 2'x4' sheets of pine, hinged with a long continuous "piano" hinge. The legs are 1/2" threaded steel plumbing pipe connected to the table with flanges. When the leaf is extended, the table is 4'x4'. The leaf is supported by a fifth leg that swivels out. I finished the wood with mineral oil and paraffin wax. We don't intend on using it as a chopping board (since the pine is way too soft), but its nice to the finish is food safe and won't kill us  (Apologies for lovely camera phone pictures)     All in all I'm pretty happy with the table. It was really wobbly so I added the cross-bracing around the legs - which was a total hack job. All the wood was cut with a hand saw so none of the angles line up well. But it helped reduce wobble considerably. The table is actually more stable when the leaf is out because it isn't top-heavy anymore. Phase two of the project is to add shelves to the top of the table, which will bolt into the wall. I'm hoping that will help reduce wobble too. polyfractal fucked around with this message at 04:45 on Sep 20, 2010 |
|
#
?
Sep 20, 2010 04:41
|
|

|
Okay, little bit of an update here. You know that guitar I was building? Well... http://www.youtube.com/watch?v=gETt8QSiZMc It's done. Hooray. Excuse my poor playing. 2 years no instructor and I was nervous playing for a camera. Hah. I'm mostly just loving around with it. (Whoops, just noticed the audio clips horribly. Oh well.) ...so I'm still deciding on what to build for the next.
|
|
#
?
Sep 22, 2010 03:44
|
|
|
Rotten Cookies posted:Okay, little bit of an update here. You know that guitar I was building? Well... Well, I'm impressed. Next project: twin neck with a 12-string over a six-string.
|
|
#
?
Sep 23, 2010 01:45
|
|

|
I'm working on a chess set. Carved in wax and cast in bronze and shibuichi (80% copper, 20% silver). I have almost all the originals done, but photography has been tough. Here's one of the queens half done. (She'll have wings when she's done, but I need to make a mold of this part, then of the wings, then put them together for a final piece). If there's some interest, I'll get better shots and maybe document the process.
|
|
#
?
Oct 18, 2010 19:25
|
|

|
Consider me interested, that's a very neat project. You could also post it in the metalworking thread. We're not all weldors and blacksmiths. There's been a serious lack of any kind of foundry work in the last few months, and I'd love to see a pour documented.
|
|
#
?
Oct 18, 2010 19:34
|
|


|
I'm trying to track down a foundry of some sorts, and if I do find one I will definitely post a start to finish. Sadly, I'm in Russia for the next year, and the language barrier is... steep. But, I will get better pictures of my pieces and the wax carvings and throw them up here. It will also be cross posted to the metals thread, I've had a few issues with some casts and I want ideas on how to fix them.
|
|
#
?
Oct 18, 2010 22:24
|
|
|
gently caress studs not being where they're supposed to be. Redid my closet today. I forgot to take a "before" picture. Imagine old wooden shelves from the early 80's supported by 2x4's where the gaps in the paint are.  Click here for the full 431x720 image. Painted. Just went solid one color because it's cheap and it's a closet and I'm not entertaining guests in there for them to comment on my color scheme.  Click here for the full 431x720 image. One side  Click here for the full 431x720 image. Other side  Click here for the full 431x720 image. Middle  Click here for the full 431x720 image. Probably going to put more shelving on the back wall, or maybe put something in that space. So what does one do with a walk in closet? One uses maybe 5% of the total space, while his girlfriend uses the rest and then complains that there still isn't enough room.
|
|
#
?
Nov 14, 2010 05:11
|
|

|
I loved that modular shelving+rod stuff. Does that system have a way to do a wrap-around hanger rod? I was able to put together a continuous rod where I can slide a single hanger across all 3 walls.
|
|
#
?
Nov 14, 2010 05:57
|
|

|
eddiewalker posted:I loved that modular shelving+rod stuff. Does that system have a way to do a wrap-around hanger rod? I was able to put together a continuous rod where I can slide a single hanger across all 3 walls. Yes, it can do that. I think I'm going to put two shelves along the back, at the heights of the top two on the right. This will wrap all the way around the top, and 3/4 around the 2nd level. I can always move things around if I need to. I've got about 45" to cover, shouldn't be a problem. I think the bottom is either going to be this cabinet thing I have, or more shoe racks. The closet in the other bedroom is getting the cheap organizer. This master closet cost about $250 including paint.
|
|
#
?
Nov 15, 2010 15:55
|
|
|
On Saturday my friend and I went for a walk about town, stopping at the local antique shop. While she didn't get anything, I found a hand-made butcher's block for $5. I sure as hell wasn't going to pass that up, especially when I could have a project to work on. I had to remove the original rubber feet, which had rotted, but luckily I had some replacements at hand. Here it was essentially at the time of purchase, scratched, dried out, with some of the blocks warped and sticking up:   Today I sanded it with an orbital sander, going over it first with 200-grit, then 400- and 600-grit. The old beeswax coatings (someone had obviously cared for this block, long ago) proved to be quite a problem, but a cabinet scraper took care of most of it. A coating of mineral oil and some stainless steel wood screws later, I have a usable block!   Unfortunately the hardware store didn't have beeswax for a nice, glossy top coat, but I'll find it sooner or later.
|
|
#
?
Nov 15, 2010 23:30
|
|


|
This old gent showed up in the mail today I am still undecided on wether or not to restore the receiver itself yet. It looks pretty much untouched since it was built and seems more authentic than a cheap knock off this way. At bare minimum I have to build a bell box that won't kill Australian switching equipment and get me arrested. Possibly later a dial pad as we have no more operators. They are both pretty easy things to do for a competent electronics wiz, but I don't have much experience so it will be a fun ride.
|
|
#
?
Nov 17, 2010 10:05
|
|
|
That's a beautiful phone. What about getting a cheap pre-paid phone that supports voice dialing and hacking it in somehow? Is there room in the base or is it ballast? I'm just thinking there's gotta be a way to make it voice dial so you don't have to muck it up with a dial pad (not that you would, it just doesn't match the aesthetic).
|
|
#
?
Nov 17, 2010 16:52
|
|

|
landis posted:That's a beautiful phone. What about getting a cheap pre-paid phone that supports voice dialing and hacking it in somehow? Is there room in the base or is it ballast? I've got an inline DTMF dialpad. It doesn't have to be attached to the phone. Heck, you could dial from another handset on the same line.
|
|
#
?
Nov 17, 2010 18:52
|
|
|
Oooh good point. Cool, looking forward to seeing it finished!
|
|
#
?
Nov 17, 2010 20:23
|
|
|
Sounds like you've got a good plan in mind already, but it would also be a pretty cool bluetooth handset for your cell phone. Pick up the receiver and it automatically answers your cell.
|
|
#
?
Nov 17, 2010 20:42
|
|

|
Grave $avings posted:I'm really liking this; it looks brand new.
|
|
#
?
Nov 17, 2010 20:45
|
|


|
landis posted:That's a beautiful phone. What about getting a cheap pre-paid phone that supports voice dialing and hacking it in somehow? Is there room in the base or is it ballast? The actual telephone here is little more than a microphone, speaker and switch (hook). The business end was another box called a subset which contained the wiring and ringer. I am going to build this part brand new so any mods will take place at that end.
|
|
#
?
Nov 18, 2010 15:01
|
|
|
Grave $avings posted:
That's a beautiful block. As for the beeswax, surely the hardware store had some new toilet gaskets right?
|
|
#
?
Nov 18, 2010 19:53
|
|
|
Slung Blade posted:That's a beautiful block. Find a local supplier of organic beeswax that doesn't use mite pesticides (Apistan, Check-Mite, etc)that poo poo is horrible for you. I wouldn't want to eat off a cutting board covered in commercial beeswax just due to the chemicals involved. I would recommend my local apiary store Bees Neez (https://www.beezneezapiary.com) Jim is amazing ")
|
|
#
?
Nov 18, 2010 21:12
|
|
|

|
| # ? May 21, 2024 20:28 |
|
|
Nebulis01 posted:Find a local supplier of organic beeswax that doesn't use mite pesticides (Apistan, Check-Mite, etc)that poo poo is horrible for you. I wouldn't want to eat off a cutting board covered in commercial beeswax just due to the chemicals involved. I would recommend my local apiary store Bees Neez (https://www.beezneezapiary.com) Jim is amazing Come to think of it there's a farmers' market in town every Saturday, and there's usually an apiarist there. I'll have to check to see if he sells beeswax or not. Thanks for the tip!
|
|
#
?
Nov 19, 2010 02:03
|
|