

|
Nerobro posted:You don't know what nice forks are then. ;-) I've heard people say they prefer MKII hydros to EBR hydros.
|
 #
?
Sep 27, 2010 14:57
#
?
Sep 27, 2010 14:57
|
|


|

|
| # ? Jun 8, 2024 15:07 |
|
|
They're at best just skinny damper rod forks. "At best." A moped with real suspension would be a corner destroyer.
|
|
#
?
Sep 27, 2010 18:25
|
|

|
ShaneB posted:I've heard people say they prefer MKII hydros to EBR hydros. Compared to equally vintage Kreidler, Honda, Suzuki and Yamaha mopeds those forks are a laugh, they're utter poo poo. loving stamped out from compressed beer cans.
|
|
#
?
Sep 27, 2010 20:56
|
|

|
Nerobro posted:You don't know what nice forks are then. ;-) It's all relative. Mopeds forks are all junk compared to even a lovely pit bike, but as moped forks go...
|
|
#
?
Sep 27, 2010 23:21
|
|

|
ShaneB posted:Those are the standard Magnum XK/II forks though, yeah? The Hydros have the black wiggly covering up top. Yes and yes. 19phbg race clone, polini long filter, 21mm intake,port and case matched and polished, 17x40 gearing. Slowish off the line, tops out around 50. I have a aslil quich pipe coming my way that, with a little work, should put it in the mid 50's.
|
|
#
?
Sep 27, 2010 23:34
|
|
|
OlDirtyBehrmann posted:Yes and yes. 19phbg race clone, polini long filter, 21mm intake,port and case matched and polished, 17x40 gearing. Slowish off the line, tops out around 50. I have a aslil quich pipe coming my way that, with a little work, should put it in the mid 50's. You try tuning your clutch springs a little? I run 17x40 and my clutch slips up to about 20mph, it isn't so bad at all really off the line. With a 14 bing and a tecno circuit I hit 48 on the flats, with the Estoril 46. I've been wanting to move to a PHBG, too, though.
|
|
#
?
Sep 28, 2010 01:09
|
|
|
The clutch is tuned fine. It's due for a top end rebuild and has some small airleaks that are throwing my jetting off making it really tough to adjust for. I have about 750 miles on this set of gaskets that are sealed with copper permatex(it's poo poo) and it needs to be torn down and have all of them replaced with something better and gas resistant. Ditch the bing, it's alright, but doesn't have nearly the tunability of a phbg or mikuni.
|
|
#
?
Sep 29, 2010 04:02
|
|
|
OlDirtyBehrmann posted:The clutch is tuned fine. It's due for a top end rebuild and has some small airleaks that are throwing my jetting off making it really tough to adjust for. I have about 750 miles on this set of gaskets that are sealed with copper permatex(it's poo poo) and it needs to be torn down and have all of them replaced with something better and gas resistant. Ditch the bing, it's alright, but doesn't have nearly the tunability of a phbg or mikuni. Yeah, but ditching the bing means $150ish on the carb, intake, and jets. I'd rather put that money into a polini setup on the ZA50 that came with my Magnum... I think. Not sure where to go from where I am now with a pretty indestructable setup that is a lot of fun to ride and gets to the high 40s with temps maxing at 380-400F. Either throw a new carb at that and try to push it into the mid 50's, or Polini-ize the ZA and have the overall power it provides, and move the k-star setup back to the Maxi for double the fun. Choices choices.
|
|
#
?
Sep 29, 2010 04:17
|
|
|
Went to the SHS rally in Pittsburgh this weekend, and had a great time. I wish I could have gone to more than just 2 this summer, but my wedding and reception made going to Whiskey Business and Bomb Prom impossible. There is always Austin in a few weeks, I guess....
|
|
#
?
Oct 4, 2010 18:15
|
|
|
 I took the lawnmower bike to work for the first time today. Looks like it can top out at around 35 MPH or so. Not bad for an air-cooled 49cc engine and automatic transmission I guess. I simultaneously felt like a huge dork and yet awesome because this thing that I built neither fell apart nor killed me. I felt a little overdressed though in my armored jacket, full face helmet, boots and gloves. But I'd rather wear too much than too little in the worst case scenario. I'm guessing I can use the bike lanes when drivers want to pass and there are no bicyclists using it. At least I've seen guys on scooters wearing bike helmets doing that. The last thing I want to do is piss off drivers any more so than bicyclists already do. Soon I'll see if I can use it to go shopping, or come home to find my groceries have been bounced out of their bags. Edit: added a picture of its current state. Rugoberta Munchu fucked around with this message at 18:04 on Oct 7, 2010 |
|
#
?
Oct 7, 2010 07:10
|
|

|
The transmission went kaboom Friday night. I had to wait until Saturday morning to check out the damage. First, the transmission cover, once flat, now has a nice raised circular portion and it looks like something tried escaping.  Popped off the transmission cover to find it full of plastic and metal shavings and a mysterious piece of metal.  That mysterious metal piece was the key that fit in the notches in the drive shaft and pulley to keep the pulley from coming loose. Looks like that didn't work. Instead, it worked its way loose and lathed a nice hole in the transmission cover before falling out completely A hex bolt, fender washer and some loctite later and everything's back together with seemingly no permanent damage, save for that hole in the transmission cover. I rode the bike into town tonight without a problem.
|
|
#
?
Oct 10, 2010 11:56
|
|
|
anyone else in an ma branch (i'm a latebird)/go to ceremony a few weeks ago? top 3 weekends of my life. 
|
|
#
?
Oct 13, 2010 16:33
|
|
|
heyleroy posted:anyone else in an ma branch (i'm a latebird)/go to ceremony a few weeks ago? top 3 weekends of my life. Don't I wish. I missed Bomb Prom and Whiskey Biz because I got married and had a wedding reception on those weekends... only made it to Ghost Ride and SHS, and can't afford/don't want to travel again down to Austin. Ceremony had absolutely insane rides scheduled and mapped out, I really wish I could have been there!
|
|
#
?
Oct 13, 2010 18:50
|
|
|
I have been interested in replacing the somewhat trashed forks on my VIP and I'm looking for some insight. For slightly more than the price of EBR hydros, I can eBay a 90's CR80 front 17" wheel w/ hub and rotor, CR80 forks, tripleclamps, and caliper. This being said, why don't more people swap a small displacement dirtbike disc brake/front suspension setup? It seems like everyone is running EBRs or take offs from a more modern bike. Too much travel? Fitment issues?
|
|
#
?
Oct 15, 2010 22:27
|
|

|
heyleroy posted:anyone else in an ma branch (i'm a latebird)/go to ceremony a few weeks ago? top 3 weekends of my life. i am in this photo
|
|
#
?
Oct 16, 2010 04:28
|
|
|
cinder posted:I have been interested in replacing the somewhat trashed forks on my VIP and I'm looking for some insight. For slightly more than the price of EBR hydros, I can eBay a 90's CR80 front 17" wheel w/ hub and rotor, CR80 forks, tripleclamps, and caliper. Short answer is that they don't sell them on treats or 1977 and they aren't a kit/pipe/carb so swapping out forks for a set of nice hydro forks with a disc brake is way down on the list of mods that your average moped kid is going to do. There is also the fact that most people just slap parts on their bikes and forks aren't as simple as bolt and go most of the time.
|
|
#
?
Oct 16, 2010 05:43
|
|
|
I've been having to tweak my fuel/air mixture as it's getting colder and the engine's getting broken in. It's idling a lot more smoothly now but still dies under even more than slight throttle when coming from a dead stop. After I get rolling, it's fine no matter what I do. So a few more quarter turns here and there are needed. I also stripped an engine mount bolt and had to replace it which put the hermaphrobike out of commission for a couple of days. This fall's been wonderful with lots of warm sunny days. I know that won't last much longer. For lighting, I removed the guts from my old single LED bullet headlight and stuck a lantern bulb in there, reversed the polarity and ran some heavy gauge speaker wire to a 6 volt lantern battery zip tied between the seat post and rear rack. It works surprisingly well for $4 and doesn't look nearly as horrid as I'm describing it. The best part is I can still use the original power switch. I added some folding baskets to the rear rack and secured them with six 75 pound capacity zip ties per side. Truly a sign of a professional. Perhaps it wasn't the best idea to test how secure my setup was with a full bag of groceries (including a massive glass jug of Martinelli's apple juice) but I was hungry and really curious how viable this thing is as an errand runner. Everything made it home in one piece and nothing broke loose. According to the mechanical speedometer, I hit 40. That's about 5 miles per hour faster than it used to top out at, but I don't know how accurate that speedometer is. Still not bad for a lawnmower engine mated to a CVT. I removed the plastic lawnmower shroud as I think it's ugly and clunky looking. However, the ripcord handle made contact a few times with the spinning cooling fins on my way to and from work tonight, so I'll have to figure some way to keep that from happening again.
|
|
#
?
Oct 29, 2010 07:39
|
|
|
I recently ported the K-Star 70cc kit that is on my Magnum (writeup here) and was getting both tired of my 14 bings complete inability to idle well and was getting insatiably curious about more tunable carbs. I snagged a 19 PHBG race clone (Old Dirty Behrmann approved, based on the treats review) and got it tuned in rather quickly, it just required borrowing some jets from a buddy. I had ordered 86-98, thinking this would cover things for the K-star and the future Hobbit Athena build, but an 83 was the magic bullet. Anyway, the setup tops out the same, about 49 now, but the midrange is absolutely sick. As soon as the clutch fully engages at about 25 the bike is a rocket to the 40s. I can cruise at 1/8 throttle in the low 30s and open it up and it just pulls like crazy. I love the estoril on this setup, even if it's holding the top speed back a bit. And spigot mount race carbs let you do some nice ghetto moped tech like this:  Hacked Puch exhaust header intake, heater hose, hose clamps = legitimately permanent intake for a moped. I turned my air filter assembly around after I realized it was facing the wrong way. ShaneB fucked around with this message at 14:00 on Oct 29, 2010 |
|
#
?
Oct 29, 2010 13:56
|
|
|
M4rg4r1ne posted:Mb madness. So your EZ trans wasnt so easy afterall huh? - i love how your bike is coming out. how does that trans work? is there a slip clutch or is it automatic? ive been itching to build another one that isnt quite so... retarded, dont get me wrong, i love my bikes but the boardtracker, antique frame, antique springer and antique brake isnt really the safest thing in the world. I want one with a bit more utility...and fat knobbies. and disc brakes. in other news, im running wheel discs now...  
|
|
#
?
Oct 30, 2010 11:12
|
|
|
Where did you get those disks.... and are they available in 700c?
|
|
#
?
Oct 31, 2010 09:24
|
|
|
LobsterboyX posted:So your EZ trans wasnt so easy afterall huh? - i love how your bike is coming out. how does that trans work? is there a slip clutch or is it automatic? Rugoberta Munchu fucked around with this message at 13:13 on Oct 31, 2010 |
|
#
?
Oct 31, 2010 13:11
|
|
|
A siphon hose should do the trick. A piece of clear tubing or similar will work fine. Also, try googling "oklahoma credit card"
|
|
#
?
Oct 31, 2010 20:16
|
|


|
the discs are not available in 700, i got them from choppers US - they only come in 20" and 26" http://www.choppersus.com/store/category/3/14/Wheel-Covers/ I put them on my roadbike just to test, ive got some old super deeps that came off a bike i found in a dumpster.. they were just a touch too small, looked akward. about the EZ, Ive talked to the inventor of that transmission about whizzer stuff, his name is quinten. i bought an auto clutch for my whizzer that does not work and i sold it to him for about half what i paid for it (burned by ebay) he is a really nice guy and he talked to me at leingth about how cool this ez thing was going to be before he got it off the ground, he said eventually he would make one for the whizzer, but i guess thats on the back burner for now... hers the whizzer for reference.... 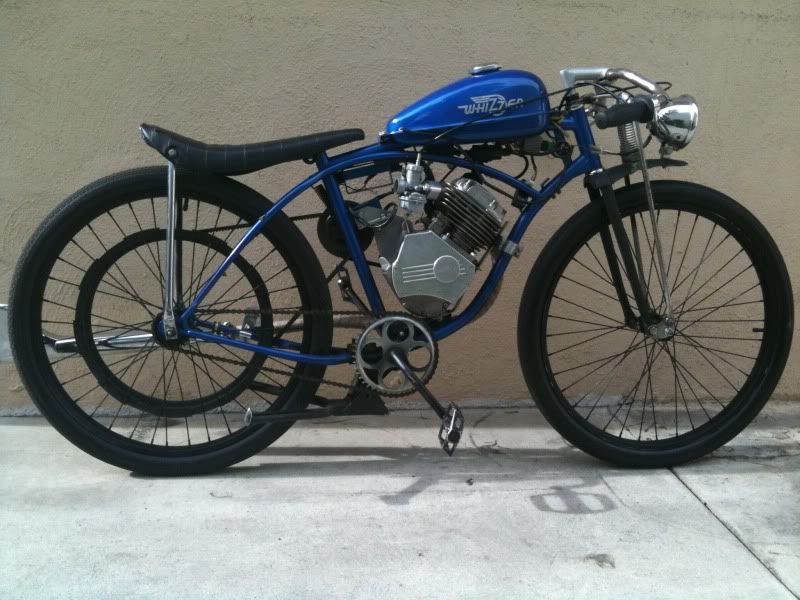 thats 138cc of 4 stroke power in a chinese made schwinn knock off. direct drive, no clutch, no brakes. all or nothing and dangerious as gently caress. it tops out at 50 i cant really work on this thing at the moment just because of the volume of projects, but eventually, i plan on giving it a new frame, custom spring fork and im going to loose the pedals and do running boards, get the correct auto clutch and finish my performance upgrades (ive already done cam and lifters, i need a high flow head and i need to port match the intake and exhaust..)
|
|
#
?
Nov 2, 2010 09:28
|
|
|
drat son. Yeah the EZ Motorbike folks were super helpful and nice when I encountered (very few) problems. I wish they'd be able to make one for the 2-stroke engines, since they have more hop-up parts, or finish developing the 2-matic, which is supposed to use a lot of the parts that my Q-matic has.
|
|
#
?
Nov 2, 2010 18:27
|
|
|
Thought I'd revive this thread with some notes of my Hobbit build: I got a 1983 PA50 on Craigslist for $120, not running, but pretty drat clean. I love the black Hobbits with the triple tank stripe and black paint, too, so it was a great foundation to work with. Soon after I got it I realized the previous owner was a moron, there was one busted case stud in the case, and one of the stud holes was stripped out. So I had some work to do. My plans include: Appearance: - Simplification of wiring, removing keyed ignition and turn signals. I'd like to get it down to the point where I don't need the stock controls at all. (Potentially. The turn signals are growing on me for some sort of ironic reason.) - Removing busted head light, replacing with something else mounted with these nice and low - Put on Pug bars, which are exactly the same as Hobbit bars, just about 1/2 the height - New seat of some sort, probably a stock PA-1 deal Performance: - Pull engine, re-tap stripped case screw hole - Install new performance crank and bearings - 71ish cc Athena kit (this and the crank are actually already purchased, so this ain't just pie in the sky) - Motomatic N8P (or maybe a Motion Left pipe, but N8P is proven on this setup) - Pull the notched and ramped stock variator from my DR setup, eventually use a TJT perhaps and some Polini weights? ($$$) - 2,000 RPM scooter clutch springs - 19 PHBG race clone carb outside the subframe, all tubed mounted up to a stock intake bored out to 19mm - Boyesen Mod dual-stage power reeds - New rubber, probably stick with the usual IRC NR53�s I like to run Luckily, a friend of mine who is/was waaay into Hobbits has a bunch of expensive stuff for me to borrow for testing: Motomatic Destroyer pipe, TJT variator, and a 6-roller Camino variator. I can test the 3 variators I have against each other and use the Destroyer to see how I like things and how I want to shape the powerband with a new pipe. OK, so first step was to disassemble the Hobbit's engine. Remove engine from subframe, check. Remove head, cylinder, piston, check. Insert rod through crankshaft wrist pin opening to stop it from moving, check. (Probably should have just used a piston stop while the head was still on.. whatever). Remove the nut that holds on the variator and clutch bell, pop off the clutch with a clutch puller: side 1 done. Remove the nut that holds the flywheel on, use a 2-jaw puller to remove the flywheel guide thing, unbolt stator, side 2 done. Remove 4 hex bolts under stator, done. Attempt to separate case halves. Use rubber mallet to pound them apart. Mistakenly believe they are just really freaking stuck. Use big crescent wrench to attempt to pry the halves apart using the engine mount "ears". Cry a little as you break off one of the engine mounts.... You see, there are two more screws/bolts that hold the case halves together. They are pretty obvious, too, when you look for them. I just wasn't paying attention and screwed things up. So yeah, busted case half, either needed to weld or find more halves. Luckily, a friend down in Toledo had a bunch of extra parts he wouldn't really use very soon, or ever, and let me come down to snag an engine case. The case halves on my friend's engine were held together with philips head screws, which I believe is the case for most years. Time to pray. 2 screws came out, 2 screws stripped out, and 2 screws (the ones easier to access) required cutting a big notch into with a dremel and removing with a beastly flathead screwdriver and vice grips. We first tried to use an ez-out to remove the stuck screw, but it just broke off into the screw. My buddy then busted out his 18v Dewalt cordless drill and went to town on the screwheads. After removing them, the cases came apart, and we used vice grips to remove the screw bodies. Phew. During the day down there, I also opened up my stock intake to 19mm all the way through, to match up with a Puch exhaust header another friend was nice enough to donate to my cause. Round high-speed cutter, mid-grade sandpaper wheel, hand-sand 400 grit: 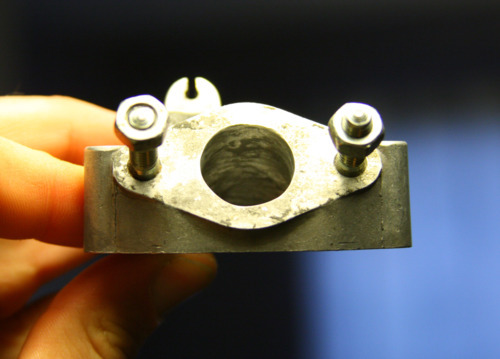 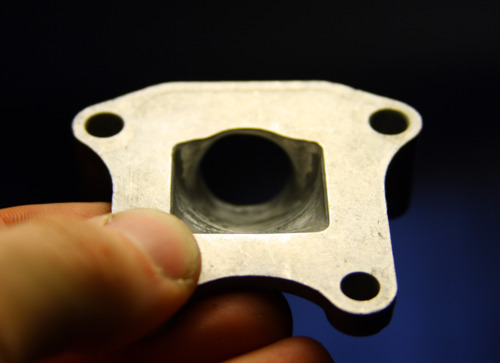 The Puch exhaust header matches this thing PERFECTLY, it's like it was made for it. The cases were pretty gnarly, so I spent some time sanding down surface rust and weird residue. I used a sharp paring knife to cut off the leftover gasket bits, as well. I then took the Athena's base gasket, cut it down to match the Athena's transfers, then used it to see what I needed to cut off the cases to get a decent case match. About 1-2mm all around the transfer, really. Used a high-speed round cutting bit, a mid-grade sandpaper wheel, then hand sanded with 400 grit. With the cases apart, grinding out the transfers was so easy and I was able to get all the way back into the case: 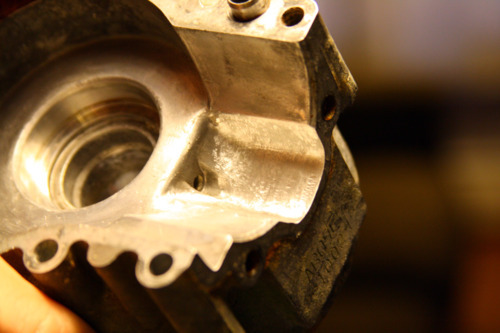 I then cleaned up the cases in some Simple green and hot water. Just enough to get the worst stuff off, this is an engine, after all. So then I got the parts all together. 77 crank, bearings, seals, case halves: 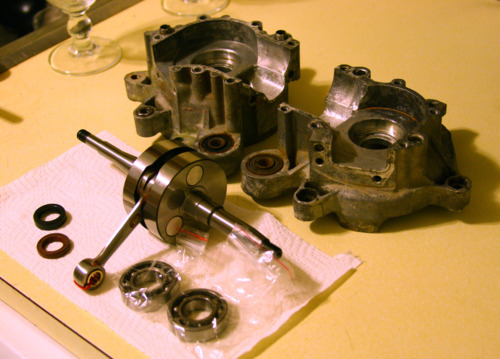 Following some advice from a Hobbit guru, the crank goes in the freezer: 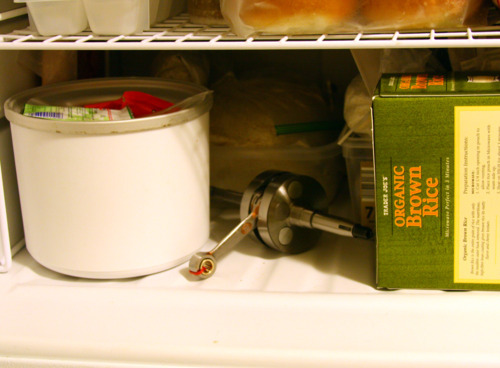 and the bearings go in the toaster oven at 250F: 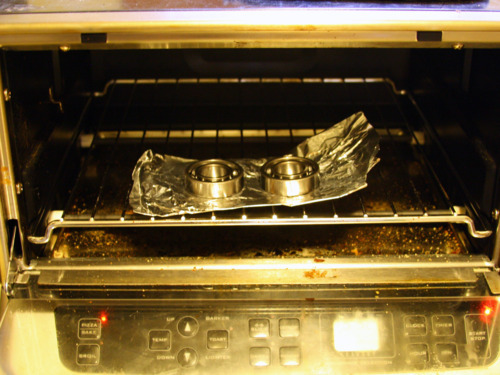 This contracts the metal in the crank and expands the metal in the bearings, hopefully making it easier for the bearings to slide down onto the crank. After the crank had been in the freezer for 45 minutes or so, and the bearings in the toaster oven for a half hour or so, I attempted to drop the bearing on, and assumed it would just drop down into place. Nope. Not even close. I took my bicycle seat post and rubber mallet and attempted to pound the inner race of the bearing, but it didn't want to get on there. I stuck the crank back in the freezer, bearings in the oven, and waited a bit. The next time I took a real hammer and whacked the end of the seat post as soon as the hot bearing hit the crank. Success. After a few hard hits the bearings were seated into place: 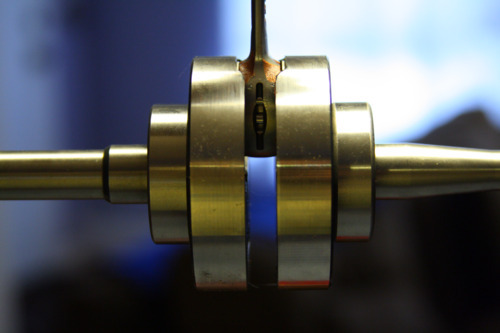 Tossed that into the freezer to prepare for the next step, which is placing the whole assembly into hot engine case halves. Crank and bearings in the freezer, yup. Tossed one of the case halves in the oven, heated it up for a half hour. Remove case half, place it on something heat resistant and with a place for the crank to go. I found this worked well. Duct tape on a nalgene: 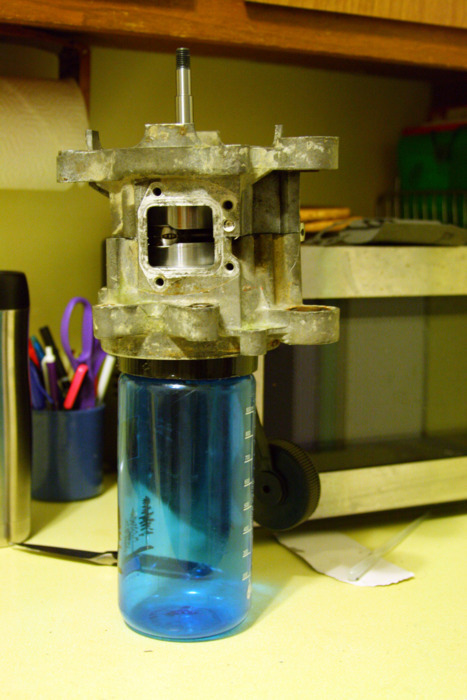 Triple check you are putting the crank in the right way and drop it straight in. It should slide right into place. If it gets stuck, chill and heat longer, then try again. Use a hair dryer or something to chill out the case half enough to handle, then put the entire thing in the freezer for awhile. Heat up the other case half. When you remove it, place it on your stand, put your 2-stroke oiled gasket in place, and drop the crank/case half assembly down onto the other half. I had to tap mine down a bit to make it seat completely. Quickly start hand-tightening the hex-head screws to secure the case halves together. Then tighten them in some sort of criss-cross pattern with a socket driver. Use a blow dryer or something to cool everything down. Done. Next step is pressing in the crank oil seals, which is pretty easy. I lubed up the hard rubber seals with some 2-stroke and simply pushed them in until they stopped, using some needle nose pliers. 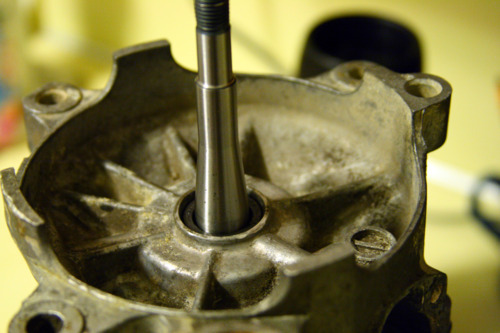 Note that the other one goes in deeper. So yeah, engine cases together: 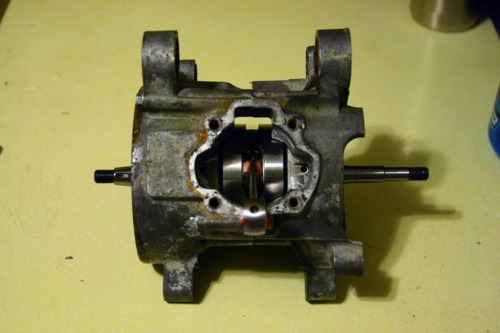 Pulled the woodruff key off my old crank, put it on the new one, ran the stator wires through that dumb rubber boot (hard as hell), secured the stator, placed the flywheel holder in place around the woodruff, tightened down the flywheel. Done. 2k clutch springs are in my clutch, which is waiting for a variator setup. Intake ready. Boyesen 2-stage reeds in the reed plate. This thing should be running the week after Thanksgiving. ShaneB fucked around with this message at 17:00 on Nov 24, 2010 |
|
#
?
Nov 24, 2010 16:30
|
|
|
That's pretty awesome. Looking forward to the completed build ")
|
|
#
?
Nov 24, 2010 19:03
|
|

|
Awesome, that minty-rear end crank really stands out in those cases, haha.
|
|
#
?
Nov 25, 2010 18:56
|
|


|
I just made an intake for my hobbit the exact same way. It really is like they were made to go together.
|
|
#
?
Nov 30, 2010 22:17
|
|
|
Hope you guys like photos. Did a lot of work today down in my new workshop area, a warehouse space down in the south of town, along with my buddy who found the space in the first place. Got a lot done in 4 hours. First a quick tour of the space: 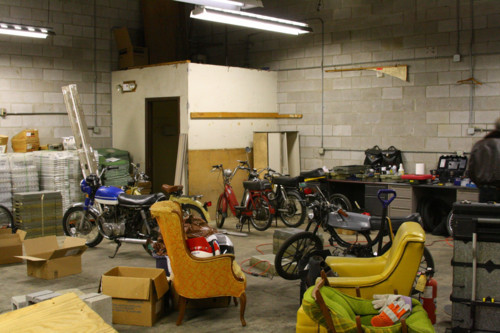 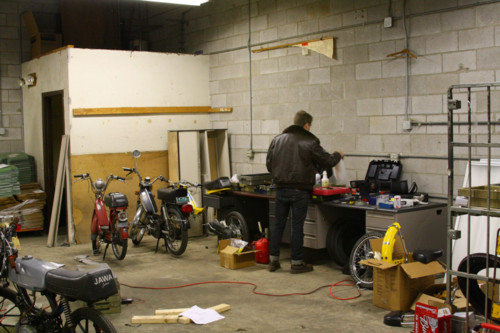 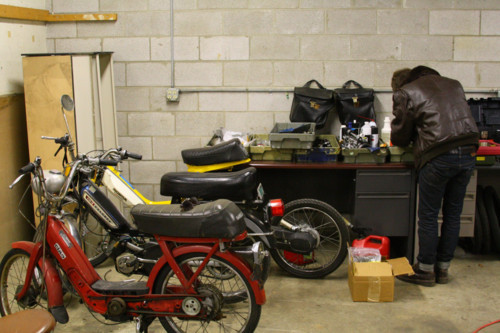 The bikes are mostly my friend's, his collection is growing. His Hobbit is apart for some top secret (for now) customizations and I�m not sure any of the others are running. Tons of old post office trays and stuff are there, for some reason. Good for organization, or what amounts to it for mopeds: 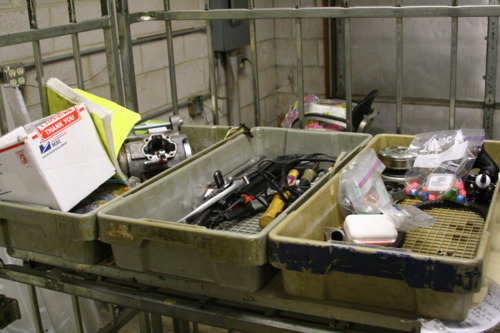 Bike at the start of the day:  So, onto some work. My DR bike hadn�t been variating right, variating too early and sticking in too high of a �gear� for too long. It�s currently running a borrowed Camino 6-roller which is pretty fun, but not quite as fast overall. Here�s what causes variation problems: 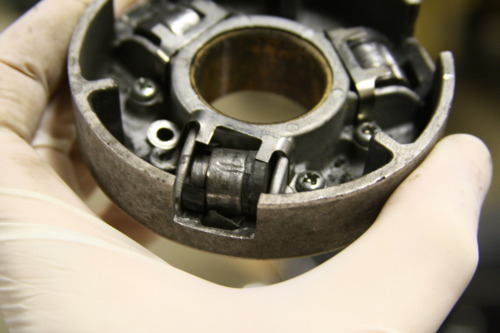 A broken plastic roller guide is not a good thing (I removed the screw, it wasn�t like that). I was also concerned that my notches weren�t wide enough. So to use this with the Athena build, I widened the notches a little: 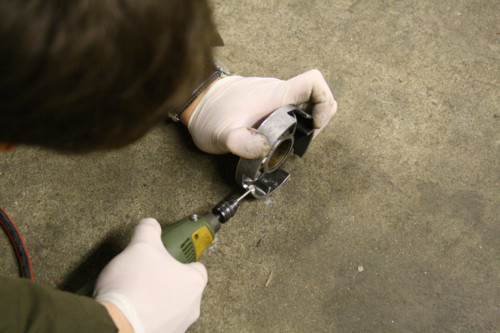 and installed the Moped Factory rollers: 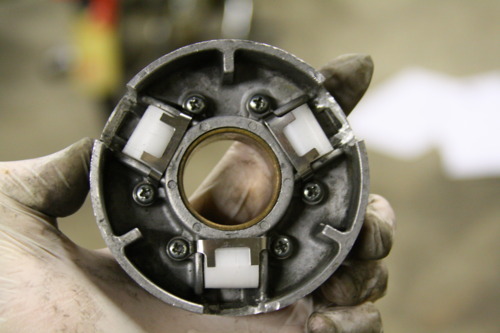 These are a really durable hard plastic material and weigh very slightly less than the PA50-1 weights I was running, which should be a good match for the setup. Next I had to widen out the exhaust mount area on the Athena cylinder itself so the Motomatic header could fit. This: 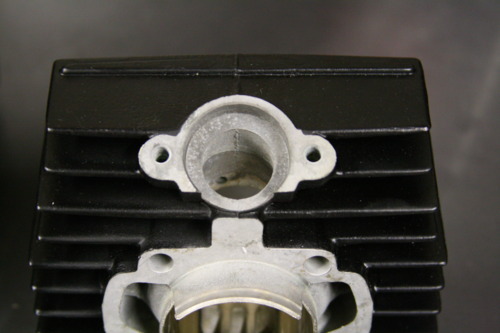 plus this: 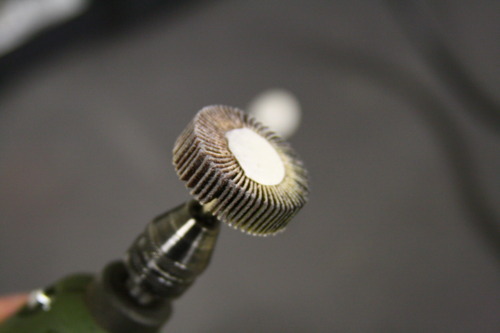 equals this: 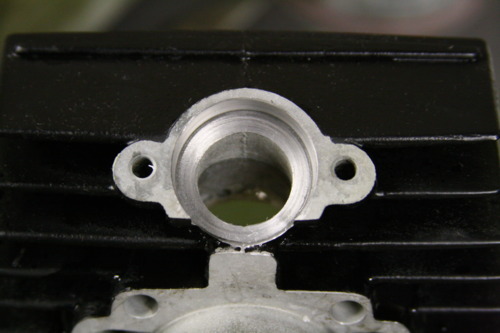 This was actually the first time the Proxxon bogged down on me. Sanding that much at once. So time to put the engine together. Check out this gorgeous custom squish band cut by Graham Motzing at Moped Factory: 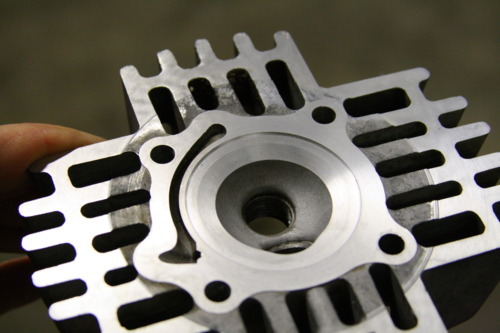 Reinstall the decomp (cool broken fin u guys): 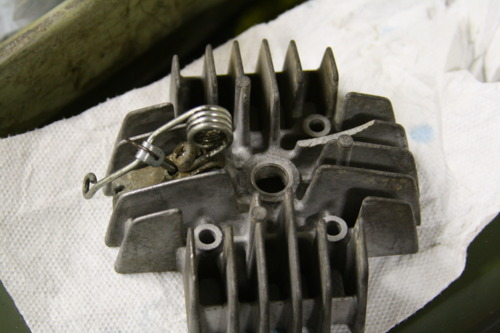 Piston on, base gasket, cylinder in place: 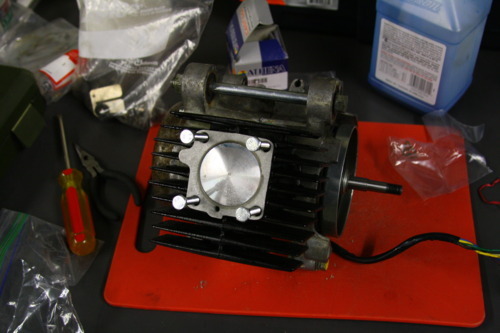 Bottom end together whattup. Don�t forget the head gasket, buddies: 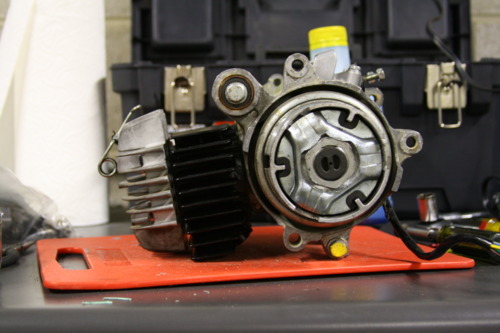 Got the new rubber on the rear wheel and got it back on the subframe, along with the engine:  You know what ain�t gonna work? The intake cut this long: 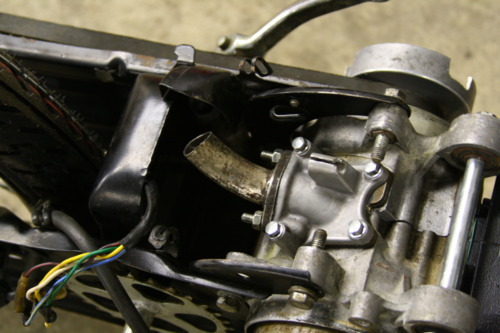 In fact the more I look at this thing the more afraid I get about making everything fit perfectly. So yeah, still work to do: 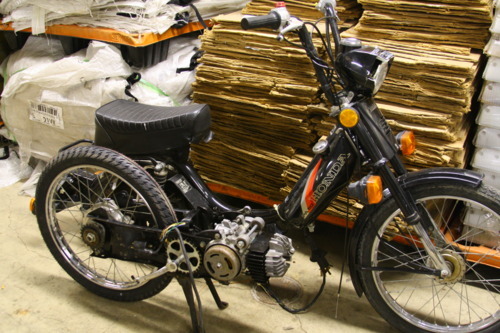
|
|
#
?
Dec 6, 2010 16:06
|
|
|
Why on earth does it have a decompression mechanism?
|
|
#
?
Dec 6, 2010 17:41
|
|
|
Phat_Albert posted:Why on earth does it have a decompression mechanism? Makes starting a whole lot easier.
|
|
#
?
Dec 6, 2010 17:48
|
|
|
ShaneB posted:Makes starting a whole lot easier. Right, but its 50cc. Or is it easier on the clutch and whatnot to have a decomp mechanism?
|
|
#
?
Dec 6, 2010 17:51
|
|
|
Phat_Albert posted:Right, but its 50cc. Or is it easier on the clutch and whatnot to have a decomp mechanism? Probably. On my 70cc DR kitted Hobbit it starts easier with the decomp. It's not necessary but it's a few less rotations of the pedals. The entire pedal-start subframe stuff isn't super sturdy anyway, so you can do much faster bump starts if you open the decomp, too.
|
|
#
?
Dec 6, 2010 18:05
|
|
|
If you lose the pedals and go with some pegs, you can make an intake that hangs the carb out the side.
|
|
#
?
Dec 7, 2010 09:11
|
|
|
OlDirtyBehrmann posted:If you lose the pedals and go with some pegs, you can make an intake that hangs the carb out the side. Yeah I'm spigot mounting it out the side, I just don't want to lose pedals. I think I can make it work.
|
|
#
?
Dec 7, 2010 14:36
|
|
|
That hobbit is going to be sickeningly fast. I'd love to find a PA50 but I haven't seen a single one on craiglist..
|
|
#
?
Dec 11, 2010 20:48
|
|

|
OK, so a friend bought me a 21mm PHBG for saving him a ton of money on an auto repair, so I decided to use it over the 19mm PHBG. First thing was to bore out the intake to 21mm or so... this is actually pushing the tolerances of the stock intake, and I think some points are more like 20mm. The top of the intake is pretty thin at this point, I'm not sure how much more I can grind it. I might clean this up even further in the future. Cell phone photos this time... ugh: To make fitting the intake, exhaust header intake dong, and tubing easier, I decided to cut off a lot of the stock airbox area. This took quite some time with my Proxxon and a bunch of cutoff wheels, but gets the job done:  I didn't take any photos of the intake, tubing, and carb setup right now, and for that I apologize. It fits really well and sticks out of the subframe without impeding pedal rotation. Unfortunately, the Motomatic Destroyer does. The N8P is out of the way, I think, but I won't have that for a few months. But yeah, got everything hooked up and started it with a drill. I ran it through a few heat cycles and putted it around the warehouse space. Needs to be jetted and tuned correctly, but it's in the teens and snowy out, so that's going to be pretty rough. Turruble video of it running for the first time. Motomatics sound pretty awesome, though. http://www.youtube.com/watch?v=3-wEPgBOIA4
|
|
#
?
Dec 14, 2010 16:27
|
|
|
I derestricted my estoril the other week and it is awesome. I also upgraded to a three shoe clutch with blue springs at the same time to make up for the loss in low end. You can feel the pipe hit harder/higher and keeps pulling when the stock estoril gives up. Unfortunately, one of my wrist pin clips snapped off and trashed my cylinder about 30 miles later. I had to beat the cylinder off with a hammer. I don't think I'll be using those double sided clips again.
|
|
#
?
Dec 24, 2010 02:23
|
|
|
OlDirtyBehrmann posted:I derestricted my estoril the other week and it is awesome. I also upgraded to a three shoe clutch with blue springs at the same time to make up for the loss in low end. You can feel the pipe hit harder/higher and keeps pulling when the stock estoril gives up. Unfortunately, one of my wrist pin clips snapped off and trashed my cylinder about 30 miles later. I had to beat the cylinder off with a hammer. I don't think I'll be using those double sided clips again.  I love my stock estoril on my Puch. It has such a great midrange, I don't want to lose that in the derestriction... I'm going to replace my messed up studs and another set of new gaskets, along with a legit PHBG mount, for my magnum, and port it some more, just to hit 50 on the k-star. My hobbit project continues to roll. Redoing the wiring and ordering new controls as soon as I know just how many gift certificates I have after xmas.
|
|
#
?
Dec 24, 2010 02:39
|
|
|

|
| # ? Jun 8, 2024 15:07 |
|
|
Picked up a yamaha scooter top end the other night for my maxi project. The transfers are enormous and the wrist pin is 10mm, so I have some modifications to do, but the stroke is drat close and it should only need a spacer plate that is ~2mm thick.
|
|
#
?
Dec 25, 2010 00:44
|
|