


|
snarkcookie posted:Mounted to some mdf board on the underside of the unit's shelf, an idea I stole from http://www.decluttered.com/ I was going to build a shelf to hold all the crap but this is a better idea.
|
 #
?
Apr 9, 2012 03:28
#
?
Apr 9, 2012 03:28
|
|


|

|
| # ? May 21, 2024 16:22 |
|
|
wormil posted:I was going to build a shelf to hold all the crap but this is a better idea. I have an idea on how to get cables off the floor while still having the stand be slightly portable for cleaning/viewing pleasure. I'll describe the process in time.
|
|
#
?
Apr 10, 2012 09:55
|
|
|
I have done something similar to my desk and my mouse is dead. I have been using a crappy temp for about a month now because I am avoiding having to tear it apart to get the wires out.
|
|
#
?
Apr 12, 2012 03:29
|
|

|
snarkcookie posted:The new stand. I love this. Very simple design, but aesthetically pleasing and functional too. So, I've managed to lose all the photos I took of the construction process. Well, I didn't lost them exactly, I borrowed my (ugh) Mom's camera, since I was using the space and tools at my parents' house, and it looks like all those photos were deleted before I got to them. Anyway, I'll do my best without em. So, you want to build a boat... Good for you. It sounds daunting; I had a hell of a time convincing my dad to give up space in his shop. "So, let me see if I can understand this", he'd say, again and again, "you are going to build a boat out of plywood in the barn?! I just can't understand this." *walks off shaking head* You might be saying this yourself. I'm here to tell say: gently caress you, it's surprisingly simple. It did take much longer than I anticipated, but at no point did I feel like I was out of my league, and I don't know what the gently caress about nothin. My biggest resources were the boatbuilding tips section of this site: http://www.clcboats.com/shoptips/, as well as the kayak builders forum. I got the panel offsets for free here: http://www.squeedunk.com/c-16.htm Originally, I had planned to build a cedar-strip canoe, but feared the cost of materials. Then I found that you can accomplish much the same thing with much cheaper materials using the stitch-and-glue method. This involves "stitching", then "gluing" together plywood sections to create the overall shape of the boat. It also requires no forms, as would using cedar strip construction. Most every source I've seen recommends using marine-grade okoume plywood, but I'm way too cheap for that. After seeing the price tag of $38 a sheet and $123 for shipping, I opted to use two sheets of 5mm underlayment for at $11 each that I could get at the Home Depot. (This kind of frugality will become a common theme) Really, I don't see how springing for the marine-grade plywood would have made any difference. Every bit of it ends up coated with fiberglass and epoxy and thus touches no water, but more on that later. I started with the hull. This is made with four sections of plywood, two for the bottom and two for the sides. I created four sections 16.5 feet long and about 2 feet wide. This required making two joints for each segment, since each plywood sheet as it came from the store was only 8 feet long. The proper way to do this would be to create a scarf joints where needed. I tried this, and got a terrible result and so opted to just use butt joints. Here's a thing to explain this:  Some glue, some staples, and I was off to the next step: laying out the offsets. Refer to the link above. Reading these is pretty simple. Start by marking a straight line along the entire length of the plywood sheets. Then, starting from 0 on one end, mark along this line each of the stations as indicated by length, from 9.25 to 179.625. After the stations are marked, the top and bottom edges are marked as height from the baseline. Note that the ends have only a top edge, as each segment comes to a point there. After this is done, it�s a process of connect the dots, creating uninterrupted, flowing lines following each of the top and bottom edges. Each of these two lines should come together at each end, as I mentioned. Then, just cut along the lines using a jigsaw or your weapon of choice. Now we can get on with stitching. For this, I used some cheap narrow-gauge copper wire--single-strand doorbell wire I think it was�which I stripped the insulation off of. 1/16th inch holes were drilled at regular intervals along the adjoining edges of the segments to accept the wire. Then, using approximately 2-inch lengths of the copper wire, loop thru adjacent holes and cinch tight. Do this all along the adjoining edges and things should take shape. If you're doing it right, here�s what you get at about this point.  *note: not my boat I�ll get on with this later, if anyone is still paying attention. And I�ll get some more pictures of the finished product up tomorrow. Right now, I have to get to bed.
|
|
#
?
Apr 12, 2012 04:23
|
|


|
Once I get some cash to play around with, I'll be building a boat in my spare time. How much is the fiber glass because I was thinking of springing for the marine plywood.
|
|
#
?
Apr 12, 2012 20:47
|
|

|
Rockis Dukakis posted:So, I've managed to lose all the photos I took of the construction process. Well, I didn't lost them exactly, I borrowed my (ugh) Mom's camera, since I was using the space and tools at my parents' house, and it looks like all those photos were deleted before I got to them. Anyway, I'll do my best without em. You should give this a shot on the card. http://www.z-a-recovery.com/ I use it all the time and it works well.
|
|
#
?
Apr 12, 2012 21:50
|
|

|
Rockis Dukakis posted:Finally finished the fucker. Well, close to finishing anyway. Still have to secure the rear hatch and cut another in foredeck. Next step is to put it in the water and see if it floats. Ignore the dogs. oh. my. That's drop-dead gorgeous. I can't see it not floating.
|
|
#
?
Apr 13, 2012 03:28
|
|


|
My Spirit Otter posted:Once I get some cash to play around with, I'll be building a boat in my spare time. How much is the fiber glass because I was thinking of springing for the marine plywood. I got mine from CLC, $5.24/sq. yard, and used about six yards. Oh, and I tried the image recovery. No dice, but there were some other...interesting finds there.
|
|
#
?
Apr 13, 2012 04:56
|
|
|
Rockis Dukakis posted:I got mine from CLC, $5.24/sq. yard, and used about six yards. How much weight did the fiberglass add?
|
|
#
?
Apr 13, 2012 15:05
|
|
|
My Spirit Otter posted:How much weight did the fiberglass add? A lot. Before I started adding fiberglass, I could toss the boat around one-handed. I'd say at least 2/3 of the weight is fiber and epoxy.
|
|
#
?
Apr 13, 2012 15:10
|
|
|
Ya, thats what I am worried about with using fiberglass. The boat I am going to build is about 20 feet long 8 feet wide. Pretty sure I have to go with a marine grade plywood.
|
|
#
?
Apr 13, 2012 15:43
|
|
|
Make a concrete boat
|
|
#
?
Apr 13, 2012 20:19
|
|


|
peepsalot posted:Make a concrete boat that doesnt seem very practical, tbqh!!
|
|
#
?
Apr 13, 2012 21:34
|
|
|
My Spirit Otter posted:that doesnt seem very practical, tbqh!! http://www.camp-sdmines.com/index.php/camp-teams/concrete-canoe
|
|
#
?
Apr 13, 2012 21:40
|
|


|
Racing-grade concrete canoes are actually concrete-reinforced carbon fibre. They take a loose-woven carbon fibre and pour concrete around it to bond it all together. It works, but it's not actually pure cement+sand. You could replace the concrete with resin and it would be functionally identical, but much more expensive.
|
|
#
?
Apr 13, 2012 23:55
|
|
|
JEEVES420 posted:I have done something similar to my desk and my mouse is dead. I have been using a crappy temp for about a month now because I am avoiding having to tear it apart to get the wires out. Just snip the ends off with a wire cutter, then as long as you didn't put the wire ties on kink-tight, you should be able to just pull the wire out.
|
|
#
?
Apr 14, 2012 12:47
|
|

|
There was the hull of a concrete sailboat floating in the harbor by my house for about 10 years, it's pretty sturdy stuff. If you run in to a rock, just sail it up on a tidal flat, lay it over and spackle some concrete + iron mesh over the crack, paint it, and keep on going. It's not as durable as an all-steel hull if you get washed up on the rocks during a storm, but more than a few concrete boats have circumnavigated. There's a 420 ft concrete boat that's been turned in to a sort of park in Galveston Bay (near Houston), it's been there since 1922. Her sister ships got towed up near Alaska where they're still floating (Barely) and have been tied up for use as a breakwater for a logging port. Some sort of WWI "conserve steel for tanks and guns" spruce goose style experiment involving concrete. http://www.crystalbeach.com/selma.htm 
Hadlock fucked around with this message at 14:29 on Apr 14, 2012 |
|
#
?
Apr 14, 2012 14:23
|
|


|
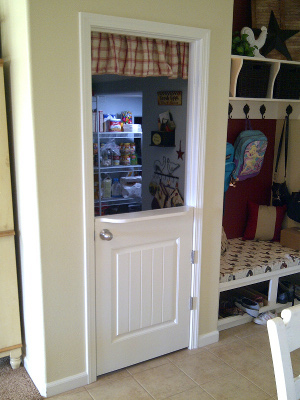 Simple project. We have a big pantry, and it's decorated on the inside, so I figured I might as well make it easier to see the inside. I cut the door in half and build a support in the door (it's mostly hollow), and then mounted some 5/8" MDF on top to form a sill. I also had to relocated the top hinge. In hindsight, I should have mounted the hinge higher. I assumed that evenly spacing the hinges (11" from the top and from the bottom) made sense, but when you're supporting weight, you really want the top hinge higher up on the door. It should be ok, but I end up having to relocate it. Anyhow, I like it. My wife is thrilled. Win win.
|
|
#
?
Apr 15, 2012 17:13
|
|

|
First time posting in here! I recently dug up this project I started about a year ago. It's an embroidery of the Tim and Eric Season 5 DVD cover on a canvas bag. I'm not really sure what I'll do with it afterwards, but I've had a good time embroidering it. Here is a link to the actual DVD. Sorry for the instagram. 
|
|
#
?
Apr 18, 2012 02:24
|
|
|
jovial_cynic posted:
looks good and you are right that the top hinge should be higher. While reading your post the placements for Timely and Pioneer frames hit me (8 1/4 and 4 7/8 from top). Freaked me out since I havent done door prep in over 10 years. How high did you end up mounting it?
|
|
#
?
Apr 18, 2012 03:57
|
|
|
This is one of the coolest things I've ever seen! I want one!Dogtanian posted:Quite a while back I floated an idea for a product to my workmates and it was shot down as stupid and a massive waste of time, so my stubborn streak meant I pretty much had to build it.
|
|
#
?
Apr 20, 2012 22:25
|
|


|
Professor X posted:First time posting in here! Nicely done so far. That will be one disturbing bag, but I would high five anyone I saw carrying stuff in something so awesome. Check out Death Springs, my free webcomic updated every Thursday!
|
|
#
?
Apr 21, 2012 01:10
|
|

|
snarkcookie posted:Some time soon I'll redo the top part, you can see in the side view picture that the boards warped when I had them clamped together. Avoid backsawn boards: 
|
|
#
?
Apr 22, 2012 01:44
|
|
|
KingEup posted:Avoid backsawn boards: I've read/studied an excessive amount about wood, both in academic settings and in my personal hobby pursuits. I have never ever seen flatsawn boards referred to as "backsawn", anywhere.
|
|
#
?
Apr 22, 2012 02:08
|
|

|
GEMorris posted:I've read/studied an excessive amount about wood, both in academic settings and in my personal hobby pursuits. I have never ever seen flatsawn boards referred to as "backsawn", anywhere. Same thing. Different country. 
|
|
#
?
Apr 22, 2012 02:35
|
|
|
I think its an Australian-only term, but definitely used. Other synonymous nomenclature from Hoadley: flatsawn, flat-grained, tangential-grained, plain grained, slash grained, sometimes side grained and plainsawn.
|
|
#
?
Apr 22, 2012 18:09
|
|

|
I think I'm going to declare this done. Since you saw it last, it's had a few more coats of marine varnish on the deck, rear hatch has been secured, and tie-downs added to the foredeck. Oh, I got it inspected, so we're nice and legal.   She needs a name...
|
|
#
?
Apr 25, 2012 04:40
|
|
|
A slightly smaller boat... this loving thing. An Artesania Latina model of the Bluenose 2, with instructions so bad they're basically useless. I've already had to saw the bulkheads off and reglue them in different positions due to hosed up italian translations or whatever. Still, not a bad way to escape the wife for a couple hours
|
|
#
?
Apr 25, 2012 05:45
|
|

|
A coffee table  And a birdhouse ") 
|
|
#
?
Apr 25, 2012 05:46
|
|
|
Rockis Dukakis posted:She needs a name... Envy? She's bloody stunning, hell of a job.
|
|
#
?
Apr 25, 2012 09:30
|
|

|
Rockis Dukakis posted:I think I'm going to declare this done. Since you saw it last, it's had a few more coats of marine varnish on the deck, rear hatch has been secured, and tie-downs added to the foredeck. Oh, I got it inspected, so we're nice and legal. Did you ever determine if it floats?
|
|
#
?
Apr 25, 2012 14:04
|
|
|
Are you taking that into the actual ocean? Do you have a rudder rigged up? PS: that is a beautiful kayak lags fucked around with this message at 16:03 on Apr 25, 2012 |
|
#
?
Apr 25, 2012 16:00
|
|

|
Rockis Dukakis posted:
Atalanta means "balance"... I kinda like that for a homemade boat name.
|
|
#
?
Apr 25, 2012 17:14
|
|

|
Paul Coffey posted:Just a heads up - it looks like you have a withered peach lying there on the table, or is it a big plum? Anyway better get rid of it because it's bad for the wood.
|
|
#
?
Apr 25, 2012 22:40
|
|


|
Palpek posted:Just a heads up - it looks like you have a withered peach lying there on the table, or is it a big plum? Anyway better get rid of it because it's bad for the wood. Its his nutsack  Also the boat is amazing. My old flatmate is making one but can't shell out for the fiberglass. EDIT: How come I've never noticed these nutsack pics before? A LOVELY LAD fucked around with this message at 20:19 on Apr 26, 2012 |
|
#
?
Apr 25, 2012 23:24
|
|


|
A LOVELY LAD posted:Its his nutsack
|
|
#
?
Apr 25, 2012 23:46
|
|
|
A LOVELY LAD posted:Its his nutsack I never thought I would be beaten on such an obscure post. Well done sir. ... and Rockis, that kayak is looking awesome. Nice work.
|
|
#
?
Apr 25, 2012 23:52
|
|
|
Lots of good projects, I made a pretty great shoe shelf and queen size bunk beds recently, I'll have to take a few photos when it's daylight.
|
|
#
?
May 5, 2012 15:12
|
|

|
c0ldfuse posted:queen size bunk beds Holy poo poo, yes I want a picture!
|
|
#
?
May 7, 2012 20:15
|
|
|

|
| # ? May 21, 2024 16:22 |
|
|
I found a discontinued Molger table frame in an Ikea As-Is section (I love As-Is!), and decided to make a tabletop for it. I found a couple of beautiful planks of oak at a wood show, glued them together, planed them into a smooth surface, and attached the Molger. Unfortunately, the frame was a little too wobbly, so I thought to solve it using turnbuckles to give it tension. It seems to work OK, attached with domed bolts. 
|
|
#
?
May 10, 2012 06:42
|
|