


|
philkop posted:I make leather wallets and I am looking to barter for a custom wooden tool box. I would trade a few custom wallets (which I value at roughly 50$ a piece) for the box. Asking certainly isn't out of line, and overall, it doesn't look bad. I'm confused, though, by your drawing, mainly the top view. Or is that just the divider layout for that top-most drawer? If so, out of curiosity, why all the diagonals/oddly-shaped spaces?
|
 #
?
Aug 20, 2012 04:36
#
?
Aug 20, 2012 04:36
|
|


|

|
| # ? May 22, 2024 18:36 |
|
|
Bad Munki posted:Asking certainly isn't out of line, and overall, it doesn't look bad. I'm confused, though, by your drawing, mainly the top view. Or is that just the divider layout for that top-most drawer? If so, out of curiosity, why all the diagonals/oddly-shaped spaces? Yeah that is the divider layout for the top view. It is perfectly portioned out to store all of my main tools. The main diagonal cradles my shears, and the space bellow it completing the rectangle holds a sewing awl.. Below that goes my leather punches, and the diagonal beneath the spool just completes the main diagonals line through the box giving it better composition in my opinion. In the inner triangle I will store needles, in the outer I can store rivets and clasps. The long rectangle at the bottom stores an exacto blade and some pencils. The rest will be whatever I need to throw in them. I have put a lot of thought into it. I really wish this could be a project of my own but I do not have the money to invest in any tools to make it happen. I also have never taken on any wood working project beyond a wooden duck I made back in shop class (back in middle school.)
|
|
#
?
Aug 20, 2012 04:45
|
|

|
I'd be interested in doing it, depending on the terms, but my shop is currently still only at about 20% functionality after the move. I'm hoping to have my table saw powered again some time this week. :/
|
|
#
?
Aug 20, 2012 04:47
|
|
|
The terms are take as long as you need. Have fun making it, add your own touches and change anything you think you need (consult me about it.) And I extend the same courtesy to you on the wallets. I could make you your wallet first, and 1-2 more after completion depending on how close it matches what I need. You can see info on the custom at the bottom of the page here http://www.mysterywallet.com/goon-discount.html The design can be altered, It was a semi-rough draft. E: And if it was unclear, no money would be passed on either side, just one mans goods for another. You can g chat me at philkop at gmail dot com if you had any more questions/ideas/advice philkop fucked around with this message at 04:57 on Aug 20, 2012 |
|
#
?
Aug 20, 2012 04:55
|
|
|
philkop posted:here are my crude plans Intriguing but unfortunately I don't need any wallets. I'll mention a few things that may help you out though... Don't forget the wood thickness. If you need a drawer 1.5" tall, make sure to specify if that is inside (open) space or total height because you'll lose probably close to 1/2" off the height and maybe 1/2"+ off the width depending on how it's built. Same for the tray dimensions on top.
|
|
#
?
Aug 20, 2012 05:01
|
|

|
wormil posted:Intriguing but unfortunately I don't need any wallets. I'll mention a few things that may help you out though... Don't forget the wood thickness. If you need a drawer 1.5" tall, make sure to specify if that is inside (open) space or total height because you'll lose probably close to 1/2" off the height and maybe 1/2"+ off the width depending on how it's built. Same for the tray dimensions on top. Thanks, it's easy to forget this thing will exist in the 3 dimensional world one day... I'll revise my plans tomorrow. The only real issue would be the dividers on the top, the rest I could stand to give or take a half inch. What should I look for in terms of quality of the wood and joints? Plywood would be too thick and I can't imagine it aging very well. I essentially want a wooden tackle box.
|
|
#
?
Aug 20, 2012 05:05
|
|
|
philkop posted:Thanks, it's easy to forget this thing will exist in the 3 dimensional world one day... I'll revise my plans tomorrow. The only real issue would be the dividers on the top, the rest I could stand to give or take a half inch. Plywood comes in different thicknesses 1/8, 1/4, 3/8, 1/2, 5/8, 3/4 & 1" (although it's really in millimeters these days). Good kitchen cabinets are made from hardwood plywood and it would be sturdy and age well; edge banding would hide the ugliness. Ply would make a strong if utilitarian tool box. The alternative is solid wood but the cost goes up. Could go with box joints for the main box and delicate but sturdy drawers made from 1/4" stock. An alternative would be a frame and panel box with the frames made from a nice hardwood and the panels from 1/8" birch ply. Economy version the sides would be joined with pocket screws & glue, dowels & glue, or biscuits & glue. What's attractive about doing panels is that most of the box could probably be made with scraps .  There are certainly many more ways to construct it but the labor starts getting way out of proportion to the trade.
|
|
#
?
Aug 20, 2012 08:15
|
|
|
wormil posted:Plywood comes in different thicknesses 1/8, 1/4, 3/8, 1/2, 5/8, 3/4 & 1" (although it's really in millimeters these days). Good kitchen cabinets are made from hardwood plywood and it would be sturdy and age well; edge banding would hide the ugliness. Ply would make a strong if utilitarian tool box. The alternative is solid wood but the cost goes up. drat, I wish you needed a wallet. You sound like you could make a great box. Thanks for the advice. The hardwood plywood sounds fine. After all this will be more function than form. I had some new ideas for it and I am messing around in some free drafting program I found. We will see what it turns out. E:gave up drafting program. MS Paint For Life philkop fucked around with this message at 21:35 on Aug 20, 2012 |
|
#
?
Aug 20, 2012 17:16
|
|
|
CUSTOM WALLET BARTER: Ok managed something decent in inkscape.. This should make more sense. As far as I can tell, all of the math is correct. After coming this far I wish I could just make it myself, but I lack the time, tools, and skills to do so. I still work on The Wallets out of my bedroom. We are planning to move in May so I can build a respectable shop by then. As of right now my wallet tools are in a shoebox so I would love something nice for them. After seeing the work that will be involved I would have no problem making a few custom wallets for you and some buds or relatives. Custom wallets really are a whole different experience. You can control as little or as much as you want from colors to pocket arrangements. Also you get my personal guarantee on your wallet (one of the bunch,) meaning I will fix/repair/replace your wallet for life, provided you cover shipping to me. I will also cover shipping cost for the tool box above 10$ I will also write a blurb and post pics of the barter in the bartering section on my site (if that means anything to you.) I have tried to take virtually all of the planning work out of it for you, I just need a skilled set of hands. If anything is unclear let me know. This is the first time I have attempted something like this. The project would be best suited for a a hardwood plywood. If the .25" and .5" woods were different tones it would probably look nice. I would like some kind of seal to promote the longevity of this box(as I plan to keep it for a very long time.) If you can do this with recycled wood that would be awesome as I recycle all of the leather for the wallets. I have edited this reply several times, sorry for the confusion, I figured it was better than crapping up the thread with a bunch of replys. Here is the final plans I have for "The Perfect Wallet Tool Box."         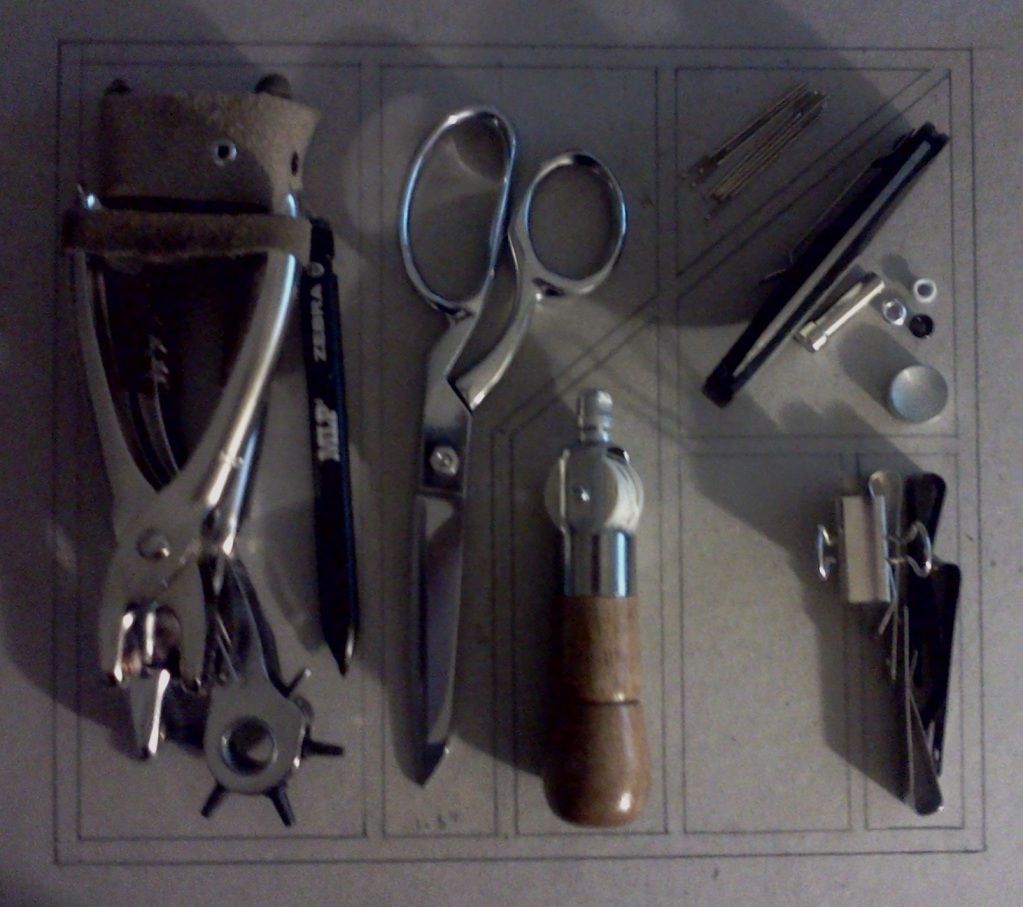 It's time. I found an old desk on the side of the road. The drawers have the perfect thicknesses of wood needed for me. Will be posting once I have some more done. Whats a good cheap handsaw for cutting a bunch of straight and accurate pannels. Going to do this whole project on the cheap with hand tools, learning as I go. Wish me luck! philkop fucked around with this message at 16:29 on Sep 23, 2012 |
|
#
?
Aug 20, 2012 21:14
|
|
|
Is there a reason why planes with a chip breaker have the blade oriented bevel down and planes without a chip breaker (ie trimming plane) have the blade bevel up?
|
|
#
?
Aug 28, 2012 06:25
|
|

|
It's more that planes with the bevel up can't have a chipbreaker, than the other way around. Also, the bevel up blade is usually set at a much lower angle, which places the iron more directly behind the cut, which makes it stiffer, which reduces flex and vibration at the edge. This is very important for cutting end grain, which is what low angle block planes were invented for.
|
|
#
?
Aug 28, 2012 12:51
|
|
|
Here are a couple pens I had to do I guess. Corrugata burl and blue dyed box elder burl. Didn't several of you get a lathe in the last few months? 
|
|
#
?
Aug 30, 2012 23:00
|
|

|
My lathe is still in a box in the garage after moving.  However, that hasn't stopped me from collecting wood: got a couple small, unidentified logs from a neighbor down the road who had just taken a tree down to add to my ever-growing collection of wood waiting to be processed. Which reminds me, I still need to figure out a chainsaw-based milling solution, or similar. However, that hasn't stopped me from collecting wood: got a couple small, unidentified logs from a neighbor down the road who had just taken a tree down to add to my ever-growing collection of wood waiting to be processed. Which reminds me, I still need to figure out a chainsaw-based milling solution, or similar.What'd you use for the finish? CA, or something else? Also, those little stands are nifty. ")
|
|
#
?
Aug 30, 2012 23:04
|
|
|
CA. The ant liked them too apparently. I saw him in post but decided to leave him in to see if anyone noticed.
|
|
#
?
Aug 31, 2012 00:41
|
|
|
I was typing up a long post on the workbench I'm in the process of building, but then I decided I'd ask first if anyone actually wanted to read a wall of text on the subject. So I'll just post pics in the mean time. Here's a shot of the pieces I have almost ready to glue up for the top.  It's white oak that I cut down and milled to rough size. It's ~24" x 7'6" x 4" (about 60cm x 230cm x 10cm for you furriners.) Let me tell you, what looks like plenty of wood in rough cut form diminishes very quickly when you start cutting off all the crooked parts. I was going to make it 30-36" wide, but I just don't think I can pull enough nice pieces out of the pile to do it. Plus then I have to move a 350 lb top around. I also wanted to make it at least a full 8' long, but I just couldn't squeeze it out of some of the boards, so I'll make the end caps extra thick and hope it comes close. This is a little more than half the sawdust I made trying to just clean up both faces of the wood. I didn't take off any more than was necessary to get a good glue surface.  You can see on the underside how I had to be very selective about what boards I put where.  That notch on the top left is where the tail vise is going, so I can use some of the wood from the log that I cut <7' for some reason. This also determines how long my tail vise is going to be, so it's a good thing I didn't really design that yet. I just picked this plane up at a flea market on Sunday. It's a Stanley #7 Jointer, and after a little TLC, it's running pretty well.  Whoever put it up for sale must have attacked the iron with an angle grinder, because it really looked terrible. I almost could have cried when I pulled it out and looked at it. After nearly an hour with a sharpening guide and many sheets of sandpaper, I have an acceptably sharp, consistently beveled edge. I still need to take the horribly crooked curve out to make it cut evenly, but I wanted to make shavings.  So I did. Ok, I wanted to avoid a long post, and I still didn't. Here's the album which only has a few more pictures for now. I'm terrible at remembering to take pictures while I'm working on something, so hopefully I'll stop along the process and do so.
|
|
#
?
Aug 31, 2012 03:55
|
|
|
One Legged Ninja, Keep the pics & updates coming and I'm interested in reading about the tailvice. Have fun hand planing white oak. I've done a mahogany dining table and it wasn't bad but oak is a lot harder. And Chaotic, keep the pics coming. Seeing projects in the woodworking thread makes my day just a little better.
|
|
#
?
Aug 31, 2012 07:11
|
|
|
wormil posted:Seeing projects in the woodworking thread makes my day just a little better. Me too! I tend to alternate between hobbies as one or another catches my interest at the time, so I watch this thread and the blacksmithing thread very regularly. Right now woodworking is in the driver's seat, though. After work I'll finish putting my post together with some diagrams and bar charts and stuff. Not really any bar charts. Edit: I'll just put it here instead of double posting. I'll also link the pictures, since I already posted them. Find the album here. Here's a work in progress, which from me means you might see the completion some time in the next few years. I hope not, since I've been putting other projects off until I finish this one. I've been wanting a real workbench since dad built our shop 20 years ago. We've always made do with countertops, sawhorses, etc. But if you've ever had to use something similar, you know it leaves a lot to be desired for just about any kind of woodworking. There's just no substitute for mass and rigidity, not to mention how nice proper workholding equipment is. I decided not so long ago that enough was enough, and it was time to build my first bench. This also gives me a very good incentive to clean up some junk, because there really isn't room for a decent sized bench, and that says a lot in a 1700 sq. ft. woodshop. You've got to begin at the beginning, so earlier this year I cut some trees down to cut and dry for lumber. Workbench snobs will try to tell you that a real bench can only be made from Beech, because all the European woodworking masters used beech for their benches, so it must be the best. While the vast majority of benches in Europe were indeed made of beech, it was only for more pragmatic reasons. It came down to three things: it was durable, plentiful, and cheap. While it's still just as durable, it's a little less plentiful over here across the pond, and certainly not as cheap. I have a few acres of White Oaks, so that's what I used. Anyway, I cut the logs on the mill, trying to get as much quartersawn as possible, stickered them, and tried to forget about it all for as long as possible. I have very little patience, however, so I only let it dry for a few months It should all work out ok in the end, though. Fast forward to a few weeks ago, when I bought The Workbench Book, by Scott Landis. I was debating between this book and one of Chris Schwarz's books. I have read Schwarz's blog musings on benches, which is probably what set me on the path, but picked Landis' book for some reason that I forget now. Having not read Schwarz's books, I can't say if either one is better, so just pick whichever one you feel like. After reading through the book, and as many blogs and websites as I could find, I began to have an idea of what features I wanted my bench to have. What kind of work you do, and how much space you have to do it in are the two biggest factors in determining what you need to build. Someone who uses hand tools exclusively needs a somewhat lower bench than someone who uses power tools, and a person who makes raised panel doors does different kinds of work than someone who builds jewelry boxes. I do a little of everything, so I had to compromise on some things. I spent a few hours running everything through the planer and jointer, and made a big pile of sawdust. Then I laid out as many boards as I needed for the top, and arranged them with the best sides up and towards the outside. Here I found out that I should have cut the logs a foot longer. I also found out that I didn't have as much nice wood as I thought. As I said in my last post, I was planning on making it 36� wide, but it just started to look like more trouble than it's worth. So I lined them all up as square as possible and marked them near each end with a T-square. Today, in between doing actual work, I cut biscuit slots on both sides at each mark. I'm only using them for alignment, since they add a negligible amount of surface area to a 4� wide board. Next comes the frantic part. I need to put down 85 square feet of glue, insert 32 biscuits, assemble 17 boards, and put every clamp in the building on this thing before the glue sets, while trying to keep it as flat as possible. Don't count on getting pictures of this part 
One Legged Ninja fucked around with this message at 23:26 on Aug 31, 2012 |
|
#
?
Aug 31, 2012 13:00
|
|
|
Nice write up! A true work bench is something I've always put off, simply because I don't use hand planes much, really. Beyond the Veritas low angle block I got for myself around Christmas last year, love that thing. I will build one eventually if only for the leg vise etc. It'll have to wait till after I get a CNC. All current funds are being diverted toward that end right now. Three more dyed pens. Box elder. 
|
|
#
?
Sep 3, 2012 00:08
|
|
|
I went over to the nearest city of any size on Saturday looking for some extended working time glue, only to find out the Rockler store is closed on weekends, and Grizzly only had a 16 oz bottle left. Then one of our dogs died after I got home. So Saturday was not a productive day. I did, however, remember that I wanted to cut the dogholes with the router before I glued up the top. That helped take my mind off of things for a bit. I made from some scraps a jig that basically looked like an italic capital H. I say italic because the holes are all slanted slightly towards the clamping direction. This makes the dogs tend to push into the table when you tighten the tail vise, rather than lift the object being clamped away from the table. Most of the references I found say to make it about 2-3 degrees from vertical, so I made it 3. Roy Underhill's book, The Woodwright's Guide: Working Wood with Wedge & Edge has a chart showing how to find any angle up to 45� with a framing square. I also found a printable copy here. I used a plunge router with a 3/4" straight cutting bit, and went 1/4" deep at a time. The dogholes were 1" square, so I relieved both sides where they would tear out, and took a pass each direction. Repeat four times for each hole, times 17 holes. I also considered using a dado blade in the table saw, but I don't really have long enough wings to support an oak 2x4 while I cut dadoes right up to the ends. You could also use a Skil Saw with a good saw square to knock them out, or for the truly masochistic, a handsaw and chisel. You can see in this picture the relief I cut in the top of the hole.  This is for the extra material on the top of the dog that keeps it from falling through the hole when you aren't using it. I plan to make a dog for each hole, and have them stick slightly below the benchtop, so you can just reach down and push one up when you need it. This way you never misplace one by taking it out of the bench. I just slid the jig over 1/4" and ran the router in until the router base was flush with the bottom of the board. This isn't a critical dimension, but I like to keep them as uniform as possible. Didn't get much done today, either. Things kept popping up that needed my attention. I did go to Lowes, though, and bought a bottle of glue, a small roller, some foam brushes, and some of the components of the finish I'm going to put on it. Most of the benches in the book are maintained with some mixture of beeswax and turpentine. One has some boiled linseed oil in it. The turpentine is just a solvent for the wax, which, like the BLO, soaks into the wood and provides a durable, waterproof finish. After a little research, I found that most BLO today has hardeners added to it, which will make hard spots in my mixture after it sits for a while. I'm not sure yet if I'm going to use it or not. I also glued the board with the dogholes to the front-most board to see if I had enough clamps. Protip: You never have enough clamps. Here's a drawing of what I want the final product to resemble.  I haven't finished drawing all the vise hardware yet, and I didn't bother making anything in 3D, so some of the lines are hard to make out. One thing I plan to try on this build is making a tap and screwbox for a wooden screw on the leg vise. I thought if there was any interest, we could pass it around or something. It's one of those tools that you couldn't justify buying for just one use, but if you had one, you'd find more uses for it. It's going to be a 2" screw, I think. ChaoticSeven posted:Nice write up! A true work bench is something I've always put off, simply because I don't use hand planes much, really. Beyond the Veritas low angle block I got for myself around Christmas last year, love that thing. I will build one eventually if only for the leg vise etc. It'll have to wait till after I get a CNC. All current funds are being diverted toward that end right now. A good, solid bench makes a difference even if you never touch a hand tool. You might not need it so thick in that case, but the only downside to a heavy bench comes if you ever need to move it. I can understand about wanting a CNC, though. Maybe someday *sigh*  Those pens look amazing! Penmaking seems to me like it has to be a labor of love, because I couldn't imagine trying to make a profit on something like that. Speaking of pens, I was working in the Balston Spa/Clifton Park area of NY for a while, and I visited the hardwood area of Curtis Lumber. If any of you goons are in the area and haven't been there, you should. Just don't bring a checkbook, because you'll go broke. 2' wide mahogany. Zebrawood. Rosewood. Wenge. Sappele. Bowl blanks of every type of wood. The best thing, though was a $60 burl pen blank. I forget what kind of wood it was, though. I picked up a short piece of bloodwood to make my dogs out of, as well as a piece of ash to make springs to hold the dog in place.
|
|
#
?
Sep 3, 2012 02:41
|
|
|
Another commendable post. Have you noticed how insane clamp pricing has gotten though? Parallel clamps particularly. Makes me wish I'd known how it would go a few years ago. I would've taken advantage of Amazon's pricing egregiously. As far as the pens go, yeah. Even though the hardware is premade it isn't very profitable unless you try to stay high scale in pricing. I actually still enjoy seeing what exactly is in a particular piece of wood and so I stay around the $40-$50 dollar mark for those particular ones so I can indulge that more often. I'd like to try fountain pens and blanks like desert ironwood and high end amboyna burl but you end up being in the $100+ to $200+ range at that point. It takes a bit of time to do things right and I'm not sure how many, if any, I could sell at that range.
|
|
#
?
Sep 3, 2012 08:23
|
|
|
ChaoticSeven posted:Another commendable post. Have you noticed how insane clamp pricing has gotten though? Parallel clamps particularly. Makes me wish I'd known how it would go a few years ago. I would've taken advantage of Amazon's pricing egregiously. I dunno, I picked up 4 2 packs of 50" jet parallel clamps for about $60 on amazon a few months ago (8 clamps for $250ish)
|
|
#
?
Sep 3, 2012 14:03
|
|
|
Clamps really are expensive. I don't know how people can afford their walls of clamps, even if they do buy them a few at a time. http://www.ibuildit.ca/Workshop%20Projects/clamp-1.html It makes me tempted to try this out. This guy's whole webiste is cool in fact, and since i've been hoarding electric motors from bust appliances it's really inspired me to at least make the disc sander I could never afford. But before that I need more bench space. So i've been planning out a stout 2 meter wide bench in sketchup and i'm now figuring out how it's all going to join together, and while looking at screw prices online i've noticed that they don't seem to sell 'normal' wood screws any more. Now they've all got inbuilt rifling, serrations, and little fins to clear wood chips (???), and I guess this gives them the excuse to charge a fortune for them. What I wanna know is if these innovations actually work and're worth the price hike or if it's just marketing gimmicks and an excuse to hide the cheap screws?
|
|
#
?
Sep 3, 2012 14:12
|
|

|
I buy all my Jorgensen cabinet master clamps at Menards. They used to go on sale for $20, 25, and 30 for 24, 36, 48 inch clamps. They are slightly more expensive now, but still a good deal. Buy a couple at a time, it's less painful.
|
|
#
?
Sep 3, 2012 14:50
|
|


|
If you're patient, garage and estate sales can be good sources for woodworking gear Knock off Pony bar clamps are also $13 at Harbor Freight and you can usually find pipe at a salvage yard dwoloz fucked around with this message at 17:38 on Sep 3, 2012 |
|
#
?
Sep 3, 2012 17:34
|
|
|
I have an idea for a couple of benches by my new fire pit and I'm looking for some input on how to make it happen. What I'd like is a flat bench supported by a couple of smallish boulders. But I'd like the boulders to come right up through the surface of the bench. Here's a side view of what I'm thinking. What might be the best way to get a really good tight fit on the boulder? I'm thinking I could make a mould of the top part of the boulder, and then cast that with foam which I can cut off in a plane with where I want the bench, which will let me get a really good scribe of the perimeter at that level, and then I could carve that out by hand, but I'm wondering if there's a better way that is more likely to succeed. e: I guess I could do something with just some cardboard or similar stiff but thin material, and just get a scribe of the top and bottom levels, although I feel like the casting would, of course, be more accurate. Bad Munki fucked around with this message at 18:19 on Sep 4, 2012 |
|
#
?
Sep 4, 2012 18:08
|
|
|
Bad Munki posted:I have an idea for a couple of benches by my new fire pit and I'm looking for some input on how to make it happen. What I'd like is a flat bench supported by a couple of smallish boulders. But I'd like the boulders to come right up through the surface of the bench. Here's a side view of what I'm thinking. if you marked the level you want the bench to sit at on each stone with tape or chalk and take a photograph from the same height above each one you could probably quickly extract some templates in photoshop.
|
|
#
?
Sep 4, 2012 18:28
|
|

|
Bad Munki posted:I have an idea for a couple of benches by my new fire pit and I'm looking for some input on how to make it happen. What I'd like is a flat bench supported by a couple of smallish boulders. But I'd like the boulders to come right up through the surface of the bench. Here's a side view of what I'm thinking. Good cold chisel plus 3 lb hammer and break the blocks in half, stack below and above the boards. Marvel at your simple illusion ")
|
|
#
?
Sep 4, 2012 19:09
|
|

|
kafkasgoldfish posted:Good cold chisel plus 3 lb hammer and break the blocks in half, stack below and above the boards. Marvel at your simple illusion I'm not terribly confident in my ability to break the stone along the line I necessarily want. And depending on the type of stone (currently unknown) they might not even be willing to break in a straight line. The visual trace using a photo might work.
|
|
#
?
Sep 4, 2012 19:54
|
|
|
Ya need one of them thar rotating laser levels and a thousand years or so.
|
|
#
?
Sep 4, 2012 20:23
|
|
|
Sounds like a job for a 3D laser scanner and CNC to me. A few days off provided me with some energy to get back in the swing of things a little. Here's another elm bowl, calabash style.   
|
|
#
?
Sep 4, 2012 22:11
|
|
|
ChaoticSeven posted:Sounds like a job for a 3D laser scanner and CNC to me. And as we all know, you can't count the cost of the tools when budgeting for a project, because the tools will get used again! 
|
|
#
?
Sep 4, 2012 22:14
|
|
|
Buuuh..git?
|
|
#
?
Sep 4, 2012 22:49
|
|
|
After looking through a variety of box joint jigs I stumbled on this: (caution: adjust volume down) http://op.woodgrainonline.com/spacer/indexus.html For only $21, I might just buy one.
|
|
#
?
Sep 4, 2012 23:51
|
|
|
Ok, I posted a while back about a custom tool box for my wallet making tools. I have decided I am going to take on the project myself when I have more time. I am having some pretty intense sales right now and can't devote any time for garage experimentation. Not to mention I don't have the right tools to do it. When I get to making it be sure I will post the progress here. Trading custom wallet for simple wood job. 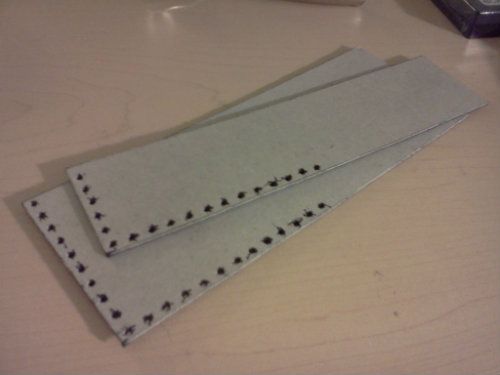 I could use some wooden templates though. Should be a quick job for someone who has the tools and possibly some wood scraps to do it. I don't have a drill press, or any kind of saw. Besides I would rather have them done right. They are roughly 7.75"by 3" But I will give more exact measurements if anyone agrees to do them. I need the template to be .25" or thinner and of durable hardwood. I plan to cut the leather around the outside of template and can't have the wood shaving away. Maybe a good coat of something to seal it up too. As for the holes, I need them small enough to create exact dots when I stick my pen in. So it would be best to drill the holes, and the drill a cone like hole so my pen fits. (like a sand pit almost. I know there is a wood working term but I just don't know it.) Shoot me an email if you are down. We can talk about more details and the things I offer with my wallets. you can check out philswallets.com but I have no full size wallets on that site. I can do just about anything you can think of though.    
|
|
#
?
Sep 5, 2012 02:11
|
|
|
Here's what my drawing of the dogholes depicted. It's upside down in this view, but you get the idea.  And here's my test run of clamping.  Time for the real deal. I put all but six boards together before I felt I needed to clamp it. If I could do it over again, I would only glue half of them at a time. Fewer if I didn't have help. I used a 4� foam roller and paint tray, and a 4� foam brush. I wouldn't recommend the brush, it was flimsy and didn't spread well. I put the last six boards on after about an hour of clamp time.  I was upset to see that a few of the boards with funky grain warped quite a bit since I jointed them, so I'll have to take around 3/8� off of the top to get them all even. This doesn't bode well for the stability of the top in the long run, but I think of this as the prototype for when I build one out of actual quality lumber. Today I trimmed one end down with a handsaw just to see how much work it would be. Then on each end I cut a kerf down to the surface of the lowest board, and pared away the waste to a line I drew with a straightedge. This would be a very good place to use a shoulder plane, but I don't have one. (Yet.) (Sorry for the cell phone pics. I stopped by after work, and didn't want to go home to get my camera.)   Then I took a level, placed it on that shelf I just cut, and leveled one end of the bench on the saw horses. I measured the deviation from level on the opposite end, and marked the edges far enough down from the top to meet the lowest surface.  Then I cut a little recess for my chalk line to sit in, and connected all four corners. I traced over the chalk with a pencil and straightedge just to make sure I can see the line while I'm planing.  I'm probably going to end up using a power planer to hog off the wood. I'm on the lookout for a nice scrub plane, but I'm not going to buy one just for this.
|
|
#
?
Sep 6, 2012 03:05
|
|
|
One Legged Ninja posted:Here's what my drawing of the dogholes depicted. It's upside down in this view, but you get the idea. Hm, I've looked over this and thought about it a bit. I've come to the conclusion that if you shim one side of that benchtop such that it doesn't rock then mounted a 1.5" downshear router bit in a CNC you could probably level that top pretty quick with a few lines of gcode. I mean, that's just me brainstorming. I might have a problem. Edit: Slightly more reasonable suggestion would be ye olde router sled.
|
|
#
?
Sep 6, 2012 05:10
|
|
|
ChaoticSeven posted:Hm, I've looked over this and thought about it a bit. I've come to the conclusion that if you shim one side of that benchtop such that it doesn't rock then mounted a 1.5" downshear router bit in a CNC you could probably level that top pretty quick with a few lines of gcode. I mean, that's just me brainstorming. I think you're right on all of your points (  ), but I don't have a CNC with 8 ft of travel. (or any at all, but that's beside the point.) I suppose I could make a router sled, but routers are boring. :P I'm on a hand tool kick right now; if I had a workbench to work on, I probably wouldn't have used the planer, jointer and router in the first place. This is one of the few woodworking projects I've done that is as much fun to make as it will be to use. Usually I'm in a hurry to build things, so I rush through the process to get to the end result. ), but I don't have a CNC with 8 ft of travel. (or any at all, but that's beside the point.) I suppose I could make a router sled, but routers are boring. :P I'm on a hand tool kick right now; if I had a workbench to work on, I probably wouldn't have used the planer, jointer and router in the first place. This is one of the few woodworking projects I've done that is as much fun to make as it will be to use. Usually I'm in a hurry to build things, so I rush through the process to get to the end result.ETA: I wouldn't judge anyone who sent their top through a 24" planer or wide belt sander, though. :-D One more toy I'd like to have some day. One Legged Ninja fucked around with this message at 05:51 on Sep 6, 2012 |
|
#
?
Sep 6, 2012 05:49
|
|
|
One Legged Ninja posted:I'm probably going to end up using a power planer to hog off the wood. I'm on the lookout for a nice scrub plane, but I'm not going to buy one just for this. Scrub planes don't need to be fancy, just sharp. Buy an inexpensive Stanley bench plane and go to town. I flattened the top on my mahogany dining table that way, it was easier than I expected. You will have a bit more work with harder wood but hey, it builds character, or something.
|
|
#
?
Sep 6, 2012 06:10
|
|
|
I just meant nice as in not cracked, rusted to death, or missing the iron/cap/etc. I saw a bunch of bench planes of various makes at the same flea market I bought the #7 at, and I should have picked one up then. I'll just have to make another trip down there at some point. In related news, I'm going to the Woodwright's School in October to take a class, so I'll have access to the store on second floor. 
|
|
#
?
Sep 6, 2012 12:58
|
|
|

|
| # ? May 22, 2024 18:36 |
|
|
 Finally bought one of these, gonna get my old chains good and sharp, and convert one to a ripping chain. I just don't seem to be able to put a consistent edge on with a hand file, and I figured adjusting to make a ripping chain would be a more touchy process than I wanted to deal with. Hoping I'll have an easier time processing all the logs I've been collecting.
|
|
#
?
Sep 6, 2012 14:23
|
|