

|
Crowleraptor posted:I'm looking to work with some plasticard I've got to convert a heldrake but it's pretty thick, 5mm I would say. This is ideal for what I want but I was wondering if there is a better way to cleanly cut it rather than scrape it 10,000 times with the back of my hobby knife Use the front of your knife? Or get one of these bad boys. It's scary good.  http://www.amazon.com/Xacto-X75300-Precision-Razor-Saw/dp/B00004Z2U4 [edit]Late to the party, times two
|
 #
?
Nov 11, 2012 11:25
#
?
Nov 11, 2012 11:25
|
|
 will blow your mind.

|

|
| # ? Jun 3, 2024 14:25 |
|
|
Firstly, I always read the best way to get a straight cut was to use the back of the blade edge a lot then snap it. Also - is the gw razor saw any good? I have a local gw but not much else And also thanks for suggestions ")
|
|
#
?
Nov 11, 2012 11:39
|
|

|
Hmm, I was told to use the sharp part, but not to push hard. You score then snap meaning you make accurate light passes to make a small groove so when you make one or two medium pressure passes they don't deviate from the path. And obviously the goal is to get most of the way though then snap instead of cutting straight through. I am sure the GW one is fine, I use their xacto knife and it's quite nice. But at the same time if you have access to other vendors it can't hurt to price compare.
|
|
#
?
Nov 11, 2012 11:44
|
|
|
Do you still score if you are using a razor saw? The project is basically "turn the hell drakes gaping rear belcher into something possible for an aircraft tail" It's going to be on the backburner for a while as I brush up (learn how to use) with green stuff on some plague marines
|
|
#
?
Nov 11, 2012 11:50
|
|
|
I believe you just saw like you would anything else, that's what I have been doing. It should even make plasticard-dust, so do it near a trashcan or get your dusting pan ready. The saw is a handy tool for unique jobs you never thought capable before, like cutting a rhino in half. It's called upon when you wouldn't want to use a hobby knife or even a box cutter in fear of breaking blades and cutting hands.
|
|
#
?
Nov 11, 2012 12:20
|
|
|
Crowleraptor posted:Do you still score if you are using a razor saw? You can score with a saw or just cut right through. You'll want to have a file/emery stick on hand to smooth out the cut afterwards.
|
|
#
?
Nov 11, 2012 12:26
|
|

|
After losing half a bottle of Nuln Oil on my desk (fortunately it is exactly the right shade of black that it doesn't matter) I think I've just become a Vallejo/Reaper paint convert. Dropper bottles.... edit: I have been getting paint out of these pots onto my palette by basically getting some on my brush and wiping it off. Is there a best practice regarding getting paint from pot to palette for thinning/mixing that is some other way? Using an eye dropper or something maybe? If not I really do think I'll just never buy PP/GW paint again. signalnoise fucked around with this message at 12:42 on Nov 11, 2012 |
|
#
?
Nov 11, 2012 12:30
|
|

|
I haven't seen this linked, bit of an odd item: http://www.games-workshop.com/gws/catalog/productDetail.jsp?catId=cat470002a&prodId=prod1760024a  signalnoise posted:edit: I have been getting paint out of these pots onto my palette by basically getting some on my brush and wiping it off. Is there a best practice regarding getting paint from pot to palette for thinning/mixing that is some other way? Using an eye dropper or something maybe? If not I really do think I'll just never buy PP/GW paint again. I just use a toothpick/cocktail stick to fish out a droplet at a time (whenever I actually use pots, I just have a few GW metallics/washes). It's actually quite handy, as you have a lot of control over how much paint you're using; I find dropper bottles tend to be a bit difficult to get tiny amounts out of.
|
|
#
?
Nov 11, 2012 13:22
|
|


|
OneTrueBru posted:I haven't seen this linked, bit of an odd item: http://www.games-workshop.com/gws/catalog/productDetail.jsp?catId=cat470002a&prodId=prod1760024a It's the Edinburgh Castle Rock paint set. Well, apart from lacking a tartan.
|
|
#
?
Nov 11, 2012 14:25
|
|


|
SRM posted:I'd be down to see some Blood Ravens. First go at a properly painted Blood Raven.  Red over black has gotten a lot easier with the new paints, I was almost considering priming white as usual but the red looks pretty good anyway and it's quicker to paint over black thanks to it being more forgiving to mistakes.
|
|
#
?
Nov 11, 2012 15:02
|
|
|
WIP Robot attempt #2, no legs yet I'm attempting shading and highlighting here. Since I am having difficulty making smooth gradients, I'm attempting kind of a cartoon shading here. I'm also having difficulty telling what I'm supposed to be doing with metallics. If I apply a wash, it just makes it look dull and dirty. I do not yet have a brown wash though, just Nuln Oil. I do have 2 different shades of steel, is highlighting metallics something that's done like you would do for non metallics? When my red paints come in, I want to fill in those eyes but also look like there's a lot of heat building up in that smoke stack. Something a beginner can do? signalnoise fucked around with this message at 15:32 on Nov 11, 2012 |
|
#
?
Nov 11, 2012 15:30
|
|
|
signalnoise posted:WIP Robot attempt #2, no legs yet I find blue washes work well for metallics. He's a quick and dirty Grey Knight I did for a friend  A good idea with the wash is that after you apply it and let it dry you should go over it again with the base colour, leaving the washed areas in the recesses. What exactly do you mean heat building up? Do you mean like it's glowing red hot? That might be tough. The thing I would reccomend is putting a drop of nuln oil in each of those holes on the stack. Cataphract fucked around with this message at 15:50 on Nov 11, 2012 |
|
#
?
Nov 11, 2012 15:46
|
|
|
Cataphract posted:I find blue washes work well for metallics. He's a quick and dirty Grey Knight I did for a friend I like the blue, I will try that on my next one maybe. By heat building up I mean I want each hole to be slightly glowing like there is a tube of lava or something in it. Maybe have some soot above each hole too? VVVVVVVVVVV Will do signalnoise fucked around with this message at 15:53 on Nov 11, 2012 |
|
#
?
Nov 11, 2012 15:49
|
|
|
signalnoise posted:I like the blue, I will try that on my next one maybe. in that case I would put the black wash in and around the holes. then I would apply layers of red, orange and yellow in the holes themselves.
|
|
#
?
Nov 11, 2012 15:51
|
|
|
Cyclomatic posted:I'm testing out salt chipping, and I'm having a devil of a time getting the salt to adhere to a surface. If you are talking about the sea salt "flakes" or larger cut crystals then I can see where you have problems. Try normal salt (like Mortons). Otherwise brush water on, sprinkle salt should work.
|
|
#
?
Nov 11, 2012 17:33
|
|

|
richyp posted:First go at a properly painted Blood Raven. Looking good! What's your process for the red?
|
|
#
?
Nov 11, 2012 17:33
|
|

|
Daedleh posted:Scratch built Meganobz seem to be all the rage these days since they were converted to Finecast. Here's my attempt so far: The one on the far right looks like a turtle stretching his head out of his hard, metal, shell.
|
|
#
?
Nov 11, 2012 17:56
|
|


|
SRM posted:Looking good! What's your process for the red? Thanks. The red is pretty straightforward. On black: Dry brush a couple of coats of Mephiston Red. Wash Agrax (over everything except metals) Repaint flat areas in Mephiston Then layer in some blazing orange Then edge highlight in very thin pure orange I did another inner highlight with a drop of yellow added and painted a couple of vertical lines over the knees and around the mouth too.
|
|
#
?
Nov 11, 2012 18:46
|
|
|
Crowleraptor posted:Firstly, I always read the best way to get a straight cut was to use the back of the blade edge a lot then snap it. Also - is the gw razor saw any good? I have a local gw but not much else I can imagine what would happen if I tried to use the back of the blade, and it involves forgetting and pressing my thumb down on the front of the blade.
|
|
#
?
Nov 11, 2012 18:54
|
|

|
Crossposting from the historicals thread. This commission probably the last 15mm stuff I do this year at least. The last 30 or so out of 110 samurai:  It will feel so great to paint some of my own stuff, as soon as I can get these varnished and sent off!
|
|
#
?
Nov 11, 2012 21:41
|
|

|
Those are amazing, especially since the size they are on my monitor are about the size they are in real life!
|
|
#
?
Nov 11, 2012 21:43
|
|

|
krushgroove posted:Those are amazing, especially since the size they are on my monitor are about the size they are in real life! Thanks, they bloody well should be given that the client has been waiting for them since back in May (roughly 110 miniatures or so). At least he hasn't cancelled the order. The client wants to base them himself, that's why they are on various strange bases. Seeing them like this, I got the idea to paint up some of my own and put them on 10mm round bases for some skirmish 15mm action. I've never seen that done in a period before WW2. E: and yes, that !!!l@@k!!! pro-painted freehand banner is actually correct. He wants both the banners for Uesugi Kenshin (which is the white one with the Japanese character on it) and Naoe Kanetsugu's personal banner, the third from the left:  I've never been able to get something as closely resembling an original design in 15mm before now, so I'm pretty happy with the results. lilljonas fucked around with this message at 21:59 on Nov 11, 2012 |
|
#
?
Nov 11, 2012 21:51
|
|
|
And another
|
|
#
?
Nov 11, 2012 22:23
|
|
|
richyp posted:First go at a properly painted Blood Raven. This looks like candy in a good way.
|
|
#
?
Nov 11, 2012 23:48
|
|

|
So, I'm getting back into painting after a bit of a hiatus. I'm using P3 paints and constructed a wet palette. I primed the figure last night using Army Painter white, which I've used for quite a while with no issue. My paint is all streaky. See attached.  I tried a few different things on this model to test. Most of that is P3 Cygnar Blue Base with a bit of P3 Mixing Medium added in. I also tried mixing about 2:1 paint/water as I normally do, and, just to be sure, I broke all the rules and painted right out of the pot. Same. The primer feels normal. I've used the same can forever, though I suppose it could have gone bad. I shook it for a good 2 minutes before use, sprayed from a foot away, and did all my normal tips and tricks. This is the first time I've seen this. Looks like I'm out of Simple Green. Blah.
|
|
#
?
Nov 12, 2012 00:15
|
|
|
Unless it's particularly textured, just use multiple coats until you get the coverage you want.
|
|
#
?
Nov 12, 2012 00:38
|
|

|
Water mix and put on several light coats. Its going to look runny and thin on the first few, but you will get a much smoother surface using several thinned ones than one globby streaky coat.
|
|
#
?
Nov 12, 2012 00:48
|
|
|
Cygnar blue base covers like poo poo, sadly. Try another coat, or switch to a different blue. Most p3 paints cover well, but that paint sucks.
|
|
#
?
Nov 12, 2012 02:19
|
|

|
Behold my first mini ever! I'm happy with how the bronze parts and the weapons turned out, and the loincloth (Except the bare strip that would not take paint no matter how often I tried!).Also really dig that pouch of his. Had a damnable time with the eyes, might redo them. I also need to go back over the hooves.   I'm also noticing stray paint I didn't see before. Will have to touch that up. Esser-Z fucked around with this message at 02:34 on Nov 12, 2012 |
|
#
?
Nov 12, 2012 02:28
|
|

|
LordAba posted:Where would you use the hairspray technique over salt-chipping? It looks like the hairspray technique gives you more control over the areas that are distressed? I know the question was directed at me, but I can't help. I own the hairspray-weathered models, but I didn't paint them myself. One of the painters here would have to answer this for you.
|
|
#
?
Nov 12, 2012 02:44
|
|

|
Any goons got any advice on painting faces? I've been working on this: Ignore the hand, I started to base coat it and figured I'd come back to it as it's a bit awkward to get to. Basically, I've base coated, shaded, highlighted it up and am wondering where to work on it from here. I'm finding faces quite tricky to work with and was wondering if anyone has any insight on where to go from here? I've glazed it since to soften the transition between the skin tones slightly, but I'm pretty happy with the results so far. I know the bunny-ear needs some more shading on one side, and highlighting so ignore that for now. e: Photo is from my phone as my cameras not working at the moment, so forgive the eh quality.
|
|
#
?
Nov 12, 2012 03:04
|
|

|
Nipples?!?!?!? That's a trigger image for me, please edit out. Besides, think of the children! Thanks in advance.
|
|
#
?
Nov 12, 2012 03:08
|
|

|
lilljonas posted:*awesome samurai* Pierzak fucked around with this message at 03:43 on Nov 12, 2012 |
|
#
?
Nov 12, 2012 03:37
|
|
|
Nipples are only inappropriate if they're on sanguinary guard, obviously.
|
|
#
?
Nov 12, 2012 03:39
|
|

|
Hey man, you know how hard it is to find a shirt that fits a minotaur?
|
|
#
?
Nov 12, 2012 03:56
|
|
|
I don't like him as much as the Dark Apostle, but I finished up the new Sorcerer. Tried NMM on the sword, but I'm not terribly good at blending and don't have an airbrush! The freehand Iron Warriors insignia looks too cartoonish for my tastes too. Came out alright though: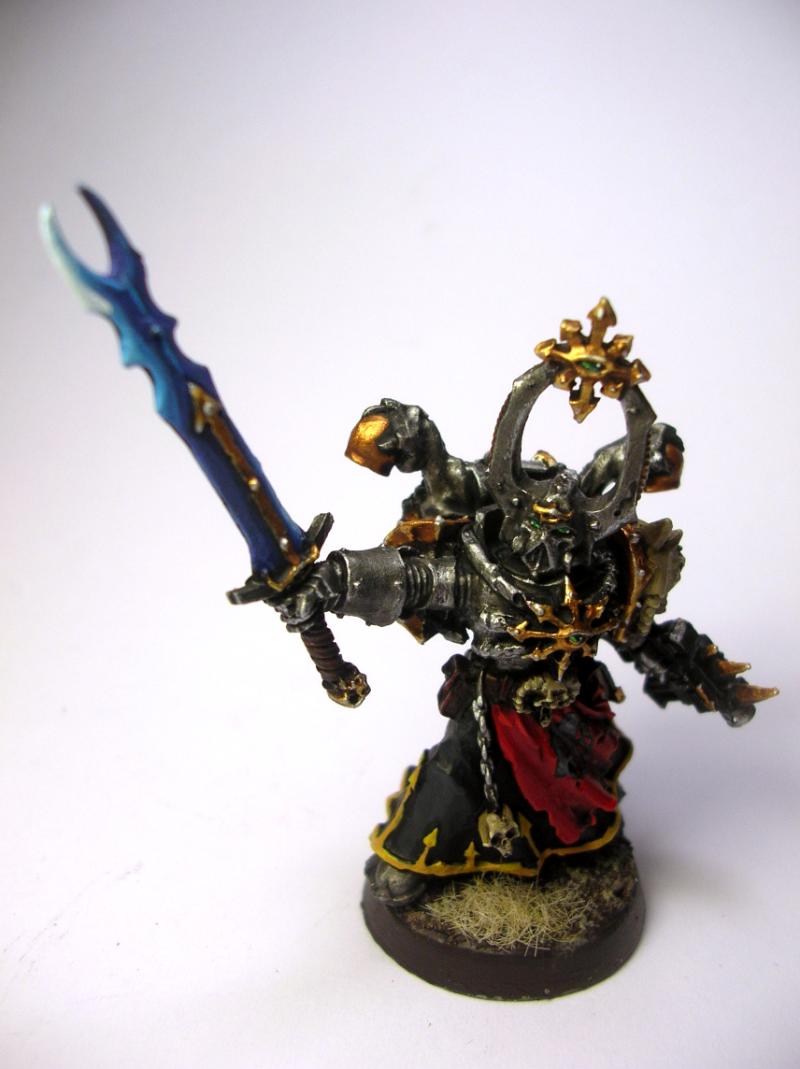  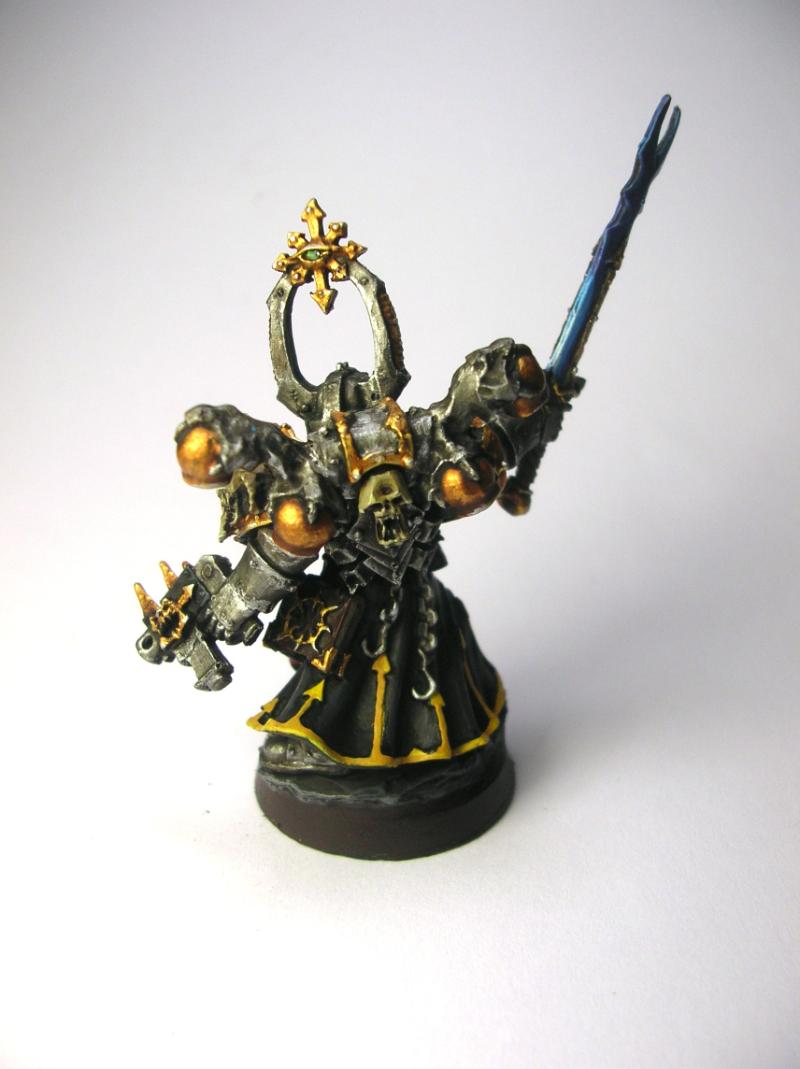 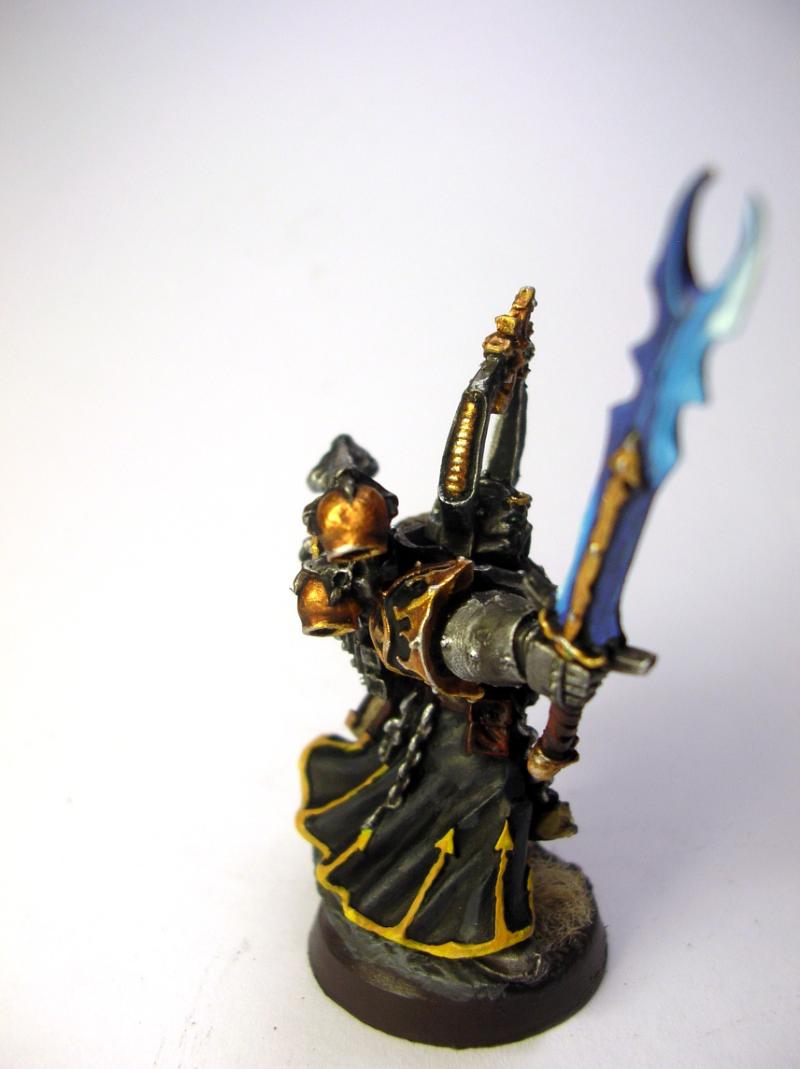
|
|
#
?
Nov 12, 2012 07:49
|
|
|
Pierzak posted:Can you recommend a samurai/medieval Japanese online color scheme guide (as in, traditional colors/banners for different lords/houses)? I'm looking for some inspiration for my Infinity Yu Jing. The best online inspiration should be this thread on the Samurai Archives Citadel: http://forums.samurai-archives.com/viewtopic.php?t=1638 Emmanuel has provided the best researched illustrations of samurai heraldry that I know of in English, and he has collected his templates in that thread. The board is mostly populated by people who already has access to some of the more famous lords such as Oda, Tokugawa and Takeda, so a lot of the images are of important but slightly more obscure characters. You should be able to find some great designs anyway. When it comes to armour and stuff, there's almost no cases of uniforms in Japanese armies before mid-17th century. Armours where predominately black, with red and rusted brown being far distant second and third. So don't assume that the armour and clothes he has chosen are connected to the lords, it's just that he has a couple of templates to make his work easier. Some terminology to understand the pictures: Nobori: bigger banners, often denoting units Sashimono: the smaller banners worn on the back (Ko) Uma jirushi: an army banner for someone important O-uma jirushi: a second, bigger, army banner for someone really important Tsukaiban: special heraldry for messengers Horo: a kind of bag on a bamboo frame worn on the back, usually to distinguish messengers or guard troops
|
|
#
?
Nov 12, 2012 09:32
|
|
|
This is my first miniature scaled model so I am looking for some help. I just picked out the color scheme and put down a base coat.   As I see it these are my steps I have left Do another coat or two of white to smooth it out Drybrush some metallic color onto the guns Highlight armor pieces and hair Pick out details like lens and face Use a wash of some sort Matte coat it all. Did I miss anything? I have had the luxury of airbrushing everything before now so I have run into some issues that are new to me. Some of my paint does not seem to be going on very smoothly. I think its because I am not waiting long enough between coats. I feel a little rushed to add coats because my paints keep drying up so fast on my palette. I guess I need to make a wet palette? How do you do faces? I have been painting with a 000 series 7 but the smallest thing I have ever used it on is a gundam's eyes. Those are about as big as the whole face. Is there some way to cheat and make it look okay at arm's length without having to actually paint the face? I have gone back to fix something 7 or 8 times now. How do you deal with not being satisfied with your work? I'm thinking I should just set a benchmark and then not go past that for the rest of the squad, otherwise I will never be done. Fauxtool fucked around with this message at 11:57 on Nov 12, 2012 |
|
#
?
Nov 12, 2012 11:53
|
|

|
Fauxtool posted:This is my first miniature scaled model so I am looking for some help. It looks like your paint is not thinned out enough. A 000 brush shouldn't be necessary, I think both me and a lot of other folks here just use a 0 and a 1 brush for most of our painting. It's more about skill than a small brush, and sometimes a brush that is too small will cause more problem than it is solving. For example, the paint on a larger brush doesn't dry as quickly, so you get less rushed to get it on the model as soon as you dip your brush in the paint. Personally, I put on the wash after I do the base coat. Then I re-apply the basecoat, and move on to highlights. If you put on the wash once everything is done, your base coat and your highlights can end up too dull. However, there's a technique called glazing, where you put a very thinned out coat of the the base colour over the entire area when you are finished. This will tone down your highlights, which is good if they are too strong, but it is a much thinner coat of paint than a normal wash. Your paint not being smooth has probably more to do with not mixing it well enough before, or having too much or too little water when you dilute it. But it is hard to say without watching you actually paint. Cheater way to paint faces: 1. Paint the face in a base flesh colour 2. Put a brown wash over it 3. Do the base colour again, but leave the recesses alone 4. Put a lighter shade of brown on stuff like the cheeks, chin, nose etc. 5. Forget about doing the eyes and stuff at all. 6. Take out a bottle of beer and feel good about having a mini that is passable on the tabletop. How to deal with imperfections? Repeat to yourself that it's good enough for now, and that you will do it better on your next mini. Buy more minis. Die alone under a crushing pile of unpainted lead.
|
|
#
?
Nov 12, 2012 12:10
|
|
|

|
| # ? Jun 3, 2024 14:25 |
|
|
Thanks for the face stuff I had no clue what to do. I think my paints are thinned enough. I am using Vallejo Air and it comes pre-thinned for airbrushing. I feel like its drying on my palette then I am picking up some of the dried paint lumps. I will try adding some retarder to the mix. Like I said, its my first mini so I have a lot to learn still. Once i have lumpy paint like in the pictures there is no fixing it without stripping and starting over right? Is there a practical way to erase acrylic paint in only small areas? I am happy with the chest and the gun, but the hair and the legs are visibly rough. This is nothing like airbrushing my larger stuff where I can put on a coat of paint in 10s and its dry to the touch and perfectly smooth. Fauxtool fucked around with this message at 12:24 on Nov 12, 2012 |
|
#
?
Nov 12, 2012 12:19
|
|