


|
areyoucontagious posted:How stupid an idea is it to have my firepot underneath the roof of my garage? I want to re-locate my forge now that I have an anvil, and I just cleaned out one side of my garage. Assuming that I have all the safety precautions in place (fire extinguisher, hose, etc.), could I theoretically keep the actual fire underneath the cover of my garage and not have it set my roof on fire, or will the heat be too great? The other option is somehow rig my firepot to move on wheels, and just roll it out for forging and back in after the fire is extinguished. I'm wondering the same stuff with regards neigbours and noise. They're not the sort to complain but it wouldn't be fair to spend nice days clanging in the garden. I think the risk would be fumes in an enclosed space, even with doors open. As well as stray embers floating around on the hot air into places they shouldnt be. Also keep in mind that fire extinguishers aren't foolproof and you should never expect them to actually put out a fire, they're just a last resort for when unexpected things happen. You could maybe install a flue and hood into the garage if you have the time and money, or look into less glamorous propane forges. I wonder if a regular carbon monoxide alarm would be enough to monitor air quality. Myself after looking around a bunch I've kinda come back to this idea. When I first saw it I figured I could probably avoid all the faff but then nothings ever as cheap or easy as you expect it to be...
|
 #
?
Jan 29, 2013 01:11
#
?
Jan 29, 2013 01:11
|
|


|

|
| # ? May 23, 2024 10:47 |
|
|
Charcoal burns clean enough that any loosely-constructed building that isn't sealed against the elements will be fine in terms of ventilation, whereas coal *must* be used with an adequate chimney. Beyond that, consider that smithy fires were historically improbably rare- the reasoning being that you are always right there when the fire is in use. You never walk away like you will with a barbecue or oven. As long as you don't keep anything too flammable near by you should be fine. I've forged inside a garage plenty with charcoal, albeit just inside the open door- the rolled-up door over my head makes me less nervous about an errant spark settling in the rafters or wherever. e: although, to be clear, a propane forge is definitely the safest way to blacksmith inside; it'll burn about as clean as good charcoal will, but with a vastly-reduced probability of embers wandering into places they shouldn't be. The greatest fire risk in either case is still probably hot steel getting away from you and skittering somewhere inconvenient; either a glowing bolt slipping from the tongs and bouncing into, say, a pile of sawdust at the other end of the garage, like happened to me, or hot-chiselled cuttings going flying in all sorts of weird directions. Ambrose Burnside fucked around with this message at 01:50 on Jan 29, 2013 |
|
#
?
Jan 29, 2013 01:47
|
|

|
As far as noise, it depends on the neighbors too. An anvil ringing is downright idyllic to some people. I had my neighbor across the street tell me how much he loved hearing it. But then he was also woodworker and general craftsman himself, so that might have been part of it.
|
|
#
?
Jan 29, 2013 01:48
|
|


|
ArtistCeleste posted:I have to say, Slung Blade, you've had some really cool posts lately. I love the dragonfly design. Have you thought of forging the wings out until they are almost paper thin? It would make them look lighter and more delicate. Coming from someone of your talent, that means a lot, thank you for saying ") I keep trying to get better, but I know I'm just an amateur playing in the backyard. I keep trying to get better, but I know I'm just an amateur playing in the backyard.I have, actually. I just wish I had the time to do it, I have so many projects I want to work on  I took the inspiration for the design from a guy who's made his living as a smith for decades, but his were all one piece. The shank of the spike was thinned down, chiseled apart, and the wings and body formed from spindles of that. Really cool effect, but holy poo poo it would take forever for me to do by hand.
|
|
#
?
Jan 30, 2013 06:08
|
|


|
Has anyone experimented with homemade machinable wax? I'm too cheap to buy the real stuff, so I used paraffin and grocery bags. I get fairly inconsistent, but semi-useful results. It's handy stuff for testing CNC stuff and screwing around on the milling machine. The problem though is it tends to crack in thin places as the milling cutter exits the cut and I haven't figured out a good way to cast it into rods.
|
|
#
?
Jan 30, 2013 15:54
|
|
|
Hu Fa Ted posted:Has anyone experimented with homemade machinable wax? I'm too cheap to buy the real stuff, so I used paraffin and grocery bags. I get fairly inconsistent, but semi-useful results. It's handy stuff for testing CNC stuff and screwing around on the milling machine. The problem though is it tends to crack in thin places as the milling cutter exits the cut and I haven't figured out a good way to cast it into rods. My first couple batches were not well mixed and had lots of un-dissolved plastic, like this. Now, I can get pretty uniform blocks without even having to strain any plastic out. I use orange LDPE bags from our newspaper delivery with some HDPE swarf; keep it above 300F and give it plenty of time to dissolve everything. And yeah, I can't make or machine any sections thinner than about 0.1" or it will crack. For casting into a rod shape - how about using PVC pipe as the mold? The wax should shrink enough that it will slide right out.
|
|
#
?
Feb 1, 2013 21:51
|
|

|
Wandering Orange posted:My first couple batches were not well mixed and had lots of un-dissolved plastic, like this. Now, I can get pretty uniform blocks without even having to strain any plastic out. I use orange LDPE bags from our newspaper delivery with some HDPE swarf; keep it above 300F and give it plenty of time to dissolve everything. And yeah, I can't make or machine any sections thinner than about 0.1" or it will crack. Very nice results, do you measure it first or just chuck it in till it stops melting the plastic? Does the commercial stuff hold up better on thin sections?
|
|
#
?
Feb 2, 2013 00:44
|
|
|
I measure beforehand with a digital kitchen scale and shoot for 4:1 wax:plastic. Sometimes the plastic stops dissolving before that perfect ratio so you end up doing a lot of stir-wait-10-minutes. Cutting the plastic into thin strips seems to help a lot with preventing clumps from forming and thus not dissolving. I've never used commercially-available stuff so I have no idea if it is better than home brewed. How thin do you need the wax to be?
|
|
#
?
Feb 2, 2013 02:16
|
|
|
Wandering Orange posted:I measure beforehand with a digital kitchen scale and shoot for 4:1 wax:plastic. Sometimes the plastic stops dissolving before that perfect ratio so you end up doing a lot of stir-wait-10-minutes. Cutting the plastic into thin strips seems to help a lot with preventing clumps from forming and thus not dissolving. Well, need is relative, but I was experimenting with 0.025" wall thicknesses and noticed they crack like nobodies business. But, I haven't been very careful, and I've just been melting in an ancient crockpot so perhaps the mix is all wrong. How critical do you think the ratio is? I wonder if I should start over or just deal with it.
|
|
#
?
Feb 2, 2013 02:33
|
|
|
I don't know poo poo about machinable wax, but is there a particular reason for using paraffin? Paraffin is some seriously lovely brittle wax for positive making, in my experience anyways. Even beeswax or whatever is much better, never mind that microcrystalline stuff. Or are the plastic bags designed to produce a more resilient wax without the cost of finer waxes?
|
|
#
?
Feb 2, 2013 03:08
|
|
|
Ambrose Burnside posted:I don't know poo poo about machinable wax, but is there a particular reason for using paraffin? Paraffin is some seriously lovely brittle wax for positive making, in my experience anyways. Even beeswax or whatever is much better, never mind that microcrystalline stuff. Well, I know literally nothing about the topic of wax, but I think that plasticizing paraffin causes it to be machinable enough to be useful. My searches on the internet have been sort of fruitless, culminating in the 4:1 ratio of LDPE mentioned earlier. Everything else just seems to be a bunch of cargo cult horseshit, so I couldn't say with any authority. edit: If you're curious Ambrose, I'd be willing to go drill, tap and band saw some stuff I've made and photograph it. For the price, it's neat stuff, I was hoping to push it further. Pimblor fucked around with this message at 05:15 on Feb 2, 2013 |
|
#
?
Feb 2, 2013 05:11
|
|
|
Yeah my experience probably isn't applicable to what you're doing, my metalworking + waxwork convergence is hand-carving wax positives for casting, starting with paraffin and graduating to better stuff when I realized how crumbly it is.
|
|
#
?
Feb 2, 2013 05:18
|
|
|
Ambrose Burnside posted:Yeah my experience probably isn't applicable to what you're doing, my metalworking + waxwork convergence is hand-carving wax positives for casting, starting with paraffin and graduating to better stuff when I realized how crumbly it is. Actually I think your experience might be directly applicable, any wax that takes to being hand carved (inconsistent pressures, torque, etc) should machine fantastically (uniform pressure, no side torques, ultimately a very light touch if the material is being ablated). When I first read them mentioning making up paraffin+plastic blocks my first thought was 'why not just use a ring wax'?
|
|
#
?
Feb 2, 2013 23:14
|
|

|
I need a work stand for my flypress. However, I want it up pretty high, so I don't have to bend down very far to use it. No one makes anything strong enough for me, so I gotta make it myself. Metal store wouldn't sell me 18x18" x 1/2" plate, so I got two 18" pieces of 12"x1/2" bar.  Not a perfect fit up, but not too bad.  Chamfering both sides of that fuckin plate and then welding/grinding welding/grinding and so on forever, I needed a break. Background: Guy I'm working with has a beef (  ) with a contractor we're working with. He jokingly said: "Man, I almost wish I could brand this jackass." ) with a contractor we're working with. He jokingly said: "Man, I almost wish I could brand this jackass." How far am I willing to go for a joke?    Pretty far, it seems. Even if it was just just some scrap bits I threw together in half an hour. In the timeless tradition of all blacksmiths who have made brands, I just had to test it on my wall. Maybe someday I'll make more of these, in many styles.
|
|
#
?
Feb 3, 2013 02:20
|
|
|
What kind of bevel prep did you use? I'm sorry but I laughed when I read that the 18" x 1/2" weld took a long time :P I've been doing heavy wall for way way too long and that seems so small to me now, but really it's still a bunch of weld especially if you didn't have bigger welding rod. How long did it wind up taking to finish?
|
|
#
?
Feb 3, 2013 08:06
|
|
|
The welding wasn't THAT bad, it was the grinding of the bevels that was the most painful. I did about a 45' angle on both sides, maybe 3mm of flat left on the side. Looked like this in profile: >< It stood up to me wailing on it with a sledge to flatten it out, so hopefully it's strong enough. I kept flipping it over and welding opposite sides to keep the heat shrink bending to a minimum, but it still crooked up on me. Had some bad porosity, I am really out of practice (plus it was breezy, but not that bad, so I can't use that as an excuse) thus all the weird grinding on the flats. All told it took about 3-4 hours I think. That includes setting up a table and moving wires and going inside the house to flip the breaker. Never had to do that before :/
|
|
#
?
Feb 3, 2013 08:18
|
|
|
Slung Blade posted:und: Guy I'm working with has a beef ( I like this a lot, but I'd advise using it sideways so that it's also lazy. 
|
|
#
?
Feb 3, 2013 15:09
|
|


|
I want to twist/roll some metal with some metal-bending tools I got, I can't find any pictures but they're bench-mounted hand-operated tools, I was postin' about em a while back. Thing is, I don't wanna hurt it, and everything I've read cautions strongly against putting both cold-rolled, but also carbon steel (this includes 'mild steel' most of the time) through it if you can't account for how many points of carbon, specifically, are in the metal you're using. I can get A36 hot-rolled stuff, but (of course) not in the sizes I need. Would aluminium be any gentler? The alloys available to me are all tempered and as such have yield strengths roughly comparable to steel, which Sucks A Lot, Why Can You Not Get Anything Annealed Ever, Ever, At The Metalplace Aaaargh e: Although aluminium isn't so terrible to anneal, as a rule, could I do a bundle of bars in the barbecue or something similar? Ambrose Burnside fucked around with this message at 17:56 on Feb 3, 2013 |
|
#
?
Feb 3, 2013 17:53
|
|
|
Ambrose Burnside posted:I want to twist/roll some metal with some metal-bending tools I got, I can't find any pictures but they're bench-mounted hand-operated tools, I was postin' about em a while back. Heat the cold roll up and then let it air cool. Usually cold roll is just mild steel that's literally been rolled while cold, which introduces defects that makes it harder and a little more brittle. If you heat it up and cool it, it becomes just like any other hot rolled mild steel, which should be fine for your application. What sizes are you wanting to use? Any self respecting metal retailer should have hot rolled mild steel in any barstock size down to 1/4" at the least. If they don't, they suck and you should stop shopping there.  Munki: thanks bro
|
|
#
?
Feb 3, 2013 18:30
|
|
|
I don't have a means of heating a 3/8" or thereabouts bar of steel up that hot, is the problem. Aluminium has a annealing temp thats low enough to be managed easily enough with a bar of soap and a cheapie propane torch. And yeah, they have hot-rolled in -some- sizes, but it's still A36, which (again, this is scuttlebutt coming from other people who use hand-bending tools like this) has too much carbon to be safely used because of the comparative springiness it introduces, and takes a hell of a toll on the tooling. I've heard there are places that cater to ornamental ironworkers that specifically stock very low-carbon steel, stuff that's real close to wrought iron in composition (minus the silica slag) and behaviour, but I don't know of any of these places in particular.
|
|
#
?
Feb 4, 2013 03:29
|
|
|
Slung Blade posted:The welding wasn't THAT bad, it was the grinding of the bevels that was the most painful. That's a decent time. 45' is a bit much generally for a bevel prep for future information. Usually we just use a 30' bevel, sometimes less if you have a friendly fitter because it saves a ton of weld. Porosity can really get out of hand when you are doing many many passes. Generally I just use really high heat to avoid it where possible but it's of course always the starts where the problems occur. Neat!
|
|
#
?
Feb 4, 2013 09:31
|
|
|
I did some welding in High School (10 years ago) and enjoyed it but could never afford it. Now I can afford it and want to start messing around with it again and have some projects in mind. I have a 220v (60amp) and 110v (20amp) circuit in my garage and the thickest stuff I need to weld for these projects is 1/8" steel but having the ability to weld heavier would be nice without having to bevel the hell out of everything. I was thinking a 110v Mig like a Miller 140 or similar Lincoln/Hobart would be good then a couple people mentioned if I can afford it I should just go with a 220v setup. So for a guy messing around in the garage welding stuff together is it worth looking at a 220v or a machine capable of 110&220v work? Would prefer to stay under $1000 and plan to buy used if I can find something to fit my needs in the next 1-1.5 months.
|
|
#
?
Feb 6, 2013 14:33
|
|

|
NitroSpazzz posted:I did some welding in High School (10 years ago) and enjoyed it but could never afford it. Now I can afford it and want to start messing around with it again and have some projects in mind. I have a 220v (60amp) and 110v (20amp) circuit in my garage and the thickest stuff I need to weld for these projects is 1/8" steel but having the ability to weld heavier would be nice without having to bevel the hell out of everything. The Miller 211 is right at a grand brand new and works on 110 and 220. I'm thinking about picking one up, I love being able to run 220 most of the time but also having the versatility of 110 when I need to weld somewhere other than my garage.
|
|
#
?
Feb 6, 2013 16:05
|
|

|
Ambrose, what are you trying to make? In my experience twisting steel cold will almost always cause it to break. I have very little experience forging aluminum. I recently tried it when I participated in a fashion show. It's a little hard to see but the model below is wearing an aluminum crinoline cage held together with copper rivets. The necklace are flat pieces of aluminum necked and tapered. What I learned from forging aluminum: She is a fickle metal. Too hot or an uneven heat and she will tear to pieces. I don't know the annealing temperature, but I do know that it is very low. I managed to melt a couple pieces in the forge by leaving it in just a couple seconds too long. My process was to anneal, quench and then forge. Before bending the long pieces into a hoop shape I annealed them as well. Some of the pieces broke from their own weight. Also uneven heating left some parts very soft and other parts brittle causing a weakness in the metal. I have noticed that when you work harden one area and have an annealed area nearby that this also causes weakness in the metal. At first I punched the holes for riveting, but it caused more deformation than I anticipated. Because it's such a soft metal drilling was preferable. From my limited experiences in welding aluminum I know that the material oxidizes and becomes more like a ceramic. I believe you can tell when aluminum is oxidized because it is less refractive in appearance. When welding you brush or clean the top layer off to remove the oxidized layer. When forging I ended up discarding oxidized pieces because the finished product looked bad. Aluminum is very soft and incredibly easy to forge provided it is well annealed and evenly heated and worked. But take all of this advice with a grain of salt. I only know from trial and error and have done very little research on the subject. Oh, and since I am sharing from the fashion show, one of my fashion designs made it into the SF Chronicle. It mostly was featured because of Sam, the leatherworker's, corset. I designed the outfit, did the re-purposing and of course made the steel headdress. Sam created the corset and the leather harness for the collar.   edit: Oh, and the model for the second piece is the lovely, Miss Scarlett Black. (She prefers if I tag her in pictures.) ArtistCeleste fucked around with this message at 22:07 on Feb 11, 2013 |
|
#
?
Feb 11, 2013 22:04
|
|

|
I think I have an issue with my tuyere and air source. I found a bathroom exhaust fan for $3 at the local building salvage, and it blows pretty decently, but i'm getting practically no flow through my charcoal. Should I widen my holes and/or drill more? I have a 1" iron pipe with 5-6 evenly spaced 1/8" holes. Also, my hose going from the exhaust fan to the pipe is only 1" wide, maybe i'm just not getting enough flow? Even after leaving my metal in for 15 minutes, all I got was a slight dull red glow, and hammering it just kind of mushroomed the edge.
|
|
#
?
Feb 11, 2013 22:19
|
|

|
QPZIL posted:I think I have an issue with my tuyere and air source. I found a bathroom exhaust fan for $3 at the local building salvage, and it blows pretty decently, but i'm getting practically no flow through my charcoal. Should I widen my holes and/or drill more? I have a 1" iron pipe with 5-6 evenly spaced 1/8" holes. Also, my hose going from the exhaust fan to the pipe is only 1" wide, maybe i'm just not getting enough flow? Try enlarging every other hole to 3/16 and see if that works. If not, enlarge your other holes a little but at a time. if you make one too big you can always drop a bolt in it or weld it shut. Also, pictures of your forge setup would make it easier to figure this out.
|
|
#
?
Feb 12, 2013 03:29
|
|

|
tonedef131 posted:The Miller 211.... I run a 211 also, great welder for everything I've wanted to do with MIG. Saving up now for a TIG machine though...
|
|
#
?
Feb 12, 2013 04:15
|
|

|
ArtistCeleste posted:From my limited experiences in welding aluminum I know that the material oxidizes and becomes more like a ceramic. I believe you can tell when aluminum is oxidized because it is less refractive in appearance. When welding you brush or clean the top layer off to remove the oxidized layer. When forging I ended up discarding oxidized pieces because the finished product looked bad. Yep. Aluminum that is exposed to oxygen passivates itself and forms a layer of aluminum oxide that is much, much harder than the base metal. That's why you (usually) have to use an AC TIG to weld it -- the repeated strikes help blast off the oxide coating so that the current can flow smoothly. The oxide's melting point is also about twice that of elemental aluminum, so you usually have to ramp the power way up to get a pool going, then quickly back off so that you don't blow right through. Brushing the metal helps establish the arc quite a lot. Unoxidized aluminum is usually slightly duller and whiter than the passivated stuff (which is what you mostly see). Until you melt it -- then it suddenly goes really shiny (the only indication that it's liquid) and stays that way for a couple of hours as the weld cools and the oxide regenerates. I greatly enjoy TIG welding 
|
|
#
?
Feb 12, 2013 04:33
|
|


|
So I was testing out an old 60s Russian camera that I got, and remembered someone mentioning that a picture of my forge setup would help troubleshoot. So, here are a couple pictures from my shed. The forge is the second shot obviously. It's a metal tub with a layer of clay/ash on the bottom, bricks as walls, a black iron tuyere in the bottom, and a bathroom exhaust fan as an air source (not pictured).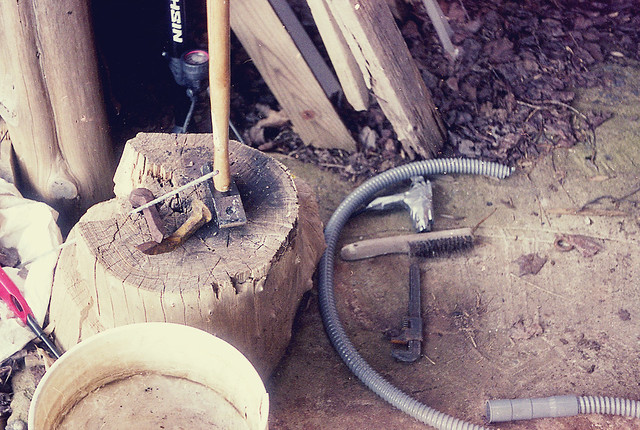 Blacksmithing by iantuten, on Flickr 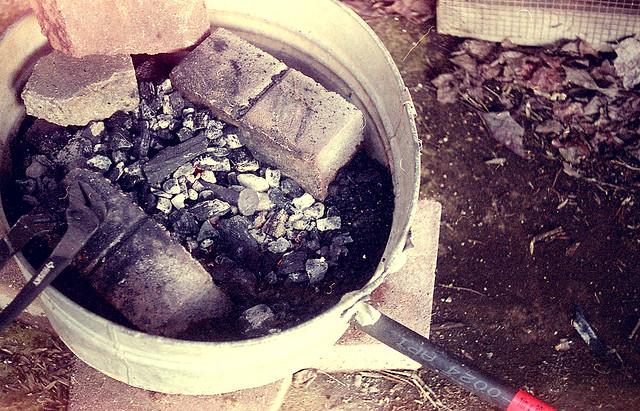 Blacksmithing by iantuten, on Flickr
|
|
#
?
Feb 14, 2013 05:45
|
|
|
Is that tub galvy? I might be concerned about fumes depending on how hot the sides get, but then I'm paranoid when it comes to metal fumes. Otherwise, from the looks of it you may be lacking depth. With charcoal you want to be more in the neighborhood of 6"-8".
|
|
#
?
Feb 14, 2013 06:50
|
|
|
Yeah, you most certainly need more air with that setup. Try what I said in my previous post, and you need to beware about that galvanized tub. When galvanized metal heats up enough, the zinc burns off and the vapors are DEADLY. Never ever heat galvanized metal under any circumstances! Larger holes will give you more air, which you certainly need!
|
|
#
?
Feb 15, 2013 02:27
|
|
|
iForge posted:Yeah, you most certainly need more air with that setup. Try what I said in my previous post, and you need to beware about that galvanized tub. When galvanized metal heats up enough, the zinc burns off and the vapors are DEADLY. Never ever heat galvanized metal under any circumstances! Larger holes will give you more air, which you certainly need! Not that deadly, but unhealthy for sure. I remember cooking pizzas on a rack inside a galvanized trash can thrown onto a campfire with the lid on  and then eating them. and then eating them.
|
|
#
?
Feb 15, 2013 03:13
|
|

|
Deadly fumes, not necessarily deadly chemicals to eat. Also, that wikipedia article implies that metal fume fever isn't deadly, and that's possibly true, but it can still lead to death. See: http://www.anvilfire.com/iForge/tutor.php?lesson=safety3/demo for a specific and tragic example. Leperflesh fucked around with this message at 03:26 on Feb 15, 2013 |
|
#
?
Feb 15, 2013 03:17
|
|

|
In the vast majority of circumstances zinc fumes are lovely but pretty harmless unless you're hovering over the source huffin' like mad. I mean, metal fume fever blows, but in contexts other than welding galvy it's generally avoidable. Personally, I'd stoke the forge-bowl absurdly overpacked to the brim, just once, and light it with the blast open full in a very well-ventilated area, and just let all the galvanization burn off. I'd probably use a cup of gasoline, but I'm an idiot like that. Or, hell, just sand the surface finish off of everything that's galvanized and likely to heat up. Ambrose Burnside fucked around with this message at 04:20 on Feb 15, 2013 |
|
#
?
Feb 15, 2013 04:18
|
|
|
Leperflesh posted:See: http://www.anvilfire.com/iForge/tutor.php?lesson=safety3/demo for a specific and tragic example. Yep, that page right there, that's what led to my metal fume paranoia.
|
|
#
?
Feb 15, 2013 04:51
|
|
|
How big is that pipe feeding your fire Qpzil? It looks awfully small. I think the one I use is 2" at least, maybe 2.5.
|
|
#
?
Feb 15, 2013 07:47
|
|
|
Ambrose Burnside posted:In the vast majority of circumstances zinc fumes are lovely but pretty harmless unless you're hovering over the source huffin' like mad. I mean, metal fume fever blows, but in contexts other than welding galvy it's generally avoidable. The right way to do it is to coat the thing in muriatic acid and let it sit over night, and then rinse off the goo and you're done. There's no need to turn the zinc to vapor.
|
|
#
?
Feb 15, 2013 09:19
|
|
|
Slung Blade posted:How big is that pipe feeding your fire Qpzil? Yeah that's what I think one of my issues is - the pipe is 1".
|
|
#
?
Feb 15, 2013 14:09
|
|
|
QPZIL posted:Yeah that's what I think one of my issues is - the pipe is 1". I'd bet that's your problem. I'd think your bathroom fan moves enough air by itself, but at a low pressure across a wide cross-section. When you neck it down into a very small cross-section, then bleed it up through small holes, you're decreasing the cross-sectional area that is available to move the air. The smaller the area, the more pressure it takes to force a fluid (like air) through the pipe due to friction with the walls. Where your fan is a low-pressure pump of sorts, you need a wider tube. Get yourself a 2-3" pipe with 3/8" holes in it and I think you'll be in business. Or I guess you could get a higher-pressure air pump, but I think that would be more complex and expensive than just getting a bigger pipe.
|
|
#
?
Feb 15, 2013 19:45
|
|

|

|
| # ? May 23, 2024 10:47 |
|
|
Metal fume fever is nothing to play with. It is nasty and will permanently damage you if it doesn't outright kill you. It is not something to take a risk on. Anyone who tells you different is a fool.QPZIL posted:Yeah that's what I think one of my issues is - the pipe is 1". Get yourself some 2" or 2.5" black iron pipe, a 90, a small pipe nipple, and a pipe cap, and make a similar forge to the one in this VIDEO Crappy paint image of what it should look like with your galvanized tub:  You can change your tub out for something else, or tweak things a bit, but the general idea is there. His forge is a very good design.
|
|
#
?
Feb 16, 2013 18:02
|
|