

|
alkanphel posted:Question: When do you guys do your sharpening? After resizing to output size? Always sharpen at output resolution.
|
 #
?
Apr 25, 2013 07:09
#
?
Apr 25, 2013 07:09
|
|


|

|
| # ? Jun 5, 2024 07:14 |
|
|
casa de mi padre posted:But Lightroom 4 is $20 off right now so I guess I'll just buy it. You might as well just wait for LR5 if you can. I am still on LR3 and will probably upgrade to LR5. I would have updated to LR4, but Adobe pissed me off so much. I bought LR3 when the price dropped to 50% off. Then about 32 days later, they released LR4 full version for the same price I paid for LR3. Just as the digital download returns or free upgrade window closed. So to get LR4, I would have had to buy the upgrade version. I knew LR4 would come out at some point, but I didn't think they'd change the pricing so radically. I thought I'd still be on top if I bought LR3, then later upgrade version to LR4. Would have been cheaper to just buy LR4 full version.
|
|
#
?
Apr 25, 2013 07:19
|
|

|
Reichstag posted:Always sharpen at output resolution. Hmm ok, that is what I'm doing now so that's good to know.
|
|
#
?
Apr 25, 2013 07:21
|
|

|
I sharpen to taste at full resolution, and then let Lightroom sharpen again when resizing for export.
|
|
#
?
Apr 25, 2013 08:14
|
|

|
alkanphel posted:Question: When do you guys do your sharpening? Never.
|
|
#
?
Apr 25, 2013 10:20
|
|


|
mr. mephistopheles posted:Never. Yeah, tbh I use bilinear resize and then don't sharpen at output either, almost ever.
|
|
#
?
Apr 25, 2013 10:33
|
|
|
Ashex posted:This is one of my favorite shots and I'm planning to get it printed on either canvas or foam. If anyone can give me some C&C on how I might improve the colors I'd greatly appreciate it. Probably shifting the color temperature towards blue a bit would make the scarf pop more. The whole thing is pretty orange right now.
|
|
#
?
Apr 25, 2013 14:59
|
|


|
Haggins posted:I know this is an old post but... Yeah, I've tried to work in Lightroom 4 and I just really don't like it as much as I do Aperture. I'm curious to see what Lightroom 5 looks like, though. I don't really tag/rate photos or anything like that. The only things that I miss from Lightroom is the built in lens correction (which I could just buy PT Lens) and the perspective correction. I like the (free) BorderFX output plugin for Aperture, of which I have yet to find a free equivalent in Lightroom. In the end I've sort of decided to stick with Aperture for now, not sweat being "stuck" on a potentially "dead" product, and figure that someday I'll eventually get too limited and have to move. Or not.
|
|
#
?
Apr 25, 2013 19:01
|
|

|
ZippySLC posted:Yeah, I've tried to work in Lightroom 4 and I just really don't like it as much as I do Aperture. I'm curious to see what Lightroom 5 looks like, though. I don't really tag/rate photos or anything like that. The only things that I miss from Lightroom is the built in lens correction (which I could just buy PT Lens) and the perspective correction. I like the (free) BorderFX output plugin for Aperture, of which I have yet to find a free equivalent in Lightroom. I think you can do the lens correction in Photoshop. Aperture has always worked well with photoshop.
|
|
#
?
Apr 25, 2013 19:29
|
|

|
alkanphel posted:Hmm ok, that is what I'm doing now so that's good to know. rule of thumb is that if you're planning on sharpening, it should be the last thing you do before printing or uploading or whatever you're doing with the final product.
|
|
#
?
Apr 25, 2013 21:55
|
|

|
Genderfluid posted:rule of thumb is that if you're planning on sharpening, it should be the last thing you do before printing or uploading or whatever you're doing with the final product. I find my digital images look less 'digital' if I sharpen using a really high quality method at full resolution BEFORE resizing, it's just a preference thing. There's no fast rule, whatever look you like best.
|
|
#
?
Apr 25, 2013 22:01
|
|

|
Haggins posted:I think you can do the lens correction in Photoshop. Aperture has always worked well with photoshop. I don't have Photoshop, unfortunately.
|
|
#
?
Apr 25, 2013 22:06
|
|
|
Wyeth posted:I find my digital images look less 'digital' if I sharpen using a really high quality method at full resolution BEFORE resizing, it's just a preference thing. There's no fast rule, whatever look you like best. I guess indeed it's something to try and see which method give the final output I like the most.
|
|
#
?
Apr 25, 2013 23:13
|
|
|
The sharpening is going to depend on the way you're going to view the photo. In general, the further away you're going to view the photo, the sharper it needs to be. So if you're printing out a 20x30 to hang on the wall, you'll need it pretty sharp. It's ok if it doesn't look great close up, no one is going to pixel peep it. Think of it like those prints they put on the glass windows at fast food joints. The graphics/photos look great from the road, but once get up to the door, it looks like a bunch of pixelated crap. The photos are made to look good for their viewing distance. Secondly, how you sharpen is also going to be dependent on what you're printing on. It's going to be different for glossy, matte, canvas, metal, etc... Finally, don't sharpen the out of focus areas of the picture. It will look better if you don't. I sharpen for the specific application so that's why I do it as my final step. If you want to make sharpening an easy process I'd suggest getting a copy of Nik Sharpener. It has all the presets built in for you and it's easy to do selective sharpening.
|
|
#
?
Apr 25, 2013 23:56
|
|
|
Guitarchitect posted:
Can you please elaborate on this? I don't think I fully understand what you are saying there. Yeah, I emailed the guy a few weeks ago and got no response, unless he's up doing some paid photoshoot of mars or something. I don't think I'm going to get any trade secrets out of him. Uh yeah so I've been reading a bit into infrared filters as well, wondering what kind of interesting affect that would have when I'm down there with long exposures. I have a hard time believing that he managed to get some of those iceberg shots from something that was not moving, as they look like they would be big enough to be very deep underwater, he would have had some sorcery or some other unknown method to be so close and get a long exposure, unless he was using some super badass megatelephoto lens. Might try a different approach this coming season. I'm looking into ordering a set of coloured/ND/GND filters to fit my cokin p series bracket, to see what kind of results I can get out of it. But I would love to know how to make some of those shots as interesting as the guy above with necessary post
|
|
#
?
Apr 26, 2013 08:13
|
|

|
Sludge Tank posted:Uh yeah so I've been reading a bit into infrared filters as well, wondering what kind of interesting affect that would have when I'm down there with long exposures. I have a hard time believing that he managed to get some of those iceberg shots from something that was not moving, as they look like they would be big enough to be very deep underwater, he would have had some sorcery or some other unknown method to be so close and get a long exposure, unless he was using some super badass megatelephoto lens. (apologies if I misinterpreted and you meant an IR filter *in addition* to a red filter) Red filter != infrared filter. One is mostly transparent, but will darken the sky in a b&w... the other cuts off all the visible light (ie, everything below a certain wavelength - 700-800nm usually) and thereby need super long exposures to get an image. That's for unmodified digital, anyways; with a modified digital sensor, you can shoot short exposure IR. Similarly, some IR films are only sensitive from the near-IR spectrum on, and so you avoid those kind of long exposure issues. Your best bet if you wanted to shoot IR, would be a cheap DSLR with the IR filter removed (Life Pixels). Whether it would be worth the effort over and above a simple red filter, on the other hand, is up for debate... ----- Looking at the ocean surface and the clouds, most of those don't look to be long exposure shots. Some of the b&w ones are. IIRC, he mainly shoots a walker titan 8x10 and a Fotoman 617, but all the color shots were done on an Mamiya/Phase digital combo and stitched. He shot most of it from Zodiacs, with the occasional shore trip (which would encompass most of the tripod+ND+long exposure stuff I assume). The other thing he mentioned in the interview was some kind of badass gyro stabilisation thing, something like a steadicam for stills. Pretty sure that's mostly for the digital panos, since stitching five frames shot from a boat on the ocean would be a real bitch. Sludge Tank posted:Might try a different approach this coming season. I'm looking into ordering a set of coloured/ND/GND filters to fit my cokin p series bracket, to see what kind of results I can get out of it. But I would love to know how to make some of those shots as interesting as the guy above with necessary post You can get most of the dark sky effect using color channels in PS (and, to a lesser extent, LR). A red/orange filter, a polariser and a set of GNDs and a Big Stopper would be pretty comprehensive. ... if you want to smuggle me on board, I'll totally carry your tripod or something. BrosephofArimathea fucked around with this message at 09:00 on Apr 26, 2013 |
|
#
?
Apr 26, 2013 08:54
|
|

|
Are there any good books/guides/forums about the Nik tools? I picked up the discounted package and while most of the stuff is fairly straightforward, the Sharpener module has me confused and there's not much help on their website; the FAQ basically says "What's shown on your monitor isn't what things will look like when printed, move sliders around until you like what you see." What's Adaptive Sharpening? How's that different from Creative Sharpening? Should I be using one or the other or both? And so forth.
|
|
#
?
Apr 26, 2013 17:00
|
|

|
edit: Here's the pdf of the Sharpener manual: http://download2.niksoftware.com/downloads/pdf/usa_guides/Sharpener_Pro_3.0_User_Guide.pdf I think Adaptive Sparpening is what you use for the entire image, and Creative Sharpening is what you use selectively to draw out the detail in specific areas. Honestly, I don't use Sharpener all that much. an AOL chatroom fucked around with this message at 17:49 on Apr 26, 2013 |
|
#
?
Apr 26, 2013 17:42
|
|

|
The best and most helpful thing I found was their webinars. http://education.niksoftware.com/training/index.php It looks like they're still scheduling live stuff and there are a ton of prerecorded episodes.
|
|
#
?
Apr 26, 2013 17:47
|
|
|
Okay, this has been bothering me since I first started using Lightroom 4, but now I'm taking enough photos that I want to process and keep that it's becoming cumbersome. When I'm going through images that I've just imported, often when I first double-click em to biggie-size them, it takes a second or two for the image to load the full rez. At this point, even though the image is fuzzy I can see the exposure levels and saturation are what I'm (mostly) after.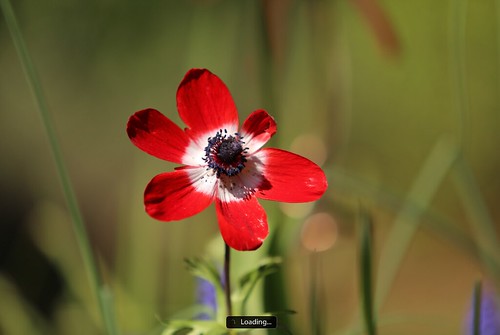 However, after it is finished loading the full rez image, LR seems to apply some really crappy preset to every image and it looks like this (easier to see on Flickr). Seems to reduce the overall exposure and boosts the contrast. 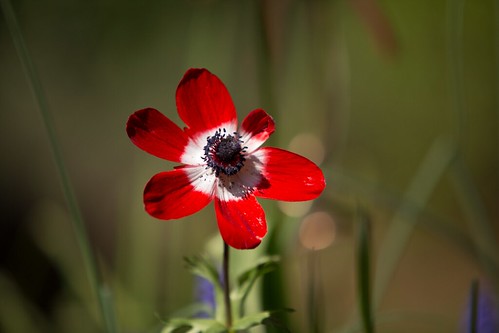 While the difference is minor, it's annoying to have to fix this everytime when I can see from the "loading" image that at some point it looked the way I wanted it. Anyone know how to avoid this? I like the jpg preview that both the T4i and 6D produce, so if it could just load that preset to the RAW on import that'd be a great starting point. Thanks in advance.
|
|
#
?
Apr 26, 2013 23:10
|
|

|
bisticles posted:edit: Here's the pdf of the Sharpener manual: Thanks for the link to the manual. The videos looked promising to me too until I clicked on the first one I saw that looked good and it told me "Video does not exist."
|
|
#
?
Apr 26, 2013 23:35
|
|
|
mclifford82 posted:Anyone know how to avoid this? I like the jpg preview that both the T4i and 6D produce, so if it could just load that preset to the RAW on import that'd be a great starting point. Thanks in advance. Did you try messing with the camera calibration options at the bottom of the develop panel? There's a "camera faithful" setting that might help. Pretty sure the preview that loads is the jpeg that gets saved in the raw, so it has whatever image processing on it that your camera saves. To reproduce that, you'll probably have to configure a preset that you apply to the imported raws. Not sure if there's one out there on the internet you can just download.
|
|
#
?
Apr 27, 2013 00:08
|
|

|
mclifford82 posted:Okay, this has been bothering me since I first started using Lightroom 4, but now I'm taking enough photos that I want to process and keep that it's becoming cumbersome. When I'm going through images that I've just imported, often when I first double-click em to biggie-size them, it takes a second or two for the image to load the full rez. At this point, even though the image is fuzzy I can see the exposure levels and saturation are what I'm (mostly) after. If you like what the in-camera processing gives you, why shoot RAW? Why not just shoot jpeg?
|
|
#
?
Apr 27, 2013 00:19
|
|

|
Haggins posted:The best and most helpful thing I found was their webinars. http://education.niksoftware.com/training/index.php These are fantastic because they work great as a selling tool, as you can see how easy it is to use the software, and as a resource for people who have already bought it. For the amount you can do through Nik Software and taking into account it costs as much as a nifty fifty lens, it's one of the best things you can possibly buy.
|
|
#
?
Apr 27, 2013 00:29
|
|


|
doctor 7 posted:These are fantastic because they work great as a selling tool, as you can see how easy it is to use the software, and as a resource for people who have already bought it. For the amount you can do through Nik Software and taking into account it costs as much as a nifty fifty lens, it's one of the best things you can possibly buy. It really is. I've been using Nik for almost as long as I've been shooting and I can't imagine working with out it.
|
|
#
?
Apr 27, 2013 00:49
|
|
|
joelcamefalling posted:(apologies if I misinterpreted and you meant an IR filter *in addition* to a red filter) Awesome. Thanks for your help. Perchance do you have a link to this interview?
|
|
#
?
Apr 27, 2013 01:12
|
|
|
xzzy posted:Did you try messing with the camera calibration options at the bottom of the develop panel? There's a "camera faithful" setting that might help. The camera calibration presets are the same (or as good as) as the picture styles on a Canon camera. So if you use the "landscape" picture style on your camera, and like how that looks on the jpeg preview, then you can set LR to apply the landscape camera calibration on import or just do it manually for each photo. This vid kinda explains it https://www.youtube.com/watch?v=lBtNMShttTk
|
|
#
?
Apr 27, 2013 01:26
|
|
|
I have LR4 via the Adobe subscription. The 5 beta sounds cool and I'm thinking about trying it out. I don't want to play with it, I'd like to actually use it for all my work. Is this a bad idea or should I just wait until 5 is released? Should everything flow seamlessly into the final version once beta is over?
|
|
#
?
Apr 27, 2013 01:59
|
|
|
Haggins posted:I have LR4 via the Adobe subscription. The 5 beta sounds cool and I'm thinking about trying it out. I don't want to play with it, I'd like to actually use it for all my work. Is this a bad idea or should I just wait until 5 is released? Should everything flow seamlessly into the final version once beta is over? That's how it worked when going from LR3 to the LR4 beta to LR4. I'm just not sure if there's a way to revert if you decide you don't like it.
|
|
#
?
Apr 27, 2013 02:25
|
|
|
CarrotFlowers posted:If you like what the in-camera processing gives you, why shoot RAW? Why not just shoot jpeg? He said he just wanted it as a starting point. The default that Lightroom does is the "Adobe Standard" camera profile. I don't know what it does, but with that profile applied it has a tendency to make images I've taken look terrible. Especially those with super high saturation. Took me awhile to figure out what was causing it and how to change the default import settings so at least I had a good starting point as well.
|
|
#
?
Apr 28, 2013 07:48
|
|

|
Hotwax Residue posted:The camera calibration presets are the same (or as good as) as the picture styles on a Canon camera. So if you use the "landscape" picture style on your camera, and like how that looks on the jpeg preview, then you can set LR to apply the landscape camera calibration on import or just do it manually for each photo. Yes, this is a good place to start. They work fantastic with *most* cameras. I find with all my Nikons it works great except with the D4. With the D4 i had to make my own presets with custom camera calibrations i made myself. I feel like Adobe just forgot to even try to make them look good/accurate.
|
|
#
?
Apr 28, 2013 22:27
|
|

|
Chitin posted:Probably shifting the color temperature towards blue a bit would make the scarf pop more. The whole thing is pretty orange right now. Edit NVM, looks worse. Ashex fucked around with this message at 02:01 on Apr 30, 2013 |
|
#
?
Apr 29, 2013 05:31
|
|

|
Ashex posted:This is one of my favorite shots and I'm planning to get it printed on either canvas or foam. If anyone can give me some C&C on how I might improve the colors I'd greatly appreciate it. Make a hue/saturation adjustment layer and mask it so that it touches everything but the scarf, then lower the yellows and reds until the main scarf still pops but the background doesn't look weird (in that it would have too low saturation). The problem is that you have a very popping item in focus that just shares all the popping colours of the background -- yellow and red in front of yellow and red, taking out some of the yellows and reds should make it stand out in how vivid it would look.
|
|
#
?
May 1, 2013 06:34
|
|


|
So, i've never tried post before. It was always develop -> print. But i've started scanning my negs and today during a free afternoong started loving around with some shots and drat, I need to figure out post. Any and all criticism is really appreciated, I don't know much about it so I'm basically winging it. Original  europa 110 por primoitcho, no Flickr  europa 110MOD por primoitcho, no Flickr Original 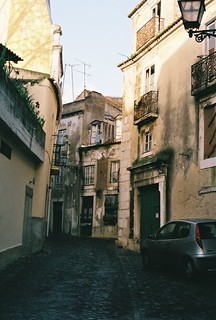 europa 269 por primoitcho, no Flickr 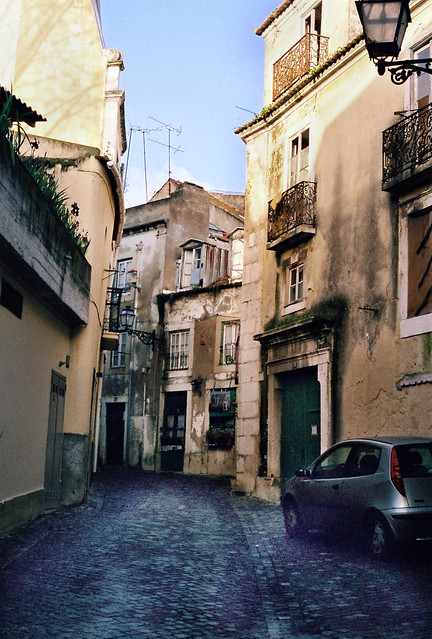 europa 269MOD por primoitcho, no Flickr
|
|
#
?
May 2, 2013 23:05
|
|
|
Primo Itch posted:
Look at the ground, whatever adjustment you've made is introducing alot of noise and is bleeding into the car.
|
|
#
?
May 3, 2013 00:35
|
|
|
XTimmy posted:Look at the ground, whatever adjustment you've made is introducing alot of noise and is bleeding into the car. One way to get around this is to use a gradient layer set to desaturate, killing the colour noise, but also make it add back some of the original blue.
|
|
#
?
May 3, 2013 01:13
|
|
|
http://www.theverge.com/2013/5/6/4305300/adobe-announces-creative-suite-update-and-rebranding-focus-on-cloud well then
|
|
#
?
May 6, 2013 20:06
|
|
|
Yeah I wasn't sure where to post the Cloud news... that sure is something. I guess (for Adobe) guaranteeing $40-or-so every month beats a bunch of people sticking with CS3 forever.
|
|
#
?
May 6, 2013 20:13
|
|

|
triplexpac posted:Yeah I wasn't sure where to post the Cloud news... that sure is something. Or more accurately, people running cracked cs6 or cs5 forever.
|
|
#
?
May 6, 2013 20:35
|
|


|

|
| # ? Jun 5, 2024 07:14 |
|
|
Mr. Despair posted:Or more accurately, people running cracked cs6 or cs5 forever. there will still be pirated photoshop and it will be about as difficult to crack as it usually is, that is to say not very. it's in adobe's best interest to have piracy be an option, since it just means more people learning adobe products, helping them to stay the market leader. it would cost them more to completely lock it down than it would to just let it be.
|
|
#
?
May 6, 2013 20:37
|
|