

|
This owns, and really makes me wish I had my sewing machine with me in residence because gosh darn I really want to make one. I actually don't mind working in felt or fleece for my plushies. I guess it just depends on what you want the fabric to do? I haven't worked in minky at all but if I can find some I'll give it a try.
|
 #
?
Sep 20, 2013 23:59
#
?
Sep 20, 2013 23:59
|
|


|

|
| # ? Jun 2, 2024 11:31 |
|
|
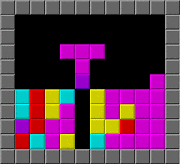
I made a few things for Plush You! at Schmancy   
|
|
#
?
Sep 27, 2013 05:45
|
|
|
Is that a TARDIS Popple? Holy moly, that's brilliant! Here is a practice pony that I made using a pattern made by ValleyViolet (you can find her on Etsy and Deviantart), featuring bonus Cat. The pattern is a lot of fun and I felt very proud for figuring it out. I know how to sew darts now! 
|
|
#
?
Sep 27, 2013 14:43
|
|
|
four lean hounds posted:Is that a TARDIS Popple? Holy moly, that's brilliant! Thanks! Yes TARDIS / Tenth Doctor Popple. I call it Doctor Whopple
|
|
#
?
Sep 27, 2013 15:52
|
|
|
Serious question here! How could I go about making a stuffed grub/larva puppet thing? I'm having trouble figuring out a good way to make the body segmented like without using a multiple passing of basting stitches. The head is giving me a bit of trouble too, but that's not too bad. I look online for maybe a few grub plushes for inspiration but all what I get is Homestuck stuff.
|
|
#
?
Oct 17, 2013 10:05
|
|

|
Salsa McManus posted:Serious question here! How could I go about making a stuffed grub/larva puppet thing? I'm having trouble figuring out a good way to make the body segmented like without using a multiple passing of basting stitches. The head is giving me a bit of trouble too, but that's not too bad. You could sew bands of fabric together? Please reference my lovely illustration: 
|
|
#
?
Oct 17, 2013 16:25
|
|
|
Jawesome! Thanks, that actually helped me a lot. I messed with that style a bit and came out with something that works wonderful for what I want.
|
|
#
?
Oct 18, 2013 16:56
|
|
|
Salsa McManus posted:Jawesome! Thanks, that actually helped me a lot. I messed with that style a bit and came out with something that works wonderful for what I want. ...you understood that? I mean, of course you did! I'm an excellent teacher. Cool, glad you got the result you wanted! Post a picture when you finish as I'd love to see a plush/puppet maggot.
|
|
#
?
Oct 18, 2013 20:53
|
|
|
four lean hounds posted:I'd love to see a plush/puppet maggot. Sounds like you need to watch Freaky Stories:  (Incidentally, I had no idea until I just found this photo that Dan Redican was involved in that show.)
|
|
#
?
Oct 18, 2013 23:38
|
|

|
Dienes posted:I have only sewn once before, about 10 years ago when I had to make a (plain square) pillow for home ec. I just finished grad school and suddenly find myself with both free time and disposable income, so I wanted to try out some more sewing. I. Umm. Totally saw the same thing on Tumblr and made it, but with microchenille and cotton (for the suckers). I also made a ton of mistakes, mostly on the arms (I need to stitch the cotton to the microchenille, rather than the other way around. Since the chenille is stretchy, I got curvy legs). 
|
|
#
?
Oct 26, 2013 14:53
|
|

|
I made this Cthulhu for a custom order, now he's available made to order on my shop. I wanted him a slight bit shorter and fatter, but good enough to keep the pattern I made, I think. I'm especially happy with his head and wings.   
|
|
#
?
Oct 28, 2013 22:25
|
|

|
Second project, making a starcraft baneling. Wasn't able to secure enough minky for it all, but the recipient loved it.  I just acquired yards and yards of embossed black and red minky for a 40" dragon plush. I'm inordinately excited.  Brainbread posted:I. Umm. Totally saw the same thing on Tumblr and made it, but with microchenille and cotton (for the suckers). That turned out amazing!
|
|
#
?
Nov 4, 2013 20:59
|
|


|
I've been buying what I think is the Shannon cuddle minky from my local chain (like 5 stores). However I seem to be running into a bunch of irregular spots in the fabric. Typically they're spots where the nap is longer than it should be but occasionally there will be other problems too. Of the three chuncks I've worked with tonight two have had them. Is this something you folks run into and how often? Am I unlucky or would another online seller be better?
|
|
#
?
Dec 4, 2013 06:33
|
|
|
I get mine from Fabric.com and I've never seen any problems. I only use the Cuddle 3 tho, are you using a more plush minky? I haven't posted any pictures lately; here's a grey Fat Cat I made on commission:  I might not have been sewing much but I did put together a nice lightbox for taking pictures and even tho I'm not much of a photographer I'm really happy with how much of a difference a few lamps, some PVC and a sheet can make.
|
|
#
?
Dec 4, 2013 15:57
|
|
|
Keska posted:I get mine from Fabric.com and I've never seen any problems. I only use the Cuddle 3 tho, are you using a more plush minky? I think it's the cuddle 3 or at least something that looks identical to your picture.
|
|
#
?
Dec 4, 2013 16:14
|
|
|
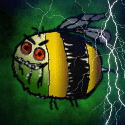
I know it was a couple of pages back, these bee's are wonderful stitching, Instant Love. Edit: my stupidity
|
|
#
?
Dec 6, 2013 03:56
|
|


|
Brainbread posted:I. Umm. Totally saw the same thing on Tumblr and made it, but with microchenille and cotton (for the suckers). You say this like a bad thing but...it's a squid. Isn't that the point?
|
|
#
?
Jan 4, 2014 02:50
|
|


|
I recently made a Totoro plush as a Christmas gift! It was my first time working with fleece, which was a learning experience, to say the least. The pattern calls for you to iron on some backing material to his white tummy circle... and it turns out that fleece don't like no heat. That added a little extra time onto the project.  It is not quite so lopsided as show in this picture, but I have a feeling the friendly puppy had a bit to do with that. 
|
|
#
?
Jan 4, 2014 04:21
|
|
|
I make potoos sometimes.  
|
|
#
?
Jan 5, 2014 08:30
|
|


|
I like 'em, they've got personality. Finished a big (for me) project recently. Made a large plush with polymer clay parts. The face, horns, and claws are polymer clay. I really like how he turned out!  Excuse my kitchen counter, my apartment has really bad lighting everywhere else. It made him look more blue than purple too. Anyone else work with clay this way?
|
|
#
?
Jan 5, 2014 12:52
|
|

|
Radio! posted:I make potoos sometimes. Oh good lord this is adorable! radioactivemongoose posted:I like 'em, they've got personality. I like how it turned out too! How do you attach the clay pieces?
|
|
#
?
Jan 5, 2014 16:35
|
|
|
radioactivemongoose posted:else work with clay this way? Cast resin rather than clay, and they're not finished yet (pretty much just sculpted the masters, need to make the molds), I posted some pics on the last page
|
|
#
?
Jan 6, 2014 13:54
|
|

|
four lean hounds posted:I recently made a Totoro plush as a Christmas gift! It was my first time working with fleece, which was a learning experience, to say the least. The pattern calls for you to iron on some backing material to his white tummy circle... and it turns out that fleece don't like no heat. That added a little extra time onto the project. Next time if you need an appliqued piece to stay in place you can just use a bit of spray glue or even just a bit of fabric glue. The spray glue won't dry super stiff usually if you get the correct type.
|
|
#
?
Jan 6, 2014 16:31
|
|
|
Dienes posted:I like how it turned out too! How do you attach the clay pieces? Trial and error since it can be hard to find info on how to do it online. For the horns I made pegs at the end with holes through them, then sewed it into the fabric like a button. Same for the claws, holes at the end of the piece, sewed into the fabric. The face was a little trickier though. I ended up making a ring of clay with holes poked all around it on the back of the face plate and attached it as I did the others. It worked but there's room for improvement. I've also heard that people will make recessed grooves at the end of pieces and attach them with a ziptie, sort of like how plastic arms and legs are attached to soft bodied baby dolls.
|
|
#
?
Jan 10, 2014 20:13
|
|
|
I'm currently working on a second giant squid plushie. And then a 3ft long shrimp plushie. I just need to drag myself away from videogames for it! Its great to see what everyone else has been working on! ")
|
|
#
?
Jan 10, 2014 21:10
|
|
|
I really want to get into making plushs. Do you guys have any good websites, resources etc on getting started?
|
|
#
?
Jan 14, 2014 19:21
|
|

|
I've found this book to be pretty impressive. Stuffed Animals: From Concept to Construction http://www.amazon.com/dp/1454703644/ref=cm_sw_r_tw_awdo_VoA1sb00ANH2B
|
|
#
?
Jan 14, 2014 21:57
|
|
|
Comrade Quack posted:I've found this book to be pretty impressive. Stuffed Animals: From Concept to Construction http://www.amazon.com/dp/1454703644/ref=cm_sw_r_tw_awdo_VoA1sb00ANH2B Before I go ahead and buy a book without knowing if I'd even like this, is there some free online resource? I googled but all I found was deviantart stuff which normally isn't my resource database of choice.
|
|
#
?
Jan 15, 2014 00:48
|
|
|
You could check out Abby Glassenberg's blog; she's the one who wrote the book Comrade Quack recommended. She recently posted a very simple free bunny pattern. http://www.whileshenaps.typepad.com
|
|
#
?
Jan 15, 2014 05:16
|
|
|
horriblePencilist posted:I really want to get into making plushs. Do you guys have any good websites, resources etc on getting started? Another book I'm afraid, but I found this very helpful http://www.amazon.com/Creative-Book-Soft-Toys-homecrafts/dp/0861013301/ref=sr_1_1?ie=UTF8&qid=1389784683&sr=8-1&keywords=sue+quinn+soft+toys and you can get it secondhand for very cheap (like a cent plus shipping). While it doesn't really contain lessons, it's great for learning by doing, starting with a super simple three piece squeaky mouse pattern and going all the way to the panda, polar bear and lion cub which are fairly complicated and involved. You'll naturally get a feel for darts, gussets, round end pieces for feet, mixing fabric types and other basic techniques which will stand you in good stead for designing your own patterns. There are 25 patterns in the book, which you can scan and expand to the appropriate size, which works out at less than 20 cents a pattern if you buy it on amazon. It's also one of the few books I've seen which concentrates on toys that use fur fabric rather than fleece, minky, felt or woven fabrics, (there are a few felt projects but the majority are made from fake fur). So if you'd rather make fuzzy critters than the more designer-ish type things you see on a lot of blogs, it's a really good place to start.
|
|
#
?
Jan 15, 2014 12:35
|
|
|
Faux fur can be expensive especially if you're want the nicer stuff; I also find it harder to work with. While it will behave differently than other materials those other materials can be an easier cheaper place to try something out or learn.
|
|
#
?
Jan 15, 2014 16:53
|
|
|
I tried my hand on my very first plush! My mom already has a great machine, I've got material, I know how to make a sphere, let's g- Oh.  Oh. Right now I'm using crumpled scraps of random fabric, I probably ought to get more consistent material. It's fun tho, I'll do some more today. Edit: All y'all modest people in here relax, there's a new worst plushmaker in this thread.  I made him after Glassenberg's bunny pattern and he was mostly a lot of fun to make save for the hand-stiched cleanup work. Just look at how messy he is!  Ugly stiches!  Uneven ears!  Asymmetric face! horriblePencilist fucked around with this message at 18:55 on Jan 16, 2014 |
|
#
?
Jan 16, 2014 13:09
|
|
|
That is adorable in its derpiness. I want to give it a hug.  I used to make intentionally bad plush bunny heads with mismatched eyes, but I don't have pics. I gave a bunch to my sister and she loved them.
|
|
#
?
Jan 17, 2014 02:06
|
|


|
Heehee, that's cute. A couple of tips for your next plushie: Give yourself nice big seam allowances to work with until you get used to sewing. You can trim them down after you sew the machine stitches. Stuff the plush pretty firmly. It will round out the shape, so you don't get that lumpy look where the seams wobble, and it actually makes it easier to hide the hand-stitching. Here's a really great visual guide to sewing a nice, neat ladder stitch to close up your pluhsies. Keep sewing and have fun!
|
|
#
?
Jan 17, 2014 15:31
|
|
|
Thanks for the tips! Ladderstiches is definitely something I'll have to improve on. Do you have any tips for attaching parts like arms along a seam? Attaching the ears was a huge pain and obviously didn't turn out as expected. I actually went out and bought some black and white fleece and cotton, though I haven't decided what to do next yet.
|
|
#
?
Jan 17, 2014 17:16
|
|
|
^^I love the little critter. He looks like a good desk buddy. As for attaching things like arms and legs along a seam, I sandwich it all together and sew along as if it were just a normal, very thick seam. And I try like mad to make sure I don't have to do a closure for where I've stuffed something along an arm/ear/leg since ladder stitching through four layers is a pain in the butt. So many whales, and these aren't even all of them. I like the pattern because I can easily hand stitch a whale in an hour or two. Gives me something to do with my hands on RPG night.   
|
|
#
?
Jan 17, 2014 18:10
|
|

|
flutterbyblue posted:^^I love the little critter. He looks like a good desk buddy. As for attaching things like arms and legs along a seam, I sandwich it all together and sew along as if it were just a normal, very thick seam. And I try like mad to make sure I don't have to do a closure for where I've stuffed something along an arm/ear/leg since ladder stitching through four layers is a pain in the butt. Oh gosh these are adorable. And thanks for the compliments, the lil guy is actually sitting right next to me on my desk. The only problem is that I used hamsterwool to stuff him because it was the only thing around, so I doubt he's machine-washable. I designed my next project but I need some advice. I want to make him look like this:  But I'm not quite sure how to do the face and the appendages. I want to make his face inset, but how can I properly stitch everything shut? I'd like to fold it like the top right illustration, but I don't know for sure how to do it. As for the arms, I'd like to have an alternating black and white pattern. Is the easiest way to have stripes and stitch them altogether? Also, I'm gonna have to stuff the appendages first, don't I? Next, how should I do the buttons? I use fleece, in case this matters, but if I just stitched it on without folding the fabric, wouldn't the ends get loose? Lastly, I'd like to give the body a bit volume. Would a dart similar to the bottom right illustration help? Or should I add some fabric towards the bottom? horriblePencilist fucked around with this message at 18:43 on Jan 17, 2014 |
|
#
?
Jan 17, 2014 18:34
|
|
|
horriblePencilist posted:Oh gosh these are adorable. And thanks for the compliments, the lil guy is actually sitting right next to me on my desk. The only problem is that I used hamsterwool to stuff him because it was the only thing around, so I doubt he's machine-washable. Right For the face, I would do it like this:  1: cut out the main front (green) and another piece in the same fabric (dark green for clarity) rather larger than the face hole you want. place the smaller piece over the area you want the face hole 2: Sew the exact shape and sixe of the desired face hole through both pieces 3: cut out the middle of both pieces inside the sewn lines and slightly smaller than the face hole, and cut slits to the corners of the sewing (take extra care here, you don't want to snip any stitches 4 (not illustrated, it's beyond my MS paint abilities): turn the edges of the smaller piece so it's kind of rolled in place, then you can use a bunch of pins or a couple of little dots of glue to tack it in place, do the same to position the face itself on the back, then topstitch it all in place Not sure that's the clearest explanation or even the best way of doing it, but it's the approach I'd use. To add volume to the body, you could just make the whole thing as a cuboid, with a strip of fabric all the way around between the front and back, you can then attach the arms somewhere along that side by folding them in, between the side and the front, ladder stitch them to it after making the body, or stitch them into circular holes cut in that edge piece horriblePencilist posted:Thanks for the tips! Ladderstiches is definitely something I'll have to improve on. Do you have any tips for attaching parts like arms along a seam? Attaching the ears was a huge pain and obviously didn't turn out as expected. I actually went out and bought some black and white fleece and cotton, though I haven't decided what to do next yet. in general, if you're having difficulties it's probably because your seams are too narrow for either your skill level, fabric or sewing setup. If you were to remake the bunny, you might want to add half a centimeter or so around the pattern and to the bottom of the ears, and just make the seams bigger, you can always trim them after doing the sewing if they're getting in the way when you come to turn/stuff Fatkraken fucked around with this message at 19:18 on Jan 17, 2014 |
|
#
?
Jan 17, 2014 19:13
|
|
|
Not sure if I quite got that. Would the order of fabric be "big piece - smaller piece - face"? I didn't quite get part 3. Where do you attach the face cloth? Also, the stitching would be visible, wouldn't it? And how could I attach the eyes and the buttons? Sorry if this is really obvious stuff, I've never did anything like this before.
|
|
#
?
Jan 17, 2014 22:17
|
|
|

|
| # ? Jun 2, 2024 11:31 |
|
|
horriblePencilist posted:Not sure if I quite got that. Would the order of fabric be "big piece - smaller piece - face"? I didn't quite get part 3. Where do you attach the face cloth? Also, the stitching would be visible, wouldn't it? tell you what, I have some spare fleece, I'll do a mockup and take pics as I go, hopefully that will help explain things. And yes, the stitching attaching the face will be visible, but you can make that a feature rather than a "bug". I'll upload it when I'm done, maybe an hour or so? For the buttons and eyes you have half a dozen different options, depending on the look you're going for. You can use actual buttons (ones with a little post rather than holes), glue on pieces of felt (which won't fray or show weave), applique on felt or fleece either with a straight topstitch and a small seam, a loose zigzag stitch, a very tight satin stitch, hand sew them on with an invisible whipstitch, hand sew them on with a decorative blanket stitch, or just paint them. EDIT: Right, got the tutorial done. It's a little messy as I just did it on the fly, and I made it very small to save fleece, you'll want to take more care and probably make it a lot bigger as it will be easier to manage. Anyway, without further ado: 1: Make your pattern for the main body and for the extra piece you're using to do the face edging. This piece should be rather larger all round than the desired face hole, I added 1cm on each side, you might want to add a bit more  2: Cut pieces from your chosen fabric  3: position the smaller piece on the larger, with the right side up on the large piece and the wrong side up on the small piece. Draw around the face shape onto the smaller piece while in position, using your original pattern  4: machine sew along the line marking out the face. You might want to pin the fabric in place to stop it slipping around  5: cut out the fabric inside the face area, keeping close to the stitch line and clipping the corners to go right up to the stitching.  6: turn the rim of fabric you now have to it's on the back of the main piece. I put a few dots of craft glue around the edge to hold it in place, make sure it;s a glue that doesn't soak through your fabric and it's safe for the intended use of the plush    7: Cut out the face, I use the small piece pattern to get it the right size  8: glue the face in place on the wrong side of the main piece, again be sure that whatever glue you use is safe for the intended user (if it's just a decorative plush for adults, considerations are different than a plush for small children that may be chewed or sucked, this also applied to things like buttons and eyes)   9: Turn the whole thing over then do a neat line of stitching around the face on the RIGHT side of the fabric   10: you're done! Mine is rather messy and ratty as I did it very small to save fabric and very quickly to get this tutorial done, if you do yours bigger and more carefully it should be rather neater This is just how I would approach the problem, given that you wanted the face to be inset. I personally rather like the top stitching around the face, I think it adds definition, but if it's not to your taste you might want to use a different method Fatkraken fucked around with this message at 13:12 on Jan 18, 2014 |
|
#
?
Jan 18, 2014 12:05
|
|