


|
Stabby McDamage posted:Wow, I had no idea. I got several decent chips, but I indicated that I was working with a high school robotics team. I just put that for completeness -- I didn't think it mattered. Maybe it's actually why I got the chips? Yeah, I think I asked for like two midrange AVRs so I don't think I went nuts. I didn't make up a project (that is to say, I actually am working on a thing for my company) but I probably didn't make it sound convincing enough.
|
 #
?
Dec 19, 2013 04:12
#
?
Dec 19, 2013 04:12
|
|


|

|
| # ? May 8, 2024 05:32 |
|
|
Aurium posted:Or if the filament was seeing straight AC, it would be driven negative half the time, which would turn on all of the anodes, but would still prefer the ones that should be on. This would give you 60hz flicker on the rest of the elements. That is exactly what's happening. I grew up with computer monitors, I can spot 60 Hz a mile away. When it was plugged in and hooked up I could see the 60 Hz blink in it, but the elements that should be lit were lit brighter. So it sounds like that is the most likely culprit?
|
|
#
?
Dec 19, 2013 04:29
|
|
|
kid sinister posted:That is exactly what's happening. I grew up with computer monitors, I can spot 60 Hz a mile away. When it was plugged in and hooked up I could see the 60 Hz blink in it, but the elements that should be lit were lit brighter. So it sounds like that is the most likely culprit? It matches the symptoms well, but I'm having a difficult time seeing a potential circuit fault on what we can see that would cause it. I suppose that they could be using some kind of half wave rectifier scheme. After you measure those other components, see if all of the diodes still work as diodes. Be careful, considering one of the zeners is 22v, it's hard to know just how much higher the input voltage would be. How was it connected to the rest of the oven? I assume just though E1 and E2.
|
|
#
?
Dec 19, 2013 05:04
|
|

|
Cyril Sneer posted:I also have a diode question. I was talking to another EE here about RF switching diodes and he mentioned that applying RF without DC on the diode can short the oxide layer. I've never heard of this before. Can anyone point me to some discussion on this? I've never heard of this either. Since you're talking about RF diodes, do you mean something like a GaAs PIN diode? Typically diodes don't have an oxide layer as such, since that would be totally non conductive. Even if you did have an oxide layer, like a MOSFET or pHEMT, I wouldn't think that applying an RF source would cause problems. Maybe if it was higher power it could capacitively jump to the body?
|
|
#
?
Dec 19, 2013 10:05
|
|

|
Are there any clips that hit the contacts or connectors for salvaged HD motors? Soldering onto them is kind of a crappy solution.
|
|
#
?
Dec 19, 2013 20:14
|
|

|
Aurium posted:It matches the symptoms well, but I'm having a difficult time seeing a potential circuit fault on what we can see that would cause it. Just through E1 and E2. They're just 120V AC straight out of the wall. The only other electric in this stove is the igniter for the burners and the bulb inside the oven.
|
|
#
?
Dec 19, 2013 20:44
|
|
|
Things I have learned in the midst of my first major electronics project: 1. The circuitry is only half the cost of production and 2. Custom aluminum engraving sites are the coolest thing ever. Example:  My last board is in tomorrow, my enclosures are in the 27th, then I'm measuring and ordering my Front Panel Express panels and testing to make sure nothing has horribly failed. It's a pretty great feeling.  Kudos on the Extech 330 recommendations. Got some minigrabber leads along with it and it's absolutely what I'm looking for. ")
|
|
#
?
Dec 20, 2013 01:40
|
|

|
Nothing makes you feel so good about a DIY project like a super sleek enclosure. I put almost as much effort into the presentation of my dumb little projects as I do about the project itself. I put my AVR Dragon in a nice little aluminium enclosure but then I started geeking out and building one from scratch with CNC milled sheets and poo poo. I got most of it built too, but then I got a job and had to do some actual work instead. WIll have to finish that some day. The box I have the dragon in right now is pretty okay. I managed to run some light pipes and stuff so it flashes status lights at least 
|
|
#
?
Dec 20, 2013 04:29
|
|
|
kid sinister posted:Just through E1 and E2. They're just 120V AC straight out of the wall. The only other electric in this stove is the igniter for the burners and the bulb inside the oven. The wild wild world of transformerless power supplies. So many cheats. Anyway, I think the best thing to do would be to test the diodes, the regular ones can be tested with it disconnected, but you won't know if the zeners are regulating unless it's plugged in. In addition, the zeners might have wall voltage on them, and if they're whats bad, they might be passing it straight though. So, there's danger there. The electrolytic caps look fine, but look at the base of them to see if they've popped up at all. That's pretty much is the end of the easy things to troubleshoot. From here it's testing the transistors, watching traces on an oscilloscope, and mapping out the circuit to see where everything goes.
|
|
#
?
Dec 20, 2013 06:36
|
|
|
Aurium posted:The wild wild world of transformerless power supplies. So many cheats. How do I test a zener diode? From what I gathered about them, zeners conduct one way below their breakdown voltage and both ways when fed a reverse voltage above their breakdown voltage, is that correct? Because I tried testing them on the board with some jumpers at some batteries, and I don't think that they're behaving right, or at least I can't interpret my voltage readings. Plus I didn't take them off the board when I was testing them, so it's possible that a board neighbor was screwing with them. Fun discovery I made: did you know you can daisy chain 9V batteries together with just their terminals? I saved a bunch of jumpers doing that. edit: I tried to wiggle that big electrolytic cap and I noticed a crunching sound when I did. So I desoldered it and yep, it's leaking. What's weird is that is still tests in spec with my multimeter... kid sinister fucked around with this message at 02:30 on Dec 21, 2013 |
|
#
?
Dec 20, 2013 22:15
|
|
|
Slanderer posted:The RF ADCs that I got from TI were still the craziest sample ever, though. I think they were like $800 each when I got them. Cyril Sneer posted:I also have a diode question. I was talking to another EE here about RF switching diodes and he mentioned that applying RF without DC on the diode can short the oxide layer. I've never heard of this before. Can anyone point me to some discussion on this? ANIME AKBAR fucked around with this message at 01:35 on Dec 21, 2013 |
|
#
?
Dec 21, 2013 01:28
|
|


|
kid sinister posted:The caps all look perfect. Zeners usually work as voltage regulators. Sometimes they're input protection though, but it doesn't look like it in this case. Z2 might be, it's hard to tell. So you need to give them enough voltage to regulate. The simplest way to test is plugging the device in, and seeing what voltages are present. Which is why it's dangerous, if they are being used to regulate, you don't know what they are regulating(unless you trace the circuit out), but I suspect it's the live 120v. Hence the danger warning earlier. Z1 should have 22 volts across it, Z3 should have 8.2v. I can't read the markings on Z2. There's a decent chance that it should be in the 3-5v region to power the uC though. Or it could be input protection for it instead. It's hard to tell from the positioning. That said, if it's either of those, it's very unlikely to be your problem. If it's input protection, it wouldn't cause flicker like that on the output. If it's powering the uC and it's blown or shorted the unit wouldn't work at all. Note the discoloration around Z1, Z3 and R1. They're clearly in the power section, so they're almost definitely being used as power regulators. I reiterate though, be careful measuring them. The can fail in such a way that it would put high voltage in more places. You could take the zeners out of circuit as well, all you need is a resistor to limit current, and a power supply with more voltage than the value of the zener. Another resistor as a dummy load would be good as well. It'd be safer. If you're interested in this approach, here's what you need to know. Model your test circuit after the one at the very top of the page. Testing the other diodes is pretty easy if you have a multimeter with diode test though. You don't need to plug it in, which is why I'd recommend you test them first. Just place it one way, then the other. It should just conduct one way, if it conducts neither way or both ways, take it out of the board. Then test it again as it's possible for the rest of the circuit to affect readings.
|
|
#
?
Dec 21, 2013 02:56
|
|
|
Aurium posted:Zeners usually work as voltage regulators. Sometimes they're input protection though, but it doesn't look like it in this case. Z2 might be, it's hard to tell. So you need to give them enough voltage to regulate. The simplest way to test is plugging the device in, and seeing what voltages are present. Which is why it's dangerous, if they are being used to regulate, you don't know what they are regulating(unless you trace the circuit out), but I suspect it's the live 120v. Hence the danger warning earlier. All the diodes test out fine. The regular diodes all passed the multimeter diode setting test. I removed Z1 and Z3 from the board, but left Z2 after the damage I did to the trace bridging the anodes of Z1 to Z3. It was just a 2-hole trace, I can just bridge them with a jumper wire later. Anyway, they both test fine and within spec. I tested Z2 on the board. It's knockdown voltage is around 4.35V. I can't read the label either without removing it, so I can't get the specs on it to tell if it's behaving like it should. I found a leaking cap. C2 was leaking, barely. It was leaking on its negative side, and that trace also connects to R1, the cathode side of Z3, C6, R4, the buzzer, C7, R23 and... pins 24 and 25 of the VFD. Those are the 2 pins on the end with the burn mark. I don't have a replacement in my parts bin, so that will have to wait a night to get replaced. I also noticed a cold solder joint on C1. I could wiggle one pin in and out of it's hole near R26. Could just a plain old loose connection cause my problem? kid sinister fucked around with this message at 05:24 on Dec 21, 2013 |
|
#
?
Dec 21, 2013 05:10
|
|
|
kid sinister posted:All the diodes test out fine. The regular diodes all passed the multimeter diode setting test. I removed Z1 and Z3 from the board, but left Z2 after the damage I did to the trace bridging the anodes of Z1 to Z3. It was just a 2-hole trace, I can just bridge them with a jumper wire later. Anyway, they both test fine and within spec. I tested Z2 on the board. It's knockdown voltage is around 4.35V. I can't read the label either without removing it, so I can't get the specs on it to tell if it's behaving like it should. 4.3 is a standard zener value. I wouldn't worry about it. You could confirm that it's the power supply by checking to see if it's connected to pin 18 on the chip though. I don't think it's C1, based on the size, shape and placement it's almost certainly the series pass cap, without that nothing will work. Although they could have other things going on as well. C2, though, sounds promising. It's probably the smoothing cap for the power supply. I suppose if it's not doing a good enough job that the filament voltage could drop too low, and thus turn on for everything. I suspect those connections on the VFD it's going to are for the filament. From all those connections, and that it's the negative cap terminal, it's probably the ground side. As far as it still being in spec, if you put it on an ESR meter, I'd say that it'd be awful. Now, someone correct me if I'm wrong, but most multimeters measure capacitance by actually measuring the time constant. Bigger capacitors take longer to charge. This works well enough if the capacitors you're measuring have a low ESR, which new capacitors do. It's also very easy to do. However, if a capacitor has a large resistance it will also take longer to charge. So as the capacitor goes bad it's capacitance decreases, the equivalent series resistance increases and the time constant could potentially stay close enough to not register any problem.
|
|
#
?
Dec 21, 2013 06:53
|
|
|
Aurium posted:4.3 is a standard zener value. I wouldn't worry about it. You could confirm that it's the power supply by checking to see if it's connected to pin 18 on the chip though. Close. R3 is between the anode side of Z2 and IC pin number 18. However, the cathode side of Z2 connects to the widest trace on the board that connects to pins 1 and 22 on the IC.
|
|
#
?
Dec 21, 2013 09:04
|
|
|
kid sinister posted:
I used to short two (almost gone) 9V batteries together like that and feel how warm it got as a kid. The thing about multimeter capacitor testers is that they don't work for testing most failed capacitors, you need something called an ESR meter to properly test (and they can test in-circuit too). I have this: MESR-V2 for hobby use, it works really well for such a cheap meter. Thought if you can find the fault by looking at them there's no need to measure.
|
|
#
?
Dec 21, 2013 10:30
|
|


|
kid sinister posted:Close. R3 is between the anode side of Z2 and IC pin number 18. However, the cathode side of Z2 connects to the widest trace on the board that connects to pins 1 and 22 on the IC. Pin 1 is the ground, and 22 is a test pin that's grounded in use, so that wide trace is ground. So yea, Z2 is power for the uC. Not the problem. Pin 18 is Vcc. The datasheet if you're interested. 9v barrery fun: https://www.youtube.com/watch?v=sjpFJPsu8Cs
|
|
#
?
Dec 21, 2013 19:28
|
|
|
Aurium posted:Pin 1 is the ground, and 22 is a test pin that's grounded in use, so that wide trace is ground. So yea, Z2 is power for the uC. Not the problem. I figured that would be a ground. The biggest traces on boards usually are the ground, at least the ones I've seen. I fixed that cold solder joint, replaced that leaking cap with a brand new one and put back those zeners that I removed, along with soldering a jumper wire across their connecting trace that I ruined. There is no improvement.  I got blinking segments everywhere that shouldn't be lit along with that buzz. I got blinking segments everywhere that shouldn't be lit along with that buzz.
|
|
#
?
Dec 21, 2013 23:34
|
|
|
kid sinister posted:I figured that would be a ground. The biggest traces on boards usually are the ground, at least the ones I've seen. Well, we're getting really close to the limit of what I can do without being able to probe it myself. Where do pins 1 and 2 go on the vfd? It's hard for me to trace though the circuit, but it looks like they go though some resistors then to the transistors. Which seem to be connected via the middle pin somewhere under the display. The other end goes via a resistor somewhere else. Of course it look like the transistors are involved now, so they could be bad. I'd start needing to draw out a circuit to go farther with this analysis, and even then without being able to probe it, all I'd be doing would be shotgun debugging. Which I have some ideas on. If one electrolytic is bad, the other one may be too, replace C7. You could try testing the diodes out of circuit, just to make sure that their faults weren't being masked. D2 and D6 are rectifier diodes. D5 is connected to the what I presume is the bases on the transistors connected to what I presume is the filament power. Can you read the part numbers on the transistors? Are they all the same?
|
|
#
?
Dec 22, 2013 00:29
|
|
|
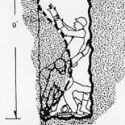
Aurium posted:Well, we're getting really close to the limit of what I can do without being able to probe it myself. Here, I managed to pry the VFD away from the board without destroying it (  ) along with all the button spring clips: ) along with all the button spring clips: Please don't laugh at my resoldering work. Q2, Q4 and Q5 transistors are KSP2907A, Q3 is KSP2222A. Pins 1 and 2 of the VFD both go only to R22. R22 connects to the collector pins of both Q4 and Q5, and also R19 and R21. The base pins of Q4 and Q5 connect via D5 to IC pin D12, and both those base pins also connect via R20 to the collector pin of Q3. It turns out I got a replacement for C7. Give me a second to replace it. It's not in the photo yet. I haven't tested the big diodes yet either. Wish me luck I don't gently caress up these traces either! edit: C7 was bulging out the bottom. I got it off the board it and it doesn't even register on the cap test with my meter. Let me go test to see if it works now... edit2: SONOFABITCH! That was it! No more blinking, no more buzz! This is cause for celebration. Now with a working timer I can bake a pumpkin pie for Christmas. Aurium, if you ever come by St. Louis, I owe you a beer and slice of pumpkin pie. I suppose I should clean off all the fingerprints off the VFD before I go putting it back together... edit3: So what purpose did C7 serve exactly? kid sinister fucked around with this message at 02:41 on Dec 22, 2013 |
|
#
?
Dec 22, 2013 01:57
|
|
|
kid sinister posted:edit2: SONOFABITCH! That was it! No more blinking, no more buzz! This is cause for celebration. Now with a working timer I can bake a pumpkin pie for Christmas. Aurium, if you ever come by St. Louis, I owe you a beer and slice of pumpkin pie. I suppose I should clean off all the fingerprints off the VFD before I go putting it back together... Fantastic! As far as it's purpose, it's definitely a power smoothing capacitor. I believe it's in parallel with D6, though I didn't finish figuring tracing out the connections. D6 I believe is in this case is acting as a half wave rectifier. Basically the diode takes the 60hz AC and chopps off one half, giving you DC that's pulsing at 60 hz. The capacitor smooths this out, by storing energy when it's high and releasing it when it's low. When the capacitor went bad, it no longer smoothed it, and you were left with that pulsing dc. Now exactly how this pulsing DC gets to the VFD I'm not sure, but I suspect is that it's connected to the filament. So between the pulses when the voltage falls too low, bias between the filament and the deactivated anodes is high enough that they all turn on. Aurium fucked around with this message at 03:23 on Dec 22, 2013 |
|
#
?
Dec 22, 2013 02:51
|
|
|
Aurium posted:Fantastic! No, they were both in series, or at least the closest thing that passes for "series" on this board. The negative on C6 is connected to the positive of C7. Holy gently caress, I got it. I did some tracing of how the big component diodes were connected to E1 (that should be the beginning of the circuit, since it's numbered lower, right?) and it looks like it's doing half-wave rectification on both sides of the waveform. Half of the board was on one rectification, the other board half was on the other rectification.
|
|
#
?
Dec 22, 2013 04:28
|
|
|
kid sinister posted:No, they were both in series, or at least the closest thing that passes for "series" on this board. The negative on C6 is connected to the positive of C7. That makes sense. The diode was clearly a rectifier, and I assumed that the negative lead of the cap was a ground, I didn't consider the possibility of negative voltages. When I didn't find a jumper between the the traces I just assumed I missed it. An interesting design to be sure. There's no real standard for component designators. It's often something like top to bottom left to right. Or just in whatever order they were placed onto the board via whatever layout software they used.
|
|
#
?
Dec 22, 2013 05:05
|
|
|
Aurium posted:That makes sense. The diode was clearly a rectifier, and I assumed that the negative lead of the cap was a ground, I didn't consider the possibility of negative voltages. When I didn't find a jumper between the the traces I just assumed I missed it. An interesting design to be sure. So it was something like this? http://metroamp.com/wiki/index.php/Half_Wave_Dual_Polarity_Rectifier So with the smoothing cap on one half of the board not working right, there were still gaps in that waveform rectification. That "ground" where both smoothing caps, the VFD filament (assuming that is VFD pins 24 and 25) and the buzzer were all attached together wasn't really always near 0V like the buzzer and filament expected, causing the buzz and flicker. Does that sound about right?
|
|
#
?
Dec 22, 2013 05:26
|
|
|
kid sinister posted:So it was something like this? http://metroamp.com/wiki/index.php/Half_Wave_Dual_Polarity_Rectifier Sounds right. Usually you declare ground to be unmoving and the rails to move. But that's more a semantics thing. It usually helps with analysis too. For this the resistors on E1 and E2 allow this circuit to float a bit, the series capacitor is potentially on the neutral side as well. So the diodes would be able to pull on the center a bit more than if it was just shorted to neutral. The math would work out either way, but for the VFD it might be more convenient to think of the "ground" moving. I suspect that if you probed it with a scope relative to wall ground, you'd see interesting movement on all of the rails, including the center. Earlier I said that a VFD is like any other tube. They're basically triodes, you can use them as amplifiers too.
|
|
#
?
Dec 22, 2013 06:33
|
|
|
Aurium posted:Earlier I said that a VFD is like any other tube. They're basically triodes, you can use them as amplifiers too. ...but can VFDs go to 11? I'm still trying to wrap my head around negative voltage. If water is analogous to electricity and voltage is the water pressure, then it should follow that negative voltage would be a vacuum? I can understand that, but I don't get how it would be useful, or how you could do any work with it. Also, what do you mean by "series cap"?
|
|
#
?
Dec 23, 2013 01:28
|
|
|
kid sinister posted:...but can VFDs go to 11? Voltage is only useful when compared to a reference. Negative voltage just sets the reference, 0V, at the higher point. Imagine a 12V circuit as water pumped up 12' (power supply) and poured on a 12' waterwheel (load). Imagine negative 12V as water being poured from ground level onto a 12' waterwheel in a 12' hole and then the water being pumped back to ground level. 12V and -12V are exactly the same, just different references.
|
|
#
?
Dec 23, 2013 01:44
|
|

|
I believe Europeans use negative voltage as their standard because they use actual current flow, as opposed to backwards conventional current that Americans use. So to them, it's actually positive that they're using. From what I gather, anyway. I've used a bunch of European equipment on -48.
|
|
#
?
Dec 23, 2013 02:22
|
|
|
kid sinister posted:...but can VFDs go to 11? The cap I'm referring to is C1. Almost all transformerless power supplies have a capacitor in series with the circuit. A highly simplified version of that circuit is as follows: E1--R1--(almost all of the circuit goes here)--C1--R26--E2 There's actually a little bit of stuff in parallel with C1. One thing is just a discharge resistor R25. The other is R8 which might also be directly parallel and thus also discharge; it depends on if there's a trace between the anode of D2 and C5. If there isn't there's more stuff in that loop, and I'm not sure what it does. Here's an app note with a bit more about transformerless supplies. To expand upon asdf32 a little bit, if we call 12v 12' above ground level, and -12v 12' below ground level. We could also call the bottom of the hole 0v, ground level 12v and our tower 24v. Or we can call our water tower 0v, ground level -12v and our hole -24v. ante posted:I believe Europeans use negative voltage as their standard because they use actual current flow, as opposed to backwards conventional current that Americans use. So to them, it's actually positive that they're using. Not in the general case. But there are there are positive ground systems everywhere. Where as most things attack the negative terminal to ground, these connect the positive terminal to ground instead. One common example is old automobiles. There's also a fair bit of -48v telephone equipment. If you use negative voltages you can reduce contact corrosion because you get some limited galvanic protection. You can also occasionally find it on naval equipment, another high corrosion environment. With battery powered equipment it's very easy to declare one terminal ground and the other live and design around it, with many ac to dc converters, you often get one terminal that has been connected to a center tap of a transformer, or earthed to a case or grounded via other means. In that case the choice has been made for you. Now, if your equipment never needs to interface electrically with the outside world you can still declare ground to be positive. But most equipment will use the opposite reference (negative ground), and naive connections will get you shorts everywhere. Aurium fucked around with this message at 02:54 on Dec 23, 2013 |
|
#
?
Dec 23, 2013 02:34
|
|
|
kid sinister posted:...but can VFDs go to 11? Here's how to make it work with water: Just imagine that 0 volts is sea level. If you were a foot below sea level, you could do work by routing water from sea level to the one-foot-below sea level area. The most surprising thing I learned in my EE undergrad was that the water metaphor is incredibly adaptable!
|
|
#
?
Dec 23, 2013 02:41
|
|

|
ante posted:I believe Europeans use negative voltage as their standard because they use actual current flow, as opposed to backwards conventional current that Americans use. So to them, it's actually positive that they're using. I'm not sure what this has to do with Europe. The telco standard for decades and decades is -48, perhaps that's what you're thinking of.
|
|
#
?
Dec 23, 2013 02:42
|
|

|
I think I got it. Voltage is really just a point of reference? And now for the big question: how long do you have to solder by hand before you start to think you're "good at soldering"? You can see my board rework in my picture above. I think I'm poo poo. I couldn't lift those zeners without destroying the trace between them.
|
|
#
?
Dec 23, 2013 02:48
|
|
|
I read an IPC soldering standard that outlined the best practices to detect solder faults and that helped me a lot more than any amount of practice had. If you can look at a joint and know you over/under-soldered it is easy to fix while you're still at the bench.
|
|
#
?
Dec 23, 2013 03:07
|
|
|
Aurium posted:
Why is this?
|
|
#
?
Dec 23, 2013 03:17
|
|
|
ante posted:Why is this? It's basically active cathodic protection. If you have a couple of electrodes in a solution the and apply a DC bias to them, the one that is more positive will be the one that corrodes away. In a positive ground system any wire or connector actively carrying current will always be more negative than ground, so whatever the ground is will corrode first. If you're using a chassis as the return ground path, much more corrosion that can happen before failure than a fine wire or a fragile contact. In the case of cables in ground If you're using an earth return path, or just earthing the positive ground, what you'd end up corroding would usually be some minerals in the dirt rather than your cable. Like galvanic corrosion itself, it's only relevant in the presence of an electrolyte (rain, ocean water etc) and you could make the argument that something's already gone wrong if one has gotten in that's the case. But mostly it went by the wayside because most things are negative ground, and standardization and ease of interfacing trumped out. kid sinister posted:I think I got it. Voltage is really just a point of reference?
|
|
#
?
Dec 23, 2013 05:18
|
|
|
Hopefully this is a decent thread for this. I'm fairly handy with appliance repair. Have soldered relays in electric ovens and fixed LCD monitors by replacing capacitors...but microwave ovens have always seemed a little spooky to operate on. The other day my microwave oven, about 5 years old, was cooking along just fine. While it was running I noticed the food inside was getting close to boiling over so I did what I've done 1000 times before - opened the door quickly to stop the cooking and let the food bubble down for a moment. Usually this simply pauses the microwave and turns on the inside light. This time it cut all power to the microwave as if someone had just unplugged it from the wall entirely. What on earth? Breaker wasn't popped. Unplug/replug got me nothing. No clock, no beeps, no inside lights...dead. So I popped off the front cover and went for the most obvious looking part, a 250v 20a ceramic fuse right near where the main power comes in. Popped it out and a quick test with the multimeter showed it was indeed blown. Easy fix, right? Went to radio shack, got a replacement for a few bucks, popped it back in. Lights and clocks and beeps! Put a cup of water in there (so not to run it empty) and fired it up. It buzzes its usual buzz and the tray rotates. Great! I fixed the microwave..right? Until the wife informs me an hour later it isn't actually heating anything. My test was too short. I put a cup of water in for two full minutes - usually enough to make it too hot to touch. It comes out cold. So..what on earth would blow the main 20a fuse on a microwave when opening the dang door that would then not blow the fuse again afterward..but apparently prevent the actual magnetron from firing? Is there another fuse tucked away somewhere? Is this a bad capacitor (the big daddy one lying next to the magnetron that I know enough NOT to touch) or a magnetron that shorted and then somehow failed open circuit? Thanks in advance for any thoughts. Its a microwave that matches the kitchen and is built into the deal over the oven..so it'd be nice to fix it instead of try to find another that fits in the gap, lines up with the vent hole to the outside of the home, matches, etc.
|
|
#
?
Dec 23, 2013 06:26
|
|
|
Aurium posted:What's your soldering iron? Weller WP35 with a couple different tips I use depending on the size of what I'm working with. I thought it was a 45W iron, but according to google it's a 35W iron. I picked it up at my local hobbyist store. I didn't spend $50 like they want online for it though, more like $35, not including the separate tips. Did I get a knock off? I also got a 15W-or-30W switchable Radio Shack iron in my parts bin some place. I didn't like that thing since I could never get the tip to tin no matter what I did to it.
|
|
#
?
Dec 23, 2013 07:27
|
|
|
A lot of little things can make it harder to solder, looks like the WP35 isn't temperature regulated which is a big downside for electronics, as soon as you apply the tip to the PCB it drops in temperature. A big deal for high end production grade soldering is having irons that have proper temperature regulation, power AND a good thermostat is the core of a good iron. Having the right tip is also important to get good heat transfer, for normal trough hole use a 2-mm chisel tip, for surface mount use some kind of tiny chisel or a round tip. Making sure you're cleaning the tip properly is important, a sponge is used to removing oxidation on the tip IIRC, while the steel/brass wool is used for cleaning excess solder, never put the iron away without solder on the tip. Use leaded tin unless you have some good reason for not using it, avoid mixing leaded and non-leaded tin. Avoid using a solder pump, they tend to destroy low quality PCBs, and can damage high end ones too, use a solder wick/braid and make sure you're using flux, I've heard good things about flux pens too. Don't get flux meant for water pipes, it's acidic and will eat your circuit. Also everyone should have watched these videos from Pace about proper technique: https://www.youtube.com/watch?v=HKX-GBe_lUI The whole series is on their channel, great way to spend christmas, be sure to check out the rework & repair videos too. longview fucked around with this message at 10:26 on Dec 23, 2013 |
|
#
?
Dec 23, 2013 10:20
|
|
|
The WP35 is actually temperature controlled, it's just permanently set to 850F. In a perfect world you'd have a little more power, and a little lower temperature, but based on the soldering around the capacitor, it looks like it'd work fine. I've never heard of knockoffs in this area so I wouldn't worry too much about if you got a knockoff. Don't use the radio shack one. Fixed power ones like that are basically all terrible, only useful for needing a soldering iron at the absolute cheapest price. And wood burning. Also, add flux. Your solder almost certainly has it in its core. It'll say something like flux core or rosin core (or more rarely no clean, or water soluble), and if not I'd go buy some new solder immediately, but that only helps you when you're adding solder to the board. Aurium fucked around with this message at 22:25 on Dec 23, 2013 |
|
#
?
Dec 23, 2013 20:49
|
|
|

|
| # ? May 8, 2024 05:32 |
|
|
More power and temperature? I'm pretty green to soldering but I've done all my soldering at 680F with eutectic solder on my Hakko and had great results. Or am I messing something up? 
|
|
#
?
Dec 23, 2013 22:53
|
|