


|
Wormil, you have motivated me to finally take a class. The local community college offers a night class for woodworking at a high school very close to my house. I think it is 1 night a week for 8 weeks and all of $75. I'm sure I'd get something out of it.
|
 #
?
Oct 9, 2014 22:00
#
?
Oct 9, 2014 22:00
|
|


|

|
| # ? May 30, 2024 22:48 |
|
|
Tim Thomas posted:not that I'm anything beyond beginner, but I have found that woodworking is an interesting combination of simple things that build up to a much more complex whole. Learning how to chain them together in a pleasing way is really where the skill and craft comes in, but I am at a loss on how someone could truly teach that. That's more of a design and class sort of thing. This is exactly right. That's why I'm hoping to take some straight-up design courses in the future. I find that my actual woodworking skills are no longer what is limiting the scope of my projects. It's now become a struggle to make something unique or elegant using the plentiful resources that i have.
|
|
#
?
Oct 9, 2014 22:38
|
|

|
Hand planes are fun and I've really enjoyed incorporating them more, if only for the visceral connection they provide to the woodworking process. But you know...There are also times I really wish I had a 12 inch jointer.
|
|
#
?
Oct 10, 2014 02:58
|
|

|
Jointer or thickness planer? I have a thickness planer, and it's super handy...but I still haven't learned to use a regular hand plane properly. Last time I was at Home Depot I picked up a small sheet of .05" acrylic. I'm thinking if I clamp this to my router fence, then I can turn my router into an ad-hoc jointer -- just rig the router with a straight bit to remove .05" and run a board past. Haven't tried it yet since I have other projects I have to force myself to finish, but the concept seems sound at least. I had a hell of a time finding anyone at Home Depot who could help me find a thin, reasonably sturdy piece of material though. They kept trying to convince me to get a sheet of plywood.
|
|
#
?
Oct 10, 2014 03:26
|
|

|
I think it was in the Wood Whisperer videos that such a thing was demonstrated. In his case, I think he used some thick paper, like cardstock or something.
|
|
#
?
Oct 10, 2014 03:45
|
|


|
TooMuchAbstraction posted:Jointer or thickness planer? I have a thickness planer, and it's super handy...but I still haven't learned to use a regular hand plane properly. Are you trying to do this with a loose router or a router table? I've done exactly what you described with my router table and a .063" sheet of steel. The only downsides are that the max thickness you can joint is however tall your longest bit it, and that I never incorporated a featherboard or other forcing method so sometimes the workpiece can lift off the bit a little bit and force me to make another pass to clean it up.
|
|
#
?
Oct 10, 2014 04:39
|
|

|
oXDemosthenesXo posted:Are you trying to do this with a loose router or a router table? I've done exactly what you described with my router table and a .063" sheet of steel. The only downsides are that the max thickness you can joint is however tall your longest bit it, and that I never incorporated a featherboard or other forcing method so sometimes the workpiece can lift off the bit a little bit and force me to make another pass to clean it up. Router table, definitely. I've no idea how you'd set that up to work with a handheld router. I'm sure it's possible somehow but I wouldn't want to try it. I work pretty much exclusively with 4/4 wood, so I should be fine as far as board thickness is concerned. I have a featherboard, but it might be tricky to set up for wider boards. Still, having to make a second pass is not a huge deal.
|
|
#
?
Oct 10, 2014 04:43
|
|
|
TooMuchAbstraction posted:Router table, definitely. I've no idea how you'd set that up to work with a handheld router. I'm sure it's possible somehow but I wouldn't want to try it. I did this once. I was working on a friends house and needed to make some stepped shims to repair a door. Worked, but it was scary as hell. I didn't have to pass the whole piece over he blade, which is the only reason I had the balls to do it. I had taken a picture of the setup but I lost it when I formatted my phone. Today's shop project:   That's a 3" radius btw. Unfortunately I didn't get a chance to take a picture of the shaper blade before we returned it. It was scarily huge.
|
|
#
?
Oct 10, 2014 07:15
|
|
|
Few weeks back there was some discussion about building a table with solid wood arrayed around the center. Here's your answer, jump to 7:40 https://www.youtube.com/watch?v=IM84dgqN264
|
|
#
?
Oct 10, 2014 08:10
|
|

|
Bad Munki posted:I think it was in the Wood Whisperer videos that such a thing was demonstrated. In his case, I think he used some thick paper, like cardstock or something. Steve Ramsey did a video on it too a while back. Using a split fence on the router table as a jointer is a good idea. https://www.youtube.com/watch?v=H6nql7mlSOo A lot of commercial ones actually come with split fences, mine does.
|
|
#
?
Oct 10, 2014 18:24
|
|

|
Several years ago Shopsmith made a dedicated router based jointer with adjustable infeed and outfeed tables that slide on an incline. It looks really cool but I don't know why anyone would bother unless you wanted a permanent edge jointer. I couldn't even find a picture of it after 30 intensive seconds of looking.
|
|
#
?
Oct 10, 2014 19:33
|
|
|
I was lucky enough to visit La Sagrada Familia today, and I came up with a pretty neat Idea for a bench that uses a variety of forms Gaudi used. The one that I am most excited to execute is on his double helical tapered column, like so: http://www.sagradafamilia.cat/sf-eng/docs_instit/geometria1.php . I have an idea of how to do a single taper using a cove bit in a router and a compound angled sled so long as the beginning stock is hexagonal, but I am going to have to come up with something else to cut the countertwist unless I make a legit full sled instead of just referencing an external surface and the vertex of the hexagon as shown in the link. That is probably easiest although the least fun, I expect there is a clever setup I could use instead. This gets over to wormil's point earlier: there isn't anything hard about this operation once it is figured out, one just has to figure it out.
|
|
#
?
Oct 10, 2014 20:27
|
|
|
I have something I want to run by you guys. I'm thinking of experimenting with an exposed spline. I've never seen it done which sets off alarm bells but I don't see anything inherently wrong with it. Imagine 2 boards edge joined with a spline that is too long. Wood is 3/4" thick. Spline is 1/2" thick by 1" long. Gap is 3/8". Reveal is 1/8". The picture is horizontal but these will actually be vertical sides on a box (the spline running horizontal).  The reason is I have a 4.5 wide board and need it 8" wide. I could simply edge glue it but I want a decorate element. This is a box that will receive minimal handling. I'm not seeing a problem but want a 2nd opinion.
|
|
#
?
Oct 10, 2014 20:40
|
|
|
So long as you are aware that the resulting panel will be approximately the strength of the half inch piece you will be fine. I have seen that done on floating panels as the spline connecting the panel and the frame as a decorative element on modern furniture before and it looks very nice. Temped to do some sort of transitional piece with that sort of look and a dyed spline, let us know how it turns out.
|
|
#
?
Oct 10, 2014 20:56
|
|
|
It really depends on your spline material and how much stress the joint is going to be under. Usually with a spline joint, the spline is overlapping the joint and reinforcing the existing pieces. In this case all the stress will be entirely on the spline itself. If the spline's grain is parallel to the joint, you're going to actually have a much weaker joint than if you had just put the edges together. Of course, if you're using a plywood spline instead of solid, you're in the clear. Edit: Posted in the OSHA.jpg thread already, but yesterday one of the guys in the shop next door to mine put his hand through a jointer. Lost a third of his right ring finger and didn't even scream. The day before, he came to ask a question and stated "We're not professional woodworkers over here, so I'm not sure about [project issue]" Skinny Bins fucked around with this message at 01:11 on Oct 11, 2014 |
|
#
?
Oct 10, 2014 21:04
|
|
|
Tim Thomas posted:So long as you are aware that the resulting panel will be approximately the strength of the half inch piece you will be fine. Yep, totally fine with that. Skinny Bins posted:It really depends on your spline material and how much stress the joint is going to be under. Usually with a spline joint, the spline is overlapping the joint and reinforcing the existing pieces. In this case all the stress will be entirely on the spline itself. If the spline's grain is parallel to the joint, you're going to actually have a much weaker joint than if you had just put the edges together. Of course, if you're using a plywood spline instead of solid, you're in the clear. The spline will be padauk, joining 2 pieces of mystery wood. Something given to me along with some ipe, same weight and also very hard but darker and tighter grained. Might be ipe that looks different than the other ipe.  I might put a filler piece in the back of the joint just to beef it up a little, that would make the spline 5/8" at the weakest point. I might put a filler piece in the back of the joint just to beef it up a little, that would make the spline 5/8" at the weakest point.
|
|
#
?
Oct 11, 2014 04:27
|
|
|
wormil posted:I have something I want to run by you guys. I'm thinking of experimenting with an exposed spline. I've never seen it done which sets off alarm bells but I don't see anything inherently wrong with it. Imagine 2 boards edge joined with a spline that is too long. I wouldn't be worried about the spline breaking, I'd be worried about it cracking along the inside corners and just falling open
|
|
#
?
Oct 11, 2014 06:16
|
|

|
I haven't had the time to actually do this yet, but I have an idea for misusing a biscuit joiner. I mostly use mine in tandem with a pocket hole jig for really quick and dirty plywood work (shop cabinetry, tool hangers, etc). I like it for that, it makes a kreg jig really accurate and it makes dealing with giant panels really, really easy. For things that matter, I've fully drunk the Dowelmax coolaid. I'm thinking that it'd be possible to do a long sliding cut with a biscuit joiner to make internal spline joints. Bang out some long splines with the grain oriented correctly and a biscuit joiner could actually make some viable joints instead of just doing quick alignment work. Can even take advantage of the full cut depth some joiners have past #20 size. Anyone ever do this? Hypnolobster fucked around with this message at 13:12 on Oct 11, 2014 |
|
#
?
Oct 11, 2014 12:55
|
|


|
That sounds interesting, don't see any reason it wouldn't work, but I haven't used a biscuit joiner in years so I might be forgetting something. In other news, so worth it.  Cleaned out my tablesaw with it (really needed it, so lots of fine sawdust... can't see any in the vac itself. Now to get some proper tubing and adapters and make a little cart for it. My shop is rather small, so I was thinking of a design that would put the cyclone stacked above the vac. Not sure if stability would be an issue though, I'd certainly need a larger and heavier base. I think it's also time to get a decent flexible hose, 2-3" 10+ft. Suggestions?
|
|
#
?
Oct 11, 2014 14:24
|
|
|
Don't use corrugated tubing. And be careful of static buildup.
|
|
#
?
Oct 11, 2014 14:28
|
|


|
What would you recommend using?
|
|
#
?
Oct 11, 2014 14:50
|
|
|
bimmian posted:What would you recommend using? Got one of mine from home d and one from woodcraft. Love the deputy! I double bucketed my deputy and put it on wheels for extra mobility.
|
|
#
?
Oct 11, 2014 15:03
|
|
|
Hypnolobster posted:I haven't had the time to actually do this yet, but I have an idea for misusing a biscuit joiner. I've done this. It works, but it can be hard on the blade. It depends on the density of the material, but i find that the dust chute on on my joiner gets clogged pretty quickly when i do bigger cuts.
|
|
#
?
Oct 11, 2014 15:47
|
|
|
Well the exposed spline turned out to be more trouble than expected but not because of the design. Once I saw the spline, all my worries about being strong enough vanish. No, the problem turned out to be the padauk which bowed like crazy soon as I started cutting. It bowed so much I had to finish cutting the spline on the bandsaw but my crappy BS isn't very precise. And my TS featherboard isn't strong enough to push the bow out so I couldn't trim to final thickness. The planer was no help, it wouldn't push the bow out either and acted like a jointer so the piece ended up thin in the center and thick on the ends. I almost gave up and used a different wood but the paduak looks so awesome with the mystery wood I decided to use the thinner waste piece, which is only about 1/32" thinner than the groove, and shim it. The glue is drying now but it seems to have worked out fine. The finished box will be an urn so the shimming won't matter since no one will see the inside. And I'll probably fill the inside groove with a wood strip anyway. I'll post pictures later.
|
|
#
?
Oct 11, 2014 20:41
|
|
|
bimmian posted:That sounds interesting, don't see any reason it wouldn't work, but I haven't used a biscuit joiner in years so I might be forgetting something. I did exactly what you're describing and it works great. My shop is super tiny so every bit of space is precious, and keeping dust down is super important. I've just used the hose from the shopvac instead of dedicated tubing so I can disconnect it and use for other things. The whole thing was slapped together in an hour or so, so it looks like hell and could be much more elegant. I'm using the 10' long 2-1/2" diameter hose from Woodcraft. I highly recommend the threaded adapters for the end like this: http://www.amazon.com/dp/B00KB826IU/ref=pe_385040_121528360_TE_dp_1 
|
|
#
?
Oct 11, 2014 21:43
|
|
|
Where's the bowl turning gurus? I've recently done a lot more turning, and have a problem with sanding. I've blown through three 3" sanding pads in the past two months, and at around $15-20 a pop, I'd rather not keep having to buy them. I learned to put my lathe on low low low speed while sanding, but still, every once and a while, the pad gets pulled downward with the spin of the bowl and the foam that sits between the hook-and-loop top and the drill bit bottom gets a tear. A couple good tears and the pad blows up. Any advice? Should I stick with those type sanding pads? Are there any other (or better) options?
|
|
#
?
Oct 11, 2014 23:19
|
|
|
oXDemosthenesXo posted:I did exactly what you're describing and it works great. My shop is super tiny so every bit of space is precious, and keeping dust down is super important. I've just used the hose from the shopvac instead of dedicated tubing so I can disconnect it and use for other things. The whole thing was slapped together in an hour or so, so it looks like hell and could be much more elegant. Nice, that looks like a good design, mine will end up looking pretty close. I actually bought one of those hoses at woodcraft this morning, 40% off right now.
|
|
#
?
Oct 12, 2014 00:27
|
|
|
I really need to stop buying tools. This and last weekend's acquisitions from estate sales for a grand total of $47: Stanley #7, 5, 4 and 3C. Berg gouge and random gouge. Gent's dovetail saw.
|
|
#
?
Oct 12, 2014 23:08
|
|
|
wormil posted:Few weeks back there was some discussion about building a table with solid wood arrayed around the center. Here's your answer, jump to 7:40 I asked about that, and this is cool. In other news I got a benchdog router table and its great except for the part where the router insert doesn't have ruler markings on it.
|
|
#
?
Oct 13, 2014 00:01
|
|


|
Cpt.Wacky posted:I really need to stop buying tools. This and last weekend's acquisitions from estate sales for a grand total of $47: Goddam those #7 go for $100+ around here by themselves.
|
|
#
?
Oct 13, 2014 00:43
|
|
|
Stavrogin posted:Where's the bowl turning gurus? I've recently done a lot more turning, and have a problem with sanding. I've blown through three 3" sanding pads in the past two months, and at around $15-20 a pop, I'd rather not keep having to buy them. I learned to put my lathe on low low low speed while sanding, but still, every once and a while, the pad gets pulled downward with the spin of the bowl and the foam that sits between the hook-and-loop top and the drill bit bottom gets a tear. A couple good tears and the pad blows up. I turn the lathe on and sand by hand with hook and loop disks for my ROS. Probably not the cheapest way to do it, but I keep a stack of them next to the lathe and they generally last quite a while.
|
|
#
?
Oct 13, 2014 10:58
|
|


|
LordOfThePants posted:I turn the lathe on and sand by hand with hook and loop disks for my ROS. Probably not the cheapest way to do it, but I keep a stack of them next to the lathe and they generally last quite a while. Dumb question, but how do you know when the sandpaper is used up? I normally feel out with my fingers but it's not very scientific. Always wondering and thinking maybe I'm not doing it right, those discs are 1.25$ / per at home depot! The harbor freight ones are 1.00$ but I agree with reviewers they don't seem to last as long
|
|
#
?
Oct 13, 2014 11:20
|
|
|
Here is the sprung joint article noted in that video linked above about wood expansion - http://www.finewoodworking.com/item/26796/spring-joints-an-edge-glue-ups-best-friend/page/all Neat concept, I assume you still glue all the surfaces in a panel while doing this or just the center? This is unclear but I'm pretty sure you still glue everything.
|
|
#
?
Oct 13, 2014 12:50
|
|
|
dhrusis posted:Dumb question, but how do you know when the sandpaper is used up? I normally feel out with my fingers but it's not very scientific. Always wondering and thinking maybe I'm not doing it right, those discs are 1.25$ / per at home depot! The harbor freight ones are 1.00$ but I agree with reviewers they don't seem to last as long I generally just go by feel with sandpaper. When it doesn't feel like it's doing anything anymore, I switch. Or I vaccuum it clean, which helps a bit to unclog the grit.
|
|
#
?
Oct 13, 2014 17:06
|
|


|
Sylink posted:Here is the sprung joint article noted in that video linked above about wood expansion - http://www.finewoodworking.com/item/26796/spring-joints-an-edge-glue-ups-best-friend/page/all Glue the entire edge. The point is to prevent the glue lines separating near the end grain which will shrink faster than the rest of the board. Sealing the end grain well also helps.
|
|
#
?
Oct 13, 2014 17:36
|
|
|
I'm interested in getting into this. I ordered a handful of books recommended throughout the thread (thanks wormil!), a No. 4 planer, and a small chisel set, and I've already got a handful of tools inherited from my girlfriend's grandfather. My plan is to start with a coat rack for the front entry way. Shelf for hats, scarves, etc. and obviously pegs below. Even if I don't use all the tools I've bought, I'd like to try building other things in the future. This seems like a good starting project. The big thing I'm lacking is a good way to cut wood. A table saw might be in the budget, but my garage is pretty small. I'd probably need something that I can collapse and tuck away. I'm not opposed to using a hand saw, but I guess that'd get old quick. Another option would be to cut it elsewhere--my parents have a radial arm saw--but hauling the wood seems like a bitch. Any thoughts? E: Durn, my local community education does a woodworking class, but it started two weeks ago. Maybe in the Spring! ColdPie fucked around with this message at 00:52 on Oct 14, 2014 |
|
#
?
Oct 14, 2014 00:47
|
|

|
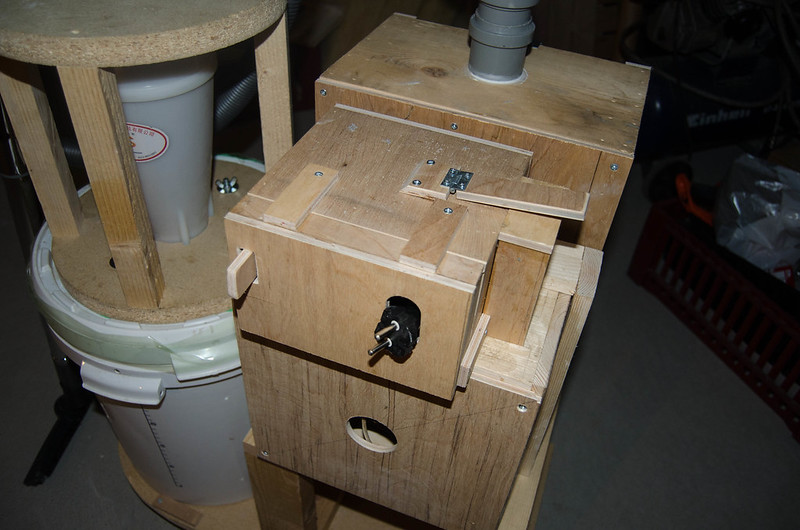
His Divine Shadow posted:Wire retracts when you push the switch to it's left. The switch on top is the power switch. The motor speed adjustment is on the front of the box, you can see it in other pictures a bit. I think this is a really cool project. I like seeing how you came up with ideas for features you wanted and figured out how to incorporate it. Stuff like that is pretty neat.
|
|
#
?
Oct 14, 2014 01:11
|
|


|
Decided to start a four-color cutting board project that I've been thinking about. This requires me to have equal-sized boards in my four colors: maple, padauk, purpleheart, and sapele. Unfortunately the padauk board is only about 5" wide, so I doubled it to 10". Also unfortunately, my maple board is 8" wide... No real question, I'm just disappointed in my lumber stash. Best I can figure is cut a 2"-wide strip of the maple and glue it to a full-width section, but it still rankles.
|
|
#
?
Oct 14, 2014 01:37
|
|
|
know what really rankles? I couldn't put time in the workshop in for months. I finally get back in, with a full 3 day weekend ready to tackle like 5 different projects. First day, I do some much needing cleaning and re-organization. Oh yes, this will be good. Fire up the planer - it's humming along just fine until I hear the cutterhead just start to... slow down. Then stop. Cue an awful, acrid burning smell. With my DC running, I figure the motor has given up its magic smoke... I pull the drat thing apart, and when I finally get to the belt cover, I pop it off... the micro-groove v-belt has run out of its grooves and into the side of the planer, which is what caused it to seize. I take the tension off the belt, put it back on track (it was frayed but still together), but I notice a patch of 2 (out of 6) grooves is coming off. I get it back up to speed again and it goes along fine for a bit, until the same slowdown->rubber burning smell. I pop off the belt cover and, yet again, it has run off the grooves. Sad face. Got it to run one last time before a whole patch of the 6 grooves was gone. So anyway, a 3-day weekend in the shop turned into a morning of planing wood and an afternoon figuring out what the gently caress happened. No belt-supplying places are open sunday, and today was a holiday (go canada!), and tomorrow I'm out in the wilderness photographing... and all of my projects are destined to NEVER BE FINISHED. And everywhere online wants to charge $20/belt + $30 shipping. All of that being said - does anyone know why this would happen? Would the belt fail just from getting really hot? And why would it run out of the grooves - would it happen because of belt fragments getting in the fast spinnng belt? Each time the belt went off, it was after I tightened the cutterhead lock... It's a Delta 22-580 if that helps, and it's probably 10-15 years old... so maybe the belt just wasn't as elastic as it used to be?
|
|
#
?
Oct 14, 2014 02:47
|
|

|

|
| # ? May 30, 2024 22:48 |
|
|
SkunkDuster posted:I think this is a really cool project. I like seeing how you came up with ideas for features you wanted and figured out how to incorporate it. Stuff like that is pretty neat. Thanks, I am pretty much making it up as I go. I really need to make a new bucket, the vacuum in it is not good enough and that ruins the cyclones efficiency a lot. It's a lot better after I went over the bucket with sealant but the lid is still not good and the tape isn't a perfect solution. I got to witness as it failed to separate really fine particulates when I used it to vacuum the fireplace of ash. The filter might also leak, need to make a gasket, I wonder if I can make an improv gasket by just squeezing out a line of silicone and letting it dry, then squeeze the filter tight against it. Really this is what is most trouble, finding and sealing all the air leaks. And I think I still need a good quality filter after the motor to collect the last particulates, some kind of HEPA vacuum bag perhaps... In other news I went to a 2nd hand store and found a bit & brace with a nice ratcheting mechanism and a good selection of bits for just 6 bucks. Already have a brace that's got a nicer ratcheting mechanism but for the price I would have bought just the bits. Even had a big flat screw mounted, which is something I've needed before. Also work gloves with build in led lights, for only 5 bucks, will wonders never cease? Also, my table saw has always been standing on these wooden legs that where put there by the previous owners, it raised the table to waist level, now that they're gone it's about the height of my wrists as they rest by my leg, which I guess is the supposed ideal for workbenches, but it feels weird to have the table saw this low. But it needed to come off since I'm building a mobile base for it finally. Got some castor wheels that are rated for 150lbs each, I think all 4 of them will be enough to support the saw at least for the short wile it will be raised for moving it about. His Divine Shadow fucked around with this message at 08:53 on Oct 14, 2014 |
|
#
?
Oct 14, 2014 08:47
|
|
