


|
Chillyrabbit posted:Should I be able to fit D10 by itself onto the wheel? It feels like the curve is off. Oh sorry I was looking at the wrong side of the instructions. Yes, D10 should fit right on the wheel.
|
 #
?
Feb 23, 2015 05:39
#
?
Feb 23, 2015 05:39
|
|


|

|
| # ? Jun 5, 2024 19:43 |
|
|
Ensign Expendable posted:Oh sorry I was looking at the wrong side of the instructions. Yes, D10 should fit right on the wheel. Ok wiggling it really hard makes it sink into the wheel,I wasn't sure if I was bending it too much. I wish this kit had multi lingual instructions as I am guessing that's the warning in that smaller window.
|
|
#
?
Feb 23, 2015 05:45
|
|


|
The Locator posted:And the main deck planking is all placed. The little indent-y things where the planks go past the various bit of deck furniture make me so loving happy. It's so neat. I can't wait to see the finished thing!
|
|
#
?
Feb 23, 2015 15:58
|
|
|
Chillyrabbit posted:Ok wiggling it really hard makes it sink into the wheel,I wasn't sure if I was bending it too much. I wish this kit had multi lingual instructions as I am guessing that's the warning in that smaller window. It just says something along the lines of 'make sure to get it placed on the correct side'.
|
|
#
?
Feb 24, 2015 04:17
|
|


|
I'm lazy and don't like painting, so I decided the best way to get into it is a fun paint job based on this: https://www.youtube.com/watch?v=bN0Jcd_XrGg 
|
|
#
?
Feb 24, 2015 06:01
|
|

|
https://www.youtube.com/watch?v=-FuFEO_-ZtY I converted my two decade old playmates model to have lighting. Far from perfect, but I'm quite happy with it. Now to build a shitload of the 1/350 ones.
|
|
#
?
Feb 24, 2015 06:31
|
|


|
cursedshitbox posted:https://www.youtube.com/watch?v=-FuFEO_-ZtY That's awesome.
|
|
#
?
Feb 24, 2015 07:11
|
|


|
ScottyWired posted:I'm lazy and don't like painting, so I decided the best way to get into it is a fun paint job based on this: Is that a 1:48 McDonnell Douglas F-15 Eagle? It looks lovely. What make is it? I've always wanted to try one. I've just started this whistling death as my next project. Compared to the modern jets it is tiny and I'm really looking forward to trying the paint on it.  
|
|
#
?
Feb 24, 2015 23:56
|
|

|
big_g posted:Is that a 1:48 McDonnell Douglas F-15 Eagle? It looks lovely. What make is it? I've always wanted to try one. That's the Tamiya one, yes? is it 48 or 72 scale?
|
|
#
?
Feb 25, 2015 04:18
|
|


|
Jonny Nox posted:That's the Tamiya one, yes? It is indeed the Tamiya kit and it's in 1:48 scale. It is kit number TA61085 for those interested.
|
|
#
?
Feb 25, 2015 15:26
|
|
|
I started building models a few weeks ago and while slowly getting better I still have some trouble with getting colour to work correctly. I started working on the Revell VW Beetle Limousine 1968, which I plan on "converting" into a Herbie by slapping some fitting decals on I found in Japan. I really don't like how the colour tends to accumulate at the very edges of this engine cooling unit.  I'm using Revell Aqua Color thinned to a fluidity somewhere between cream and milk (more on the milk side). Anything I can do to make these edges look better? (disregard the marks to the lower left, theres going to be stuff right in front)
|
|
#
?
Feb 26, 2015 01:32
|
|


|
Are you sure that's the paint accumulating at the edges? It seems too uniform, like it was a tiny seam that was invisible until paint was applied. If it's definitely the paint, I assume you're brush painting? If so, you don't need to thin the paints too much for brush painting, just make sure each coat is as thin as possible, to where you're almost dry brushing. It'll take a bunch of coats, but it'll ensure you don't get blobs of paint anywhere. Adding a tiny drop of dish detergent to the paint can help break up the surface tension as well, helping the paint flow and settle better.
|
|
#
?
Feb 26, 2015 02:28
|
|

|
EDIT: disregard, misinterpreted post.
|
|
#
?
Feb 26, 2015 02:30
|
|
|
Thanks hedgehog, i'll try with the detergent.
|
|
#
?
Feb 26, 2015 08:33
|
|
|
Crossposting from the Miniature painting/modelling thread, but I'm very pleased with how this A-wing came out. It was my first time messing around with oil washes, gloss/matte varnishes and trying out painting engine glow   
|
|
#
?
Feb 27, 2015 05:51
|
|


|
Pretty spiffy! I've been tempted to do some Star Wars kits of late. Seems like a good place to try out oil filters.
|
|
#
?
Feb 27, 2015 07:28
|
|

|
Commissar Canuck posted:Crossposting from the Miniature painting/modelling thread, but I'm very pleased with how this A-wing came out. It was my first time messing around with oil washes, gloss/matte varnishes and trying out painting engine glow Looks great! Let's hope that Bandai releases an A-Wing kit, so that we don't have to hunt for +20 year old ones. Here's mine. No engine glow, though. I've got to learn that technique. 
|
|
#
?
Feb 27, 2015 12:25
|
|

|
Advice for a novice model shipbuilder needed. I've bought a 1:350 scale flower-class corvette model, which should measure up to a little over 7 inches in length once assembled. With model ships of this size, is it better to paint the components before assembly or do you think I'll be safe to assemble it in the meantime then paint it afterward? The kit I've gone for is this one: http://www.britmodeller.com/forums/index.php?/topic/234933975-in-the-box-review-of-mirage-hobbys-1350-hms-anchusa/ - it's supposedly not too complex to put together and in terms of this particular class of ship, which I wanted to model as it was the class my grandfather served on, it was between Mirage's range and Revell's �100 1:72 monster, which I don't think I'm ready to tackle as a newcomer.
|
|
#
?
Feb 27, 2015 15:41
|
|

|
Owlkill posted:Advice for a novice model shipbuilder needed. I've bought a 1:350 scale flower-class corvette model, which should measure up to a little over 7 inches in length once assembled. With model ships of this size, is it better to paint the components before assembly or do you think I'll be safe to assemble it in the meantime then paint it afterward? The kit I've gone for is this one: http://www.britmodeller.com/forums/index.php?/topic/234933975-in-the-box-review-of-mirage-hobbys-1350-hms-anchusa/ - it's supposedly not too complex to put together and in terms of this particular class of ship, which I wanted to model as it was the class my grandfather served on, it was between Mirage's range and Revell's �100 1:72 monster, which I don't think I'm ready to tackle as a newcomer. I'm a newcomer too, but what I found to be working best for ships for me personally is to assemble the hull and deck-> paint that -> assemble any larger on-deck structures -> paint them-> install them on the deck -> then lastly painting/installing all remaining tiny structures/parts individually on their own.
|
|
#
?
Feb 27, 2015 15:53
|
|
|
Here's the Corsair taking shape and all primed and ready to go.  
|
|
#
?
Mar 2, 2015 00:08
|
|
|
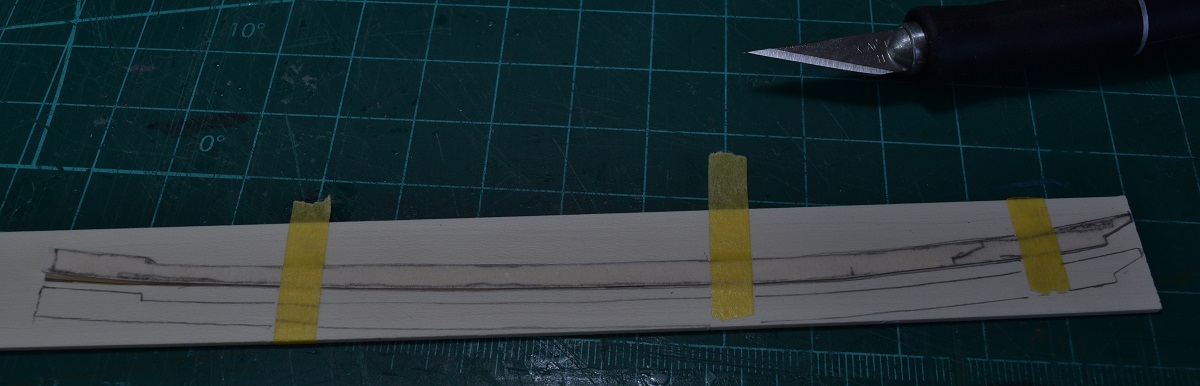
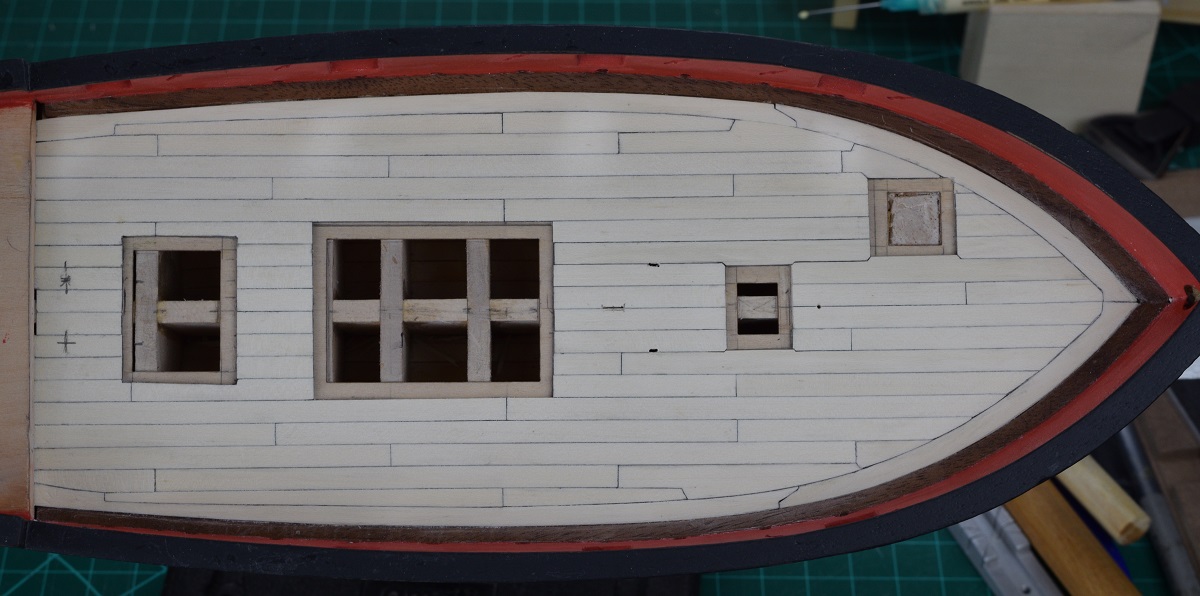
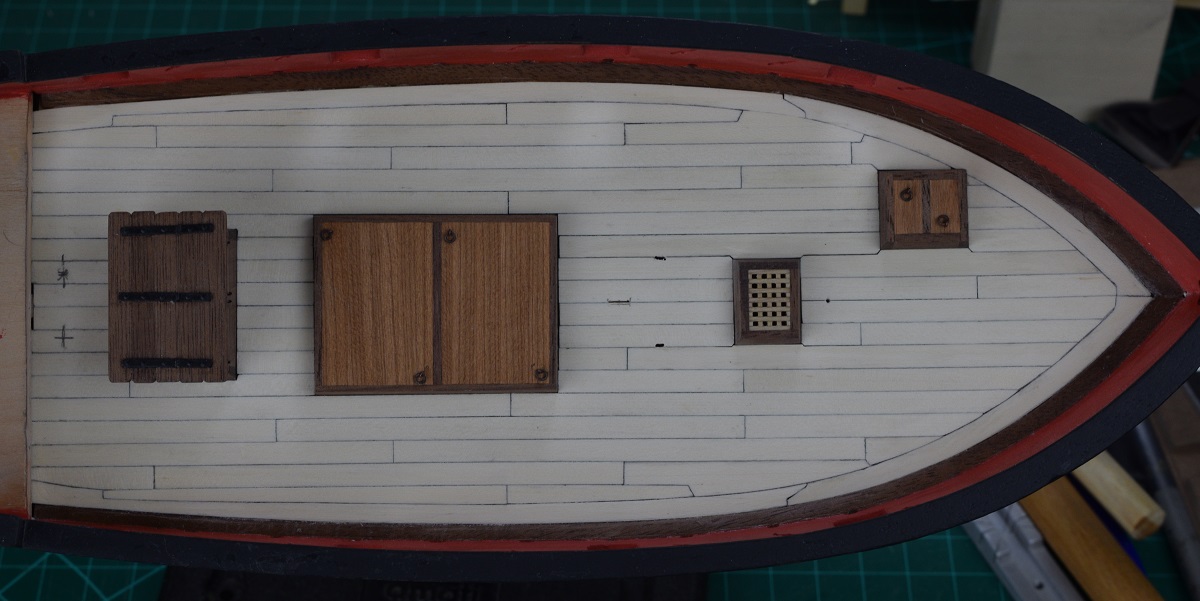
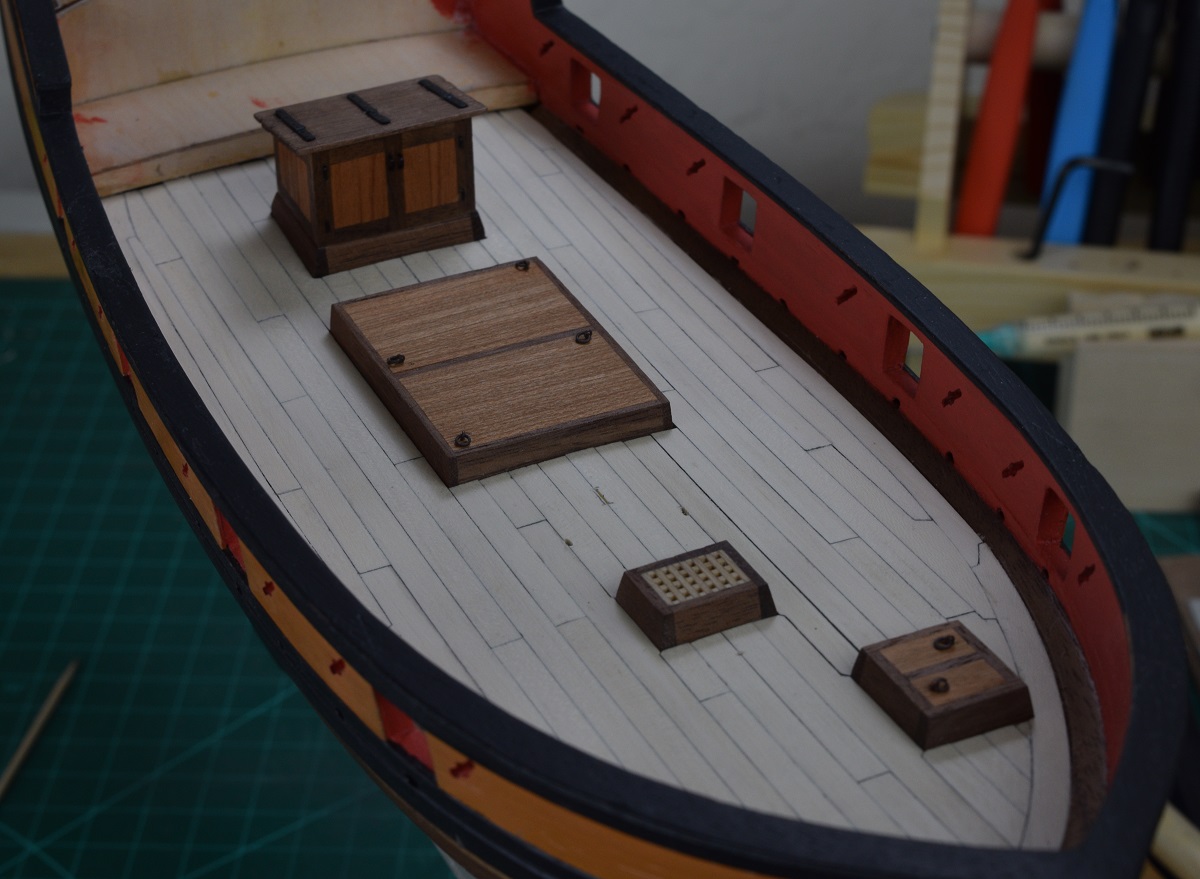
Nice looking Corsair. I like that you have the flaps down, gives it a different look. In boat news, I finished planking the quarter deck, and then began drilling a zillion holes in all my pretty decking planks. 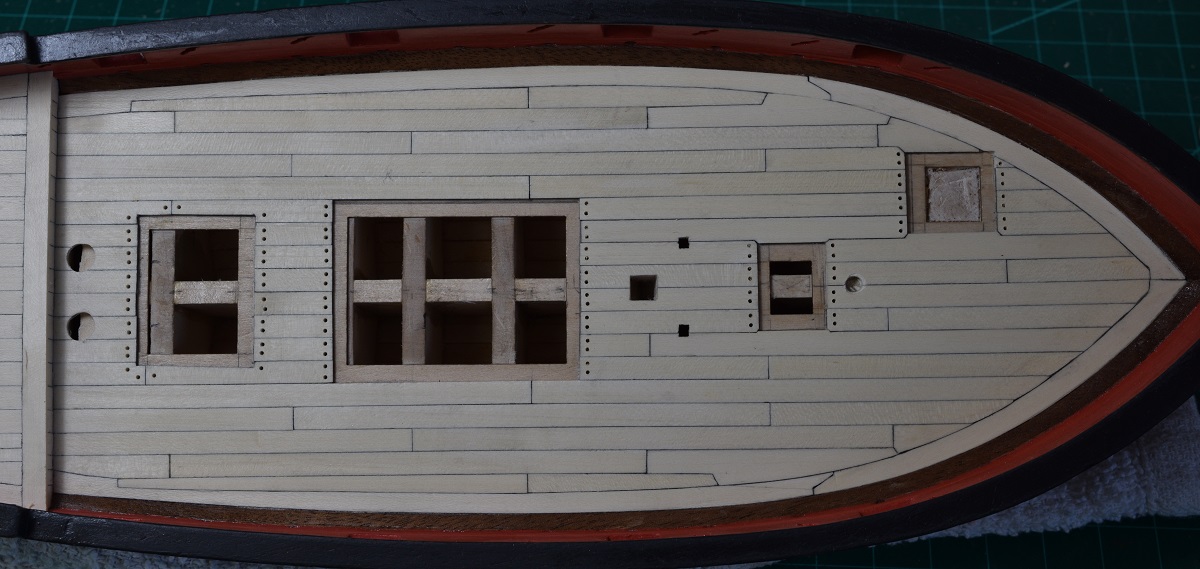 The purpose is to simulate tree nailing (or tre-nailing, or trunnelling - depends on what reference you read, and from what century, they call it all three things). Tree nailing is the use of 1" (approximately) dowels to nail planks in place, or, as is the case in most decking, a round 'plug' used to fill the hole in the plank where a bolt or metal fastener was placed. In either case the visual appearance is about the same. I used a .031" drill bit to drill these holes, which is actually over-scale, but when I did simulated decking to test I decided that this was better visually. Have to look good! Once the holes are all drilled, they can either be filled with actual tiny wooden tree-nails, or just simulated with some sort of filler, wax, etc. I used a maple wood filler. After the filler is dried, the excess is scraped off, the deck sanded, and given a coat of wipe-on poly. I didn't take any partially complete pictures except for the one above. Here are a bunch of pictures of the end result: 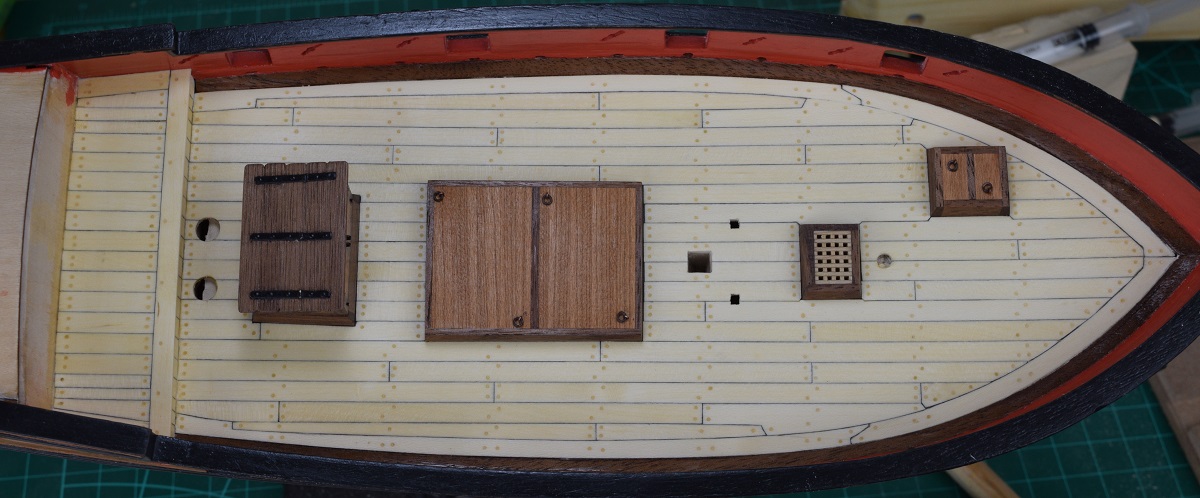 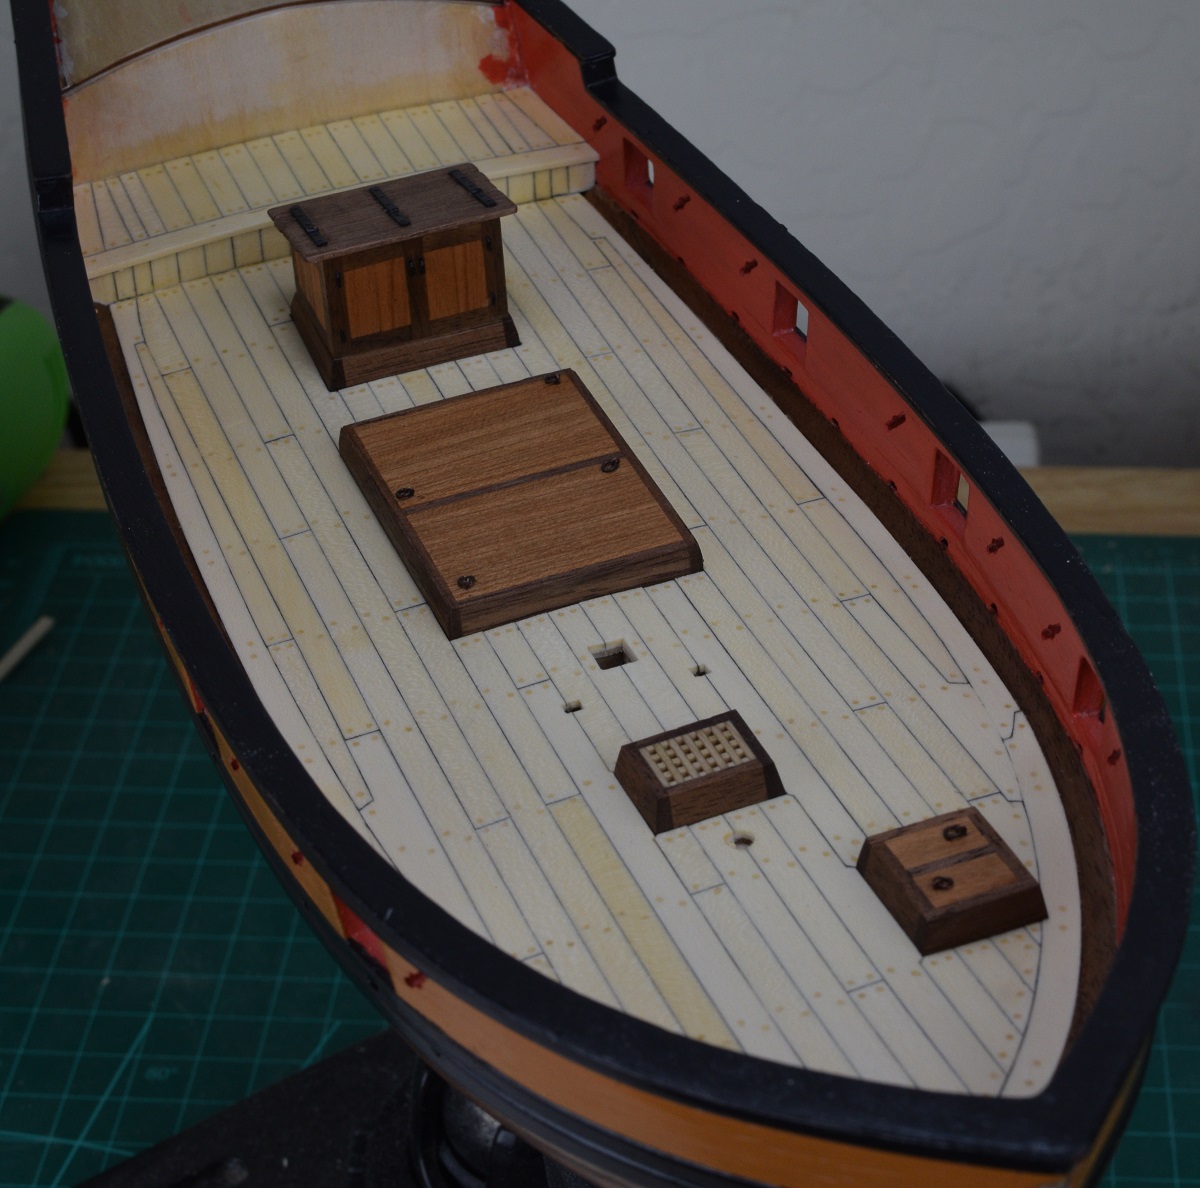 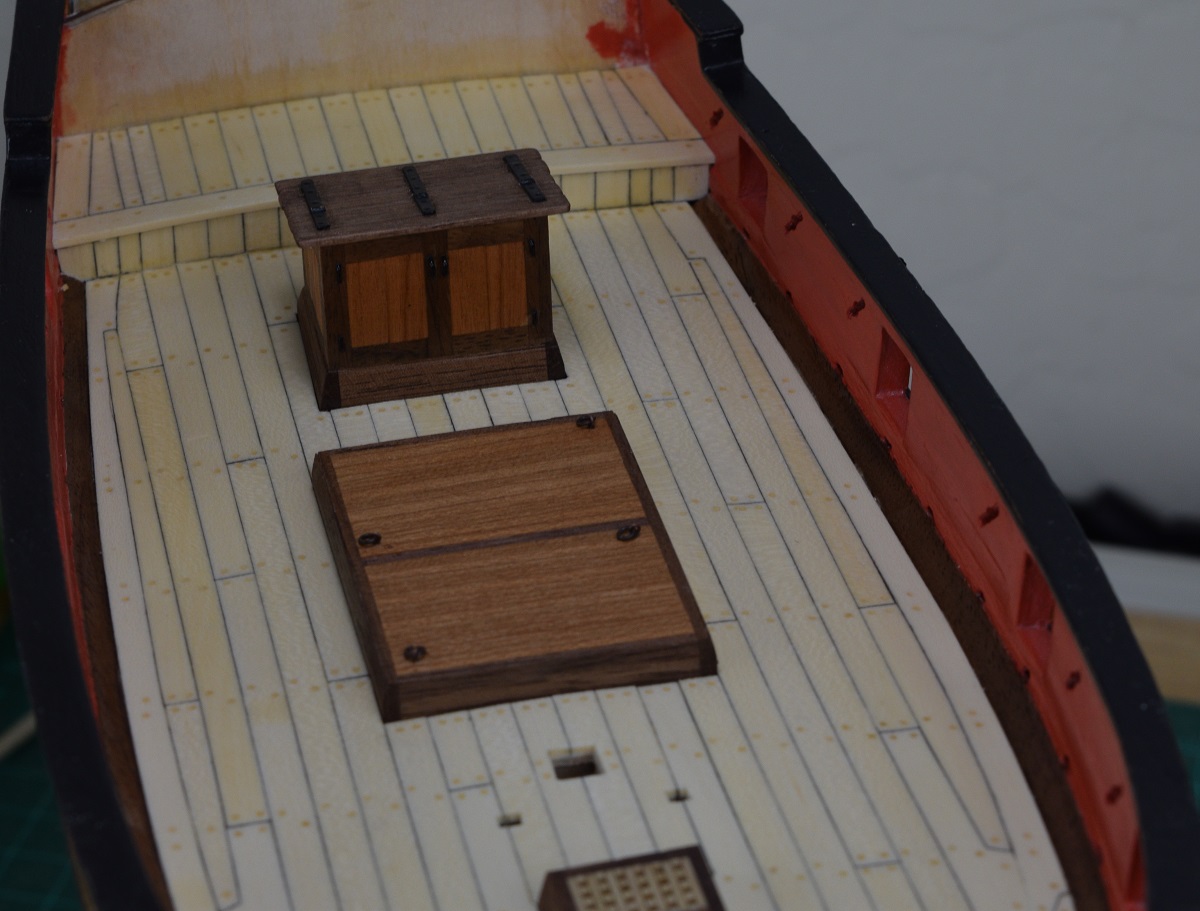 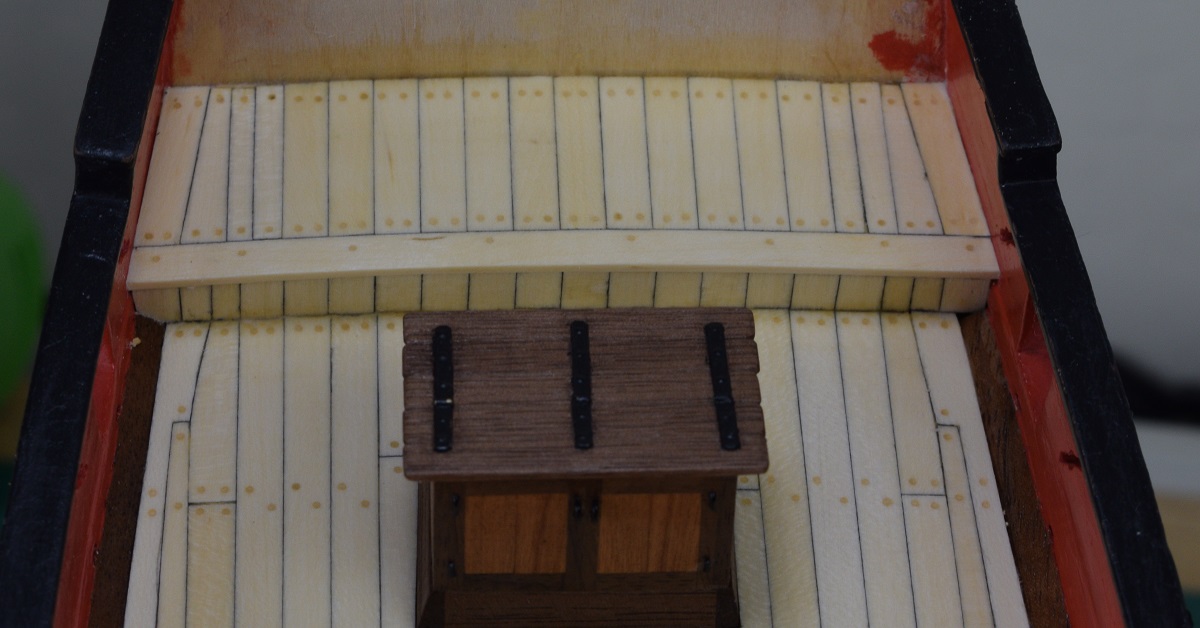 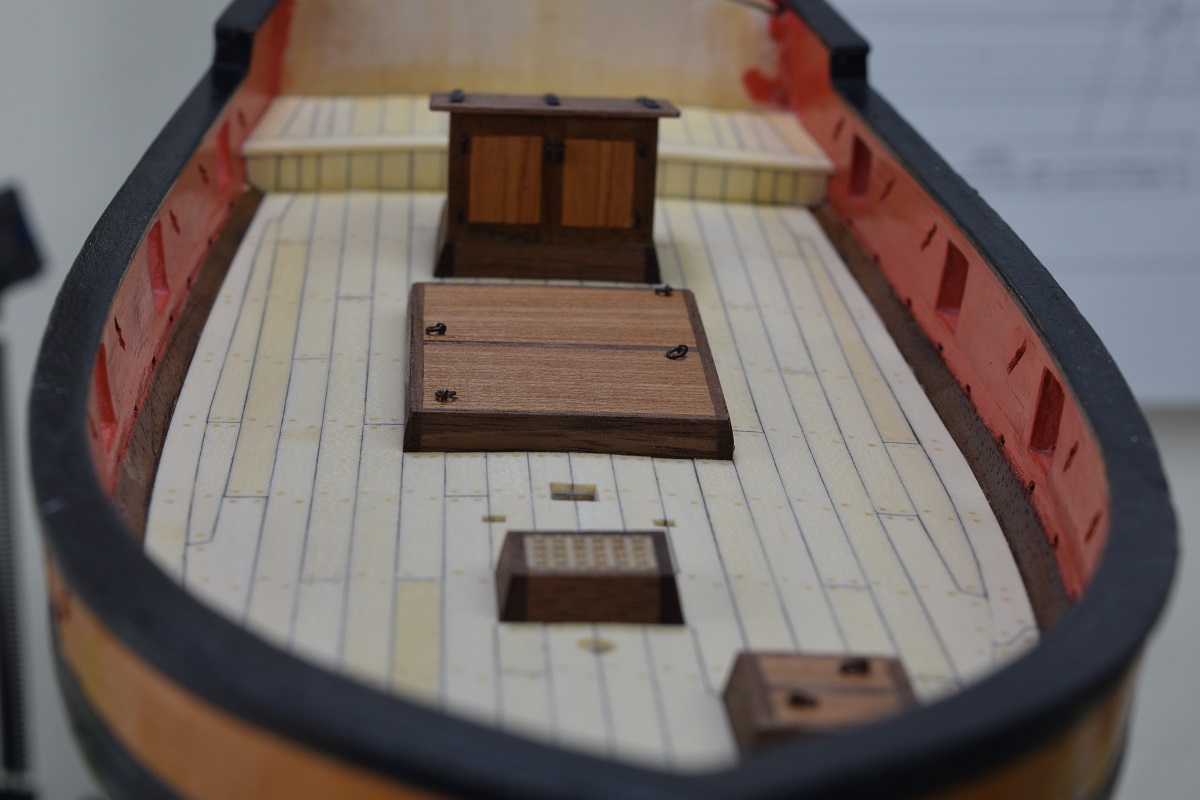 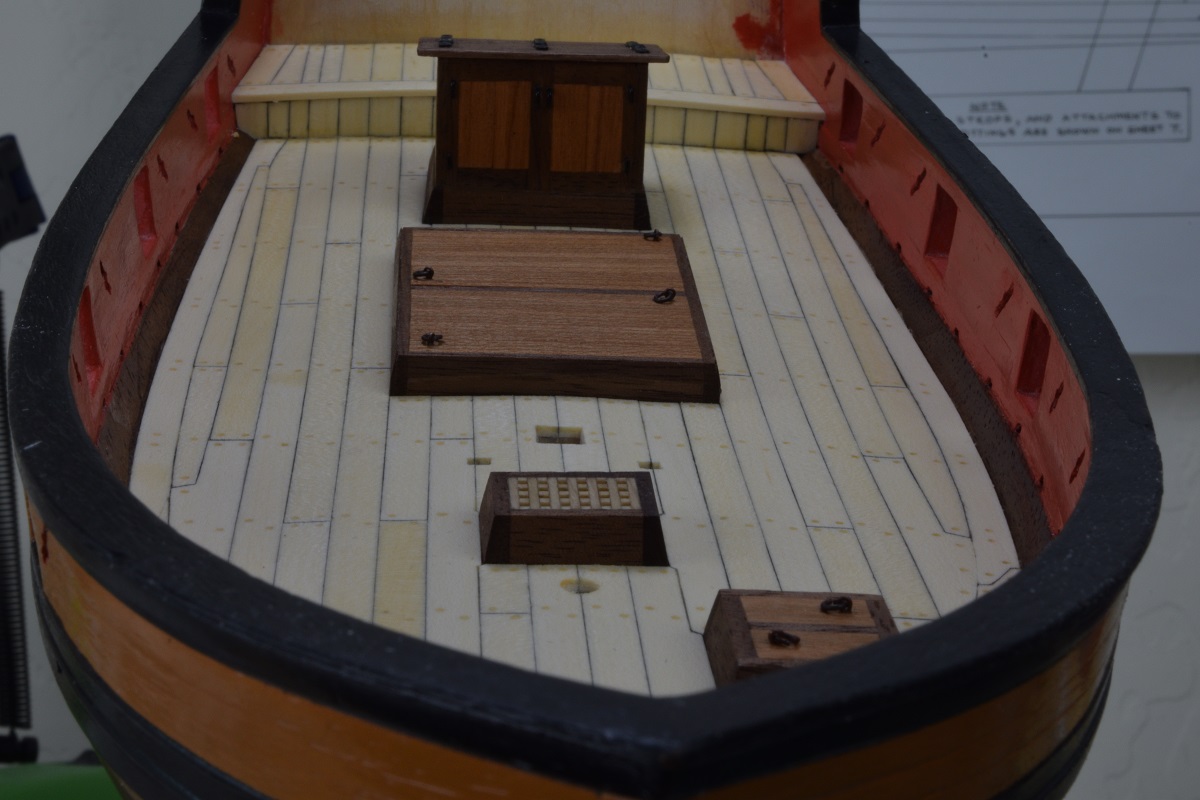 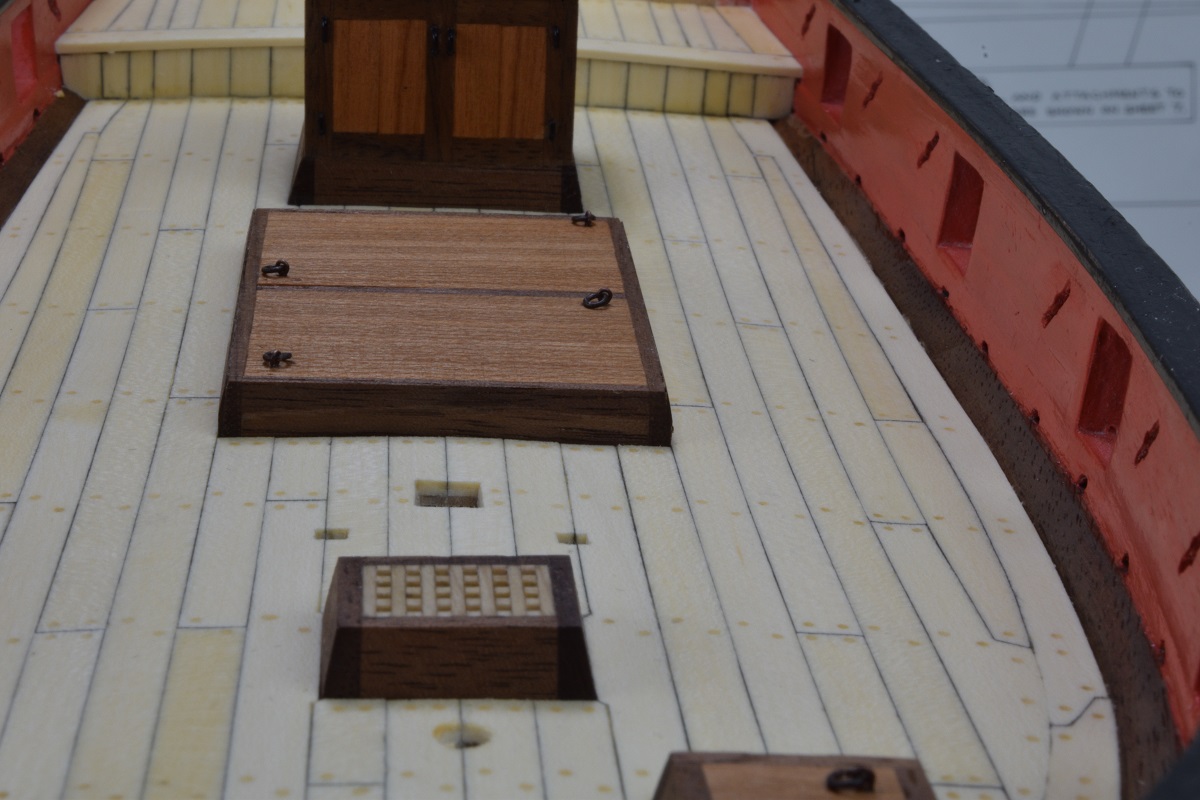 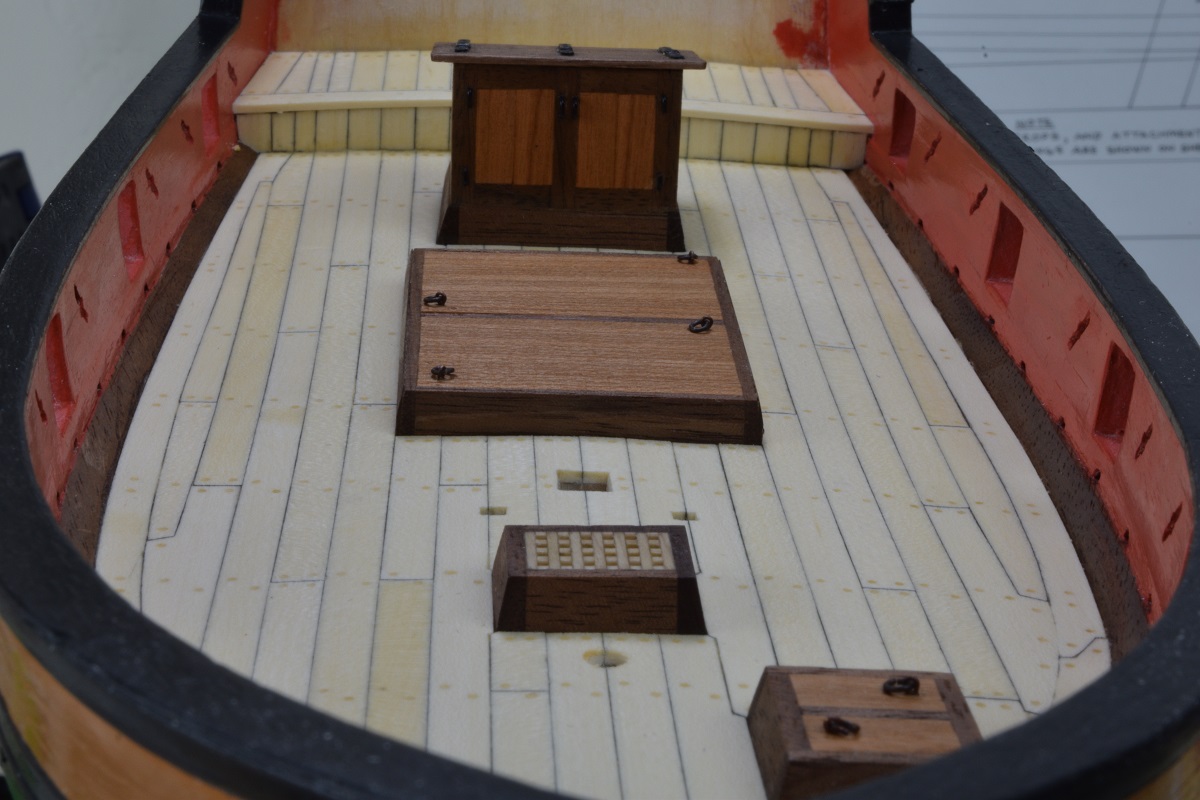 E: I think there are 510 holes, but I can see in the picture that I missed 2, and I need to refill one that came out. The Locator fucked around with this message at 02:58 on Mar 2, 2015 |
|
#
?
Mar 2, 2015 02:51
|
|
|
drat, that ship is really coming together. Doing great work on it!
|
|
#
?
Mar 2, 2015 03:37
|
|

|
The Locator posted:
That boat is looking fantastic! It kind of makes me want to start building boats, but I'm already working on two simultaneous projects, so that probably wouldn't be a wise idea.  My Viper MK II waiting for the snazzy red racing stripes. I sprayed flat black under the white coat to bring out the lines and recesses. I'm pretty excited to start masking it up!  I started this Tamiya F16 Aggressor today while waiting for the Viper's paint job to cure and got pretty far on it. It's a fun kit so far!
|
|
#
?
Mar 2, 2015 06:02
|
|

|
Troll Bridgington posted:It kind of makes me want to start building boats, but I'm already working on two simultaneous projects, so that probably wouldn't be a wise idea. I see all the cool plastic models in the thread while I'm taking months and months to build the boat, and keep wanting to start building plastic kits! That Viper is looking quite nice. Then I realize that I'd need to buy a bunch of junk to do plastic models that I don't currently have, and I still don't even have all the tools and stuff I want to have for making the wood boats. I have ordered a few of the small boat kits (a dinghy, a canoe, and an 18th century long-boat), so once those arrive I will start one of them as a side project for when I get antsy with the slow progress on the big one. Also the small ones will give me practice with some of the basic woodworking stuff like planking, since the large ships take so long between them. Also the dinghy will be painted, so I'm going to work on airbrushing skills.
|
|
#
?
Mar 2, 2015 06:25
|
|
|
The Locator posted:I see all the cool plastic models in the thread while I'm taking months and months to build the boat, and keep wanting to start building plastic kits! That Viper is looking quite nice. Thanks! I do kind of like not having to spend months on one model at the moment, but I can imagine the pay off being totally worth it. Out of curiousity, what kind of tools are you using for your current project?
|
|
#
?
Mar 2, 2015 06:31
|
|
|
I've never tried to laser a classic turn of the century brick building but I've given it a go, it's turning out... ok. I lost some of the parts and broke the window frames but it's coming along. After a quick hit of primer  Storefront in and general painting done. All my tiny brushes look like an old witch broom so painting the tiny details was a huge pain and the paintjob is kinda bad. I rubbed cake flower into the building with my finger to get the mortar effect, then hit it with dull coat, then a wash to tone-down the white.  The bricks are about .4 by 1.5mm, almost exactly to scale. The top "crown" part of the building kept catching on fire in our laser that's not doing so well lately so I switched to acrylic, it seems to have worked ok.
|
|
#
?
Mar 2, 2015 07:16
|
|


|
Troll Bridgington posted:Out of curiousity, what kind of tools are you using for your current project? Let me preface this by saying that I'm one of those dumb people who buy way too many tools for whatever my hobby of the moment is, and that there are some amazing museum quality wooden ship models made by people with just a few dozen simple hand tools. That said, I'm not one of those amazing people. I'm a hardware nerd. The tools used vary depending on what stage of the ship you are working on, and obviously a kit doesn't require a lot of tools that a scratch build requires (I don't have to rip planks down from large stock for example). Light. Lots and lots of light (I'm old). Squares. Building board or purchased keel clamp. Jewelers saw. X-acto knife. Razor saw of some kind and mitre box. Sanding stuff. Sand paper of all grits, and either purchased or made sanding blocks in all sorts of shapes and sizes. Glue and applicators (I use a syringe). Clamps. You can never have too many clamps of every kind you can possibly find. Files (all kinds, all small. Riffler files are amazing). Pliers and cutters. Tweezers of all sorts. A vise is pretty handy Painting supplies. Micro drills (#60-#80) and some drill bits between those and a 'normal' set of drills. Painting supplies (if needed). Measuring devices (engineers rulers/squares, digital calipers). The tools I use the most are: A small micro saw (razor saw) - http://umm-usa.com/onlinestore/product_info.php?cPath=21_28&products_id=37 A micro mitre-box for the above saw - http://umm-usa.com/onlinestore/product_info.php?cPath=21_28&products_id=3340 An X-acto type knife and #11 and #22 blades. I buy 100 #11 blades at a time, having a sharp blade is very important, and they are less than a quarter a piece. A syringe for applying glue. A square sanding block and sanding board - http://www.micromark.com/sand-it,9548.html Digital caliper for transferring measurements. An Amati keel-clamp for holding the ship, but if I'm going to be applying pressure, I put the ship on the desk on a soft cloth instead (side pressure on the keel is bad). A fine (0.5) mechanical pencil. A pin-vise and the micro drills. Everything beyond that list is all about making life easier (sanding and drilling with a Dremel tool for example). Here is a shot taken tonight of my work area (it's a mess). Off screen to the left is something I consider fairly important, an air cleaner designed for wood workers - http://www.amazon.com/Rikon-Speed-Air-Cleaner-400/dp/B00GTRKL5W I run the air cleaner any time I'm sanding. Lots of people don't use these, but I have allergy & sinus issues and it works great.  I have two Dremel's. One hanging with the flex-shaft that I use all the time for various things, and the other is mounted in the drill-press thing. As you can see I'm acquiring some other power tools, but so far only the sander has actually been used for this build. I picked up the lathe a couple weeks ago but haven't played with it yet. I got the band saw and a scroll saw (on the floor on the very bottom right of the photo) this weekend - I bought them both from a guy for a $50 bill. They both work, but I need to buy good blades before they will be useful. Notice that the list of 'tools I use the most' is probably obtainable for $100 or less (except for that keel-clamp). Baronjutter posted:I've never tried to laser a classic turn of the century brick building but I've given it a go, it's turning out... ok. I lost some of the parts and broke the window frames but it's coming along. That's fantastic!
|
|
#
?
Mar 2, 2015 07:30
|
|
|
The Locator posted:Nice looking Corsair. I like that you have the flaps down, gives it a different look. Looking good so far! I'm going super slow on my build, and I'm only about half way done fairing the bulkheads. At this rate I might finish in a year or two.
|
|
#
?
Mar 2, 2015 08:00
|
|
|
I decided to not go to sleep and kept working on the F16 instead. I finished the bulk of the assembly and painted the cockpit.   It looks like I might be spraying it with the Viper this week. The Locator posted:Let me preface this by saying that I'm one of those dumb people who buy way too many tools for whatever my hobby of the moment is, and that there are some amazing museum quality wooden ship models made by people with just a few dozen simple hand tools. That said, I'm not one of those amazing people. I'm a hardware nerd. Thanks for the write up! That seems a lot less intimidating than what I was expecting.
|
|
#
?
Mar 2, 2015 09:44
|
|
|
Baronjutter posted:I've never tried to laser a classic turn of the century brick building but I've given it a go, it's turning out... ok. I lost some of the parts and broke the window frames but it's coming along.  It's like you're doing some entirely different hobby than me. Wow.
|
|
#
?
Mar 2, 2015 11:26
|
|
|
Arquinsiel posted:
I have the same feeling when I look at some people's miniatures and model kits. I just do my best and be happy and proud of my own work instead of trying to compare myself to that level of quality. I try to instead use them as sources of inspiration and motivation. ")
|
|
#
?
Mar 2, 2015 15:36
|
|
|
I'm a lurker and I don't even do scale modeling and I'm ashamed of myself for not doing something so well. I'll just be over here in the corner, sobbing quietly into my useless hands.
|
|
#
?
Mar 2, 2015 17:44
|
|


|
Pile of Kittens posted:I'm a lurker and I don't even do scale modeling and I'm ashamed of myself for not doing something so well. I'll just be over here in the corner, sobbing quietly into my useless hands. You should definitely start, or at least give it a go. I'm sure everyone on here would be able to help with your first kits. It really is a rewarding hobby. What interests you the most? Planes, trains or auto-mobiles? The correct answer of course is TANKS
|
|
#
?
Mar 2, 2015 20:43
|
|
|
Model sidewalks and roads is where it's at.
|
|
#
?
Mar 2, 2015 20:47
|
|
|
If you like robots there's always the snapfit route 
|
|
#
?
Mar 2, 2015 20:49
|
|


|
everythingWasBees posted:If you like robots there's always the snapfit route This is me. I don't even paint or remove seams. I just try my best to remove and smooth down nubs from the sprue tree and do some good work with panel lining. But I still enjoy looking at what others have done with all types of models.
|
|
#
?
Mar 2, 2015 21:14
|
|
|
Pile of Kittens posted:I'm a lurker and I don't even do scale modeling and I'm ashamed of myself for not doing something so well. I'll just be over here in the corner, sobbing quietly into my useless hands. I guarantee you that you can make an impressive scale model within a year of doing the hobby. Those first few skills go a long, long way.
|
|
#
?
Mar 2, 2015 23:35
|
|
|
If you scrape off the mold lines and prime, the model becomes infinitely better looking for next to no effort. Making good looking models isn't very hard. You can turn out some cool looking stuff without heaps of equipment or months of effort.
|
|
#
?
Mar 2, 2015 23:39
|
|
|
Ensign Expendable posted:If you scrape off the mold lines and prime, the model becomes infinitely better looking for next to no effort. Making good looking models isn't very hard. You can turn out some cool looking stuff without heaps of equipment or months of effort. This is worth repeating. If you know how to use it, you'd be surprised how far basic equipment used well can take you.
|
|
#
?
Mar 3, 2015 00:06
|
|


|

|
| # ? Jun 5, 2024 19:43 |
|
|
I basically use a scalpel and wire cutters for everything. I "recently" added a pin vice to my toolkit though.
|
|
#
?
Mar 3, 2015 00:59
|
|