


|
 body bags by PC-P, on Flickr body bags by PC-P, on Flickr
|
 #
?
Mar 25, 2015 11:47
#
?
Mar 25, 2015 11:47
|
|

|

|
| # ? May 24, 2024 04:28 |
|
|
Genderfluid posted:
High five dude. I always loved checking out the photo work in the lobby when I was at Tisch. I'll try to stop by and check it out tomorrow.
|
|
#
?
Mar 25, 2015 14:49
|
|

|
Underexposed Astia goes a little blue, especially in the shadows. The View from Gheralta (Daniel Korkor) by Isaac Sachs, on Flickr
|
|
#
?
Mar 25, 2015 15:48
|
|

|
So yeah I love my new 300mm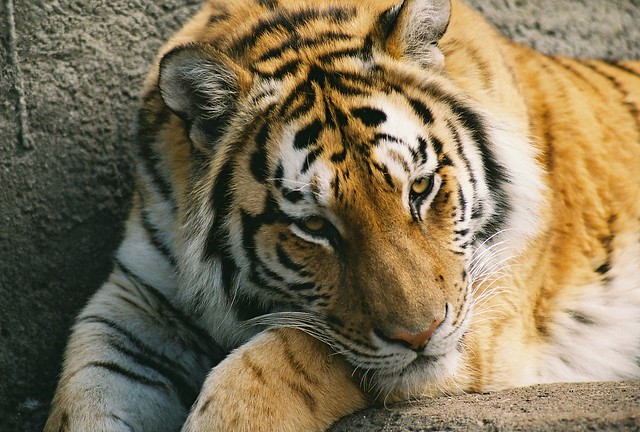 00000012 by PhotoBen27, on Flickr 00000012 by PhotoBen27, on FlickrFilm was some basic Fuji 400.
|
|
#
?
Mar 25, 2015 16:53
|
|


|
Is that 35mm? Looks pretty drat sharp. What kind of scanner do you have?
|
|
#
?
Mar 25, 2015 16:54
|
|

|
BANME.sh posted:Is that 35mm? Looks pretty drat sharp. What kind of scanner do you have? It is, and... a local lab 
|
|
#
?
Mar 25, 2015 16:56
|
|
|
Owns owns owns
|
|
#
?
Mar 25, 2015 17:24
|
|

|
Genderfluid posted:
|
|
#
?
Mar 25, 2015 17:57
|
|
|
So, i jumped right into large format photography last week. I just developed a couple of sheets and they're drying right now. I've also modeled a copal 1 and 0 lensboard for my schools monorail camera, cause for some reason, it's missing. I'll get some scans asap. The Modern Sky fucked around with this message at 19:14 on Mar 25, 2015 |
|
#
?
Mar 25, 2015 19:10
|
|
|
Understanding posted:So, i jumped right into large format photography last week. I just developed a couple of sheets and they're drying right now. How are you developing the sheets?
|
|
#
?
Mar 25, 2015 21:58
|
|
|
I was given some film racks on loan from a grad student to work with. I had to fashion the tanks out of cheap one gallon tubs from a 99� store so I can have the rack submerge the negative alone without having to use up too much chemicals. Each tub needs about 2 liters of chemicals. Relatively light free rooms are easy to come by at my school, so I just dunk it in and agitate it by pulling them out and and draining them to the left or to the right every minute. The Modern Sky fucked around with this message at 22:39 on Mar 25, 2015 |
|
#
?
Mar 25, 2015 22:34
|
|
|
Cool. I've been using hangers recently too, in the process of making another daylight tank out of black Perspex, should be able to do one hanger in less than 1lt of fluid so I can do colour processing relatively economically.
|
|
#
?
Mar 26, 2015 00:52
|
|
|
After midterms are over, I'm gonna look into some sort of rig to 3D print to develop in a steel 3 reel tank or a 2 reel paterson tank. I wanna look into this perspex idea, i'd like something more sturdy than cut plastic food containers. The Modern Sky fucked around with this message at 01:08 on Mar 26, 2015 |
|
#
?
Mar 26, 2015 01:05
|
|
|
Grr, even though I overexposed by two stops and used a light meter app on my phone, I'm not getting those really nice colors I see on other Fuji 400H pictures I see around the web. Veronica by khyrre, on Flickr Veronica by khyrre, on Flickr Victor by khyrre, on Flickr Victor by khyrre, on Flickr Casmay by khyrre, on Flickr Casmay by khyrre, on FlickrNot to mention, it feels like I'm doing way too much post work on these, fixing the exposure, contrast, color casts, etc. My scanning workflow is using Epson Scan and setting the full 0-255 range, then setting the end points on the visible edges of the histogram. Except when I do that, the images get a heavy yellowish cast and they still don't quite fill up the entire histogram once I open them in Lightroom. Am I missing something? 404notfound fucked around with this message at 03:10 on Mar 26, 2015 |
|
#
?
Mar 26, 2015 03:05
|
|


|
Scan RAW as 48-bit tiffs and do all your adjustments in Lightroom.
|
|
#
?
Mar 26, 2015 03:18
|
|

|
Understanding posted:After midterms are over, I'm gonna look into some sort of rig to 3D print to develop in a steel 3 reel tank or a 2 reel paterson tank. Acrylic/perspex is pretty easy to work with, I've found using fairly thick stuff is best (6mm). I just use a jigsaw with a fine tooth blade to cut to shape, and a dremel to cut small shapes for putting ports in. The ports I make out of pvc plumbing supplies, and the acrylic glue works great for water sealing the whole thing.
|
|
#
?
Mar 26, 2015 10:44
|
|
|
big scary monsters posted:Scan RAW as 48-bit tiffs and do all your adjustments in Lightroom. I'm already doing that. I guess I'm just not sure how to get pictures that look like these. My scans come out flat and usually with a yellow cast, and no matter how much I play with it in Lightroom, I can't get those "dreamy" colors. There are so many variables, I'm not sure where to even start getting closer to that look. The camera/lens, how many stops to overexpose, how the lab develops the film, the scanner I'm using, the scanning software I'm using, the adjustments in Lightroom...
|
|
#
?
Mar 26, 2015 18:03
|
|
|
Oh, right. Yeah, it takes some work. My images often seem to start with a green cast. My normal workflow is to get very approximate colours with temp/tint, then set RGB curve before going back to white balance. That's sometimes enough, otherwise you can get into the individual colour channels or mess with the HSL settings. If I'm still not happy it's probably time for adjustment brushes and filters. And you'll probably go back and forth fine tuning bits throughout. Here's an example of an image I've been working on, not quite there yet but it's getting close. It's shot on MF Portra 400.   Image as imported, after cropping and straightening.  Here I've just done auto tone and auto white balance, normally this is not what you want but I find it helpful as a starting point.  Slight S shape added to the RGB curves.  Cooled the image down and upped the magenta in white balance. Probably went a bit far into blue here and it's still too green but for whatever reason I went into channels next.  Very slight S to the green channel, lowered blue a bit, upped red slightly.  Lowered green saturation in HSL and adjusted the hue of yellow somewhat leftwards. Next would be spot removal and sharpness adjustments, maybe bring down the lens vignetting. It still looks a bit green to me in the highlights and the contrast is perhaps a touch low: blacks aren't very black and the white paper bags are kinda grey. Then I'd probably leave it for a day and come back and decide I want to adjust the crop or something. Sometimes I play with the tone settings but normally I find it's easier to get what you want from curves. I can usually get most of the way to what I want in 5 or 10 minutes but for pictures I actually like (not this one) I'd spend a lot more time fine tuning. I dunno if this sort of workflow is normal or what but it works OK for me.
|
|
#
?
Mar 26, 2015 21:31
|
|
|
https://www.youtube.com/watch?v=u_qeZOWqchM
|
|
#
?
Mar 26, 2015 21:42
|
|
|
If this didn't solve your problems it means you weren't doing it right. Practice practice practice
|
|
#
?
Mar 26, 2015 21:49
|
|
|
Lately this has been my workflow: Do a positive scan in your software of choosing with no adjustments at all. Be sure not to crop out all of the frame edges so some of the pure orange mask is visible (you'll need it in a sec) Open in Photoshop and add a Levels adjustment layer. Choose the highlights eye dropper from the levels adjustment box and set the sample size to average instead of point sample. Click somewhere between the frames or on the edge where it's pure orange mask. This completely removes the orange mask. From here you can make fine adjustments in each RBG channel as shown in The One True Film Scanning Video, or just leave it like this. Add an Invert adjustment layer Add a Curves adjustment layer and choose the midtones eye dropper Click somewhere that's supposed to be pure grey without any color cast. This removes color cast. This gets me well within the ballpark for 95% of my images. From here I import to lightroom and do other final edits like contrast, sharpening, etc.
|
|
#
?
Mar 26, 2015 21:50
|
|
|
big scary monsters posted:Oh, right. Yeah, it takes some work. My images often seem to start with a green cast. My normal workflow is to get very approximate colours with temp/tint, then set RGB curve before going back to white balance. That's sometimes enough, otherwise you can get into the individual colour channels or mess with the HSL settings. If I'm still not happy it's probably time for adjustment brushes and filters. And you'll probably go back and forth fine tuning bits throughout. Here's an example of an image I've been working on, not quite there yet but it's getting close. It's shot on MF Portra 400. have you not watched the video?? the video gets you way closer way faster
|
|
#
?
Mar 26, 2015 22:49
|
|

|
Yeah I have but the try hard offensive tone and lisping makes it hard to listen to.
|
|
#
?
Mar 26, 2015 22:54
|
|
|
big scary monsters posted:Yeah I have but the try hard offensive tone and lisping makes it hard to listen to. put it on mute and do the things in the video
|
|
#
?
Mar 26, 2015 22:57
|
|
|
Going to be doing some hiking around the Colorado/Utah border and want to bring a film camera along for landscapes, however it's just a tiny Rollei 35 SE. Any recommendations for film? I'm thinking Kodak Ektar 100 but I've never shot slide film before (and would not be developing it myself), should I give Velvia a try?
|
|
#
?
Mar 27, 2015 03:30
|
|


|
Cacator posted:Going to be doing some hiking around the Colorado/Utah border and want to bring a film camera along for landscapes, however it's just a tiny Rollei 35 SE. Any recommendations for film? I'm thinking Kodak Ektar 100 but I've never shot slide film before (and would not be developing it myself), should I give Velvia a try? Ektar will be nice for sunny days and desert reds; Velvia and Provia will make your cloudy days pop. That little Rollei might just be the best 35mm you can take on a hiking trip, since you'll have to sacrifice about 2 granola bars' worth of space to tote it along.
|
|
#
?
Mar 27, 2015 03:41
|
|

|
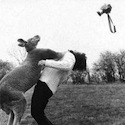
got some film back from my Nishika N8000 the other week. Such a fun little toy camera. Untitled by Paul Frederiksen, on Flickr Untitled by Paul Frederiksen, on Flickr
|
|
#
?
Mar 28, 2015 22:00
|
|
|
 _DSC8174 by Stingray of Doom, on Flickr _DSC8174 by Stingray of Doom, on Flickrgently caress ektar. I will use it the way I want to.
|
|
#
?
Mar 29, 2015 07:40
|
|

|
Pukestain Pal posted:got some film back from my Nishika N8000 the other week. Such a fun little toy camera. It really is. I gotta shoot with it more. 
|
|
#
?
Mar 29, 2015 13:10
|
|
|
 
|
|
#
?
Mar 30, 2015 02:30
|
|
|
Oh so this is now the Nishika gif thread?
|
|
#
?
Mar 30, 2015 06:42
|
|

|
I gotta get me one of those (and a sprocket rocket)
|
|
#
?
Mar 30, 2015 07:03
|
|
|
404notfound posted:I gotta get me one of those (and a sprocket rocket) You can get a brand new one, in the packaging, for about $20 on ebay.
|
|
#
?
Mar 30, 2015 12:50
|
|
|
Pukestain Pal posted:You can get a brand new one, in the packaging, for about $20 on ebay. Uggggh, my GAS is flaring up again!
|
|
#
?
Mar 30, 2015 14:56
|
|

|
The animated pics further up the thread prompted me to buy a Nimslo (glass lensed Nishika precursor) for $40 on ebay.
|
|
#
?
Mar 30, 2015 17:09
|
|


|
Th n8000 is fun, but i would really love to get a nimslo.
|
|
#
?
Apr 1, 2015 03:30
|
|
|
Nimslo's are p. cool. The actual quality is nicer but all of these were just snapshots of negatives on a lightbox.     
|
|
#
?
Apr 1, 2015 21:08
|
|

|
Oh hey, look at what I found 
|
|
#
?
Apr 2, 2015 00:52
|
|


|
Does the part, in the camera body, that detects your aperture have a generic name? I have an om-4 and it doesn't return to position after closing the aperture, so after going to f22 the camera always thinks it's at f22. It's hard to search for a fix when I don't know what to call the part.
|
|
#
?
Apr 7, 2015 14:31
|
|

|

|
| # ? May 24, 2024 04:28 |
|
|
bobmarleysghost posted:Oh hey, look at what I found Colors look pretty lovely to me tbh
|
|
#
?
Apr 7, 2015 14:37
|
|