


|
Someone explain why masking each and every individual pane is better than masking the whole thing and painting the dividers by hand? Sounds like a gigantic pain in the rear end to me.
|
 #
?
Apr 5, 2015 00:14
#
?
Apr 5, 2015 00:14
|
|

|

|
| # ? Jun 1, 2024 06:52 |
|
|
How would you paint them if you "masked the whole thing"? You have to leave the supports exposed to paint them. Which is what people are doing when they mask off the individual panes, leaving the supports exposed.
|
|
#
?
Apr 5, 2015 00:37
|
|

|
Mask the whole thing, spray the model so the parts near the actual body get painted the same way, remove mask, paint supports?
|
|
#
?
Apr 5, 2015 01:06
|
|
|
I'm not a plane modeler but those canopies seem like something a thin brass overlay of some sort would work well for. Like have the non-transparent parts a separate piece that just fits on top.
|
|
#
?
Apr 5, 2015 01:38
|
|


|
Masking the canopy is one of the things that keeps me from starting my 1/35 Fi-156 Storch, even though it includes masks and a (poorly) painted canopy.....
|
|
#
?
Apr 5, 2015 01:45
|
|


|
Tape the whole thing. Get a good LED flashlight shine flashlight through taped cannopy using a brand new razor blade, cut along the now clearly visible lines use the tip of the blade to lift the waste away. obviously, do this before you glue. Works for me anyways (don't ask about the Bronco model I've stalled right out on. Because of masking)
|
|
#
?
Apr 5, 2015 03:21
|
|


|
Jonny Nox posted:Tape the whole thing. This is the way I used to do things, but the canopy frames on this cheapo kit are so thin and so shallow that you can barely distinguish them from the glass panes. The crappy masking tape I used immediately started peeling up when I hit it with paint so paint got under it  . Going to strip it and try again. Probably do what Jonny recommends but with frosted scotch tape; that works nicely on smaller scale models. . Going to strip it and try again. Probably do what Jonny recommends but with frosted scotch tape; that works nicely on smaller scale models.
|
|
#
?
Apr 5, 2015 03:47
|
|

|
I've also used a fine felt tip marker to mark the inside of my cut lines. they're gonna get covered in paint anyways...
|
|
#
?
Apr 5, 2015 03:50
|
|
|
Baronjutter posted:I'm not a plane modeler but those canopies seem like something a thin brass overlay of some sort would work well for. Like have the non-transparent parts a separate piece that just fits on top. Some model brands include vinyl masks that are precut to the size of the glass panels with curvature and such already taken into account. Eduard does that with most of their more expensive kits and also produces aftermarket masks for more popular kits by other vendors.
|
|
#
?
Apr 5, 2015 03:53
|
|
|
Pierzak posted:Mask the whole thing, spray the model so the parts near the actual body get painted the same way, remove mask, paint supports? You'd want to freehand paint the supports? There's no way you'd get a straight enough line for it to look realistic.
|
|
#
?
Apr 5, 2015 07:11
|
|
|
Well... you win some, you lose some. I've been working stupid hours for the last few weeks (like 70-80, and I have a 1.5 hour 1 way commute), but I've been sneaking in an hour here and there trying to get the finish on the canoe. I guess I shouldn't try 'new' stuff while I'm punch-drunk tired, as I've managed to wreck it. I was trying a new technique (to me) that I stole from a guy who made a beautiful 50's era Chris-Craft model, and had a beautiful glassy finish on it. He did this by using a finishing resin over the wood, laid down in multiple coats to a thick layer (wet sanded between each layer), and then sanded down in finer and finer finishing grits to 12000 and then a final 'polishing compound' finish. Things were going pretty well, and the finish was looking really nice and smooth, until tonight when I was using the 1800 grit micro-mesh pad, and went through to the wood in several places, stripping off the stain on the wood itself. Either I was over-sanding, or I just didn't lay down enough coats to start with. I found that I really couldn't tell how thick my resin finish was, and it was probably just too thin, and in all likelihood had thin spots. The resin takes 2 hours to dry, and over 6 hours before you can sand it, and in that time I found that it was flowing down the sides of the hull and pooling at the bottom and along the gunwales (if I let it dry upside down). I don't know of a good way to fight this, other than making some sort of rotisserie mount to put the canoe in while the resin is drying. In any case, the only way I can think of to 'fix' it now is to strip it all the way back to the wood everywhere, and start over. I'm not prepared to do that while I'm working these dumb hours, so I stuck it in a drawer to await whatever I decide to do with it next month after this terrible release cycle at work is done. In the mean time, when I have a spare hour here or there I'll get back to doing some stuff on the sloop. I've finished planking the poop deck, and once I get the forward trim piece on the deck I'll get some progress pictures up.
|
|
#
?
Apr 5, 2015 07:17
|
|


|
Bloody Hedgehog posted:You'd want to freehand paint the supports? There's no way you'd get a straight enough line for it to look realistic. Why not? Different painting techniques? I paint miniatures, it doesn't seem that big of a problem. OTOH, masking tiny windows sounds exactly like a thing I'd gently caress up and leave looking like modern art.
|
|
#
?
Apr 5, 2015 10:21
|
|
|
You could always go with a original canvas covered effect. Bit of shame, but it would hide any issues caused by the resin.
|
|
#
?
Apr 5, 2015 10:21
|
|
|
This vid has some interesting ideas about canopies. https://www.youtube.com/watch?v=WHJmxKKxsew
|
|
#
?
Apr 5, 2015 14:05
|
|
|
I hate canopies with a passion. Also, those fiddly little antenna and arials that prop-driven aircraft seem to be covered with. I only recently started modelling, made an Airfix Zero and a Revell Corsair, both 1:72 scale. I didn't have the patience for masking but I've found free handing and then carving a chisel out of a cocktail stick and using that to scrape away the excess gets me passable results
|
|
#
?
Apr 5, 2015 14:47
|
|

|
Owlkill posted:I didn't have the patience for masking but I've found free handing and then carving a chisel out of a cocktail stick and using that to scrape away the excess gets me passable results Good tip! I used to do this all the time before I started buying pre-cut masks and spraying them. It works surprisingly well. Just paint the lines as neat as you can and then clean up with the wooden cocktail stick. Because the canopy has not been primed the paint just comes off really easily. You can get a decentish edge buy letting the stick follow the course of the raised lines.
|
|
#
?
Apr 5, 2015 14:54
|
|

|
Bloody Hedgehog posted:You could always go with a original canvas covered effect. Bit of shame, but it would hide any issues caused by the resin. Yea, I was thinking about that last night after I posted. I'm going to wait and think about it since I have so little free time to work on it now anyway, but that may be the route I take in the end. If I do that I'll have to get another small boat of some kind to try the resin finish on in the future.
|
|
#
?
Apr 5, 2015 15:26
|
|
|
So I decided not to work this morning, and instead see if I could make a little bit of progress on the sloop. Some of this stuff was actually done some time ago, but I put it all together this morning. The poop deck on the sloop is planked with 26 walnut planks, but because the aft end of the deck is quite a bit narrower than the front, ever single plank has to be tapered to make it work and look nice. To do this, I decided to make a jig (well, two, but one I already had). First I measured the longest plank measurement, and cut a new line into my little plank cutting jig that I used to cut all my hull planks to length. You can see here that these planks are a bit shorter than the 4" notch where all the hull planks were cut. I cut about 26 pieces of this length. 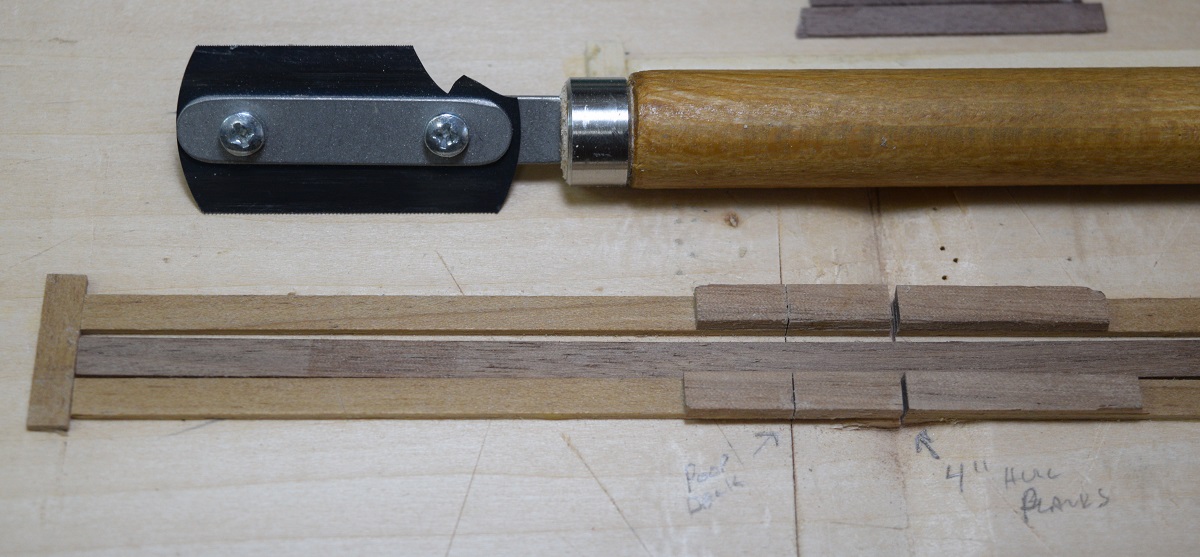 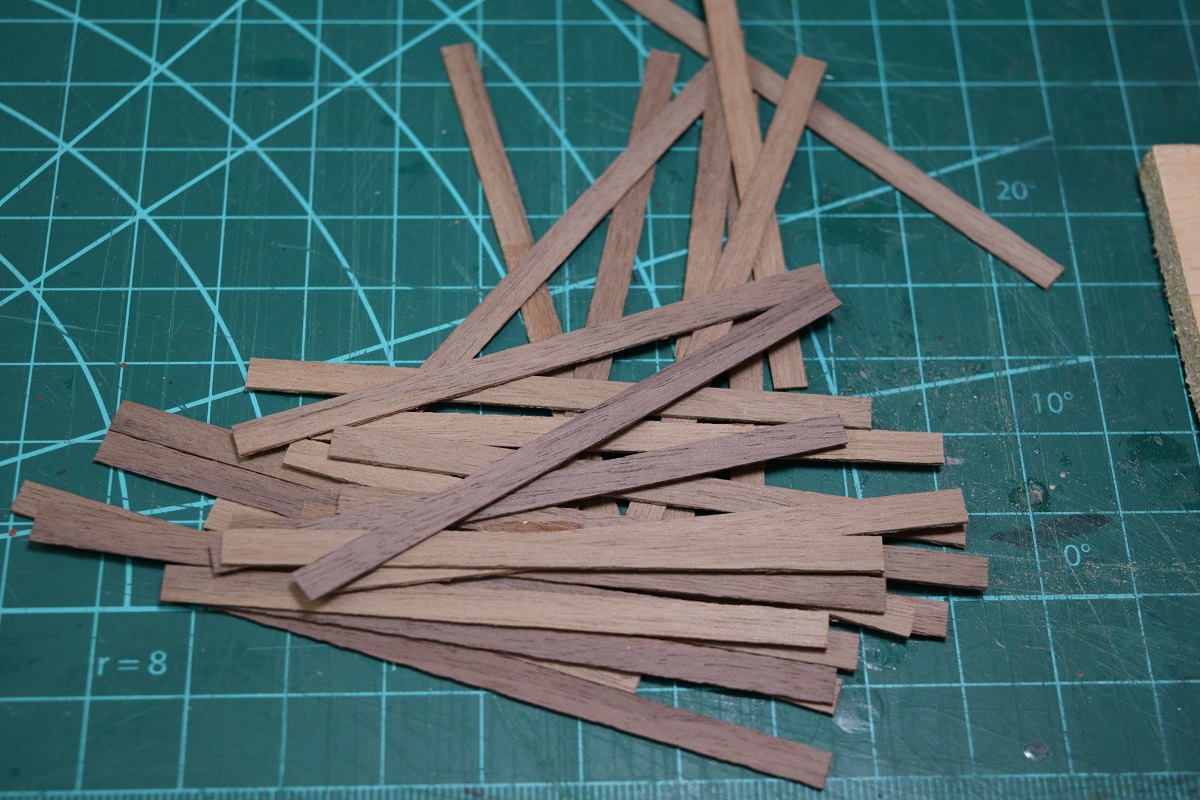 I needed a way to make all of these pieces tapered, so for that I stole an idea from another build log that I read somewhere and made this little jig. The plank to be tapered is set into the jig as shown, then a straight edge is laid on top and pushed into the end pieces of the jig which were sanded to the right length and angle to provide the needed taper. When cutting I actually used a very thin metal straight edge, I just used the clear plastic for the picture so it's easier to see how it's laid over the support wood and the plank piece. Carefully cut using very light passes with the X-acto #11, and presto, a tapered plank. 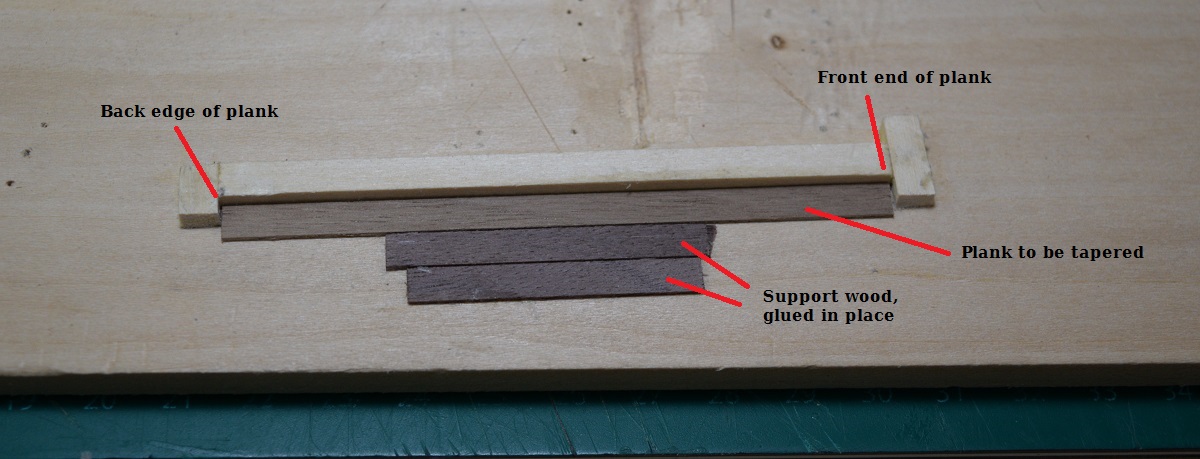 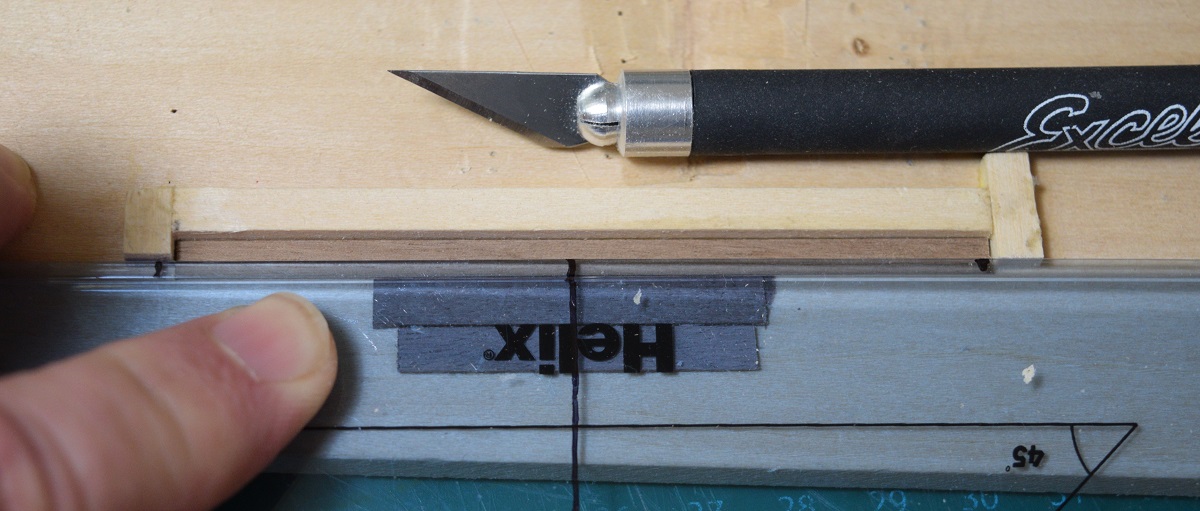 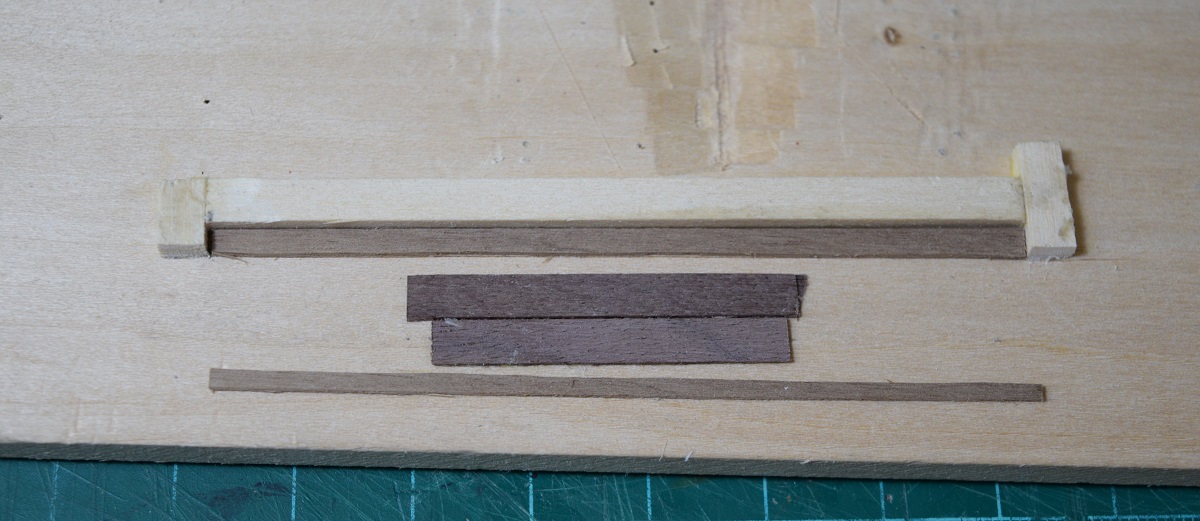 Which can then be glued in place on the poop deck! 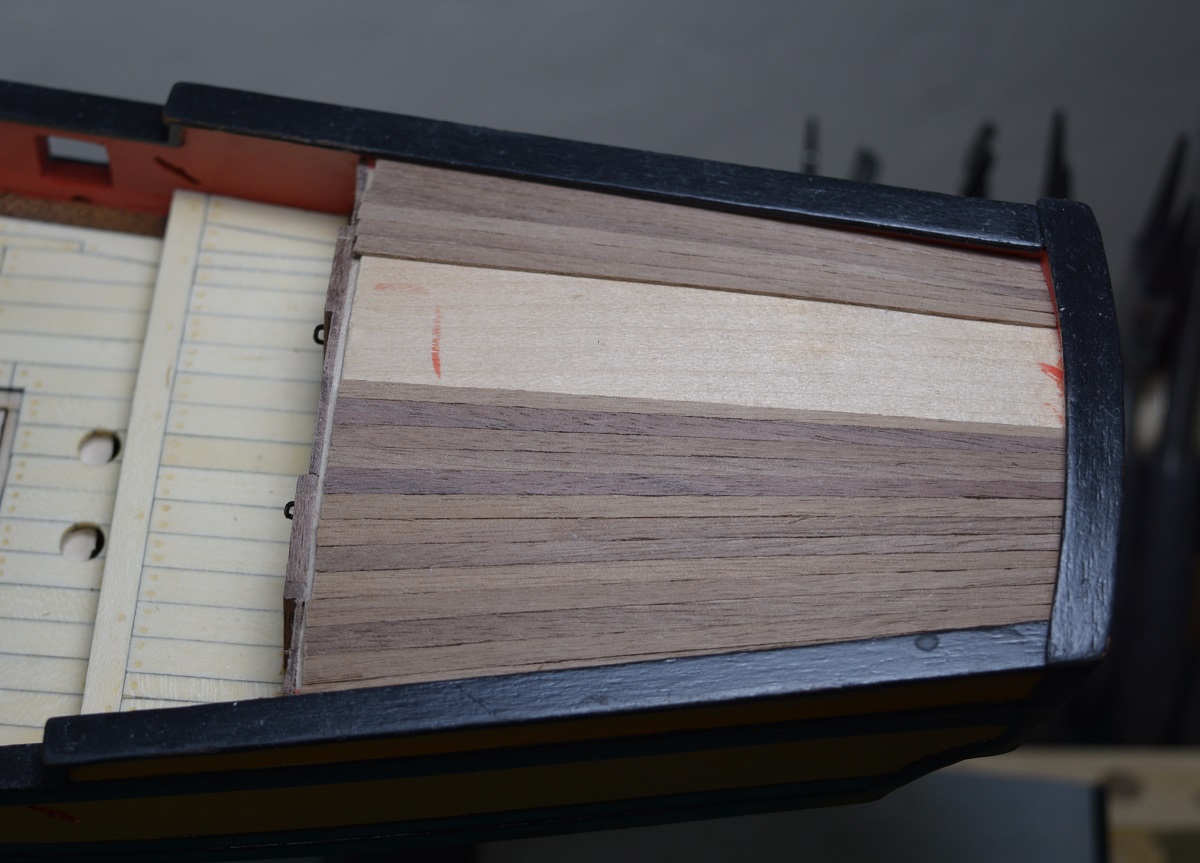 When complete, there is a ledge left at the front end of the deck. This was trimmed down using a sharp chisel (not the final edge in the photo).   A trim piece goes in the remaining ledge. This is supposed to be walnut, but I decided to go for a bit of contrast, and just happened to have an almost perfectly sized piece of swiss pear in my wood pile, so I cut it to size and bent it to shape. I had to use the chisel and make some adjustments to the plank edges, but eventually managed a fit I was reasonably happy with. 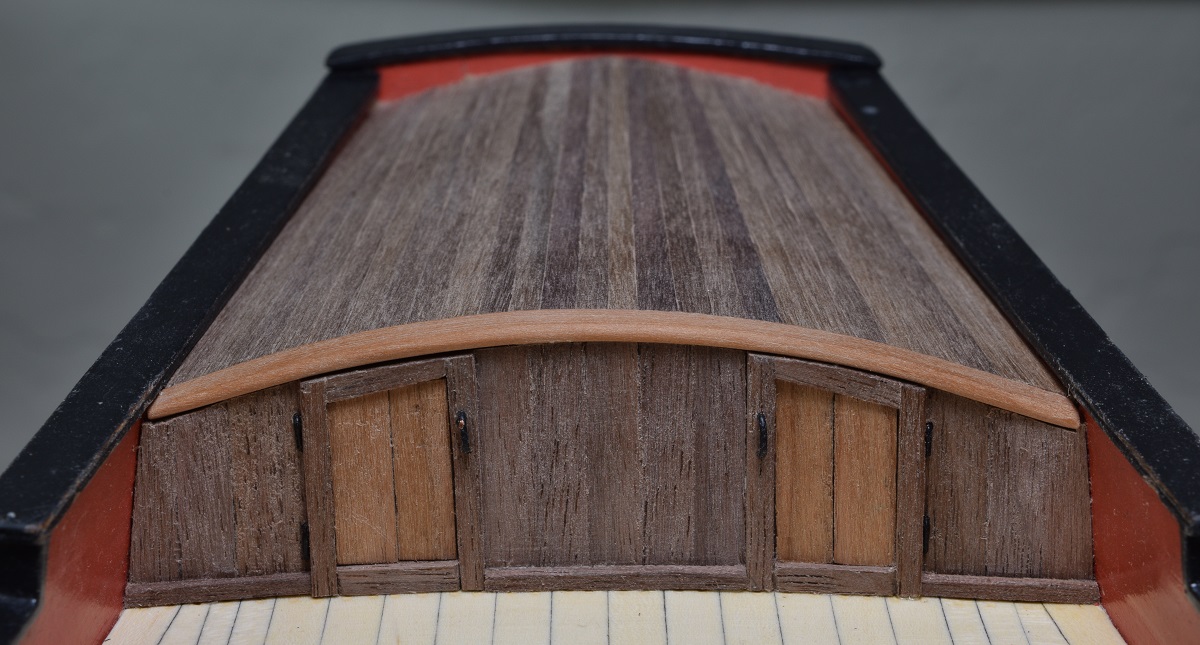 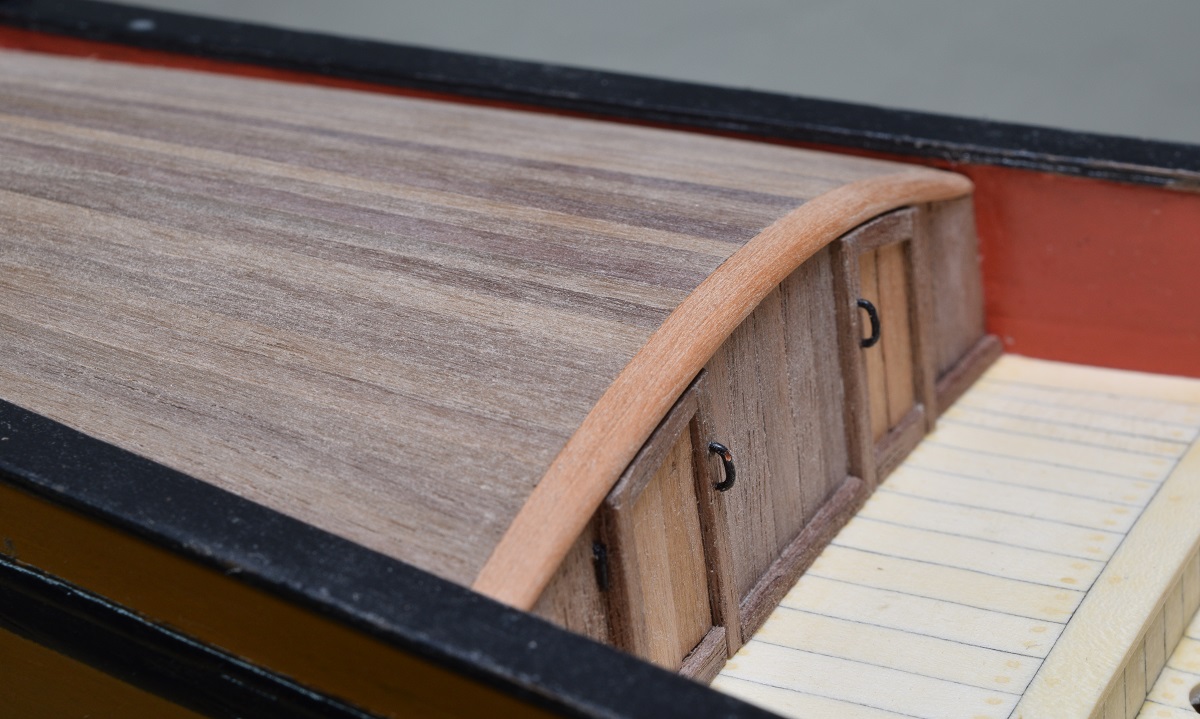 And then applied a coat of wipe-on poly, which is now drying. 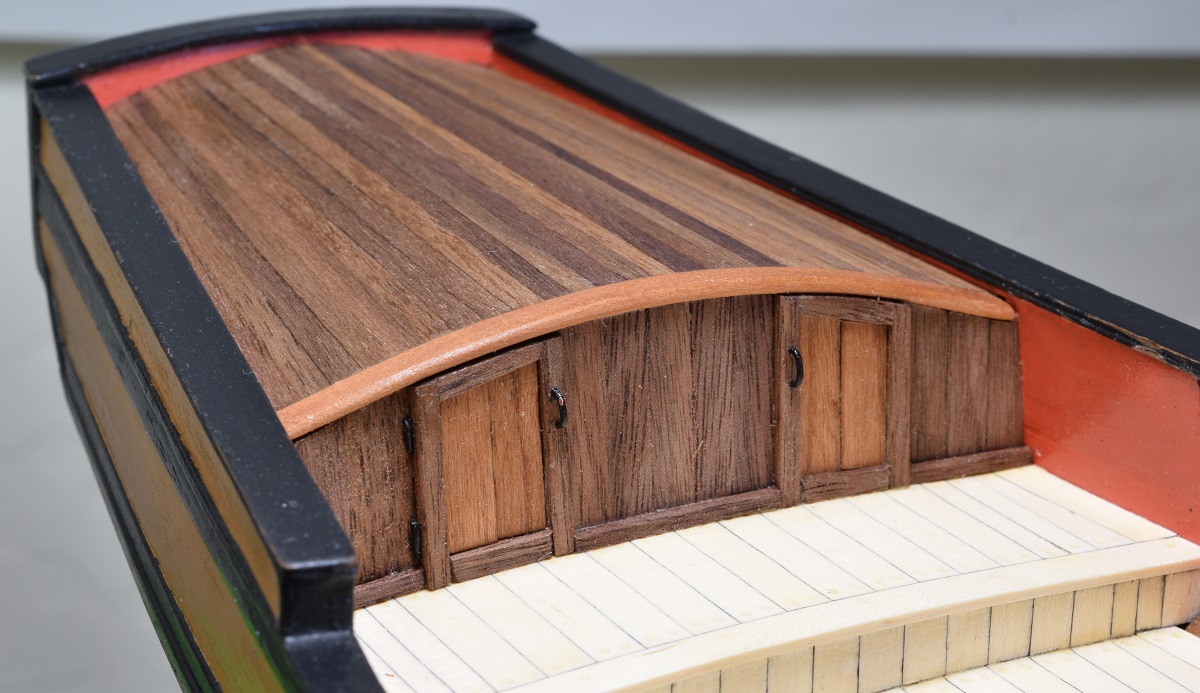 After I get a few coats of poly on, I will have to touch up the paint on the door handle that I managed to knock back to the copper while applying the poly or working on the trim. Obviously the black cap rail continues to get marred as I work, so that will be an ongoing problem requiring touch up painting. Next up - making gun carriages! But first.. back to work. 
|
|
#
?
Apr 5, 2015 18:31
|
|
|
Bloody Hedgehog posted:You'd want to freehand paint the supports? There's no way you'd get a straight enough line for it to look realistic.
|
|
#
?
Apr 5, 2015 21:52
|
|

|
All these planes being posted recently, not enough  tanks! tanks!Or self propelled AA guns, whatever.     This is an Italeri Flakpanzer Ostwind 1st Series with Academy PzIV tracks to replace the ghastly vinyl ones. The kit is nothing to write home about, you do one PzIV chassis, you've done them all (this is my third and I still kind of want an Ausf F2). The turret has some flaws, namely that the instructions are a bit confusing and they tell you to put things together in a way that isn't possible sometimes. The kit features minimal interior parts (fighting compartment floor, driver and radio operator seats, hull MG, transmission case). It also comes with some fairly generic figures, so I didn't bother making them. Strangely enough, the box shows a vehicle covered in Zimmerit, but there is obviously no Zimmerit coating inside the box.
|
|
#
?
Apr 6, 2015 05:31
|
|

|
And now I am done with modelling for a while, this project while not hard was just a pain to paint and I have gotten too lazy to finish now that the weather is nice.  Album
|
|
#
?
Apr 7, 2015 00:15
|
|


|
A small thing I finished recently. I think I like working on one or two figures at a time better than a whole set, it lets me focus on each individual one more.  
|
|
#
?
Apr 7, 2015 00:37
|
|
|
Chillyrabbit posted:And now I am done with modelling for a while, this project while not hard was just a pain to paint and I have gotten too lazy to finish now that the weather is nice.  It's perfect. I saw it on front page reddit and remembered a goon was doing it
|
|
#
?
Apr 7, 2015 06:34
|
|
|
I've gotten the itch to put together a Sherman Firefly (the least terrible Sherman). Are there any kits that stand out over the rest?
|
|
#
?
Apr 12, 2015 15:34
|
|


|
There's a tamiya kit of it on my to build shelf that comes with six figures and was well reviewed when I looked it up. Dragon also makes a nice easy eight kit.
|
|
#
?
Apr 12, 2015 15:43
|
|

|
My laser cutter got a new lens finally. Holy crap is it better. It's like I was modeling with a fat dull knife and now I have a sharp knife. Anyways, got back into making more loving sidewalks and bike paths... I ran out of my standard concrete gray, it was a solid puck, so I mixed up a new "standard" concrete colour and I don't give a gently caress that it doesn't match. It's newer concrete, deal with it.
|
|
#
?
Apr 13, 2015 04:23
|
|
|
What laser cutter do you use?
|
|
#
?
Apr 13, 2015 04:36
|
|
|
The Locator posted:What laser cutter do you use? What ever full spectrum laser's entry level model was years ago, they don't make it anymore and now their entry level is like 50% more expensive. My makerspace got it used and had to replace a ton of stuff, but it works.
|
|
#
?
Apr 13, 2015 04:45
|
|
|
I've been having a hell of a time trying to mask the canopy on an Aifix 1:48 Stuka. The canopy frames have almost no profile so there's nothing to run your knife against while trimming so my lines were ending up all over the place. Tried scotch tape instead so I could see though it and it requires to much pressure from the knife to cut through so it damaged the plastic underneath rather badly in some places, especially where the blade skipped over a nearly flat panel edge. Hoping the paint covers up the worst of the damage. A painter friend of mine recommended Glad Press'n Seal. She uses it as a replacement for Frisket since Frisket is hilariously expensive. Its basically regular cling wrap with some sort of space aged freakish pressure sensitive adhesive on one side. Its more translucent than scotch tape so I was able to see through it just fine while following the "barely there" panel lines on the canopy and its so thin I could cut it with almost no pressure. Seems to hold down just fine and the adhesive isn't water based so I doubt my acrylics will lift it up. Only down side is that it does leave a residue behind when you pull it up. Its very little though and cleans up fine with a bit of weak isopropyl alcohol. As long as you don't press to hard on it you can pull it up and reposition it as much as you like and its stretchy so it handled the little curved triangular bits on the front canopy without issue. Used a q-tip to buff down the edges after cutting the film. Peeling it off also satisfies that primal urge we all get when peeling the protective film off the glossy parts of our consumer products.   The lines are mostly nice and straight, but the blade marks under the film are making the light refract oddly. Also if any of you work for Airfix tell them that the next time I'm in the UK i'm going to pay them a visit and punch the dick of whoever though the clear ball turret didn't need a frame around it. "gently caress it just make a crease instead of a full frame," is the sort of thing that gets you punched in the dick. Wasn't so bad cutting a frame around it free hand by going a little at a time; but it probably looks horrible for folks that don't want to put in that effort.  Life lesson: Don't pick a $15 model plane with a green house canopy as your first kit in over a decade. Sauer fucked around with this message at 05:37 on Apr 13, 2015 |
|
#
?
Apr 13, 2015 05:28
|
|
|
Commissar Canuck posted:I've gotten the itch to put together a Sherman Firefly (the least terrible Sherman). Are there any kits that stand out over the rest? According to the review site I hit up, in 1:35 the Tasca VC Firefly and VC Firefly w/ cast cheek armour are the standouts, but the Dragon #6182 Firefly VC is ok as well. The earlier Dragon VC and IC Firefly kits apparently had issues, but if you're not finnicky they're the kits you get in the Cyberhobby bargain boxes. Worth nothing those are the only two brands with reviewed Fireflys there though. NTRabbit fucked around with this message at 10:35 on Apr 13, 2015 |
|
#
?
Apr 13, 2015 10:33
|
|


|
IIRC the Tamiya kit is the Tasca kit, re-released.
|
|
#
?
Apr 13, 2015 15:57
|
|
|
Raskolnikov38 posted:IIRC the Tamiya kit is the Tasca kit, re-released. It is and supposedly it's phenomenal. I have Dragon 6182 in my stash and I'm loving terrified of the tracks. There's like a thousand sprues each with several million pieces for the tracks. It's horrifying and this is coming from a guy who simply adores Dragon's magic tracks and Friuls. Indie link tracks are where it's at. Anyway, if you google around a bit for that kit, there's some complaints about it. The barrel is ~5mm too long and the pistol port on the turret is *gasp* ~.5mm too high or too low. Edit: ah, here you go. Scroll down for a write up of the  glaring errors glaring errors
|
|
#
?
Apr 15, 2015 01:15
|
|
|
What's a good primer to shoot through an airbrush for Tamiya and Vallejo acrylic paints? I've tried Vallejo dark gray and it airbrushed well, although it peels off plastic models fairly easily. I'm looking at getting one of the 200 ml bottles of Vallejo grey primer, but Amazon doesn't have them in stock for Prime and I can't get them locally. I'm hesitant to buy it from another site online to pay ~$25 with shipping (I'm a poor grad student). They do have the white primer available, is there any particular reason I should avoid white and get gray? Any other brands have a big bottle of primer that I should look into?
|
|
#
?
Apr 15, 2015 15:38
|
|
|
So this is certainly not my work, but I thought some people here might be interested due to the amazing detail coupled with the age. I stole this directly from the MSW forum:quote:Just found this and I thought I'd share - something as unusual as a 100+ year old model with a working engine, and super-detailed at that: There are links at the bottom of each page for more details - it's simply an amazing model, and made over 100 years ago.
|
|
#
?
Apr 15, 2015 17:04
|
|
|
Casyl posted:What's a good primer to shoot through an airbrush for Tamiya and Vallejo acrylic paints? I've tried Vallejo dark gray and it airbrushed well, although it peels off plastic models fairly easily. I'm looking at getting one of the 200 ml bottles of Vallejo grey primer, but Amazon doesn't have them in stock for Prime and I can't get them locally. I'm hesitant to buy it from another site online to pay ~$25 with shipping (I'm a poor grad student). They do have the white primer available, is there any particular reason I should avoid white and get gray? Any other brands have a big bottle of primer that I should look into? Vallejo's 'Surface Primer' range all seem to go fine through an airbrush (I've personally user Black, White, Gray and German Red-Brown primers from this range with much success) If you have no other choice of colour, white primer is perfectly fine, and is certainly better than not using primer at all. For many cases you'll be able to prime white and then go over with your actual base colour anyway, so you should be ok. If you do go for the gray, just make sure you're getting the gray colour from their primer range, and not the regular paint that is the colour of 'Grey Primer'. It is an easy mistake to make!
|
|
#
?
Apr 16, 2015 01:41
|
|
|
In regards to Press 'n Seal again. Its not only pretty good for masking canopies you can also slap a piece of it over your pallet or goblets that you've decanted hairspray/spray paint into and they're never drying out. Rather handy stuff. Edit: I just shot some Alclad Aircraft Aluminum over glossy black on a spare wing I had to test out a new effect. It looked really good, but when I shot some Future to seal it the varnish just completely killed the reflectiveness of the Alclad. It looks like generic regular old acrylic silver paint now . Wasn't expecting that. I let the Alclad sit for an hour before I sealed it; I wonder if that wasn't long enough to let it fully cure and make that nice glow it usually has permanent. Not the end of the world since the next step was hairspray and then RLM 2 as a primer color.
Sauer fucked around with this message at 02:14 on Apr 16, 2015 |
|
#
?
Apr 16, 2015 02:03
|
|
|
Alclad should dry for at least 24 hours. Still, even after a full day drying, I can't say whether the Future would've still killed the shine or not.
|
|
#
?
Apr 16, 2015 02:28
|
|
|
Its almost certainly insufficient drying time. Everytime I've used it in the past I've let it dry overnight and never had an issue with the shine dying like that after clear coating. Future usually makes it look even better by imparting this sort of sub-surface glow if that makes any sense. Not going to worry about it, this is just a piece of scrap I'm testing a three layer weathering approach on.
|
|
#
?
Apr 16, 2015 02:49
|
|
|
Sauer posted:Its almost certainly insufficient drying time. Everytime I've used it in the past I've let it dry overnight and never had an issue with the shine dying like that after clear coating. Future usually makes it look even better by imparting this sort of sub-surface glow if that makes any sense. Not going to worry about it, this is just a piece of scrap I'm testing a three layer weathering approach on. This does make sense in that Future seems to be almost magical stuff when modeling.
|
|
#
?
Apr 16, 2015 12:10
|
|


|

|
| # ? Jun 1, 2024 06:52 |
|
|
Thanks for the Firefly advice! One other unrelated question, does anyone have a technique for doing a mirrored metallic finish? I'm thinking of putting together that Aerial HK model kit as a quick little project.
|
|
#
?
Apr 16, 2015 20:13
|
|