


|
I'd throw down a light bronze drybrush and then some splotchy washes of black and brown around all the vents for that burned out vent look.
|
 #
?
May 5, 2015 03:22
#
?
May 5, 2015 03:22
|
|


|

|
| # ? May 16, 2024 18:37 |
|
|
I purchased this model and would like to paint the plain brown plastic kit to look something like this. Any advice on what primer would work best, or general advice on how to get that nice wood grain look?
|
|
#
?
May 5, 2015 03:33
|
|

|
A while ago I was able to pick up one of the now-OOP Forgeworld heavy bolter emplacements. I always dug this model since it was the same one they used for the Space Marine heavy bolter turrets in Dawn of War, and I'm glad I can add it to my Valhallans: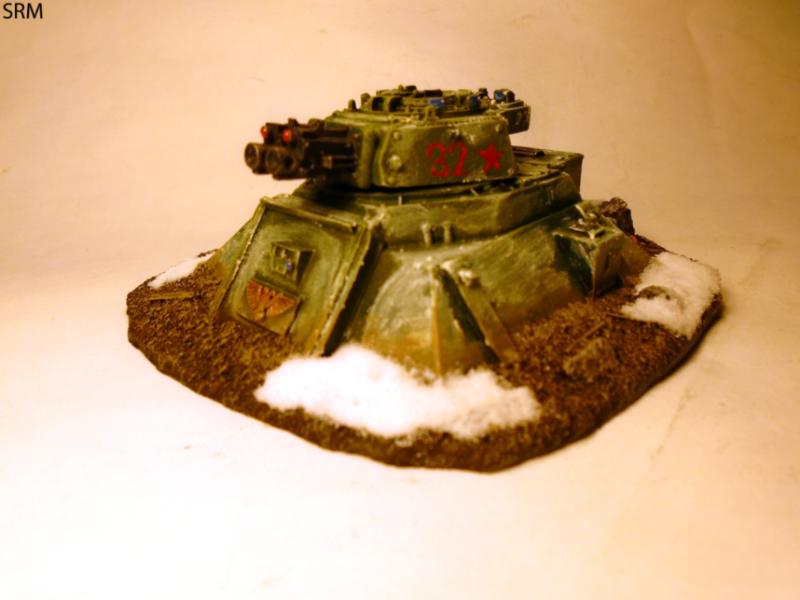 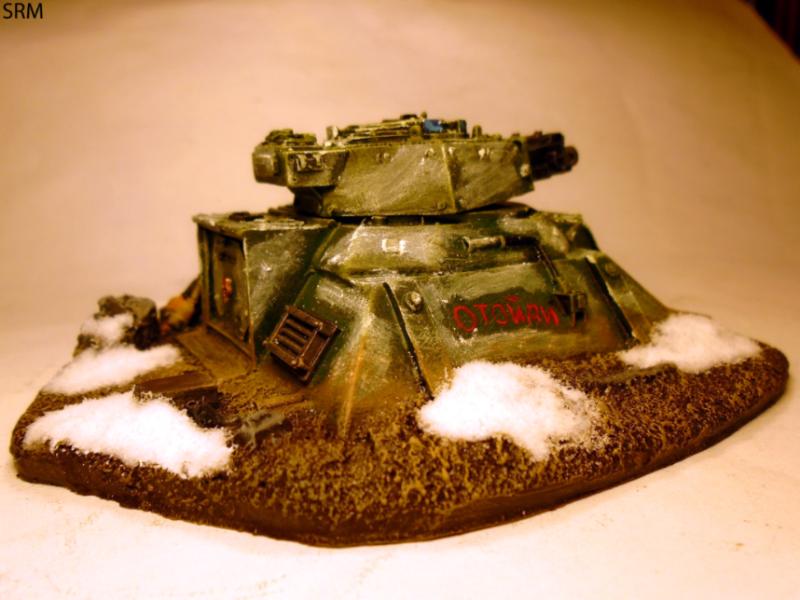 The text reads something akin to "Go away" 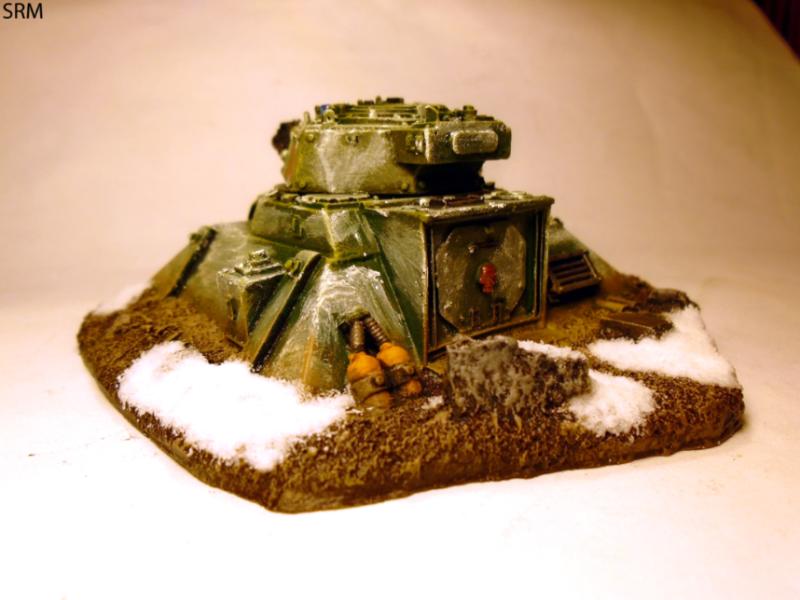 And for scale: 
|
|
#
?
May 5, 2015 04:50
|
|

|
More like "[informal you] step away", but I've seen much worse Russian inscriptions. If you're looking for something with a GTFO feel to it, you'll probably want "убирайся".
|
|
#
?
May 5, 2015 04:54
|
|

|
Ensign Expendable posted:More like "[informal you] step away", but I've seen much worse Russian inscriptions. If you're looking for something with a GTFO feel to it, you'll probably want "убирайся".
|
|
#
?
May 5, 2015 04:57
|
|
|
Drake_263 posted:Happy to helpo! And yeah, highlighting is one of those things that looks difficult at first, but it's simple once you get a handle on it. Most of the time I go with a simple three-to-five step paintjob - base everythiong with the correct colors, wash the whole mini with a single appropriate wash, clean up everything with the base colors again, highlight with a thin layer of a slightly brighter color, line highlight with a second brighter color. Thanks again! And yeah, I knew that with primer--I'm painting my Deadzone Enforcers in roughly the studio scheme, which means a lot of white, so I primed them white! For highlights/etc, I'm basically expanding my paint collection as I need something for a project, so next order I make will have some appropriate stuff for this one. Need a new grey to put down before the white, pretty sure, and I'll need the highlight colors for the purple. Reaper has handy shade/base/highlight color trisds... but the purple I used for my main color is the light end of one of those, so I'll have to find something else to use! Actually, anyone have a recc for what to highlight Reaper MSP Royal Purple with? I suppose I could, y'know, mix some of it with some white and make my own highlight color! Esser-Z fucked around with this message at 12:26 on May 5, 2015 |
|
#
?
May 5, 2015 12:17
|
|

|
Thanks for all your primer help guys, sorry but I really want to get it from here and its a limited choice... Spray Primers Element Games Sells Which is the best all round? I always heard Army painter is pants but maybe that was a while ago?
|
|
#
?
May 5, 2015 12:48
|
|
|
Army Painter is good , and you get the added benefit of having your basecoat done off the bat and having matching dropper-bottle paints as well, so you don't have to worry about your base and touchup colors being different. However, I've found that AP spray does not adhere to metals particularly as well and will rub or chip off easier than, say, Krylon will, under normal handling. I don't know if this holds true for plastics - obviously most stuff now is either plastic or resin, so this may not affect you . Once properly sealed, I don't know if you'll have this issue. As for best around, I still stand by Krylon in the US. I have never had a problem with it, it coats well, and handles nicely. I'd recommend the AP if you're in a rush or have a lot of models to paint in one go.
|
|
#
?
May 5, 2015 13:50
|
|
|
berzerkmonkey posted:Army Painter is good , and you get the added benefit of having your basecoat done off the bat and having matching dropper-bottle paints as well, so you don't have to worry about your base and touchup colors being different. Ah no worries, i'm starting with plastic, want to start painting the Assassin boardgame from GW this weekend and I was going to try none GW paints and stuff this time round. Thanks!
|
|
#
?
May 5, 2015 14:31
|
|
|
 +++ WOULD YOU LIKE TO HEAR THE WORD OF THE IMMORTAL GOD-EMPEROR AND HIS DIVINE BBBHHHRRRRTTTT? +++ Chucky was pretty fun and fast to paint, and he looks like he'll be pretty drat nasty on the field. Meanwhile, my next project is going to be this:  Got the basic colors blocked out on the three dudes in the back, the others are going to catch a blast of primer to prime the FW parts that I gave them earlier.   I had fun converting the shield on this badass dude. I'm likely going to play these guys as counts-as Imperial Fists, and he'll be my Lysander when I feel like going for maximum beatstick.
|
|
#
?
May 5, 2015 14:53
|
|
|
Unzip and Attack posted:I purchased this model and would like to paint the plain brown plastic kit to look something like this. First off, do the 'planks' have a wooden texture to them, or are they all smooth? If they're smooth, you might want to consider carving the texture yourself - basically take the tip of a hobby knife or some other pointy implement and draw fine lines along the grain of the wood. After that's done, you prime and paint the model as usual; the idea is that you can just wash the planks with a black or brown wash in order to get the 'grain' to appear.
|
|
#
?
May 5, 2015 15:20
|
|
|
I wonder how well one of those furniture repair markers would do in a case like this?
|
|
#
?
May 5, 2015 15:21
|
|

|
Drake_263 posted:First off, do the 'planks' have a wooden texture to them, or are they all smooth? If they're smooth, you might want to consider carving the texture yourself - basically take the tip of a hobby knife or some other pointy implement and draw fine lines along the grain of the wood. After that's done, you prime and paint the model as usual; the idea is that you can just wash the planks with a black or brown wash in order to get the 'grain' to appear. The wood texture already exist in the mold, so I'm thinking a dark primer (either black or brown) and then drybrush a lighter brown over the surface to get the worn wood look. I just don't want to overdo the gaps in between and make it too dark.
|
|
#
?
May 5, 2015 16:12
|
|
|
Drake_263 posted:Not at all, I'm afraid. If I recall correctly, the Predator sprue comes like, one or two extra track shoes you can glue on as stowage or the like. drat, ok, thanks.
|
|
#
?
May 5, 2015 16:24
|
|

|
Esser-Z posted:Actually, anyone have a recc for what to highlight Reaper MSP Royal Purple with? I suppose I could, y'know, mix some of it with some white and make my own highlight color! I tend to like the outcome of highlights that change the hue of the base color slightly. In the case of that purple color, I would probably experiment with a much less saturated color, even possibly dipping into the grey lines of colors. A Citadel Dawnstone, possibly mixed with a little dab of blue or purple would be a nice highlight.
|
|
#
?
May 5, 2015 16:35
|
|

|
Unzip and Attack posted:The wood texture already exist in the mold, so I'm thinking a dark primer (either black or brown) and then drybrush a lighter brown over the surface to get the worn wood look. I just don't want to overdo the gaps in between and make it too dark. Black or brown primer with a brown drybrush and maybe a brown wash sound like the way to go, then. That's what I'd do. If you want to really get fiddly, you might want to give the individual planks slightly different washes before drybrushing and washing the whole lot - bring out subtly different shades in the lumber. I do that to give my SKaven stuff the impression that it's been pieced together from whatever wood the little fuckers found, no matter the age or source, but then again it might not be the effect you're going for. HardCoil posted:drat, ok, thanks. Sorry to be a disappointment, happy to help!
|
|
#
?
May 5, 2015 16:36
|
|
|
Welp, I've had a productive lunch hour for once. Combat Patrol, here I come: [  56 Steel Legion based and ready for priming/basecoating. Also, I'd like to share something I figured out for those of you who still have slotta bases - toilet paper/kleenex. Tear off a little bit, apply a glue/water mix around the exposed slot area, and apply tissue. Instant coverage - it's pretty awesome.
|
|
#
?
May 5, 2015 18:24
|
|
|
berzerkmonkey posted:Also, I'd like to share something I figured out for those of you who still have slotta bases - toilet paper/kleenex. Tear off a little bit, apply a glue/water mix around the exposed slot area, and apply tissue. Instant coverage - it's pretty awesome. Ooh. You're pretty much applying quasi-paper-mache there. That's not a bad idea.
|
|
#
?
May 5, 2015 18:53
|
|

|
Iris of Ether posted:Ooh. You're pretty much applying quasi-paper-mache there. That's not a bad idea. Yep. I was going to use tape or putty, but wound up going this route, and it was quick and easy. Tape wouldn't hold due the lack of surface area, since I was only trying to cover a small portion of the slot.
|
|
#
?
May 5, 2015 18:55
|
|
|
SRM, your stuff is amazing, but for the love of god please work on your white balance.
|
|
#
?
May 5, 2015 18:59
|
|
|
An Angry Bug posted:SRM, your stuff is amazing, but for the love of god please work on your white balance.
|
|
#
?
May 5, 2015 19:03
|
|
|
Oh, that's fine, I meant editing or something. I think someone in this thread posted an online tool that could fix white balance on pics after the fact, but I forget the name.
|
|
#
?
May 5, 2015 19:06
|
|
|
SRM posted:I'm trying, it just gets really tricky when I have snow basing. The white on the snow is either SUPER hot and blows everything out, or everything gets that kind of yellowish tint to it. I really need a real lightbox instead of the blank side of an 18x24 drawing I did in college and a pair of desk lamps. Snap it without any white balancing or adjust it manually to your bulb colour (3000k for warm white/incandescent, 7900k for flourescent/cool white) then tweak it in your photo editor of choice. The programs auto-levels/auto-tone usually does a better job than your camera.
|
|
#
?
May 5, 2015 19:13
|
|

|
Z the IVth posted:Snap it without any white balancing or adjust it manually to your bulb colour (3000k for warm white/incandescent, 7900k for flourescent/cool white) then tweak it in your photo editor of choice. The programs auto-levels/auto-tone usually does a better job than your camera.
|
|
#
?
May 5, 2015 19:23
|
|
|
berzerkmonkey posted:Army Painter is good , and you get the added benefit of having your basecoat done off the bat and having matching dropper-bottle paints as well, so you don't have to worry about your base and touchup colors being different. Wash your metal minis and buff them with a rag.
|
|
#
?
May 5, 2015 20:07
|
|
|
SRM posted:I'm trying, it just gets really tricky when I have snow basing. The white on the snow is either SUPER hot and blows everything out, or everything gets that kind of yellowish tint to it. I really need a real lightbox instead of the blank side of an 18x24 drawing I did in college and a pair of desk lamps. Okay here's a very quick and dirty bit of white balancing using GIMP, which is like a free version of Photoshop. Go to Colors > Brightness-Contrast, then click 'Edit These Settings as Levels.'  See the little dropper bottle here? This is the white point.  Clicking this will get a dropper bottle and will put you back on the image. Find the white point of the image--typically the brightest white point, and in this case I actually clicked just north-west of the turret hatch--and click on it. Doing so will magically turn your image from this to this.  This can be done with most image editing software that I'm aware of. Definitely photoshop, probably others, but it might go about it a different way depending on the program.
|
|
#
?
May 5, 2015 20:19
|
|

|
SRM posted:I'm just choosing the black and white points in Photoshop and using a point and shoot Sony camera. I'll look into it next time I take photos of some of my models since I'm kinda tired of my pictures looking like that too. If you're using Photoshop, keep doing that but also use the Remove Color Cast tool.
|
|
#
?
May 5, 2015 20:19
|
|


|
El Estrago Bonito posted:Wash your metal minis and buff them with a rag. What does this have to do with anything? I wash all of my minis - AP doesn't have the tooth that Krylon does and doesn't adhere as well to metal minis.
|
|
#
?
May 5, 2015 20:20
|
|
|
Slimnoid posted:Super helpful tutorial moths posted:If you're using Photoshop, keep doing that but also use the Remove Color Cast tool.
|
|
#
?
May 5, 2015 20:28
|
|
|
Holy poo poo I stopped in some random out of town LGS and found 3 pots of Charadon Granite  No Boltgun Metal though. 
|
|
#
?
May 5, 2015 20:45
|
|

|
Fyrbrand posted:Holy poo poo I stopped in some random out of town LGS and found 3 pots of Charadon Granite drat your eyes. At least there are good alternatives to Boltgun Metal. There isn't poo poo for Charadon Granite.
|
|
#
?
May 5, 2015 20:47
|
|
|
SRM posted:This is exactly what I've been doing, but if you look at the snow, it's super duper hot and kinda blows out any detail. It just looks like this glowing white blob. You might be able to counteract that by adjusting the white balance on your camera before taking pictures. Keeping it at a baseline level and not boosting it seems to help for me, but ymmv. Personally I'd rather have some blown-out snow than a grungy yellow backdrop that infects the rest of the color balance, but that's just me.
|
|
#
?
May 5, 2015 20:59
|
|
|
Ensign Expendable posted:More like "[informal you] step away", but I've seen much worse Russian inscriptions. If you're looking for something with a GTFO feel to it, you'll probably want "убирайся".   SRM posted:I'm trying, it just gets really tricky when I have snow basing. The white on the snow is either SUPER hot and blows everything out, or everything gets that kind of yellowish tint to it. I really need a real lightbox instead of the blank side of an 18x24 drawing I did in college and a pair of desk lamps. I feel you man. My models were really hard to photograph correctly because I had deep shadows, lots of undertones, and white. Despite my best photoshop efforts I was still blowing out my whites and making things look generally awful. The trick was a long exposure time and a tripod. Also a DSLR, but that was less important than the setup. I dunno if you have something that can do that, but it helped me transmogrify my models: 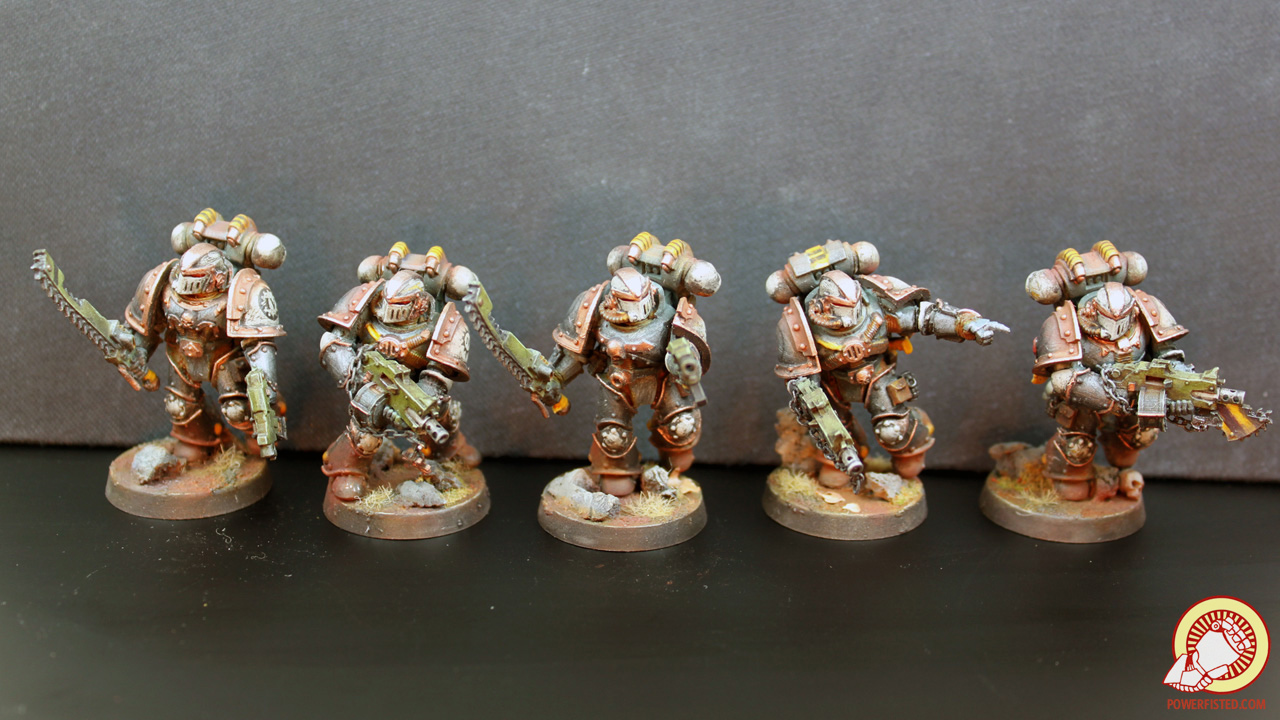 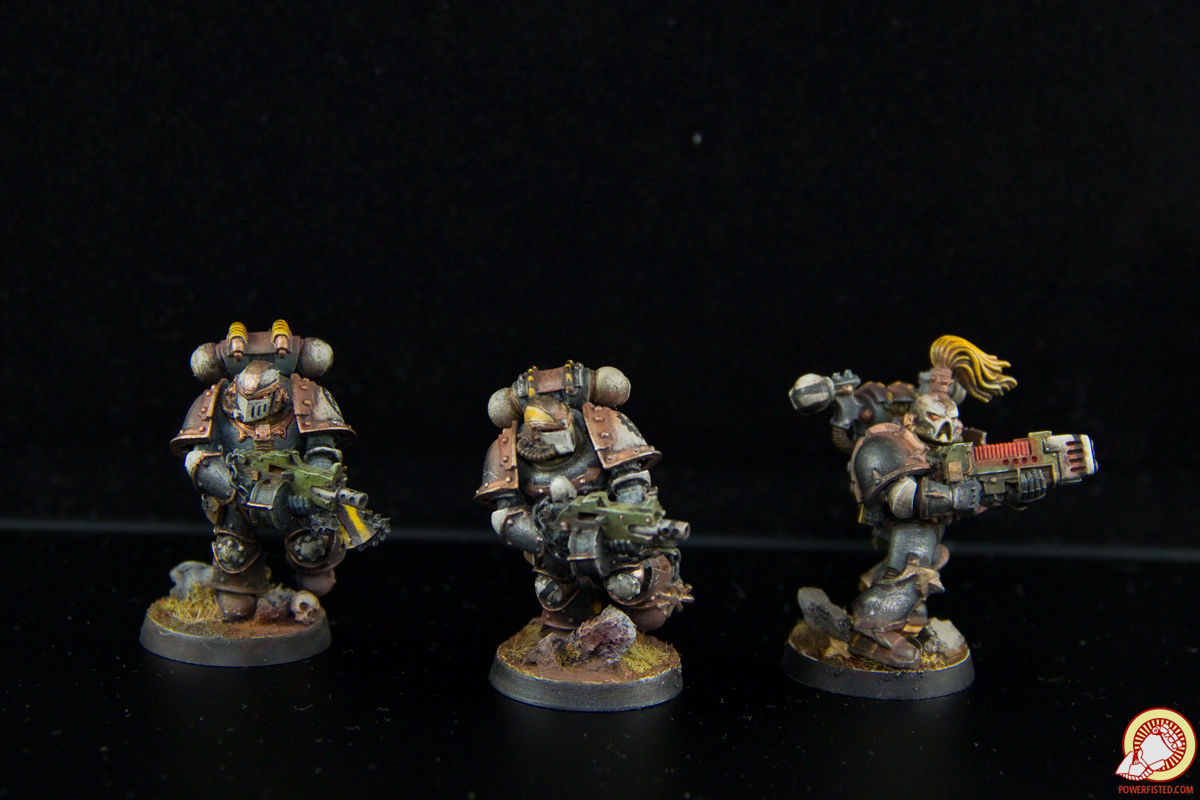  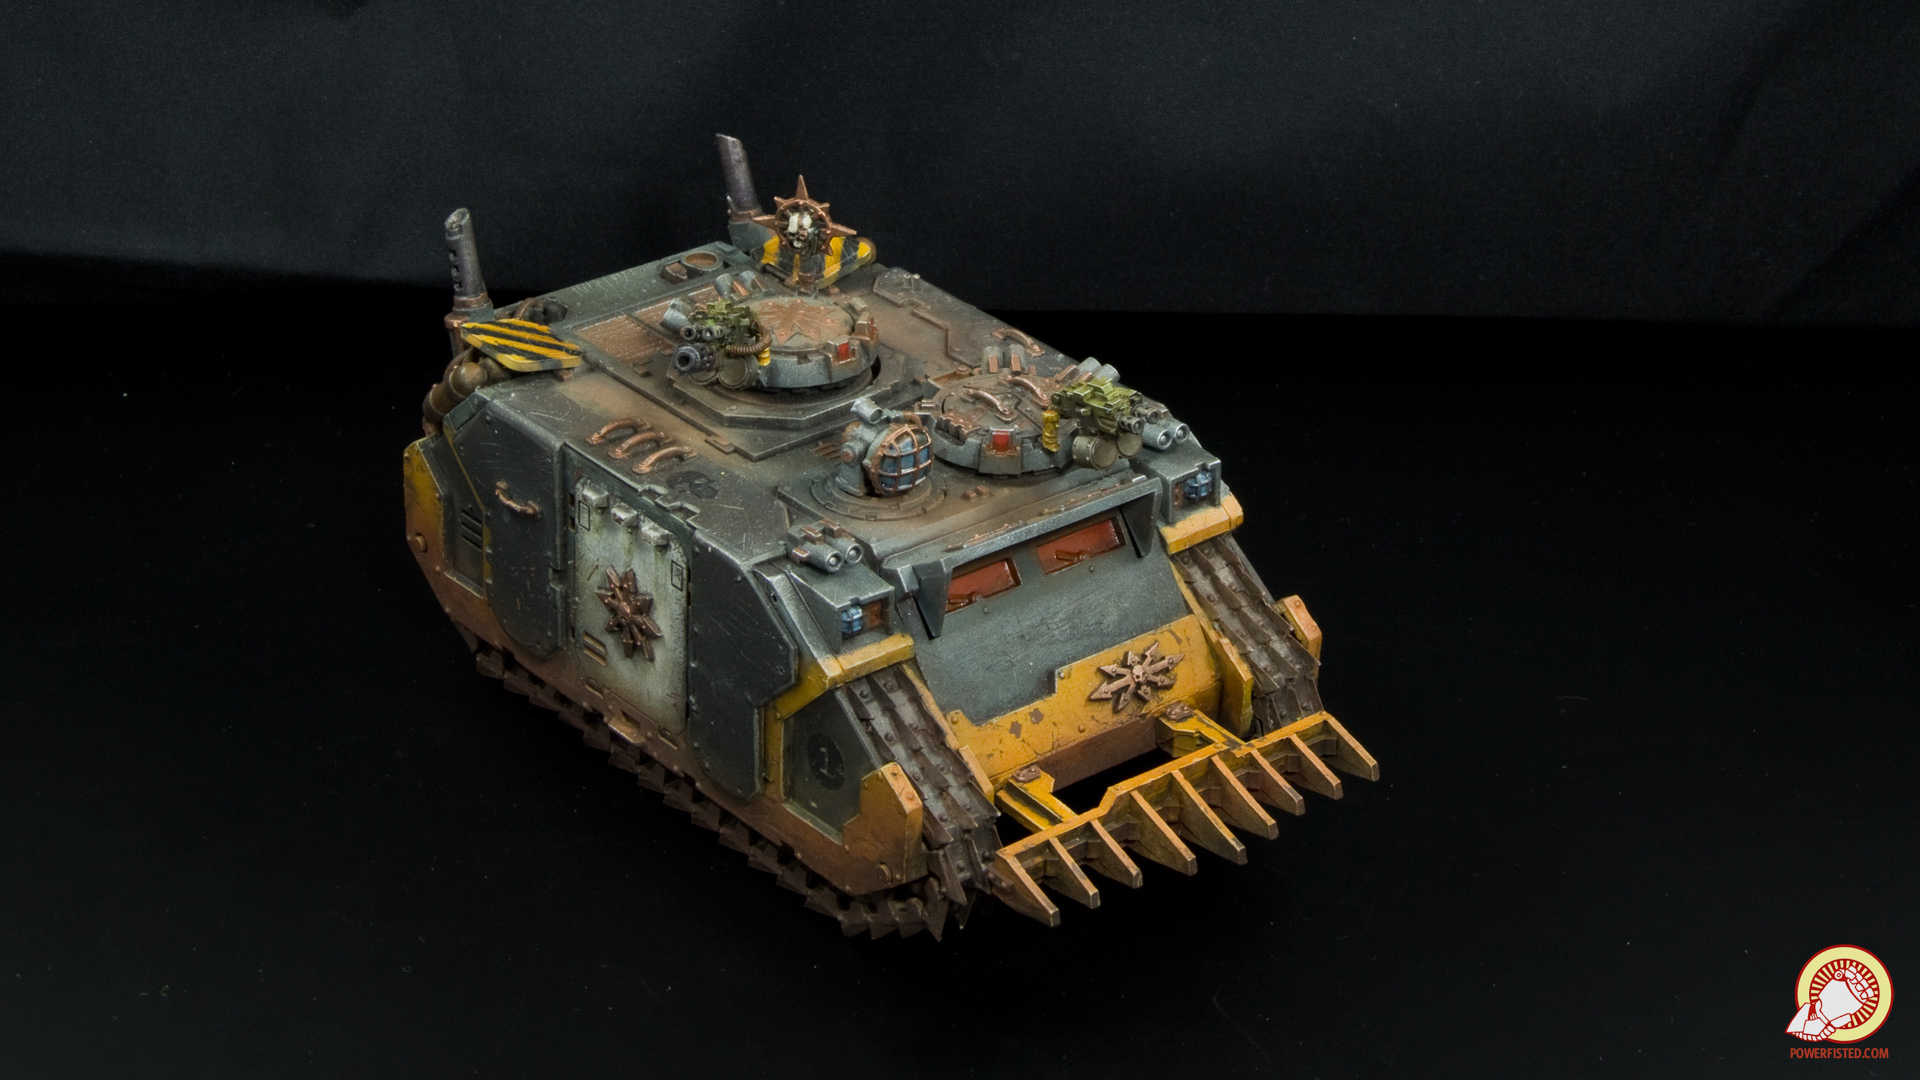 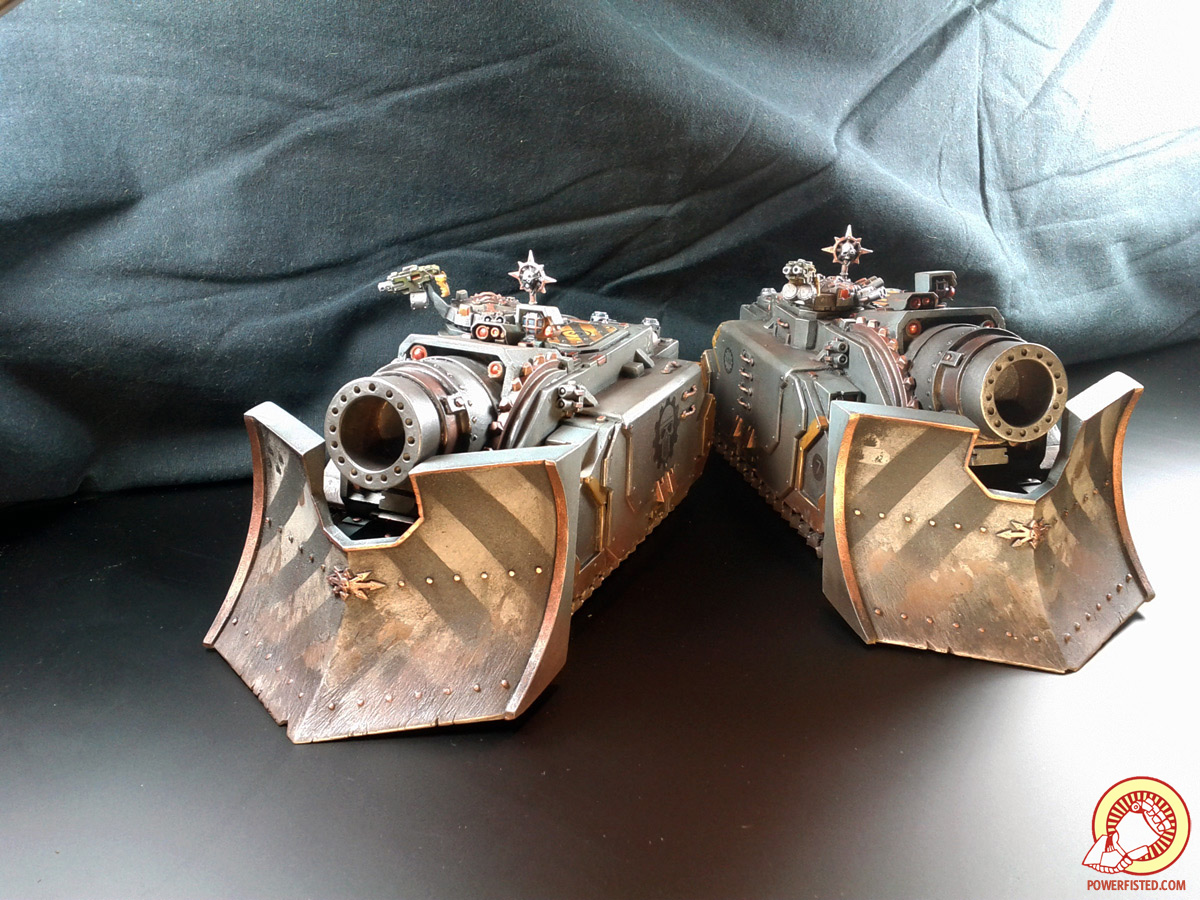 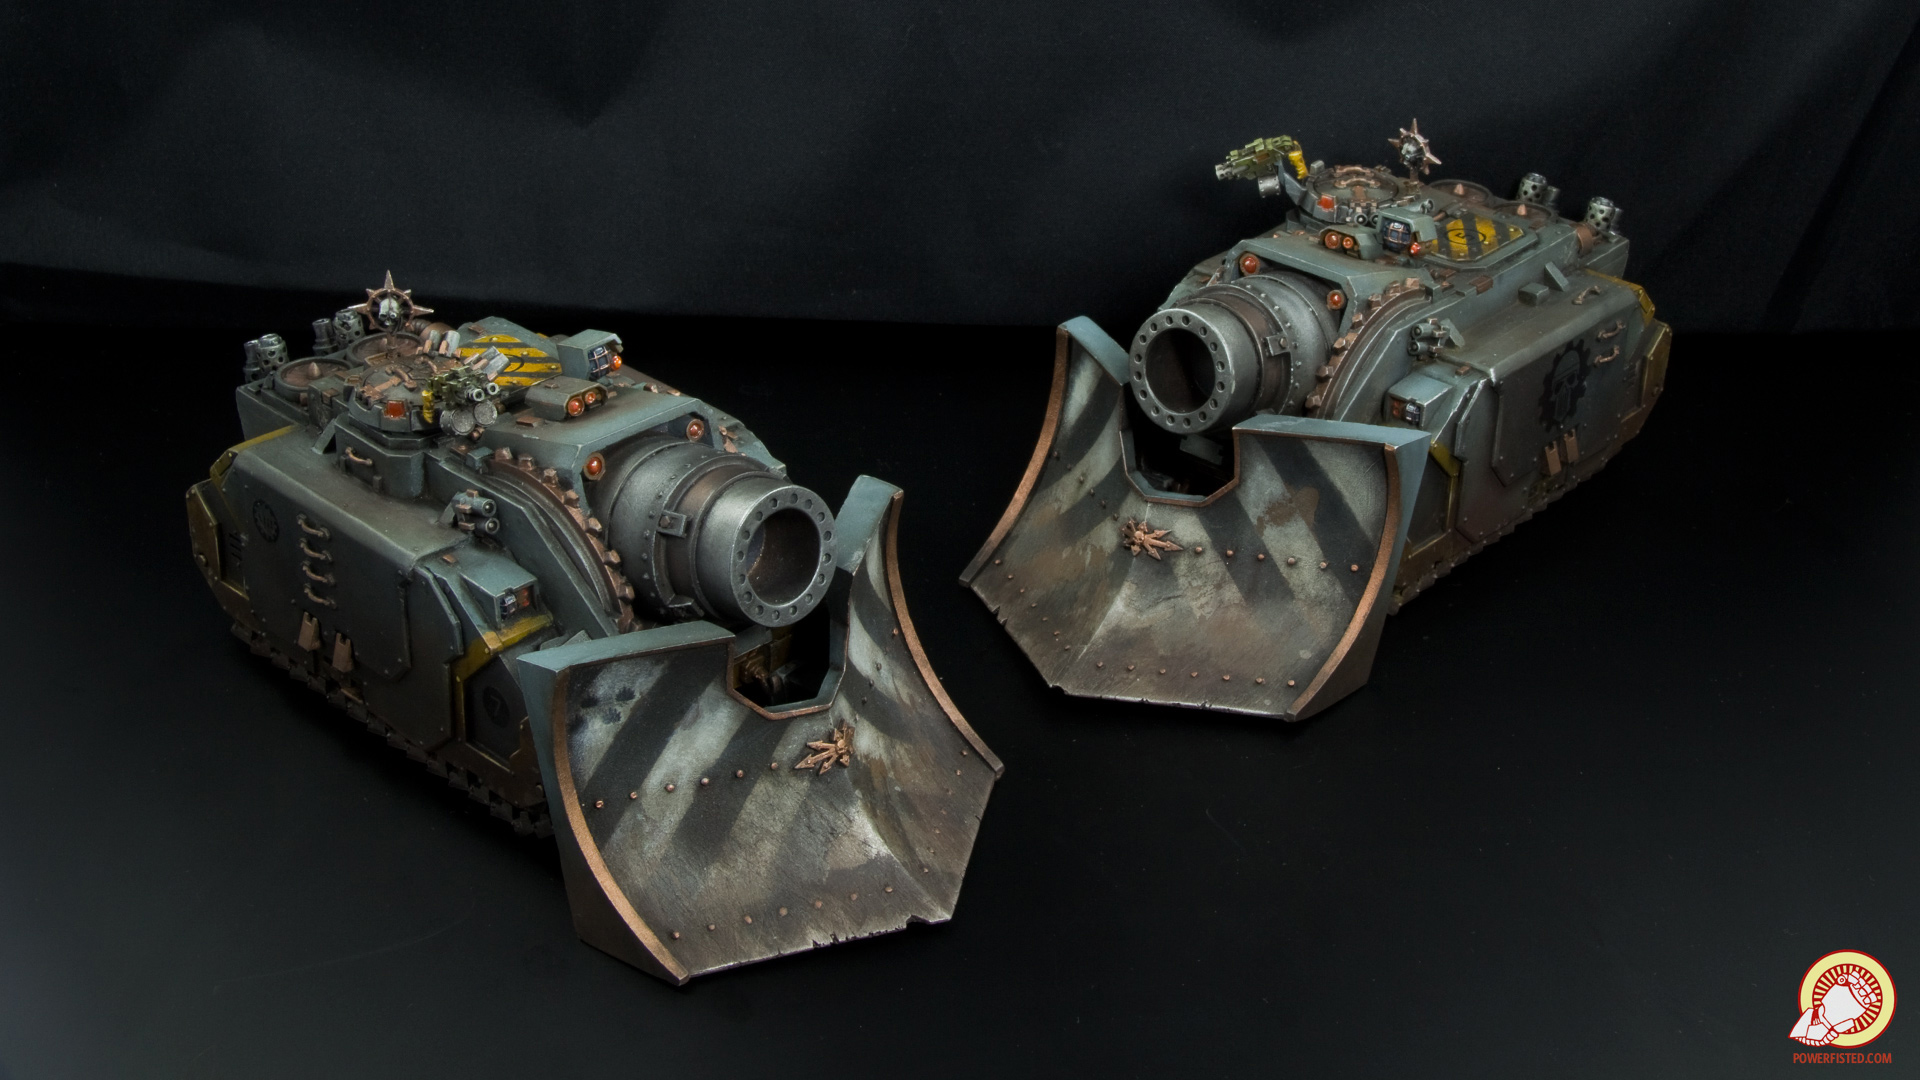
|
|
#
?
May 6, 2015 06:28
|
|


|
I'm genuinely envious of how well your poo poo photographs. If I put a black background down I'd have a muddled mess that looked like something out of Dakka's auto-balance feature for photos. Unfortunately I don't have an SLR or anything, but I'll see if my camera has exposure settings anywhere in there.
|
|
#
?
May 6, 2015 07:01
|
|
|
Thanks man. Your stuff rocks though and you crank out whole armies in the time it takes me to paint a single squad  I'd say experiment with backgrounds and light position. Lighting + background combos are an art, really. I tried many setups before figuring out the best one for me. Part of that was different backgrounds: I'd say experiment with backgrounds and light position. Lighting + background combos are an art, really. I tried many setups before figuring out the best one for me. Part of that was different backgrounds:White Looks decent, but it really downplays my metallic highlights and color depth. Also the whites look flat.  Blue I found it very 'meh'. Its like a middle ground between black and white with no real advantage for my colors.  Black Closest to the 'actual' colors of the models. Despite this, it requires lots of harsh direct light.  Black Backdrop, Frosted Glass Surface My sweet spot. The backdrop absorbs most of the light, but the frosted glass bounces back enough to fill the lightbox with refracted light... no direct light needed so its way softer, but it requires long exposures to work.  If you're like me and spend 100s of hours painting and modeling, the cost of a better camera is worth giving your hard work the justice it deserves. BULBASAUR fucked around with this message at 08:17 on May 6, 2015 |
|
#
?
May 6, 2015 08:15
|
|
|
Meanwhile I'm plugging on with a lovely webcam and whatever light I can get in through my window. This is what I did last night:   I quite like how these dudes turned out. Basic tabletop standard, but it works.  Cataphractii Praetor, I'll use him as either a counts-as generic Chapter Master or Lysander.  Couldn't resist the urge to bling up the shield! I like how it turned out.  Why does my webcam even -have- a 'focus to two inches' setting?
|
|
#
?
May 6, 2015 08:54
|
|
|
koreban posted:I tend to like the outcome of highlights that change the hue of the base color slightly. In the case of that purple color, I would probably experiment with a much less saturated color, even possibly dipping into the grey lines of colors. A Citadel Dawnstone, possibly mixed with a little dab of blue or purple would be a nice highlight. Thanks!
|
|
#
?
May 6, 2015 12:37
|
|
|
Drake_263 posted:Why does my webcam even -have- a 'focus to two inches' setting? Dick shots (yours specifically) sorry
|
|
#
?
May 6, 2015 13:56
|
|


|
berzerkmonkey posted:drat your eyes. What is this good Boltgun replacement you speak of? The new GW metals I've tried have been poo poo. PP stuff is ok but not nearly as legit as Boltgun was. I tried VGC and wasn't impressed either.
|
|
#
?
May 6, 2015 15:27
|
|
|

|
| # ? May 16, 2024 18:37 |
|
|
I really like Vallejo Model Air metallics, specifically Gun Metal, Steel, and Chrome.
|
|
#
?
May 6, 2015 15:37
|
|
