

|
Most of what anything anyone teaches falls apart if you pull back far enough, what with the rules of quantum mechanics stating that the past is dictated by future measurements and all that, but this is a piece of information that should be able to take someone from not having any idea what they're doing when drawing cubes to being able to construct the fundamental shapes in a series of dense city streets as simply as possible: https://instagram.com/p/3tl6afF49R/
|
 #
?
Jun 9, 2015 15:55
#
?
Jun 9, 2015 15:55
|
|

|

|
| # ? Jun 2, 2024 01:05 |
|
|
Agreed that the Marshall Vandruff series is great. One thing that unfortunately doesn't get enough explanation is the idea of focal length. When first learning, most of us put the vanishing points too close together, which while "consistent" with the rules of perspective makes things look weirdly distorted compared to typical experience. This imgur album that was posted in the Making Comics thread has some great info about applying perspective in practical scenarios (a city street, etc.).
|
|
#
?
Jun 9, 2015 16:03
|
|

|
i am harry posted:Most of what anything anyone teaches falls apart if you pull back far enough, what with the rules of quantum mechanics stating that the past is dictated by future measurements and all that, but this is a piece of information that should be able to take someone from not having any idea what they're doing when drawing cubes to being able to construct the fundamental shapes in a series of dense city streets as simply as possible: This doesn't address what Fangz was asking, though. Using two points only works if every object in the image has parallel sides. If you have two squared shapes and one of them is turned relative to the other, they're going to use different vanishing points, and it's not immediately obvious how to place different sets of points on the horizon and have them work together.
|
|
#
?
Jun 9, 2015 22:49
|
|

|
Besesoth posted:This doesn't address what Fangz was asking, though. Using two points only works if every object in the image has parallel sides. If you have two squared shapes and one of them is turned relative to the other, they're going to use different vanishing points, and it's not immediately obvious how to place different sets of points on the horizon and have them work together. Have you tried it? Part of figuring anything out with visual arts is trying it. Looking at the scene in the link above this post and trying it out would be something I'd be very interested in seeing from anyone who wonders this. Maybe with some examples of the problem I can answer the question a bit more completely. Aafter posted:I'm pretty sure I know how 2-point perspective works and I'm making mistakes anyway. Oh, that's called being lazy. I'm pretty sure it's a waste of time if you're going to be lazy about it. i am harry fucked around with this message at 02:47 on Jun 10, 2015 |
|
#
?
Jun 10, 2015 02:39
|
|
|
i am harry posted:Oh, that's called being lazy. I'm pretty sure it's a waste of time if you're going to be lazy about it. no youre lazy.  But really, thanks for the video. I'm still reading through the album neonnoodle posted.
|
|
#
?
Jun 10, 2015 03:10
|
|

|
It's important to note that fundamentals such as perspective aren't things that people master off the bat (or arguably ever) but are skills and tools that you constantly work at and improve during your lifetime as an artist. It's okay to not get everything at first, and it's important not to beat yourself up over that. The more you learn and the more you practice the more things sink in. The important thing is to not be afraid to tackle difficult stuff and to give it your best shot.
|
|
#
?
Jun 10, 2015 03:15
|
|
|
i am harry posted:Have you tried it? Part of figuring anything out with visual arts is trying it. Looking at the scene in the link above this post and trying it out would be something I'd be very interested in seeing from anyone who wonders this. Maybe with some examples of the problem I can answer the question a bit more completely. Yes? All of the cubes in your illustrations have parallel sides. You're not addressing shapes that don't. But this is trivial to demonstrate: put two index cards on a table facing the same direction and then rotate one of them 45 degrees. The edges are no longer going the same direction. Here's a sketch (forgive the wobbly lines, I was improvising a straightedge):  The head-on shape obviously doesn't use the same vanishing points as the shape at an angle. I'm working out a guideline from empirical observations, but it would be nice to not have to reinvent the wheel.
|
|
#
?
Jun 10, 2015 03:16
|
|
|
i am harry posted:Have you tried it? Part of figuring anything out with visual arts is trying it. Looking at the scene in the link above this post and trying it out would be something I'd be very interested in seeing from anyone who wonders this. Maybe with some examples of the problem I can answer the question a bit more completely. Yes I've done it lots. The basic point is that any pair/triplet of vanishing points works with single objects, or sets of objects parallel to each other. For example boxes A and B in the image:  That's because all the corresponding Red, Blue and Green edges are parallel to each other. Suppose we want to introduce another cube into the scene - but this time rotated in the vertical axis. Then how do we have the new shape be still in perspective with the old? Look at the brown cubes. If we fix the leftmost vanishing point, we can vary the rightmost vanishing point and obtain a range of different foreshortenings. Each is consistent to itself, but most of them are *wrong* with the existing shapes in the image because they imply a different focal length. So, the question is, how does the original positions of the vanishing points determine the relationship between the two vanishing points, if I was to move one of them to facilitate a rotated perspective? I have no idea how to construct this by hand.
|
|
#
?
Jun 10, 2015 03:20
|
|


|
I don't understand it 100% myself, but here goes. Basically you need to think about what this looks like from above. These are boxes, with right angles. The vanishing points show how perpendicular lines (at 90 degrees to one another) look in perspective: one set of parallel lines goes to this point, another set, perpendicular to the first, goes to that one. Right Vanishing Point (RVP), Left Vanishing Point (LVP). You already know this.  So what you do is make those perpendicular lines explicit - draw a right angle, such that it intersects your horizon line where you've placed your vanishing points. Now there's an infinite number (I think) of ways to do that, so you have to decide on where the lines will meet. You find where they join by dropping a vertical line from your Center Vanishing Point (CVP), which is "straight ahead," or along the "line of sight." It can be anywhere relative to your vanishing points, for ease and because I'm doing this backwards I put it halfway between the ones you started with. In general you determine the CVP (and thus where "straight ahead" is relative to the frame of your image, so usually in the center, width-wise) along with your horizon line. The point where the right angle meets the vertical from your CVP is called the Station Point (SP). That's where the camera is, relative to the scene. So, finally, to generate a new set of vanishing points, separated by 90 degrees in perspective, you take your original right angle (which technically gave you your first set of VPs, remember), and rotate it how ever you like, using the SP as the pivot point. Where it intersects your horizon is where the new vanishing points end up. I've done that (red angle) for the box highlighted in blue, using your new Right VP and showing where the new LVP ends up. I had to do this backwards, in general you'd decide the location of the CVP (centered in your image) and SP along with the horizon line and then go from there, generating your vanishing points and perspective grid(s) as needed. Look up "Visual Ray Method" for more on this. Scott Robertson's "How To Draw" is the resource I used to figure this out. Prolonged Panorama fucked around with this message at 04:49 on Jun 10, 2015 |
|
#
?
Jun 10, 2015 04:45
|
|

|
Aha. Measuring the angles at the "camera" was the step I was missing. (In my defense, ) Thanks!
|
|
#
?
Jun 10, 2015 05:07
|
|
|
Is there a trick to accurately drawing lines in perspective when the vanishing point is too far off the paper?
|
|
#
?
Jun 10, 2015 05:20
|
|
|
I've finally drawn some things. Basically I sit down and just start so these are somewhere inbetween sketches and rushed still life. But then I don't even get the first outline right, get frustrated and stop.      Anything I should try in particular or just keep drawing until I get it right?
|
|
#
?
Jun 10, 2015 10:43
|
|

|
Don't begin by drawing a detailed outline. If you are having trouble,. draw construction lines that establish the basic shape of what you are drawing, to give yourself the scaffolding to locate the details accurately. (Rather rushed and a crappy smartphone photo, but you get the idea) Fangz fucked around with this message at 11:37 on Jun 10, 2015 |
|
#
?
Jun 10, 2015 11:31
|
|
|
Argue posted:Is there a trick to accurately drawing lines in perspective when the vanishing point is too far off the paper? Why yes there is, glad you asked: 
|
|
#
?
Jun 10, 2015 12:38
|
|
|
Oh my god, it's so incredibly obvious now that I know it. Thanks!
|
|
#
?
Jun 10, 2015 13:17
|
|
|
Fangz posted:Don't begin by drawing a detailed outline. If you are having trouble,. draw construction lines that establish the basic shape of what you are drawing, to give yourself the scaffolding to locate the details accurately. Thanks, I'll give it a try. I thought I was supposed to do these things freehand since they're kinda like sketches?
|
|
#
?
Jun 10, 2015 22:39
|
|
|
Entenzahn posted:Thanks, I'll give it a try. I thought I was supposed to do these things freehand since they're kinda like sketches? You can do freehand construction lines.
|
|
#
?
Jun 20, 2015 22:39
|
|


|
Thanks to the goon who posted about /r/ArtFundamentals, it looks like exactly what I need to get back into drawing regularly. Now to figure out how to draw with a chronic pain condition that makes my hands stiff.
|
|
#
?
Jun 23, 2015 09:27
|
|

|
painted bird posted:Thanks to the goon who posted about /r/ArtFundamentals, it looks like exactly what I need to get back into drawing regularly. Probably need to contact a specialist to figure something like that out but in the mean time maybe you could try various pencil grips to see if there is one that causes you less pain than the others. For instance, if its your wrist that is giving you trouble, you can try a violin grip where you have the bottom of the pencil resting in your palm and you grip it between thumb and your index/middle fingers. You'll have to have a vertical or slightly angled drawing surface (can prop up a board on a chair in front of you) but it'll let you use your shoulder/elbow to draw instead of your wrist. It might not help, but figure it's worth a shot.
|
|
#
?
Jun 23, 2015 12:30
|
|
|
painted bird posted:Thanks to the goon who posted about /r/ArtFundamentals, it looks like exactly what I need to get back into drawing regularly. I've gone through the same thing (kind of), and JuniperCake is right about the violin grip. You can flip that over depending on what you're using to draw with so you can rest the pencil/pen/brush between the middle finger and ring finger while adding light pressure with your thumb and keep a pretty decent grip. You can also do a claw like thing where you rest the pen/pencil between your index and middle finger, brace it against those fingers with your thumb, and again, draw with your arm.   Both of these don't require much pressure at all to maintain. I can use both for long periods of time with little to no pain. I don't have the tremors you have, but I've found resting my forearm on the top of my left or right hand stops my own hand from shaking too much as well as keeping it from resting on the paper. fromoutofnowhere fucked around with this message at 14:13 on Jun 23, 2015 |
|
#
?
Jun 23, 2015 13:38
|
|
|
I've got problems other than just the pain, like unsteadiness and random tremors (this is medication-induced in part but I'm unable to change medication). The biggest problem is that I've got no sense of how hard I'm gripping, so when I hold a pen, I grip it incredibly tightly and put additional strain on my hand. If I try to loosen my grip, I inevitably overcompensate and drop the pen. I'll figure something out. EDIT: I'm a pleb and I just use the pen grip for drawing and always have. Really, all attempts to change to a "better" grip have ended up not working out, as my coordination is shot to the point that I just don't have fine enough control when using my elbow or shoulder as a pivot. Maybe I should just practise more, though.
|
|
#
?
Jun 23, 2015 13:39
|
|
|
painted bird posted:The biggest problem is that I've got no sense of how hard I'm gripping, so when I hold a pen, I grip it incredibly tightly and put additional strain on my hand. If I try to loosen my grip, I inevitably overcompensate and drop the pen. Can you wrap the pen in a sock or something so it fits within the neutral curvature of your fingers?
|
|
#
?
Jun 24, 2015 14:24
|
|

|
painted bird posted:EDIT: I'm a pleb and I just use the pen grip for drawing and always have. Really, all attempts to change to a "better" grip have ended up not working out, as my coordination is shot to the point that I just don't have fine enough control when using my elbow or shoulder as a pivot. Maybe I should just practise more, though. Hehe that's something everyone goes through. It's incredibly frustrating, your hand loving flies all over the place at first, if you persevere in a few days you'll notice improvement, in a couple weeks you'll he cursing yourself for not doing this earlier. The time it takes probably varies from person to person, but it's an aquired skill, not something that just comes to you. Learning to use your whole arm is like going from training wheels to a real bike. Look into ergonomic pen grips also, I mean the rubber things you put on a pen. There are some are for ppl with RSI, others like the thick one that comes with intuoses I'm not sure what they're for but worth trying too. An anecdote: I once had a thing where I had to draw a lot more every day digitally than I'm used to, and I developed an annoying and lasting wrist pain, or something between pain and itching, really unpleasant. It actually kept me from falling asleep at night, and it was caused by the smallest wrist movements even if I tried my best to keep it fixed. So what I did and I know that sounds retarded, I took a small towel, wrapped it around my wrist and taped it together with masking tape like a cast. That was surprisingly good for keeping my wrist fixed, basically saved me back then. It even gave me a pleasant kinda warm feeling in there while working. loga mira fucked around with this message at 00:41 on Jun 25, 2015 |
|
#
?
Jun 25, 2015 00:23
|
|

|
Ok, so my total art education is basically zero past the age of 13 but I started painting a few months back after doing a short evening course and while it's a fun learning experience, my drawing has always been quite bad (particularly in terms of anatomy) and as such my initial sketch generally is traced from the outline of what I was going to paint to which I fill in the detail myself. I spend the weekend practising some drawing from photos and produced this one of my nephew: As soon as I finished and stepped back from the paper I could see my main problem, that I'd drawn his body too narrow (the side next to his mother should be further to the right) and as a result it makes his head look a little too oversized. Anyone who has more of a clue what they're doing that I have other suggestions?
|
|
#
?
Jun 29, 2015 08:04
|
|

|
Noxville posted:Ok, so my total art education is basically zero past the age of 13 but I started painting a few months back after doing a short evening course and while it's a fun learning experience, my drawing has always been quite bad (particularly in terms of anatomy) and as such my initial sketch generally is traced from the outline of what I was going to paint to which I fill in the detail myself. I spend the weekend practising some drawing from photos and produced this one of my nephew: Did you block it out before you started sketching? I've noticed that when I would try and freehand I'd always end up with wonky proportions depending on where I started the drawing.
|
|
#
?
Jun 29, 2015 17:28
|
|

|
himajinga posted:Did you block it out before you started sketching? I've noticed that when I would try and freehand I'd always end up with wonky proportions depending on where I started the drawing. Nah I didn't actually because I'm real bad at planning. Definitely will try and get the composition down before I start doing anything with any detail next time.
|
|
#
?
Jun 30, 2015 21:24
|
|
|
Hey thread. I've always loved art, I have a degree in Art History but I've never consider myself talented enough to do it. This thread has inspired me to give it a go, I guess I'm looking for some advice/direction in my journey. I want to cultivate a clean line style. Like Thurber, Matisse, some DSL illustrations etc. What are the important concepts related to this style? Where should I start and what should I concentrate on? Any advice would be awesome.
|
|
#
?
Jul 2, 2015 12:01
|
|

|
Chille Tid posted:Hey thread. I've always loved art, I have a degree in Art History but I've never consider myself talented enough to do it. This thread has inspired me to give it a go, I guess I'm looking for some advice/direction in my journey. Clean lines are more about practice and confidence than a specific style. That said there are a few things that can help. 1) Explore different pencil grips, like the violin grip. Different kinds of grips are going to lend themselves to different kinds of strokes. If you want a long flow-y and uninterrupted line you'll have a much easier time with a grip that lets you use your whole arm. Doing small little details might be easier with the wrist, and etc. Also, for stability reasons it's actually very helpful to have your hand rest on the drawing surface. To deal with smudges can try a fingerless glove or work from top left to bottom right. 2) Try working with pen on cheap paper first for sketching and other quicker exercises. Not being able to erase can make you consider your lines more instead of getting into that habit of draw a line, erase, draw a line, erase x 50 times which won't help you develop a confident line. 3) If you don't feel like you have the motion down to draw something like a smooth circle, you can practice it by trying to make the motion just above the paper a few times before actually setting the pen/pencil down and making the mark. It's okay to take a moment to think about how you might do something or make a practice motion before actually setting your pen down on the paper. But the most important part is to practice for days, weeks, months, years, etc. As far as what to draw, that's up to you. Drawing from life is a good idea, as well as drawing things you think are cool (you'll be more invested). The hardest part really is just being tenacious enough to stick with it for as long as it takes to get good results, so make sure you enjoy at least some parts of the process. If you don't then you are going to have a miserable time with this hobby. Frustration is normal but if you hate every moment of making art, you aren't gonna stick with it. So don't push it to the point that everything becomes a chore. Everyone has their own limit. For now I would just focus on training your hand-eye coordination this way, use measuring (can use 8 heads, or a measuring stick, or whatever you like, just research measuring techniques for art) and go for as realistic as possible in your early studies. Once you have a decent grasp on that, you could start doing Master studies of Matisse and other artists you like and really examine how they simplify forms and make their marks, etc. That will give you ideas for how you can then simplify the realistic drawings you've been doing, with some of your own experimentation, and allow you to eventually create your own style that is inspired by them but also very much you. If you go straight for Matisse master studies without studying life or doing any experiments of your own at best you'll be able to copy him but you'll never be able to come into your own as an artist. Which is fine if that's your only goal, but if you want a little more you are going to have to push the fundamentals first. JuniperCake fucked around with this message at 18:25 on Jul 2, 2015 |
|
#
?
Jul 2, 2015 18:19
|
|
|
Chille Tid posted:Hey thread. I've always loved art, I have a degree in Art History but I've never consider myself talented enough to do it. This thread has inspired me to give it a go, I guess I'm looking for some advice/direction in my journey. Foundations. Foundations foundations foundations. Don't jump right ahead into trying to get an art style. That's something that will happen later. Art isn't something based on talent, despite what years of media and bemoaning envious people try to tell you. It's hard work. Pure hard work. The foundations of art is built on the ability to create an object using just a few lines that is good enough to fool the eye and mind into believing that they are looking at something more than just lines. As long as you practice diligently, willing to learn, and receptive to criticism, you'll be able to become good at it. It might take a while if you're not used to drawing, since drawing also requires a set of fine tuned motor muscles, but persistence is key. For foundations, learn technical skills first. Focus on how to shade, how to make objects look 3D, how to draw accurately. Don't focus too much on details (rough is always a good place to start), block out your image (you can always refine it later), and spend time drawing from real life. Take a sketch book with you wherever you go and observe the people, objects, creatures, places all around you and draw it down. If you can, try attending life drawing sessions, where they have real people as models for you to practice drawing. Find a group of people who are willing to improve and grow together or can help mentor you and communicate. Sometimes where you see nothing wrong, someone else may see a glaring error. Once you get that down, start paying attention to color theory. Color can influence the mood and meaning of your work, it can make or break it - bottom line, it's important. Once you can master technical skills, then you can start talking about style.
|
|
#
?
Jul 2, 2015 19:17
|
|
|
Noxville posted:Nah I didn't actually because I'm real bad at planning. Definitely will try and get the composition down before I start doing anything with any detail next time. Planning is the number one most important thing for drawing accurately, even if you're drawing from imagination. I tend to do something like: 1) Establish the start and end points of an object in the drawing (e.g. the top of someone's head to the bottom of their feet). I check the width compared to the height and add rough bounding lines for the side. 2) Subdivide the "line" between the start and end points based upon critical landmarks that will help me to better establish rough proportions. If I were drawing a human body in an upright, neutral pose, for example, I would first mark the division between the upper and lower body (typically at or just above the iliac crest, about halfway between the two points), then mark further key landmarks based on those subdivisions (like where the elbows will be, where the knees will be, and so on). 3) Begin sketching in the rough, initial shapes, focusing entirely on outlines over fine details. Using large circles/ellipses or simple line clusters is best here, because all you're aiming for is a correct silhouette that's proportioned properly to the specifications you set out. The objective should be to make sure that it "looks right" before you get into the nitty gritty of form, shadow, and so on. It seems like a lot of busywork, but it makes doing the final drawing so much loving easier. You don't need to waffle around wondering if the proportions are correct, if the knee is in the right place, and so on, because you've already confirmed that. It lets you focus on making sure the details are accurate. This stage also takes minutes to do once you get good at it, which means that you can easily make corrections at the time when it's easiest to do so.
|
|
#
?
Jul 3, 2015 01:29
|
|


|
neonnoodle posted:Agreed that the Marshall Vandruff series is great. One thing that unfortunately doesn't get enough explanation is the idea of focal length. When first learning, most of us put the vanishing points too close together, which while "consistent" with the rules of perspective makes things look weirdly distorted compared to typical experience. This imgur album that was posted in the Making Comics thread has some great info about applying perspective in practical scenarios (a city street, etc.). That album is gold. Focal length is something I was exposed to by accident, and it wasn't in an art class. I followed my English Comp professor to three of his other courses because I liked his teaching style. One of those classes was Film. The text for the class was Looking at Movies: An Introduction to Film. Amazon link One of the DVD chapters explains focal length in a very clear way. I recommend it. That's cinematography, and I think it's unfortunate that cinematography and traditional art (painting, drawing) are treated as separate disciplines. Cinematography answers questions I didn't know I had, about producing an image. Three-point lighting is another big one that was never explained to me in my traditional art classes. I was under the impression the oversight was just a community college thing. Neonnoodle, this video was excellent, thank you. I also picked up that Photoshop plugin you linked. https://www.youtube.com/watch?v=slm9uZQ4mqQ The video series Every Frame a Painting is great. Tony analyzes film in a way that gives a lot of insight into framing, which is useful to artists when planning an image. Storyboarding, too. He does a new video once a month, and each one is basically a video essay that would qualify as an A assignment in a film class. https://vimeo.com/tonyzhou/videos Anagram of GINGER fucked around with this message at 04:32 on Jul 14, 2015 |
|
#
?
Jul 12, 2015 14:10
|
|
|
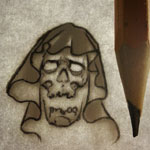
I�ve attended a drawing workshop last week. It was my most stressful vacation ever. I said I'd be back with some drawings so here, have some loving drawings Day 1 � Warmup Exercises & Still Life I obsessed over getting the cube in the back �just right� instead of merely cube-shaped so I didn�t even get to the cone lol. Lesson learned.   Day 2 � Sketching: Botanical gardens & Karlsplatz Didn't quite get the hang of sketching at first. I measured, but my sketches were all way off.      Day 3 � Still Life Xtreme Almost lost against the coffee pot there because I tried to get the outline down right from the start. Teacher basically knocked the pen out my hand and told me to just draw some ellipses and chart out the rest of the drawing before I get into the details.   Day 4 � Sketching: Museum of Natural History I think the proportions on these ones turned out much better. Not sure what exactly I did differently, but I'll take it.    Day 5 � Sketching: Josephinum (Museum of Anatomy) I swear the hand measured out like this but somehow it just didn�t work on paper�? I tried again (on the right) but it still didn't quite work out.    Day 4 & 5 � MURDERSKULL  Teacher helped with some corrections but otherwise this is probably one of the best drawings I made that week.  Day 6 - Portrait I measured this, and it looked so good when it was just the outline and guidelines, but then I got to the nose and I... it looked kinda plausible, but not like on the model. So I redid it and then this happened and then I'd already spent 1-2 hours on the nose so I had to move on. I want to apologize to her. She had a nice nose.   WHAT I LEARNED WHAT I LEARNED
There will be an autumn workshop for advanced babies and I think I may attend. Well anyway thanks for listening P.S.: Anyone know what format 440x642mm is? I bought an A2 map for the big sheets before I realized they're slightly bigger than that. I've never heard of this size before.
|
|
#
?
Jul 15, 2015 01:19
|
|
|
Thanks guys. I bought a couple of "sketch a day" pads and have been sketching my street with my morning coffee-ciggarette. Let's hope I can stay motivated. Seeing peoples progress in this thread is intimidating already!
|
|
#
?
Jul 15, 2015 04:28
|
|
|
That's cause we never post our failures but you see all of your own. ")
|
|
#
?
Jul 15, 2015 06:21
|
|


|
I only post my bad stuff out of humility.
|
|
#
?
Jul 15, 2015 07:51
|
|
|
Any tips on how to best do anatomical studies and whatnot? Can I learn this stuff from drawing photo references? Right now I'm drawing after a photo of Tom Hardy, so when I'm done do I scribble on top of it to indicate where the eye sockets and jawline and other facial features are? Do I look at my own body in a mirror and draw my arm from various angles and then write notes next to where I assume that my muscles are? I'm guessing it's a mix of everything, but I don't wanna fall into some kind of trap where I'm mindlessly copying lines instead of learning how stuff works.
|
|
#
?
Jul 17, 2015 11:07
|
|
|
Entenzahn posted:Any tips on how to best do anatomical studies and whatnot? Can I learn this stuff from drawing photo references? Right now I'm drawing after a photo of Tom Hardy, so when I'm done do I scribble on top of it to indicate where the eye sockets and jawline and other facial features are? Do I look at my own body in a mirror and draw my arm from various angles and then write notes next to where I assume that my muscles are? Best advice I've heard as far as not falling into the trap of mindlessly copying is just to slow down and force yourself to spend some time to think about the lines you are making. Speed is fine for learning gestures and studying motion but for studying stuff like form and anatomy it really helps to take your time and spend a lot of time looking at what you are drawing. Also while studying muscles/bones is a good idea, you should probably first learn the basic forms of the human body and how to simplify them into planes before you get into memorizing each and every muscle. There are a lot of different approaches to do this, and pretty much any of them will work. Loomis, Reilly Method, Bridgman, etc. There is a fair amount to learn in any of these approaches, far more than can be said in one forum post so just find a method that you like and learn it. Once you know basic forms and construction, you can supplement that knowledge with anatomy studies and observation that'll help you to push your drawings further. While life studies will always trump photos, you can definitely use photo reference for this. If there is direct lighting with strong shadows, you should be able to see the form well enough to learn from it.
|
|
#
?
Jul 18, 2015 01:58
|
|
|
Thanks for the advice. I've avoided Loomis because the point of that method seems to be to draw from imagination, but now that I think about it, you could probably apply most of that stuff to life drawing as well. I just recently got Bammes's book on life drawing, but it seems rather complicated, at least in German. Maybe I'll give Loomis a try as well. Other than that I'll definitely keep drawing. My Tom Hardy portrait turned out nothing like Tom Hardy, but I noticed a lot of new things about eyes, and now I've got a whole page of eyes, some from reference and some bad ones from imagination May post everything later somewhere.
|
|
#
?
Jul 19, 2015 20:56
|
|
|
What is the consensus on Kimon Nicolaides's The Natural Way To Draw? I know it's a lengthy course and rather rigorous, but wouldn't that be the best way to push myself into new techniques and territories? I'm also going through Loomis's Figure Drawing for All It's Worth and Bridgeman's Guide To Drawing From Life, but it doesn't really provide me with structured exercises. I draw daily and went through DotRSotB years ago.
|
|
#
?
Jul 21, 2015 22:26
|
|


|

|
| # ? Jun 2, 2024 01:05 |
|
|
Nicolaides died before compiling The Natural Way to Draw into the book he wanted it to be. The text we have was assembled by his students and is not considered truly finished. That said it has some good exercises, but the prose is hard to understand and nobody really, really knows what the guy meant in parts of it. There's good discussion of the book and how to work through it over on ConceptArt.org. (Do a custom Google search on the domain, the native site search is awful.) Loomis and Bridgman are both great. IMO Loomis has become hugely overrated on the web, I think stemming from an earlier time when PDFs of his books circulated a lot. There is much better drawing instruction out there. Much of Loomis' stuff is a mess of grids and measurements that over complicate. Look on CA.org for the notes people have compiled from Frank Reilly. Reilly's approach is the best I have found because it naturally achieves unity and cohesiveness in drawing by the use of rhythm lines.
|
|
#
?
Jul 22, 2015 01:30
|
|