


|
BULBASAUR posted:You're the man for using god's own liquid gold paint (the best metallic paint) I stand by metallic ink
|
 #
?
Aug 13, 2015 02:55
#
?
Aug 13, 2015 02:55
|
|


|

|
| # ? May 9, 2024 11:40 |
|
|
crime fighting hog posted:
Pretty much just gotta keep 'em boiling. You'll need to make sure they don't touch the surface of your pot, which can be tough with larger pieces, but if you can make a sort of cloth hammock, that can help. The problem is that it has to head throughout the piece. With small minis, that's not a problem. With bigger ones... I've heard around five or ten minutes usually do the job, though I've heard of people taking twenty on these big 'uns. Have another large container filled with ice water. If it's got a nice flat bottom, it'll even help shape the terrain pieces as you lay them down and shock them straight.
|
|
#
?
Aug 13, 2015 05:14
|
|


|
Anyone else use silly putty for masking their models? It works really well.
|
|
#
?
Aug 13, 2015 06:10
|
|

|
rawr
|
|
#
?
Aug 13, 2015 06:10
|
|
|
Bavius posted:Anyone else use silly putty for masking their models? It works really well. That looks really nice, I'll have to remember that trick next time I'm painting tanks.
|
|
#
?
Aug 13, 2015 07:09
|
|
|
Honestly at 28/32mm scale you don't need to paint pupils. They just wouldn't be all that visible at that scale anyways. If you get them the correct size they look fine, but usually people paint them way to large and it looks cartoony. For example here are two separate miniatures I have painted. The first one has correctly scaled pupils, the second one had no pupils, at a distance greater than a foot it's basically impossible to tell them apart:   If you're going to do pupils I don't advocate the style where you paint a white line on either side of a blackened off eye socket. Instead I would advocate painting the eye black and then painting a half moon shape from corner to corner of the socket. It's harder to do, but it gives a much more centered pupil and avoids the serious case of lazy eye syndrome a lot of figs end up with. Really tho, I'd say just paint the eye solid white and then wash it with a light black, brown or skintone wash and call it good. If you wanna cheat you can do a trick I learned from a pro painter friend of mine: Use a very sharp and very fine pointed sewing pin or pin vise pin and drill tiny pupil holes into the eye of the miniature. Then after you paint the eye white, you can just go over it with some GW black wash or black magic wash and the wash will pool only in the corners of the eye (giving you shading) and the small pupil hole you poked (giving you a pupil). I'd recommend practicing it a few times on models you don't care about because finding exactly how deep to punch the holes is sort of an art not a science and it can take practice.
|
|
#
?
Aug 13, 2015 07:39
|
|

|
El Estrago Bonito posted:Use a very sharp and very fine pointed sewing pin or pin vise pin and drill tiny pupil holes into the eye of the miniature. Then after you paint the eye white, you can just go over it with some GW black wash or black magic wash and the wash will pool only in the corners of the eye (giving you shading) and the small pupil hole you poked (giving you a pupil). I'd recommend practicing it a few times on models you don't care about because finding exactly how deep to punch the holes is sort of an art not a science and it can take practice. I'm going to be trying this. Thanks for the tip!
|
|
#
?
Aug 13, 2015 07:47
|
|
|
dr_ether posted:Finished Katalyst, for the Alchemist team in Guild Ball. Your background image is detracting from the model. The high light burst in the centre is not great and is causing your camera to wash the colours out.
|
|
#
?
Aug 13, 2015 09:20
|
|


|
bencreateddisco posted:eyes are just not something i can do please help - black dot for the pupil - done I found this much easier than lining the white, or gods forbid, lining with dark color and painting the eye on it. And dots are much harder to gently caress up than lines. Also, use a 1-2 size brush with good point, 0 and smaller will dry faster and give you less time to work with. Less time = more stress = higher fuckup chance. ed: have an illustration: 
|
|
#
?
Aug 13, 2015 10:53
|
|
|
Does any of you crazy wizards have some bizarre trick for tinted canopies? Specifically, I'm doing my first attempt at a greeny glowy spoopyvision cockpit on a Stormtalon, and I feel like it really needs a black tint on the canopy to properly work. I know I can just use transparents to do this hassle free but I'm not in a position to get my hands on some any time soon. Stuff I have at hand that might help result in some weird McGyver mix are just plain old black, from both GW and Vallejo, nuln oil, lahmian medium and some thick as gently caress glossy varnish. I tried the wash as-is on a piece of sprue and as expected, the result is way too smokey.
|
|
#
?
Aug 13, 2015 15:12
|
|
|
Bavius posted:I'm going to be trying this. Thanks for the tip! This sounds really promising to me
|
|
#
?
Aug 13, 2015 18:04
|
|

|
Pierzak posted:- two bone-colored/offwhite dots on the sides, where the white should be (pure white is too strong and looks weird unless you're doing the blank eyes zombie look) That's all kind of backwards. Painting the eye black and dotting in the corners gives you the lines around the eye, keeps the eyes from looking too wall-eyed or surprised, and is easily done in 4 little dabs of white. If it works for you it works for you, but dotting in the corners white has been my go-to for a long time.
|
|
#
?
Aug 13, 2015 18:16
|
|

|
SRM posted:is easily done in 4 little dabs of white More like the easiest way to gently caress up a face. And black lining looks either very weird or like heavy makeup. The brown lines I mentioned are more like ink than actual paint.
|
|
#
?
Aug 13, 2015 18:23
|
|
|
I like painting eyes this way: http://www.reapermini.com/Thecraft/12. You pretty much just paint the eyes before the rest of the face so you don't have to fight the shakes.
|
|
#
?
Aug 13, 2015 18:34
|
|


|
For eyes I paint them white, then do a wash of red around them, then some purple near the nose. I go back over with white, then just grab my .005 micron pen and do a dot where I need it to be.
|
|
#
?
Aug 13, 2015 18:37
|
|

|
Hra Mormo posted:Does any of you crazy wizards have some bizarre trick for tinted canopies? Specifically, I'm doing my first attempt at a greeny glowy spoopyvision cockpit on a Stormtalon, and I feel like it really needs a black tint on the canopy to properly work. I know I can just use transparents to do this hassle free but I'm not in a position to get my hands on some any time soon. Stuff I have at hand that might help result in some weird McGyver mix are just plain old black, from both GW and Vallejo, nuln oil, lahmian medium and some thick as gently caress glossy varnish. I tried the wash as-is on a piece of sprue and as expected, the result is way too smokey. Here you go: https://www.youtube.com/watch?v=DH1ffArWJ-4
|
|
#
?
Aug 13, 2015 19:33
|
|


|
Two nights ago I was on a painting binge and thinned the paint (P3 Sanguine Base) with acrylic flow release, as it dried and got used up, I added more paint and flow release and 48-ish hours later the paint is still a little tacky and super shiny. I've never had anything like that happen before, and as interesting as it is, I'd really like to not have to wait days for my paint to dry. What sorcery did I accidentally perform?
|
|
#
?
Aug 14, 2015 01:05
|
|


|
rantmo posted:Two nights ago I was on a painting binge and thinned the paint (P3 Sanguine Base) with acrylic flow release, as it dried and got used up, I added more paint and flow release and 48-ish hours later the paint is still a little tacky and super shiny. I've never had anything like that happen before, and as interesting as it is, I'd really like to not have to wait days for my paint to dry. What sorcery did I accidentally perform? Maybe you achieved Soap? Pure flow aid?
|
|
#
?
Aug 14, 2015 03:36
|
|

|
Yeah, flow release is meant to be used diluted 10:1 with water.
|
|
#
?
Aug 14, 2015 04:40
|
|

|
stabbington posted:Yeah, flow release is meant to be used diluted 10:1 with water. Huh. Look at that. I've only used it one other time and it didn't have that effect but the paint to release must have been low enough not to create soap.
|
|
#
?
Aug 14, 2015 04:43
|
|
|
This guy is specifically using a transparent, and one that's out of stock on the manufacturer's site and doesn't come in the color I want. I'm not opposed to just using clear-drying paint, I just can't seem to find any.
|
|
#
?
Aug 14, 2015 15:02
|
|
|
Hra Mormo posted:This guy is specifically using a transparent, and one that's out of stock on the manufacturer's site and doesn't come in the color I want. I'm not opposed to just using clear-drying paint, I just can't seem to find any. Find a model shop or craft/hobby store with scale models and they'll probably have Tamiya paints - they do a good range of clear paints (orange, red, smoke, yellow).
|
|
#
?
Aug 14, 2015 15:08
|
|

|
You should pick up some Tamiya anyway because their Clear Red does the best drat blood effects out there.
|
|
#
?
Aug 14, 2015 16:34
|
|
|
I hate blood effects, but I looked into Tamiya Smoke and it looks like it'll work just fine and is easily available to boot. Thanks!
|
|
#
?
Aug 14, 2015 18:07
|
|
|
Everyone should own a jar of Tamiya Smoke, it's like a magic bottle of instant grunge.
|
|
#
?
Aug 14, 2015 18:13
|
|


|
Hra Mormo posted:I hate blood effects, but I looked into Tamiya Smoke and it looks like it'll work just fine and is easily available to boot. Thanks! Don't just think of it that way. Tamiya clear red over white or light colors can make some really great candy coat effects or add depth to something that's supposed to be reflecting red light. You can mix it with whatever water effect you're doing to make it look like dark water is being lit by a torch or the setting sun. You can use it to make red gems or glass visors/lenses really pop. You can use it for leaking hydraulic fluid. coming out of your giant samurai robot who's totally not bleeding blood after being wounded in a laser sword fight.
|
|
#
?
Aug 14, 2015 18:53
|
|

|
Finished Guild Ball teams. Better shots of each model to be done tomorrow.
|
|
#
?
Aug 15, 2015 02:35
|
|

|
Gotta love scrap metal
|
|
#
?
Aug 15, 2015 15:26
|
|

|
   My latest little conversion project. I've got a lot of stuff I finally finished painting, too, just need to get a proper camera on them! Edit: "I WILL gently caress YOU UP!  " "
|
|
#
?
Aug 15, 2015 15:44
|
|
|
Updating the paint job on my Wave Serpents, you can see a before on the right, and an after on the left. The original paint jobs are from when the Wave Serpent kits first came out (10+ years ago). The old Wave Serpent actually had a clear canopy but I've already laid down the base coat on it for updating. 
|
|
#
?
Aug 15, 2015 16:16
|
|
|
Boon posted:Updating the paint job on my Wave Serpents, you can see a before on the right, and an after on the left. The original paint jobs are from when the Wave Serpent kits first came out (10+ years ago). The old Wave Serpent actually had a clear canopy but I've already laid down the base coat on it for updating. Dang, but that is lovely. Never liked playing as Eldar but I sure would love to paint some of their stuff sometime!
|
|
#
?
Aug 15, 2015 16:43
|
|
|
GUYS, CHECK OUT THIS STICK I FOUND!
|
|
#
?
Aug 15, 2015 22:52
|
|
|
Sometimes, while working with green stuff, I have to resist the urge to eat this green tacky stuff that makes me want to think it's taffy.
|
|
#
?
Aug 16, 2015 00:26
|
|
|
Star Man posted:Sometimes, while working with green stuff, I have to resist the urge to eat this green tacky stuff that makes me want to think it's taffy. Maybe you should start using the aluminum putty, brownstuff.
|
|
#
?
Aug 16, 2015 01:43
|
|
|
signalnoise posted:Maybe you should start using the aluminum putty, brownstuff. Then it just looks like chocolate.
|
|
#
?
Aug 16, 2015 01:53
|
|
|
Finished up the Troll from the first Stonehaven Kickstarter. I fgured I hadn't painted enough orange pieces: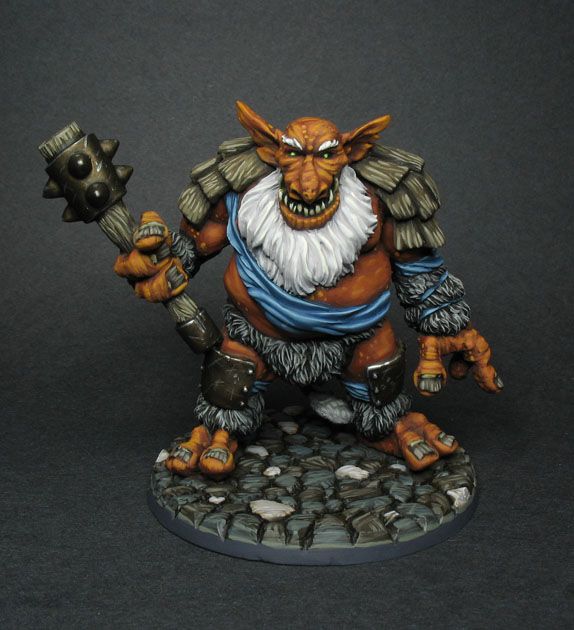 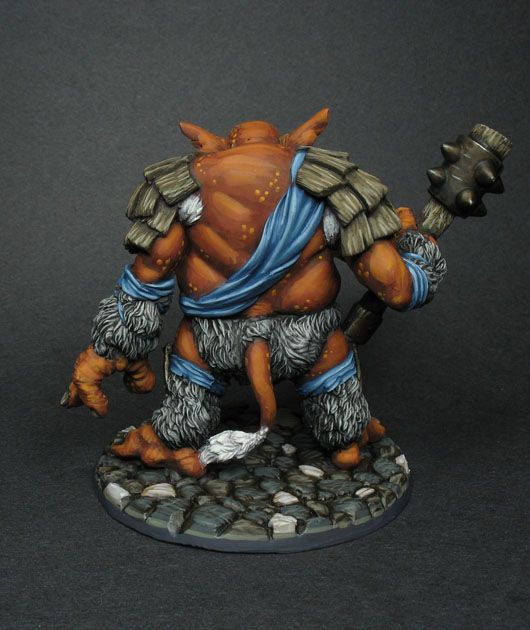
|
|
#
?
Aug 16, 2015 02:33
|
|

|
That's legit great. Like even a step up from your normal stuff.
|
|
#
?
Aug 16, 2015 03:09
|
|

|
Silhouette posted:GUYS, CHECK OUT THIS STICK I FOUND! It'S GOT A POINTY BIT ON THE END! AIN'T IT COOL?! Bachtere posted:Finished up the Troll from the first Stonehaven Kickstarter. I fgured I hadn't painted enough orange pieces: Now this is legit awesome. Love the color scheme, nice contrast betwen warm and cool colors. signalnoise posted:Maybe you should start using the aluminum putty, brownstuff. Speakin of, what're the practical differences between the different types of 'stuff when it comes to modeling? I've only ever used greenstuff and I seem to recall someone saying that graystuff is better for press molds, but what about the rest?
|
|
#
?
Aug 16, 2015 03:41
|
|
|
Brownstuff is for hard edges and weapons and shut like that. Greenstuff is better for more organic shapes. Haven't dealt with the other stuffs
|
|
#
?
Aug 16, 2015 11:58
|
|
|

|
| # ? May 9, 2024 11:40 |
|
|
I'll keep that in mind! Meanwhile, I took the time to finish another project I had knocking around:    BROTHER-CHAPLAIN TURBOPOPE THE THIRD is done, save for varnishing and a couple of grass tufts on the soil-y bits of the base. I had way too much building and converting this dude.
|
|
#
?
Aug 16, 2015 17:05
|
|