|
He says the points are low enough that he doesn't really notice them, and since the mask attaches with velcro he can just slip it on and off. ") We're in Madison, so being able to drink is a pretty serious consideration for Halloween We're in Madison, so being able to drink is a pretty serious consideration for Halloween 
|
 #
?
Oct 27, 2015 01:43
#
?
Oct 27, 2015 01:43
|
|

|

|
| # ? May 9, 2024 18:49 |
|
|
Tamir Lenk posted:Did a test fit of my Halloween outfit I like it. I think you really did a good job of capturing the look very well.
|
|
#
?
Oct 27, 2015 02:07
|
|


|
Tamir Lenk posted:Did a test fit of my Halloween outfit Whoa, apparently I missed this on the last page, this looks awesome!!
|
|
#
?
Oct 27, 2015 02:46
|
|
|
One of my friends was recently in a car accident and will be stuck wearing a neck brace for the next six months. She's been talking about wanting to decorate it to look more steam punk. Would anyone have advice on where to look to get started on a project like that?
|
|
#
?
Oct 27, 2015 06:16
|
|


|
Soylent Pudding posted:One of my friends was recently in a car accident and will be stuck wearing a neck brace for the next six months. She's been talking about wanting to decorate it to look more steam punk. Would anyone have advice on where to look to get started on a project like that? I can relate, I broke my finger pretty badly back in May and went with an Iron Man motif while I was stuck in various splints for the next two months. Fortunately, I'm left handed and broke my right ring finger.   It got really ridiculous when my doctor prescribed a splint within a splint to make my finger extend all the way, so I turned the tiny one into a circuitboard to nest within the armor. The whole getup got a lot of photos from the occupational therapists!  Acrylic paint, glossy sealer, old screws, decorative gears, and bits of copper wire. All of it can be found at a craft store or even laying around in the back of your kitchen drawers.
|
|
#
?
Oct 27, 2015 08:07
|
|

|
Soylent Pudding posted:One of my friends was recently in a car accident and will be stuck wearing a neck brace for the next six months. She's been talking about wanting to decorate it to look more steam punk. Would anyone have advice on where to look to get started on a project like that? I dunno about the steam punk stuff, but my immediate thought was of Joan Cusack's character in Sixteen Candles. foxatee fucked around with this message at 19:07 on Oct 27, 2015 |
|
#
?
Oct 27, 2015 16:18
|
|
|
Soylent Pudding posted:One of my friends was recently in a car accident and will be stuck wearing a neck brace for the next six months. She's been talking about wanting to decorate it to look more steam punk. Would anyone have advice on where to look to get started on a project like that? Personally, I'd go for the most famous movie character with an immobile neck/head: 
|
|
#
?
Oct 27, 2015 18:49
|
|

|
I've been lurking this thread for a while, and it has been a huge help with this year's Halloween costume. It's almost done, but for a final touch I need a way to make myself look dirty. Not like, rolled around in mud dirty, but more like has homeless, unkempt, and possibly insane dirty. Are there any idiot-proof guides on how to do this? I would prefer not spending much more money, and I know zero about makeup. All the guides I've seen have been trying to sell me expensive dirt cream and/or expecting me to know how to do things like "blending" and whatever. If it matters, I'm a Fallout-style raider.
|
|
#
?
Oct 28, 2015 12:41
|
|
|
ScratchAndSniff posted:I've been lurking this thread for a while, and it has been a huge help with this year's Halloween costume. It's almost done, but for a final touch I need a way to make myself look dirty. Not like, rolled around in mud dirty, but more like has homeless, unkempt, and possibly insane dirty. I looked this up a few weeks ago, found a great video tutorial, but it's been taken down now without explanation as far as I can tell. The products they used were Aloe Gator gel sunscreen and Mehron StarBlend cake makeup in Ebony, which could be used to create a varying degree of sweatier looking dirt. It gives it a small shine so that it photographs well too. I think the method involved just putting some of the Starblend on your face and mixing in the sunscreen? Someone with make up experience can probably help you out but there's a place to start.
|
|
#
?
Oct 28, 2015 14:25
|
|


|
Sounds easy enough. Thanks! Is there some substitute out there for theater makeup I would never wear again? Is there a reason coffee grounds or powdered cocoa mixed with sunscreen would be bad ideas?
ScratchAndSniff fucked around with this message at 15:15 on Oct 28, 2015 |
|
#
?
Oct 28, 2015 15:11
|
|
|
Had to reconstruct a ton of poo poo as my scaffold for the sculpt wasn't strong enough. I am thinking of using a bit of silicone to seal a few gaps, but I'm wary of trying to paint over the silicone (like tile/tub sealant) since the stuff is waterproof and I planned on using some rattle can latex paint. Would some plastic primer from a can give decent results?
|
|
#
?
Oct 28, 2015 16:16
|
|

|
I used a bottle of $1 craft paint to simulate dirt/blood on my face before, and it looked pretty convincing, though it was a little itchy and kind of annoying to scrub off at the end of the day.
|
|
#
?
Oct 28, 2015 16:38
|
|
|
ScratchAndSniff posted:Sounds easy enough. Thanks! Is there some substitute out there for theater makeup I would never wear again? Is there a reason coffee grounds or powdered cocoa mixed with sunscreen would be bad ideas? Squarely Circle posted:I used a bottle of $1 craft paint to simulate dirt/blood on my face before, and it looked pretty convincing, though it was a little itchy and kind of annoying to scrub off at the end of the day. That's why. The theater makeup is formulated to not give you a rash, though I suppose you could just get a cheap dark foundation from Wal Mart instead of the Mehron stuff.
|
|
#
?
Oct 28, 2015 16:48
|
|

|
gamera009 posted:Had to reconstruct a ton of poo poo as my scaffold for the sculpt wasn't strong enough. Shoe Goo is great for sealing gaps in things. I use it on my masks. It holds really well and I have painted it without any issues even years later. Drug stores usually sell tiny tubes of it
|
|
#
?
Oct 28, 2015 16:49
|
|
|
canyoneer posted:That's why. The theater makeup is formulated to not give you a rash, though I suppose you could just get a cheap dark foundation from Wal Mart instead of the Mehron stuff. Good point.  is a small price to pay to avoid clogged pores. is a small price to pay to avoid clogged pores.
|
|
#
?
Oct 28, 2015 17:13
|
|
|
ScratchAndSniff posted:I've been lurking this thread for a while, and it has been a huge help with this year's Halloween costume. It's almost done, but for a final touch I need a way to make myself look dirty. Not like, rolled around in mud dirty, but more like has homeless, unkempt, and possibly insane dirty. What about just a dark powder foundation- can probably get some cheap at any store.
|
|
#
?
Oct 28, 2015 18:36
|
|

|
Funhilde posted:What about just a dark powder foundation- can probably get some cheap at any store. Sounds like a good choice. Is there a guide somewhere I can use so it actually looks like dirt and not some kind of skin condition or blackface? This will be my 1st experience with makeup ever, so sorry if this is an obvious question.
|
|
#
?
Oct 28, 2015 18:45
|
|
|
Anytime I need makeup help I just search on Youtube. There are so many folks with tutorial videos.
|
|
#
?
Oct 28, 2015 19:15
|
|
|
Youtube was actually where I started this whole thing, and I was a bit intimidated since all the videos seemed to be targeting people who know the basics about applying makeup. I guess I just need to stop worrying and give it a try. If nobody has a dumbed down video to recommend I'll just experiment a bit beforehand. Thanks for the help, all! I'll hit up the cosmetics aisle tonight.
|
|
#
?
Oct 28, 2015 19:57
|
|
|
Seriously the best thing you can do is just practice on yourself or get a friend to do it. I'm sure you know someone who can do make up. Hell, ask your mom.
|
|
#
?
Oct 28, 2015 22:34
|
|
|
Transmogrifier posted:Seriously the best thing you can do is just practice on yourself or get a friend to do it. I'm sure you know someone who can do make up. Hell, ask your mom. Becoming Something Awful! - The best thing you can do is just practice on yourself
|
|
#
?
Oct 29, 2015 16:09
|
|
|
Welp I'm pretty happy with how this turned out.  Still need to get the boots and proper belt but for someone who hasn't sewed in about 6 years I'm fairly pleased.
|
|
#
?
Nov 1, 2015 02:45
|
|

|
Sewed up our costumes in a few hours so they aren't screen accurate but should be able to fix them by comic con. 
|
|
#
?
Nov 1, 2015 03:20
|
|
|
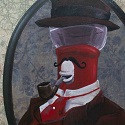
Crossposting because it's Halloween. I made my first jason costume. I took bits and pieces that I liked from a few of the movies and threw it together because I thought it would be better than just flat out carbon copying something that's been done to death. The reason for the sack mask & the traditonal hockey mask was actually because I felt that without a latex hood the mask itself would look lame, and I needed something to even out the damage on the mask against my super white/non-deformed flesh.  
|
|
#
?
Nov 1, 2015 06:30
|
|

|
Halloween was awesome.  
|
|
#
?
Nov 1, 2015 09:33
|
|
|
CherryCat posted:Welp I'm pretty happy with how this turned out. Freshman guitar? I have the same one. It's nice.
|
|
#
?
Nov 1, 2015 13:21
|
|
|
You guys all look great, well done! 
|
|
#
?
Nov 1, 2015 13:23
|
|


|
I posted a quick Halloween selfie in the regular Cosplay thread, but I wanted to share my Immortan Joe costume in here now that I've got some higher-quality pics:    And here's my girlfriend's Furiosa:   
|
|
#
?
Nov 1, 2015 17:59
|
|
|
Rush job Kamesennin worked out.  A shame the first shell collapsed (plaster wasn't as strong as I'd hoped) but mark two looked great even though it was just the foam. 
|
|
#
?
Nov 1, 2015 18:39
|
|
|
 Halloweeeeeen!! Here's no makeup/glasses still on Furiosa. Had a ton of fun riding shiny and chrome with my crew and we even ran into 2 other Furiosas, which was awesome. Def really happy with the arm despite having suuuuper cutting corners.
|
|
#
?
Nov 2, 2015 04:22
|
|
|
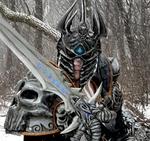
Was Penny Arcade Expo 2015 AND halloween in Australia this weekend, so I went as Jason Voorhees, and a super rad dude snapped this photo (the splatter is edited in):
|
|
#
?
Nov 2, 2015 12:02
|
|


|
Very nice. Question about making masks and such with latex. I'm making a two-face half mask with latex, and I'm wondering if there is some way to keep the latex from sticking to itself when moving it around. As in, if I fold a corner of the dried latex onto itself, it bunches and sticks and I can't separate. Could I do a really fine dusting of talc or something?
|
|
#
?
Nov 3, 2015 02:58
|
|
|
I realized I never posted my completed costume here.  But I'm in need of some more help as I try to improve the costume. Does anyone have any recommendations for a microphone that could fit under the mask? I'm planning on having a speaker setup under the tunic to give me a metallic tone to my voice. Any recommendations on small speakers or even voice changers would be welcome, too.
|
|
#
?
Nov 6, 2015 15:37
|
|


|
Commissar Canuck posted:I realized I never posted my completed costume here. If no one knows here, I would recommend getting on The Geek Group IRC channel and asking there. There is almost always someone on who knows what you need.
|
|
#
?
Nov 7, 2015 02:32
|
|

|
Planning construction for next halloween. Any recommendations for how to make a costume fit through normal doors, when it's not a great fit? I'm plotting out a Totoro, but I just realized that it wouldn't fit through a normal door due to the rotund-ness of the abdomen area.  Suggestions?
|
|
#
?
Nov 7, 2015 06:15
|
|
|
gamera009 posted:Planning construction for next halloween. Catbus, sized to fit though doors with minimal clearance. I can't think of a way to do a Totoro besides having it easily disassemble somehow.
|
|
#
?
Nov 7, 2015 08:04
|
|


|
gamera009 posted:Planning construction for next halloween. If we do it out of soft/puppet foam it should both hold its shape and squish through doors.
|
|
#
?
Nov 7, 2015 08:50
|
|
|
Yeah, I was going to say upholstery foam covered in fabric, then you can just smoosh right through the door 
|
|
#
?
Nov 7, 2015 17:46
|
|
|
Funhilde posted:If we do it out of soft/puppet foam it should both hold its shape and squish through doors. That sounds like a good idea. I got some decent practice getting curves cut into foam with the turtle shell. I guess I'll probably see about modeling the cuts in cardboard and then try it with some foam. These kinds of tests are just so expensive though. 
|
|
#
?
Nov 7, 2015 18:40
|
|
|

|
| # ? May 9, 2024 18:49 |
|
|
 Almost exactly a year ago, I saw this picture floating around on the internet. I thought it was pretty awesome looking, and as Halloween just happened, I was in the costume frame of mind. I kept saying, �nah, that is waaaaay too complicated to make; you don�t know how to do any of those parts or effects.� But, little by little, week by week, I kept thinking about it. Use a few clamps here, some modeled cardboard there, and just slather the whole thing in fabric and paint. Pretty soon, I realized that I had thought of every single component on the rig, I had solved each piece to be entirely within my skill set (and budget). It was just a question of taking the time to do it. Before I get into it in earnest, a few things up front: 1. I like to solve problems on my own; to wit, I did not visit or browse any costume/cosplay resources. I know that there will likely be places where the more seasoned vets of this will be slapping their foreheads as to why I didn�t do/use �X� method. Sorry. In this sense, following someone else�s advice would just be painting by number for me. It�s gotta be all me. 2. An engineer by trade, I�d like to think of myself as a handy fellow. I know how to swing a hammer just fine, but I haven�t touched a sewing machine since 7th grade Home-EC class. I better get to learning. Also, I know that the satin fabric that I am using is exceedingly hard to cut and sew properly, so I am going to use that liability and turn it into an asset with the ragged appearance of the cloth. 3. I did not want to make this cheaply. I wanted every piece to be robust and not just fall to pieces when I wear it and move around in it. Glue and tape would only be an option when glue and tape is the ONLY and/or actual BEST option. No hot gluing or taping things because it�s faster. Sewing, buckles, bolts, wires, and legit structural fasteners are going to be heavily used. 4. I had to use a fair amount of creative license to get all the pieces done. Obviously there is only one single source photo, so not all the parts are shown. I did my best to keep the overall aesthetic theme constant throughout the self-created parts. There were also a few times when I overrode the original artists choices, but I�ll get into them in their own section. 5. Things are definitely not in chronological order. Whenever I got stuck on one piece, I would just simply abandon it for a while and work on another. Let creativity dictate my actions, not schedule. Let�s get into it! DUMMY The first thing I realized I was going to need was a fitting dummy. I needed to be able to size and pin and work on the rig while it wasn�t on myself and hanging it off the back of a chair wasn�t gonna cut it. I looked into simply buying a dummy, but due to cost, size, and gender, I realized I was going to be making that too.  It turned out really well, though it is definitely not adjustable in any way. It is slightly larger than I am, but I figured it would be better to be bigger rather than smaller as if thing will fit on it, they will definitely fit on me. And as always, like most things, we tend to accumulate mass rather than lose it� I did put the 2x2 crossbar in the shoulders just in case I wanted to attach hanging arms to it. That will probably come a while after if I ever want to use the dummy as a display for the costume. But for now, the head and torso will suffice. Fun note, I made the head detachable not to facilitate ease of dressing the thing, but rather because the first few days I had it with the head on, every time I got home from work or socializing, it scared the crap out of me when I saw a big shadow lurking in my apartment. With the head removed, the spookiness subsided. TABARD  I figured I would start my sewing adventure here. It is the least visible and gave me the immediate chance to use my sparkly new dummy (and sewing machine!) I didn�t take many pictures at the start of it, but there isn�t really much to show.  Looking back on it, I can definitely say that it was the worst constructed piece, and if I had to do it again, it would take less than half the time and be at least twice as nice. I had planned the entire time to add elastic straps up the sides of it to tighten it up on my torso, as I cut the waist/chest size of that thing at like 55� (way big), but I forgot until the last minute and then just didn�t bother. Eventually it didn�t matter as the amount of other junk hanging off my chest just compressed it down anyways. GLOVES  The gloves were probably the most difficult part. Fortunately, barely anything of the hand is visible, so I had a bit of flexibility as to how to design the hands and fingers. All we know is things are fairly tear/petal shaped and the armor articulates upwards rather than downwards. That makes things a bit harder on the rest of the armor, but on the gloves, it is the easier way to go. This was also the first step where I committed to using a goodly amount of steel plate in the design. I couldn�t think of anything else that would be strong, substantial, and easily moldable into whatever shape I wanted. I decided on three plates per finger, and two on the thumbs. Then I could simply attach each one to the knuckles on the sides.  The only difficult part of working with the steel was when clipping around curves, tiny little needles would be created. And let me tell you, your feet will find every single one of those on the floor in the middle of the night if you don�t take care to keep them in the trash.  The gloves were the only time that I ultimately found it necessary to roll the steel back under itself. The lip it creates is far stronger and allows it to keep the tight curve of the finger piece to always hold its shape. I had originally thought it would help make the steel bits less �pokey� to myself and others, but that didn�t really matter. They poked everyone regardless. No poking would have required huge amounts of sanding, which is something I had neither time, equipment, or desire to do.  The only real difficulty of getting the lights on the hand was just finding a suitably sized, semi-translucent round thing to enclose them in. I realize now that I didn�t take a picture of it, but I just used a white plastic soda cap, sanded down to rough it up, gold painted, and then daubed with a bit of clear caulk to make it appear somewhat fancy. It is the same as the chest light, but just smaller.  The gloves were very comfortable to wear, only difficulty was getting them on and off, and I suspect that was more due to the bulk of the fabric from the wrist attachment points rather than the gloves themselves.  CHEST  This was the step that took the longest time as it involved tons of cutting and gluing of cardboard together. I probably went through a quart of rubber cement and a roll of duct tape. Most of the main structural seams I would use my Dremel to rough up the surfaces with grinding wheels then I could glue in confidence.  I wanted to have the chest articulate once in the center. That way, as I moved, it would naturally hinge downward to keep a sleeker, more form fitted appearance. At any rate, I would need all the help that I could get in that department, as to get the required depth of the reactor light, the chest needed to be like 6 inches thick. By the end of this, I will be as thick as I am wide.  The bottom half of the chest was a definite puzzler, as it has a two-dimensional curve. I figured I would build the �outline� out of the cardboard frame, seal it up, and then fill it up with expanding liquid foam. The stuff worked better than expected, as I could carve it to the desired shape in some of the more troublesome areas.  Once the under-frame was complete, surfacing the chestplate would be pretty easy. This was later on in the whole process, so I was a bit low on available leather in large pieces, so I decided for both top and bottom to cut them into lots of little panes that would later get sewn together. It proved a very good move, as it gave great depth and texture to the costume as well as saving on fabric for later, unforeseen applications.  I decided to use steel plate on the bottom, as this was a little late in the game to do more cardboard work, as well as I had the highest confidence in my steel bending at this point. I covered the steel in batting as well as the interior with both batting and black satin. That�ll help me from getting poked in the chest or �elsewhere� as well as provide a little moisture control. Wearing several pounds of synthetic satin directly against your skin with little breathing room would be a recipe for sweaty disaster. It worked out quite well.  I attached it to myself with simple backpack-type straps. I had considered attaching it via the harness that I would anchor the rest of the costume off of, but ultimately decided against that as having it independent would allow it to always stay where it wants to be, rather than being hoisted around by the harness whenever that moves (which was often).  HARNESS (pt.1)  The harness is another thing that I have huge liberties with due to lack of source material, and again, it is to my great benefit. I wanted something that would distribute the weight evenly across my body as well as being comfortable and self-adjusting. I would go with a spidery kind of harness that would naturally pull down on the front, up on the back, and transfer down to the leg parts to keep them in check as I moved around.  The bulk of the work on this piece was figuring out where all the various connections points were going to be. This is to be the anchor of the whole costume. As mentioned in my notes up top, I want this thing to be somewhat �realistic� in terms of assembly and attachment and not just a hodge-podge of things stapled together. I wanted quick dress and undress capabilities. A good foundation is key. ACCESSORIES  I split the harness part in two, as the remainder heavily features these next parts. In addition to being (somewhat) in the picture and needing something to guard my high thighs and rear, I needed something to weigh the harness down. I figured liberal use of steel would be just the ticket.  This was some of my first steel work and I was still deciding how detailed the exterior lip I should make. You can see in a few pictures that I used a puff paint (purple) to add some dimension to the outer edge. I ultimately decided against that on the overall costume as it took far too long to dry (like 2 full days to get solid) and just wasn�t adding enough. I could just glob on the gold paint and get a similar effect.  The left side was a bit heavier than the right, so I used a big flat pack of pennies sealed up into a belt part to help balance it out.  What to do with the back? If this was only CSI, I could zoom and enhance and figure out what�s back there, but my computer budget is a bit lacking. I guess I�ll just have to wing it. I want something spinal, maybe something like what Klingons have on their armor.  Unfortunately, somewhere while constructing the lights on the back part, one of the wires got somewhat pinched, so whenever I move with the lights on, they flicker in and out. No matter. The right side of the belt was a bit easier to do: just had to make a hanging belt, curve it, then attach some spiney things in the gaps.  I put a bit of clear caulk on the back of the spines to make the wire attachment less pokey on myself. While it was successful in that regard, it was always tacky to anything that had paint on it, so I was constantly peeling it off of other pieces while working on it. I also decided to make it detachable from the belt, so I just used the main support wire running through it and made some nice little clamp-hook things on each end. HARNESS (pt.2) The remaining parts of the harness were mostly a question of �how to attach things�.  For the left side, I embedded a steel wire through the fabric underlay that I could attach hooks onto. It provided a nice, secure, yet flexible attachment.  Unfortunately, I don�t have great photos of the back attachment methods, but basically, they used a thick wire to loop around the harness and back to the steel underside.  Ultimately, the harness worked out great, held everything in place, was nice and comfy, and probably weighed something like 15-18lbs on its own. Elbows  Time for an easy part! Elbows I had plenty of liberty with, and just made them simple and quick. Probably should have lined them with something; the raw back of that leather is pretty sweaty against skin.  Shins  This was another part that basically just made itself. I picked up a set of hockey shin pads and basically just sealed them in with the theme. That being said, the image shins are a bit off-theme to the top. I just kinda blank-slated them in terms of fanciness.  I had to cut part of the shin plastic just below the knee off because it made walking a very uncomfortable affair. I guess walking isn�t a design concern for people who skate around. Flying plastic from a cutting wheel is hot! The rest was just glue, clamp, stitch. Glue, clamp, stitch� Helm  The most iconic part of the costume! I knew this was the one piece that was going to let people know what I was doing regardless if they knew (they didn�t, how could they? They�re not internet nerds!) what I am basing this off of. This is one of the main parts of where I disagreed with the artist. What makes Iron Man is the hard, horizontal brow above the eyes. Theirs was a bit too sleek and vertical; I just couldn�t do it.  The second most defining part of the helm is the jaw line. If the helm doesn�t have the jaw line, it is still too vague.  Here�s a quick example; the brow and jaw are what define the entire thing. Without those, even the chest reactor light doesn�t mean anything.  This was one of the latest-in-the-game pieces that I did. That way, I could take advantage of all the steel working skills I had developed. Making something with a plethora of different angles and interlocking pieces was definitely a challenge. I used tabs on the insides as well as a bunch of JBWeld. Very solid.  The hat was very labor intensive vs. how big of a piece it was. All of the fabric had to be sewn on by hand, which led to a very boring evening. When I cut the brim off the hat, I left a little behind so the mask had something to grip onto. For the mask, I had to use a base coat of the gold paint mixed with a bit of black. As usual with acrylic paint mixing, any yellowish color + black has green tones to it, so I got some gold leaf and touched up the main accents of the mask, just to make them pop as a not-green color.  I did my best to paint the mask to honor the original artists scheme, but I didn�t want it to be overpowering. For the eyes lighting up, they worked great in light conditions, but for night-time, they would have made me a walking disaster, as I could only see though a tiny sliver of my normal range. And even though I blacked out the back of the lights, the light fiber-optic�d its way to the sides and made it a bit bright for any night excursions. Still, great success. Wrists  The wrists on this were rather difficult to decide on just how to keep to the image, but still keep their �practicality� as the image ones don�t quite work out physically.  As from being a kid who played soccer, but also liked to play fight with his brother, I knew shin guards make for awesome wrist guards. This thing is making itself!  Shoulder  Unfortunately, the only part of this thing that I failed to complete was the actual spaulder. I got half-way through one side, but had to make it a planned sacrifice in order to finish the other, more important parts.  I had a huge bulk of pics of the main spaulder, but had to ditch them. Suffice it to say there was a ton of 3d cardboard modeling. Oh well, this still turned out halfway decent. Very pokey. Thigh  Like the elbow, the thigh was another easy piece. It was meant to play in the background, under the other headliners. Only real technical part of this was I had to have a ton of garter attachments to keep it up on the thigh.  Image Dump!  Hey there, handsome!       The only thing left for me to do is to make a way to display the arms. But I'll save that for another day. Also, I'm sure I left some stuff out of this post, let me know if theres any part you think I forgot, and I'll make an addendum.
|
|
#
?
Nov 8, 2015 02:33
|
|