


|
jadebullet posted:Just curious, what is your guys opinion on the Fine Scale Modeler magazine. Is it worth picking up a subscription? (noone around me carries it, so a sub is my only option) Don't waste your money on a subscription and just buy the mega issues that cover everything. How many new breakthroughs in sprue-cutting do you think are being made? Its a lot like fitness magazines, lots of recycled information each month, just written differently in a couple months when you likely forgot what you read. I bought some at a used bookstore from like the late 80s and then some that were more current and surprise surprise same poo poo. I should post some of the pages from it, people have been using floor wax on canopies for like 20 or 30 years. Or just get a years worth, then cancel. Blackchamber fucked around with this message at 21:56 on Nov 16, 2015 |
 #
?
Nov 16, 2015 21:49
#
?
Nov 16, 2015 21:49
|
|


|

|
| # ? May 9, 2024 08:36 |
|
|
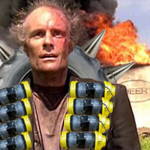
ANAmal.net posted:Dooooooope. If you shitpost in this thread you must atone for your sins by building and posting a craptank. I'm finishing up my German 8.8 Flak Gun, but I found out that I'm all out of autumn grass tufts. It's like falling one yard in front of the finish line. 
|
|
#
?
Nov 16, 2015 22:23
|
|

|
What is the craptank anyway? I mean, I know it is a "everyone build the same thing" community build, but what model is it?
|
|
#
?
Nov 17, 2015 00:38
|
|


|
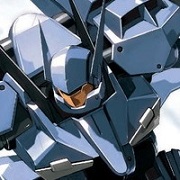
This time it's the Hi-Mock gundam kit, last time it was the Airfix IS-3. Next time? 
|
|
#
?
Nov 17, 2015 00:44
|
|

|
if we're talking crappy models, I vote the Revell 1:535 Missouri. It's the crappiest ship model I've ever laid eyes upon, and possibly the worst ship model that's easily available at any craft store. The Lindberg Yamato/Zuikaku double kit that I've seen in hobby lobby looks like it might be even worse, though.
|
|
#
?
Nov 17, 2015 02:27
|
|


|
I'm totally up for craptank 2: son of craptank.
|
|
#
?
Nov 17, 2015 03:17
|
|

|
Triggerhappypilot posted:if we're talking crappy models, I vote the Revell 1:535 Missouri. It's the crappiest ship model I've ever laid eyes upon, and possibly the worst ship model that's easily available at any craft store. The Lindberg Yamato/Zuikaku double kit that I've seen in hobby lobby looks like it might be even worse, though. Let's not put the cart-tank before the robot horse. There's still November left!
|
|
#
?
Nov 17, 2015 03:49
|
|


|
Do you guys have any tips for dealing with the joints where two fuselage halves come together. With my Tempest I filed it down, as well as used some liquid green stuff on them, but the joint is still somewhat visible.
|
|
#
?
Nov 17, 2015 04:16
|
|
|
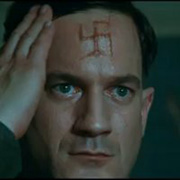
Finished building the hi-mock. Man, for a $15 kit, these things have a ton of parts and are very high quality. Plus they're fun to pose! Let's play the children's favourite, "boot the fascist"!  Oh you, your silly knife can't do anything against my punchy fist! 
|
|
#
?
Nov 17, 2015 04:36
|
|

|
Pierzak posted:Vallejo Air Steel (71.065) is a very smooth metallic acrylic that's awesome for mixing for colored metal effects. Thanks for the reply. As it just so happens I have a bottle of that lying around, as well an aluminum one, and the instructions say to mix silver with gold or red paint for the metallic look. Sounds like I've got a plan!
|
|
#
?
Nov 17, 2015 05:19
|
|

|
jadebullet posted:Do you guys have any tips for dealing with the joints where two fuselage halves come together. With my Tempest I filed it down, as well as used some liquid green stuff on them, but the joint is still somewhat visible.
|
|
#
?
Nov 17, 2015 05:28
|
|
|
I'm pretty new to models, and I'm putting together a simple Revell P-40B kit as my first kit. I've got a couple of questions. When should I prime the model? I was planning on priming/painting once it was all together to avoid having to sand paint off later to cement pieces together. Should I put the canopy on before or after painting, and if after what's the best way to mask the open areas such as the canopy area while airbrushing? Finally, how should I go about masking for camo? I'm going to be using a soft camo pattern for this build, but I'd like to know hard methods for later as well.
|
|
#
?
Nov 17, 2015 05:57
|
|

|
Ensign Expendable posted:Finished building the hi-mock. Man, for a $15 kit, these things have a ton of parts and are very high quality. Plus they're fun to pose! Nice. I've had so little time in the model room lately that I am still working on mine. I need to finish another leg and then the lower torso I think is all, then paint and do my mod ideas, which the main parts arrived for today, yay!
|
|
#
?
Nov 17, 2015 06:00
|
|


|
Mr E posted:I'm pretty new to models, and I'm putting together a simple Revell P-40B kit as my first kit. I've got a couple of questions. When should I prime the model? I was planning on priming/painting once it was all together to avoid having to sand paint off later to cement pieces together. Should I put the canopy on before or after painting, and if after what's the best way to mask the open areas such as the canopy area while airbrushing? Finally, how should I go about masking for camo? I'm going to be using a soft camo pattern for this build, but I'd like to know hard methods for later as well. My method is to assemble, fill,sand, prime, then paint. Masking the canopy happens before I attach it. But attach the canopy before you prime because there is always frame pieces that you'll want to match your cammo. Ordinance, antenae, and often landing gear get painted on sprue then attached at the end. Blue Tack is my go to hole masker, but I recently tried stuffing with torn paper towel to great success. They way you approach your fist model is going to be very different to the way you do your tenth. Like many hobbies, learning is an integral part of the fun.
|
|
#
?
Nov 17, 2015 06:15
|
|


|
The Locator posted:Nice. I've had so little time in the model room lately that I am still working on mine. I need to finish another leg and then the lower torso I think is all, then paint and do my mod ideas, which the main parts arrived for today, yay! Oh I'm far from done. I have a drawer full of spare tank parts to stick on this guy.
|
|
#
?
Nov 17, 2015 06:25
|
|
|
Blue Footed Booby posted:Let's not put the cart-tank before the robot horse.  I thought you were doing Hi-Mocks, not Fuunsaiki?  Ensign Expendable posted:Finished building the hi-mock. Man, for a $15 kit, these things have a ton of parts and are very high quality. Plus they're fun to pose! You forgot nuclear-noogie the Nazi!
|
|
#
?
Nov 17, 2015 09:00
|
|

|
Ensign Expendable posted:Man, for a $15 kit, these things have a ton of parts and are very high quality. Gundam kits are so cheap and so nice that you just have to be careful when buying them, otherwise you end up with a backlog like this: 
|
|
#
?
Nov 17, 2015 09:21
|
|
|
My backlog of unbuilt kits is almost nonexistant now, just a Bf 109, two bandai kits (Scout Speeder and AT-ST), and a japanese Castle. Miniatures, however....
|
|
#
?
Nov 17, 2015 09:34
|
|
|
Neddy Seagoon posted:
God, I forgot about that dumb thing. For those who don't know, that robot is from a show where robots are controlled kind of like Jagers in Pacific Rim. Horse bot is piloted by an actual horse.  Also, lol at where they put the stand mounting point. Also, also, 
|
|
#
?
Nov 17, 2015 12:51
|
|
|
jadebullet posted:Do you guys have any tips for dealing with the joints where two fuselage halves come together. With my Tempest I filed it down, as well as used some liquid green stuff on them, but the joint is still somewhat visible. http://www.internetmodeler.com/scalemodels/nrtools/Perfect-Plastic-Putty.php This stuff is the bees knees, best putty I ever used, applicable with either spatula or syringe depending on your needs, dries in minutes, is easily sanded or removed with water. Need to fill a seam? Just run a syringe of the stuff along the seam, let dry for 10 minutes, run a damp brush along the seam, clean up with a tissue, done.
|
|
#
?
Nov 17, 2015 13:09
|
|


|
big_g posted:I decided to do the Ghostkeel in a grey scheme with selected plates in an digi urban cammo scheme as that's something I've never done before. Neat! I've thought about picking up a larger Tau figure. I have no intention of playing or building a Tau army, but I've always really liked the aesthetics of their stuff.
|
|
#
?
Nov 17, 2015 14:43
|
|


|
I finished the 8.8cm Flak cannon. It's an Italeri 1/48 kit, and it was pretty fun and simple to build. It's built to be an objective for wargaming, so the base is not completely realistic: the wheel pairs should really be disconnected with one on each side of the cannon, not rolled together like this.  
|
|
#
?
Nov 17, 2015 22:07
|
|
|
Very nice weathering! Not over the top like you see on lots of models. One detail to nitpick on (maybe for another kit), German equipment was primed a dark red, so when the paint chipped it would show red first and then metal. Maybe paint some tiny edges of red between the dark gray and metal bits?
|
|
#
?
Nov 18, 2015 00:59
|
|

|
 Gotta figure out a color scheme now.
|
|
#
?
Nov 18, 2015 07:09
|
|


|
Molentik posted:Very nice weathering! Not over the top like you see on lots of models. One detail to nitpick on (maybe for another kit), German equipment was primed a dark red, so when the paint chipped it would show red first and then metal. Maybe paint some tiny edges of red between the dark gray and metal bits? Thanks! And doh, I knew I missed something. I even got a pot of Rotbraun and everything. I'll try to go back with a brush and see if I can work in a bit of brown between the metal and the grey. Oh, and Mock-Vierling looks great. Keep up the good work. ")
|
|
#
?
Nov 18, 2015 08:53
|
|
|
Boaz MacPhereson posted:Neat! Thanks, that's exactly how I felt, I've always liked the Tau stuff and wanted to do something non historical and then just stumbled upon the Ghostkeel kit. Mr E posted:I'm pretty new to models, and I'm putting together a simple Revell P-40B kit as my first kit. I've got a couple of questions. When should I prime the model? I was planning on priming/painting once it was all together to avoid having to sand paint off later to cement pieces together. Should I put the canopy on before or after painting, and if after what's the best way to mask the open areas such as the canopy area while airbrushing? Finally, how should I go about masking for camo? I'm going to be using a soft camo pattern for this build, but I'd like to know hard methods for later as well. I would usually assemble the whole thing bar the ordinance and the canopy then prime and paint the main body and ordinance separately. For the canopy I would really recommend dipping it in future or something similar first to give a nice finish and then get some after market masks and then airbrush it before glueing it to the model. I usually do this last. Also remember to be careful what glue you use to avoid frosting. Why don't you post some pics we always need more and then we can help along the way. For camo I would use panzer putty for soft edge or just use nothing and control the brush depending on the finish you want. For hard edge I find Tamiya masking tape really really good.
|
|
#
?
Nov 18, 2015 20:21
|
|

|
big_g posted:Thanks, that's exactly how I felt, I've always liked the Tau stuff and wanted to do something non historical and then just stumbled upon the Ghostkeel kit. To be honest, don't give Games Workshop money.
|
|
#
?
Nov 18, 2015 20:28
|
|

|
Iron Crowned posted:To be honest, don't give Games Workshop money. Fair enough I could see why, I bought some shares in the firm ages ago so I don't mind buying their stuff. In semi unrelated news I've also just read that they are going to be changing their name from "Gamesworkshop" to "Warhammer" at some point in the future which seems like a strange move!?
|
|
#
?
Nov 18, 2015 20:35
|
|
|
big_g posted:Fair enough I could see why, I bought some shares in the firm ages ago so I don't mind buying their stuff. In semi unrelated news I've also just read that they are going to be changing their name from "Gamesworkshop" to "Warhammer" at some point in the future which seems like a strange move!? http://forums.somethingawful.com/showthread.php?threadid=3750899 Here's the thread about one of the shittiest
|
|
#
?
Nov 18, 2015 20:38
|
|

|
big_g posted:Fair enough I could see why, I bought some shares in the firm ages ago so I don't mind buying their stuff. In semi unrelated news I've also just read that they are going to be changing their name from "Gamesworkshop" to "Warhammer" at some point in the future which seems like a strange move!? I heard that that was what they were renaming their stores to, wouldn't surprise me though. The short of it is, they've forgotten their roots, and despite having "games" in the name, decided they're a miniatures manufacturer, and to make their shareholders happy, are inflating themselves out of the market with major, unwarranted price increases. They also axed their oldest property (Warhammer Fantasy) for an untested set of garbage rules earlier this year (Age of Sigmar), which has bombed hard, despite the official line stating it was really successful. But I digress, there's a whole thread about that.
|
|
#
?
Nov 18, 2015 20:43
|
|
|
big_g posted:I would usually assemble the whole thing bar the ordinance and the canopy then prime and paint the main body and ordinance separately. For the canopy I would really recommend dipping it in future or something similar first to give a nice finish and then get some after market masks and then airbrush it before glueing it to the model. I usually do this last. Also remember to be careful what glue you use to avoid frosting. I'll post some pics after I prime it. I think I'm going to get a touch n flow because I think I hate normal glue application!
|
|
#
?
Nov 18, 2015 23:33
|
|
|
So just a quick WIP post on my Tempest MKII. I decided to paint it in Pakistan Air Force paint because it looks pretty drat cool. It's a Special Hobby kit, and I don't know how old it is. It has some issues, mainly the prop cone not sitting flush with the the rest of the prop shaft. (the assembly is supposed to be pin, cowling, spinner back, prop, cone, with the prop being pinched between the spinner back, and the forward cone fairing. Unfortunately, the cone isn't long enough, and if I push it any further back, the prop blades bend backwards.) It also didn't have any pins or anything to line up the fuselage, so that was interesting. But hey, it came with photoetched for the cockpit, which was nice, as I have never worked with that before, and now I am hooked. Anyway, I am almost done getting the main color scheme onto it, then I am going to clean it up, wash it, fade it, decal it, and weather it. Sorry for the lovely cell phone pic, this was just a kind of spur of the moment post. 
|
|
#
?
Nov 19, 2015 04:41
|
|
|
jadebullet posted:So just a quick WIP post on my Tempest MKII. I decided to paint it in Pakistan Air Force paint because it looks pretty drat cool. It's a Special Hobby kit, and I don't know how old it is. It has some issues, mainly the prop cone not sitting flush with the the rest of the prop shaft. (the assembly is supposed to be pin, cowling, spinner back, prop, cone, with the prop being pinched between the spinner back, and the forward cone fairing. Unfortunately, the cone isn't long enough, and if I push it any further back, the prop blades bend backwards.) It also didn't have any pins or anything to line up the fuselage, so that was interesting. But hey, it came with photoetched for the cockpit, which was nice, as I have never worked with that before, and now I am hooked. Good start, what are you going to use for the wash stage? I had some time tonight to get some more base coat on the Ghostkeel. Starting to come together a bit more now.     
|
|
#
?
Nov 19, 2015 22:21
|
|
|
Nostalgia4Ass posted:
I like where this is going.
|
|
#
?
Nov 20, 2015 03:12
|
|

|
Got the full metal freight train engine propped up on half of it's feet now. I also spent about 4 hours yesterday trying to shape and lay down these "pipes" made from brass wire on the instrument panel of another way too big steam engine I'm building.  Thoroughly messed up everything around the "pipes" with glue. It's like brass wire has a mind of its own. "Noooo, I don't wanna lay down there, gently caress you, dad."
|
|
#
?
Nov 20, 2015 12:46
|
|
|
big_g posted:Good start, what are you going to use for the wash stage? Can you show some pictures of how you mask and paint the digital camo?
|
|
#
?
Nov 20, 2015 15:57
|
|


|
Greyhawk posted:Got the full metal freight train engine propped up on half of it's feet now. Glue? You are supposed to solder it, slacker! Nice looking job.
|
|
#
?
Nov 20, 2015 17:35
|
|
|
I am probably going to go over it with some citadel nuln oil wash, then do the touch up I normally do on my 40k stuff.
|
|
#
?
Nov 20, 2015 18:30
|
|
|
SkunkDuster posted:Can you show some pictures of how you mask and paint the digital camo? I'm afraid I can't as I didn't take and WIP pics with it just being a quick filler project. I can explain though? Basically I used these. First I sprayed the selected panels a dark grey then lightened towards the centre of the panels with a mid grey. Once dry I added the first lot of masks, sprayed brown and then cream...again towards the centre of the panels. I then added the second lot of masks, sprayed a dark blue then again a light blue towards the mid panels. Then you pray to the God of masking and slowly remove with a Stanley blade and fine tweezers. You basically start with the darkest colour "Flecks" you want and start working up. Similar(ish) to how I did the SU-27 earlier in this thread if you want a look at some photos.
|
|
#
?
Nov 20, 2015 19:31
|
|
|

|
| # ? May 9, 2024 08:36 |
|
|
So I was looking at a review of the Hasegawa mv-22 online. An hour later I have 5 models ordered from hlj, none of which are a Hasegawa mv-22!
|
|
#
?
Nov 20, 2015 19:52
|
|