


|
Yes, metric gets frustrating when you have a time crunch. If you have the time, take a look at Misumi for specialty metric parts. I do machine design and usually spend 30-40% of the budget with them. They have a lot of standard components but also configurable sizes. I've used them to get custom polyurethane bushings for my car as they were cheaper than oem.
|
 #
?
Mar 14, 2016 19:55
#
?
Mar 14, 2016 19:55
|
|

|

|
| # ? May 25, 2024 12:35 |
|
|
Here's a pic of the broken spring pin. The new drill bits I got, worked well. I was going at it with a 7/64 bit wonderfully and then it stopped advancing, and I realized the remnants of the spring pin was now spinning in the hole. At that point I was able to fish it out with a pick. The half on the left is what was stuck in the ram. Here's all the hardware cleaned up and protected with lanolin. I finally got around to finishing and protecting the tools I tested the evapo-rust on.  I used some 320 grit sandpaper, scotchbrite, and Marvel's to clean up the holes that the big pin slides into. After cleaning them and the pin, they are very obviously supposed to be a slip fit, not a press fit! A block of wood and small ball peen hammer should be all I need to drive the pin home on assembly, not a hydraulic press.   bred posted:Yes, metric gets frustrating when you have a time crunch.
|
|
#
?
Mar 15, 2016 01:52
|
|

|
This seems to be the right thread, even though this guy is half machinist/half woodworker, but I think you'll like it all the same (BTW, this is one of my subscribed threads, but I don't have anything really useful to post that often) I've been watching Frank Howarth's videos, and one of his latest videos is a semi-restoration of an old De Walt saw. It has a nice, slow pace, and is similar to How It's Made in calmness, but at least his videos don't put me to sleep like HiM does. https://www.youtube.com/watch?v=DyS0Ih7ga8k Pretty high production values (a lot of stop-motion, blueprint overlays, etc) for a one-man setup. Now, does anybody else know of a good YouTube channel like his? I'll list my current watched channels that are relevant to this thread below (and feel free to copy it for reference if you want, like for an OP or something): Tested. Adam Savage, computers, cosplay, animatronics, and fun James Bruton. A British 3D printing god, with innovative engineering. Currently designs toys for some big toy company. BigCliveDotCom. A Scottish bloke from both the Isle of Man and the UK. Loves LEDs, explains circuits, and is addicted to buying cheap Chinese eBay things and taking them apart while sometimes drinking "white wine-style beverages." Chris Vallone. A VW Beetle masterworker, but a lot of his techniques apply to any shop, big or small. Very soothing Brooklyn accent. Cody'sLab. A redneck who's not afraid of anything. Blacksmithing, forging, metalwork, mining his own ores, and occasionally exploding mercury-based things. jimmydiresta. What's it about New York that produces the best woodworkers? This guy is amazing, and most of his videos are time-lapse works of jobs, with no speaking. I respect this man. AgentJayZ. A Canadian jet engine mechanic, that does weekly Q&A's about jet engines, builds his own jet racing boats, and is an oldschool audiophile as well. AvE. ArduinovsEvil, a true Candian skookum choocher who will fabricobble anything out of anything. Remember, plastic cuts skin, belt cuts plastic, aluminum cuts plastic, cuntson tarbide cuts everything else. AWE me. A mostly useless channel, but they run MAN AT ARMS: REFORGED, which has some of the best blacksmithing I have ever seen, focusing on swords and novelty weapons. Ilya is love, Ilya is life. EEVblog. An Australian electrical engineer with a high standard for circuit design and an even higher pitched voice. Very knowledgeable. "Don't turn it on: take it apart." Matthias Wandel. A master woodworker, whether he believes it or not. Is on a weird quest to convert all of his power tools to homemade wooden power tools, including a sander, tablesaw, router, and a lathe. Loves plywood, and wooden gears. A bit weird, but good production values. Mighty Car Mods. As meticulous EEVblog is about circuit design, these guys are the inverse with regards to cars. Seems out of place in this list, but they know how to do things right, if you can get past the chode exteriors. Check out their 300kW VW Beetle conversion! Samm Sheperd. A kid with a Rick Astley-esque deep voice that doesn't match his face. He experiments with microcontrollers and RC airplanes. Good, bite-sized aerodynamic lessons. Techmoan. Another UK-er, this guy loves vintage AV stuff, and is very knowledgeable and informative on obsolete tech like RCA CED videodiscs or nanocassettes. Somehow doesn't manage to be stereotypically nerd-cringey. The Post Apocalyptic Inventor. A German bloke that has a habit of tearing apart old washing machines to use their motors, old scanners to cannibalize their op-amps, or old <anything> to take its <anything> for <awesome project>. Currently in a pseudo-partnership with AvE to design an EDM machine. The Backyard Scientist. Loves molten aluminum, propane, and high-speed cameras. Slower release schedule, but the results are always beautiful, and the guy isn't irritating like most slo-mo shows. As it says on the tin, everything is done in his backyard. Afrotechmods. Learn electronics! Colin Furze. A UK plumber cum mad scientist, Colin Furze is the master of thermite, pulse jets (scooter, bicycle, go-kart, car), and crazy. A British national treasure. ElectroBOOM. All injuries are real and not staged. Bill Hammond, the Engineer Guy. Bill Hammond walks us, step-by-step, through the genius of past and current design. From fourier analysis machines, the RMS Titanic, and click pens, every video gets my rapt attention. Nearly on-part with HiM for soothing, informative viewing. mikeselectricstuff. As crazy as EEVblog is, mikeselectricstuff is as calm. Watch Mike take apart and analyze everything from cell phone chargers to a $1m confocal laser microscope. Very informative. Applied Science. Ben Krasnow, who works for Google's super-secret-squirrel development team, GoogleX, designs and builds his own contraptions, while explaining very concisely and accurately the principles behind the operations. Automatic chocolate chip cookie machine? Scratch-built scanning electron microscope? How oil-air vacuum pumps work? Check this guy out! Bad Obsession Motorsport. AKA "Project Binky," two British blokes spend 3+ years meticulously engineering an answer to the question of, "What happens when you try to stuff a 4WD Celica Sport drivetrain into an original Rover Mini 1000 body?" Hijinks and precision welding ensue. NightHawkInLight. How to make a Thermic Lance. Make rope from Grass. DIY Paper Airplane Ballista. Winding custom springs. A very calm, nice guy with a progressively-lengthening beard, in the backwoods of <somewhere> doing crazy poo poo with basic tools and limited knowledge. Check it out!] Clickspring. I don't know if he's a master clockmaker, but he should be. See ya latah. Queen_Combat fucked around with this message at 19:32 on Mar 15, 2016 |
|
#
?
Mar 15, 2016 04:40
|
|
|
You are missing one of the best channels. Clickspring. Incredible production and even more amazing work.
|
|
#
?
Mar 15, 2016 12:27
|
|
|
I want to see a million dollar confocal laser microscope. Also a home-made SEM, that sounds nuts (mine is a $400k machine, plus licensing and maintenance contracts). Thanks for these!
|
|
#
?
Mar 15, 2016 15:22
|
|

|
If you like cool real world metal and machine related stuff, check out Keith Rucker OWWM. His vids are a bit chatty but HQ.
|
|
#
?
Mar 15, 2016 17:34
|
|

|
Also, abom79 and halligan142.
|
|
#
?
Mar 15, 2016 18:09
|
|
|
This Old Tony just built a CNC router, built some stuff for his lathe and picked up a new mill; he's got great production quality and sense of humor!
|
|
#
?
Mar 15, 2016 19:12
|
|

|
Brekelefuw posted:You are missing one of the best channels. poo poo. Yeah, he's on the list, but I forgot to open the tab to add to the list. I'll update it.
|
|
#
?
Mar 15, 2016 19:32
|
|
|
Mark Aspery's channel has tons of content. Covers teaching curriculum for actual courses too.
|
|
#
?
Mar 15, 2016 20:35
|
|


|
Don't forget Keith Fenner at Turn Wright Machine Works.
|
|
#
?
Mar 15, 2016 20:48
|
|

|
Here's a few from my "metal" youtube list. SV Seeker is a dude building a giant rear end steel boat in his backyard, it's pretty cool to watch tubalcain old machine guy sharing knowledge ChuckE2009 welding and fabrication mostly Bruce Whitham has a machine shop in Perth WA and posts up videos of jobs he does Shadon HKW another fabrication metal guy
|
|
#
?
Mar 16, 2016 00:16
|
|

|
Sorry in advance for some of the blurry pics, I'm a terrible cameraman and I was excited today. McMaster Carr shipped the pins timely, and the friendly UPS man showed up at my door right on time after I got home from work. Off to the shop.  On my way I stopped by Harbor Freight and got a cheap metric tap set so I can chase threads. These were really gunked up with rust and dirt.  Worm gear installed. I chose to use Mobil Vactra #4 on the pin, and I put some anti-seize on the set screw.  Here I am setting the height of the chain hoist. I then pulled the ram back out and cleaned up the ways with kerosene, and put on a liberal coating of Vactra #4.  No pics of the gib or the setup, but I cleaned up the gib, set the gib screws so they just sat inside their cut-outs, and then clamped the right side using 2 blocks of wood and a C-clamp so the gib wouldn't move on me. The ram slid in fairly easily. The handle has no problem moving it easy-peasy. I then put on the rest of the hardware.  This is how the bolts are inserted into the neck.  Spring pin installed, with anti-seize. I also used anti-seize to lubricate the surfaces the pivot-pin goes into.  Here's the neck installed. The pivot-pin went in fairly easy with a block of wood and a hammer. While the pin was inserted half way, I used a combination square to make sure the hole in the pivot-pin was aligned with the spring pin. Added new washers onto the 3 locking bolts.  The locking bolts, pivot-pin retaining nut, and it's set screw all got anti-seize, of course. The mating machined surfaces on the neck got Vactra #4.  Before I installed the neck, I packed grease in the gear teeth.  Here's the head prepared to be installed. Put grease on the gear, and Vactra #4 on the mating machined surfaces.  Installing the head was a PITA. Next time I do this I definitely will have a second person available. I had to tilt the neck down as you can see. Once I got the bolts to just poke thru I put the nuts on and drew it in further. Then took the nuts off one by one and put a washer behind them, and then drew it in all the way.  After I got the head fully bolted on and back upright, I took the nuts off again one by one and cleaned up the threads, added new washers, and of course... you guessed it... anti-seize.  
|
|
#
?
Mar 16, 2016 03:34
|
|
|
^^^ Nice work, looks like a fancy ice cream machine  Geirskogul posted:poo poo. Yeah, he's on the list, but I forgot to open the tab to add to the list. I'll update it. Ahh, here's the guy. Torbjorn Ahman
|
|
#
?
Mar 16, 2016 04:16
|
|
|
I had to think about it for a while, but now I kind of see it. Certainly not one of these however.  The knee has heavier rust then what I've worked on so far. I decided to attack it with naval jelly first.  Here it is after two rounds of naval jelly.  After several rounds of barkeeper's friend, this is what we are left with. I found some rust that barkeeper's won't handle. I'll hit the tough spots with more naval jelly tomorrow when I go back to the shop. It's not entirely apparent in the pics, but you can still see the original scraping marks on the ways. 
|
|
#
?
Mar 17, 2016 03:36
|
|
|
Tomorrow I am going to be cutting some slots on a die that I am making. Any tips? I will be using a slitting saw on my mill. The size is 8-32, so I don't have much room. Does the position of the slit make a big difference? Does it need to be slightly off of center like when making a reamer?
|
|
#
?
Mar 18, 2016 02:11
|
|
|
Anyone ever used a Dillon gas torch? Also known as Hernob or Cobra or a combo of all three DHC 2000. E: went to the junkyard btw, very rarely have a chance to make it there in time before they close. You can find all kinds of metal junk there, bought 20lbs of various steel plate for welding training for 5 bucks. His Divine Shadow fucked around with this message at 07:05 on Mar 18, 2016 |
|
#
?
Mar 18, 2016 05:37
|
|

|
Some idiot scrounger climbed the mountain of prepared steel while a guy was working the magnet crane a few years ago. I forget if he got killed or just severely injured but almost none of the yards around here let people browse anymore.
|
|
#
?
Mar 18, 2016 15:41
|
|
|
That sucks, you can make some real deals there sometimes, like entire cast iron bandsaws about to be melted down, but otherwise functional. The worst problem I have is I can basically only make it out there a few times a year.
|
|
#
?
Mar 18, 2016 16:53
|
|
|
So I'm putting this hydraulic press together, and one big thing I need to figure out is: repeatability. Because the metal i'll be forming is hidden by the die components and pressing into urethane gives varying results depending on pressure, if I wanna do production runs I have to be hitting about the same pressure every time. The two approaches I know of to achieving this are 1) drilling and tapping a hole in the bottle jack to accept a pressure gauge, or 2) modifying a torque wrench to replace the bottle jack handle so you can work out the right torque setting through trial-and-error. 2 is easier to put together but seems less useful overall. Installing a gauge seems really finicky and easy to screw up, if you scratch the internals or leave any metal chips in there it can destroy your jack. Can anybody think of any other ways to hit the same tonnage every time?
|
|
#
?
Mar 18, 2016 19:38
|
|

|
The only 3rd option that comes to mind would be some type of electric pressure transducer or sensor. My preference however would be drilling and tapping a hole for a gauge... should be very accurate and repeatable, not a whole lot to go wrong, and besides, drilling and tapping holes in risky places always makes for an adventure!
|
|
#
?
Mar 18, 2016 20:29
|
|
|
If the pressure release on most bottle jacks works how I think it does (basically like a brake bleed screw) you could also drill the center of the bleed screw for a gauge, or pull the bleed screw, measure the threads/conical tip, and machine a custom one with the same threads and tip but with a gauge port on the back. e: not quite, apparently they usually use a ball bearing that's pushed into a port by the release valve screw, but I think this is probably still the easiest place to modify the design without getting nasty poo poo in the cylinder. Here's an exploded diagram: https://jdparts.deere.com/partsmkt/document/english/pmac/32785_fb_ServiceParts_SW10129C.htm You could also get one that's at least semi rebuildable and pull the piston out while drilling/tapping so that you can deburr the hole and flush any metal debris out before reassembly. e2: huh, apparently some brands DO have a conical-seat release valve screw that's very similar to a brake bleeder. It just releases the fluid back into the reservoir around the conical part instead of up through the bore in the center. kastein fucked around with this message at 21:05 on Mar 18, 2016 |
|
#
?
Mar 18, 2016 20:50
|
|
|
Brekelefuw posted:Tomorrow I am going to be cutting some slots on a die that I am making. Any tips? I will be using a slitting saw on my mill. The size is 8-32, so I don't have much room. I've never made a die so I can't weigh in on the position of the slot. I just wanted to warn you that it might clamp down on the saw when you break through the last bit of material. If you can leave a little material and finish it with a hacksaw or bandsaw.
|
|
#
?
Mar 18, 2016 21:54
|
|


|
Just saw this video and thought you guys would appreciate it: https://www.youtube.com/watch?v=bmIObGZDjew Machining and metalworking porn in 4K resolution. Needs more CNC
|
|
#
?
Mar 19, 2016 05:47
|
|
|
I glass bead blasted the gas welding equipment today and I will have a closer look at it. Found an old AGA spark lighter, turned out like new after blasting. 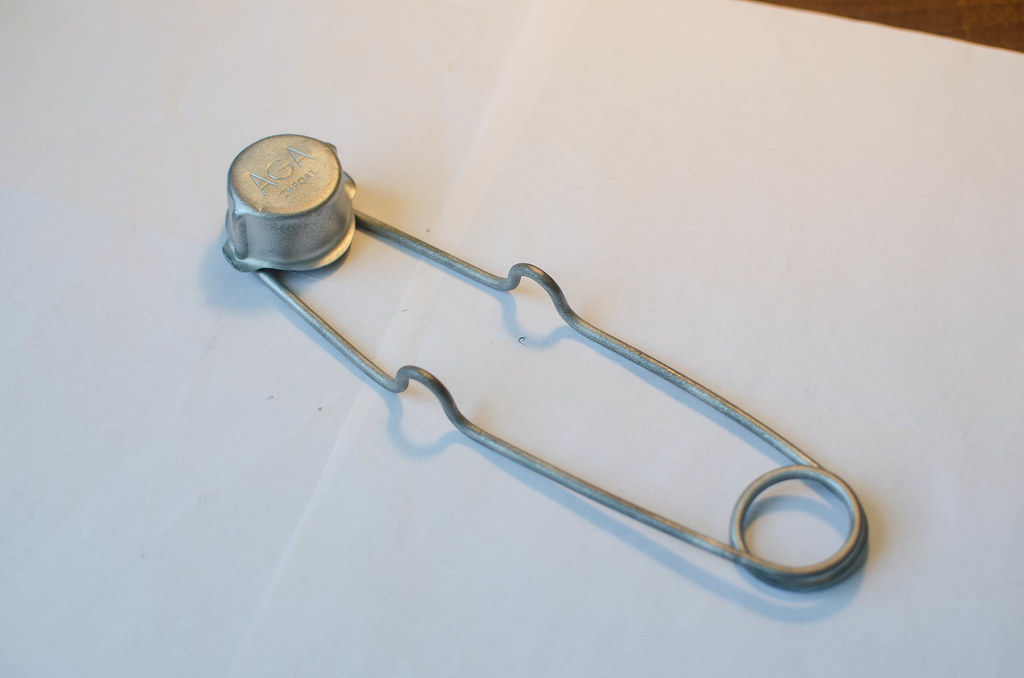 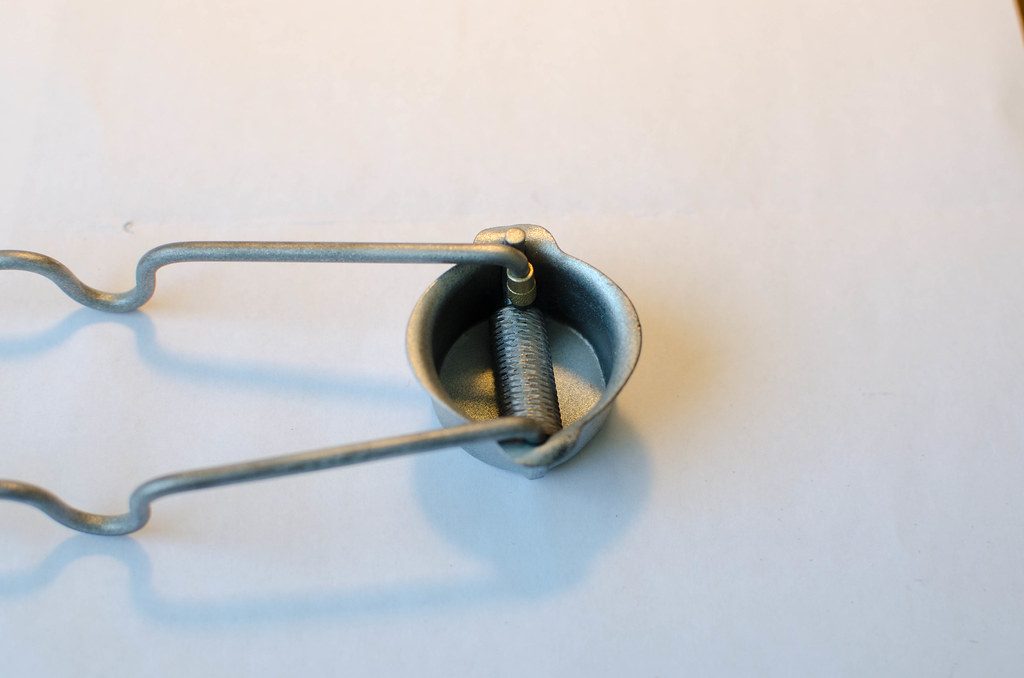 The handle 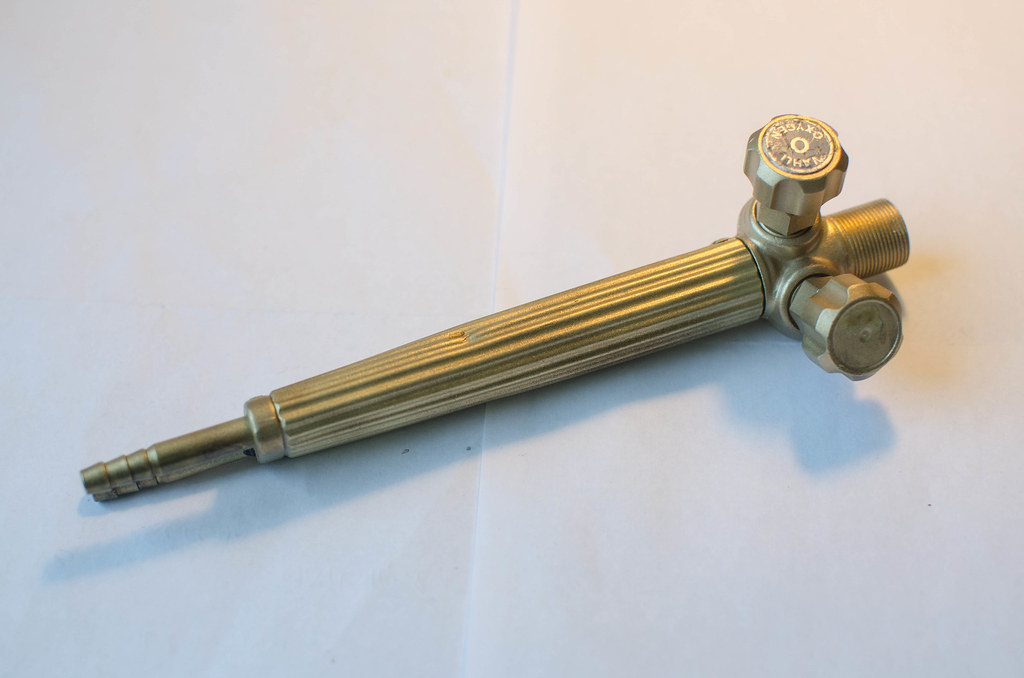 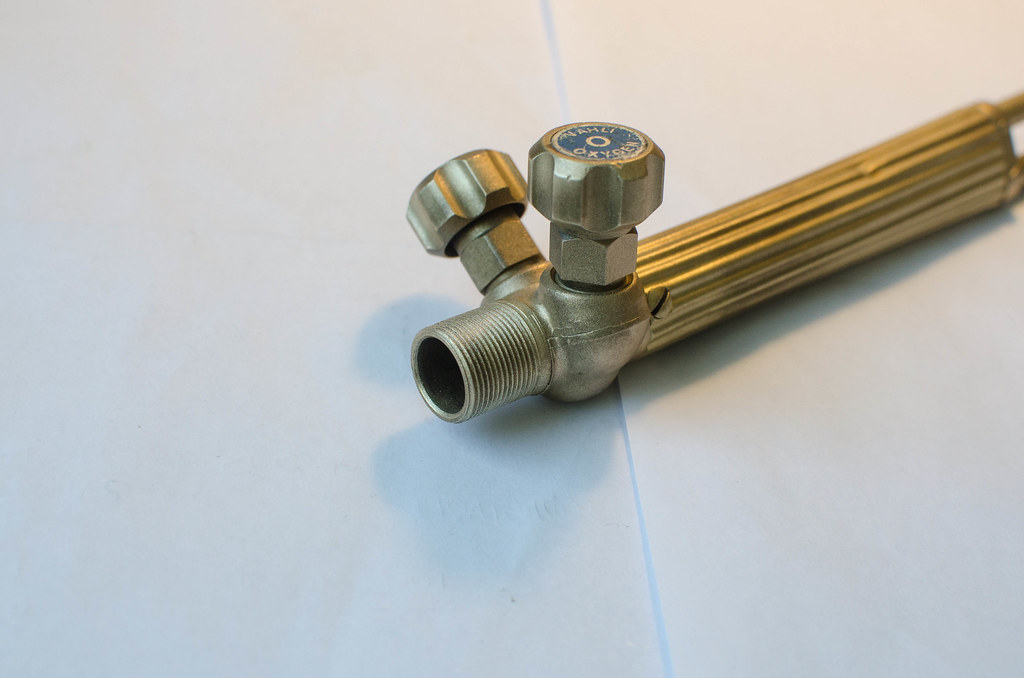 Cutting torch 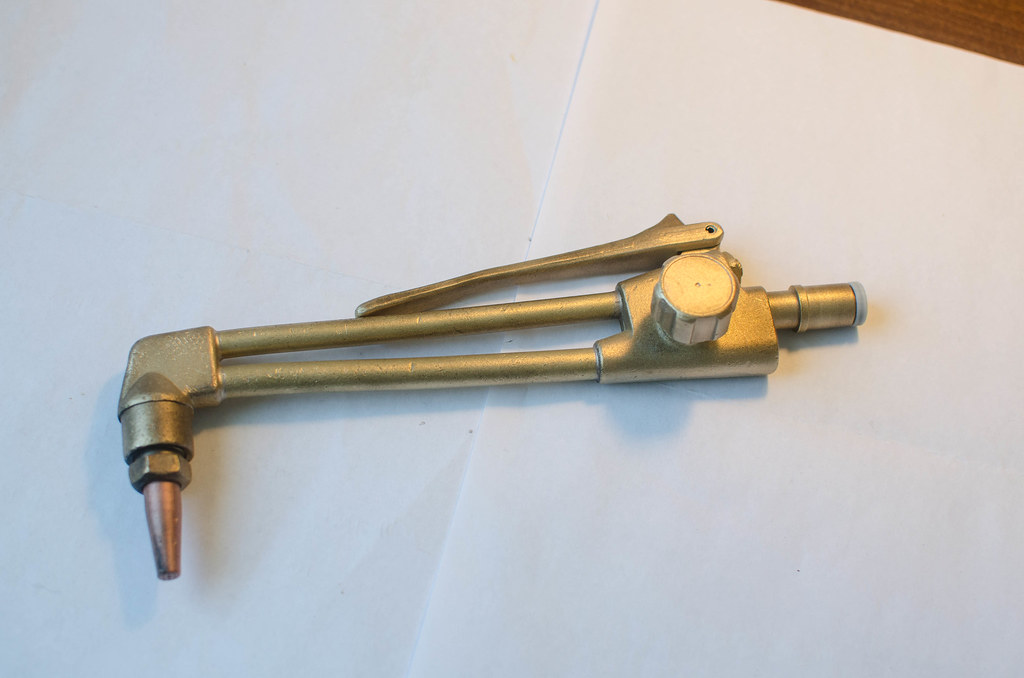  Various welding tips 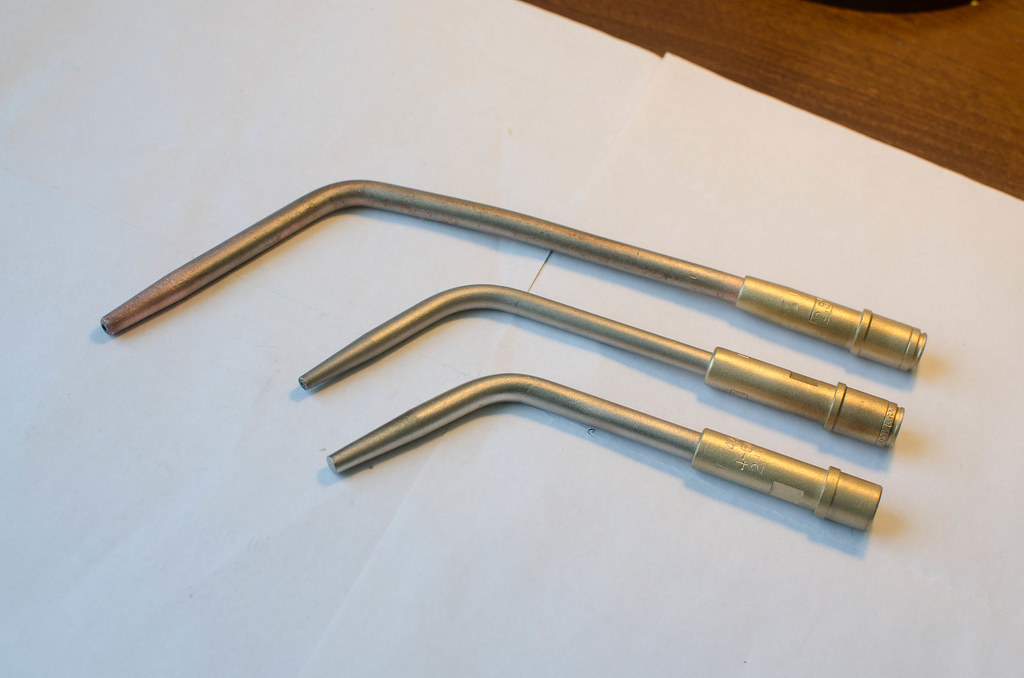 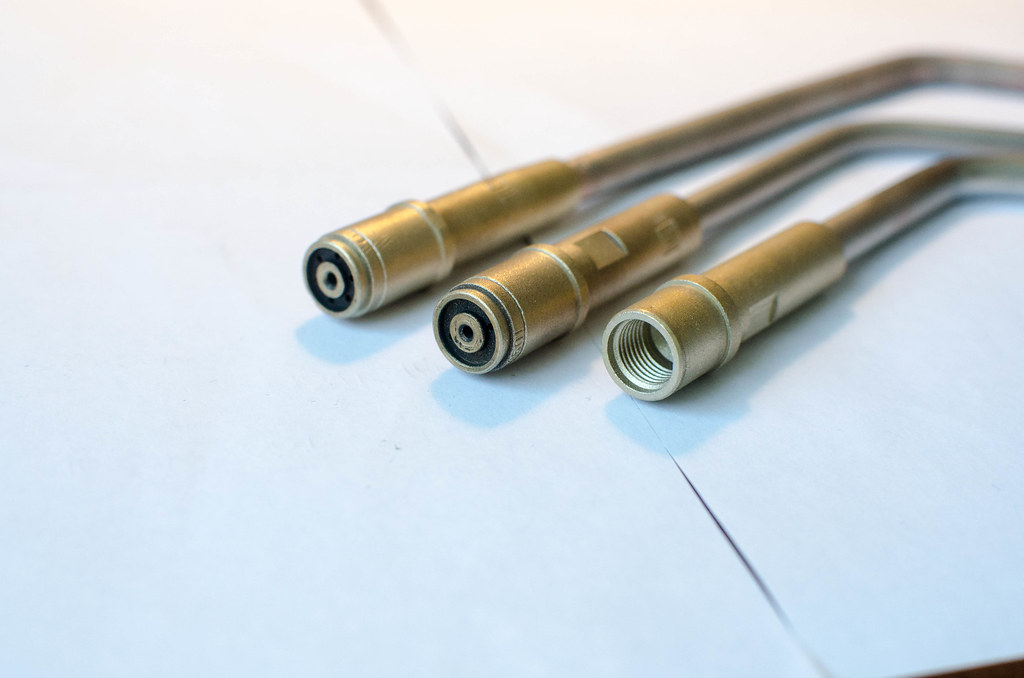 I note one of them is different at the base. 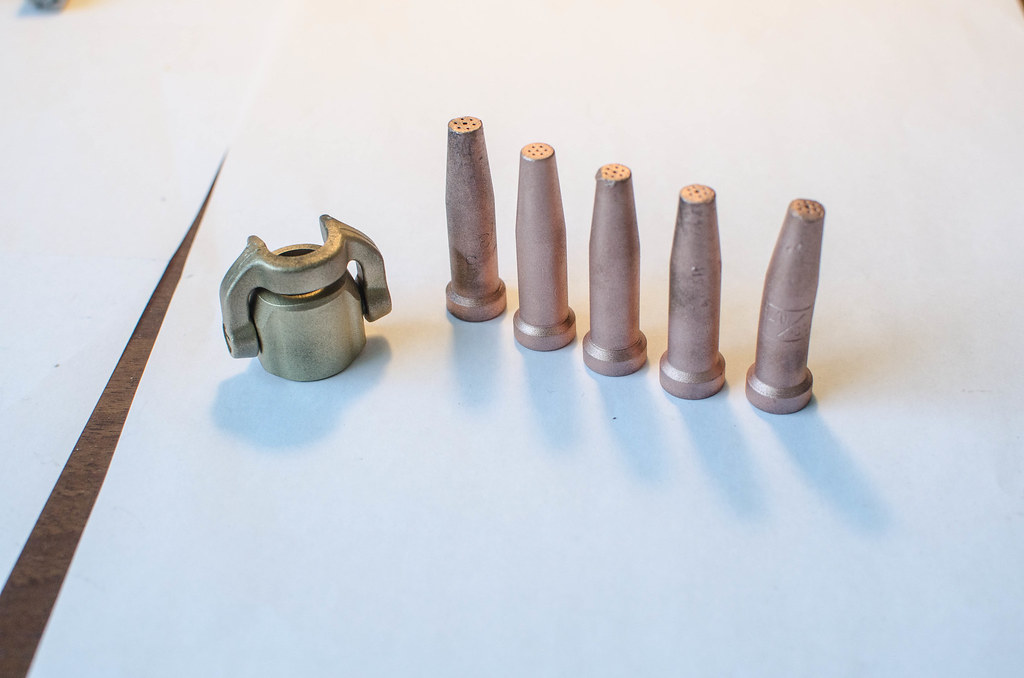 Different tips for the cutting torch, one looks like it has halfway melted.
|
|
#
?
Mar 19, 2016 14:30
|
|
|
Goddamn, somebody gave this away (to whomever who could come and collect like now), the seller got so bogged down with calls and had to shut down his phone: I wish I had some crazy bastard like that next to me... Anyway took apart the handle but the camera battery died on me. Here's the inside of the oxy and acetylene regulator knobs, the acetylene side is sooty and black, I assume that's how it normally gets with use. Everything otherwise looks to be in top shape. I can't see that this design uses any gaskets or o-rings anywhere by the way... I thought the soot was an o-ring first. 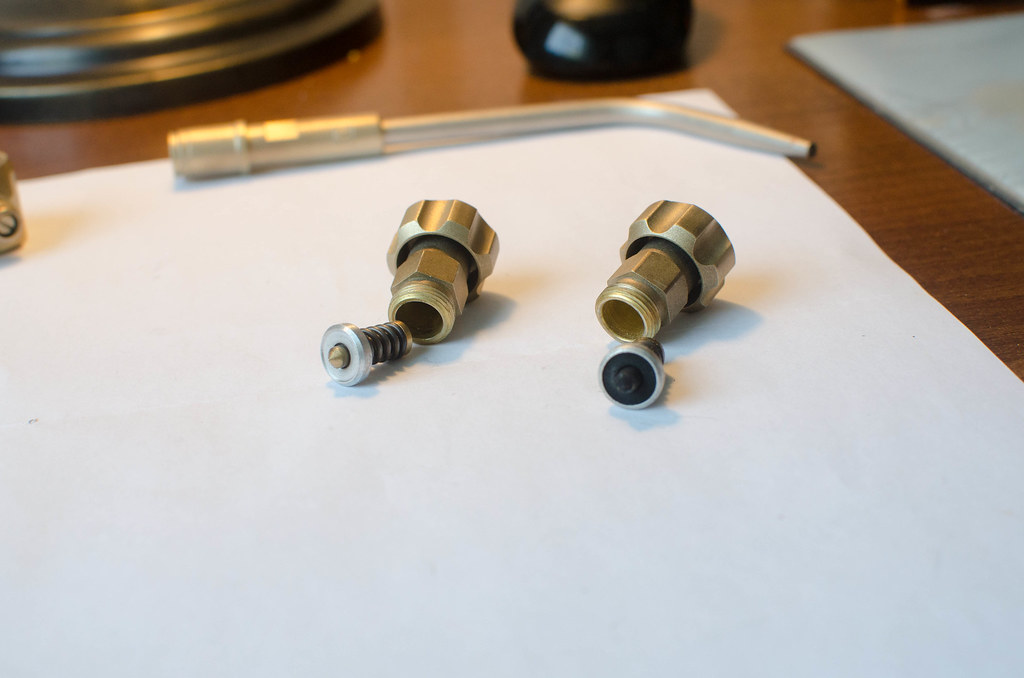
|
|
#
?
Mar 19, 2016 15:35
|
|
|
The knee is cleaned up to my satisfaction. I gave it to two more coats of naval jelly, then went at it again with barkeeper's friend, one last wash with purple, dried it down good, and gave it some lanolin on the clean surfaces. I have now used up the whole can of barkeeper's, need to get more! I'll also get some pipe cleaners so I can work on the oil passages, but I sprayed some WD-40 through there for now to displace any water. I expect I'll be chasing some threads too. Now the jigsaw portion of the build starts, sorting out and cleaning all the bearings, hardware, and other parts that make the knee go up and down. What makes this fun is I don't know precisely what I'm looking for. The parts diagrams in the manual are of limited help... they aren't exploded at all, so you don't see the true shape of all the parts. I've looked at some bridgeport videos and while similar, there are also differences.   I used some paper and pen to make my checklist for the parts while I was at the restaurant eating breakfast this morning. When I got to the shop I found a couple things I was missing and then laid them out.  Here's everything cleaned up. Had to use the hydraulic press to disassemble a couple assemblies. The two bearings that are permanently lubricated just got wiped down with a paper towel. They feel fine. The big bearing which the weight of the knee rests on got cleaned up in the ultrasonic cleaner.  Here's the dial for the knee. (Z axis) It got some naval jelly, a round with barkeeper's friend, a go on the buffing wheel, another round of barkeeper's friend, and a wipe down with some brasso. I'm happy with it.  The big bearing got packed full of grease, put the dust covers on, and then wiped off the big mess of grease on the outside with a paper towel. Before cleaning, I thought this bearing was toast, but after cleaning and lube, it feels just fine.  Here's the machine ready to accept the knee. I cleaned up the ways on the column and the knee with kerosene and gave them a rub down with Vactra way oil.  Here's the knee lowered onto the column and the gib and screw inserted. Thanks to halligan142 on youtube for the idea of clamping the steel inside the knee as a lifting point.  Here's what it looks like inside with the knee resting on the screw.  Gear installed and nut tightened down snug, well as snug as you can get it until the screw spins, but that is snug enough.  Shaft installed and gears packed full of grease.  The gears have a cover to keep off the chips and dirt.  Here's the knee and everything fully installed that makes it go up and down and lock it. While I was assembling everything I triple checked the parts diagram and list, and ended up with 3 extra washers. I'm pretty sure everything is correct according to the parts diagram, everything fits properly, moves without smoothly without interference, and the gears mesh right, so I'm satisfied. We'll see what's leftover when everything is said and done. It's starting to look like a milling machine now! Tomorrow when I go back I'll clean up all the caked up dirt and grime on the saddle/crossfeed and prepare a container for it to sit in Evapo-rust. I know I have to order some parts for the oiling system which have rotted and the way felts so I'm going to assemble the rest of the mill without the oiling system to see if I'm missing anything. Once everything is cleaned and put together, dis-assembly and re-assembly to install the oil system components and anything else will be easy peasy. 
|
|
#
?
Mar 20, 2016 04:16
|
|
|
What's the best way to remove hammer handles, particularly ones that aren't so loose or broken that they're falling out? I have to re-handle about 25 hammers, most of which still have handles.
|
|
#
?
Mar 20, 2016 14:41
|
|

|
Pagan posted:What's the best way to remove hammer handles, particularly ones that aren't so loose or broken that they're falling out? I have to re-handle about 25 hammers, most of which still have handles. Cut the handle off just below the head, pull out any metal wedges if you can, drill out as much wood in the eye as you can, and then you should be good.
|
|
#
?
Mar 20, 2016 14:55
|
|


|
Fire? Could you cut off most of the handle, hold the head in a vice, and use a drill press to get out most of the handle left in the head? Dunno how that might work with those little metal wedges in there.
|
|
#
?
Mar 20, 2016 15:01
|
|


|
AbsentMindedWelder posted:The only 3rd option that comes to mind would be some type of electric pressure transducer or sensor. My preference however would be drilling and tapping a hole for a gauge... should be very accurate and repeatable, not a whole lot to go wrong, and besides, drilling and tapping holes in risky places always makes for an adventure! lmao i had a dream that i drilled and tapped my jack but Oh No!! I Forgot To Take The Piston Out!! the metalworker's equivalent of "im late to write the final exam and when i get there i realize im not wearing pants", I suppose
|
|
#
?
Mar 20, 2016 15:30
|
|
|
Rotten Cookies posted:Fire? Fire bad, you'll mess up the steel (this applies more to axes but still). The rest sounds fine though.
|
|
#
?
Mar 20, 2016 16:37
|
|
|
Beardless posted:Fire bad, you'll mess up the steel (this applies more to axes but still). The rest sounds fine though. I dunno why I didn't think of that. True. Don't ruin your hammer like that
|
|
#
?
Mar 20, 2016 19:27
|
|
|
Before I knew better I threw a hammer into a camp fire to burn out the handle. I wouldn't do it again but I can't tell any difference before and after.
|
|
#
?
Mar 20, 2016 20:44
|
|
|
With hammer I can see it not being as much of an issue, but most of my re-handling knowledge is geared towards axes.
|
|
#
?
Mar 20, 2016 21:52
|
|
|
Tool steel subjected to as little as 500 degrees can lose a hard temper that's been put on it. The softer the original temper, the hotter you can get it without destroying that temper, but unless you have specific data about that original temper you're just making a guess. In other words you should assume any tool steel that's been in a fire needs to be re-hardened and then re-tempered. For a hammer handle that's not that challenging since you'd probably be fine with an even hardness throughout, but with an axe you probably want a good hard temper on the edge and then a softer temper at the eye and the back, so now you're doing a differential temper and if you've never done it before, it's a little more effort. This is also why if you use a torch to get fasteners apart on your car, you shoudl not re-use them unless you're certain they were soft anyway. Likewise you should not re-use car parts that might be hardened steel once you use a torch on them. They may look absolutely fine, but now be softer than they should be and fail when they shouldn't under severe stress, such as during maximum cornering (suspension parts) or in an accident (frame parts). Removing a handle from a hammer head depends on whether it has a metal wedge or wooden only, and on whether you're trying to save the handles or not. If there's no metal wedge and you don't want to save the handle, run a big drill bit down from the top to remove material, and then drive the handle out with a drift. If you have access to a press you can just press it out. If not, the post vise will make driving the handle out with a drift or punch a lot easier than if you have to use a bench vise, but either way will work. Drilling out some of the material allows the rest to compress enough to come out more easily.
|
|
#
?
Mar 20, 2016 22:10
|
|

|
FCAW question: With arc there's 6011 and 7018. Is it so with flux-core mig? Or is this a dumb question because wire speed?
|
|
#
?
Mar 21, 2016 01:45
|
|
|
Got the saddle cleaned up today. This thing was so increddibly dirty beforehand, that i didn't even know it had red paint on the inside, it was totally caked up. Took a good bit of work to get it clean. I decided to de-rust by hand with naval jelly, barkeeper's friend, and MMO. Next up I'll start working on the table. The table is getting the Evapo-Rust treatment, at least that's the plan.  DreadLlama posted:FCAW question: With arc there's 6011 and 7018. Is it so with flux-core mig? Or is this a dumb question because wire speed? Well 6011 is a fast feeze electrode, which the nature of, would not be applicable to wire feed. From what I can tell the flux core I've done on thicker metal looks a good bit similar to 7018. That said, I haven't looked into any of the chemistry stuff with fcaw. You certainly need clean metal, that I can tell you!
|
|
#
?
Mar 21, 2016 01:52
|
|
|
AbsentMindedWelder posted:That said, I haven't looked into any of the chemistry stuff with fcaw. You certainly need clean metal, that I can tell you! Actually, one of the best things about fcaw is blowing through rust. Doesn't make for a pretty or as strong as possible weld, but drat it's a good farmer field weld to get you home. Obviously I do'nt suggest this as a general practice, but in my limited experience it works better than other processes under suboptimal conditions.
|
|
#
?
Mar 21, 2016 02:14
|
|

|

|
| # ? May 25, 2024 12:35 |
|
|
Motronic posted:farmer weld It's funny you mention that because that bit in the op about some dude out in the middle of nowhere welding some ugly working machine is familiar to me. Due to budgetary and space restrictions, the entirety of my work is conducted out of doors and on scrap metal. I'm trying to get as idiot-proof as possible. Any recommendations for a wire that's good for "got paint on it, I suck at welding and also it might be humid"? DreadLlama fucked around with this message at 03:11 on Mar 21, 2016 |
|
#
?
Mar 21, 2016 03:07
|
|