|
Check that the trigger mechanism and the little metal ring thing with the tongue tab behind it are properly aligned.The trigger rod in particular has a little slot drilled through it the needle passes through - if you disassemble the brush and accidentally rotate the trigger rod, of course the slot won't be aligned with the needle and let it pass through.
|
 #
?
May 25, 2016 21:26
#
?
May 25, 2016 21:26
|
|

|

|
| # ? May 9, 2024 16:35 |
|
|
I once had to clean out my nozzle with a toothpick in order to get dried paint out. With the nozzle off, and needle out , you should be able to see through it from end to end. Can you?
|
|
#
?
May 25, 2016 21:42
|
|

|
Drake_263 posted:Check that the trigger mechanism and the little metal ring thing with the tongue tab behind it are properly aligned.The trigger rod in particular has a little slot drilled through it the needle passes through - if you disassemble the brush and accidentally rotate the trigger rod, of course the slot won't be aligned with the needle and let it pass through. I doubt that's it; I first noticed when I realised that releasing the trigger wasn't causing the spring to push the needle back, and the needle wasn't extended through the nozzle either, i.e. even without drawing the trigger back the needle was withdrawn. The needle was definitely in place to begin with, so I assumed I'd clogged it somewhere between the cup and nozzle somehow while I was spraying, but thinners haven't helped a ton there, either.
|
|
#
?
May 25, 2016 21:44
|
|
|
dexefiend posted:I once had to clean out my nozzle with a toothpick in order to get dried paint out. How'd you clean it with the toothpick? That might be what I need, possibly. I'll have a check.
|
|
#
?
May 25, 2016 21:45
|
|
|
Pull the gunk out the big end with it?
|
|
#
?
May 25, 2016 21:49
|
|

|
I took the nozzle and gently rorated it on the end of a toothpick. It was the only way i could get the gunk out of it. This was my .18mm nozzle, and i just couldnt get the paint out otherwise. Edit: MSP's suggestion would work too, but start at gentle. Don't be banging it against a table.
|
|
#
?
May 25, 2016 21:49
|
|
|
That's what she said! 
|
|
#
?
May 25, 2016 21:57
|
|
|
grassy gnoll posted:Holy poo poo, you guys, VMA metallics. Please try Vallejo Metal Color and report back about your head having exploded. I've started mixing those into other paints just because of pigment density and how they make just about any other paint cover in a single pass.
|
|
#
?
May 25, 2016 22:12
|
|
|
Discovery #1 today: Nozzles come off! Discovery #2 today: Nozzles are an absolute bitch to get back on.
|
|
#
?
May 25, 2016 23:38
|
|
|
Mango Polo posted:Please try Vallejo Metal Color and report back about your head having exploded. Whoa whoa whoa. They make water-soluble Liquid Metal equivalents? So getting those.
|
|
#
?
May 26, 2016 00:36
|
|
|
Pierzak posted:Whoa whoa whoa. They make water-soluble Liquid Metal equivalents? So getting those. They're not as good as Liquid Metal but they're very good
|
|
#
?
May 26, 2016 01:39
|
|

|
Metal Color is crazy. Get a shade darker than you think you need because it is soo bright and clean.
|
|
#
?
May 26, 2016 01:57
|
|

|
spectralent posted:Discovery #1 today: Nozzles come off! Not only does the nozzle come off, but you can shoot without it for a finer line! (Assuming you're talking about the front nozzle that shrouds the needle.) Usually it's two parts, the front piece helps the spray widen, and the back piece holds the needle.
|
|
#
?
May 26, 2016 03:24
|
|
 Their flashing tongues, spitting out blood and poison.
|
The part this is called "Fluid nozzle" here: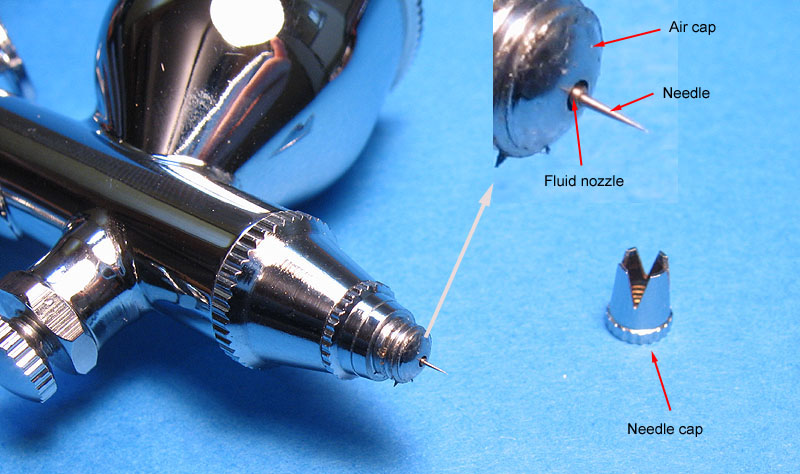 I successfully got it off, but getting it back on is proving much more difficult. It's been literal hours and I can't manage the dexterity to twist it back in 
|
|
#
?
May 26, 2016 03:43
|
|
|
I'm not familiar with that airbrush but the nozzle typically isn't supposed to come apart. You probably should order a new one.
|
|
#
?
May 26, 2016 04:09
|
|
|
grassy gnoll posted:Holy poo poo, you guys, VMA metallics. It's actually because the metal flakes are smaller to fit through the airbrush. The side-effect of that being a much smoother finish. I haven't tried Citadel air yet, but I'm expecting something similar.
|
|
#
?
May 26, 2016 04:15
|
|

|
I haven't painted a mini since I was a kid but I want to get back into it so I bought the Reaper 'Learn to Paint' set and just finished the three minis that it came with. I don't think they're too bad but I still need to figure out the whole dry-brushing thing. I tried painting eyes and teeth on the orc but couldn't manage a clean dot without obscuring the whole drat face.      
|
|
#
?
May 26, 2016 07:11
|
|

|
CommissarRed posted:Well, I completed this Lich for Frostgrave and now that I've taken photos of him, realize he looks pretty awful. i feel like my paints never really seem to pop as much as I want and they're never as vibrant as I'd like them to be. The execution is really good, I think it's just the palette choice that might need tweaking. It's been mentioned but the blurring together of colours is happening due to 2 things. The first is that the adjacent colours are very close to each other e.g. red armour next to purple cloth and brown staff with a darker brown hand wrap on it, which makes it hard to see the different areas of the model. The other reason is this: Ilor posted:Once you've got that part down, another technique that will help is "darklining," which helps to visually reinforce transitions. This sort of technique would really help with the gold edging for the red armor plates or the silver pointy bits against the purple robe. Both these things are straight forward to improve. For the colour choice you can shift the purple up to a more pinky hue with some lighter layers over the purple, or make them the same teal colour as the centre of the model in which case I'd do the same with the hood too to tie it together. Doing this gives you no adjacent colour overlapping which I believe probably has some name in the art world but I'm going to call it that because it sounded clever. Dark-lining/Black-lining/etc.. as Ilor mentioned is a great technique and one that I learned way to late really but it absolutely helps and doesn't require as much accuracy as you might think. In a nutshell paint a very thin (as in size and consistency) dark line between adjoining colours using either paint, ink or a small amount of wash, the colour will usually be black or a very dark grey/brown depending on the colour you're painting over (I also like blue). I don't have any camera setup as my painting area is gone for the next month of 2. But here's a couple of older models from a few years ago right about when I found out the joys of dark lining and the non-adjacent colour thing:  Vibrant colours (Dark blue lines between white and adjacent colours as well as the recesses of the green cloak, brown lines between hair, face and others). In hindsight the gold tiara thing was a bad colour choice as it's too close to the hair colour, I should've done it silver/grey like the weapon.  Very muted palette which is pretty much just black lines for everything. I avoided the same/similar colours touching by making the outer part of the robe dark grey so that it would divide the inner part and the cloak on his back. Ilor posted:look at richyp's Infinity minis for a fantastic example of wider tonal shifts that produce a beautiful "pop."  Thanks, that reminds me that I have 6 guys sat in primer for the May oath that I've not touched thanks to having my painting area/man cave turned into a building site. At this rate I'll have to paint on the floor Thanks, that reminds me that I have 6 guys sat in primer for the May oath that I've not touched thanks to having my painting area/man cave turned into a building site. At this rate I'll have to paint on the floor 
|
|
#
?
May 26, 2016 08:38
|
|


|
Another update on the Imperial Fists. Just really the bases to do now.
|
|
#
?
May 26, 2016 08:46
|
|

|
spectralent posted:The part this is called "Fluid nozzle" here: That piece they call the needle cap (everyone calls the parts at the end different things) should just...screw on? If it snaps into place or something that's kind of weird. The fluid nozzle is held in place by the air cap (I'm using the terms in that picture), then the fluid nozzle will either fall out or need a small wrench to be unscrewed itself. It's the fluid nozzle that has your clog and dried paint. Soak that in Dettol, isopropyl alcohol, cellulose thinner, white spirit or something else that will eat paint and use the needle of the airbrush or a hair brush to remove the clog or push it through the fluid nozzle. You can break apart a toothpick to get tiny splinters and use that to clean out the nozzle too - the wood is softer than the metal so it won't harm anything unless you get a splinter stuck in the nozzle (which you can remove with the airbrush needle). The airbrush post in the OP has some tips for you as well, including these: quote:
krushgroove fucked around with this message at 10:03 on May 26, 2016 |
|
#
?
May 26, 2016 10:01
|
|

|
spectralent posted:The part this is called "Fluid nozzle" here: Ok, I see now. The part I was talking about was the needle cup. I know you mentioned his was a used airbrush, is it also your first one?
|
|
#
?
May 26, 2016 11:24
|
|
|
TTerrible posted:Metal Color is crazy. Get a shade darker than you think you need because it is soo bright and clean. This guy knows what's up. The great shame of Metal Color is the lack of diversity in non-steel/aluminium colors and that the gold is a weird pale green tint. But they mix amazingly well with other ranges. Right now a mix of Scale 75 and MC is my favourite gold ever, and the scale 75 coverage issue is entirely fixed.
|
|
#
?
May 26, 2016 11:27
|
|
|
MasterSlowPoke posted:I'm not familiar with that airbrush but the nozzle typically isn't supposed to come apart. You probably should order a new one. I'm not an expert but I'm pretty sure it is, because the brush has different nozzles for different needle thicknesses which were provided; it'd be weird if they couldn't be removed and replaced with the others. krushgroove posted:That piece they call the needle cap (everyone calls the parts at the end different things) should just...screw on? If it snaps into place or something that's kind of weird. The fluid nozzle is held in place by the air cap (I'm using the terms in that picture), then the fluid nozzle will either fall out or need a small wrench to be unscrewed itself. It's the fluid nozzle that has your clog and dried paint. Soak that in Dettol, isopropyl alcohol, cellulose thinner, white spirit or something else that will eat paint and use the needle of the airbrush or a hair brush to remove the clog or push it through the fluid nozzle. You can break apart a toothpick to get tiny splinters and use that to clean out the nozzle too - the wood is softer than the metal so it won't harm anything unless you get a splinter stuck in the nozzle (which you can remove with the airbrush needle). The needle cap isn't the issue, no; the nozzle is the bit I'm trying to screw back on. It's got thread around the base so I'm assuming it screws in, but goddamn it's fiddly. Also cheers for the OP reminder. malal posted:Ok, I see now. The part I was talking about was the needle cup. That it be. EDIT: So, checking, I think there's still paint gunk in there despite a lengthy soak and prodding, but it's coming out in small smudges. I'm not quite sure how to deal with that... But it may not matter. I thought "Hell, I'll try one of the other needles while I soak it some more", and I've noticed the thread on the bases of those nozzles is longer. Muuuch longer. The thread on the base of the first nozzle also has a somewhat jagged edge. In other words, I'm fairly sure when I tried to unscrew the nozzle, it's snapped and wedged most of the base in the airbrush.
spectralent fucked around with this message at 11:55 on May 26, 2016 |
|
#
?
May 26, 2016 11:36
|
|
|
Mango Polo posted:This guy knows what's up. The great shame of Metal Color is the lack of diversity in non-steel/aluminium colors and that the gold is a weird pale green tint. I picked up Aluminium and Dark Aluminium to do studs and bracing on my 30k marines and the first test model looks like I've polished the underlying metal with a rotary tool. I'm going to try Magnesium/Burnt Iron/Gunmetal Grey/Exhaust Manifold next time I'm in Dark Sphere.
|
|
#
?
May 26, 2016 12:53
|
|
|
TTerrible posted:I picked up Aluminium and Dark Aluminium to do studs and bracing on my 30k marines and the first test model looks like I've polished the underlying metal with a rotary tool. I'm going to try Magnesium/Burnt Iron/Gunmetal Grey/Exhaust Manifold next time I'm in Dark Sphere. I put this together as a reference, maybe it'll help.   
|
|
#
?
May 26, 2016 13:06
|
|
|
Oh nice, that is OP worthy (if it isn't already there  ) )Did you pick up the complete set?
|
|
#
?
May 26, 2016 13:09
|
|
|
Sort of. I started with just gold, copper, silver and gunmetal and I keep adding a bottle or two every so often. I picked up Burnt Iron yesterday just to paint a Space Wolf Except for the various aluminiums (the exception being aluminium and duraluminium) which have way too many iterations, I can see myself getting the remaining few. Some of the paints look very similar though when brushed and only really shine if you airbrush them on the gloss black primer. Chrome is the biggest culprit.
|
|
#
?
May 26, 2016 13:14
|
|
|
Oath thread cross post. These models are pretty fun to paint.Electric Hobo posted:Oath complete!
|
|
#
?
May 26, 2016 16:16
|
|


|
big_g posted:Another update on the Imperial Fists. Just really the bases to do now. These are getting lost in paint talk - they look good.
|
|
#
?
May 26, 2016 16:50
|
|
|
richyp posted:The execution is really good, I think it's just the palette choice that might need tweaking. It's been mentioned but the blurring together of colours is happening due to 2 things. The first is that the adjacent colours are very close to each other e.g. red armour next to purple cloth and brown staff with a darker brown hand wrap on it, which makes it hard to see the different areas of the model. The other reason is this: This is super helpful, thanks! I spent all day yesterday watching guides on youtube and started from scratch. I oathed this dude for the oath thread and painted him up last night. I just did the 3 layers up process, with shading. I'm pretty pleased with it overall, but i see some areas where I could improve (such as increasing the midtone coverage so the recessed areas aren't as pronounced.) Maybe I could go back and add some darklining to him to separate the armor & scarf from the uniform. I need to work on him some more anyway, since I'm adding an ice base tonight.   Darklining makes a lot of sense, and that warlock looks pretty amazing. I need to try that asap.
|
|
#
?
May 26, 2016 19:07
|
|
|
big_g posted:Another update on the Imperial Fists. Just really the bases to do now. These own so hard. How large of a force are you planning on doing?
|
|
#
?
May 26, 2016 19:09
|
|
|
CommissarRed posted:These own so hard. How large of a force are you planning on doing? Thanks! I'm just doing these five so far as a one off fun little side project. I do like some of the Heresy era terminators thought so I might pick some of them up soon.
|
|
#
?
May 26, 2016 19:50
|
|
|
spectralent posted:
I've used inter-dental brushes to clean out a nozzle before. http://www.gumbrand.com/between-teeth-cleaning/interdental-brushes.html?gclid=CLf_rsfB-MwCFQUmhgod9PEBKw Dirt cheap.
|
|
#
?
May 26, 2016 20:50
|
|

|
Second go at this whole airbrushing business. Success! Except I seem to have accidentally painted a Word Bearer instead of a Thousand Son, gently caress. Next model I will try with FW's Angron Red, which is a bit more orange.
|
|
#
?
May 26, 2016 21:31
|
|
|
Thanks to whoever told me to use washing up liquid as a way to break surface tension on my black paint; it's worked fantastically.Unkempt posted:I've used inter-dental brushes to clean out a nozzle before. Thanks, but the nozzle's actually broken, so I'm going to need a new one anyway.
|
|
#
?
May 26, 2016 22:46
|
|
|
spectralent posted:Thanks, but the nozzle's actually broken, so I'm going to need a new one anyway. I got dibs on telling you to buy a Badger Patriot
|
|
#
?
May 26, 2016 22:49
|
|
|
Guess who spilled acetone on their model. I don't know if it's of interest to anyone but I've started updating my blog again http://lethemonster.blogspot.co.uk/
|
|
#
?
May 26, 2016 23:11
|
|

|
signalnoise posted:I got dibs on telling you to buy a Badger Patriot I just upgraded from a Delta starter to a Badger Xtreme (XTREME) Patriot 105. Hoping for some good weather this weekend.
|
|
#
?
May 27, 2016 00:18
|
|

|
cyberia posted:I haven't painted a mini since I was a kid but I want to get back into it so I bought the Reaper 'Learn to Paint' set and just finished the three minis that it came with. I don't think they're too bad but I still need to figure out the whole dry-brushing thing. I tried painting eyes and teeth on the orc but couldn't manage a clean dot without obscuring the whole drat face. These are really good for what is basically a first try. Next I'd suggest experimenting with some washes, try black on the metals, a dark green on the orc skin, etc.
|
|
#
?
May 27, 2016 00:21
|
|


|

|
| # ? May 9, 2024 16:35 |
|
|
Crossposting from the Oath Thread It was one hell of a month, but the awesome kit that my fiancee got me for my birthday is finally complete. It is a Nurgle Heldrake conversion for my Forsaken Chaos Space Marines, and fits in very well with my skeletal plague marines(coming soon), demon prince, and winged Lord. (also coming soon)  
|
|
#
?
May 27, 2016 00:38
|
|