


|
Ugh, I gloss-coated my TIE pilot helmet and the finish has developed a sort of crackle in places. Why has this happened and is it fixable? It's not something I'm desperately concerned about as it's not that noticeable, but it is really loving irritating, especially as it didn't happen on the backplate I used as a test piece for this gloss varnish. I (thought I) did everything right and it still hosed up D: E: fixed it with another coat. And a horrible photo jazzed up a bit with IMGUR's editor because I couldn't get the flash to work with the self-timer on my camera arg.  So freaking pleased with this. Ideally I'd add Imperium logo decals to the top of the helmet but I don't want to risk that. thespaceinvader fucked around with this message at 14:35 on May 31, 2016 |
 #
?
May 31, 2016 10:20
#
?
May 31, 2016 10:20
|
|


|

|
| # ? May 9, 2024 07:09 |
|
|
Crackled spray paint can come from a ton of poo poo unfortunately. Humidity levels and how cured the base coat is are big factors but I've also had it where I'm pretty sure 2 paints just reacted poorly when I know the base layer is cured. Such a pain. I basically quit clearcoating pieces if I used a rustoleum primer because it's so unpredictable. The helmet came out awesome though! The gloss coat looks really nice.
|
|
#
?
May 31, 2016 14:43
|
|
|
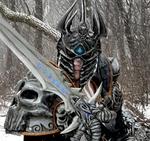
Thanks. The only genuine problem with it is field of view and mobility of head. If I fix anything before EMF, it'll be the hoses, which are currently stiff electrical conduit, and should be flexible vacuum hose or similar, but I didn't have time to source the right stuff before I needed it finished for UKGE. And field of view is just dire, worse with the coloured lenses. The straps are a hilarious bodge made of black duck tape and velcro, but they work... remarkably well actually. To the point where I may not actually replace them once the proper straps arrive. thespaceinvader fucked around with this message at 17:12 on May 31, 2016 |
|
#
?
May 31, 2016 16:54
|
|
|
   Little more progress on the Cuirass - It's very slow going, making sure that everything lines up just right. I'm pretty much eyeballing everything as I go, so it's a very step-by-step process. Hopefully I'll be able to have most of it finished tonight, then I can move on to the pauldrons. EDIT - Got the front side done, took a lot longer than I expected. I spent most of the time adding triangular lengths to the insides of the 'ridges' to fill in the gaps and give the armor a little more structural inegrity, so most of the work isn't really visible. Obviously I'm going to have to spend more time cleaning it up, filling in cracks, etc, but I'm very pleased with the overall shape. Plus, I can exaggerate the ridges when it comes time to paint. On the back side, I'm only going to complete about half of the ridges, as most of it will be covered by the tattered cloak, and I need a part of it to remain flexible, so no polyurethane resin.  
McKilligan fucked around with this message at 01:08 on Jun 2, 2016 |
|
#
?
Jun 1, 2016 01:08
|
|
|
So Tamir Lenk, I don't know if you got your mini fogger to work, but I thought you might be interested in this video from BigClive https://www.youtube.com/watch?v=iC878A2puH0
|
|
#
?
Jun 6, 2016 01:04
|
|

|
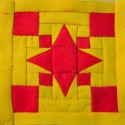
Chiffon blouse is near completion. Still needs cuffs and buttons on the back. Put the mock up red cincher over it to get a good visual.  There is no undershirt for the bodice and there is a flower stitched onto each sleeve like an appliqu�.
|
|
#
?
Jun 6, 2016 02:41
|
|
|
Trip report: Cosplay went really well, I had hella fun, and I am already planning my costume for next year. This bug has bitten me good and proper. These are the photos from Thanet Cosplay's booth.   Already planning to do something with the greenscreen background, I want to make myself an alt-art x-wing card. I did enter the contest, and apparently the result was announced as '*my name* as Jareth the Goblin King'. I was elsewhere losing horribly at x-wing so I couldn't attend the presentation, so I don't yet know whether it was me who won or the guy who did Jareth. I'm assuming the latter, given that his costume was awesome, and the costume is the more important part of the contest rather than the cosplayer's name. Still, I would be dead chuffed to win a thing first time out. Next year I will try to go down for the competition and one of the masquerades.
|
|
#
?
Jun 6, 2016 11:16
|
|
|
I love that blouse; you could totally wear it mundanely.
|
|
#
?
Jun 6, 2016 22:50
|
|


|
Workin' on making my own copy of this lovely design from Thingiverse: http://www.thingiverse.com/thing:1311108  http://i.imgur.com/mgX7V3Q.webm Also finished my Magneto helmet (colour scheme from his 2015 comics)  (this one was made on a reallllly bad printer and took a ton of cleanup work.. Gesso is actually amazing for hiding print layers!)
|
|
#
?
Jun 7, 2016 00:27
|
|

|
Heavy fill primer works well too.
|
|
#
?
Jun 7, 2016 03:31
|
|
|
Finished aside from closures in the back and maybe some more lace details. Now all that is left is to add pockets to the Bert costume and buttons. Really pleased that I got this all done.  I'm also hoping to get a Rainbow Brite and her Sprite costume set done but I may have to just do some other completed costume instead.
|
|
#
?
Jun 7, 2016 05:43
|
|
|
Update: I didn't win  But I did make the top 10 shortlist which isn't bad for my first costume in more than 10 years and my first EVA foam creation full stop. But I did make the top 10 shortlist which isn't bad for my first costume in more than 10 years and my first EVA foam creation full stop.The straps finally arrived. I'm not going to put them into this costume, but I'll use them for the next one. E: 3d printed mjolnir is beautiful.
|
|
#
?
Jun 7, 2016 13:30
|
|
|
The Repo Man posted:So Tamir Lenk, I don't know if you got your mini fogger to work, but I thought you might be interested in this video from BigClive Thanks for the info. Still fleshing out the wiring and layout of my lights/smoke show. I like this simple approach, but suspect that the tiny e-cigarette component would need frequent oil/battery changes that might annoy me. If my own setup fails during testing (still waiting on some components), I may double back to this instead.
|
|
#
?
Jun 7, 2016 18:14
|
|

|
Tamir Lenk posted:Thanks for the info. Still fleshing out the wiring and layout of my lights/smoke show. I like this simple approach, but suspect that the tiny e-cigarette component would need frequent oil/battery changes that might annoy me. If my own setup fails during testing (still waiting on some components), I may double back to this instead. Get a bigger/longer lasting vape setup. Attach the air pump close to the rig and bring the long tube from the other end to your wrist. I agree that that setup is very neat, but it probably won't last long if you want to use it semi-frequently. A bigger rig can be hidden elsewhere as long as you can run a tube to where you need it to go.
|
|
#
?
Jun 7, 2016 18:29
|
|


|
neogeo0823 posted:Get a bigger/longer lasting vape setup. Attach the air pump close to the rig and bring the long tube from the other end to your wrist. I agree that that setup is very neat, but it probably won't last long if you want to use it semi-frequently. A bigger rig can be hidden elsewhere as long as you can run a tube to where you need it to go. That's where I'm headed with mine. Still working out kinks with the design or the manifold for the blower to tank connection, fine-tuning the voltage for the tank (since mine is a 12v system) and mapping out the switches and relays for the system (e.g., separate switches for fan and tank, or a TDR, etc.)
|
|
#
?
Jun 7, 2016 18:47
|
|
|
In the dream future where I actually finish my revamped Rocketeer cosplay, I really want to have the jetpack produce smoke; the problem in the past was generating enough to make a decent effect. So definitely keep us posted on how yours goes!
|
|
#
?
Jun 7, 2016 19:42
|
|


|
I have also seen a lot of people say they used this tutorial for smoke effects so maybe useful to somebody: http://valkyriestudios.net/making-a-mini-fog-machine/
|
|
#
?
Jun 7, 2016 19:58
|
|
|
Paint, yay! 
|
|
#
?
Jun 7, 2016 23:00
|
|

|
Are those real sheep/goat horns? It looks great by the way.
|
|
#
?
Jun 8, 2016 17:50
|
|
|
McPantserton posted:I have also seen a lot of people say they used this tutorial for smoke effects so maybe useful to somebody: http://valkyriestudios.net/making-a-mini-fog-machine/ That's pretty close to where I am going with this. My tank, however, has a different intake, and I am using a squirrel blower instead of an air pump (because the vapor has to travel through about 3-4' of tube from tank to wrists. The tank in question uses a sub-ohm coil - which supposedly will produce big thick clouds, but also makes the voltage calculations trickier, as it needs low volts but significant amperage. So I'm playing around with manifolds and wiring to get the power and airflow right. Will definitely keep updating ITT, especially if it fukken works .
|
|
#
?
Jun 8, 2016 18:00
|
|
|
Tamir Lenk posted:That's pretty close to where I am going with this. My tank, however, has a different intake, and I am using a squirrel blower instead of an air pump (because the vapor has to travel through about 3-4' of tube from tank to wrists. The tank in question uses a sub-ohm coil - which supposedly will produce big thick clouds, but also makes the voltage calculations trickier, as it needs low volts but significant amperage. So I'm playing around with manifolds and wiring to get the power and airflow right. Will definitely keep updating ITT, especially if it fukken works . Please do. I've been thinking of doing a large Grim Reaper sort of costume, but the second most major effect, trailing fog/smoke everywhere I go, had eluded me over the years. This is exactly what I need to pick it up again.
|
|
#
?
Jun 8, 2016 21:26
|
|
|
thespaceinvader posted:Are those real sheep/goat horns? Thanks! And yep, real goat horns from eBay.
|
|
#
?
Jun 8, 2016 23:22
|
|
|
Done! (gonna make a stand for it) Love that Skyrim helmet btw! 
|
|
#
?
Jun 9, 2016 23:29
|
|
|
Thanks for the kind words goons! I don't have time for a full effort post right now but here's something I wanted to share. I needed to make a pauldron that was a sort of swoopy organic curve so my first thought ran to Worbla. However, upon reading, I found that you need to sand it, prime it, sand it again, prime it again, etc etc to get it smooth. I decided to try another material instead. Click for huge.  This is a product called Infinity by Chesapeake Medical Products (CMP). It's a formable thermoplastic that's used to make splints for busted wrists fingers, hands etc. Th plate above is Infinity after a single coat of Plasti-Dip, with no sanding beyond smoothing the cut edges. I didn't have to use any other prep at all as it comes with a smooth, slightly textured surface. The main blemishes you see in the pic are just where my fingertips pressed a bit too hard into it. Next time I'll make a styrofoam buck and let it drape. I picked up a single sheet 18" x 24" of Infinity for about $35 + 15 shipping (sucks but I didn't wanna buy bulk in case it was crap) and the above took me... oh, 10 minutes?
|
|
#
?
Jun 11, 2016 00:04
|
|
|
BlackIronHeart posted:Thanks for the kind words goons! What was the activation temp like? Sounds like a super interesting material, I am def interested to know more
|
|
#
?
Jun 12, 2016 01:53
|
|
|
The sheet that came with it lists it as 70�C � 75�C (160�F � 170�F) for 1 minute for 1/8" thick stuff . I used a B&D heat gun and that was more than enough to get it floppy and drapey in a minute or less. It's pretty rigid with a little bit of flx when cool so I can't imagine it'd shatter, crack or chip if you drop it. I could try some tests if anyone wants to suggest some?
|
|
#
?
Jun 12, 2016 02:12
|
|
|
I have a splint made from that stuff and was telling the Physical Therapist how I thought it would be great for Cosplay. To mold it she puts it in a hot bath and then fine tunes the shape with a heat gun. It does stick to itself when it is hot enough.
|
|
#
?
Jun 12, 2016 04:36
|
|
|
Funhilde posted:I have a splint made from that stuff and was telling the Physical Therapist how I thought it would be great for Cosplay. To mold it she puts it in a hot bath and then fine tunes the shape with a heat gun. It does stick to itself when it is hot enough. I can confirm that it does make for some good cosplay material, last summer I broke my finger so bad it required titanium screws so I got to spend two weeks with this bad boy:  The therapists were baffled as hell until I told them I'm a lefty. I got so many envious looks from children out in public!
|
|
#
?
Jun 14, 2016 23:17
|
|

|
All my costumes are coming along. I have one toddler free con day and I was struggling with what to wear. Had considered rewearing my Scarlet Witch costume but it needs work before it fits. Thankfully I remembered that I have a Blossom costume so I'll probably sport that. I have added some pockets to Bert's coat and only have buttons left to sew. 
|
|
#
?
Jun 14, 2016 23:52
|
|
|
First costume was a success. Bummed my belt got all moved around and I'm not a great model but this wasn't about me really.
|
|
#
?
Jun 18, 2016 06:53
|
|
|
Also dressed up today in my Mary Poppins costume also husband and child as Bert and Penguin. Only thing I didn't make was pants, shirt and bow tie for Bert. 
|
|
#
?
Jun 20, 2016 03:20
|
|
|
Funhilde posted:All my costumes are coming along. I have one toddler free con day and I was struggling with what to wear. Had considered rewearing my Scarlet Witch costume but it needs work before it fits. Thankfully I remembered that I have a Blossom costume so I'll probably sport that. Ahhh, a good matched up stripe is just so satisfying to look at! Kid costumes are mad cute, and the Mary Poppins dress looks great too! I ended up making a tiny plush Sex Pistol to go with my Mista costume, it was really fun, and now I sort of want to make more plush Stands.  He snapped onto my hat and chilled there all day.  I sort of forgot to take any decent pictures at the convention, but here's one I found later. He even lent me his gun! I actually saw a lot of people with fairly realistic looking guns, I just didn't feel comfortable carrying one around the city.  And now, after nearly a month of mis-shipped packages and sold out fabric I finally got my white stretch twill (You've never seen someone so excited to receive a box of plain white fabric, hah) and real progress on JoJolion Kira Yoshikage is happening!  Sailor hat! I covered some regular braid with yellow silk so it would match my anchor pin. Pictures taken before I added the tassel and button on top. I also put some batting in between the outside and lining after this to soften the shape a bit.  Sailor top nearly done. just have to get the dickey installed and make the scarf. And decide if I'm going to put a hood on it. Sometimes he's got one, sometimes not. Pants are just placeholders to see how it looks, I'm making pants from scratch because....  I figured out how to draft some weird drapey pockets! I got more Pellon 542 interfacing too, so I'm ready to make Josefumi's waffleshirt, which is one of the scariest looking drafts I've ever done.  Yeah...just line up all those lines. No biggie. 
|
|
#
?
Jun 21, 2016 01:35
|
|
|
Does anybody have any good ideas about where to find belt blanks, or even just belts I guess, in a similar geometric pattern to this one? I'm starting to get materials together for Yara Greyjoy and I searched foreverrr yesterday and didn't find anything that I thought was very similar to the pattern on the sword belt there. I'm ok with not screen accurate but I really thought I could find something close and so far I have just totally failed!
|
|
#
?
Jun 21, 2016 19:19
|
|
|
McPantserton posted:Does anybody have any good ideas about where to find belt blanks, or even just belts I guess, in a similar geometric pattern to this one? I'm starting to get materials together for Yara Greyjoy and I searched foreverrr yesterday and didn't find anything that I thought was very similar to the pattern on the sword belt there. I'm ok with not screen accurate but I really thought I could find something close and so far I have just totally failed! Have you tried Tandy Leather? https://www.tandyleather.com/en/category/leather-belts-leather-straps
|
|
#
?
Jun 21, 2016 23:05
|
|
|
Belt blanks are easy to find, Tandy has you covered there. https://www.tandyleather.com/en/category/leather-belts-leather-straps I'd think that specific pattern was something that was embossed as a custom thing but I could be wrong. e;fb
|
|
#
?
Jun 22, 2016 00:15
|
|
|
Embossing leather is super easy! You can definitely do that with just a few basic tools.
|
|
#
?
Jun 22, 2016 02:20
|
|

|
Op Shops / Thrift Stores near me have way too many women's fashion belts in a multitude of patterns, styles and "weatheredness" for really cheap prices. Good for Nomura cosplay.
|
|
#
?
Jun 22, 2016 03:12
|
|

|
I wore my Dragonborn costume to IndyPopCon over this past weekend and it seemed to be well-received! My buddy and I were doing leather work up until the very last minute (I left Friday morning at 6am, we finished at 8pm Thursday night) and so the boots and tunic were a total hack job but hey, that's cosplay life, right? 
|
|
#
?
Jun 22, 2016 23:39
|
|
|
Work and life got in the way of cosplay work, but now I've got time again, back to fixing this disaster. When I last left off, I had just attempted to make my life way easier by re-casting my blank prop using a plaster waste mold and some old leftover resin. The idea was hopefully to get me something that wasn't made 90% of cardboard so that I could sand, sculpt, and drill some parts I was having a bunch of trouble with. This did not turn out well, due to reasons I mentioned in my last post:  After doing a bunch of experimentation, I determined that the correct way to extract my prop from the enormous chunks of plaster it was embedded in was to soak it in a basic solution, so I dumped a box of baking soda into a plastic tub, got some huge gloves, and scrubbed away at it, revealing the plastic underneath it. My elation at figuring that out, though, was quickly dampened once I saw how the cast had actually turned out:  You see, resin gets very hot when it's curing. If you pour it into a plaster mold that isn't 100% dry (which happens if you add too much water, which I did), then that extra water boils, turning to steam, which bubbles up through the resin as it cures and turns into an awful mess. But, whatever, that's what Bondo is for. I filled in all of the bubbles, used some Apoxie Sculpt to fix up the parts that I wanted to, and sanded it down more-or-less smooth. The beveled center bit was basically entirely lost, since I didn't want to fill in those weird controls. I filled that entire bit in with a generous amount of Bondo and marked it out for dremeling:  A bunch more carving, sculpting, sanding, and filling later, I was finally satisfied with the shape it was in. I hit the entire thing with a light coat of primer so that I could more easily catch any cracks and tiny little bubbles that I couldn't spot, sanded down the rough spots, and filled the last bits in, and, well...   The loving bubbles are back. They were always there, lurking under the surface, and every time I sand anything down I reveal the next layer of tiny pockmarks. I need suggestions on what I can possibly do to fix this. The bubbles are tiny, so it's difficult to get Bondo in there, and the interiors of the bubbles are very smooth, so it's impossible to get it to stick. Is there something that I can slather on top of this thing that I can sand down smooth afterwards? I remember seeing a gesso marked as "sandable" at the store, would that work?
|
|
#
?
Jun 23, 2016 05:12
|
|


|

|
| # ? May 9, 2024 07:09 |
|
|
Maybe polyurethane resin? It's sandable, should stick to anything and you can get it at any hardware/big box store.
|
|
#
?
Jun 23, 2016 08:56
|
|