


|
kid sinister posted:Currently I'm refinishing my front door and I need some tool recommendations. It's a 3 vertical panel all pine door with solid pine rails and panels, while the stiles are pine cores with pine veneer, so no knotholes anywhere. A power sander only took the better part of a day to get through the outer coating and This little scraper can get into angles and has some rounded edge blades available for the more intricate parts of the door. Used it for cabinet doors and it worked quite well. https://www.amazon.com/Bahco-Premium-Ergonomic-Carbide-Scraper/dp/B000288LOW
|
 #
?
Jun 29, 2016 00:50
#
?
Jun 29, 2016 00:50
|
|

|

|
| # ? Jun 7, 2024 17:29 |
|
|
Check out a couple of different multitools as well. Some of them have sanding attachments that could get into some small nooks.
|
|
#
?
Jun 29, 2016 01:44
|
|


|
Does anyone know what the hardware is being used on this setup? I can't figure out how it closes flush, with the front covered the internal frame without it the rear of the leaf catching, so I assume it's a function of the hinge? Like the ones used in kitchen cabinets? 
midge fucked around with this message at 02:38 on Jul 2, 2016 |
|
#
?
Jul 2, 2016 02:30
|
|

|
Re: gate chat from earlier, I'm considering something like this (apologies for unclear mockup): Basically, 1x6 boards with a standard 2x4 Z-backing form the actual gate, but I decorate the front with fake rails and stiles that are just nailed/screwed on. Seems like it should be simple enough, and prettier than a basic gate would be. Any reason this wouldn't work?
|
|
#
?
Jul 2, 2016 02:36
|
|

|
midge posted:Does anyone know what the hardware is being used on this setup? http://www.rockler.com/fully-adjustable-concealed-fall-flap-hinges 
|
|
#
?
Jul 2, 2016 03:14
|
|

|
TooMuchAbstraction posted:Re: gate chat from earlier, I'm considering something like this (apologies for unclear mockup): I assume fake rails and stiles are 1" thick? Any thicker may look out of proportion.
|
|
#
?
Jul 2, 2016 09:41
|
|


|
Cakefool posted:I assume fake rails and stiles are 1" thick? Any thicker may look out of proportion. I'm planning to use 1x boards or planed-down fence boards for the stiles/rails, yeah.
|
|
#
?
Jul 2, 2016 15:31
|
|
|
I made a thing   Next up is painting it and sticking some trim around the top, the closet isn't square so I had to cut the sheets a little short or gently caress around with making it fit by sanding or making a slight angle.
|
|
#
?
Jul 2, 2016 19:15
|
|


|
tater_salad posted:I made a thing Shoe rack? Looks good. What kind of wood is that on the top? It looks like very thin butcherblock countertop material.
|
|
#
?
Jul 2, 2016 21:40
|
|
|
I'm bad at manipulating things in a 3D space in my head, so I take it that you assembled it in place right? Looks good!
|
|
#
?
Jul 2, 2016 21:42
|
|

|
Magnus Praeda posted:Shoe rack? Looks good. What kind of wood is that on the top? It looks like very thin butcherblock countertop material. Yes shoe rack and bench for putting shoes on. My wife wanted to buy one but I wanted something that would fit the closet, eventually I'll put some kind of decorative back on it. But for now this at least keeps the shoes from being a jumbled pile on the floor. The top material is a sheet of "stain ready" 24x72x1 board from lowes. It has a very burcherblock look to it. The other 2 platforms are plywood sheeting, and the dividers are pine. Top part is going to get poly rest is going to get paint. Edit:yeah it assembled in place It actually is just being held together right now by friction and weight. I had to put the sheets in at an angle then flatten them once through the "doorway".. I'm actually debating painting just the sheets of plywood only since I think if I paint the vertical pieces they won't fit in the dados.. I made them 3/4 and added a .20 shim and the vertical pieces juust fit and need some coaxing. Or I will assemble in the garage and paint there. tater_salad fucked around with this message at 22:16 on Jul 2, 2016 |
|
#
?
Jul 2, 2016 22:08
|
|
|
Magnus Praeda posted:What kind of wood is that on the top? It looks like very thin butcherblock countertop material. If it were butcherblock, you'd see the end grain, not long grain. That looks like pine to me. I've assembled the gate I'm building, but painting and installation are going to have to wait until I get back from a brief vacation. Overall I think it's going to look quite nice, though.
|
|
#
?
Jul 2, 2016 22:31
|
|
|
TooMuchAbstraction posted:If it were butcherblock, you'd see the end grain, not long grain. That looks like pine to me. Going by the traditional definition of butcher block, yes. But these days they sell any laminated blocks/strips of wood as butcher block and just call the real stuff "end grain." I.E.: this. tater_salad posted:I'm actually debating painting just the sheets of plywood only since I think if I paint the vertical pieces they won't fit in the dados.. I made them 3/4 and added a .20 shim and the vertical pieces juust fit and need some coaxing. Or I will assemble in the garage and paint there. Paint all but the bit that is actually in the dado, perhaps? Or paint and then sand back as necessary? Magnus Praeda fucked around with this message at 22:58 on Jul 2, 2016 |
|
#
?
Jul 2, 2016 22:55
|
|
|
Magnus Praeda posted:Going by the traditional definition of butcher block, yes. But these days they sell any laminated blocks/strips of wood as butcher block and just call the real stuff "end grain." God dammit people  No butcher would be caught dead using a countertop like that...though the butchers I've seen have generally used stainless steel, so oh well.
|
|
#
?
Jul 3, 2016 01:35
|
|
|
Why is an end-grain cutting board/butcher block preferable to edge grain?
|
|
#
?
Jul 3, 2016 07:31
|
|
|
MetaJew posted:Why is an end-grain cutting board/butcher block preferable to edge grain? End grain won't catch the blade of the knife (so it's faster), it's more resilient to cutting, and is far less likely to split when you wale on it with a cleaver.
|
|
#
?
Jul 3, 2016 07:43
|
|
|
Some months back my TV series tracking app marked The Woodwright's Shop as a cancelled series. I assumed it was a mistake but it's still marked cancelled. I can't find anything about the show being renewed or cancelled, or nothing about a 2016 air date. Anyone hear anything?
|
|
#
?
Jul 3, 2016 18:32
|
|

|
THere is a guy here selling some old stanley planers in 5, 5 1/2, 7/8, and 1 1/4. What do you think would be a fair price to offer him? I haven't seen them in person yet but they look like they are in pretty good shape in the pictures?
|
|
#
?
Jul 4, 2016 00:23
|
|

|
vulturesrow posted:THere is a guy here selling some old stanley planers in 5, 5 1/2, 7/8, and 1 1/4. What do you think would be a fair price to offer him? I haven't seen them in person yet but they look like they are in pretty good shape in the pictures? Some of those model numbers don't make sense. 5 and 5 1/2 are bench planes. 7/8 might be a 78 rabbet plane. I don't know what 1 1/4 would be. There is no #114. Price depends on a lot of different factors. Some of the things I look for: Is it rusty? How bad is the rust? How much of the blade is left? Are the knob and handle plastic or wood? If wood, are they cracked? Is the depth adjustment wheel made of brass or stamped steel? You can learn a lot about each model here: http://www.supertool.com/StanleyBG/stan0a.html I've paid anywhere from $5 to $55 per plane at estate sales depending on the model and condition. I've found the same stuff will sell on ebay for about twice as much, so I feel like that's a good guideline for a deal.
|
|
#
?
Jul 4, 2016 04:53
|
|

|
wormil posted:Some months back my TV series tracking app marked The Woodwright's Shop as a cancelled series. I assumed it was a mistake but it's still marked cancelled. I can't find anything about the show being renewed or cancelled, or nothing about a 2016 air date. Anyone hear anything? Saw a promo with Peter Follansbee making shrink pots for an upcoming episode. https://pfollansbee.wordpress.com/2016/04/30/dry-humor/ It has a Facebook page too
|
|
#
?
Jul 5, 2016 17:33
|
|

|
Ah good. I guess FB is the way to keep up to date, finally a good use for that site. There is a FB exclusive on testing tusk tenons, I wish they had shown more.
|
|
#
?
Jul 6, 2016 05:59
|
|
|
swampface posted:Finally spent some time with sketchup and designed and built a bench for the yard using some deck boards left by the previous owner. Having a shop laptop with an open sketchup plan makes building stuff amazingly easy, I even adjusted some angles/dimensions as I was going. Probably going to need slightly more cross-bracing (and glue) for the next one, but it is pretty comfortable! I dig that bench. You still have the plans?
|
|
#
?
Jul 7, 2016 07:52
|
|


|
I do but won't have access to them until Sunday. I also need to make slight adjustment to them as the legs are too close together and it does not amuse my wife when I get up and she ends up on the ground. It is comfortable though!
|
|
#
?
Jul 7, 2016 17:42
|
|

|
Hi woodworking thread. I come again asking advice on what to do about this table.  My plan is to refinish and stain it. It's going to be used as a computer table since I really like the size (5'x3') of it without the leaves. However, the ends look like they're warping and the glue is pulling away. It's doing this at all 4 corners. And no, I have no idea why the end pieces are just a little narrower than the main surface.  Should I just screw back in the ends into the main table (doesn't affect the leaves, the end pieces with the pegs are for that)? I'm worried it might crack the ends since the wood really doesn't seem to want to be there anymore. It was difficult to pull out the end cap pieces for the leaves since the pegs are now a little bent. I had to use a pry bar so I'm not sure if the leaves will ever really be functional again.  Should I just leave it as is and sand and stain it? Should I just leave it as is and sand and stain it? 
|
|
#
?
Jul 8, 2016 12:26
|
|


|
I'm upgrading my current craptastic workbench and going with a Sellers design. It'll be all big box lumber. Any thoughts or additions? Would I be better off buy a bunch of 2X12's, curing them for a month, and then ripping down to size for the top? I've had my issues with the local 2X4 stock at Menards.
|
|
#
?
Jul 8, 2016 12:52
|
|


|
Yooper posted:
I like your idea of ripping 2x12's. Those are usually straight and not cupped. If you have to use 2x4's be prepared to spend a shitload of time picking through the stack. But that time will be worth it in the end compared to fighting with lovely lumber.
|
|
#
?
Jul 8, 2016 13:34
|
|

|
Larrymer posted:Hi woodworking thread. I come again asking advice on what to do about this table. The end pieces are shorter because of seasonal expansion from humidity- which is normal, and the piece should have been designed to allow for that. Check again in winter, it will probably align again. If you want a quickie, but generally acceptable method of refinishing, just touch the worn areas with fine grit sandpaper like 220, then hit the entire thing with an oil-based all-in-one stain/finish like minwax. (similar color like what they call cherry or oak) I'd bet a dollar that table is lacquered and the oil will touch the bare areas up like a pro.
|
|
#
?
Jul 8, 2016 16:43
|
|


|
Mr. Mambold posted:The end pieces are shorter because of seasonal expansion from humidity- which is normal, and the piece should have been designed to allow for that. Check again in winter, it will probably align again. That was the plan, 220 and maybe 400 then stain it. So with the expansion, would you recommend not touching the ends where the glue is pulling away? I could live with it, but if there were a way to fix it correctly I would prefer that. It just seems that they're warped a bit, bowing on the ends away from the rest of the table.
|
|
#
?
Jul 8, 2016 17:38
|
|
|
Larrymer posted:That was the plan, 220 and maybe 400 then stain it. Tbh, I thought that end-piece was doweled or screwed where those buttons are, as gluing to end-grain is idiotic and against all the rules of woodworking. Wide boards will have a tendency to bow over time. Without pulling the top entirely off, you should probably just live with it. What is the rounded piece with dowels protruding?
|
|
#
?
Jul 8, 2016 18:05
|
|
|
Has anyone here done much steam bending? I'd like to do a project for my nieces and nephews -- wooden letters of their first initials that they can hang on their walls. When I was a kid my uncle made similar letters for me and my siblings, but he cut them out of boards instead of bending them, which left them weak at points and prone to breaking (since kids will play with anything, including wall ornaments). So I figured I'd try steam bending. The hangup is that one initial is an S, which may prove tricky to do (I also have a J, and an A and an E that of course will not require any steam bending, just joinery techniques). I figure the letters should be about a foot tall and use 1"-wide boards. For wood I was thinking I'd use 4/4 white oak. I've been reading this Veritas article but it is of course focused on using a Veritas strap clamp. Is such a thing really required or can I get away with just using a large number of traditional clamps? Any other resources I should read up on? I figure I'll just make a plywood box, hold the pieces up on wire chairs (or string wire through the box to suspend the pieces, either way), run steam through it for an hour or so, then strap them to forms. It doesn't sound complicated, but I'm sure there's plenty to consider in practice, so I guess basically I'm looking for tips and tricks.
|
|
#
?
Jul 8, 2016 19:58
|
|
|
Mr. Mambold posted:Tbh, I thought that end-piece was doweled or screwed where those buttons are, as gluing to end-grain is idiotic and against all the rules of woodworking. Wide boards will have a tendency to bow over time. Without pulling the top entirely off, you should probably just live with it. What is the rounded piece with dowels protruding? Rounded piece comes off and the leaves are inserted there. They're held in by the drawers I'm told. Haven't looked at it underneath yet.
|
|
#
?
Jul 8, 2016 20:10
|
|
|
Yooper posted:I'm upgrading my current craptastic workbench and going with a Sellers design. It'll be all big box lumber. I agree with ripping 2x12s, you'll get better wood out of them. I made mine either 5 or 6 feet long and I should have done the full 7.5 or 8 feet long. I run out of space on the top when working on things and I wish it was heavier. I also made the tool well wider. Your design seems pretty narrow. Think about what tools you're going to have sitting in there and make sure it's wide and deep enough for them.
|
|
#
?
Jul 8, 2016 22:50
|
|
|
TooMuchAbstraction posted:Has anyone here done much steam bending? I'd like to do a project for my nieces and nephews -- wooden letters of their first initials that they can hang on their walls. When I was a kid my uncle made similar letters for me and my siblings, but he cut them out of boards instead of bending them, which left them weak at points and prone to breaking (since kids will play with anything, including wall ornaments). So I figured I'd try steam bending. The hangup is that one initial is an S, which may prove tricky to do (I also have a J, and an A and an E that of course will not require any steam bending, just joinery techniques). I helped with a couple of steam bending projects a while back, the rig was a steel tube with a cap at one end, a 90' bend and a foot of pipe the other side capped off. The whole rig was propped up so the long chamber with the access cap was a little off horizontal, the end of the short chamber was above a gas burner. A cup of water in the bottom chamber, wood slid down the long chamber, capped off with a pinhole in the lid so it doesn't explode. Boil water as needed. The bending jig was a board full of holes and pegs arranged to bend around, I seem seem to remember cutting the piece to size after the bending, not before.
|
|
#
?
Jul 9, 2016 13:08
|
|
|
Cakefool posted:I helped with a couple of steam bending projects a while back, the rig was a steel tube with a cap at one end, a 90' bend and a foot of pipe the other side capped off. The whole rig was propped up so the long chamber with the access cap was a little off horizontal, the end of the short chamber was above a gas burner. A cup of water in the bottom chamber, wood slid down the long chamber, capped off with a pinhole in the lid so it doesn't explode. Boil water as needed. We did some stair rails using a straight pvc pipe and some sort of steamer, I can't recall- at one end for bending radiused handrail and base molding.(The curving part of rail came in a custom kit in 1/4" thick laminates but it was still a very tight radius) But nothing like TMA is going on about.
|
|
#
?
Jul 10, 2016 00:47
|
|
|
Gave the steambending a shot today. Here's my rig: The box is sealed at the far end, and has a small hole in the bottom there for water to drip out of (not that any did). Unfortunately, after an hour in the box, my 1"x1" stick of white oak was still just as inflexible as when it went in. I think I may be dealing with two problems here: first, the oak's been sitting around for years now and is probably too dry for steambending to work right (as I understand it, if the lignin in the wood is too "set" or whatever, you can't loosen it with steam heat). Second, I should have put the door to the box at the other end, away from the steam source; it was leaking steam for most of the hour. I thought I'd be okay because I was also getting steam out at the far end of the box (from holes between the plywood), but it's possible that the box didn't get hot/wet enough to really do work on the wood. Dog tax: 
|
|
#
?
Jul 11, 2016 00:08
|
|
|
TooMuchAbstraction posted:Gave the steambending a shot today. Here's my rig: The tips from a shipwright YouTube channel has a good video on how he steam bends for assembling boats. Looks very simple and seems to be effective if you want to try another tactic. It's probably similar to yours but take a look to see if there's any tips worth picking up. https://youtu.be/--iPQIwSEJM
|
|
#
?
Jul 11, 2016 01:20
|
|

|
TooMuchAbstraction posted:Gave the steambending a shot today. Here's my rig: Check some of this out. https://www.google.com/webhp?hl=en&tab=ww#hl=en&q=steam+bending+with+vinegar I knew I remembered reading about using vinegar. Also, ash is much more pliable than oak; and finally, if you can rip your material down to 1/4" laminates, that makes a world of difference.
|
|
#
?
Jul 11, 2016 02:07
|
|
|
Squibbles posted:The tips from a shipwright YouTube channel has a good video on how he steam bends for assembling boats. Looks very simple and seems to be effective if you want to try another tactic. It's probably similar to yours but take a look to see if there's any tips worth picking up. Yeah, I read a bit about using plastic "bags" to hold the steam instead of a plywood box, but decided I'd try the traditional approach first. It's not like I'm short on plywood scraps anyway. Mr. Mambold posted:Check some of this out. https://www.google.com/webhp?hl=en&tab=ww#hl=en&q=steam+bending+with+vinegar Thanks, and I'll keep ash in mind as well. I don't have any ash on-hand though, and I'm trying to avoid acquiring too much more wood considering the current rather comfortable state of my lumber stash. Laminating would be cheating, though! If I was going to do laminates, I could just rip down to 1/8" and wouldn't need steam at all. But it wouldn't look as good. Keep in mind that I'm doing this for a piece that's meant to be displayed.
|
|
#
?
Jul 11, 2016 02:29
|
|
|
TooMuchAbstraction posted:Yeah, I read a bit about using plastic "bags" to hold the steam instead of a plywood box, but decided I'd try the traditional approach first. It's not like I'm short on plywood scraps anyway. It's all cheating, yo. The idea is to make it work and make it look good. 1/8th is a bit too thin imo. If you are going for 1" thickness and can get there with ripping down to 4 laminates and 3 joints, a good woodworker can make it look like a single piece....try a test piece like this and see if the grain doesn't match up after you've cleaned it up.
|
|
#
?
Jul 11, 2016 02:59
|
|
|

|
| # ? Jun 7, 2024 17:29 |
|
|
Great news everyone, Matthias released the color code for his Wandel Green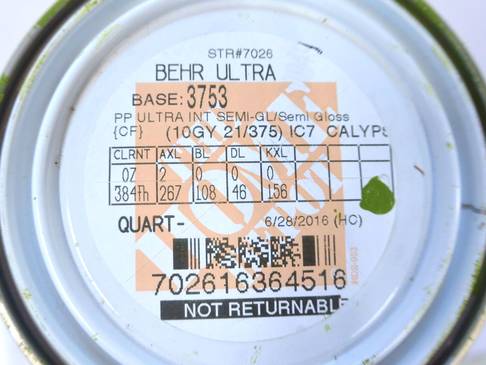
|
|
#
?
Jul 11, 2016 07:37
|
|
