


|
Mr. Mambold posted:The dust is lovely and the pollen is from Satan's own cookbook. Other than that you're probably ok working it with hand tools. Aromatic red cedar, right? I think it's got some mild anti-bug agent which along with the aroma makes it a hope chest and closet fave. Around here the trees are a pest species and go up like roman candles in a drought. I hadn't heard it called aromatic red cedar until both of you did, but yes that's the same species we call eastern red cedar. The heartwood is my favorite looking wood I've worked with, I've still yet to get any black walnut heartwood but that's next on the list. I am pretty sure the same toxin that is bad for humans when breathed in is the one that kills a lot of bugs, which is why it was (and rarely still is) used for a long time in a traditional chest at the foot of a bed for sheets and blankets, according to the internet they call it a "hope chest" some places. I'd like to start making drinking cups, my hook knife is big and hard enough to do shot glass sizes already, but I'd like to do tree limbs about the size of a modern coffee mug hollowed out. Anyone have (preferably multiple) suggestions for the right gouge or chisel? I don't own clamps and this might be the idea that forces me to buy some, but still it'll be done with all hand tools so I need to pick the right one for the job. I own zero gouges or chisels, all I really know is it needs to come sharp and stay sharp and would probably be a somewhat rounded curve maybe 3/4" wide? Pfeil makes a bent gouge that is 18mm and a #8 curve for $56, I'm thinking this is close though I imagine the bend is better for bowls than for going straight down hollowing out a branch limb. And the #8 looks a bit dramatic, but as I've never made cups before who loving knows. I'm curious how the slightly cheaper Stanley's hold up, I normally avoid any names I saw in Sears as a kid but it's got a hornbeam handle and that makes me glad.
|
 #
?
Dec 11, 2016 01:57
#
?
Dec 11, 2016 01:57
|
|


|

|
| # ? Jun 8, 2024 08:53 |
|
|
I've had good luck with Flexcut gouges. http://www.flexcut.com/mallet-tools-individuals/
|
|
#
?
Dec 11, 2016 02:23
|
|

|
Hubis posted:
Yeah, it seems so. It's something I really learned watching Roy Underhill. The more you worry about accuracy, the more you have to worry about it. What does he say, measurement is the enemy of precision.
|
|
#
?
Dec 11, 2016 02:56
|
|

|
Magres posted:That said, as far as thread etiquette goes, is it cool if I post pictures of my babby's first woodworking projects and ask a million questions for improvement and advice and stuff? This is always ok and is one of the primary purposes of the thread. The contentious stuff is when a person claims a piece of advice is "right" and another person disagrees.
|
|
#
?
Dec 11, 2016 03:04
|
|

|
GEMorris posted:This is always ok and is one of the primary purposes of the thread. The contentious stuff is when a person claims a piece of advice is "right" and another person disagrees. My dream woodworking discussion on the internet would be one where everyone who posts a picture, regardless of their experience, includes the tools and wood used as well as the techniques and anything that felt especially easy or hard for them. I enjoy pretty things, but pretty much every form of woodworking discussion I see online is easily half people going "I did this and it's very good, tell me how good it is again please". If it's just aesthetic inspiration that you want you can go to a museum, or even sit in a computer chair and pull up museum websites and go "That stuff from 200 years ago is still the best stuff! I wonder how they make it."
|
|
#
?
Dec 11, 2016 03:33
|
|
|
extra stout posted:If it's just aesthetic inspiration that you want you can go to a museum, or even sit in a computer chair and pull up museum websites and go "That stuff from 200 years ago is still the best stuff! I wonder how they make it." I've built some nice stuff, but being mostly self-taught furniture-wise, I've also done some utter dogshit projects and abandoned some others that never got completed for ~reasons~. I get a hella kick out of the projects posted by md2 and bad munki and some of you other guys because some of it's drat fine work in the same creative spirit as those old timers. *Breaks down crying in my drink.*
|
|
#
?
Dec 11, 2016 04:05
|
|


|
extra stout posted:My dream woodworking discussion on the internet would be one where everyone who posts a picture, regardless of their experience, includes the tools and wood used as well as the techniques and anything that felt especially easy or hard for them. I enjoy pretty things, but pretty much every form of woodworking discussion I see online is easily half people going "I did this and it's very good, tell me how good it is again please". If it's just aesthetic inspiration that you want you can go to a museum, or even sit in a computer chair and pull up museum websites and go "That stuff from 200 years ago is still the best stuff! I wonder how they make it." I've seen simplecove mentioned in the woodworking subreddit. I've looked over the site a few times and it seems like what you're looking for, user submitted projects with details on the process.
|
|
#
?
Dec 11, 2016 05:39
|
|

|
PYF christmas present build so far Almost 3 year old niece had a horrible garbage Ikea kids easel, and a pair of 100lb dogs playing broke it. I volunteered to make a new one for her christmas gift from me.  Ikea really saves money on glue by using approximately one dab per 3-4 dowels. Also the wood was grown so fast that the 1.25"ish legs had 6 rings total and were hilariously weak. I took it apart and harvested the whiteboard and chalkboard.     Just quick loose tenons for all the joinery. The legs and sides of the tray are 1", rest is all 3/4. The tray swings on steel pins and then locks into the other side with two bolts/knobs. Took ~2 days to make and it should be a little more dog-resistant than the old one. Also it's better than that gross spindly Ikea softwood look. e: I think this is the only large christmas present I'm going to make. Next thing is a salt box. Hypnolobster fucked around with this message at 05:58 on Dec 11, 2016 |
|
#
?
Dec 11, 2016 05:55
|
|


|
coathat posted:I've had good luck with Flexcut gouges. http://www.flexcut.com/mallet-tools-individuals/ Thanks, I'm skeptical of factory stuff that isn't from Mora but I've heard very good things about their affordable sloyd knives.
|
|
#
?
Dec 11, 2016 06:08
|
|
|
The fit and finish on their handles can be a little lacking but the edges I've seen were all polished to a mirror. Plus I do have a soft spot for their Swiss Army knife carving tools.
|
|
#
?
Dec 11, 2016 06:16
|
|
|
extra stout posted:My dream woodworking discussion on the internet would be one where everyone who posts a picture, regardless of their experience, includes the tools and wood used as well as the techniques and anything that felt especially easy or hard for them. I enjoy pretty things, but pretty much every form of woodworking discussion I see online is easily half people going "I did this and it's very good, tell me how good it is again please". If it's just aesthetic inspiration that you want you can go to a museum, or even sit in a computer chair and pull up museum websites and go "That stuff from 200 years ago is still the best stuff! I wonder how they make it." I was just going to post the picture of the finished product, but in the spirit of this post I will post the progress shots plus what I did. I present to this thread, my first spoon! Started with some 3/4 maple board cutoffs I got from the bargain bin at Woodcraft on Black Friday. I cut out a 1.5" by 8" blank and drew a line down the center. I free-handed a basic vague spoon shape:  I roughed out the shape using my garbage jigsaw and smoothed out the contours with the disk sander, rasp, and random orbit sander with an 80 grit pad. Once that was established, I freehand drew the side profile onto the blank as a guide:   Again I used my terrible jigsaw to remove the bulk of the material on the underside of the handle, the rest was done with the disk and random orbit sanders as before. Once the top and side profiles are fully established, I start smoothing out all the corners and define the bottom of the bowl area:  I didn't take pictures of the next step, but after this I further refined the shapes and curves with 100 grit paper, with help from the ROS as needed. Next comes the hard part; gouging out the bowl. Since I lack a spoon or bowl gouge, I had to make due here. I began by drilling a hole into what will be the deepest section of the bowl to establish a maximum depth. Into this hole I used a countersink remove more material. At this point I began rough material removal with a combination of 1/2" chisel and a couple very small gouges. I then used a round burr/rasp bit like this one in my drill to smooth out the gouge marks. That was followed by a grinding bit in the drill to smooth out the rasp marks. Finally, I ruined my thumbs using 100 grit paper to smooth out the inside of the bowl. At this point, it was just a matter of going over every surface with 100, 150, then 220 grit paper. I applied a coat of food safe cutting board finish and called it done:  My second spoon was done exactly the same way, except much faster. These will go to two of my friends who do SCA historical reenactment stuff, they needed handmade cutlery for Feasting.
|
|
#
?
Dec 11, 2016 06:56
|
|

|
extra stout posted:...includes the tools and wood used as well as the techniques and anything that felt especially easy or hard for them. ... Seems like the few people who do this prefer to write it up in a personal blog.
|
|
#
?
Dec 11, 2016 08:26
|
|
|
I was going to do that for my workbench but I kept forgetting to take pictures. Also the legs are all cockeyed and I'm starting to pay the price for fundamental mistakes I made in planning. Also it looks way shittier than the one that was posted not too long ago.
|
|
#
?
Dec 11, 2016 09:53
|
|

|
Skippy Granola posted:I was going to do that for my workbench but I kept forgetting to take pictures.  Haven't posted much but mine have basically been "oh god I suck at this  " "
|
|
#
?
Dec 11, 2016 09:59
|
|

|
I usually take a decent amount of progress shots, but never get around to writing anything up. But if people have questions about stuff I'm always willing to post more pictures and explain.
|
|
#
?
Dec 11, 2016 15:39
|
|
|
Not woodwork, but its for my bandsaw so it qualifies, new lower guides, the saw didn't even have thrust bearing or any such guide originally so I made this from scratch. No problem taking a 1" blade, that's s 1.3 TPI ripping blade.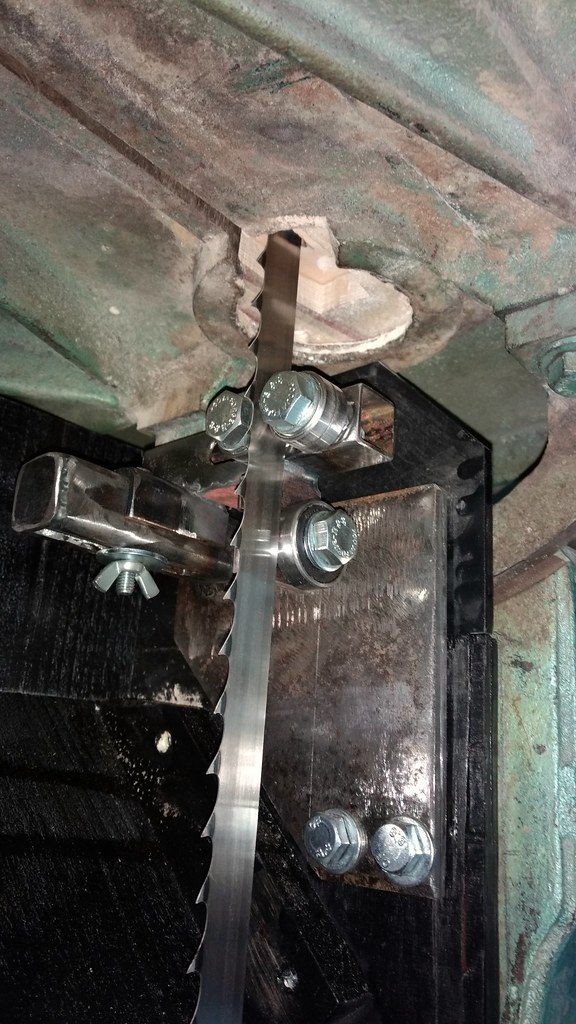
|
|
#
?
Dec 11, 2016 15:53
|
|

|
His Divine Shadow posted:Not woodwork, but its for my bandsaw so it qualifies, new lower guides, the saw didn't even have thrust bearing or any such guide originally so I made this from scratch. No problem taking a 1" blade, that's s 1.3 TPI ripping blade. Nicely done. You should have to be licensed to own a bandsaw that monstrous.
|
|
#
?
Dec 11, 2016 17:22
|
|
|
His Divine Shadow posted:Not woodwork, but its for my bandsaw so it qualifies, new lower guides, the saw didn't even have thrust bearing or any such guide originally so I made this from scratch. No problem taking a 1" blade, that's s 1.3 TPI ripping blade. Looks nice. Maybe put a split lock washer under that wingnut? I'd be worried about vibrations loosening it (although I guess ideally you shouldn't HAVE any substantial vibration there to begin with...)
|
|
#
?
Dec 11, 2016 18:30
|
|

|
GEMorris posted:This is always ok and is one of the primary purposes of the thread. The contentious stuff is when a person claims a piece of advice is "right" and another person disagrees. Excellent! Okay so probably my biggest question is how the hell do people get things to fit together so nicely? I feel like I can never get my cuts toleranced well enough to make things fit together super precisely - I use a handheld circular saw and I feel like the best I can tolerance things is like 1/32nd of an inch, if not 1/16th of an inch, and a lot of the work I see seems like it demands tolerances that are like 1/100th of an inch or tighter. I think for getting exterior bits to look perfectly flush my answer is just going to be "cut it as best I can, put them together, and then apply a hand plane until the drat things are flush" but even then I'm not sure that's my best answer. Other question, how do you make wood look... I dunno, nice? The bed I built is perfectly functional, but I think it looks like poo poo, partly because all of the wood is unfinished (is that the right word? it's just bare wood w/ nothing on it). I want to learn to make stuff look nice! Like mds2's urn and winebox both look so good and finished and stuff! My bed definitely shows the fact that I made up a design in my head, went to Home Depot for a bunch of wood, and just started cutting and screwing things together without knowing a drat thing about woodworking or how to produce something that looks like it has an ounce of an artisan's touch. I promise at some point I'll yank my mattress off my bed, clear some space in my bedroom, take pictures of the bed in all its fugly glory, and write up my build process so people can give me more specific advice, but I reaaallly don't have time today. Sorry!
|
|
#
?
Dec 11, 2016 21:32
|
|

|
How do you get things to fit together? Yes tolerances are important, but only certain ones. The surfaces that touch each other in the joint are important, whereas the outer surfaces are less important. A handheld circular saw is not the tool I'd start with for making joinery. A Western backsaw filed for the appropriate cut (rip or crosscut) would get you a lot closer (and for quality tools for even less $ outlay, look into Japanese saws). But even more important than the type of cutting tool is the marking and layout work. How to make wood look nice? This starts with board selection, picking boards that when combined have a pleasing grain, it continues with surface prep, ensuring that you have a surface which is smooth and free of tear-out. Only after these are covered will focusing on finishing techniques do a whole lot for your work. I have an aesthetic preference to let the wood be itself, if you are going to let it be "seen" (via light non-obscuring finishes) or to obscure it and let the form stand out, via paint.
|
|
#
?
Dec 11, 2016 21:50
|
|
|
Christmas gifts! A little something for a German sailor friend of mine: Actually they're for my nieces and nephews; the letters are their first initials. Pine and redwood, finished with salad bowl finish because that's what I had on-hand. The cuts are not super-high-quality; there's noticeable tool marks especially with the holes in the As and with any inside curve. But I've put way too much effort into this project as it is (I started back in July or so, trying to steam-bend wood) so I'm just glad it's done with. Also, I made a bookshelf today.  (And more photos here) It's just pine wood, and nothing fancy design-wise. I just got sick of having books covering every flat surface in my house, so hopefully this will help with that situation a bit while I work on the much fancier cherry bookshelf that's been stalled out for a few months due to fear of me loving up. With pine I'm nowhere near so worried. Didn't even go in with any specific plans, just a few rough measurements and some vague ideas. It mostly worked out, but the paneling in the back is just butt-jointed to the sides and top, and is a poor fit at points. Should've put a half-lap in there. The panel boards are shiplapped to each other. Took me six hours from start to finish. Of course it's not done, but I can't really proceed with applying finish until the glue finishes drying. Tools used: compound miter saw, router, router table, bandsaw (just for a couple trivial rip cuts). TooMuchAbstraction fucked around with this message at 00:56 on Dec 12, 2016 |
|
#
?
Dec 12, 2016 00:54
|
|

|
Magres posted:...how the hell do people get things to fit together so nicely? Something that made a big difference in my woodworking was seeing Kelly Mehler's work up close and personal, being able to touch it and ask questions. It's one thing to see pictures but seeing in person is far more impressive. I'm not half the woodworker Kelly is but once you see quality and it creates a desire to do better then you will seek out how to be better. It doesn't have to be Kelly Mehler, it could be anyone with skill. Another tip that I consider important, the internet is an easy source for information but not the best source. Hands on instruction is best with books and paid videos (DVDs etc.) a close second. If you go to a vetted instructor, someone that has a reputation, you might learn things that some people disagree with but you won't learn wrong. There is someone who uploads old woodworking videos from the 70's, 80's, & 90's, (VCR & DVD) to youtube. I don't agree with the practice in principle but some of those videos are no longer for sale and many are by people who are accomplished but not well known to the internet. His accounts keep getting nuked but he keeps making new ones and uploading videos. I can't give you a link but they aren't hard to find.
|
|
#
?
Dec 12, 2016 01:01
|
|
|
Magres posted:Other question, how do you make wood look... I dunno, nice? The bed I built is perfectly functional, but I think it looks like poo poo, partly because all of the wood is unfinished (is that the right word? it's just bare wood w/ nothing on it). I want to learn to make stuff look nice! Like mds2's urn and winebox both look so good and finished and stuff! My bed definitely shows the fact that I made up a design in my head, went to Home Depot for a bunch of wood, and just started cutting and screwing things together without knowing a drat thing about woodworking or how to produce something that looks like it has an ounce of an artisan's touch. Welcome to beginner's woodworking! Kind of what other people have said: look at some other pieces critically. Having built some things, you can look at another similar piece of work and see how it was put together. Figure out why. What parts are structural? What things did they do which weren't strictly necessary -- why did they do them? One thing that I've come to realize is just the slightest bit of offset at a joint can create an interesting bit of detail that takes a piece from "I slapped this together with 2x4's and plywood" to "hobbyist craftsman". As for finishes, get yourself an random orbit sander and some Watco Danish Oil. Sand whatever you do down to 220 (I do something like 120, 180, 220) then after you glue it up just rub the thing down as needed. You can do some fun stuff like sanding the piece again by hand while the oil is still wet (which will make an oiled slurry out of the dust which fills in pores and gives a smooth finish). There are other interesting finishing techniques with their own advantages, but this is by far the easiest I've found to make a simple project have a finish which is both durable and natural looking.
|
|
#
?
Dec 12, 2016 02:14
|
|
|
Hubis posted:As for finishes, get yourself an random orbit sander and some Watco Danish Oil. Sand whatever you do down to 220 (I do something like 120, 180, 220) then after you glue it up just rub the thing down as needed. You can do some fun stuff like sanding the piece again by hand while the oil is still wet (which will make an oiled slurry out of the dust which fills in pores and gives a smooth finish). There are other interesting finishing techniques with their own advantages, but this is by far the easiest I've found to make a simple project have a finish which is both durable and natural looking. I have been loving this as a finish lately. Durable, makes the grain really pop and is possibly the easiest finish I have ever applied, barring maybe orange oil for chopping boards.
|
|
#
?
Dec 12, 2016 08:08
|
|


|
The big change for me in getting perfect fitting parts was marking knives, really good rulers and a shooting board. Those 3 things are completely critical to how I work now. Digital calipers are pretty huge too.
|
|
#
?
Dec 12, 2016 13:56
|
|
|
Magres posted:Other question, how do you make wood look... I dunno, nice? The bed I built is perfectly functional, but I think it looks like poo poo, partly because all of the wood is unfinished (is that the right word? it's just bare wood w/ nothing on it). I want to learn to make stuff look nice! You're talking about a set of techniques and knowledge that is literally millenia old, but it sounds like you're diving in without doing any research. Doing is a great way to learn, and I'm impressed that you've already made something functional! Keep doing! But also do research. This thread is over 300 pages long. Pick a random page and start reading. If someone talks about something you don't understand, Google it and figure out what it means. If you find a good resource for that question, see what else that resource has to offer. If you don't even know how to phrase a question about woodworking intelligently, this thread is a great place to pick up the vocabulary, which you can then do more focused research on. A couple pages back, I asked for blog and magazine suggestions. The OP has some book suggestions, and there are more scattered in the thread.
|
|
#
?
Dec 12, 2016 14:16
|
|

|
Hypnolobster posted:The big change for me in getting perfect fitting parts was marking knives, really good rulers and a shooting board. Those 3 things are completely critical to how I work now. I agree with all those except digital calipers, I went the other way, from digital to vernier, my mitutoyos are my favorite calipers and they never loose battery.
|
|
#
?
Dec 12, 2016 14:27
|
|
|
I just use my phrenology calipers.
|
|
#
?
Dec 12, 2016 14:57
|
|


|
Some calipers are just superior to others.
|
|
#
?
Dec 12, 2016 15:29
|
|

|
ColdPie posted:You're talking about a set of techniques and knowledge that is literally millenia old, but it sounds like you're diving in without doing any research. Doing is a great way to learn, and I'm impressed that you've already made something functional! Keep doing! But also keep asking questions and don't accept "gently caress you just look it up" as an answer imo. What's been most helpful to me as I learn woodworking is picking a project and making sure I see it all the way through. Once it's done, glued, and covered in finish I try to figure out what I did well and what I need to do better. Problem for me is I am also learning as I go- I don't have much in the way of mentorship or guidance besides the University of YouTube. Anyway, my philosophy is what the hell, I'm not selling these so why not wing it.
|
|
#
?
Dec 12, 2016 17:52
|
|
|
Skippy Granola posted:What's been most helpful to me as I learn woodworking is picking a project and making sure I see it all the way through. Once it's done, glued, and covered in finish I try to figure out what I did well and what I need to do better. Good lord this right here.
|
|
#
?
Dec 12, 2016 18:01
|
|
|
GEMorris posted:Good lord this right here. This also helps with acquiring tools. When I started out I was overwhelmed with all the various woodworking tools out there. Picking a project that requires a few specific tools allows you to end up acquiring things you will actually use on a regular basis. Moreso now that I've moved onto using hand tools about 90% of the time.
|
|
#
?
Dec 12, 2016 18:55
|
|
|
Skippy Granola posted:What's been most helpful to me as I learn woodworking is picking a project and making sure I see it all the way through. Once it's done, glued, and covered in finish I try to figure out what I did well and what I need to do better. Also known as "practicing". It's not rocket science: you get better at something by doing it. Listening to more experienced woodworkers is important, but it won't stick if you don't get your hands dirty.
|
|
#
?
Dec 12, 2016 19:08
|
|
|
Spring Heeled Jack posted:This also helps with acquiring tools. When I started out I was overwhelmed with all the various woodworking tools out there. Picking a project that requires a few specific tools allows you to end up acquiring things you will actually use on a regular basis. Moreso now that I've moved onto using hand tools about 90% of the time. This as well, the list of tools you need to get started in woodworking is quite small, and also varies based on the project. Unfortunately a lot of the tools that are heavily marketed are not the tools a new woodworker is going to need to do basic casework or staked furniture work. Or at least they may not be the most efficient path to get them to where they want to go (which assumes they know where they want to go, which is a separate issue) GEMorris fucked around with this message at 19:19 on Dec 12, 2016 |
|
#
?
Dec 12, 2016 19:15
|
|
|
Super Waffle posted:I was just going to post the picture of the finished product, but in the spirit of this post I will post the progress shots plus what I did. Looks a hell of a lot better than my first, it seems like there's almost more steps in doing something so small with machines than there would be with hand tools. The exception is absolutely the sanding, you could hand sand a spoon blank into a spoon with an hours time and ten cents of sand paper, but if the goal is make it look historical you would probably want to pick up the rule of the hand tool woodcarvers: No sanding ever. It's kind of an obnoxious but beautiful idea, you force yourself to learn how to make precise clean cuts with a knife until you decide if each piece looks like it was sanded but was not, or looks like it was very hand made and rustic. Also if that's an eating spoon it seems like it'd be too thick and slightly too deep in the bowl, but it looks like it'd be a fine soup spoon. Thanks for sharing, I might do a similar step by step for a hand tool carved spoon but I think it'd be pretty boring for most of the posters. wormil posted:Seems like the few people who do this prefer to write it up in a personal blog. True, I was going to link a few but god drat one issue I have even with the guys that I respect a lot is that 2/3 of the blogs become about THE SPIRIT OF TRUE WOODCARVING: IM DRINKING BIRCH SAP WINE, which I appreciate but it just sort of gets in the way if you're trying to show new woodworkers ideas for stuff to make, rather than to offer them a new religion. http://www.robin-wood.co.uk/wood-craft-blog/2014/06/11/birch-bark-canoe-build-4-setting-stitching-bark/ I'd love to make a birch bark canoe but there are so many loving things that can go wrong all the way down to lenticel patterns in the bark, trying to find thick enough birch bark when it mostly doesn't grow that thick anymore, drying, you could put a month into this project and a mouse could still put a hole in your boat. extra stout fucked around with this message at 19:32 on Dec 12, 2016 |
|
#
?
Dec 12, 2016 19:22
|
|
|
TooMuchAbstraction posted:Also known as "practicing". It's not rocket science: you get better at something by doing it. Listening to more experienced woodworkers is important, but it won't stick if you don't get your hands dirty. Basically. I don't want to argue semantics or anything but to my mind working through an actual project start to finish is more valuable than spending an evening making L shapes out of wood for an evening. Again I'm just finding my feet here so I'll happily defer to experience
|
|
#
?
Dec 12, 2016 20:48
|
|
|
Skippy Granola posted:Basically. I don't want to argue semantics or anything but to my mind working through an actual project start to finish is more valuable than spending an evening making L shapes out of wood for an evening. Actually finishing projects has a few other benefits besides just tool practice: 1) As has been said before here, mistakes that seem painful/obvious/painfully obvious to you are often invisible to others. You learn how to work around minor mistakes and create a finished piece that still looks surprisingly good, which is arguably as important/more important a skill than just not making them to begin with. 2) Looking at a finished project with acknowledged mistakes gives you a chance to think about how they happened and how to avoid them in the future.
|
|
#
?
Dec 12, 2016 21:02
|
|
|
"finish your drat projects" is some advice I wish i had listened to a lot earlier in life.
|
|
#
?
Dec 12, 2016 23:21
|
|
|
GEMorris posted:"finish your drat projects" is some advice I wish i had listened to a lot earlier in life. That's what I've come to like most in my brief time working with wood - there's always a tangible and shameful reminder of work left unfinished. Unless you own a fireplace
|
|
#
?
Dec 12, 2016 23:33
|
|
|

|
| # ? Jun 8, 2024 08:53 |
|
|
GEMorris posted:"finish your drat projects" is some advice I wish i had listened to a lot earlier in life. What's kind of worked for me is that I won't let myself have more than, like, 3 or 4 projects floating incomplete at a time across all of my hobbies. I have to either finish one or explicitly abandon it before I'm allowed to start a new one.
|
|
#
?
Dec 12, 2016 23:33
|
|