


|
BlackMK4 posted:Is there anything about the EP3 Civic Si that makes it not a good DD for <$3k? US EP3 Civics are all made in England! I have no input apart from that.
|
 #
?
Jul 2, 2017 01:25
#
?
Jul 2, 2017 01:25
|
|

|

|
| # ? May 14, 2024 05:23 |
|
|
I haven't heard anything negative about them really. The usual k20 stuff, make sure the trans shifts smoothly and doesn't lock you out at high rpm, ask pointed questions about oil consumption.
|
|
#
?
Jul 2, 2017 01:38
|
|

|
A buddy had an ep3 that had been poorly motor swapped, abused and had the vtec system fail entirely and it was still a good car. Would buy, especially at that price.
|
|
#
?
Jul 2, 2017 04:03
|
|

|
Seems legit. I can't think of anything better in the price range for what it is. ") Thanks Thanks
|
|
#
?
Jul 2, 2017 04:17
|
|

|
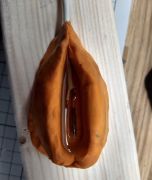
I've never experienced milkshake before. Is this what it looks like, or does it look more like grease from a CV joint with a torn boot? 
|
|
#
?
Jul 2, 2017 04:48
|
|
|
BlackMK4 posted:Is there anything about the EP3 Civic Si that makes it not a good DD for <$3k? They're theft magnets. Everyone I know who's had one wound up having it get stolen, then found a few weeks later totally stripped. Beyond that, nothing wrong with them.
|
|
#
?
Jul 2, 2017 05:15
|
|
|
PaintVagrant posted:If you like downshifting buy a manual. Then downshift properly and don't worry about clutches imo What's the proper way to downshift?
|
|
#
?
Jul 2, 2017 06:07
|
|


|
Blip the throttle to try and match expected RPMs before you let the clutch back out. Reduces the wear on the clutch significantly. If you want to get fancy and reduce synchro wear, you'll double clutch, but that's a bit too much  for me. for me.
|
|
#
?
Jul 2, 2017 07:09
|
|
|
blk posted:I've never experienced milkshake before. Is this what it looks like, or does it look more like grease from a CV joint with a torn boot? That's axle grease.
|
|
#
?
Jul 2, 2017 07:31
|
|


|
blk posted:I've never experienced milkshake before. Is this what it looks like, or does it look more like grease from a CV joint with a torn boot? Milkshake really looks like milkshake or mayonnaise.
|
|
#
?
Jul 2, 2017 08:15
|
|


|
Invalido posted:About a year ago I had a puncture in a tire plugged (paid through the nose too, like 70% of the price of a new tire because it was kind of an emergency, thanks to the rubbish Volvo space saver spare wheel). The plug is now failing and I'm losing pressure. I want to have a go at fixing this myself this time. All I can find locally and fast enough is kits with the reamer, needle and plugs, as well as bike tire repair stuff. Looking at youtubes of tire patching from the inside, it seems like a large bike patch is the same thing as a car patch. Since I can't readily seem to get my hands on those mushroom plug/patches in a timely manner, my plan is: So I dismounted, re-plugged, patched and re-mounted the tire and it holds air. Sadly I could see some damage to the side wall on the inside. The nylon cord was visible in several places, and an appropriate amount of rubber particles corresponding with the damage was in there too. My guess is that this damage happened when the screw that caused the puncture was still in the tire and it was driven at way too low pressure by an oblivious driver, probably me. There's no blistering of the sidewall on the outside as far as I can tell so that's good i guess. As I see it my alternatives are: -Drive it as is and pretend it's fine, keep an eye out for blisters. -Replace with one new tire of identical type, keep it in the back so I don't mess up the differential due to the uneven diameter on the same axle (car is FWD) -Replace two tires to have same wheel diameters on one axle. Probably put the new pair up front where they wear faster since the current tires have plenty of life in them before water planing should be an issue. -Replace all four because symmetry I hate making these types of decisions, but I'm leaning towards alternative one or three.
|
|
#
?
Jul 2, 2017 13:54
|
|
|
Invalido posted:So I dismounted, re-plugged, patched and re-mounted the tire and it holds air. Sadly I could see some damage to the side wall on the inside. The nylon cord was visible in several places, and an appropriate amount of rubber particles corresponding with the damage was in there too. My guess is that this damage happened when the screw that caused the puncture was still in the tire and it was driven at way too low pressure by an oblivious driver, probably me. There's no blistering of the sidewall on the outside as far as I can tell so that's good i guess. The combo patch/plug is available at most car parts stores - but in the back at the commercial desk. The shops use rubber cement - but they buff the tire's internal surface so that the cement makes a seal. But once you're seeing cords - you have a dangerous tire. When we dismounted a tire and the rubber bits were all floating inside - that's run-low damage - and that's a tire that should never be re-mounted. A tire with such defects is a blowout danger - if this tire is on the front of your FWD car - a blowout could send you into a wall. Whatever you do - at least replace that one tire. If you can get the same brand/tread design - you can easily get away with just replacing one and not have any issues whatsoever, even on the front. The absolute best thing to do would be to replace 2 tires - that tire and whatever other one is worn the most. I really don't think that replacing all 4 is necessary unless they're all getting low on tread, or if you find a really great deal. The shop that replaces your tires is going to practically make you put the new tires on the rear axle, despite your car being FWD. Seems counter-intuitive, but it makes sense in certain driving situations. Having less grip in the rear than the front during a slippery turn can cause fishtailing. They're erring on the side of liability. But that same shop will be happy to rotate your tires 5,000 miles later (and many shops you buy tires from will offer free rotations after you purchase) 0toShifty fucked around with this message at 15:14 on Jul 2, 2017 |
|
#
?
Jul 2, 2017 15:11
|
|
|
I have a 1998 Honda Accord with about 160k miles on it. Recently shifting started to become difficult, especially shifting back into park. I have had to press the break down hard and really punch the shifter forward to get it there when trying to park. Well, last night the shifter knob came off in my hand when I tried to show this to my friend. This time, it was in park and wouldn't move out. The steering wheel is no longer locked even when the car is off. I think the problem is with whatever sensor tells the car that the brake is engaged, so it's cool to shift into and out of park. Anyone know what this sensor is called or what I can do about it?
|
|
#
?
Jul 2, 2017 16:05
|
|

|
0toShifty posted:The combo patch/plug is available at most car parts stores - but in the back at the commercial desk. The shops use rubber cement - but they buff the tire's internal surface so that the cement makes a seal. I can and will get identical tires to the current ones. If what you say is true I might just go for one, though it bothers my sense of symmetry. No shop will replace it/them I don't think. The last few times I've shifted my own rubber and brought the wheels dismounted to a guy I know to get them balanced, I'll probably do that. The sketchy tire is in the rear right now but I'll get this sorted ASAP. I agree that it makes plenty sense to not have crappy tires in the rear compared to the front. Thing is, these are the summer set, so better tread up front (assuming all tires are good) is probably less of an issue than a tire that will roll on snow/ice/slush. I have a different set for that.
|
|
#
?
Jul 2, 2017 16:13
|
|
|
Where the christ is the date code on a tire (obviously on the sidewall)? And how do you read that poo poo? I've looked and never seen anything resembling an actual date....
|
|
#
?
Jul 2, 2017 17:20
|
|

|
wesleywillis posted:Where the christ is the date code on a tire (obviously on the sidewall)? And how do you read that poo poo? I've looked and never seen anything resembling an actual date.... https://www.tirebuyer.com/education/how-to-determine-the-age-of-your-tires
|
|
#
?
Jul 2, 2017 18:18
|
|

|
wesleywillis posted:Where the christ is the date code on a tire (obviously on the sidewall)? And how do you read that poo poo? I've looked and never seen anything resembling an actual date.... The DOT and some factory codes will be on both sides of the tire - but only one side will have the actual date. The other side has a blank oval or just nothing where the date should be. The date code is supposed to be mounted so you can see it easily, but this is down to the tire mounting guy to actually do it. On directional tires, they can't be mounted out for one side of the car. The date will be four digits all in a row like 1216. 12 is the week number, and 16 is the year.
|
|
#
?
Jul 2, 2017 18:43
|
|
|
2014 Honda Odyssey I want to add an always on power connection. I do ham radio stuff and also would like to use an inverter that pulls more than 10 amps. I know that on newer vehicles you can't go direct to the battery because of some sensor. What's the right way to do this? Also, is there a grommet or hole already in the firewall that would accommodate 12 or 10 awg zip cord?
|
|
#
?
Jul 2, 2017 19:58
|
|

|
PuTTY riot posted:I know that on newer vehicles you can't go direct to the battery because of some sensor. What's the right way to do this? I have never heard of anything like this. All the same, the easiest way is to use an add-a-circuit to branch off at the fuse box. However, that might not be rated for enough current to support your inverter.
|
|
#
?
Jul 2, 2017 20:04
|
|


|
IOwnCalculus posted:I have never heard of anything like this. http://www.k0bg.com/wiring.html Now that I'm looking at it again and see the diagram, it appears the main difference is I go to chassis ground instead of the negative battery terminal
|
|
#
?
Jul 2, 2017 20:28
|
|
|
Hondas have used some form of load detection to control the alternator since the 90s. The modern ones use inductive current sensors on the battery terminals themselves. Basically you just have to hook up your power connections after these special terminals - not between them and the battery. This lets the charging system take care of the load of your inverter too. If the load were attached between the load sensor and the battery, the car would probably undercharge the battery because it didn't know about that extra 10A+ being taken out of the system. Typically Honda negative battery cables are extremely short - and they go right to the chassis - so as you said - ground right there at that end and you're golden.
|
|
#
?
Jul 2, 2017 20:47
|
|
|
I didn't think this warranted it's own thread: I replaced the passenger side view mirror a few weeks back on my wife's 07 Jetta(Wolfsburg if it matters) without any issues. Fast forward a week or so to yesterday, when I replaced the drivers side view. Everything went smoothly until I put everything back together. Now I have no function out of any of the buttons on the door: windows, locks, gas cap, all of it is dead. If I have the headlights on, and half press the button for the passenger side window, then the buttons will at least light up. They still don't function though. Speakers in the door still work just fine, which is only frustrating me more. Things I've done: Disconnected and reconnected everything a few times Left battery disconnected overnight Visually inspected all of the cockpit fuses Capacitive discharge Inspected wires and harness in between the door and body I'm stumped. What else is there?
|
|
#
?
Jul 4, 2017 00:00
|
|

|
Gray Stormy posted:I didn't think this warranted it's own thread: I replaced the passenger side view mirror a few weeks back on my wife's 07 Jetta(Wolfsburg if it matters) without any issues. Fast forward a week or so to yesterday, when I replaced the drivers side view. I remember a thread here where someone replaced a power lock or power window switch, and suddenly nothing worked. Turned out that the switch was plugged in backwards, and it was shorting all sorts of stuff out. First thing I'd undo is whatever you plugged into the mirror. Could be from a slightly different model or year that has pins in different positions? Basically anything you touched in the door could be suspect, although I bet the power mirror itself is the most likely. If you've done that already, I guess it's time to get out the test light and trace your power from the fuse box to the stuff that doesn't work. At some point you'll find a component where you have power on one side but not the other. Tedious, though, so I hope you don't have to resort to brute forcing it like that.
|
|
#
?
Jul 4, 2017 00:16
|
|

|
2001 corolla/prizm i went on vacation 6/27. immediately before leaving i cranked the car (no issues) and moved it to its parking spot. today was the first day i attempted to crank again and got nothing at all. DMM on the terminals was reading 1.5V. it's a brand new autocraft battery, and advanced was too busy to give me a hard time, so i have a new battery back in it now. cranks OK and 14.7V on the terminals while running. with my DMM in series between the negative battery terminal & the negative lead i see between a .001 and .250 A load with the ignition off (key out). what is most likely happening here?
|
|
#
?
Jul 4, 2017 01:12
|
|
|
nine16thsdago posted:2001 corolla/prizm A quarter amp is way too much. Leave it connected for a bit (ignition off), and see if it drops down to the sub-mA range. The computers should go to sleep, and nothing else should be on. If there's no light that got left on or something, do you have an aftermarket stereo or immobilizer? I would suspect that sort of thing first. A high draw immediately after reconnecting the battery like that is not unreasonable, though, since the computer has to figure itself out for a few seconds. Then it should go to sleep.
|
|
#
?
Jul 4, 2017 01:18
|
|
|
Gray Stormy posted:I didn't think this warranted it's own thread: I replaced the passenger side view mirror a few weeks back on my wife's 07 Jetta(Wolfsburg if it matters) without any issues. Fast forward a week or so to yesterday, when I replaced the drivers side view. That was my thread with the '01 Intrepid. It was a defective power mirror switch (diagnosed by ubermensch Adiabatic) that was apprarenty crosswired or shorted or something. I replaced it with another aftermarket switch & it was fine. Try unplugging the controls etc in the door & see if everything works again. VVVV yeah, it was backfeeding through the grounds PainterofCrap fucked around with this message at 19:59 on Jul 4, 2017 |
|
#
?
Jul 4, 2017 04:14
|
|
|
Didn't adiabatic diagnose an internal short in the switch? The whole thing was just next level.
|
|
#
?
Jul 4, 2017 11:54
|
|
|
Breakfast Feud posted:Didn't adiabatic diagnose an internal short in the switch? The whole thing was just next level. I already tried plugging everything in individually. The speakers both work fine, everything else is borked. Bonus discovery: the remote fob will pop the trunk but won't lock, unlock, or activate the alarm.
|
|
#
?
Jul 5, 2017 03:44
|
|
|
Gray Stormy posted:I already tried plugging everything in individually. The speakers both work fine, everything else is borked. Okay, so if nothing works one-at-a-time, it's got to be loss of power or ground to the whole door. Can't imagine anything else they'd share. So you'll likely have to trace your power from the fuse box to the door to figure out where it stops working. And make sure that you don't have a missing ground strap or something! We're sure that the fuses are all good, right?
|
|
#
?
Jul 5, 2017 06:37
|
|
|
Gray Stormy posted:I didn't think this warranted it's own thread: I replaced the passenger side view mirror a few weeks back on my wife's 07 Jetta(Wolfsburg if it matters) without any issues. Fast forward a week or so to yesterday, when I replaced the drivers side view. Reminds me of this one I just watched https://www.youtube.com/watch?v=_rFfoBw-Tfs
|
|
#
?
Jul 5, 2017 07:04
|
|

|
When using paddle shifters, should one remove their foot off the accelerator prior to shifting ala a manual tranny, or should you remain at speed?
|
|
#
?
Jul 5, 2017 10:53
|
|
|
BoyBlunder posted:When using paddle shifters, should one remove their foot off the accelerator prior to shifting ala a manual tranny, or should you remain at speed? Don't worry about it. It's either a dual clutch or the programming will do what it needs to not ruin the transmission.
|
|
#
?
Jul 5, 2017 13:47
|
|

|
I can't remember if I've asked about this previously, but I'm having one HELL of a time with a lower ball joint on a '66 Corvette. It's nothing fancy, just a ball joint riveted into a control arm and press-fit into the spindle. Well, the joint shaft and spindle have apparently become one over the years. What I've tried: Pickle fork MAPP torch hammer PB Blaster hammer ATF/acetone hammer impact hammer this separator tool, which just failed (bent the forked bits, didn't snap) and smacked me in the shin I've still got the OE springs in place, which I think are 460lb. Not enough, it seems. I've even set the floor jack under the joint's castle nut and lifted, to put as much weight as possible on it...lifted the car off the jack stand. Any other suggestions besides cutting it and seeing if a shop can press it out with a hefty shop press? With my luck this thing is made from some ridiculous steel that'll chew through reciprocating saw blades.
|
|
#
?
Jul 5, 2017 16:08
|
|

|
Raluek posted:A quarter amp is way too much. Leave it connected for a bit (ignition off), and see if it drops down to the sub-mA range. The computers should go to sleep, and nothing else should be on. If there's no light that got left on or something, do you have an aftermarket stereo or immobilizer? I would suspect that sort of thing first. i did observe the behavior you describe (computer goes to sleep after a while). at-rest draw was less than .01A after (was using 10A scale, good enough for me)... anyway, after chasing this and getting worked into a froth over it my wife mentions, "i noticed when we got home your trunk was cracked open. i closed it."  the one convenience light in that car that still works is the trunk light. the one convenience light in that car that still works is the trunk light.so, good call. thanks.
|
|
#
?
Jul 5, 2017 16:37
|
|
|
I have a 2011 Honda Civic. The front driver-side wheel has a very slow leak, such that it lost maybe 5 psi in the span of a week. I took it to an (admittedly really lovely and useless) auto repair place and they said they were unable to find a leak. Is it possible for a leak to be too small to find, yet still result in a loss of pressure? Is there a way for me to find the leak myself? Or is a leak of this size not something I should bother fixing unless it gets worse?
|
|
#
?
Jul 5, 2017 17:33
|
|


|
Pollyanna posted:I have a 2011 Honda Civic. The front driver-side wheel has a very slow leak, such that it lost maybe 5 psi in the span of a week. I took it to an (admittedly really lovely and useless) auto repair place and they said they were unable to find a leak. Is it possible for a leak to be too small to find, yet still result in a loss of pressure? Is there a way for me to find the leak myself? Or is a leak of this size not something I should bother fixing unless it gets worse? Have you pissed anyone off lately? Theres probably a 0% chance of this but I've read a good way to gently caress with people is to superglue a BB inside of the valve stem cap, that way it only leaks when the cap is on, and really slowly at that. 5 psi sounds like enough to go to another shop to have them take a look. Cage fucked around with this message at 17:47 on Jul 5, 2017 |
|
#
?
Jul 5, 2017 17:44
|
|
|
I find that removing the wheel and submerging it in water is effective, generally. A leak of that size would be a very small stream of bubbles, but might be visible. You'll need a way to weigh the wheel down. Last time I checked for a leak I just plopped the wheel in a lake and stood on top of it.
|
|
#
?
Jul 5, 2017 17:47
|
|
|
Invalido posted:Last time I checked for a leak I just plopped the wheel in a lake and stood on top of it. Remove the wheel from the car first.
|
|
#
?
Jul 5, 2017 17:49
|
|

|
None of my tires have their air plug caps anymore, from what I can see. Only the one tire started going flat. They did the "submerge in water and look for bubbles" thing, but they didn't seem to try very hard when I watched them. I'll try another place.
|
|
#
?
Jul 5, 2017 17:57
|
|
|

|
| # ? May 14, 2024 05:23 |
|
|
Godholio posted:I can't remember if I've asked about this previously, but I'm having one HELL of a time with a lower ball joint on a '66 Corvette. It's nothing fancy, just a ball joint riveted into a control arm and press-fit into the spindle. Well, the joint shaft and spindle have apparently become one over the years. What I've tried: Hey ball joint buddy. I just beat my Silverado's front end into submission and had the same problem. I was replacing everything, so I had the knuckle and LCA off the truck which made my job a little easier. What ended up doing it for me was heating the knuckle around the ball joint as hot as possible with my lovely propane torch, quenching with pb blaster and then coming back the next morning to drive in a pickle fork and hit the threaded end of the joint (upside down, at this point) as hard as I could with a 4lb hammer. Obviously, that's a lot of extra work/parts vs doing it on-car. You might want to see about getting a C-clamp style ball joint press. I picked one up but didn't see how I could mount it without a cut-out receiving cup (top right in this HF kit) and the parts store I went to didn't have anything like that on hand. You might try your local stores, they might have better selections than mine. PS have fun drilling rivets. I had to buy a $18 carbide 1/2" drill bit because my cheapo bit wore out after a rivet and a half. I tried cold chiseling the heads off one side and driving them out but that only worked once (luckily on a rivet that I snapped a 1/8" bit in.) for the rest I still snapped the heads off and drilled down from both sides until I was 'flush' with the ball joint body and then beat the joint more with that hammer.
|
|
#
?
Jul 5, 2017 17:59
|
|
 Boys who love boys