

|
Dire Lemming posted:Are you planning on showing off Insane difficulty at all? I've been trying it and it's very different. I wouldn't even say it's much harder than Nightmare simply because of the ridiculous loot you get. Probably not. For the most part I find Insane tedious, unfun and unbalanced (others are free to disagree with me on this, of course). Even if I could muster the time and energy to get an Insane run going, I have no particular advice on Insane-specific play as opposed to general play, so most of my commentary would not be especially interesting or edifying. Anyone who actually enjoys Insane mode is free to show it off, though.
|
 #
?
Jul 18, 2017 13:30
#
?
Jul 18, 2017 13:30
|
|


|

|
| # ? May 15, 2024 19:49 |
|
|
I've been mostly playing Normal, but I ventured into Nightmare recently, and somehow it actually feels a bit easier than Normal? I'm not sure if it's just luck or what.
|
|
#
?
Jul 18, 2017 13:53
|
|


|
PurpleXVI posted:I've been mostly playing Normal, but I ventured into Nightmare recently, and somehow it actually feels a bit easier than Normal? I'm not sure if it's just luck or what. Are you switching classes? Running a great class on Nightmare is easier than running, like Bulwark, on Normal.
|
|
#
?
Jul 18, 2017 16:23
|
|


|
Just wanted to thank you for the LP. It's encouraged me to give the game another try, I played it a little waaay back in version 1.0.0 when the mouse support was wonky and I played an extremely boring dwarven Bulwark because that's what everyone said was newbie friendly back then. Now instead I'm playing an Archer (yeah, I know, shut up) and aside from an incident where I got completely roflstomped bashing my face into the Assassin Lord and lost all my lives that way, my second playthrough has been going swimmingly and I've been having a blast. Admittedly I'm playing on normal, but still. I wouldn't have made it that far in the first place without Skeletor's inspirational example of murder hoboing.
|
|
#
?
Jul 20, 2017 01:20
|
|
|
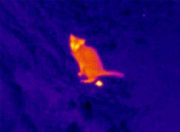
 Time to deal with this mess in Derth. This quest automatically triggers at level 14, which is why clearing the arena quest and claiming your free generics prior to that is of utmost importance.  Well, that doesn�t sound good.  Ah, here�s the problem. Derth has been taken over by storm elementals of some kind. Gwelgoroths are lightning elementals � immune to lightning damage, but weak to fire. The ordinary gwelgoroths know only Lightning, the greater gwelgoroths know both Lightning and Shock � a lightning-damage projectile that can daze us it if it hits.  Ultimate gwelgoroths know Lightning, Chain Lightning and Shock. In addition, they have Hurricane sustained � every time one of their lightning spells dazes us, it has a chance to inflict Hurricane on us, a magical debuff which causes us to generate a radius 3 lightning AOE centered around ourselves that damages us for 10 turns straight. Fortunately, the only spell that can daze us is Shock, which we can dodge with relative ease thanks to Gravity Locus. Incidentally, there�s an achievement for saving all the citizens of Derth. The easiest way to accomplish this is to dig out a big hole in the forest and slowly shuffle all the town NPCs into it way before the storm triggers. Without cheesing the achievement, it�s practically impossible. Luckily, there�s no real reward for doing so.   From nowhere! From the sky! I do not know� I was tending to my crops just outside the town when I heard screaming. As I entered the town, I saw the dark cloud over here. Those� those things were coming from it in blasts of lightning! From nowhere! From the sky! I do not know� I was tending to my crops just outside the town when I heard screaming. As I entered the town, I saw the dark cloud over here. Those� those things were coming from it in blasts of lightning! It seems they have stopped coming for now. I will look for someone who could help to dispose of this nefarious cloud. Thank you! You have saved many people today! I have heard of rumours of a reclusive town of wise and powerful men somewhere in the mountains. Maybe they could help? There are also those Zigur-something people who claim to fight magic. Why are they not here? I will not let you down. It seems they have stopped coming for now. I will look for someone who could help to dispose of this nefarious cloud. Thank you! You have saved many people today! I have heard of rumours of a reclusive town of wise and powerful men somewhere in the mountains. Maybe they could help? There are also those Zigur-something people who claim to fight magic. Why are they not here? I will not let you down. As hinted in the Halfling�s speech, one method of solving this puzzle is to enlist the aid of Zigur, but only if you�ve already gone antimagic. If not, we need to enlist the aid of a wise and powerful mage who lives in the mountains. Who do we know that fits that description?  Not that one.  Ah, there we go.  Choosing the second option teleports us directly to Tempest Peak. If we were Antimagic, this quest would have a different solution � as we can�t use the portal to Angolwen, we�d have to talk to the chief of Zigur instead, which generates the entrance to Tempest Peak in the mountains near Daikara.  The first floor of Tempest Peak is just this tiny area. Sometimes chests or other features spawn on it, but it�s mostly a prelude to the next floor.  Before we head down, we switch our equipment up a bit. As you can imagine, lightning resistance is going to come in very handy.  The second floor of Tempest Peak is a large sprawling mountain level, pretty much identical to the ones we�ve been trawling through in Daikara. We run into our old friend the boulder thrower almost immediately.  In addition to the usual mountain inhabitants, gwelgoroths and other lightning-themed enemies are common here.  The floor is big and sprawling, but thankfully it isn�t long before we run into the source of our troubles. Urkis is a powerful mage with a focus on lightning and ice spells. His modus operandi is to Freeze us whenever it goes off cooldown, then to blast us with lightning from a distance. As with the Ultimate Gwelgoroths, he has Hurricane, Shock, Lightning and Chain Lightning, alongside Thunderstorm and Nova (a gigantic lightning AOE centered around himself with a high chance to daze). The biggest game-changer is Tempest, which increases his lightning damage and lightning resistance penetration, and gives every lightning spell of his a chance to daze � and thus a chance to inflict Hurricane. Getting Hurricaned is often a game-ender � Urkis is probably the boss most likely to kill you even after his death.  The best way to neuter Urkis is to have some form of magical sustain removal (preferably Gloves of Dispersion), removing his sustains and thus his Hurricane chance. Failing that, bring along a method of clearing magical effects and/or a method of rendering yourself daze-proof while fighting him, such as a movement infusion. And failing that, at the very least bring enough defenses/healing to ride out the near-inevitable Hurricane. Fortunately, we�re in a pretty good spot right now. We survived/dodged most of his major daze-inflicters without much issue, and we got him down to a sliver of health. Being a squishy mage, Urkis isn�t particularly difficult to take down himself � time to drop See the Threads and roll the dice.   It�s a good thing we did. On timeline 1 and 3, Thunderstorm manages to inflict a lucky Hurricane on us just as we land the finishing blow, and we cancel those timelines early rather than attempt to ride it out. On timeline 2 Attenuate removes him without much issue, and we collect our prize. The Anti-Gravity Boots are a fun EoR item that can be activated for a rocket jump that does AOE fire damage � not especially damaging, but more mobility is always useful. Defeating Urkis for your first time also unlocks the Tempest tree for Archmages, a high-level spell tree that boosts your lightning damage and lightning spells.  Time to clear out the rest of Tempest Peak. Storm Drakes are a fairly common sight here. They know Lightning Breath and Lightning Speed � a wild-gift that transforms them into pure lightning, granting them a colossal movement speed boost and raising their lightning and physical resistance while active. Any damage done during this time will be converted to pure lightning damage, but any action taken other than moving will end the effect.  And here comes big momma. Lightning Wyrms know Lightning Speed, Lightning Breath, Tornado (a slow-moving, homing projectile that explodes into a radius 4 AOE if it hits us, with an additional chance to stun) and Static Field (a talent that works similar to our own Echoes of the Past � lightning damage plus additional damage equal to a percentage of the target�s health).  There�s a couple of vaults on Tempest Peak 2. They just contain higher-level versions of common enemies, so they�re no real problem � boulder throwers excepted, of course. Nothing particularly good in them loot-wise, though. We clear them out and recall out, since there�s no other way to get down.   Kitty! We now have a cute little orange cat wandering around our fortress. He doesn�t really do anything, but that�s cats for you. We also have a little bit more fortress energy, so we can check out a couple more of the fortress�s special features. Can you use your magic to alter the appearance of my gear? Yes, master. The Mirror of Reflections is what you need. It is currently dormant but could be re-activated. I will need 10 energy to do this. That could be quite nice. Yes, please do it. Yes, master. The Mirror of Reflections is what you need. It is currently dormant but could be re-activated. I will need 10 energy to do this. That could be quite nice. Yes, please do it. Choosing this option unlocks the Mirror of Reflections, located next to our storage room.  With the Mirror of Reflections, we can now alter our gear�s appearance, changing it to look like any other similar gear any of our characters has ever worn in the past. It�s purely a cosmetic thing, but fun to mess around with at times. I find your appearance unsettling. Any way you can change it? I can alter the Fortress�s holographic projection matrix to accommodate your racial tastes. This will require 60 energy, however. Well, you do not look so bad, actually. Let it be for now.We can also change our butler�s appearance with a staggering amount of fortress energy. We�ll leave that alone for now � the tentacled horror look suits him just fine. Defeating Urkis clears out the storm clouds over Derth, though we don�t get any other rewards from completing the quest this way other than whatever loot we earned. Completing the quest via Zigur earns you an additional bonus - reporting the defeat of Urkis to the chief earns you the locked Wild-Gift/Fungus generic tree, a tree that boosts regeneration effects. Oh well, at least we can bask in the knowledge of a job well done. Moving on.  The golem graveyard is located randomly in out of the way corners of Maj�eyal, such as this one. That�s the portal to the Lost Land of Poosh under it � we won�t be headed there until a bit later.  The golem graveyard is a single-level zone chock-full of golems. They�re big bulky enemies who can zap you with eye beams and heat beams from a distance. Not too tough one-on-one, but multiple rare golems teaming up can be a nuisance.  The main reason to check this area out early is for chests � like the Maze and the Sandworm Lair, the Golem Graveyard has a relatively high chance of spawning chests containing high-tier artifact loot.  Also, high-tier artifact golems. Not much loot-wise, but we did learn a couple of interesting tinker schematics that we�ll put to use as soon as we have the necessary ingredients/skills.   On our way out, we stop by the local tourist attraction.  We have time for one more dungeon. The Hidden Compound is another one of those out of the way dungeons. Can be completed at a fairly low level, actually. Playing a skeleton is kind of throwing me off � most other races would have been much higher leveled by this point on Nightmare on account of not having a massive 40% EXP penalty, so I keep thinking we�re a lot weaker than we actually are. Then again, no real harm in playing it safe.  There are two types of enemies in the Hidden Compound � Yaech slavers and enthralled slaves. The former are mages who blast you with spells from a distance, the latter are brawlers who like to close in on you and grapple you to death.  Every slaver is accompanied by two enthralled slaves. If you kill a slaver without killing the slaves, the slaves will turn friendly and accompany you around, fighting other enemies they encounter. However, accidentally hitting a friendly slave with an AOE attack/spell will turn them all hostile again. We�re a little overleveled for this dungeon, so we can actually take our time facetanking the slaves while repositioning ourselves for careful slaver removal. The optimal way of clearing this dungeon would actually be to slaughter anyone in our way on the off chance one of the slaves was carrying something useful, but eh, we can afford to be nice once in a while.   Plus, we got a neat item off one of the slavers anyway. Tirakai�s Maul is an interesting weapon � the base-level maul is a fairly average 2-handed weapon, but upon slotting in a gem�  �the maul takes on the property of the gem, converting its damage to the gem�s associated damage type and giving you additional bonuses based on the gem. The damage will scale up with the gem�s tier, and sticking artifact gems in can result in especially powerful maul bonuses. It�s kind of a gimmicky weapon, but building around it can be fun for certain classes, and it�s always a nice item to find early on. Incidentally, Tirakai�s Maul has a very high chance of dropping in the Searing Halls, the starting zone of doombringer/demonologist adventurers and doomelves. It�s pretty clearly implied to be demonic in origin, though this has no real bearing on the maul�s effects should you choose to use it.  On the second floor of Hidden Compound, we�re rewarded with a cheevo for saving over thirty slaves from yaech enthrallment.  My word, that�s a nice hat. 25% temporal resist penetration and voidstalker bonuses? Yes please.  On the third floor, we come face to face with the mastermind of the entire operation.   Well, you see, it�s quite simple. I will mentally take command of various wild creatures or slaves while you use the orb of command on the other side of this room to take control of a slave. Then we fight using our pawns for 10 rounds. If your slave survives you win the Bloodcaller. What if I lose? Normally you would be taken as a slave, but you look like you would be more useful as a full time player, so you can just try again. Blood and death without risk of self-harm? Sounds fun! Splendid. Oh yes, before I forget, you will need to pay the standard fee of 150 gold pieces. I�m sure this is small money for an adventurer of your class. 150 gold? Uh�sure. Well, you see, it�s quite simple. I will mentally take command of various wild creatures or slaves while you use the orb of command on the other side of this room to take control of a slave. Then we fight using our pawns for 10 rounds. If your slave survives you win the Bloodcaller. What if I lose? Normally you would be taken as a slave, but you look like you would be more useful as a full time player, so you can just try again. Blood and death without risk of self-harm? Sounds fun! Splendid. Oh yes, before I forget, you will need to pay the standard fee of 150 gold pieces. I�m sure this is small money for an adventurer of your class. 150 gold? Uh�sure.This probably cancels out all the good karma we gained from saving all those slaves, but the Bloodcaller is pretty nice.  Activating the orb puts us in charge of a slave brawler for a short period of time. To win, we have to defeat ten enemies in a row. This particular brawler actually has a couple of outdated skills that modern brawlers don�t have, but they aren�t especially game-changing.  It�s not an especially difficult fight, by any means. Brawlers are a pretty tough class, and we come with a healing and regeneration infusion for when things get dicey. If we do lose, we can just pay 150 gold to try again, though.    For our win, we�re rewarded with the Bloodcaller. Bloodcaller is a guaranteed artifact ring given to you upon completion of this sidequest, and it�s a pretty good ring if you haven�t found anything better yet (which may very well be the case if you take on this area early). Wearing Bloodcaller gives us a 15% chance for our attacks to inflict Life Leech, restoring 30% of the damage done as HP. Bloodcaller combos well with classes like Necromancer or Demonologist, who have skills that give them a small permanent life leech bonus � the additional 30% life leech will stack, without having to rely on the innate 15% proc chance granted by the ring. In addition, if this is your first time completing the quest, winning unlocks the brawler class. Now, let�s get our karma back by killing a slaver-king.  The Blood Master is tougher than he might appear at first. Being a Mindslayer, he moves and attacks at a much higher speed than normal, and his telekinetic weapon allows him to attack opponents even outside melee range. We drop an Attenuate on him, then Induce Anomaly and trap him in a stone wall for a few turns. The Blood Master is attenuated away before the wall fades, but we don�t recover any decent loot off him, though we do get a couple of tinker schematics. C�est la vie. More side dungeons/sidequests coming up in the next update.
|
|
#
?
Jul 20, 2017 01:45
|
|
|
Are yeeks telepathic monkeys?
|
|
#
?
Jul 20, 2017 08:36
|
|

|
Gunslinger Bears, a class that should exist in every RPG.
|
|
#
?
Jul 20, 2017 09:59
|
|


|
Zaodai posted:Gunslinger Bears, a class that should exist in every RPG. They have the right to bear arms.  But seriously, I would play a gunslinger bear every chance I got, no matter how little it fits the setting.
|
|
#
?
Jul 20, 2017 12:18
|
|


|
Artificer posted:Are yeeks telepathic monkeys? A little more like telepathic undergrown yetis, but yeah, the point stands. Small telepathic humanoids covered in very soft fur. They probably have the funniest tier one racial talent, since where other races get 'speed up' or 'crit bonus' or what-have-you, Yeeks get to MIND CRUSH a target every 25-50 turns.
|
|
#
?
Jul 20, 2017 12:25
|
|
|
Artificer posted:Are yeeks telepathic monkeys? More like little telepathic, furry semi-aquatic mammals. Psychic water-ewoks, basically.
|
|
#
?
Jul 20, 2017 13:18
|
|
|
Randalor posted:They have the right to bear arms. They're nature's perfect killing machine. Imagine running into one in D&D or something. "You push your way through the underbrush into a clearing, you see a bear." "Oh, poo poo. Uh... I take a shot at it with my longbow." *bear rolls better initiative*"Unfortunately, the bear has already noticed you and is quicker on the draw. He fires at you with both pistols." "Of course he wou- wait WHAT?!"
|
|
#
?
Jul 20, 2017 15:00
|
|
|
Zaodai posted:They're nature's perfect killing machine. Imagine running into one in D&D or something. They all laughed when I took Bear Lore, but I was the only one prepared for this...
|
|
#
?
Jul 20, 2017 16:38
|
|

|
Rainuwastaken posted:They all laughed when I took Bear Lore, but I was the only one prepared for this... Now I'm trying to fit bear puns into gunfighter names. Grizzly the Kid Wyatt Ursa
|
|
#
?
Jul 20, 2017 20:20
|
|


|
 Hopefully the last derail til OP comes back.
|
|
#
?
Jul 20, 2017 21:03
|
|
|
The rare enemies can get pretty hilarious. In a recent game I played one of the farmers in Derth was a necromancer. Good luck explaining that one to the wife, buddy!
|
|
#
?
Jul 20, 2017 21:08
|
|

|
Hello Sailor posted:Now I'm trying to fit bear puns into gunfighter names. John Grizzly Hardin, clearly. He's not a nice
|
|
#
?
Jul 20, 2017 21:09
|
|
|
SettingSun posted:The rare enemies can get pretty hilarious. In a recent game I played one of the farmers in Derth was a necromancer. Good luck explaining that one to the wife, buddy! Saves a fortune on feeding beasts of burden when they're dead?
|
|
#
?
Jul 20, 2017 22:12
|
|
|
Randalor posted:Saves a fortune on feeding beasts of burden when they're dead? Plus they're perfectly obedient, so there really is no need to beat a dead horse!
|
|
#
?
Jul 20, 2017 22:15
|
|
|
I appreciate that Yeeks have been described differently every time someone tries.
|
|
#
?
Jul 20, 2017 22:46
|
|


|
Hello Sailor posted:Now I'm trying to fit bear puns into gunfighter names. Dirty Teddy The Sundance Cub
|
|
#
?
Jul 20, 2017 22:59
|
|

|
CzarChasm posted:Dirty Teddy Pandy Oakley Koalamity Jane Pat Bearett Bearfalo Bill Charles Bolles AKA Black Bear-t Bearic Stoner AKA the Cincinatti Cub Wild Bill Bearcock Commodore Beary Owens The Bear with No Name and of course you gotta have Vet Holliday to patch em up. Going up against them are Judge Roy Bearm played by Richard Dryfur and Cow Marshall Seth Bullock played by Timothy Elephant.
|
|
#
?
Jul 20, 2017 23:26
|
|

|
 Time for more side dungeons. The Very Old Halfling Ruins are located in this hidden path to the mountains, next to where Zigur would be if it existed. 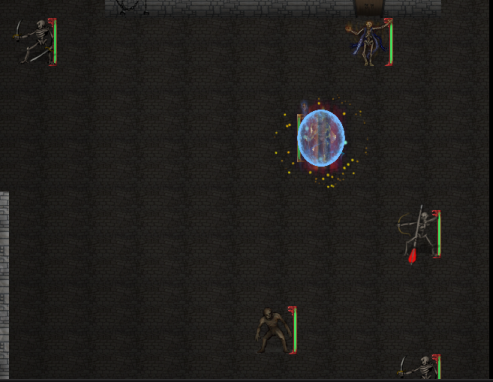 As you can see, undead are the main order of the day. The first floor is a wide-open space broken up by a few buildings, and can be a bit of a challenge. The undead aren�t much to write home about though � ordinary skeleton warriors, archers and mages, with the occasional ghoul breaking things up.  This one is a bit of a challenge, though. Skeleton Master Archers are a step up from regular skeleton archers, and were threatening even before the new archer update. We can dodge with relative ease thanks to Gravity Locus, but we can easily be killed by one if we let our guard down too much.  When the ruins were said to be very old, they weren�t kidding. The Age of Allure was several thousand years ago from the �present�, the Age of Ascendancy. These notes are pretty much the oldest non-Sher�tul related lore in the game, outside of a couple of debatable incidents.  Skeleton assassins are one tier up from regular skeletal enemies, alongside Master Archers and Armored Warriors. They�re essentially basic skeletal shadowblades, with a small selection of low-tier shadowblade skills. Most of these little buildings are empty, though it doesn�t hurt to check.  For all that master archers can be annoying, they�re still no match for straight-up archer rares � such as this ghoul that immediately accosted us on the second floor. This one managed to Mark us, rendering us vulnerable to his more powerful skills. That -20% global speed is really helping out at the moment, seeing as how archers gain a slight attack speed boost.  We picked up the Grounding Strap schematic! The Grounding Strap is pretty much half of the reason to go tinkers in the first place, and I�ve been hoping to find it for quite some time now.  When attached to our cloak, it grants us lightning resistance and additional stun/freeze resistance based on its tier. The best ingredient we can spare for it at the moment is Stralite, so it�s only a t4 Grounding strap and thus only offers 40% stun/freeze resist. Still, when combined with other equipment bonuses and Matter Weaving, we have slightly over 100% stun/freeze immunity � useful in case an enemy has a way to lower it.   One of the skeleton mages dropped Eclipse. As you can tell it�s mostly meant for Anorithils, but it might work well for us � wielding it would lower our temporal damage bonus slightly, but increase physical damage and give us bonus spell crit chance. We�ll stick with our current one for now, though, since our primary damage is temporal.   More Hompalore on level 2. Farportals certainly have been the cause of a lot of trouble, haven�t they?  We run into one of the aforementioned ghoulkings on level 3. Fortunately, this one hasn�t gone all summon-crazy on us yet.  Yet more Hompalore. Wonder what happened to Subject Y?  Oh, and what a coincidence! Director Hompalan is a rare AB skeleton that only shows up 30% of the time in the Old Halfling Ruins, unless you�re a Shaloren, in which case it�s guaranteed. As with all AB enemies he�s not too much of a threat, tending to focus on spellcasting rather than actually leveraging Arcane Combat.  We finish him off and find his last orders on his mouldering corpse. Killing Hompalan unlocks a certain special dungeon that we would have been unable to find otherwise, so this is turning out to be a pretty good run for showing off rare zones. Anyway, we�re still not done with the ruins themselves. Moving on.   The last bit of Hompalore on level 4. Guess we know what happened there, given all the undead.  A regular bone giant. We last fought one of these things all the way back in our starter dungeon, but that one was only half-complete. Bone Giants are the lowest tier of bone giant, but they�re still pretty annoying to face. They come with a set of high resistances, Bone Armor and Stun, though thankfully we don�t have to worry about that last one now. One of the good things about Attenuate is that if he�s reduced to below 20% health and activates his shield, that instakill chance still has a chance of activating even while that shield is absorbing damage.  The final door of the halfling ruins. I wonder what awaits us beyond it?  Oh, looks like we�ve interrupted something. Subject Z is a Shadowblade/Doomed combo. He�s not too threatening at this level, but he can be difficult to hit in melee due to his naturally high defense. However, right now we�re his second priority � Subject Z�s first order of action is to attack the neutral Yeek Wayist. He will only attack us if he has no other choice of target or if the Wayist is dead, and we want to keep the Wayist alive.  We have to be careful with our attacks � if we hit the Yeek, the Yeek turns hostile, and we�ll more than likely have to put him down ourselves. Making things worse is Subject Z, who teleports often and beelines straight for the Yeek whenever possible. One more turn should do it. Might as well See the Threads for extra safety.   On timeline 1, he drops the Robe of Force. It�s a low-level robe that grants additional bonuses to physical and mind damage and has surprisingly high armor/defense for a robe (though that�s being modified by our Armor Reinforcement tinker, it�s nowhere near that high). Useful on a solipsist if you can find it early, but we�ll pass on it.   On timeline 2, we earn Penitence, an interesting t2 staff. As you can see, Penitence does not offer any elemental damage bonuses � instead, it grants additional damage resistance and damage affinity to the element it�s tuned to. One of the few nature-damage associated magical items.   On timeline 3, we earn Daneth�s Neckguard. It�s a useful amulet for melee classes, though casters can also benefit from it as well � possibly more so, even. Daneth�s Neckguard grants bonus armor, Strength and Constitution, and can be activated for Juggernaut, which increases physical resistance and crit shrug off chance. Both the Neckguard and Penitence would be useful, but we�ll go with Penitence for now. We probably won�t run with it for the most part, but there�s a couple of areas coming up soon where it could come in very, very useful. Incidentally, none of those are Subject Z�s associated artifact � that would be Nightsong, a ring that boosts Cunning and Mental Save, grants additional stamina and lowers fatigue, and can be activated to cast Dark Tendrils. Now to chat with the Yeek we saved.  The greatsword floats to a less aggressive stance. He seems surprised.  Then on behalf of The Way, I thank you. What is The Way, and what are you? The Way is enlightenment, peace and protection. I am a Yeek. I came through this tunnel to explore this part of the world that was closed off to us for centuries. Can you tell me more about The Way? I cannot, but I may show you a glimpse. Then on behalf of The Way, I thank you. What is The Way, and what are you? The Way is enlightenment, peace and protection. I am a Yeek. I came through this tunnel to explore this part of the world that was closed off to us for centuries. Can you tell me more about The Way? I cannot, but I may show you a glimpse.He leans towards you. Your mind is suddenly filled with feelings of peace and happiness. This is The Way. Thank you for this vision. Farewell, my friend.Saving the Yeek gives us a bonus +15 mental save and +10% confusion resistance. If this is your first time saving the Yeek, this will also unlock Yeeks as a playable race. Even if you�ve already unlocked Yeek, it�s still worth saving him � bonus mental save and confusion resistance is always useful. Saving the Yeek while playing as a Yeek does not grant you the additional bonuses, but it does unlock the Mindslayer class if it�s your first time doing so. Also, the Yeek cannot be saved as a Halfling � should the Yeek survive the battle with Subject Z, he will still turn hostile upon seeing his old racial enemy.  There�s some other features in this tunnel. Let�s check them out.  The chest contained some skeletons, and this artifact greatmaul. Would be a nice find if we were a 2-handed user, but as it stands all we really get out of it is some tinker ingredients.  The first of the invokers that popped out of the pedestals. Path of the Sun is a Sun Paladin skill that creates a shining path of light for a few turns. It does some light damage to enemies that step on it, but more importantly allows free movement for the caster � moving along the shining path is functionally instantaneous, making it both a great distance-closing and escape talent all in one.  We lure out the last of the three invokers to somewhere suitably distant. The boss will only spawn at the pedestals once we kill the last of them. As a result, if we kill the last invoker far from the pedestals, we can rest up and regenerate all our cooldowns/paradox rather than taking on the boss immediately. Luring them out would be much more convenient if they weren�t a gunslinger, though.  The bringer of doom in question. What an odd combo � a wyrmic/demonologist fire imp. It�s not actually a very good combo � being a form of magic alien to Maj�eyal, Vim really doesn�t play well with wild-gifts, and using any vim-based skill will throw you wildly out of balance with nature, increasing your equilibrium by five times the amount. The fire imp himself seems to be content with using Flamespit on us non-stop as long as we stay far enough away. Works out fine for us - all his hard-hitting skills are melee. Incidentally, we�re hitting the point where Magic-based enemies have enough spell save to shrug off our Attenuates sometimes. That�s a worrying note � we should start investing more in our other offenses.   We Attenuate it away eventually, and get Nature�s Blessing as our reward. Nature�s Blessing is a t2 antimagic light armor that offers an array of defensive bonuses, which increase if the wearer themselves is antimagic. Of no use to us, naturally.  Most race/classes will get this message if they try to enter the staircase at the end of this tunnel. The tunnel is, in fact, a tunnel to the island of Rej, the Yeek starting zone. After clearing the two Yeek-only starting zones, Yeeks will emerge from this tunnel into the Halfling ruins. It�s possible to take Subject Z on right there and then if you�re brave and powerful enough (the dungeon will scale to your level to some extent), but most smart players tend to just Rod of Recall out the second they enter, which transports you directly to the Maj�eyal worldmap.   Since we�re at about the right level for it, we might as well check out the new zone we unlocked. The Conclave vault is located right outside the Halfling ruins, below the area where Zigur would be. It only appears if Hompalan shows up and you defeat him.  Ogres are the main theme of this vault. There�s no way to avoid conflict with these two sentries on the first floor � they attack regardless of answer. Nonetheless, they go down without too much trouble.  These old vats are one of the most common �enemies� in the Conclave vault. They�re completely invulnerable, but wait a few turns�  �and ogres pop out. These two on the top are mostly just standard melee types, but the bottom one is an ogre pounder, a brawler that can grapple us for additional damage. Luckily, his grapple skill isn�t high enough to also silence us if we�re grappled.  Ogre Warmasters are one of the toughest melee enemies in this zone. They�re high-level bulwarks who can damage and disable us from a distance with Warshout, and pull us into melee with Battle Cry.  That pile of flesh to the left is a Degenerated Ogric Mass, and they�re actually pretty annoying foes. They come equipped with a rare talent combo � Epidemic (a disease inflicting spell that completely ignores disease immunity, and lowers it once inflicted), Rotting Disease and Catalepsy (a spell that removes all diseases but does 120% of remaining disease damage instantly and stuns us for a few turns).  Ogric Abominations are an interesting enemy � a combo between an ogre warrior and a golem. They all come with Reflective Skin sustained, which reflects 20% of our damage done back onto us. Not too much of a problem if we�re paying attention, but fighting multiple Abominations at once as a high-powered melee character can wear you down surprisingly quickly.  Oozes and traps are the next most common sight here, alongside ogres and ogre derivatives. Here�s where that bit about Attenuate sticking to all those ooze copies comes in really handy. Most oozes you�ll find here aren�t much of a threat except for the Poison Oozes, which can inflict a variety of randomized poisons with their Poisonous Spores attack � though that�s not a problem we have to worry about. To the right of the ooze, there were some more pedestals. Incidentally, I once got a set of pedestals on the first floor of the Conclave Vault. Which, as you might recall, consists of a single long tunnel. Fun times. Anyway, let�s see what fate has in store for us this time.  A doombringer quasit with additional bulwark/brawler skills�neither of which he can use thanks to wielding a 2-handed weapon. Huh. Still, even the doombringer part poses enough of a threat that we�ll try to stay out of melee. Might be a difficult task, given his multiple distance-closing moves.   He opens up with Fiery Grasp, a move which we thankfully manage to shrug off � getting hit by a level 4 Fiery Grasp would Silence and Pin us for a few turns. We finish him off shortly after, and are rewarded by Helm of the Dominated. As you can see, it�s a helm meant mainly for Doomelves, but could actually be of use to us � bonus spellpower and silence immunity is a good combo.  These ogres tend to come in with a small selection of runes, invisibility among them. Our see invis is usually high enough to spot them, and even if it weren�t we could just toss Attenuates in their general direction, so it�s not too much of a problem. These Ogric Masses would be a lot more of a threat if they didn�t open with Catalepsy as their first move � it does nothing to us if we have no diseases.  We got blinded and now we can�t see anything, not even ourselves. One of the more annoying things about the game � the most common method of being blinded is by someone using a Sun Infusion near you. Sun Infusions will actually inflict two debuffs � Blinded and Illuminated, a debuff which decreases your defense and stealth power for a few turns. Illuminated is a generally pointless debuff but for one thing � most physical-debuff clearers prefer clearing Illuminated over Blinded, leaving us still unable to see anything for five turns.  We Temporal Reprieve out for a quick holiday (not strictly necessary, but who passes up an opportunity to use Time Holiday?) , and Dimensional Shift helps clear away the last of the Blinded turns.   We find some notes explaining how the poor, doomed ogres in here came to be. Luckily, they seem to be doing fine outside, if those ogres chilling in Elvala were any indication.  Rune-Spinners are ogre Archmages. They hit extremely hard for mages, and they can use Time Shield to extend their lifespan even further. We don�t want to be fighting more than one at a time.  More ogre lore. Guess that explains all those undead in the Halfling ruins.  The ogre maulers might not be as much of a physical threat as some of the others, but their influence on battles isn�t to be underestimated. Being berserkers, each of them can confuse us with Warshout, an effect we have little chance of resisting (the Yeek bonus wasn�t quite enough, apparently). With enough of them, they can keep us confuse-locked for almost the entire battle. In addition, Warshout also applies Brainlocked thanks to our low mental save, which is pretty much stun-lite � getting Brainlocked puts a random talent on cooldown, and no talents will cooldown during its duration. Fortunately, it only lasts one or two turns at most.  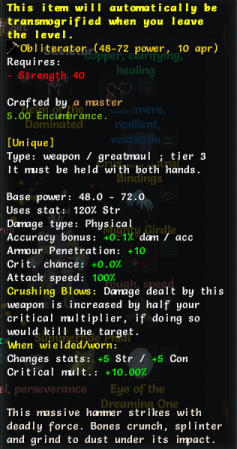 One of the ogre maulers dropped Obliterator. It�s an interesting t3 weapon that increases your critmult and does bonus damage for killing blows. A fun weapon, but there�s better t3 artifacts, and Obliterator�s effect essentially comes in useful only once per enemy, as opposed to even a plain old green weapon which does bonus damage with every strike.   Yet more ogre lore. Explains all the vats around here, at least.  These traps are fun. Stepping on them creates a small array of fireballs which explode in radius 1 after a few turns. The delay is long enough and the fireballs weak enough that the trap is no real threat, but it can be fun to repeatedly trigger to see how many fireballs you can generate before they start going off.  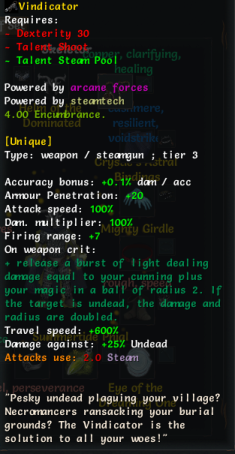 We find a fancy gun just lying around on the ground. Aside from the anti-undead bonus feature, it�s a fairly ordinary gun. Most gun-using characters don�t really have the magic needed for the bonus light ball to do any damage comparable to raw bullet damage.  At the end of the third floor, we come face to face with Astelrid herself.  She comes with a small selection of spells and runes, but for the most part they�re defensive � her main form of attack is to charge right at us and maul us with her club. She also comes with a small selection of ogre bodyguards, who are no real trouble if we stand in the corridor since they can�t hit us. Incidentally, we haven�t discussed Heroism infusions yet. Heroism infusions are powerful late-game infusions, and the second reason why undead are considered bottom-tier races. When used, a Heroism infusion boosts your three highest stats by a large amount, and renders you unable to die until below X HP for as long as the infusion is active (if below negative health when it wears off, your HP is restored to 1). With a high-scaling Heroism infusion, you gain a massive stat boost for a very long time, along with an effective healthbar increase that far outshines a shielding rune, rendering the only commonly-useful rune completely obsolete. Naturally, Ogres can make much greater use of Heroism infusions than any of the other races. Fortunately, this is the last time we�ll be fighting ogres in such a quantity � they�re pretty rare outside of this dungeon.   Defeating Astelrid causes her to drop her Clubstaff. It�s an interesting weapon that might have some niche builds built around that rune effect, but not very useful aside from that.   Astelrid also drops the last of her notes upon her death. Defeating her for the first time unlocks ogres as a playable race. And that�s the ogre dungeon complete. We have time for one more, I think � let�s get around to completing Ungrol�s second request.  The mausoleum is located next to Last Hope, unlocked once agreeing to Ungrol�s request. It�s recommended that you don�t come here until you�re extremely confident in your own capabilities (and/or above level 20+).  The first level of the mausoleum is nothing special, just a bunch of gravestones. You can check them out if you like � some are humorous, some appear to be dedicated to real people, who I�ve never been morbid enough to look up. There�s nothing else of interest on this level aside from that.  The second level of the mausoleum. That sure doesn�t sound good.  Neither does this. I have a feeling I know what we might be up against.  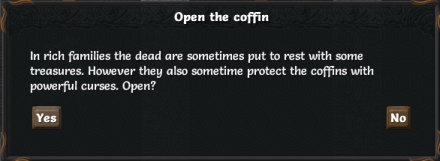 The second level consists of a long corridor lined with small side-rooms that each contain a coffin, with the boss in a large room at the end. A coffin has a chance of containing nothing, an artifact on rare occasion, or (much, much) more commonly, a nasty elite undead. There�s a nasty trick to this dungeon � upon opening the door to the boss room, every coffin will automatically open, and the stairs to the surface will vanish. Unless you�re extremely overleveled you have very little chance of surviving, so it�s best to open the coffins and deal with their inhabitants one at a time.   The first two coffins contained nothing, the third spat out this hat. A nice hat for arcane-focused archmages, pointless on almost anyone else. Gives a very nice mana bonus when combined with the Staff of Arcane Supremacy, though.  The fourth one also contained nothing, but our luck runs out on the fifth one and we unleash this anorithil skeleton archer.  We get a very nice staff upgrade from him. Still pretty average as far as staves go, but then again all we really need is the elemental bonus and spellpower, which this staff delivers in spades. The downside of Attenuate being our main damage spell is the fact that we need enough raw spellpower to overcome an enemy�s spell save � if we don�t have enough spellpower, they�ll just shrug off Attenuate and take no damage whatsoever. We�ll be keeping Penitence on the off chance we need it, though.  Coffin five contained nothing, coffin six unleashed this necromancer vampire. We take him out without much difficulty, though he does land an Impending Doom on us. It�s one of the few magical debuffs worth mentioning � it inflicts a very high amount of arcane damage on us per turn, though our debuff reduction and damage shield allow us to ride it out.  Coffins seven and eight contained nothing, coffin nine unleashed this Demonologist bone giant on us. That�s a pretty bulky combo, but nothing too threatening if we stay out of melee range. We�re just lucky he doesn�t have Rain of Fire � the only threatening ranged move a Demonologist can muster. It drops an endless stream of meteors on enemies around you, stopping only when the demonologist runs out of vim, which can be �never� for NPC demonologists.  Coffin ten contained a gunslinger bone giant! What a pain. We drop Attenuates on him from a distance, trying to stay out of line of sight as much as possible. Luckily, the layout of this dungeon means it isn�t too much trouble. If he�d had the �Embedded Restoration Systems� sustain, the battle would have been a lot more difficult � it automatically heals the gunslinger every few turns when not in LOS of an enemy, so we�d have been forced to stay in sight of the gunslinger regardless.  Coffin eleven contained a bulwark eternal bone giant. Hoo boy. The bulwark part isn�t the problem (though it would certainly not help were we a melee character), the eternal bone giant part is. Eternal Bone Giants are the next step up from bone giants � even more resistances, Bone Armor and Reassemble at fairly high levels. To kill an Eternal Bone Giant, you basically have to bring enough firepower to deplete its HP bar three times over in a short amount of time.  The fight is mostly a slogfest of dropping Attenuation and Repulsion Blasting him backwards as he tried to make his way towards us. We take a risk as he gets dangerously close to �use bone armor� levels of HP, and teleport close enough to hit him with Echoes of the Past, erasing him from existence.  The last coffin contained a bulwark ghoul. A nice breather after the eternal bone giant.  Here�s a ghoul feature we haven�t seen before. Ghouls can use Retch, creating a small blight pool that lingers for a few turns, damaging non-undead and healing undead. We happen to be in the latter category this time, so that�s no big issue. Fighting multiple ghouls can be really annoying if they decide to all Retch at the same time � the blight pools will stack and heal massive amounts of health every turn, making the ghouls all but impossible to remove unless you can kill them in a single turn. Anyway, we kill this lone one without much difficulty. We got pretty lucky coffin-wise this time � not too many undead, and the ones we fought weren�t all that much of a threat. Things could have been much, much worse. Now for the boss.  It�s kind of hard to spot Celia, but she�s there underneath the Cold Flames/Gravity Well distortion effect. Celia hit us with a Circle of Death as we walked in, a common opening move for her, and it inflicted Bane of Blindness, making it impossible to get a clear shot of her until now. Anyway, we�re fighting Celia now. She�s pretty much an average necromancer, but she can hit surprisingly hard with darkness spells, and her opening Circle of Death will almost always get you unless you run fast enough to avoid it. As with most necromancers, how tough she is depends heavily on how lucky she gets summon-wise. Speaking of which, we haven�t discussed how necromancer summoning works yet. While summoners summon one specific creature at a time, necromancers summon a large array of randomized undead within their necrotic aura, with the type and level of undead dependent on their �raise minion� talent level. Each minion costs one soul to raise, and will linger indefinitely unless killed, but decay rapidly outside their caster�s necrotic aura. The latter two points are going to be a frequent cause of frustration for player necromancers but generally irrelevant when facing enemy necromancers � most of them come with soul regeneration for functionally unlimited minions, and their necrotic aura is usually large enough to cover whatever arena you tend to be fighting in. It does mean that minion-summoning is entirely dependent on Necrotic Aura being sustained, though � if you have some means of magic sustain removal and hit an enemy necromancer with it, they can�t summon minions until they reactivate it. They�re not completely defenseless during this time, though, as they still have their usual stock of darkness/cold spells and Impending Doom.  Killing a summoned minion has a near 100% chance to turn it into a will-o-wisp as long as it dies within Celia�s Necrotic Aura, which is currently wide enough to envelop almost the entire room. Will-o-wisps will attempt to charge at us and explode, doing massive amounts of cold damage. Naturally, as they count as summons themselves, killing a will-o-wisp usually just results in it respawning at full health, though fortunately this doesn�t occur if they use their kamikaze attack.  Forgery of Haze is a common necromancer spell. It creates a ghostly copy of you with a fraction of your life and damage, but with all your talents. As with any �clone yourself� skill, there�s rarely any reason not to take it, and most enemy necromancers tend to agree with that line of thinking.  We drop a See The Threads and finish off Celia, but in all three timelines she just drops this set of randart gloves. They�re of no real use to us aside from being a minor strength statstick. Oh well, at least we cleared out one of the major undead threats to Maj�eyal � only about a billion more to go. If you haven�t unlocked it yet, finding all four of the �How to be a Necromancer� lore pieces and then defeating Celia will unlock the Necromancer class. Necromancers themselves have a special reason for clearing this area � taking out Celia provides a key component for the Lichform ritual, beginning the transformation into a powerful lich. Well, that�s about it for this update. Next time � more ruins, more elementals and more bears.
|
|
#
?
Jul 22, 2017 06:25
|
|
|
I remember only trying the tomb once and being horribly maimed by Celia, so seeing someone beat it was cathartic.
|
|
#
?
Jul 22, 2017 06:47
|
|

|
The worst part about the Tomb is what those coffins can spawn. I think literally any type of undead is fair game, I've even gotten a super-rare Blood Lich out of those things, once. The main problem for me has pretty much always been if they produced super-bulky Eternal Bone Giants, because if you're not high enough level, those can be almost impossible to bring down. Thankfully, though, if you've got some decent movement/teleport skills, there's enough space/walls in the tomb to get some peace and teleport out in most cases.
|
|
#
?
Jul 22, 2017 07:16
|
|
|
This thread finally prompted me to get back into playing again after a long break. I splatted a few normal characters in the main campaign, but then finally got around to messing with the Embers stuff. Man, some of the new items are ridiculous! While playing the ranged tinker class I got a pair of boots that made every step slide you three squares, which is so insane I basically had wasted every point that went into a mobility skill. I literally breezed through until the very end game, where some unfortunate choices saw me die in the last dungeon. This game is still insanely 'it's 2 am but I just gotta finish this dungeon' fun.
|
|
#
?
Jul 22, 2017 17:44
|
|

|
Geez, halflings seem like total dicks in this setting.
|
|
#
?
Jul 22, 2017 19:26
|
|


|
Everyone in this setting is a dick.
|
|
#
?
Jul 22, 2017 19:36
|
|
|
Artificer posted:Everyone in this setting is a dick. While true, Halflings are even more so than others. They have chilled out over the last few centuries, but for most of the world's current history halflings as a whole acted with Saturday morning cartoon levels of villainy.
|
|
#
?
Jul 22, 2017 19:39
|
|

|
I dont know posted:While true, Halflings are even more so than others. They have chilled out over the last few centuries, but for most of the world's current history halflings as a whole acted with Saturday morning cartoon levels of villainy. Gonna be honest, I don't recall the last Saturday morning cartoon where the villain both successfully planned and executed a horrifying plan on a scale comparable to the necromantic animation of corpses of both allies and enemies in a last ditch effort at victory in war.
|
|
#
?
Jul 22, 2017 19:47
|
|
|
Artificer posted:Gonna be honest, I don't recall the last Saturday morning cartoon where the villain both successfully planned and executed a horrifying plan on a scale comparable to the necromantic animation of corpses of both allies and enemies in a last ditch effort at victory in war. Bioware Evil Path
|
|
#
?
Jul 22, 2017 19:50
|
|

|
On that note, it's interesting to look at the PC's info tab near the end of the game to check out the killcount. Judging by some of the stuff you do in the second half of the game, any PC that hits the endgame is the greatest killing machine since Garkul the Devourer, and it took two armies and the alchemical version of Gigantor to take him down.
|
|
#
?
Jul 22, 2017 20:11
|
|
|
Fun little easter egg: if you're wearing the "Vestments of the Conclave" artifact robes as a human, you can briefly attempt to reason with the Vault guards - "attempt" being the key word here. If you're a halfling, they assume they're under attack and draw their weapons on sight. The Halfling Ruins weren't my doing, but the Conclave Vault was fun to write - Astelrid, with her genuine concern for her underlings / test-subjects and full investment in the political aims of her research, was conceived as a foil to Hompalan. They're representations of their respective empires, too; the Nargol Empire were blind to morality and ruthless about their practical interests, while the (previously-undercharacterized) Conclave knew exactly what they were doing and pursued their citizens' happiness with equal fervor (even when that happiness is achieved through horrific acts of revenge). Artificer posted:Everyone in this setting is a dick. I'd say "everyone in this setting WAS a dick." King Tolak and the Allied Kingdoms in general are pretty decent folk, but much like our world, ancient history looks pretty awful by modern standards. The sins of Eyal's past just don't tend to stay in the past... Synkora fucked around with this message at 02:11 on Jul 23, 2017 |
|
#
?
Jul 23, 2017 02:02
|
|
|
There's a very good reason to not use forgery of haze: the best necromancer spell for damage is chill of the grave, a huge area of effect cold damage spell. It is extremely easy to kill yourself the AOE is so huge. Your forgery will similarly kill you with it I believe.
|
|
#
?
Jul 23, 2017 19:38
|
|

|
Synkora posted:The Halfling Ruins weren't my doing, but the Conclave Vault was fun to write - Astelrid, with her genuine concern for her underlings / test-subjects and full investment in the political aims of her research, was conceived as a foil to Hompalan. They're representations of their respective empires, too; the Nargol Empire were blind to morality and ruthless about their practical interests, while the (previously-undercharacterized) Conclave knew exactly what they were doing and pursued their citizens' happiness with equal fervor (even when that happiness is achieved through horrific acts of revenge). It's also interesting to think of in terms of the magic/anti-magic divide, where the bulk of the historic problems fueling it seem to predominately derive from the political and material forces at play which magic ends up ultimately holding the bag for. Not to say that spell craft isn't an enabling factor in the setting, but as an example the horrible necromantic gambit in the last update ultimately arose from material conditions (the Nargol Empire facing imminent defeat combined with their ruthless Imperial ambitions) and there's no particular reason to believe they wouldn't have resorted to something equally horrible but far less spectacular if lacking the capabilities magic offered.
|
|
#
?
Jul 24, 2017 03:03
|
|


|
Yeah, you made the mausoleum look easy, but that one Eternal Bone Giant? That thing would be approximately invincible to any non-spellcaster. Massive armor and hardiness, insane resistances, over 2k life, huge heals and shields. Eternal Bone Giants are among the worst enemies in the game to roll as rares, because they naturally have such a ludicrous skillset and stats that compounding it with nearly any class leads to unkillable monstrosities.
|
|
#
?
Jul 24, 2017 04:17
|
|

|
The halflings are the worst no matter how you look at it.
|
|
#
?
Jul 24, 2017 05:57
|
|
|
Synkora posted:Fun little easter egg: if you're wearing the "Vestments of the Conclave" artifact robes as a human, you can briefly attempt to reason with the Vault guards - "attempt" being the key word here. If you're a halfling, they assume they're under attack and draw their weapons on sight. You know, here's something that stands out to me: There are a few places in the game where your race/class affect dialogue choices and, I think, one place where having a high enough Cunning does it as well, but this doesn't ever seem to get used for anything. It gets you a bit more dialogue/different dialogue, but it never changes anything about the game's encounters that I've seen. I wonder if it's a scrapped feature or just vestigial.
|
|
#
?
Jul 24, 2017 10:06
|
|
|
I assume it was never meant to be a big deal, just a neat easter egg for playing different races/classes. I could be wrong, though. Time for more ruins. The Ruined Dungeon is another one of those small dungeons that pop up in random, out of the way places. The �recommended level� for the Ruined Dungeon claims to be 10. This is a filthy lie � the Ruined Dungeon is a level 20+ zone at best, and can be a challenge even then depending on how unlucky you get.  As you can see, there�s an extremely wide variety of creatures in the ruined dungeon. Almost anything can spawn here, which means you have to be prepared for pretty much everything the game can throw at you before you even think about entering this area.  The Ruined dungeon consists of a central corridor with several side paths branching off it. Each of the side paths contains a randomized assortment of enemies, as well as a single powerful rare, the Guardians of the dungeon. The first one we�re facing appears to be a Doombringer orc warrior.  Of course, non-guardian rares also have their usual chance to show up, such as this Summoner jelly.  Oh boy, our first Dread. Dreads are spooky ghosts that like to hide in walls and torment us with crippling Hexes. They tend to have very high Defense, making them a challenging enemy to take on. Dreads are small potatoes compared to Dreadmasters, though. Dreadmasters are naturally invisible, can confuse us alongside their hexes, and can summon additional dreads. Probably the number one reason why you should beef up your see stealth/invis before taking on Dreadfell.  Our next guardian apparently couldn�t wait, and rushed out to meet us. This one appears to be a gunslinger wolf. The Gunslinger bit is threatening, the wolf bit is not.  Every time we kill a guardian, we get that message. To complete the puzzle at the end of this dungeon, we�ll have to defeat all six guardians before we can proceed.  Oh bugger. Luminous Horrors are one of the more annoying horror types we can encounter this early in the game. The always come in threes, have a plethora of healing/defensive spells, and have high all resist and 100% fire/light resistance. In addition, not only do they resist it, but they have 100% fire/light affinity, converting all fire/light damage they take to HP. This wouldn�t be so bad (sun paladins and fire archmages excepted) if it weren�t for their aforementioned habit of coming in threes, and their penchant for casting Firebeam straight through each other and into you. Annoying to take out on most classes, but a practically Sisyphean endeavor for Sun Paladins.  Our next guardian is a Temporal Warden Minotaur, and it looks like he�s brought some friends with him. Temporal Hounds are a sustained summon similar to Doomed Shadows � as long as the skill is sustained, one will automatically be summoned up to the maximum of three every few turns. They can teleport on command and breath a crippling Time Breath when the appropriate skills are leveled up.   We find the Corpsebow just lying around on the ground. It�s a fun bow if you can find blight-based arrows, can be used in place of a staff for certain Corruptor builds, and actually grants additional bonuses to Undead users � though since we have no blight-based skills, we aren�t going to be leveraging those bonuses.  This pink blobby thing is a Bloated Horror, another common horror. These guys are mind-based horrors � their main attacks of choice are Mind Sear, Telekinetic Blast and Mind Disruption. Like crystals, these guys are completely immobile, and their main method of transportation is Phase Door.  Our fourth guardian is a Doombringer Dolleg. Dollegs are bulky demons whose most notable trait is their Acidic Skin � meeleeing them causes you to take acid retaliation damage, with a chance to disarm you.  Our fifth guardian is a Berserker fire drake hatchling. Oh well, it�s a nice change of pace from all the doombringers.  And our final guardian is a Gunslinger Devourer. We probably are getting a little careless in fighting them up close, but with their 600% shot speed, we�d have a pretty hard time dodging their shots even at maximum range.  Anyway, now for the puzzle. There are six orbs at the end of the corridor, each of which only becomes activable when their corresponding guardian is killed. An activable orb spits out this message if you interact with it. Activate them in the wrong order and�  An array of randomized enemies pop out. This can be cheesed in a number of ways � firstly, almost any enemy type can spawn in the Ruined Dungeon, so spamming an orb enough times will eventually get you most Alchemist ingredients. Necromancers can also come here to harvest souls, and Possessors for rare bodies. Finally, killing the enemies spawned by orbs will provide you with EXP if you�re tedious enough to keep spinning that roulette, though that�s a bet you lose more often than not � the orbs will almost certainly spawn something way beyond your ability to handle eventually.  SUCH AS THIS SAW HORROR OH GOD. Saw Horrors are the aforementioned bigger brothers of Blade Horrors. They hit harder, hit faster and can easily shred us to death with a storm of saws. We run away as fast as we can and beam it to death slowly from a very, very safe distance. Well, that�s definitely enough demonstration. So what�s the �right� order? Let�s check out some of these signs scattered around the dungeon.    If you�re old enough, you might recognize this as a variation of the Dragon Slave incantation from Slayers. So how does this help us? Let�s look at the orbs.       The answer should be fairly obvious, but just in case it isn�t, the order is: darkness orb, blood orb, time slowing orb, icy orb, dark thoughts orb, corruption orb. There�s another version of the puzzle that can spawn, but that one�s not too difficult to figure out either.  Completing the puzzle opens the locked door, which promptly unleashes a various group of assorted low-level demons and horrors.  This place usually offers a decent selection of loot. We pick up a few useful schematics, some miscellaneous items, and this particular masterpiece:   Charming. We also pick up our guaranteed artifact from the center of the room.   Merkul�s Second Eye inflicts Arcane Eye on enemies you strike with it, as well as granting arrows a shot speed bonus. Cute, but a niche item at best.  This sign reveals the true purpose of the Ruined Dungeon � an elaborate entrance to the Infinite Dungeon. The Infinite Dungeon is, as implied, a never-ending dungeon where your only goal is to survive for as long as you can until you�re ultimately taken down. There are some ID-specific bonuses that you can earn � most notably, you can level up above level 50 and increase your skills above talent level 5/5 should you pass that point. Some people enjoy it, though it�s personally not the mode for me. Anyway, that�s about all there is to the Ruined Dungeon unless we want to head into the ID, and we don�t want to do that right now. Moving on.  Dogroth�s Caldera is located below the Old Halfling Ruins, in the mountains. It only has a 30% chance of spawning when you hit level 25 in any game, but a 100% chance of spawning for a Yeek.  We spawn in and are immediately confronted with an Orc High Cryomancer. Jeez, we haven�t even fought the regular variant yet. Orc High Cryomancers know a variety of hard-hitting cold spells, though thanks to our stun/freeze resistance, their most dangerous ability is neutered.  And here�s another orc who decided he wanted to get in on the ice spell action and took night classes in necromancy. This isn�t even supposed to be an orc-based zone!  We find the first bit of Caldera lore. This might be a good time to talk about Dogroth Caldera�s main gimmick � one which we�re completely missing out on. Both floors of the Caldera come with timers � a 600 turn timer for the first floor, a 50 turn timer for the second. The first floor is relatively easy to complete within the time given, the second floor much less so. When the time runs out, your character is plunged into a waking dream � essentially a small puzzle dungeon where you�re put in charge of a different character and given an objective to complete. Succeeding means you wake up with no ill-effects, failure means that you lose 70% of your HP over the next few turns. It�s not too difficult to ride out as long as you pay attention to the timer and try not to fall asleep when enemies are near. There are two possible waking dreams � the lost man dream and the mouse dream. In the former, you�re a lost man in a building filled with yeeks that will either turn into hostile ghouls or �your wife� when interacted with (a variant orc broodmother, which is probably very Freudian). To complete the dream, you have to find �your wife� and defeat her. There are a few touchstones that will heal you when touched and disappear, and successful completion is mostly based on finding �your wife� in time and careful touchstone use. In the latter, you�re a mouse trapped in a large labyrinth filled with hostile cats. You have no way of defeating them � you have 1 HP, and your only skills are Stealth, Evasion and Tumble. In order to complete the dream, you have to get to the other end of the labyrinth and escape while avoiding the cats. This one is very heavily luck-based, and will probably take a few tries if you want to complete it properly. However, there�s a way to bypass that altogether. As the lore obliquely hints, the waking dreams are caused by the strange misty fumes of Dogroth Caldera. If you obtain a belt/lamp that grants unlife and also unbreathing � or happen to be an unbreathing skeleton � you gain complete immunity to the Caldera�s effects (though sadly not the Caldera�s more commonplace dangers).  Speaking of more commonplace dangers, venom dragon families are a common sight here. This one is headed by a Venom Wyrm � in addition to Corrosive Breath and Acidic Spray, they also know Dissolving Mist (an acid-based AOE centered around themselves) and Dissolve (a 4-hit melee combo that does pure acid damage).   More Caldera lore. I�m kind of running out of things to say about them except �those sure are some spooky dreams this guy is having�, which seems slightly redundant.  Oh boy, a Gunslinger Duathedlen (It�s that humanoid patch of darkness with a lifebar, in case you missed it). Duathedlens are amongst the most annoying types of demon � being darkness demons, they have high darkness resistance, an affinity to darkness damage and can cast a wave of magical darkness to unlight tiles. Tiles unlighted in this manner won�t be automatically lit by a lamp, and can only be relighted via Sun Infusions/Illumination or a similar effect. If you don�t have any of those, enjoy fumbling around in the darkness while the duathedlen runs circles around you casting Blood Grasps. Fortunately, this one prefers to just shoot at us instead � the slightly less annoying option, in this one particular case.  The second floor of the Caldera is a big wide-open space broken up by a few trees, similar to Alt Daikara 4. Aside from the Venom Drakes/Wyrms, not too many enemies here have ranged attacks, so it�s not quite as much of a challenge here as it was there. If we weren�t a skeleton, though, we�d have to deal with possibly losing 70% of our health every 50 turns, which could be quite the challenge.  Yet more Caldera lore. Ominous.  The water in the central lake is poisoned, and will attempt to inflict poison if we step in it. We�re a skeleton and thus unaffected, but we do take a slight bit of nature damage for every turn we stand in it.  At the end of Dogroth Caldera 2, we find the final boss of the Caldera, the Mindworm. The Mindworm is a Thalore solipsist with a focus on mind-damage and sleep-based talents. Annoyingly, while we aren�t affected by the waking dreams, we are still affected by the zone�s passive effect, Heady Scent, which lowers our mind and sleep resistance. It�s a good thing we�ve been lugging around the Eye of the Dreaming One all this time � Sleep does nothing to us thanks to Lucid Dreaming.  Without being able to put us to Sleep, the Mindworm is a lot less threatening. The rest is mostly a matter of range � if we stay far enough we can clip him with Attenuates, whereas he can only hit us with his basic Mind Sear at that range. Once the Mindworm falls, the timers disappear, allowing you to finish up the rest of the Caldera exploration in peace.  He drops the last bit of Caldera lore. As you might expect, killing the Mindworm unlocks the Solipsist class � but only if you�ve completed both waking dreams successfully as well. He also dropped a randart hat we have no real use for, unfortunately. Oh well, his associated artifact wouldn�t have been useful to us either � it�s a mindstar that boosts mind damage and gives a large bonus to Solipsist mind attacks.  Behind the Mindworm is the Altar of Dreams, which can be activated to take you into one of the two waking dreams. This used to kill you if you failed to complete a dream, but has since been changed to allow you to try as many times as you want. There's still no reward for us should we choose to do so, though. That�s about it for this update. Next time, we�ll probably finally get around to the special dungeons. Inadequately fucked around with this message at 16:30 on Jul 24, 2017 |
|
#
?
Jul 24, 2017 11:24
|
|
|
For the record, I did the Altar of Dream yesterday and had to do the (goddamn) mouse dream like thirty times to get it right and unlock Solipsist. I can confirm you don't lose a life for failure.
|
|
#
?
Jul 24, 2017 16:07
|
|
|

|
| # ? May 15, 2024 19:49 |
|
|
Danakir posted:For the record, I did the Altar of Dream yesterday and had to do the (goddamn) mouse dream like thirty times to get it right and unlock Solipsist. I can confirm you don't lose a life for failure. Oh, that's good to know. Update changed to reflect that.
|
|
#
?
Jul 24, 2017 16:30
|
|