

|
Either I wiped that section from memory or I never ran into it. Either case, you made the best of it.
|
 #
?
Aug 13, 2017 21:03
#
?
Aug 13, 2017 21:03
|
|


|

|
| # ? May 15, 2024 19:55 |
|
|
Oh my god that's loving amazing. I never expected that, 10 out of 10.
|
|
#
?
Aug 13, 2017 21:07
|
|


|
That's exactly as much gravitas as that section deserved.
|
|
#
?
Aug 13, 2017 21:19
|
|

|
Sage Grimm posted:Either I wiped that section from memory or I never ran into it. There's also no real in-game rewards for the questline. Unless you're trying to unlock Doomelf (as mentioned before) or you're using a mod to put it on the map, you're usually far better off just ignoring the whole Dark Crypt period. It's a total deathtrap.
|
|
#
?
Aug 13, 2017 21:38
|
|


|
Andou posted:A rogue-like is the last place I would expect a wish-fulfillment scenario. On the contrary, roguelikes have a long and storied tradition of wish fulfillment.  
|
|
#
?
Aug 13, 2017 21:46
|
|

|
At least Melinda isn't picky. Female Yeek Brawler? She's down for it. Ogre corruptor? That's her kink!
|
|
#
?
Aug 13, 2017 21:52
|
|

|
I was interested in the LP before, but now I am loving it. Skeletor found his own Evil-Lyn! Or her own, it's hard to tell with skeletons unless you look close at the hips, and that's rather rude.
|
|
#
?
Aug 13, 2017 22:19
|
|

|
Inadequately posted:On the contrary, roguelikes have a long and storied tradition of wish fulfillment. You know, I was wondering if anybody was going to make this joke, because they really do, as far back as Nethack. (I don't think Rogue had wishes?)
|
|
#
?
Aug 14, 2017 20:40
|
|
|
Inadequately posted:On the contrary, roguelikes have a long and storied tradition of wish fulfillment.
|
|
#
?
Aug 14, 2017 21:26
|
|
|
Deceitful Penguin posted:what happens if you wish for true love or happiness 
|
|
#
?
Aug 14, 2017 21:45
|
|

|
Would have figured the Nethack devs would have linked it to summoning a succubi/incubi. Guess they're classier.
|
|
#
?
Aug 14, 2017 22:12
|
|
|
It would be better if you wished for happiness and NetHack exited the program and deleted your save, IMO.
|
|
#
?
Aug 14, 2017 22:23
|
|
|
I think you captured the essence of the Melinda arc.
|
|
|
#
?
Aug 14, 2017 23:44
|
|


|
 We�ve been putting it off long enough. It�s time to go to Dreadfell.  Dreadfell was once the final dungeon of the game. It�s appropriately long � at nine storeys tall, it�s over twice as long as any dungeon we�ve previously completed this run. Admittedly, it�s not too difficult at our level � we�re currently a little overleveled for it, actually, though that advantage will soon peter out as we head further and further down. So what does Dreadfell contain? Well, undead, mostly. Undead on every tier, of all shapes and sizes, on every floor of Dreadfell. It�s actually a bit of a slog once you get used to it � undead don�t get noticeably tougher as you descend the dungeon, which can make it easy to forget what floor you�re actually on if you�re not paying attention.  Undead aren�t the only enemy type we�ll be facing, though. The Orc Grand Summoner is one tier above a regular orc summoner. Still not especially threatening, but can waste our time with summons that get in the way.   Speaking of summoning, look what we found nearby. The Great Caller is the ultimate summoner mindstar � not much use as a weapon, but it boosts almost every aspect of summoning. If you feel like having fun with vaults, dual-wielding Great Callers as a summoner makes for an easy stroll to the endgame.  On the second floor, we get a loremaster escort. Loremasters aren�t associated with any particular tree, but give all-round bonuses instead. Escorting them successfully would be nice, but that can be hard to do in Dreadfell. We can�t even block his way in a corridor safely, because of all the enemies that can walk through walls.  Fortunately, the portal was close. As you can see, the loremaster gives you a choice between a +2 bonus to any stat, or the three skills on offer. We pick up Mind Sear � it�s a basic mind damage beam with a very low cooldown. It doesn�t do awful damage because of our high Willpower, but it�s probably not going to be a major component of our damage. Still, it can be a useful emergency skill when our Paradox is dangerously high.        Hey, someone dropped their undead-hunting guide nearby. Handy.  Eh, it�s still no Club Club Club.  Well, that�s rude. Explains the skeleton party I ran into earlier, at least.  Speaking of skeletons, they�re still one of the more common enemy types around here. Despite that, it�s still a good idea to be careful around them. Especially Skeleton Mages � Manathrust can still really hurt. Also, all the skeletons around here open their fights with Bone Armor, which makes taking them down a bit of a slog.   People keep dropping their �how-to� guides around here. Must not have been very useful information, all things considered.  Apparently we�re not the only fans of undead poetry around these parts.  Elder Vampires are one of the highest-tier vampires around. They can use Forgery of Haze to clone themselves, and summon more vampires with their Summon skill. Pretty annoying to take down in melee thanks to their high Defense, and the light retaliation damage from Phantasmal Shield can really stack up if you rely on multi-hit moves.  We found a new field effect. The Protective Aura grants us bonus armor and physical save while standing in it. Slightly useful if we can take advantage of it.  Alchemist escort on Dreadfell 4. Alchemist escorts are funny � they�re near invaluable for some specific builds, practically useless on others.  We started off surrounded by undead, so things were a bit touch-and-go there. Fortunately, we have access to Healing Light, so as long as the alchemist survives a skirmish, we can heal him up. You might have noticed he hasn�t moved. That means that the path to the portal is blocked by a door somehow. Good news for us � we can clear out the rest of the floor without worrying about the escort getting into trouble, for the most part.  We found the portal, now all we need to do is wait for the alchemist to catch up. Also, there�s a neat prize next to it.   It�s a neat axe, but there�s not that many items that boost cold damage, so it tends to falter in the damage department compared to a regular axe.  Escorting the alchemist offers us a choice of skills from the Stone Alchemy or Staff Combat tree (or the trees in question). The latter can actually be picked up from the staff shop in Angolwen should we so choose, so there�s no real reason to pick it up here. However, if we pick up a point of Channel Staff or Staff Mastery, our final Staff Combat mastery level would be higher if we chose to learn the tree from Angolwen. We don�t really need Staff Combat, so we probably won�t. Stone Alchemy is taken mostly for the one skill that allows you to imbue gems into your armor, granting you the associated gem bonus. As mentioned in the prodigy post, you pretty much need to take Crafty Hands to use this skill to its full potential, and it�s still going to cost you at least one cat point and a whole bunch of generics. Whether that�s worth it or not really depends on the gems you have. If you betray the alchemist to Zigur, things get more interesting. The alchemist will offer Psiblade-related skills instead, and picking up a point of Psiblades will boost your final Psiblade mastery level when you learn the tree from Zigur. It�s a very minor boost (+0.1 talent mastery), but every little helps. As a result, alchemists are one of the most valuable escorts a mindstar user can find.  So here�s a neat little detail. The thought-forms of solipsist rares take the form of a ghostly version of whatever spawned them. This makes sense for a ghoulking, but can be quite the sight when an ectoplasmic venus flytrap rushes up to you and stabs you in the face.  These mini-vaults are common in Dreadfell. They aren�t actual vaults, just rooms full to the brim with undead on every square, and won�t give you any warning if you try to open them. They�re entirely optional encounters for the most part (the times when you take a staircase down directly into one excepted), but what kind of adventurer would we be if we didn�t press our luck? Not that this particular room was much of a threat � a couple of Attenuates wiped them out easily.  On the fifth floor, we find more undead poetry. Seems like Club Club Club might finally have a worthy challenger.  That�s more like it. This room contains a couple of vampire lords (more or less on par with Elder Vampires), an Emperor Wight and a couple of enemies we don�t have enough see invis to actually spot. Can be a bit of a challenge, mostly because that wight is almost certainly going to land Confusion on us when we open that door. Fortunately, we�re all prepared.  Hidden Resources allows us to Haste ourselves, stop time and land a few debilitating field effects before the start of the battle at no cost. When time resumes, we try for an anomaly and get lucky with a Slow � slightly redundant with the gravity field, but certainly doesn�t hurt. We can now back away and wait for any survivors to come towards us.  Ugh, the invisible enemy in question was a Dreadmaster. Dreadmasters don�t do all that much damage by themselves, but they come with Silence, Disperse Magic, Mind Disruption and Burning Hex, as well as being capable of summoning other Dreads. Their favourite tactic is to hang out in the walls, invisibly harassing you with spells while watching summoned Dreads do all the work. Thankfully, this one�s almost dead and one more Echoes from the Past takes it out.  Lotta necromancer rares around these parts. Does the Master know you�re muscling in on his territory?  As you can see, the Emperor Wight/Vampire Lord combo starts getting fairly common from this point on. Thanks to Hidden Resources, we�re immune to the worst of their threats (confusion, specifically).  Lotta poets around these parts.  Ominous. Wonder what he found?  We run into our first mage-hunter on floor 7. Orc Mage-Hunters don�t have much in the way of offensive skills, but they come with very high antimagic skills and are one of the few enemies to have Antimagic Shield sustained. It�s annoying, but could be worse if we weren�t mostly Paradox-reliant, which isn�t affected by his manaburn. Our other magic resources means we�re still going to take a hefty amount of damage if he chooses to use Mana Clash, though.  Oh boy, our first proper vault. Vaults in Dreadfell can be quite the challenge, but also contain some nice loot to make up for it. With enough practice, you soon learn which vaults are loot pinatas and which vaults are way more challenging. This one mostly falls in the former category.  Most of these enemies are no threat, but we have to be careful of these orc high pyromancers/cryomancers. They can do some serious damage with their harder-hitting fire spells, and like to phase door away when we get close to them.   He dropped some nice loot, though. The Lightbringer�s Wand goes in our tool slot, and we might actually run with it for the remainder of Dreadfell � darkness resistance and spell save is going to come in handy soon, and a summon is always a helpful distraction, though regrettably it isn�t an instant summon.  These Heavy Bone Giants are a step up from regular bone giants, but a step down from Eternal. They�re slightly bulkier than the regular variant, but thankfully they don�t come with Reassemble.  Also, more elite orc enemies. It quickly became clear we wouldn�t last in an outright slugfest in that room, so we beat a hasty retreat, allowing them to come to us one by one.  This tiny room in the center is supposed to contain a Dreadmaster. Of course, since the dreadmaster can walk through walls, most of the time it will just charge through the walls straight at you once alerted.  More bone giants in this room, including the dreaded Eternal variant. Some nice loot, though.     The Evermoss Robe grants gigantic bonuses to nature damage, and it�s the obvious choice for any oozemancers who aren�t going for massive armor (not as odd a choice as it may sound, as equilibrium isn�t affected by fatigue, and strength/willpower/cunning is a decent mindpower build thanks to Superpower). The Calm, on the other hand, is pretty clearly a lightning archmage robe. Lightning spells/sustains used to be extremely expensive mana-wise, but the costs have been tuned down as of 1.5 to be more in line with the other elemental schools. It�s a fun playstyle that�s certainly worth a try sometime. The other room contained more bone giants and an orc wyrmic. Unfortunately, the staves here were all pretty common fare. Moving on.  On floor 8, we run into a Spire Dragon. These guys are fancy dragons with a few mindslayer skills. They�re not especially tough compared to high-level wyrms, but they have a couple of tricks up their sleeve. Their innate resistance and Kinetic Aura makes them surprisingly bulky, they move at 130% global speed, and they come with the Constrict skill, which pins you and slowly drains your air over many, many turns. If you don�t have a physical debuff-clearing move, you can die a very embarrassing death that way.  The last and final floor of Dreadfell lies ahead of us. Before we go ahead, we�ll need to get prepared. There�s one more advantage we have yet to leverage.  With the defeat of an elder vampire, we�ve now gathered all of Ungrol�s requested ingredients. Time to cross our fingers.  And with that, we�re handed the Elixir of Foundations, which we promptly guzzle down for the extra two generic points.  Looks like while we were gone, Agrimley managed to complete a potion by himself, though thankfully not the one we had our eye on. Before we head down to Dreadfell�s final level, let�s take a look at our equipment, since someone mentioned they wanted to see it.  For day-to-day combat, we�re going with the Helm of the Dominated for that bonus spellpower and silence immunity. If we run into temporal-resistant enemies, we switch to our resistance-piercing hat. We�ve attached an Air Recycler tinker to it, for even more silence resistance.  We don�t get much use from the vim bonuses, but the high spellpower, spell crit chance and bonus critmult come in very handy when combined with our armor. We don�t have any weapon tinkers attached to it � all the ones we have just grant on-hit bonuses, which go to waste on a weapon we don�t intend on hitting people with.  We�re still toting around this old t2 armor because of the +30% critmult it gives us, though the Spiked Attachment tinker attached helps alleviate the armor issue a little. Our main defense against weapon-users is still �don�t get hit�, though.   The former is worn mostly for the stun/freeze resist and spell save, the latter for the blight resist and confusion immunity. They�re not great rings, but most of our other rings are pretty meh by comparison.  We�re wielding this one mostly for the emergency heal. We don�t really have very much else better, anyway.  Bonus life, voidstalker bonuses, and a free teleport (which I keep forgetting exists). Plus, we need something to hang our Grounding Strap on.  These old things are still pretty useful. Bonus temporal damage, occasional free Dust to Dust. We have the Iron Grip tinker attached to them, which passively grants us Disarm immunity and can be activated for an armor-sundering attack. Being disarmed isn�t as crippling to us as it would be on weapon-users, but we still want to avoid it.  We�re wielding this belt mostly for the bonus encumbrance and HP. It�s probably not the most optimal choice, but it sure is convenient. The Fungal Web attached to it heals us whenever we use a salve, so we can cure debuffs and heal up at the same time.  These boots give us stacking spellpower on spell crit and bonus movement speed, which is very helpful in areas where our teleporting is limited. The Kinetic Stabilizer tinker attached to them grants us bonus physical save and immunity to enemy teleportation.  We�re still carrying around the Summertide Phial � we haven�t really found anything better. And as mentioned earlier, we�re running with the Lightbringer�s Wand in our tool slot for the bonus darkness resistance and spell save, which should come in handy in a bit. That�s about it for our preparations � let�s head on downwards.  We enter the ninth floor and�oh, who�s that over there?  It�s the Master! He comes with the standard necromancer loadout, but has a couple of extra bonus features. He likes to open with Freeze and/or Congeal Time to debilitate foes, can blast enemies back with Manathrust and has no need to worry about wasting mana/souls, thanks to Hidden Resources. Good thing we spotted him before he spotted us.  Time Stop allows us to get one hell of a jump on him. We open up with a Gravity Well/Attenuate combo, then shield up and wait to see how things play out.  There�s a bit of a back-and-forth before he finally summons minions. Once we get some space we�ll have to switch to our resist-piercing hat � he spawned with surprisingly high Temporal resistance.  We can kill off his minions without too much issue, but they come back as will-o-wisps almost immediately. We�re probably taking more damage from will-o-wisp explosions than anything else in this fight. On the plus side, we can win any prolonged battle of attrition � the Master has no way of regenerating health.  Down to the last 3% of his health. We might seem to have this well in hand, but�  �he immediately respawns at full health, but without his sustains activated. Helpful, but we can�t do enough damage to kill him before he restarts them. Not that it matters much � his last batch of minions are still around, so he couldn�t summon any more anyway.  Being a skeleton pays off once more. The overlapping blight areas would be an annoyance on any other race, but here it�s keeping us nice and healthy while we blast away at the Master.  At this point, we don�t really have enough space to regenerate Paradox, so we�re just treating it as our second lifebar and fighting only when Hidden Resources is active.  One more Echoes of the Past might do it. Unfortunately, Hidden Resources is down, so we can�t risk a See the Threads cast on top of it.  Success! Now, we just need to clear out the last of the stragglers, and get some breathing room for Paradox regeneration.    We pick up a very interesting staff from the Master�s body. Right now, it just looks pretty ordinary, but something tells me there�s more to it than meets the eye.  We pick up another fun artifact. The Wheel of Fate is a fun artifact ring from the Ashes DLC. Every three levels, you can �spin� the ring to gain a set of randomized bonuses.    We�ll stick with that last one for now. As with any gamble, it�s best not to get too greedy. As long as the ring still has one spin on it (or if you�re level 50), you can take it off, so it�s a good idea to keep track of how many times you�ve spun it. The ring�s bonuses scale with your current level and zone, so we�ll get better results in later dungeons. We clear out the rest of the floor, finding another vault in the process. Wonder what this one is?  Oh boy. If this is the vault I think it is, we�ll have to watch our step.  Yup, it�s the acid vault. If we took another step, we�d be promptly caught in several overlapping wretchling acid clouds and buffeted around by a dozen acid breaths from hidden venom drakes and wyrms. We managed to draw the wretchlings out, but we�ll need to be a bit more careful with the wyrms.  Oh, and the Worm that Walks. I should probably have mentioned that one. Worms that Walk are basically super-reavers. They shred adventurers up with dual-weapon skills, completely resist blight damage, and heavily resist acid damage. Their most notable trait is dropping Carrion Worm Masses whenever damaged, which will explode into a blight pool that heals the WtW. They�re monstrously tough foes for melee characters to defeat, and a sign that you should probably skip the zone on a corruptor or reaver.  We damaged them a little and ran behind a materialized barrier just in time. That should ensure they chase after us, rather than us having to chase them down. This vault is a very dangerous vault, but if you�re prepared, it�s entirely doable. Of course, it would be nice if those preparations included acid resistance, but we didn�t bring any of that along with us.   One of the prizes of the vault. A fun pair of boots for fire mages, but you have to remember to take them off while in towns. The flaming trail will burn friend and foe alike. There wasn�t much else of interest in the vault except for schematics that we already knew, though. Oh well, time to recall out.  I say, what�s this?  Well, guess we�re doing this. The ambush is meant to be an �unwinnable� encounter, although winning isn�t especially difficult if you�re ready for it, and the game�s plot will be adjusted to take that into account. If you die during the ambush while Ukruk is still alive, you lose the Staff of Absorption, but you don�t lose a life � presumably Ukruk was too excited to bother with finishing you off. If you kill Ukruk but die to the other orcs, however, you will still lose a life, so take that into account. Ukruk himself is an especially high-leveled bulwark, but only comes with a small set of skills.  As you can see, the archers and Ukruk are the only real threats � the other orcs just get in the way for a short amount of time. We can dodge the arrows if we stay far enough away, but we can�t move and cast spells at the same time, so eventually we�ll just have to take a hit and hope our shields can withstand it.  Finally, it�s all down to Ukruk himself.   He dropped this helpful note, which explains some of the staff�s backstory. Incidentally, the note refers to three unique undead that have a chance of showing up in Dreadfell, but we didn�t encounter any of them this run. A shame � they tend to liven up an otherwise uneventful dungeon.  It may not be immediately obvious where to go, whether you lose the fight or not. The answer to both is this house in the center of last hope.     And with that, we have to give up the staff anyway. This also opens up a new dungeon. Before we take it on, we�ll finish up one last bit of business here in Maj�eyal.
|
|
#
?
Aug 15, 2017 17:03
|
|
|
Something amuses me about Hasting yourself and then stopping time. I know the two aren't logically mutually exclusive, but something about "I speed myself up relative to everyone else. Then I stop time." just feels like it shouldn't work on some level. You're moving faster compared to time literally not moving at all than you would be otherwise, even though time isn't moving in either case.
|
|
#
?
Aug 15, 2017 17:42
|
|


|
I'm really disappointed that the three unique Dreadfell undead aren't guaranteed spawns, though when Borfast spawns in a Vault suddenly multiple levels above his usual tier, hoo. That can sting.
|
|
#
?
Aug 15, 2017 18:33
|
|
|
PurpleXVI posted:I'm really disappointed that the three unique Dreadfell undead aren't guaranteed spawns, though when Borfast spawns in a Vault suddenly multiple levels above his usual tier, hoo. That can sting. Oh, the Dreadfell uniques. Of the three, I think Aletta has ruined me on the most playthroughs - Borfast is tougher to kill, but Aletta has dropped the lockdown on far too many characters for her to be anything other than a KILL ON SIGHT level threat for me. And that's on Normal! I shudder to think of what she's like on harder difficulties. Filio is mostly a pain in the rear end for any characters I manage to get to Dreadfell with slightly lacking Accuracy, since he can be a right motherfucker to hit, and that goes double if you're melee. There are some uniques I've seen mentioned (like, in artifact names and descriptions and so forth) that I've never ever seen. Kind of a shame; it'd be nice if the uniques spawned a little more often. Maybe I just need to step it up to Nightmare? (I have no idea if random uniques appear more often on Nightmare)
|
|
#
?
Aug 15, 2017 19:17
|
|
|
What's this about keeping track of spins on the Wheel of Fate? I thought it only got a new spin three levels after you used the last one up, so there's nothing to count regarding how many times you've used it.
|
|
#
?
Aug 15, 2017 19:21
|
|

|
The description is a little misleading, you actually get one spin per three levels you have. For instance, if you found the ring at level 30, you'd be able to spin the ring ten times right then and there. As long as the ring has one spin left on it you can unequip it, but once you're out of spins you're stuck. It's a good idea to keep at least one spin on it so that if you find something better right away you aren't stuck with it for the next three levels.
|
|
#
?
Aug 15, 2017 19:39
|
|
|
Inadequately posted:The description is a little misleading, you actually get one spin per three levels you have. For instance, if you found the ring at level 30, you'd be able to spin the ring ten times right then and there. As long as the ring has one spin left on it you can unequip it, but once you're out of spins you're stuck. It's a good idea to keep at least one spin on it so that if you find something better right away you aren't stuck with it for the next three levels. In that case, it's not just misleading, it outright lies - seriously, it says 'Can only be done three levels after the last reroll. Cannot be unequipped unless a reroll is available, or you are level 50.' right in the screenshot. Good to know. I've never used it because I assumed I would always be stuck with whatever I spun for three levels.
|
|
#
?
Aug 15, 2017 19:53
|
|
|
So can you do something else with the staff? Maybe suck some cool powers outta something?
|
|
#
?
Aug 15, 2017 20:54
|
|
|
Inadequately posted:The description is a little misleading, you actually get one spin per three levels you have. For instance, if you found the ring at level 30, you'd be able to spin the ring ten times right then and there. As long as the ring has one spin left on it you can unequip it, but once you're out of spins you're stuck. It's a good idea to keep at least one spin on it so that if you find something better right away you aren't stuck with it for the next three levels. Can you use See the Threads before spinning it to maximize your chance of getting something awesome?
|
|
#
?
Aug 15, 2017 21:02
|
|

|
Try giving the staff to that guy who wants a magic artifact for his studies.
|
|
#
?
Aug 15, 2017 22:17
|
|
|
Serious question, I've got about 300 hours in this game and I only know a fraction of what is shown here. Am I just a slow learner?
|
|
#
?
Aug 16, 2017 04:40
|
|

|
Unimpressed posted:Serious question, I've got about 300 hours in this game and I only know a fraction of what is shown here. Am I just a slow learner? No. There are a million fiddly things and easter eggs, a lot of them are not clearly explained, and the game isn't hard enough to demand you figure all of them out.
|
|
#
?
Aug 16, 2017 04:52
|
|

|
The Master�s death triggered a wave of restocking across Maj�eyal, so before we continue on, let�s go shopping.  The Angolwen jewelry store got their hands on an artifact ring. The Black set is an interesting set of artifacts introduced in Ashes. There�s a �The Black ___� item for almost every equipment slot, and they primarily give doombringer/demonologist associated bonuses, though other classes might find them useful as well. In addition to their inbuilt bonuses, all Black items also grant you a small amount of additional Shadow Power, alongside an additional bonus that scales with Shadow power. As a result, you don�t have to wear the full set to gain its benefits, unlike many other item sets, but the more Black items you wear, the larger the additional Shadow Power bonuses grow. The Black Ring would be a decent ring if not for that one crippling defect � the spell proc. Our gloves grant us an occasional Dust to Dust proc on spellcast, which is a straightforward beam spell and thus a relatively safe spell to proc. Darkfire, on the other hand, is a large AOE fireball that does darkness and fire damage to anything in its explosion radius and thus not a safe spell to proc at all. It can be made to work on a doombringer/demonologist, who have high innate darkness/fire resistance thanks to their skills and can boost it even further with additional Black items. On most other classes, however, it�s a way to quickly blow yourself up when you aren�t paying attention.   The light armor store in Derth got their hands on the Rope Belt of the Thaloren. It�s a decent statstick, but there�s nothing else to it, really.  The infusion shop in Last Hope now stocks Heroism infusions, though those are still off-limits to us.   The dagger shop in Last Hope now stocks the Dagger of the Past. It�s part of a set of items for Temporal Wardens, and gains additional bonuses when paired with the Sword of Potential Futures. If we ever find a good shortstaff that surpasses our current staff, we might consider it as an offhand item. Aside from those items, there was nothing else of particular interest. I was hoping for a good pair of dispersion gloves, but the RNG was not kind today. Oh well, moving on.  The Ancient Elven Ruins are the highest-tier dungeon in Maj�eyal, though if you�re confident you can even do them pre-Dreadfell. They�re another one of those side dungeons that appear in out-of-the-way spots like this one.  What�s in them? Mummies, mostly. Mummies are a unique type of Shaloren undead exclusive to this dungeon. They come with high Shaloren racials and decent resistances, but are slow and weak to fire.  The ruins are a tangled labyrinth of small corridors, but if you�re confident and/or lazy (of which I am both), you can just hit the �autoexplore� button until you find the next enemy.  The Shalore have been working on that �immortality� thing for a long time. Some attempts were more successful than others.  SAW HORROR ALERT. Annoyingly, it proves to be tough enough to shrug off our first couple of Attenuates. We eventually gravity it down while staying far, far away, though it still manages to shave off over half our health through our shields, even at a distance.  Yet more mummy lore.  Animated Mummy Wrappings! How cute.  Killing them causes them to drop Mummy Wrappings. They�re a type of armor unique to the elven ruins that require Dexterity rather than strength, but all of them come with an inbuilt penalty to fire resistance.  Huh, haven�t seen that achievement before. Then again, Paradox Mage isn�t really my thing.  Ice sword, huh? We�ll keep that in mind.  Oh hey, there he is. The Mummy Lord is a bulwark with additional ice mage skills. We�ll want to stay out of melee range, because that sword of his can be very troublesome.  He also turns invisible all the time, though since he likes using Ice Storm and we have a whole lot of AOE/beam spells we can cast in his general direction, it�s not much of a problem. Let�s do the whole See the Threads routine � we haven�t done that in a while.   On timeline 1 he drops the Tree of Life. It�s a totem that grants high amounts of nature/blight resist, bonus nature damage and healmod. Unfortunately, as a skeleton, it�s worse than useless � if we try to wear it, that passive healing effect will actually damage us instead.   On timeline 2 he drops the Glacia. It�s an ice-themed gun that does bonus cold damage. As mentioned earlier, cold-damage boosting gear is uncommon, which somewhat limits its use, but if you do find some it can be made to work.   On timeline 3 he drops the Bindings of Eternal Night, a set of unique mummy wrappings. It comes in a set with a corresponding hat, but we�ve yet to find that. We�ll still go with this timeline anyway, on account of the fact that we have no need for an item that passively damages us or a gun.   Never mind, it was just lying five steps away around the corner.   Hmm. The full set bonuses are nice, but a lot of them are redundant with our innate skeleton abilities, and we don�t need bonus darkness damage. We�ll stick with what we have for now, but stash our new toys away just in case.  Ugh, luminous horrors. Good thing I still have the Lightbringer�s Wand equipped.  Oh hey, a wretch titan. We ran into one of their statues a while back, and now we�re fighting the real thing. They�re probably the weakest of the highest-tier demons, which isn�t exactly a searing indictment. Still, as long as we can stay out of melee range, we�re good.   We�ll have to tell Greynot to update his work if we ever find him.  Ohhh boy. While the wretch titan was probably the weakest of the highest-tier demons, the Champion of Urh�rok is on the other end of that scale. Champions of Urh�rok are high-level berserkers with a couple of extra distance-closing moves for good measure. Annoyingly enough, they know Spell Feedback despite it being an antimagic prodigy.  A saw horror sun paladin. I�m running away.  The fight is mostly a very, very long slogfest of tossing spells at him from as far as we can reasonably afford. Fortunately, he isn�t smart about using Path of the Sun to actually close in on us. One more Attenuate finishes him off.  Oh boy. In addition to resisting almost every single element, Multi-hued Drakes know every possible elemental Breath, as well as Poison Breath, Ice Claw and Wing Buffet. Multi-hued Wyrms are even more resistant than that, know said breaths at even higher levels, and come with Silence and Disarm just for good measure. Incidentally, we could use more Blindness resistance. Almost every attack that can blind us�does.  With the dungeon cleared out, we take this handy portal up to the surface. Incidentally, now that we�ve killed a multi-hued wyrm, we have one more bit of business to take care of.  Since we�re here, we might as well complete his final potion for him. Agrimley�s last potion grants bonus spellcrit, which would certainly be helpful.  Oh hey, we have all of those already.   For helping out with his last potion, we get Agrimley�s bonus reward the Infusion of Wild Growth. As an infusion, it�s useless to us, though few other characters would actually run with it over other infusions anyway. Still, going for another alchemist�s final rewards would have been an unlikely endeavor, with two of Agrimley�s potions already completed.  For our final Maj�eyal zone, we�re headed for the Sludgenest. This zone spawns in this area only 30% of the time, unless you�re playing a Thaloren, in which case it�s guaranteed. It can be a pretty dangerous zone, so we�ll keep our fingers crossed.  The first floor of the Sludgenest is a small forested area filled with random oozes. Not too much trouble for the most part, this rare Doomed ooze aside. If you�re not poison-proof, look out for the purple ones, though. It is a good reminder to boost our nature resistance, though. We switch back to our old standby of Penitence, and swap out our armor for the Evermoss Robe.  The second floor is far more interesting. The floor consists of small rooms connected by long narrow corridors, with a myriad number of oozes blocking the way. Every few turns, a nearby wall will turn into yet another enemy ooze, which only grow stronger and stronger as you slog through the dungeon. We need to find the staircase quickly, or things will turn out very, very bad.  And of course, if you end up in a dead end, you have to turn around and fight your way right back out.  We finally found the stairs (we�re standing on them, because we don�t want an ooze nabbing the spot). After regenerating as much paradox/health as we can under the circumstances, we head downstairs for the really hard bit.  The Corrupted Oozemancer is a powerful oozemancer troll with blighted summoning and extra-powerful oozemancer skills. To those who know what oozemancers are capable of, this might sound like cause for concern. That concern is well-founded.  It might be a good idea to go through this bit by bit, so we can see the full range of his capabilities. Slime: The basic offensive tree. Slime Spit is the big one, which allows him to fire a bouncing projectile of pure nature damage. Ooze: The oozemancer�s core gimmick. The more health an oozemancer loses, the higher the chance he has to spawn a Bloated Ooze upon taking damage, up to a maximum of three. Bloated Oozes have massive amounts of health and resistance, and all damage the oozemancer takes will be split between himself and his active oozes. They can also be automatically spawned without having to wait for damage with Call of the Ooze, and can be reabsorbed for an AOE manaburn attack that also boosts your all resistance by 40% for the next few turns. Moss: Moss talents generate a field of moss centered around the caster, which lingers for a few turns and inflicts debilitating effects on any enemies in them depending on the type of moss used. Moss talents are instant, but using one puts all others on a three turn cooldown (and the one used on a 20-turn cooldown). Mucus: The oozemancer�s other core gimmick. Using Mucus will cause the oozemancer to lay down a trail of sticky mucus whenever he moves, which can stack with itself and will heal/reduce the equilibrium of friendly units but poison enemy units crossing over it. The Living Mucus skill grants any patch of mucus the ability to come to life, forming a mucus ooze that can spit slime at enemies. Oozing/Corrosive Blades: The high-tier acid/nature damage trees. Both grant a basic acid/nature beam, a sustain that boosts your acid/nature damage and allows you to ignore the corresponding resistance, and a passive skill that raises your nature/acid damage by a stacking amount when using the opposite element. Corrosive Blades also comes with an acid mine talent, while Oozing Blades grants the ability to inflict a mental debuff that causes random skills to be set on cooldown whenever the enemy uses any talent. Blighted Summoning: His bloated oozes get Bone Shields, his Mucus oozes get Virulent Disease. Just to make our lives more difficult. Our one saving grace is the fact that he isn�t in direct line of sight, and doesn�t even have most of his sustains activated. While he gets himself up to speed, we continue landing AOE attacks on him. He�s down to his last sliver of health, and only now decides to pull out his oozes. Here�s hoping Attenuate does him in before he starts healing himself. Incidentally, you might have noticed we�re surrounded by Brittle Clear Oozes. They�re probably the most annoying ooze � their defining trait is being able to split at a much higher rate than any other ooze, turning a single-enemy into a room-clogging quagmire.  Attenuate didn�t kill him, but a couple more Dust to Dusts did. We�ll collect our prize as soon as we can get these oozes out of our way. If this is your first time killing him, this also unlocks the oozemancer class. We activate our Rod of Recall a little early before picking up our loot. This room also has the �walls turn into slimes� deal, and we don�t want to stick around for that any more than we have to. Naturally, slogging back through that second floor is not an option. No standarts, but he dropped an assortment of randarts that we�ll look at later in safer conditions. Now to just wait out our recalling.  Also, we found another necromancer guide lying around nearby. After strolling around for a bit more, we teleport back to the fortress and start checking out our loot.  Would be nice on a sling/gun user. Which we aren�t.  +3 physical ward could come in handy sometime, at the very least. We might hang on to this one. Incidentally, if wards haven�t been explained yet: using the Ward skill will grant us an element-specific ward that fades over a few turns, which blocks the next X damage instances of that element while the ward is active.  A voratun saw of warding. How odd. Not something we need, in any case.  Ooh, now this is a fancy ring. Bonus Magic, speed, spellpower, life regen�everything we could use, really. Well worth the effort. We promptly replace our ring slot that isn�t occupied by the Wheel of Fate. And with that, we�ve completed just about everything that we need to do over here. Time to go check out that dungeon the Elder opened up for us.
|
|
#
?
Aug 17, 2017 16:56
|
|
|
Mind Parasite can really be what wins you battles against bosses sometimes, as half their skills end up locked down within the first couple of rounds. I also wonder how strong the oozes actually get if you decide to COMPLETELY clear out a level of the Sludgenest, whether beating them at all is feasible, and whether they're gonna drop anything great enough to make it worth it.
|
|
#
?
Aug 17, 2017 17:23
|
|
|
There are more wards on that steamsaw than I've seen on, like, anything. Ever. I can't remember: does Ward have no cooldown itself? Given the numbers there, it seems like it just cares about the number of wards you have available to you.
|
|
#
?
Aug 17, 2017 18:00
|
|
|
PurpleXVI posted:Mind Parasite can really be what wins you battles against bosses sometimes, as half their skills end up locked down within the first couple of rounds. There is a cheevo I think for it?
|
|
#
?
Aug 17, 2017 18:43
|
|

|
I can't imagine how terrifying it would be to go into a place where the whole place is a big living organism and the walls are breaking off parts to come kill you. I'd be scared shitless that the whole thing was just going to come to life as a one big blob and I'd be inside it because I was in a hallway and it would just be eating me because at that point you're walking around in its belly. A place like the Sandworm Lair would be unnerving enough just with the cave ins, and at least those aren't actively malicious. Hell, when it's a big amorphous blob monster it's even more spooky than just a traditional Contra/DOOM style "The walls are made of flesh" deal, because at least those can't randomly just close in on you as a liquid with no warning.
|
|
#
?
Aug 17, 2017 18:48
|
|
|
There is also the thing that the corruption of "a proud defender of nature" is just never explained so random powerful people can just get hosed for ???? reasons.
|
|
#
?
Aug 17, 2017 18:58
|
|
|
Artificer posted:There is also the thing that the corruption of "a proud defender of nature" is just never explained so random powerful people can just get hosed for ???? reasons. Power corrupts, and absolute power corrupts absolutely. We just didn't know there was a stop at "evil master of slime monsters" along the way.
|
|
#
?
Aug 17, 2017 19:11
|
|
|
Why did you kill the Oozemancer, you monster! The Sludgenest is awesome. The slimes start easy, but the more get generated the higher level they become, and rares, uniques, and bosses start appearing in ever increasing amounts. Its the best place in the game by far to farm equipment if you can avoid being slaughtered. If you kill the Oozemancer they stop spawning though.
|
|
#
?
Aug 17, 2017 19:30
|
|
|
Zaodai posted:Power corrupts, and absolute power corrupts absolutely. We just didn't know there was a stop at "evil master of slime monsters" along the way. Oh I read corruption as "caught a brain bug" or "accidentally drank radioactive goo, mutated, and went mad" or something. Artificer fucked around with this message at 20:57 on Aug 17, 2017 |
|
#
?
Aug 17, 2017 19:30
|
|
|
Artificer posted:Oh I read corruption as "caught a brain bug" or "avcidentally drank radioactive goo, mutated, and went mad" or something. I'm sure it's meant to be there something corrupted his connection to nature magic or something like you say. I just like my explanation for the wordplay.
|
|
#
?
Aug 17, 2017 19:44
|
|
|
 After clearing Dreadfell and talking to the elder of Last Hope, the entrance to Reknor appears up in these mountains. Incidentally, the Dwarf starting town is right next to it, but it�s only accessible by dwarves.  Orcs and trolls are our main enemy here, for the most part. We haven�t been running into the higher-tier orcs outside of the occasional high pyro/cryomancer, but here�s where we�ll start encountering them in full force.  Well, that explains the bit about the �extinct� orcs. Damnit, dwarves.  Also, someone left their accounting ledger lying around.   We found the Rogue Plight lying on the ground. Aside from the bonus crit shrug off, there�s not that much else to it. We�re immune to two-thirds of its special effect, anyhow.  Oh hey, a mountain troll thunderer. In addition to being big and bulky, Thunderers also know Thunderstorm and Lightning. This one also happens to be a brawler and actually remembered to spawn without a weapon, so we�ll have to be careful around them.  And there�s one of those elite orcs we were talking about. Grand Master Assassins are high-level rogues notable mostly for their stealth and multiple poisons. We don�t have to worry about the latter, at least.  More tips for battling mages. It�s pretty useful advice, actually.   We find another artifact lying around. Colaryem�s attack speed increases with size and strength, maxing out at 125% attack speed. Some people swear by it, but I personally find it kind of meh.  More guides to mage killing. I don�t really have any pithy remarks for this one because goddamn.     I don�t know why there�s so much lore lying about on Reknor 1. Anyway, here�s more of Loremaster Greynot�s magnum opus. (You�re not really missing out much in between the lore � it�s mostly common trolls and orcs that we erase from reality long before they get into melee range.)  On Reknor 2, we run into an old friend. What are you buggers even doing here?  A duathedlen used his special attack to plunge this area into magical darkness. You can see its effects � our lamp only lights a radius 1 area around us, and the area doesn�t stay lit when we move on.  We activated some pedestals and got a dolleg wyrmic out of it. Not too shabby.   Ooooh. Un�fezan�s Cap is part of a top-tier chronomancer item set. If we can find its counterpart, we�ll be set for just about the rest of the game. Also, that dolleg kill pushed us over level 36, so that�s a new cat point for us. We promptly spend it on unlocking a fancy new tree. Let�s take a look at the new skills we just unlocked:  Rethread is a bouncing beam of temporal damage. We might invest in it more later, as it scales higher than our other damage beams due to being a higher-tier spell.  Temporal Fugue! We last saw this spell being used against us by multiple enemy Paradox Mages, and now it�s finally time to put it to use ourselves. We�ll go over some of the stuff we can pull off with it in a bit. 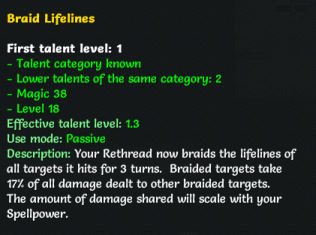 Hitting enemies with Rethread will now chain their lifebars together for a few turns, causing them to take additional damage. It�s more useful as a crowd-control measure than an anti-boss measure, but can be helpful with bypassing heavy resistances.  Oh, now this one�s a fun one. Successfully inflicting Cease to Exist causes the target�s temporal/physical resistance to be lowered by a large amount for the next few turns. If the target is killed during this time, the timeline will be unfolded, returning you to the point where it was first cast. Cease to Exist will still go on cooldown, though, so you can�t chain-CtE a crowd to death.  So what makes Temporal Fugue so useful?  Among other things, the fact that you can choose the skills your clones use. Your clones will try to stick to the allowed skills to the best of their ability, which vastly increases their efficiency. Some skills that combo well with Temporal Fugue: - Attenuate: Stacking it several times makes for a very long Attenuation duration, especially when combined with Seal Fate. - Gravity Well: Three overlapping Gravity Wells means a lot of slow-inflicting and a lot of physical damage instances, which wears away at even the toughest crowds. - Bathe in Light: Stacking three BiL healing areas can make for massive healmod boosts/shields, if you get lucky with it. - Echoes from the Past: The raw temporal damage done will be scaled down, but the bonus temporal damage that scales with an enemy�s life lost won�t. Temporal clones will spawn with any buffs you have currently active, so it�s a good idea to buff yourself up before summoning them. However, the Temporal Fugue cooldown won�t start until your temporal clones disappear � regardless of how long they last, you have to wait out the full 24 turns every time.   We recover a fancy dagger from an orc assassin�s corpse. The Moon-Star set is a solid mid-tier dagger set, but you probably have better options if you find it this late.  More dorf lore. The Age of Dusk was the period immediately following the Age of Spellblaze. There�s not much else mentioned about it � presumably everyone was too busy trying to survive to document it.  The Age of Ascendancy is the current age, the age that began with the defeat of Garkul and the end of the Age of Pyre. 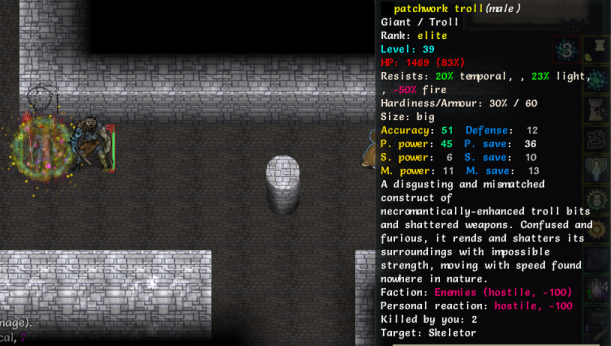 A patchwork troll! We killed one of these back in Old Forest, and apparently his buddies are now out for revenge. They�re still kind of a slog to kill, but nowhere as much as they were back then.  As a side note, the dwarf start has you starting off at the bottom of a side-passage in Reknor, with the objective to fight your way to the surface and reach the dwarf capital, Iron Throne. It�s a bit of a tough start, but surviving gives you a nice EXP boost.  Just how many of these things did Loremaster Greynot write?!  I�m finding it hard to care about dorf lore at this point, really. If there�s a less interesting way to present the history of the world than an accounting report, I�ll be damned if I know what it is.  Finally, a slightly interesting encounter. We�re fighting both Krator the Gluttonous and a rare orc corruptor at the same time. The former is an antimagic wyrmic with a special antimagic axe, the latter is, well, an orc corruptor. Krator did not drop his axe (which we admittedly do not need), but he dropped a set of randart antimagic armor (which we don�t need either). The orc corruptor dropped a wand which gives bonus nature/acid resistance, which would have been nice to have one zone ago.  The last floor of Reknor is different from the previous few. It starts in a small room connected by a corridor to � oh hey, a daelach. Daelaches are fire and darkness-themed reavers. They can be annoying, but not as much as Worms that Walk.  Ho hum, more accounting reports.  Anyway, as I was saying, it connects by a long corridor to a bigger room with lots of orcs in it, including Golbug the Destroyer. Golbug is a high-level orc wyrmic with a focus on fire and ice-drake talents. We�ll probably get confused because of all the Bellowing Roars being tossed around, which is going to be annoying.  Stacking Gravity Wells and Attenuates via temporal clone makes short work of the chaff. One more Echoes of the Past should do it.  Golbug promptly disappears from reality, leaving this fancy orb behind. It�s a quest item that can only be activated in certain locations.  A few turns later, a messenger turns up to give us this letter. Let�s check it out.  Damnit, Elder. Guess we know where we�re headed next.  The last room of the dungeon contains a farportal. All we can do here is stand in it and activate the Orb of Many Ways.   Well, looks like we�ve interrupted something. Despite what the text says, we don�t really have much of a choice here. Filarel starts off neutral, the orc immediately turns hostile.  You can see how ridiculous Seal Fate can get when combined with Temporal Fugue. Right now, Attenuate is inflicting 260 temporal damage per turn, for the next 26 turns. After waiting it out for a bit, Krogar disappears from reality, but doesn�t drop anything fun. Oh well, let�s chat with Fillarel now.    If this is your first time getting to this point, this unlocks the Anorithil class. Anyway, it�s off to the Gates of Morning with us.  Before we get there, we have to fight our way to the entrance first. This is just a one-floor dungeon, with a motley collection of demons and animals blocking our way.  We come across our first oozing horror. Oozing Horrors are antimagic horrors with a focus on nature damage. They can mana clash casters from a distance, spread an AOE slowing effect and use tentacle grab to silence and grapple them for several turns. We toss a temporal clone in their way to distract them while we wait for Gravity Well/Attenuate to do its work.  And with that, we take our first steps onto the lost continent of Var�eyal. There�s not that much here compared to Maj�eyal, but it�s still a pretty adventure-filled area.  Before we do anything else, we have to head over to the Gates of Morning/Sunwall. It�s located in the mountains, a straight line down from where we first emerged.    And with that, we now have free run of the Gates of Morning. Let�s look around for a bit.  There�s some weapon/armor shops, and some sun paladins hanging around. Nothing on sale we particularly want, though. This lady seems to have something on her mind.   Spiders? We�ll check that out later.  This guy is Limnir the Jeweler. He doesn�t sell any rings or amulets, but he will offer to imbue any white rings you have. This is useful for antimagic characters, because the service in Angolwen is off-limits to them.  Finally, Aeryn is just hanging out over to the right. Let�s chat some more.         This grants us the special skill Relentless Pursuit. It�s a 50-turn cooldown skill that reduces the length of all debuffs by either 20% of our associated save or 2 turns, whichever is greater. For us, that�s a six-turn reduction of physical debuffs and an eight-turn reduction of magical/mental debuffs. Handy. Anyway, Zemekkys? Let�s check that guy out.       Something about this guy seems familiar. I wonder what it is. Anyway, now we have to take on the full might of the Vor Armory. We�ll get to that next update.
|
|
#
?
Aug 19, 2017 09:34
|
|
|
Inadequately posted:Something about this guy seems familiar. I wonder what it is. I'm not sure. Did he direct a movie, or something?
|
|
#
?
Aug 19, 2017 10:49
|
|


|
Inadequately posted:We also create the Second Skin tinker, giving us a bonus to life regen, disease and poison immunity. First skin, surely?
|
|
#
?
Aug 19, 2017 14:02
|
|

|
The Lone Badger posted:First skin, surely? It's still the second. It's just that the first fell off and got lost.
|
|
#
?
Aug 19, 2017 14:30
|
|
|

|
| # ? May 15, 2024 19:55 |
|
|
Did those Dwarves lose 20,000 people fighting a dragon? I feel like you could get a less fatality rate by actively feeding fat dwarves to the dragon to try and kill it via obesity or heart attack.
|
|
#
?
Aug 19, 2017 21:42
|
|