

|
Some of the accounting entries are pretty funny, and they all give insight into the Dwarven racial skill that gives bonus saves for every x gold pieces. The Dragon probably destroyed some of the stuff the dwarves had equipped. "Sold war winning arms and armor to the greatest hero of the age, saving our civilization and theirs. Did not charge as much useless mineral as we should have."
|
 #
?
Aug 19, 2017 22:17
#
?
Aug 19, 2017 22:17
|
|


|

|
| # ? May 22, 2024 18:04 |
|
|
I thought saves were considered least important as far as equipment and defensive prioritization?
|
|
#
?
Aug 19, 2017 22:50
|
|

|
Artificer posted:I thought saves were considered least important as far as equipment and defensive prioritization? Depends on the difficulty. On nightmare and beyond enemy attributes scale faster than your saves. It's very difficult to get saves high enough to ignore enemy effects. It's generally easier to get the key immunities for your class and focus on hp and damage.
|
|
#
?
Aug 19, 2017 22:54
|
|

|
Artificer posted:I thought saves were considered least important as far as equipment and defensive prioritization? Generally what you want is immunity to crippling conditions first(Confusion, Stunning, Silence/Blinding perhaps), then damage resistances second, and saves last. Because primarily saves are just gonna make you resistant to what condition immunities will make you totally immune to. Really high saves can make you essentially immune to broad swathes of conditions, but they're hard to buff really high because they suffer from diminishing returns which condition immunities do not. Having mid or good saves can help you resist conditions from scrub enemies, though.
|
|
#
?
Aug 19, 2017 22:57
|
|


|
habituallyred posted:The Dragon probably destroyed some of the stuff the dwarves had equipped. I dunno, a standard loss of 350 per capita sounds an awful lot like they value an individual Dwarven life at 350 gold as a matter of policy. If it was destroying equipment it would be documented either as individual equipment losses (15,000 helmets, 12,000 axes, etc) rather than as a per-head basis. If you're losing entire sets of equipment on that scale, it's safe to assume the person wearing all that equipment was lost as well.
|
|
#
?
Aug 20, 2017 00:51
|
|


|
Maybe it was a giant Rust Dragon.
|
|
#
?
Aug 20, 2017 02:09
|
|
|
Artificer posted:Maybe it was a giant Rust Dragon. Why do you think they like gold so much? That poo poo doesn't rust. I can see a dwarf stripping naked and beating a rust monster to death with a sack of gold in D&D. I bet the Dwarves have a secret spy network across the planet to find and destroy alchemy labs that produce Aqua Regia.
|
|
#
?
Aug 20, 2017 03:42
|
|

|
Zaodai posted:I can't imagine how terrifying it would be to go into a place where the whole place is a big living organism and the walls are breaking off parts to come kill you. I'd be scared shitless that the whole thing was just going to come to life as a one big blob and I'd be inside it because I was in a hallway and it would just be eating me because at that point you're walking around in its belly. ... I am absolutely stealing "dungeon consists of air pockets within building-sized slime monster" for the tabletop rpg I'm running.
|
|
#
?
Aug 20, 2017 17:45
|
|
|
iirc the Elemental Plane of Water in Nethack did something similar, didn't it? Like, it's all water with little ambulatory bubbles of air that you have to hang out in?
|
|
#
?
Aug 20, 2017 17:54
|
|
|
Pvt.Scott posted:Why do you think they like gold so much? That poo poo doesn't rust. I can see a dwarf stripping naked and beating a rust monster to death with a sack of gold in D&D. I bet the Dwarves have a secret spy network across the planet to find and destroy alchemy labs that produce Aqua Regia. The Dwarves in Tome4 got gold adopted as a currency specifically because it wasn't useful for anything else besides jewelry and they already had a large stockpile of it that they had mined while searching for other stuff.
|
|
#
?
Aug 20, 2017 18:23
|
|


|
vdate posted:iirc the Elemental Plane of Water in Nethack did something similar, didn't it? Like, it's all water with little ambulatory bubbles of air that you have to hang out in? Yeah, but water isn't trying to kill you, it just so happens that you can't breathe it. Think about all the monsters and creatures in D&D, and then realize which ones would be scariest. Would it be dragons, or vampires or something? Not really, because those are still just physical enemies. Stronger perhaps, but you can rationalize them, and the whole "if it bleeds I can kill it" rule applies. To me, it's Gelatinous Cubes and Mimics. A mimic could be any item, and if you touch it, it instantly paralyzes you and attempts to eat you. Gelatinous Cubes are even worse, they're a big completely transparent 10 foot wall of paralyzing digestive acid that has no smell, so you literally cannot detect one until something touches it, and if you touch it it paralyzes you and starts slowly digesting you alive. An enemy you can see, and shoot or stab, is inherently not as scary as something that's like "I could be three feet away from you, RIGHT NOW, and you'd never know. If you let your guard down for a split second, I'm going to eat you alive, and there's nothing you can do about it." I guess you could stab or shoot mimics, as they're still flesh and blood once you reveal them, but Gelatinous Cubes are just big walls of loving acid, so even if you know they're there how do you fight that?
|
|
#
?
Aug 20, 2017 18:52
|
|
|
Fireballs.
|
|
#
?
Aug 20, 2017 20:09
|
|
|
The party Bard. Bass/Base joke not optional.
|
|
#
?
Aug 20, 2017 20:11
|
|
|
Artificer posted:Fireballs. Well, I meant more if they were in the real world. You could pretty easily counter most mythical creatures with current tech, even available to civilians. Those are scarier because they're hard to detect in the first place and even if you could, you don't have AOE spells in real life.
|
|
#
?
Aug 20, 2017 20:25
|
|
|
Zaodai posted:you don't have AOE spells in real life. I'm out of my first level Incendiary Grenade spells for today, so I guess I'll just cast Flamethrower.
|
|
#
?
Aug 20, 2017 20:43
|
|

|
Zaodai posted:Well, I meant more if they were in the real world. You could pretty easily counter most mythical creatures with current tech, even available to civilians. Those are scarier because they're hard to detect in the first place and even if you could, you don't have AOE spells in real life. How to kill a Gelatinous Cube (which aren't invisible, just hard to spot because they're transparent): Step 1: Find an object, preferably made of metal so its acid doesn't eat through it. Step 2: Hit it a lot.
|
|
#
?
Aug 20, 2017 20:45
|
|

|
Raitzeno posted:I'm out of my first level Incendiary Grenade spells for today, so I guess I'll just cast Flamethrower. I'm unfortunate enough to not have those in my house.  I don't even have any lighters or hairspray around because I don't use them! I don't even have any lighters or hairspray around because I don't use them!
|
|
#
?
Aug 20, 2017 20:47
|
|
|
Zaodai posted:I'm unfortunate enough to not have those in my house. Got cooking oil and a match? A propane tank in your grill and a grill lighter/torch? (Don't directly light a propane tank at point blank range. Make an oil trail leading to the propane tank and light it from around the corner...)
|
|
#
?
Aug 20, 2017 20:54
|
|
|
Zaodai posted:Yeah, but water isn't trying to kill you, it just so happens that you can't breathe it. Think about all the monsters and creatures in D&D, and then realize which ones would be scariest. Would it be dragons, or vampires or something? Not really, because those are still just physical enemies. Stronger perhaps, but you can rationalize them, and the whole "if it bleeds I can kill it" rule applies. To me, it's Gelatinous Cubes and Mimics. A mimic could be any item, and if you touch it, it instantly paralyzes you and attempts to eat you. Gelatinous Cubes are even worse, they're a big completely transparent 10 foot wall of paralyzing digestive acid that has no smell, so you literally cannot detect one until something touches it, and if you touch it it paralyzes you and starts slowly digesting you alive. Not to trigger a giant argument, but you are probably better off fighting mimics then a high-level lich with mind control/weapon immunity/shapeshifting stuff. There is plenty of stuff in that game that doesn't bleed and can't be killed without powerful magic.
|
|
#
?
Aug 20, 2017 20:56
|
|


|
Werewolves bleed in D&D, but gods aids you if you don't have a magic weapon or some silver coated blades/arrows/musket balls (or a mage/cleric).
|
|
#
?
Aug 20, 2017 21:37
|
|
|
TheGreatEvilKing posted:Not to trigger a giant argument, but you are probably better off fighting mimics then a high-level lich with mind control/weapon immunity/shapeshifting stuff. There is plenty of stuff in that game that doesn't bleed and can't be killed without powerful magic. Yeah, it kind of relies on whether or not magic is "real" when they get transferred, how it handles interacting with modern stuff they've never seen, etc. I wasn't trying to get into a whole real world fightin' mans discussion, just expressing how goo monsters and shapeshifters are on a different spooky scale than stuff that would at least feel a shotgun blast even if it doesn't outright kill them (like vampres in Vampire: The Masquerade).
|
|
#
?
Aug 20, 2017 21:42
|
|
|
Zaodai posted:Yeah, it kind of relies on whether or not magic is "real" when they get transferred, how it handles interacting with modern stuff they've never seen, etc. Do oozes in this game have any special resistance to being stabbed actually? Or would they die to buckshot all the same? I know in D&D it's the latter.
|
|
#
?
Aug 20, 2017 21:53
|
|
|
Zaodai posted:...Gelatinous Cubes are just big walls of loving acid, so even if you know they're there how do you fight that? Most fridges I've ever been near contained baking soda!
|
|
#
?
Aug 20, 2017 21:54
|
|
|
Eopia posted:Do oozes in this game have any special resistance to being stabbed actually? Or would they die to buckshot all the same? I know in D&D it's the latter. Also, oozes in this game take damage and die like anything else. I don't even know if TOME distinguishes between types of weapons or if it's all "weapon" or "physical" damage.
|
|
#
?
Aug 21, 2017 01:02
|
|


|
vdate posted:Most fridges I've ever been near contained baking soda! See, now that's a good plan. Go science!
|
|
#
?
Aug 21, 2017 01:17
|
|
|
Gygax would just make a Basic Ooze to gently caress with his players after baking soda worked once.
|
|
#
?
Aug 21, 2017 01:36
|
|
|
Baking soda would also be a heck of a lot rarer in D&D! They'd probably use lye. (Though given how dangerous lye is that comes with its own problems.)
|
|
#
?
Aug 21, 2017 01:44
|
|
|
Commander Keene posted:Some oozes in D&D split when hit with slashing or piercing damage until the resulting oozes have 1 HP. So yeah you can kill them if you shoot enough, but all the while you're turning one big ooze into a throng (not actually a swarm, that's a keyword) of small oozes. The standard 1h/2h weapons (swords/axes/maces and their 2h variants) are distinguished largely by their accuracy bonus, there's no real distinction between crushing/bashing/piercing damage or the like. Most standard weapons do pure physical damage, but you can occasionally find a rare/artifact weapon that does pure elemental damage instead. To make up for that, very few enemy types have innate physical resistance, so most weapon-users are generally better off with a regular physical-damage weapon unless their class/equipment gives them a massive boost to said element's damage/resistance penetration.
|
|
#
?
Aug 21, 2017 11:28
|
|

|
 Before we settle that armory thing, let’s deal with Ardhungol first.  As you can see, Ardhungol’s deal is spiders. There’s a few other enemies floating around, but it’s mostly spiders. All spiders know Web and Lay Web in addition to other talents, though with these low-tier spiders those other talents aren’t really powerful enough to be worth noting. There’s also a few unstable wormholes floating around, as you can see. They can explode and unleash random anomalies if spells are cast in their general direction. Annoying, but nothing we can’t deal with.  Xhaiak arachnomancers are a relatively new addition to the game, popping up after the 1.5 update. They come with the usual spider loadout, along with Endless Woes, several darkness-themed spells and the ability to summon additional spiders. This one also happens to be a summoner.  Time spiders make their return from the last time we saw them in an alternate universe. They’re not much more of a threat now than they were back then – at least, the bog-standard ordinary ones.  Faerlhings are arcane-themed spiders who come with Disruption/Phantasmal Shield, Arcane Power and Manathrust. Annoyingly, they’re also a common requirement for alchemist potions. Unless you get lucky in the Ruined Dungeon or with a vault, you’re unlikely to find one until this dungeon.  Parasitic Leeches are acid-themed horrors. Their modus operandi is to suck the blood of their enemies, gaining the ability to multiply once they suck enough blood. Gross, but they’re not too tough as far as horrors go.  Another new addition. Shiaak venomblades are spider-themed rogues. Their main threat comes from the large variety of high-powered poisons they can inflict and as a result, they’re no real threat to us.  Spider dungeon lore. Rashim’s the guy we’re trying to rescue, incidentally.  Huh, guess that bit about orcs avoiding the area was bunk. Oh well, he still goes down all the same.  On the second floor, we run into an umbral horror. Umbral Horrors are immune to darkness damage, but weak to light damage. Their focus is stealth, Creeping Darkness and Shadows. As with anything that can summon Shadows, the main threat comes largely from those.  More spider dungeon lore. 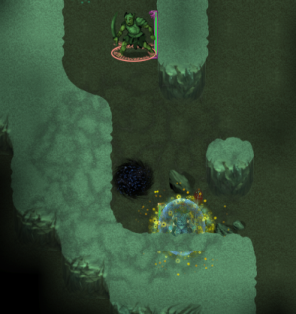 This black field effect is a fell aura – it reduces our resistances by 20%, but grants us 40% critmult. We probably don’t want to be standing in it while fighting an orc archer.  The last journal entry was lying a few steps away from the third floor entrance. Guess we have to be the bearer of bad news.   Ooh, big spider. Size aside, Ungole isn’t an especially threatening boss. She has a few souped-up spider skills, Corrosive Vapor and Phantasmal Shield, but nothing else that really worries us. Also, three sun infusions for some reason. A Christmas miracle! If this is the first time you complete the quest, you also unlock the Sun Paladin class. Now let’s see what Ungole dropped.    Huh, wonder what it says. Anyway, the Rod of Spydric Poison can be activated to inflict Spydric Poison on an enemy, which deals nature damage and pins them for its duration. It can be used from your inventory, so no need to worry about equipping it. Good for builds which rely on damaging area effects. She also dropped a randart massive armor, which we have no use for. Them’s the breaks. We clear out the rest of the spider dungeon and then move on.  Next up, the Vor Armory. It’s located right next to the Vor Pride Bastion, and it’s a good idea not to mix up the two. If we really wanted, we could skip right ahead to clearing out the prides, but then we’d be missing out on quite a lot of useful EXP/gear.  The first floor of the Vor Armory is a small labyrinth filled with traps and enemies. It can be a little overwhelming at times because it gives you very little room to maneuver, and a lot of those enemies are orc mages who care very little for concepts like ‘collateral damage’.  As you can see, the two most common mages by far are the orc pyromancer and cryomancer. If you haven’t hit 100% stun/freeze resist by this time, now is when you should really start considering it. Orc Cryomancers come in large enough numbers to keep anyone permanently freeze-locked without it.   One of the orc assassins dropped this dagger. It’s a fun one if you can make it work, but as previously mentioned, cold-damage boosters are in limited supply.  The second floor to the Vor Armory consists of a large building with a small ‘outside’ area. There’s still a couple of enemies lurking outside, so we clear those out first.  The first portion of Vor Armory consists of this set of small rooms. Generally not too bad if you take them on one at a time.  The second portion consists of this big room filled with orc pyro/cryomancers (both regular and high), as well as elite fighters and archers. The room also has a couple of scattered traps around the edges. Drawing enemies out to the small rooms is probably your best bet here, but it can be difficult without teleport resistance – orc mages like to use Phase Door both offensively and defensively, and have a nasty habit of dragging you right back out into the fray.  Fireflash is the pyromancer’s favourite attack, a large slow-moving fireball that explodes in a gargantuan radius. These fire attacks are really starting to hurt - we should probably do something about that.  A quick dash back to the fortress to grab the Crown of Burning Pain. It can be a good idea to hoard fire/cold resist gear for this point in the game.  The third portion of the Armory is the actual armory portion, guarded by a cadre of elite orcs and lined with lava flooring. (Elite orcs not shown, because screenshot messed up). We toss in a Gravity Well and Attenuate, then wait for them to come to us. 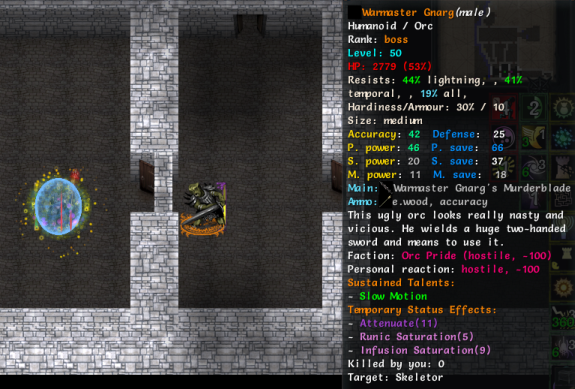 We clear out a few of the mages who rush ahead, then turn to the real threat. Warmaster Gnarg is a high-level orc berserker with a suite of powerful infusions/runes (heroism and healing included), along with Giant Leap and Windblade. His distance-closing moves are annoying, but we have enough tools at our disposal to keep him away as long as we’re just dealing with him alone.   He drops the Deflector Shield, an EoR artifact that knocks enemies away when they attack you. Fun, but as mentioned earlier, melee characters generally don’t appreciate having to chase down enemies. His signature Murderblade would have been a better prize, even though we wouldn’t exactly be using it either. 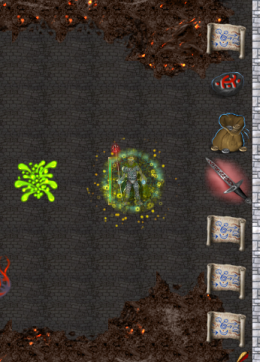 We clear out the rest of the stragglers before heading back in to claim our prize. Ordinarily Vor Armory would be a great place for high-level loot, but we got an unlucky roll and most of it has been replaced with tinker schematics – tinker schematics we already know, to boot. So it goes. The red glowing sword to the right is the Blood-Runed Athame – the quest item we came here for.  The last room of Vor Armory is this big room above the armory. The –   WELL THEN. If you’ve been opening vaults willy-nilly, this room is an unpleasant surprise. Despite how it might look, there are only seven real threats here – the overpowered multi-hued wyrms at the center and lurking at the corners. The rest will just straight-up evaporate when hit by their overlapping breaths. We draw out one for a quick skirmish, and soon confirm we can’t hack it even one on one – we don’t have enough spellpower to land any of our debuffs, and need all our defenses up just to survive. We’ll come back later. 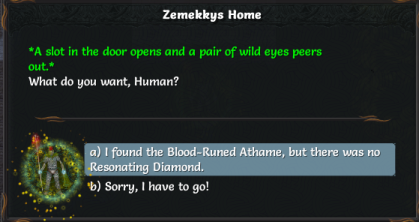    Heading back to the Sunwall and presenting Zemekkys with the Athame unlocks the other quest location, the lair of Briagh the Great Sand Wyrm.  Briagh’s Lair is located on the beach, in the southeast corner of Var’eyal. Getting there might involve clearing out a roaming orc patrol or two.  Briagh’s Lair is similar to the sandworm lair, but with no collapsing tunnels and a wide-open area. Entering it alerts pretty much every enemy inside to your location, which means your first few turns are going to be spent busily fending off sandworms of all types.  After a few turns, Briagh himself arrives. He’s an extra-strong sand drake with the ability to summon sandworms and a powerful sand breath attack.  His summons and hangers-on don’t last very long, and soon it’s down to Briagh himself.  Killing him causes him to drop his loot – an assortment of t5 gems and the Resonating Diamond. After clearing out the rest of the lair (and finding nothing else of interest in the process), we head back to the Sunwall.    And with that, we’ve secured a path back to Maj’eyal proper. Standing in it and activating the Orb of Many Ways promptly sends us right back to outside Last Hope.    Now that we’re back, we have a few things to settle. First, we stop by the elder’s home to update him on the situation.  Tannen’s House is to the left of the Elder’s house, below the bow store. We can chat with him prior to this development, but he doesn’t have anything to say.        Looks like it’s back to Reknor with us. Before we do that, there’s a few other things to check out.    First, we chat with the merchant. Now that we’ve returned from the East, we unlock a new option – the ability to pay 4000 gold in exchange for a randart item of our choice. We can choose the type of item, but not the specific bonuses of the item in question. It’s a gamble, but there’s nothing else you really need to spend your gold on at this point in the game, and the merchant artifacts are theoretically the strongest randarts in the game, with four egos instead of three. This is the main reason to always side with the merchant, rather than the assassin lord. As good as merchant randarts are, we’ll hold on to our gold for just a little longer. We’re headed for an avalanche of endgame gear pretty soon, and want to save our randarts for filling out any weak areas equipment-wise.  Next, we’ll start by looking around old areas. There’s no in-game hints at this, which is a little annoying, but Reknor isn’t the only cleared-out area worth checking out again.  In several areas, powerful new bosses known as Backup Guardians will spawn once you return from the East, such as Aluin the Fallen. A Sun Paladin with Arcane Might, Irresistable Sun and Gloom, he spawns on the second floor of Trollmire.  They’re not too tough, but as with any boss, it doesn’t pay to underestimate them. Might as well try the See the Threads routine on as many of them as we can manage.   On timeline 1 he drops the Black Crown, part of The Black set. It’s a decent Con/Will statstick and comes with good armor, even if you’re not going down the Black set route.   On timeline 2 he drops the Revenant, a set of massive armor. The shifting status resistances aren’t really all that useful compared to other massive armor egos, even common ones.   On timeline 3 he drops the Black Wall, another part of the Black Set. Unless you’re going down that route there’s not that much point to using it, since that’s pretty much the only thing that elevates it over other shields. We’ll go with the crown, because we don’t need massive armor (or the Revenant in particular), and we certainly don’t need a shield. Incidentally, none of these are Aluin’s associated artifact – that would be the Sanguine Shield, a shield that grants light and blight bonuses.  Our next destination is Ruins of Kor’pul 3, where we have to deal with Kor’s vengeful ghost. In addition to knowing all the spells that The Shade knew at higher levels, he also comes with hexes, curses and Virulent Disease.   On timeline 1 he drops the Cloth of Dreams, which grants various psionic bonuses. Not much use if you aren’t a sleep-based solipsist.   On timeline 2 he drops the Breath of Eyal, an antimagic set of light armor that grants all-round resistances to elemental damage, plus even more bonuses for antimagic characters. We certainly don’t need this.  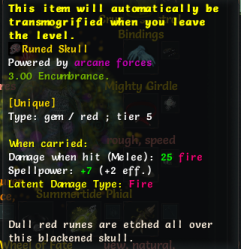 On timeline 3 he drops the Runed Skull, a gem which grants us fire retaliation damage and a small bit of spellpower just by being in our inventory. Eh, guess we’ll take this one. His actual associated artifact is Vox, an amulet which grants various magic bonuses and complete silence immunity to the wearer. It’s a shame we didn’t get it, it might have come in handy.  Moving on. Our next destination is The Maze 2, where we face Nimisil the lunar spider. An anorithil spider, she’s not that much tougher than Ungole was.   On timeline 1 she drops the Eastern Wood Hat, a hat which grants various gunslinger-associated bonuses. Makes for a decent statstick, even if you aren’t one. I assume I don’t need to explain the associated pun.   On timeline 2 she drops the Lunar Shield, her associated artifact. The Lunar Shield grants bonuses to darkness damage and anorithil skill trees, and is notable for being one of the few artifacts with a proc on spellcast effect.   On timeline 3 she drops Radiance, a very shiny cloak that grants various light-damage associated bonuses. It can be activated for a magical shield, which is pretty helpful right now. By the way, you’re not missing out on much fight-wise. We mostly just run around and blast Rethread a lot. These guys aren’t tough enough for us to really pull out all the stops.  After that, it’s off to the Sandworm Lair. Fortunately, this guy is located on the first floor and chases after us, which saves us a lot of trouble. The Corrupted Sand Wyrm is a gargantuan sand wyrm in the Briagh formula, with a few extra corruptor skills.   There’s not much point in See the Threads here, because the drops are guaranteed.  The Wyrm Bile is the other requirement for fulfilling the Draconic prodigies. Eating it grants us a randomized set of stat boosts/drops (rarely enough to make a significant difference, but it helps), as well as our last and final cat point. As for that other item, we’re not touching that with a ten-foot pole. Not until much, much later.  Our next destination is the Scintillating Caves, where we immediately find this journal entry upon entering the third floor.  Despite the big buildup, the Spellblaze Simulacrum isn’t all that much. He’s basically just a bigger, bulkier version of the Spellblaze Crystal who isn’t immobile and can turn invisible. Unfortunately, we can’t use See the Threads here because we already used it back on the original crystal.   He dropped the Pouch of the Subconscious, an odd little set of artifact shots. Could be useful on a psyshot, maybe.  Next up is the Old Forest, where we run into Snaproot on the third floor. Snaproot is mostly just a slog – gargantuan amounts of HP and decent resistances, but not much skill-wise. He comes with Throw Boulder, two pinning attacks and a stunning move, along with You Shall Be My Weapon and Massive Blow. This fight is kind of a slog. His saves are high enough to shrug off most of our debuffs, and he came with a magical/physical wild to remove the rest. We end up running around the castle in circles while exchanging boulders and beams back and forth for a long, long time.   In the first timeline, he drops the Hand of the World Shaper, a set of physical-damage associated gloves.  In the second timeline, he dropped Glacia, which we’ve already seen in an alternate timeline.   In the third, he dropped the Blightstopper, an antimagic shield with a focus on blight resistance. We’ll go with the World Shaper, it might come in handy.  After that, it’s off to Daikara 4, where we confront Massok the Dragonslayer. Most of the Backup Guardians so far have ranged from ‘pushover’ to ‘annoying, but not a real threat’. Massok the Dragonslayer is something else. A superpowered orc berserker in the same vein as Gnarg, Massok’s heavy investment in high-level berserker skills such as Unstoppable means we really can’t afford to get lax here. One advantage we have is that we can knock him about, but he can’t do the same – Kinetic Stabilizer prevents him from using Battle Call to pull us into melee range.   On timeline one he drops the Unflinching Eye, an interesting amulet. Might be worth considering – we’re good on light resistance thanks to Summertide Phial and Radiance.  On timeline two he drops this set of randart arrows. Meh. ‘Random elemental explosion’ is fun, but not as strong as it might initially sound.  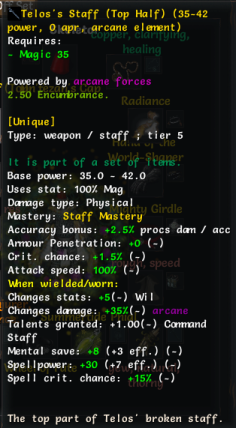 We actually don’t manage to kill him on timeline 3 in time, so we decide to stick with it and cross our fingers just to see what we got. Good thing too – the Top Half of Telos’s staff could certainly come in handy. Unfortunately, it can only be tuned to mage-type damage – fire, cold, lightning or arcane.  Next up is the Pale Drake, a skeleton archmage who’s helped himself to Dreadfell in the Master’s absence. Fortunately, he’s located on the first floor, so we don’t have to go very far. He’s a souped-up skeleton mage with a focus on fire spells.  He buggered off with some turns of Attenuation still on him, and we didn’t get to See the Threads, sadly. He did drop this decent randart belt, though.  There’s one more Backup Guardian, but unfortunately that one’s dwarf-specific and we can’t reach it. As a result, all that’s left is to head down Reknor and take on Lithfengel. He’s a demon with a focus on disease spells who guards the quest items we need to proceed.    Killing him causes him to drop the Athame and the Diamond, along with his signature axe. It’s a decent axe for a reaver, if you’re going down the dual-weapon route and not the shortstaff one. Anyway, that’s about it for this update, I think. We’ll be working on getting back to the East in the next one.
|
|
#
?
Aug 21, 2017 17:25
|
|
|
I've gotten the scrap of paper with Spydric text on it before. Is it actually something you can complete yet? Perhaps by getting lucky on a Farportal jump from the Fortress to get some sort of Spydric location? Or is it waiting on DarkGod to add the remaining parts?
|
|
#
?
Aug 21, 2017 19:39
|
|
|
PurpleXVI posted:I've gotten the scrap of paper with Spydric text on it before. Is it actually something you can complete yet? Perhaps by getting lucky on a Farportal jump from the Fortress to get some sort of Spydric location? Or is it waiting on DarkGod to add the remaining parts? Short answer: yes. Long answer: If you find the Spider-Silk Robe of Spydre beforehand, you get a spider poem that helps you translate the Spydric Rod text. I can't recall the exact wording offhand, but it's something along the lines of 'these humanoids sure are tough, we should do more research on their magical abilities, but we'd better do it quickly because hanging out on this planet any longer is going to be a really bad idea'
|
|
#
?
Aug 21, 2017 19:46
|
|
|
I've been using malediction on my TW and it's awesome. Since your temporal clones kill melee when you use ranged = procs a lot + procs the on spell ones. It really cripples the enemies.
|
|
#
?
Aug 21, 2017 20:38
|
|

|
Something I learned recently related to the artifact merchant: if you have enough gold, the game adds a third option to the "buy, not buy" menu, which reads: "Why, 'tis a paltry sum - take my order, man, and be quick about it!" I don't know how much money you need on hand to trigger that option as I only learned about it when Darkgod gifted one of my characters with 666,666 gp. Fortunately, I'd already gotten far enough in the game to get access to the randart shop, as the fear of getting killed on the way would have been crippling otherwise.
|
|
#
?
Aug 21, 2017 20:57
|
|
|
pffft The whims of Darkgod are capricious, but pretty nifty! That is a LOT of randarts, right there. Affi posted:I've been using malediction on my TW and it's awesome. Since your temporal clones kill melee when you use ranged = procs a lot + procs the on spell ones. This is my favourite part of the 'army of me' TW build. I discovered it back when TW was first updated (probably still in its OP phase); for me it was the cone-of-ice proc on Blood Letter. vdate fucked around with this message at 21:06 on Aug 21, 2017 |
|
#
?
Aug 21, 2017 21:01
|
|
|
 With the Athame and Diamond in hand, all that’s left is to report back to Tannen. 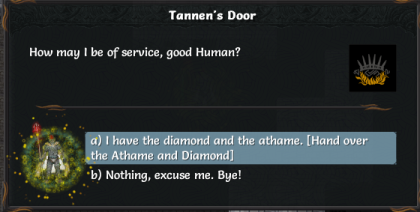  Well, not quite all that’s left, I guess. Off to Telmur we go.  Telmur is located just a short distance above Last Hope and to the right of Zigur. It’s hard to miss.  It consists primarily of small rooms filled with undead, orcs and various other enemies. If you run into a horde of rares/randbosses here, it can be pretty tough. There’s very little room to maneuver.  Sometimes the floors are wide-open areas, which can be difficult to deal with as well, especially when facing a ton of skeleton archers all at once.  On Telmur 3, we run into a unique horror – Grgglck the Devouring Darkness. A gargantuan tentacled monster, Grgglck knows Starfall, Moonlight Ray, Pacification Hex and Burning Hex. However, it’s known more for its defensive ability – that 500% all resistance makes it nearly impervious to anything we can throw at it.  Instead, the key to defeating it lies in these tentacles. Grgglck’s other method of attack is to spawn tentacles at us, which have no talents and can only slam into us. Every one we kill takes another chunk of health off Grgglck. There’s one other boss that works in a similar manner, but we won’t be running into it this run – it’s a dwarf-only boss. After running around a bit more, Grgglck finally falls, dropping an artifact tinker schematic. Unfortunately, it’s an artifact tinker schematic we can’t use, because one of the key ingredients only shows up in the EoR campaign.  On the fifth and final floor, we run into the boss of the area, the Shade of Telos. Telos is a powerful ghost archmage who specializes in ice magic, and comes equipped with the broken halves of his titular staff.    Attenuate removes Telos from reality after a bit of a back and forth struggle, and we obtain the bottom half of Telos’s staff, as well as the Tree of Life, which we’ve already seen in an alternate timeline.  The Telos Staff combo is unique. Only the top half counts as a proper shortstaff – the bottom half lacks a lot of the usual staff bonuses, but is the only staff that can be wielded in the offhand slot without Reaving Combat (the reaver skill that allows you to wield full-size 1h weapons offhand). Doing so would give us more spellpower/crit than our current staff, but there’s a catch. Telos’s staff can only be tuned to fire/cold/lightning/arcane damage – we’d lose our temporal damage bonus. Also, we didn’t find the book we were looking for. We’ll have to go back and tell Tannen the bad news.    Wow, rude. There’s another set of events that can play out – if you refuse to give Tannen the orb, he merely borrows it to study for a while before giving it back. If you try to use this orb on the Reknor farportal, it tosses you into a single-floor Fearscape dungeon, where you have to fight a powerful imp commander to escape. When you get back to Last Hope and confront Tannen about it, he tosses you right into his dungeon.  Anyway, Tannen’s dungeon is, at the very least, an interesting shake-up from the usual fare. To escape the first floor, we have to clear this bone giant room and flip the switch, along with… 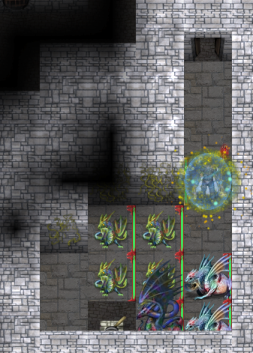 …the dragon room…  …the demon room…  …and the elemental room. Clearing them all out and flipping the switches opens the door up to the next room.   Well, that’s rude. Explains the whole Resident Evil setup, at least.  The second floor is a water-filled spiral filled with aquatic beasts, with little islands of land scattered throughout. If you didn’t bring water-breathing it might be a little inconvenient to navigate, but that’s of no concern to us.   A young couple who departed abruptly from Angolwen, huh. Also, what’s a drolem?  The third floor of Tannen’s Tower is a slightly wider spiral, filled with various undead beasties.   Demons? Well, that’s not good.   Oh, that’s a drolem. The Drolem is a gargantuan golem in the shape of a dragon. It knows the standard alchemist golem skills, comes with a large rune loadout, and knows a couple of breath attacks.  Tannen himself stands behind the golem. He’s an alchemist who can cast fire spells and throw acid bombs. Not too much of a problem, but can be annoying when coupled with the golem. 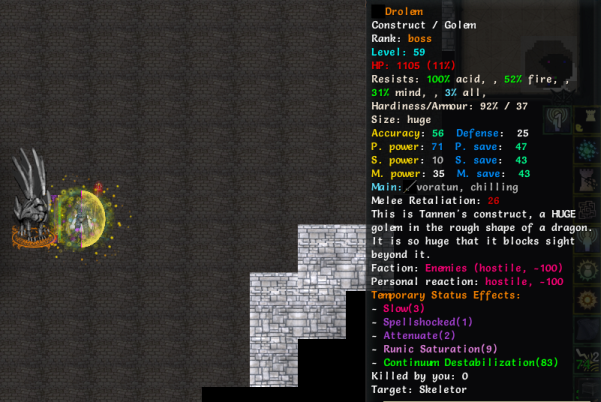 It’s a bit of a slog, but the Drolem is eventually attenuated away. He doesn’t have any temporal resistance, despite his bulk, so it’s not too difficult to take him down. By the way, the line about the drolem blocking line of sight isn’t just for show. It really does prevent Tannen from spotting us if we stand in the right spot, and he won’t back up the drolem with his spells as a result.  Now to finish off Tannen. We weren’t really focusing on him earlier, but he still took a good bit of damage from being Braided with the drolem and our large AOE attacks.  With focused attention on him, Tannen doesn’t last very long, dropping this note upon his death. Unfortunately, the note was not accompanied by any useful equipment. Oh well. With his death, a portal spawns in the center of the tower, which takes us back to Last Hope.   With this, we now have a farportal constructed in Last Hope. We can use this to travel straight to the Sunwall, and use the farportal in the Sunwall to travel right back.  Heading back to the Far East, we stop by one of the few side dungeons there. The Underwater Cave is one of those locations that pop up randomly, but it’s always located near the sea or a river.  The first floor of the underwater cave is filled with relatively common underwater enemies, like squids and water imps. The main thing that separates it from the Lake of Nur is the lack of air bubbles – unless you have some method of water breathing or unbreathing, there’s simply no way to complete this zone. It is optional, though, so no worries.  Oh, look who showed up. Walrog is a powerful water demon with a focus on ice and fire spells. He can spawn in any water zone, anywhere from Lake of Nur to the small water spiral in Tannen’s Tower. There’s a way to force him to spawn later in the game, if he hasn’t already turned up. It’s actually kind of a shame he did, because I wanted to show that off.  Upon being defeated, he drops this poem, but no other loot. A shame. There’s one other notable trait about Walrog – if you Demon Seed him as a demonologist and kill him, you get a demon seed of Walrog himself, a trait he shares with only one other unique demon. However, equipping Walrog doesn’t grant you any passive benefits (unlike other demon seeds), so the only thing that can be done with him is to summon him, and Walrog isn’t a particularly good summon.  The second floor of the Underwater Cave is similar to the first, but all the enemies here are neutral – including the boss of the cave, Ukllmswwik the Wise.    While attacking right away might seem the more profitable option, it’s best to hold off for now. Playing along with him is the only way to access the next portion of this zone.  The same underwater enemies continue showing up, but now a deadly new wrinkle appears. Nagas are the primary enemy of this zone, and they’re a good bit stronger than the common fare we’ve been clearing out. Myrmidons are the most common melee foes here, with a couple of berserker skills and Exotic Weapon Mastery.  They also drop tridents, which can be helpful for exotic weapon users.  Also, one of them dropped this volume of naga lore.  The second floor introduces naga tide huntresses into the mix, archers who combine bow attacks with water spells. They were powerful even before the archer update, and have only gotten deadlier since then.  Yet another volume of naga lore. To be fair to everyone else, this was more or less the time when orcs were taking over the world.  Naga lore volume 3. Mostly just repeating information everyone has worked out by now.  Naga psyrens are one of the few enemies in the game with innate psychic talents. They can cast Mind Sear and Telekinetic Blast, Silence mages and confuse enemies with Mind Disruption.  The third floor of the naga lair consists of two winding routes to the left and right, leading to this big room where Slasul resides. While everyone else in the room is hostile, Slasul himself starts out neutral. Attacking him turns him hostile, but bumping into him in his neutral state initiates a chat. 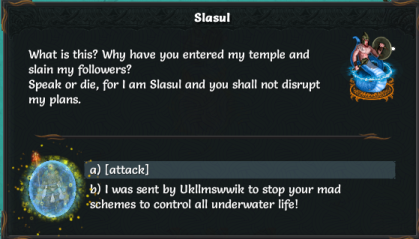 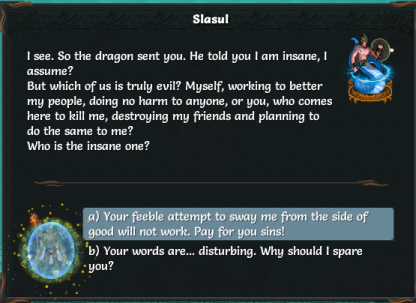   Disagreeing with Slasul at any point immediately turns him hostile. Agreeing with him through the entire conversation turns the rest of the nagas neutral, and spawns this portal back to the underwater cave.  Now, it’s back to Ukllmswwik where we… Well, this is awkward. Somehow, when we re-entered the area, Ukllmswwik and the portal back to Slasul’s cave despawned. Since the game saved when we came back to the cave, restarting the game won’t fix it. If the game didn’t bug out, Ukllmswwik would still be hanging around, neutral to us. Choosing to press him for information on Slasul or purposefully antagonizing him turns him hostile, but groveling and agreeing to his terms once more calms him down.  Let’s take a quick trip over to an alternate universe. In this one, we fought Slasul the moment we encountered him. Slasul himself is an extra-strong naga myrmidon with slightly more powerful water spells and massive healing capability.    Defeating him causes him to drop this note, as well as the Eldritch Pearl. It goes in the lamp slot, and is a pretty decent statstick as far as lights go. Granting water breathing is rather pointless, though, given that this is the last water zone in the game. 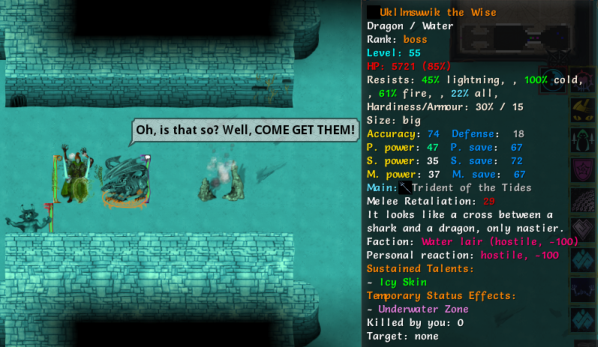 After that, it’s back to Ukllmswwik, where we antagonize him for his treasures. Ukllmswwik himself is a variant ice wyrm with extra ice spells and a very large number of prodigies – Draconic Will and Body, Spell Feedback, Unbreakable Will, Spine of the World and Bloodspring. Aside from being nearly debuff-immune and very annoying for spellcasters, he’s not too much of a threat damage-wise.   If Walrog hasn’t spawned in your game yet, killing both Ukllmswwik and Slasul will cause him to spawn. Summoning him in this manner doesn’t grant him any special boosts, so if you’ve managed to handle Slasul, Walrog himself should be barely more than a speedbump.   Ukllmswwik’s associated artifact is the Trident of the Tides, the second-best trident in the game. To get the best trident in the game, you have to side with Slasul, kill Ukllmswwik, take the Legacy of the Naloren prodigy, then return and talk to Slasul for the eponymous artifact trident. It’s not a foolproof process by any means – bugs like this one aside (which I’ve honestly never seen before, though I have had other important NPCs disappear on me at times), the more common issue is Slasul spawning/turning hostile upon re-entering the area, at which point talking to him is out of the question. On the other hand, the last time my mindslayer went for Naloren, the game somehow gave me two copies, allowing me to both wield and TK-wield the same weapon. TOME giveth and TOME taketh away.  Moving on. The Shadow Crypt is the next optional zone in the Far East. As with the Underwater Cave, it pops up in random locations.  The Shadow Crypt is filled with enemy shades. They’re pretty much the same as their regular variants, but come with a couple of Cursed/Doomed skills and can walk through walls.  On the second floor, before we go down, we load ourselves up with anti-magic equipment. This will cause us to fail almost any spell we attempt to cast. Now why would we do that?   This is why. The Rakshor Cultist is a decently tough orc corruptor, but that’s not the real threat in this battle. The moment he takes damage, he summons a Doomed Shade, a clone of your character that comes with a couple of extra Doomed skills. Depending on your build, this can range from a decently tough battle to a near-unwinnable one, though there are a couple of ways it can be mitigated. Weapon-users can neuter it by merely equipping a different one, rendering most of their talents unusable. Mages can load themselves up with antimagic equipment, which makes life very hard for their shade, but also makes surviving the start of the battle a bit of a challenge. There’s not much mindcasters can do except suck it up, though.  Both the cultist and clone need to be killed before the exit spawns. If this is your first time killing the shade, it also unlocks the Doomed class. The Shadow Crypt is an entirely optional zone, so if you don’t have any way to neuter your shade or simply don’t feel like it, skipping it is a reasonable option.   The Cultist dropped the Voratun Hammer of the Deep Bellow. As far as endgame 2h weapons go, it’s pretty ordinary – just a really hard hitting weapon with a physical damage bonus and a chance to trigger Flameshock. With that, all that’s left for us in the Far East is to take on the Orc Prides. Look forward to that in the next update. Inadequately fucked around with this message at 10:23 on Aug 24, 2017 |
|
#
?
Aug 24, 2017 09:21
|
|
|
I never even knew there was a way to force Walrog to spawn! When was it added? Because I usually kill both of the sea dorks when I play(for maximum loot, you see), and I've never had him pop up as a result. Also, what's his response if you offer to serve him? I imagine it's something like: "Well as the Lord of the Sea, you can serve me by dying, lol."
|
|
#
?
Aug 24, 2017 09:48
|
|
|
Not sure, might have been added with the Ashes DLC, since beating Walrog is a requirement for the Doomelf unlock. And yeah, his answer to any reply is some variant of 'lol gently caress off', and then he attacks.
|
|
#
?
Aug 24, 2017 09:53
|
|
|
I probably haven't done it post-Ashes because I usually only bother with that dungeon if I'm playing a Skeleton(because waterbreathing gear is relatively rare), and I haven't played a Skeleton in a long time.
|
|
#
?
Aug 24, 2017 10:01
|
|
|
Running into Rakshor Cultist on my first (unspoilered) win made for a rather amusing RP moment: Cursed: Wait, is that who I think it is? Doomed Shade: Hey... you're me! Both: AWESOME! I HATE myself! *dual Rampage ensues*
|
|
#
?
Aug 24, 2017 10:17
|
|


|

|
| # ? May 22, 2024 18:04 |
|
|
 We’ve cleared out everything else available to us except the Prides, so let’s get right to that. First up is Vor Pride, located next to the armory. Vor Pride is the first of the magic-oriented prides, with pyromancers and cryomancers galore. Everyone inside it is affected by the zone-wide Sorcerous Aura, which increases Magic and mana regeneration, but decreases accuracy and stealth. Fortunately, we benefit from the former and aren’t really affected by the latter, but since we’ll primarily be fighting mages here it’s a double-edged sword.  The entrance to each pride floor is largely the same for every floor of every pride. A small room with a powerful randboss orc guarding the door, with several orcs flanking him above and below.  Staying and fighting is an option, if a bit of a challenging one, but the safer method in almost every case is to just teleport/run past the randboss and through the door into the pride proper, granting you far more space to maneuver.  With all the projectiles flying about, Gravity Locus comes in very handy here, as you might guess.  The main bulk of the pride consists of a wide-open floor, with buildings scattered throughout it. Orc mages are fluttering around, tossing spells at us before phase dooring away.  To progress, we need to clear out these small rooms at the top and bottom of the floor and flip the switches inside.  Just because pyro/cryomancers are the main ingredient, that doesn’t mean they’re the only one. Other high-level orc enemies are common, along with demons and horrors of various stripes.  The Records of Lorekeeper Hadak are found lying around in Vor Pride, detailing the history of the orcs.  When both switches are cleared, the door to the next level will unlock. The actual exit is guarded by three high-level elite orc enemies, along with a couple of other stragglers.  After clearing them out, we look around the rest of the level, finding a vault in the process. Let’s hope there’s good stuff in it.  Aside from this randart greatmaul, which is really quite good (projection 5 goddamn), there wasn’t much else of note on this floor. Let’s move on.  We skip past the welcome party on the second floor the same way we did on the first one, before turning around and blasting them from a safe distance.  Ugh, a radiant horror. Radiant Horrors are the big brothers of Luminous Horrors, with even more HP, resistances and healing moves to their name. If you’re not reliant on light/fire damage they aren’t that bad, though, and don’t come in guaranteed groups of three.  More records of Lorekeeper Hadak.  Clearing out the guardians of this floor. Taking them all on in an enclosed area like this probably isn’t the smartest idea, but eh.   Ooh. Mana coil is a tinker I’ve been hoping we would find for a while. Mana coils can only be stuck on staves, and they grant a bonus to mana regeneration, plus a chance to cast Lightning with every spell that hits.  While clearing out the rest of the buildings on this floor, we find another page of Hadak’s writing.  This is a pretty big vault – wonder what we’ll find in there?  Hmm. Ice dragons, for one.  Nothing but ice dragons, in fact. Well, since we can deal with those with relative ease, I’m not complaining.     A couple of artifacts, too. The Steamcatcher is a decent hat for a tinker character, but less so if you’re not one. It does give a bonus to physical damage, though, which almost every class appreciates. The Grinder is a saw with on-hit gloom effects, and a chance to Blindside attackers, teleporting to them for a free attack. While powerful, it does mean that you have to deal with being occasionally teleported to another location. On the other hand, if you’re a sawbutcher, that’s not a significant setback.  On the third floor we take it slow, carefully moving through the buildings. It isn’t long before we run into our real objective here – Vor, the Grand Geomancer of the Pride.  Vor is a high-level orc archmage with – you guessed it – a focus on fire and ice spells. In addition, he knows Elemental Surge, Meteoric Crash, and a couple of lightning spells just to round things out. If you really want Meteoric Crash yourself, hold off until his activates – witnessing (or more accurately, getting hit by) his summoned meteor counts for the Meteoric Crash prodigy.  I don’t know why he’s standing so close. He’s just going to hit himself with his own fireballs at this range. Admittedly, he must have realized this too, because his next step was to run away.   We manage to toss up See the Threads just before he falls. In timelines one and two, he drops his associated hat, the Crown of the Elements. It grants all-round bonuses to fire, cold, arcane and acid damage. Could be worth hanging on in case we need to round out our resistances.   In timeline three he drops the Mirrorrazor, a very odd saw. I must admit, I’ve never really used it as a sawbutcher, so I’m not sure how good these bonuses actually are. Not something we need right now, anyway.   We also receive this note and a future quest item, the Orb of Command. We can’t do anything with it right now, but while it’s in our inventory we gain a +6 Magic boost from it.  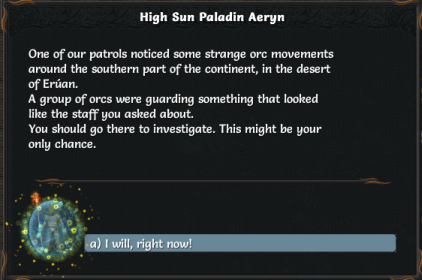 We also receive this telepathic message from Aeryn. This message pops up once we kill our first orc pride leader, and opens up a new non-Pride zone. We’ll check that out after we finish this up.  While clearing out the rest of the pride, we find the fourth of Lorekeeper Hadak’s notes.  And a Fearscape Invasion Portal. Now this is interesting. Fearscape invasion Portals will continuously spit out demons of all shapes and sizes while active. Upon stepping on them, we have a choice of either hopping in or destroying them. 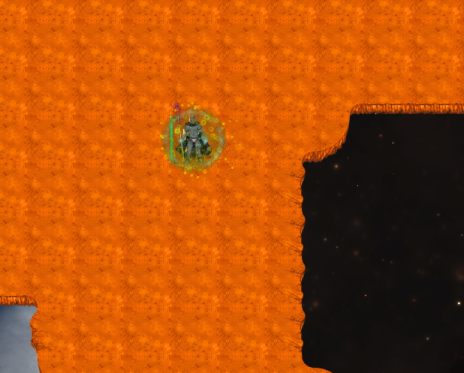 We could just destroy it, but where’s the fun in that? Hopping in takes us to the Orbital Fearscape platform, a small floating island in space. This is the only other way to obtain the ‘exposed to the void of space’ requirement for the Aether Permeation prodigy besides clearing the archmage starting zone, although if you’re not an archmage I don’t know why you’d bother taking it.  It’s no walk in the park – the fearscape platform is filled with rare demons of all shapes and sizes. One of them is the commander, and we’ll have to take him down to get out of here.  There we go. Upon killing him, a portal spawns back to the area we just left. Now, we don’t have to worry about any more demons.   While clearing out the orc mages, we find this fancy robe that one of the mages dropped. We put it on for the spellpower boost and free spell procs.  Also, the last of Loremaster Hadak’s notes.  Funnily enough, this floor still has the whole switches-and-door setup, despite the fact that there’s no reason for it to exist – we got what we needed with Vor’s death, and there are no further floors. We open it up anyway, because free loot and EXP. Also, there’s a forge-giant here.  After that, it’s on to the vaults. This particular vault is the summoning vault – no enemies inside, but a metric ton of summon alarms scattered throughout. Activating any one will almost certainly lead to a chain reaction where dozens more end up activated.  Next up is the orc vault, the most common vault type in the prides. This consists of a large trap-filled center chamber, with two long corridors filled with orcs and dragons, all leading to a large central room at the other end where the fancy loot lies. A gap in the wall allows them to filter outwards into the central chamber. It’s best to just head straight into the corridors instead. A nice selection of loot in here, too. Some highlights:   The Pick of the Dwarven Emperors is a decent pick, but fairly average as far as artifacts go. However, it becomes much more powerful in the hands of a dwarf.   The Will of Ul’Gruth is a solid set of t5 gloves. A large bonus to armor, damage and resistance penetration, and can be activated for an Obliterating Smash that removes walls. Will also proc Obliterating Smash when worn as a brawler/Flexcon user.   The Void Orb grants us all-rounded magic bonuses, but they’re mostly meant for archmages. Could still be worth hanging onto, though.   Dethblyd has a very silly name, but it’s a solid 2h sword. While its generic bonuses go well with any class, where it really shines is in a doombringer’s hands, granting them additional talent mastery and lower talent cooldowns.  Next up is another orc vault of a similar type. Told you they were common. Our contingency time stop is getting triggered a lot, even through our defensive measures. That’s a little worrisome – it means our resistances/armor aren’t quite up to par.  Oh god no. Nightmare Horrors are one of the strongest horrors in the game, on par with Saw Horrors. Their focus is on powerful darkness attacks, mental debuffs and Gloom. Their most fearsome combo, however, is Nightmare, followed up by Inner Demons. It’s a combo we really don’t want to be on the receiving end of, so we’ll play it very safe.  A quick cut away to an alternate universe to show off exactly why the combo is so scary. Inner Demons is a skill available to solipsists and psyshots, and potentially one of the most ridiculous talents in the game. Every turn, the target inflicted by Inner Demons must make a mental save, and failing the mental save has a chance to manifest an Inner Demon – a clone of themselves that lasts for ten turns, which has half the HP and deals half the damage of the original. If the target is sleeping, the Inner Demon has an even higher chance of manifesting.  After standing very far away from the nightmare horror while throwing time beams at it, the nightmare horror falls. All that’s left now is to pick up our loot. Some good stuff in here, too.   Life Drinker is a dagger that scales with Magic and Strength instead of Dexterity and Strength, and grants various spellpower bonuses. Could be useful on a shadowblade or something.   Dreamweaver is…certainly an odd gun. Might be worth using on a psyshot, I guess.   The Mandible of Ungolmor is a spydric-poison inflicting dagger. Good for a rogue going poisons-heavy.   Lotta daggers we’re finding. The Kinetic Spike scales with Dex, Strength and Will, and grants colossal amounts of armor and physical resist penetration, along with other bonuses.   Another dwarf-focused artifact, the Crude Iron Battleaxe of Kroll gains additional bonuses in the hands of a dwarf.   The Guise of the Hated is a Cursed/Doomed focused cloak, granting bonuses to Hate, mindpower and mental save.   The Guardian’s Totem is a powerful antimagic item that goes in the tool slot. In addition to its innate bonuses, it can be activated to summon a powerful antimagic guardian that attacks all enemy spellcasters in its general vicinity. And of course, several more pages of non-artifact loot barely worth consideration. We take the ones that could be useful and bugger off.  Our next destination is Eruan, the zone that opens up once we clear our first orc pride. It’s located here on the beach.  The first few areas of Eruan are large desert areas, spotted with trees. More importantly, ritches! This is the first zone they’re commonly found in (if you’re not a yeek), and we can finally harvest those much-needed stingers for our Fiery Salve.   A couple of notes from a different Loremaster lying around the first floor. These loremasters sure get around.  A champion of Urh’rok is the only really notable thing on this first floor, but nothing we can’t handle.  Why are we running into so many ritch larva who are also champion knife-tossers today?  On the second floor of Eruan, we run into a random event – a portion of the Fearscape appears to have made it to Var’eyal. An assortment of motley demons roam around a lava floor, with a powerful rare forge-giant guarding them.  In the center we find a rare prize – a white, egoless voratun ring. It might not sound valuable, but being egoless means that we can imbue it with any gem, including t5 ones. We don’t have any worth imbuing right now, though. One of the demons also dropped a white voratun amulet, which is even more valuable and can be imbued with up to two t5 gems. However, as with the earlier situation, not only do we lack any gems worth imbuing right now, we also lack a method to actually do so.  On the fourth floor, we run into this Sun Paladin, guarding a farportal.  Oh, that doesn’t sound good. We’d better go check it out.  Upon entering the farportal, the ‘Doom of the World’ quest starts. That’s not a reassuring sign. We now have 550 turns to reach the bottom of the Charred Scar. It’s a long, winding path, with various faeros and fire dragons getting in the way. Only ordinary movement counts – any random teleport will teleport you backwards, any targeted teleport forwards fails.  Thankfully, the ‘lava floor’ is just for show, and doesn’t burn you. Nonetheless, it’s slow going. We’d be much better off if we weren’t a skeleton, and could movement infusion our way through the zone. Still, at least we’re a Paradox Mage, and thus a good bit faster than most. Plus, we can clear out these fire dragons in our way with relative ease.  With some judicious use of every speed booster we have available to us, we make it with over 200 turns to spare. We have enough time to sit and rest up for a bit before pressing forward.  Have a sneak preview of the final bosses, Argoniel and Elandar. There’s nothing we can actually do to them here, though…  Upon taking any damage, they immediately teleport away, leaving behind a farportal and Fyrk, the king of the Faeros. Fyrk himself is a high-leveled faeros with powerful fire spells, but if you’ve actually managed to make it to this point, you should be able to deal with fire damage without much issue. The main challenge of the Charred Scar is the race to the bottom itself. If you fail to reach the bottom before the timer runs out, the game continues, but the sorcerers will be long gone by the time you reach. The effects of this aren’t immediately apparent, but suffice to say, nothing good comes from letting the final bosses get away with more of their evil plan.   While heading back up the Charred Scar to pick up the loot we ran past earlier, we find this little beauty. Khulmanar’s Wrath is a fun endgame weapon for any 2h weapon class, especially a doombringer. That’s about it for this update. We’ll be clearing out the remaining prides in the next one.
|
|
#
?
Aug 26, 2017 17:20
|
|