|
Efe posted:Though it makes me wonder, does every post-game EO stratum have that one floor that's basically a giant middle finger? Of course not. Claret Hollows (EO/EOU) has five of those!
|
 #
?
Oct 4, 2017 15:32
#
?
Oct 4, 2017 15:32
|
|


|

|
| # ? May 28, 2024 02:13 |
|
|
After EO1 nothing else in the EO series fazes me when it comes to dungeon hazards. EO4's postgame dungeon is too short and not nearly assholish enough too.
|
|
#
?
Oct 4, 2017 15:38
|
|
|
werbear posted:Of course not. To be fair, the EOU version of Claret Hollows made a few of the "screw you" floors much nicer. I'd say that B22F is the most notable of those, since you can actually see the pitfalls before falling in.
|
|
#
?
Oct 4, 2017 15:39
|
|

|
werbear posted:Of course not. I don't remember the first floor of Claret Hollows being so bad. The other four I could do without, though.
|
|
#
?
Oct 4, 2017 16:38
|
|
|
Basically, EO post-game strata are the point where the developers are finally willing to go full  on you. on you.
|
|
#
?
Oct 4, 2017 16:42
|
|
|
Pureauthor posted:EO4's postgame dungeon is too short and not nearly assholish enough too. I think it makes up for that with Muskoids.
|
|
#
?
Oct 4, 2017 17:02
|
|

|
Orange Fluffy Sheep posted:I think it makes up for that with Muskoids. Fun fact about those enemies, their AI forces them to use their petrification skill if they blindside your party. (As a very small mercy though, their multi-target version can only be used once. Then they'll just slice and dice any survivors to death.) Muskoid's AI Script posted:Upon being targeted with an attack, enter the bloomed state.
|
|
#
?
Oct 4, 2017 17:43
|
|

|
vdate posted:Postgame hell E: Spinner hell is way worse because you have to keep a presence of mind about all the time; any time your mind wanders off a little bit, oops - now you have no idea where you are. RegalStar fucked around with this message at 19:42 on Oct 4, 2017 |
|
#
?
Oct 4, 2017 18:40
|
|
|
vdate posted:EO5 LPs Thanks for spoiling a game that isn't even released yet dickhead.
|
|
#
?
Oct 4, 2017 19:24
|
|
|
Actually yeah, please leave the EO5 specific discussion to the EO5 LP thread. And definitely don't talk about that game without even using spoiler tags!
Araxxor fucked around with this message at 19:29 on Oct 4, 2017 |
|
#
?
Oct 4, 2017 19:26
|
|
|
More relevantly, that spinner maze is the most cruel design of the series to me. Teleport mazes even in EO1 you could draw in walls or some other bits of creative mapping to mark the right path. EO3 takes those tools away from you and if you stop paying attention and you step on a spinner you're hosed.
|
|
#
?
Oct 4, 2017 23:06
|
|
|
Update 99: Elder Dragon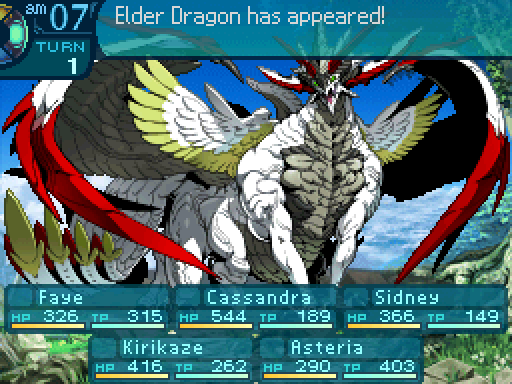 Meet Elder Dragon, the final boss of the Sea Quests! He�s a rather unique fight. 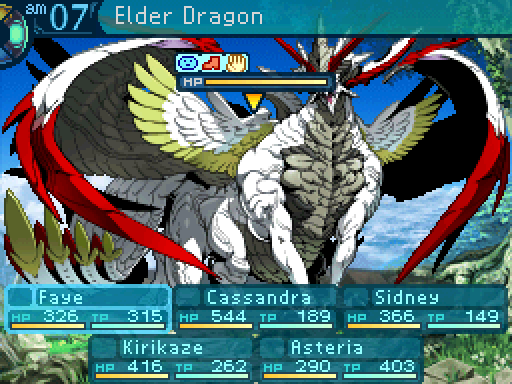 First of all, he starts off the fight fully bound. 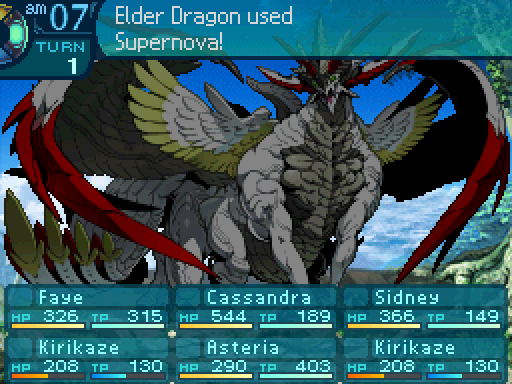 He�ll always try to cast this skill on the first turn. 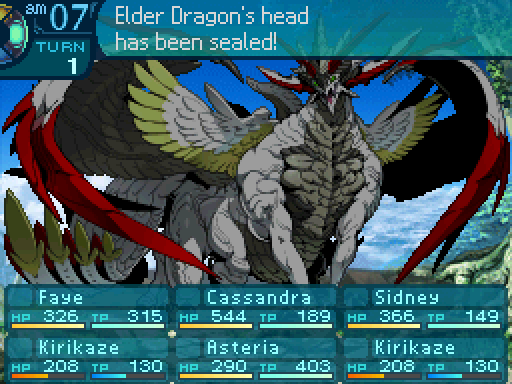 But his head bind prevents him from making use of it. 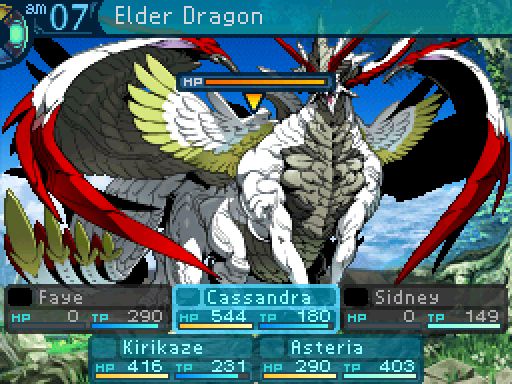  However, let him use that skill unimpeded and...       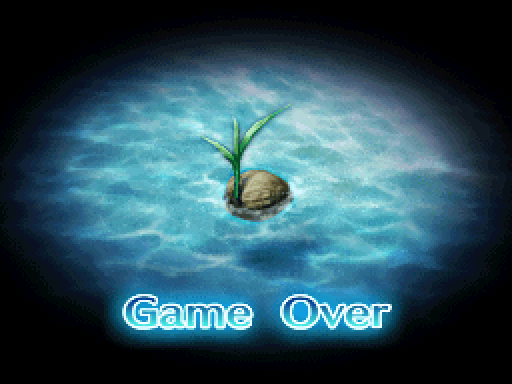 You�ll be looking at the game over screen real fast. So you better keep his head bound, or you�ll pay the price. Now there�s quite a bit more to the fight than this. So why don�t we take a closer look at Elder Dragon? 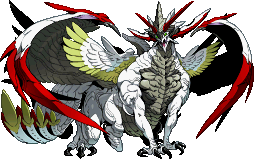 Elder Dragon Level: 75 HP: 44800 STR: 82 VIT: 79 AGI: 59 LUC: 56 TEC: 83 Attack Type: Strike Exp: 84000 Item Drops: -Normal: Holy Horn - 100% Drop Rate. Unlocks the Futsuno Mitama (Knife. Must be restocked.) --Came from a dragon so long-lived as to be called eternal. -Gold: Divine Scale - Kill while fully bound. 100% Drop Rate. Prevents normal drops. Unlocks the Dragon Blade. (Ultimate Sword. Must be restocked.) --Scale with a shine greater than the brightest miracle. Description: The pinnacle of organic life that has observed the world since the time of the gods. Damage Resistances: Slash: 50% Strike: 50% Pierce: 50% Fire: 50% Ice: 50% Volt: 50% Ailment Resistances: Sleep: 10% Confusion: 10% Plague: 10% Poison: 10% Blind: 10% Curse: 10% Paralysis: 10% Bind Resistances: Head: 80% Arm: 120% Leg: 90% Other Resistances: Death: LR � 10% Petrification: LR � 10% Stun: 10% Skills: Grand Dive: Does not use a body part. Deals 280% STR-based Strike damage to the entire party. Has an action speed of -20. Has an accuracy of 99. Wing Rush: Does not use a body part. Deals 300% STR-based Slash damage to one row. Has an action speed of +/-0. Has an accuracy of 99. Black Fire: Does not use a body part. Randomly hits the party 4 to 6 times, dealing 200% STR-based Fire damage per hit. Has an action speed of -20. Has an accuracy of 99. Scarlet Ice: Does not use a body part. Deals 280% STR-based Ice damage to the entire party. Has an action speed of -20. Has an accuracy of 99. Green Flash: Does not use a body part. Deals 450% STR-based Volt damage to one party member. Has an action speed of +/-0. Has an accuracy of 100. Ancient Breath: Does not use a body part. Heals the Elder Dragon for 1500 HP, and dispels Petrification, Sleep, Confusion, Plague, Poison, Blind, Curse, Paralysis, Head binds, Arm binds, Leg binds, and debuffs. Has an action speed of -20. Supernova: Uses the Head. Deals 3000% TEC-based Almighty damage to the entire party. Has an action speed of -50. Has an accuracy of 200. Quite the mighty looking enemy, isn�t he? Supernova is basically a kill move and one of the biggest concerns in the entire fight. Not only that, Elder Dragon takes half damage from everything aside from Almighty damage. And all but one of his skills does not use a body part, so he can�t be locked down easily. But even though he�s very resistant to ailments (as is standard in the post-game), he�s quite susceptible to binds. Still, that 80% Head bind resistance means that we can only bind his head 3 times before not being able to anything about Supernova anymore. Or is that really the case? Well you see, Elder Dragon also has some additional properties in the data that makes him different from most enemies in the entire game. Flags: Disable Bind Accumulative Resistance: Elder Dragon will not gain any Accumulative Resistance to binds, no matter what. (Elder Dragon still has Accumulative Resistance with regards to ailments.) Extra Damage: Leg binding Elder Dragon adds on 50% to his Slash, Strike, Pierce, Fire, Ice, and Volt damage multipliers. These two flags make the fight play out far differently than most other fights in the game. For one thing, Elder Dragon is the only enemy in the entire game to not have Accumulative Resistance (Only applies to binds.) As a result, binding Elder Dragon is essential to winning the fight because you are expected to make heavy usage of binds. If your party doesn�t have access to binds, don�t worry. The game has you covered on that. You�ll see what I mean later. Head binds shut down Supernova, that much is obvious. While none of Elder Dragon�s skills (aside from Supernova) use a body part, notice how every single one of them, the elemental attacks included, make use of Elder Dragon�s STR stat. As a result, Arm binds will halve the damage from his attacks. And considering how high Elder Dragon�s STR stat is, as well as how high those damage modifiers are, you�ll definitely want to bind his arms too. The 2nd flag makes it so that Leg binds are also a vital tool to make use of, as your damage is greatly reduced if you don�t bind his legs. Elder Dragon�s AI Script posted:Start off the battle with head bind, arm bind, and leg bind. Elder Dragon�s AI is pretty simple. He follows an attack pattern that he pretty much never deviates from in the first half of the fight, but he�ll mix things up once you reach the second half. Ancient Breath will start coming in at that point as well. While that skill is a bit of a setback when it gets cast, it also means that�s a turn Elder Dragon isn�t attacking you, so hog tying him is still in your best interests. Elder Dragon is honestly just a really cool fight, and it�s my favorite boss fight in the entire game. Having to use bind to keep him down really makes the fight stand out. And it also helps that he�s not fully disabled, so you still have to engage with whatever he tries to do. In that sense, binds aren�t really disables so much as different forms of debuffs. He�s a real test for your party�s capabilities, and doesn�t feel unfair for the most part. I mean for one thing, the game actually tells you how to deal with Supernova since he�s guaranteed to cast Supernova on the 1st turn, and if you let him cast it, you�ll find out very quickly why that�s a bad idea, so rematching him is fairly painless, especially considering that he�s a Sea Quest boss. A shame that the game couldn�t have ended on this note, but I digress. With that said, there�s a bit of a noticeable blemish in this fight. Notice how Elder Dragon�s head bind resistance is only 80%. Now the two best head binding skills in the game, Call Bird, and Hanging, have infliction rates of 50% and 60% at level 10. Now with an ailment score of 217, those can be increased to 100% and 120%. Oh, and Wild Mastery can increase Call Bird�s infliction rate to 115% at level 10. Oh and RNG can add up to 9% to those chances. So on average, you have a 97.9% chance of landing a head bind with Call Bird and Wild Mastery, or a 98.6% chance on average of landing a bind with Hanging. This means that mathematically, it�s impossible to be guaranteed to head bind him, no matter how high your binding skill levels and your LUC and TEC stats are. Which means that it�s completely possible to lose the fight through absolutely no fault of your own, because Elder Dragon casted Supernova on a turn where a head bind refused to land. That�s not difficulty, Atlus. That�s just being a dick. And yes, I have lost fights before because of an extremely unlucky lack of a head bind proc.  But at any rate, unlike the other Sea Quests, we�re not helping out anyone else. Instead, we�re being helped by the people we�ve assisted before. So let�s see how helpful these NPCs are.   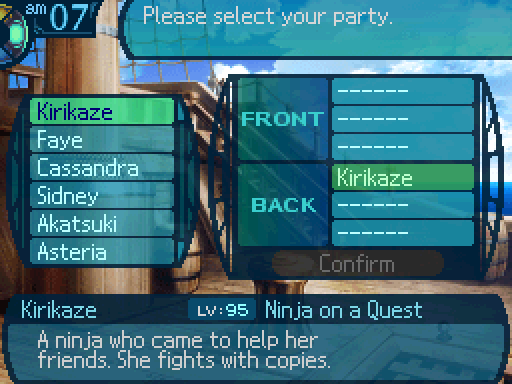 Kirikaze Class: Ninja Stats:
Kirikaze�s AI Script posted:If self's HP is below 51%, use a Medica III. (Targets self. Limit of 2.) Kirikaze was one of the first of the NPCs we�ve fought with, and now she is willing to take time out of doing tasks for her master to help us. She wasn�t a particularly spectacular party member all the times we�ve fought with her, and I�m sad to say that�s also the case here. She�ll focus on leg binding Elder Dragon, then try to make use of Tagen Battou if she�s allowed to clone herself. Unfortunately, her damage isn�t great, even though she has access to the ultimate Dagger. In fact, Kirikiaze is pretty much a straight up liability if you�re trying to make use of a Wildling, since animals are far more useful than what she can contribute. Otherwise, she�s just kind of there. Now since binds are an important part of the fight, I�m gonna talk a bit about each NPC�s binding capabilities (if they are capable of doing so). Kirikaze�s LUC and TEC stat total matches Elder Dragon, meaning that she receives no boosts or penalties to her infliction rates. She only has access to leg binds, As such, she has a 54% to 62% chance of landing a leg bind with Kagenui. Bring whoever you want for this Sea Quest, but be warned that if you try to bring a Wildling, you�re gonna be fighting over that 6th slot with her. Oh and interesting to note, all the NPCs in these Sea Quests do come with their ultimate weapons and armor to help give you an edge. (And are extremely overleveled to boot.)   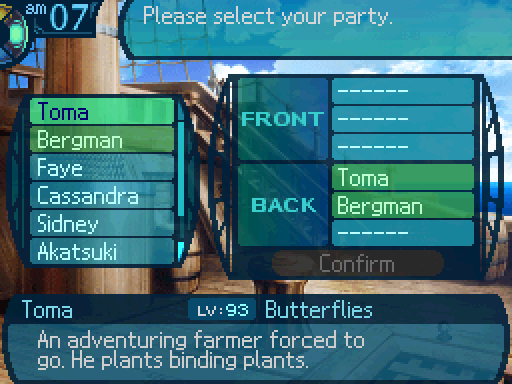 Toma Class: Farmer Stats:
Toma�s AI Script posted:When healing, prioritize party members with the lowest HP. We�ve hunted down treasure with Toma before, and in all those Sea Quests, he�s been a very good support. He continues that role here, as he�s a very good healer and will keep your party and his ally going. Occasionally he�ll try to bind Elder Dragon with Strange Seeds, but for the most part, he�ll just focus on patching your party up. And he can continue that job for quite a while. Especially if you happen to bring a healer to keep everyone topped off. As for his binding capabilities... I wouldn�t rely on him to make good use of binds. Strange Seeds is really not a reliable binding skills, but for the sake of posterity, I�ll list out the actual rates depending on the bind that it happens to choose. Head binds will have an 89% to 96% chance of landing. But arm binds and leg binds will always be guaranteed to land. However, the main issue is if Strange Seeds picks a bind that Elder Dragon is already inflicted with, it will do nothing. But fortunately, Toma is not our main binder in this fight.  Bergman Class: Wildling Stats:
Bergman�s AI Script posted:If self's HP is below 31%, use a Medica II. (Targets self. Limit of 3.) Bergman is. He has always been a reliable party member every time we�ve fought together, and was most definitely capable of carrying his own weight. Now, he will pretty much carry your party kicking and screaming to victory because he�s that drat good at his job. He will pretty much ensure that Elder Dragon stays bound whenever possible, and prioritizes head binds first so you won�t be so likely to lose the fight. And if Elder Dragon happens to be fully bound, he�ll toss out some debuffs to make the fight easier for you. Now Bergman is guaranteed to inflict arm and leg bind on Elder Dragon whenever he casts Call Snake and Call Mole. Unfortunately, due to the issue I talked about earlier, he only has a 95% to 100% chance of landing a head bind. So if you�re unlucky, you can lose to a stray Supernova. That�s about as good as binding he gets, so feel free to bring whatever bind you want, or just let Bergman handle all the heavy lifting. This is what I meant by the game having you covered if you don�t have any binders in your party. If you don�t happen to have a binder, take this Sea Quest. It�s by far the easiest Sea Quest to complete, since a Wildling is provided for you. And for the record, completing all the Sea Quests is not required for 100% completion. Only beating the sea bosses at least once is, so once you�ve taken out Elder Dragon once, you�re free to ignore the other Sea Quests if you lack a binder. At any rate, Toma and Bergman have the support angles covered pretty well, so you should mainly bring offensive characters to this Sea Quest. 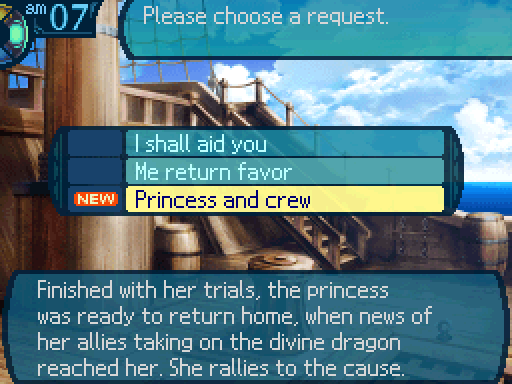 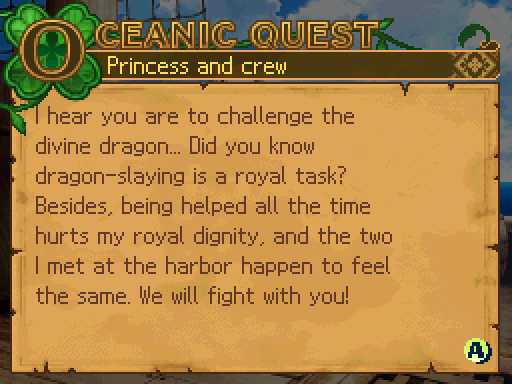  Victoria Class: Princess Stats:
Victoria�s AI Script posted:If the front row does not have the Attack Order buff, cast Attack Order. (Targets the front row.) Along with Kirikaze, Victoria was one of the first people we�ve teamed up with, and now she�s one of the last people we�ll fight alongside with. She�s been a fairly good support for her own allies, and the same applies here. She doesn�t focus on the back row too much, but considering who her allies are, she doesn�t need to focus on the back row if you bring the right party members.  Zaby Class: Buccaneer Stats:
Zaby�s AI Script posted:If Elder Dragon does not have his head bound, cast Hanging. (Targets the enemy with the lowest HP.) Zaby and her crew were able to handle things on their own the few times we fought with them, and just like those times, she�s capable of handling herself here as well. Her behavior is really simple. Head bind Elder Dragon if his head isn�t bound, and use Pincushion if it is. She�s a fairly decent damage dealer, and Victoria�s buffs can help her out. Unfortunately, you really can�t rely on Zaby to get the job done when it comes to head binding Elder Dragon. Her LUC and TEC stats are so far below his, that she only has a 48% to 55% chance of getting his head bound with Hanging. And considering that Supernova will cause you to lose the fight instantly, you�re really better off bringing your own head binder instead of trying to play with a coin toss every time his head gets unbound.  Nerona Class: Gladiator Stats:
Nerona�s AI Script posted:If Elder Dragon is blind, paralyzed, confused, asleep, poisoned, plagued, or cursed, cast Wolf Howl. (Targets the enemy with the lowest HP.) We�ve only fought by Nerona�s side once, but hey, it�s always nice to have help. I honestly have no idea what�s with the redundancy in her AI. But at any rate, Nerona�s behavior is simple. Is Elder Dragon Arm bound? No? Then try to arm bind him. Then just cast Nine Smashes whenever possible. Nine Smashes isn�t as much of an issue here as it was in the King Penguin fight, as Elder Dragon�s legs should be bound as often as possible. Also if you somehow manage to land an ailment on him, she�ll toss out a Wolf Howl so deal even more damage can be dealt to him. But that�s probably not something to deliberately go after unless you have the opportunity. Because Nerona�s LUC and TEC stats are so far below Elder Dragon�s respective stats, she actually just has a 72% to 82% chance of succeeding with Arm Breaker due to the infliction rate bug, so she�s fairly reliable at getting that job done. This Sea Quest honestly has enough in the way of damage dealers. Both Zaby and Nerona can handle the job, so you should mainly bring supports for this Sea Quest. Brining your own head binder is a must, since Zaby cannot be trusted with that job. Now that we�ve taken a look at our allies, let�s take a look at our own guild and begin the final party vote in this Let�s Play! Banned  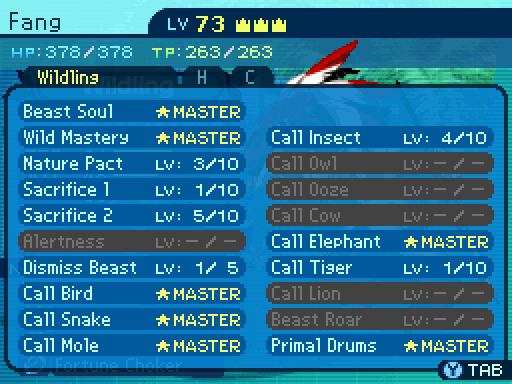  Ready, everyone? Ha ha ha, this is gonna be so much fun! Ready, everyone? Ha ha ha, this is gonna be so much fun!Considering how Fang is the only one in the guild capable of inflicting head binds, and that binds are so important in this fight, Fang is banned from voting. He�s coming along since we need him in order to win this fight. This is the other fight that I was saying that a Wildling was good for, and given all the reasons I just laid out, I�m sure you can see why. If you want to do all the Sea Quests here, having a Wildling is a must. The Rest of the Guild 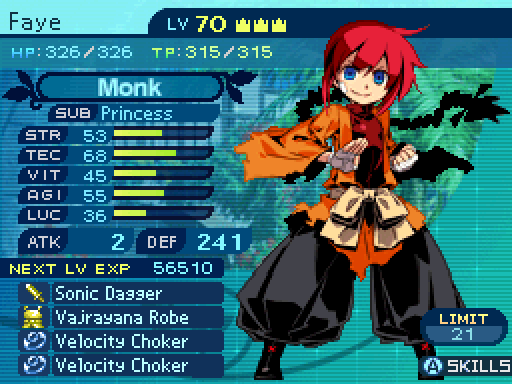 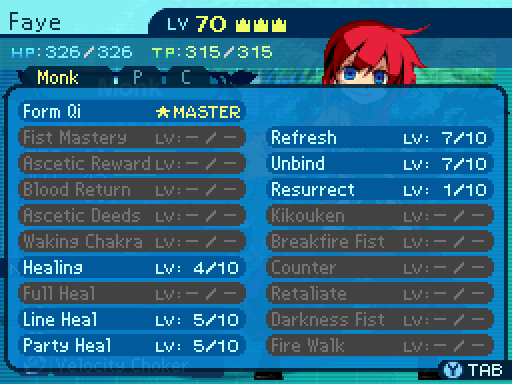 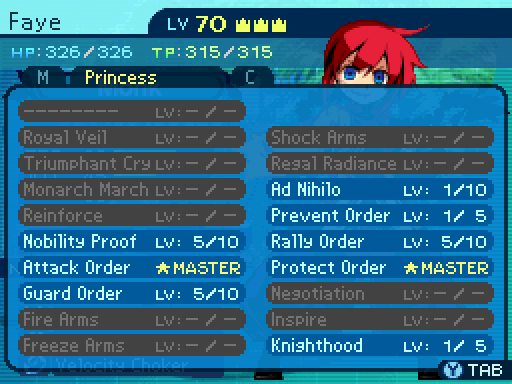  Heh heh, I�m kinda nervous about all this. Hope we can take him down... Heh heh, I�m kinda nervous about all this. Hope we can take him down...Faye is by far one of the strongest supports we can bring along. She has buffs, and her healing capabilities will make the fight far far more bearable given how much damage Elder Dragon can dish out.     As long as we are sufficiently prepared, I�m sure we�ll prevail. Yeah... Wait, why am I worried!? If we all die, we can just try again! ...That, too. As long as we are sufficiently prepared, I�m sure we�ll prevail. Yeah... Wait, why am I worried!? If we all die, we can just try again! ...That, too.Cassandra is also an extremely strong support to bring along. Her defensive capabilities can give the party a lot more room to breathe in the fight, especially considering how tanky she is on the physical side. That said, she�s not as strong as a defensive support given that she can�t use Bunshin, as Fang needs that slot far more.     Queen Dragon God... Yes, I like the sound of that. Queen Dragon God... Yes, I like the sound of that.MEGAQUEEN brings very little in the way of defense and instead goes all in on offense when it comes to support. Unfortunately, she�s rather redundant considering how many of her skills overlap with Faye�s, and defense is a lot more valuable than pure offense in this fight.   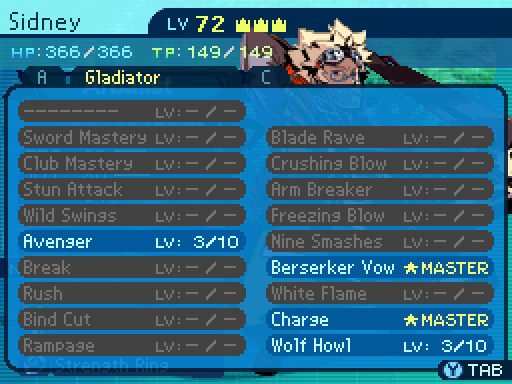  Hoo hoo! We�re gonna be in for the fight of our lives, here! Hoo hoo! We�re gonna be in for the fight of our lives, here!Sidney is one of the best physical damage dealers we have on this team. Unfortunately, his fragile defenses are very much a concern in this fight. Making use of Front Mortar is completely infeasible without Cassandra in the party, as Elder Dragon will be glad to paste him to the ground since his attacks deal so much damage. 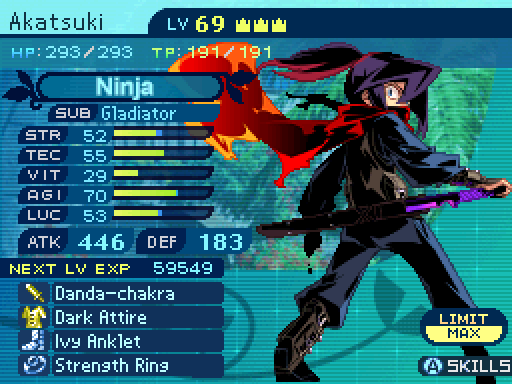  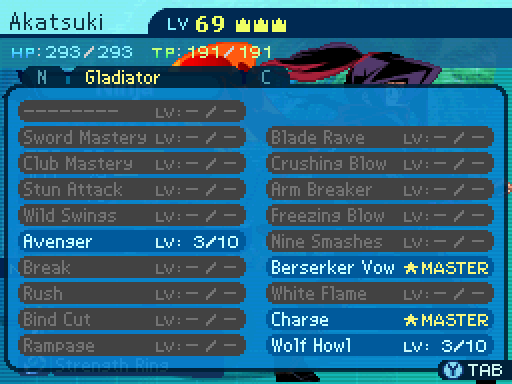  The Elder Dragon�s trial... I hope we�re up to the task. The Elder Dragon�s trial... I hope we�re up to the task.Akatsuki is really not a great party member to bring along. He can�t use Bunshin since Fang needs that slot more, so using Tagen Battou is out of the question. He�s also not that great at binding Elder Dragon�s legs either. 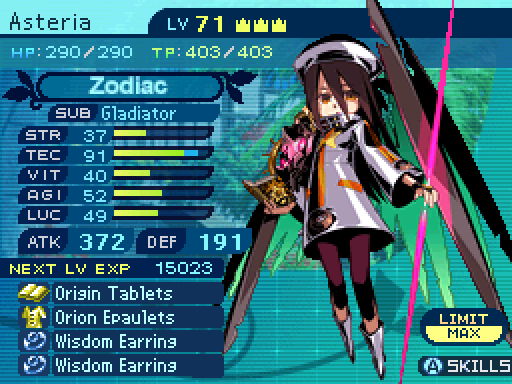    Never in my life did I think I would get to do something like this! Never in my life did I think I would get to do something like this!The absolute best damage dealer in our team without question, is Asteria. Yes, really. Since head binds are a huge part of the fight, Elder Dragon�s TEC stat will get halved. Meaning that Meteor gets a massive, and I mean massive damage boost. No other damage dealer aside from Sidney can compare to her. And her fragility isn�t a problem, since she can be placed onto the back row without any problems.      Swords sharpened... I�m ready to go! Swords sharpened... I�m ready to go!Rose is a durable physical attacker, and a fairly reliable party member to bring along. Since Elder Dragon should ideally have his legs bound at all times, her accuracy issues aren�t that big in this fight.      Queen of the dragons? Pfft, in your dreams. Would it kill you to not be a spoil sport for once? Queen of the dragons? Pfft, in your dreams. Would it kill you to not be a spoil sport for once?Scott is another good damage dealer we have, and he�s fairly fast as well. He can also provide some support with Eagle Eye. 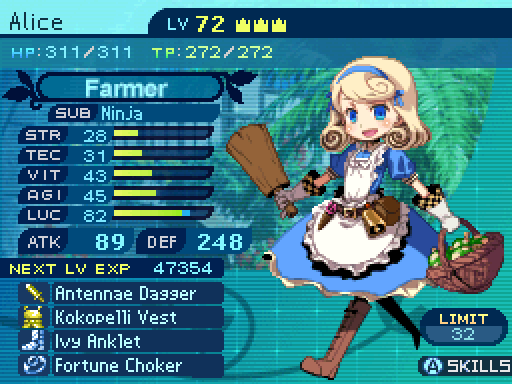     Ohhh, I hope this will all turn out well. Ohhh, I hope this will all turn out well.Alice is... not a stellar party member to bring along. Her ailment score matches Elder Dragon�s, so she gets no boosts or penalties to her infliction rates. Making her a rather mediocre leg binder.      Perhaps this will finally give us the edge we need to triumph over the Evil One... Perhaps this will finally give us the edge we need to triumph over the Evil One...Charlotte is a bit fragile and is capable of dealing great amounts of damage, but she�s a bit unreliable for the job.      Put me in coach, I�ll give that dragon god the ol� one-two! Put me in coach, I�ll give that dragon god the ol� one-two!Unfortunately, Smith is really not a great damage dealer to bring along. Breakfire Fist barely does anything, and there�s little he has to offer over all of the other options. Vote for up to 4 party members you wish to see take on the Elder Dragon�s test. Votes must be in bold. Araxxor fucked around with this message at 23:39 on Oct 5, 2017 |
|
#
?
Oct 5, 2017 22:04
|
|
|
Asteria, Cassandra, MEGAQUEEN, Fetus' Choice.
|
|
#
?
Oct 5, 2017 22:15
|
|


|
Sidney, Cassandra, Rose, Faye
|
|
#
?
Oct 5, 2017 22:25
|
|
|
Kyrosiris posted:Asteria, Cassandra, MEGAQUEEN, Fetus' Choice. This seems good. MEGAQUEEN must be the Queen Dragon God.
|
|
#
?
Oct 5, 2017 22:35
|
|


|
Edit: No, wait... Rose, Sidney, Asteria, Faye W.T. Fits fucked around with this message at 22:52 on Oct 5, 2017 |
|
#
?
Oct 5, 2017 22:48
|
|
|
Faye, Cassandra, Sidney, Asteria
|
|
#
?
Oct 5, 2017 23:14
|
|
|
Scott, Asteria, MEGAQUEEN, Sydney
|
|
#
?
Oct 5, 2017 23:16
|
|

|
Susan, Rose, Scott, Charlotte.
|
|
#
?
Oct 5, 2017 23:27
|
|
|
Too far along to change now. Faye, Asteria, MEGAQUEEN, Doctor's orders
|
|
#
?
Oct 5, 2017 23:28
|
|


|
Use different party members for each quest, give this LP the finale it deserves Okay so that probably won't count as a vote, so instead I'll say Faye, Cassandra, Scott, Asteria
|
|
#
?
Oct 5, 2017 23:40
|
|
|
Asteria, HRH MEGAQUEEN, Faye
|
|
#
?
Oct 6, 2017 00:26
|
|
|
Can I just say that Bergman claiming that he'll make a good meatshield is highly amusing to me? Anyways, I'd like Faye, Rose, Asteria, and Scott to come along.
|
|
#
?
Oct 6, 2017 01:04
|
|
|
Alacron posted:Use different party members for each quest, give this LP the finale it deserves If this were an option, I'd go for it too. Otherwise, I guess I'll throw in my votes for Asteria, Cassandra, Rose, and Charlotte. Considering that I stubbornly dragged a Wildling through my one and only run of this game (much to my detriment in a certain boss fight that I've rambled on more than enough by this point), this is a fight I would have actually liked to give a shot. All the work to reach this fight, though, is beyond my party's capabilities (and my patience).
|
|
#
?
Oct 6, 2017 01:09
|
|
|
Scott can use Hanging for all your binding needs! 
|
|
#
?
Oct 6, 2017 01:17
|
|
|
Alice, Smith, Akatsuki, Charlotte. 
|
|
#
?
Oct 6, 2017 01:37
|
|
|
Oh, that really is an interesting fight. More bosses need to have, like, alternate reactions to status conditions.
|
|
#
?
Oct 6, 2017 01:57
|
|


|
Thirding the theoretical "use different people each quest" thing, voting Akatsuki, Rose, Scott, and Asteria if that doesn't go through. I may as well give you an easy time with that conditional, because we all hate those full binds without Dominate or some other skill like that.
|
|
#
?
Oct 6, 2017 03:19
|
|
|
Alice, Asteria, Cassandra, Faye Yeah using all the members in different scenarios (with Fetus having full control over the groups so it's actually viable) would be cool.
|
|
#
?
Oct 6, 2017 03:26
|
|
|
Fetus' Choice x4 I also like the idea of variety.
|
|
#
?
Oct 6, 2017 03:38
|
|

|
quote:Use different people in every Sea Quest I genuinely have no idea how the hell I would even pull that off. I only have 1 head binder. And Scott's stats are way too low to make use of Hanging without farming a ridiculous amount of LUC and TEC books. I am not coasting on a 48% to 55% chance to continue the fight for every single Supernova for a fight that can last for about 40 turns.
|
|
#
?
Oct 6, 2017 03:50
|
|
|
Yeah I wouldn't try to ruin the last boss that's remotely fun in the game for you. I'd quite like to see Warrior Might demonstrated. Sea quests are far from ideal for using it so I've never tried myself, interested seeing how it compares. A Magical Lamp fucked around with this message at 06:29 on Oct 6, 2017 |
|
#
?
Oct 6, 2017 06:25
|
|
|
Actually, upon thinking and planning, it may be possible to pull off the whole different party members schtick. I'll try to see what I can do. So yeah, if you want to see all different party members for all Sea Quests, go ahead and vote for that option if you want. If enough people vote for it, I'll do it. Mind you, I will completely ignore voting results and control who goes to what Sea Quest in that scenario. But in the meantime, Vote so far: Asteria: 12 Faye: 8 Cassandra: 7 MEGAQUEEN: 6 Rose: 6 Scott: 5 Sidney: 4 Charlotte: 3 Akatsuki: 2 Alice: 2 Smith: 1 My Choice: 7 Different party members: 3 Araxxor fucked around with this message at 06:42 on Oct 6, 2017 |
|
#
?
Oct 6, 2017 06:39
|
|
|
Let the whole gang tag along on the final voyage.
|
|
#
?
Oct 6, 2017 06:44
|
|


|
That's what I was thinking, definitely keep Fang to make your life easier, but use everyone else
|
|
#
?
Oct 6, 2017 06:52
|
|

|
Fang, Asteria, Cassandra, Charlotte
|
|
#
?
Oct 6, 2017 07:12
|
|
|
Alacron posted:Use different party members for each quest, give this LP the finale it deserves I hate to say this, but Elder Dragon isn't the true final boss. There's one more big fight after it. But I'll be sure to give that particular finale exactly what it deserves.
|
|
#
?
Oct 6, 2017 07:28
|
|
|
Can't you subclass Alice into a wildling for this fight for a third head binder or is her tec too low for that despite farmer luck? Anyway all hands on deck if at all feasible. P.s. did Faye meet an hexer still pissed off after a dinogator encounter?
|
|
#
?
Oct 6, 2017 07:43
|
|


|
Spinners and mapless rooms. How "fun". Fetus' Choice x4.
|
|
#
?
Oct 6, 2017 08:44
|
|
|

|
| # ? May 28, 2024 02:13 |
|
|
Clearly for a boss this special, you need to send in literally everyone
|
|
#
?
Oct 6, 2017 08:58
|
|