


|
I do almost all my spraying with a Patriot 105, .3 needle, using a 2:1 mix of thinner and paint where the thinner is usually 1-2 drops of Vallejo airbrush thinner and the rest is flow improver. And that's using scale75 or reaper paints. I thin less for Vallejo air paints. I typically spray between 10 and 15 psi.
|
 #
?
Mar 6, 2018 18:45
#
?
Mar 6, 2018 18:45
|
|


|

|
| # ? May 27, 2024 20:39 |
|
|
Floppychop posted:All I have left is the transfers and weathering on this thing. Looks real good! IMO, a lot of the sisters vehicles are mobile shrines that would be kept clean and gleaming even if it is impractical to do so on the battlefield - except the repressor. The repressor is the down-and-dirty bulldozing-heretics-into-the-mud workhorse of the bunch
|
|
#
?
Mar 6, 2018 18:57
|
|


|
Thanks for the replies guys, I have ordered some Vallejo airbrush thinner and I'll drop the pressure a bit (spraying at 20 because I read online that's what I was supposed to use lol.) I'll stop thinning with water altogether and see if this helps
|
|
#
?
Mar 6, 2018 19:10
|
|

|
Avenging Dentist posted:It's like $30 shipping, but I ordered mine with a bunch of other stuff, so it amortizes out. Shipping to the US was around $8, and it takes about a week, maybe two if they don't have stock. I've ordered my Rathcore from them, and a couple other supplies a few times already.
|
|
#
?
Mar 6, 2018 19:32
|
|

|
Philthy posted:Shipping to the US was around $8, and it takes about a week, maybe two if they don't have stock. Oh cool. Their shipping guide must overestimate then.
|
|
#
?
Mar 6, 2018 19:33
|
|

|
Avenging Dentist posted:Oh cool. Their shipping guide must overestimate then. They charged me 6.75 euro for every shipment I've done. It says anything over 500g and it goes up. 500g is a bit of weight. The big handled Rathcore is only 100g total.
|
|
#
?
Mar 6, 2018 19:39
|
|
|
Oh, apparently I just scrolled right on by that and looked at the DHL graph. 
|
|
#
?
Mar 6, 2018 20:10
|
|
|
 My first mini in over a year. And I am trying to teach myself brush on OSL. I got a little impatient on it though.  And here is the unit! I still need to finish bases. But they are table ready. Eventually I will come back to these and take them up a level.
|
|
#
?
Mar 6, 2018 21:05
|
|
|
Anyone got any experience with the alcohol-based vallejo metalics? The gold that goes on is stunning but it rubs off pretty easily and seems to get re-mobilised by the testors dullcote i'm using so I can't varnish them without covering the entire model in gold flakes, am I missing something?
|
|
#
?
Mar 7, 2018 21:33
|
|

|
Jesus christ GW's model prices  Apparently if I want to get back into 40k without murdering my bank account I'm gonna have to follow the section of this thread about casting my own models. I'm fine with that, sounds like it could be fun on it's own. One question springs to mind though, how does polyurethane work as far as gluing the components together? I've used Testor's plastic weld every time I've worked with models because it has that fantastic applicator tip and super-gluing parts together never works out well in my experience. Can I still use that on polyurethane that I've cast in a silicon mold?
|
|
#
?
Mar 7, 2018 23:37
|
|


|
Ayn Marx posted:I have ordered some Vallejo airbrush thinner This will make your dry tip worse. You need this: 
|
|
#
?
Mar 8, 2018 01:19
|
|

|
whiteshark12 posted:Anyone got any experience with the alcohol-based vallejo metalics? The gold that goes on is stunning but it rubs off pretty easily and seems to get re-mobilised by the testors dullcote i'm using so I can't varnish them without covering the entire model in gold flakes, am I missing something? Maybe you have a bad pot? I use Vallejo alcohol based metallics all the time and have none of your issues 
|
|
#
?
Mar 8, 2018 02:11
|
|
|
bird food bathtub posted:Jesus christ GW's model prices What faction are you interested in? The Dark Imperium stuff can be found on eBay for bargain basement prices a lot. The Horus Heresy plastics too.
|
|
#
?
Mar 8, 2018 02:34
|
|
|
Shadin posted:What faction are you interested in? The Dark Imperium stuff can be found on eBay for bargain basement prices a lot. The Horus Heresy plastics too. When I haven't been taking a break from 40k I've played Tyranids since second edition, not gonna stop now!
|
|
#
?
Mar 8, 2018 03:19
|
|
|
bird food bathtub posted:When I haven't been taking a break from 40k I've played Tyranids since second edition, not gonna stop now! Where do you live? I have some Tyranids that need a home, and they're from the collection of my friend who passed away last year, so any cash would be going to his family, so it's for a good cause!
|
|
#
?
Mar 8, 2018 04:54
|
|


|
bird food bathtub posted:Jesus christ GW's model prices You can also get older metals for cheap if you watch eBay long enough. I kind of love doing retro conversions that update old models to new rules using old parts, but ymmv. Does anybody have experience working with old 90s FW resin? It has several huge blocks of sprue attached, which are easily a quarter inch thick. What's the best way to get these off? It's too thick for my clippers, I'm scared to dremmel it off, and a scalpel seems impractical.
|
|
#
?
Mar 8, 2018 13:50
|
|


|
moths posted:You can also get older metals for cheap if you watch eBay long enough. I kind of love doing retro conversions that update old models to new rules using old parts, but ymmv. Outside with a mask, or under a water bath with a saw and file?
|
|
#
?
Mar 8, 2018 14:08
|
|
|
moths posted:Does anybody have experience working with old 90s FW resin? It has several huge blocks of sprue attached, which are easily a quarter inch thick. What's the best way to get these off? It's too thick for my clippers, I'm scared to dremmel it off, and a scalpel seems impractical. A jeweler's or razor saw with a dust mask. Outside, if you can manage.
|
|
#
?
Mar 8, 2018 14:15
|
|

|
Ok, so I just doused my hellblasters in primer, and had a much better time with paint sticking to them, I think I was being too delicate. I sprayed them silver, and then used a green glaze (I think, it's a transparent green used for lenses on scale model tanks?) and I'm almost happy with the result. Under some light, they look cartoonishly shiny green, which is cool, although I wanted it a darker color. In other light, however, it looks nearly gold. I was going to hit them with nuln oil to make them darker, but I'm wondering if using the blue or green shade might work better. Sorry about the garage pics, I'm moving soon, and not going to invest in a proper photo set up until I do. 
|
|
#
?
Mar 8, 2018 14:38
|
|


|
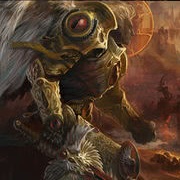
I'm going to try painting something similar to this pattern on a Leman Russ:  I've never done anything complex like this before so I'm frankly a little bit intimidated. I'll probably just do two colors to keep it a bit simpler but I'm wondering if anyone has any tips. I'm thinking of using tape to block stuff out- is there a particular size or brand that works best? Should I be using a different product entirely? What's the best way to account for all the ridges and protrusions?
|
|
#
?
Mar 8, 2018 16:09
|
|
|
I sprayed some of my Warmaster stuff last night with Secret Weapon Tire Black, and it wound up looking almost jade green on the model. Can't figure out how that one happened. I also moved my compressor, not realizing that the hose was wrapped around one of the feet, and pulled my airbrush stand and airbrushes off the table onto a concrete floor. Bent my Sotar needle 180 degrees to the rear of the brush. Yay!
|
|
#
?
Mar 8, 2018 16:13
|
|
|
Beast Pussy posted:Ok, so I just doused my hellblasters in primer, and had a much better time with paint sticking to them, I think I was being too delicate. I sprayed them silver, and then used a green glaze (I think, it's a transparent green used for lenses on scale model tanks?) and I'm almost happy with the result. Under some light, they look cartoonishly shiny green, which is cool, although I wanted it a darker color. In other light, however, it looks nearly gold. I was going to hit them with nuln oil to make them darker, but I'm wondering if using the blue or green shade might work better. Sorry about the garage pics, I'm moving soon, and not going to invest in a proper photo set up until I do. I use a similar technique for my Primaris. After the glaze over silver, I edge highlight in silver and then apply two layers of shade. In my case it's purple.
|
|
#
?
Mar 8, 2018 16:17
|
|
|
Yeast posted:This will make your dry tip worse. Flow improver is not intended to be used to thin paints. It's intended to be used along with thinner. Thinner slightly breaks down the medium to lower viscosity but it's also a drying accelerant, so you want to compensate with a little bit of flow improver (like a drop or two at the most). Using too much flow improver is going to leave your paint wet after it hits the surface of your model, what you want is for the paint to dry as soon as it hits the surface. Also both these things are expensive. A mix of 90% distilled water and 10% isopropyl alcohol is a perfect acrylic paint thinner for 10% the price. Also proper air pressure is essential, but there is no specific PSI you can set at, it is directly relative to your paint consistency. Instead thin your paint and then spray on a piece of paper or cardboard: If the paint is spattering and inconsistent then increase your pressure.  if the paint is wet and "spidering" then decrease your pressure.  It takes some practice, but the important thing is to find a thinness of paint and air pressure combination that works for you and then consistently thin your paints to that degree. If you're still getting dry tip with properly thinned paint and a little flow improver, make sure you're cleaning your needle really well, especially after spraying any sort of primer (primer binds to paint). You can also every minute or two of painting, point your brush straight down (ideally at a surface you don't mind spraying) and give it a full trigger pulse of paint, that will help dislodge anything in the tip.
|
|
#
?
Mar 8, 2018 16:19
|
|

|
Pendent posted:I'm thinking of using tape to block stuff out- is there a particular size or brand that works best? Should I be using a different product entirely? What's the best way to account for all the ridges and protrusions? I use blue masking tape and recommend it - one thing I'd suggest is sticking it on your sleeve or something a few times to make it less tacky. Additionally, save all your weathering until your base colors are done!
|
|
#
?
Mar 8, 2018 16:30
|
|
|
Bucnasti posted:Flow improver is not intended to be used to thin paints. It's intended to be used along with thinner. This belongs in the OP
|
|
#
?
Mar 8, 2018 17:21
|
|

|
Beer4TheBeerGod posted:I use a similar technique for my Primaris. After the glaze over silver, I edge highlight in silver and then apply two layers of shade. In my case it's purple. I know you used inks, right? Those just aren't available here in Vietnam, and I don't really want to wait the weeks that shipping and whatnot will take. Do you think just biel-tan green shade from GW will darken it enough?
|
|
#
?
Mar 8, 2018 17:23
|
|
|
Bucnasti posted:Flow improver is not intended to be used to thin paints. It's intended to be used along with thinner. DiHK posted:This belongs in the OP
|
|
#
?
Mar 8, 2018 17:24
|
|


|
moths posted:I use blue masking tape and recommend it - one thing I'd suggest is sticking it on your sleeve or something a few times to make it less tacky. Thanks- I guess I'm on the right path and just need to bite the bullet and go for it.
|
|
#
?
Mar 8, 2018 17:30
|
|
|
I'm looking for some sort of slightly adhesive putty I could use a small dot of to (e.g.) hold heads onto torsos temporaraly to get an idea of what it looks like without having to glue it or do some sort of balancing act with it. Is this a thing-which-exists?
|
|
#
?
Mar 8, 2018 20:09
|
|
|
A tiny dot of that blue tack poster putty?
|
|
#
?
Mar 8, 2018 20:13
|
|


|
I use a few drops of water, and a few drops of flow improver. Literally never have problems, ymmv I guess. I use Scale, Vallejo, Citadel, p3 miniatare and reaper with that. Flow improver single handedly changed my hobby game when I discovered it- and I often just rock the trigger to dry the model while I�m working. Air -> Paint -> Air -> Paint -> Air etc Allows for very seemless transitions.
|
|
#
?
Mar 8, 2018 20:16
|
|
|
Bad Munki posted:A tiny dot of that blue tack poster putty? That's a great idea!
|
|
#
?
Mar 8, 2018 20:17
|
|
|
Pendent posted:I'm going to try painting something similar to this pattern on a Leman Russ: I will never stop singing praises for Mig masking putty, which is exactly for this: http://www.migjimenez.com/en/accessories/524-camouflage-masking-putty.html
|
|
#
?
Mar 8, 2018 20:52
|
|
|
Is it true you shouldn�t use good sable brushes with alcohol based paints? Specifically talking about W&N series 7.
|
|
#
?
Mar 8, 2018 21:10
|
|


|
They will ruin your natural fiber brushes, just like other solvent based paints. Use synthetic bristled brushes. I really like my Loew-Cornell (I think that's correct.)
|
|
#
?
Mar 8, 2018 21:18
|
|

|
Pendent posted:I'm going to try painting something similar to this pattern on a Leman Russ: I really like Tamiya masking tape. It comes if a variety of precut widths too. With some patience you can get it to behave well even on pretty fiddly shapes. For something huge like a leman russ i'd probably use a relatively thin stripe to to carefully define the edge and then cover the larger areas with wider tape or putty. Tried to find some of the more bumpy spots in my fleet, the stripes are between 1mm and 4mm wide. 
|
|
#
?
Mar 8, 2018 21:41
|
|

|
I grabbed some cheapie Plaid brush set 44278 for doing metallics and washes that can be rough on sable brushes. They've performed surprisingly well although the #3 is already getting a bit rough on the tip from using it basecoating. The smaller ones hold their tip quite well.
|
|
#
?
Mar 8, 2018 22:26
|
|
|
If you want to get really involved, the PLASMO guy suggests that camo patterns via airbrush are best done by marking off the border of the pattern with thin poster putty snakes, then covering the area you�re trying to mask with tape applied between the snakes and not touching the model. This will give you a very slight gradient along the edge of the pattern as you apply it.
|
|
#
?
Mar 8, 2018 22:48
|
|
|
Bucnasti posted:Flow improver is not intended to be used to thin paints. It's intended to be used along with thinner. This was a huge help. Thanks for taking the time, much appreciated
|
|
#
?
Mar 8, 2018 23:00
|
|
|

|
| # ? May 27, 2024 20:39 |
|
|
Beast Pussy posted:I know you used inks, right? Those just aren't available here in Vietnam, and I don't really want to wait the weeks that shipping and whatnot will take. Do you think just biel-tan green shade from GW will darken it enough? The ink is only for the base coat. I used the Army Painter equivalent of GW's wash for the upper layers. I bet it will work great.
|
|
#
?
Mar 8, 2018 23:37
|
|