


|
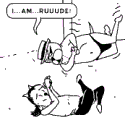
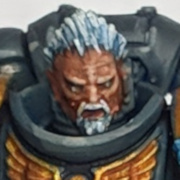
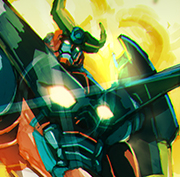
I've been wanting to build some Tyranids forever, but was waiting until I found a painting scheme that I liked which is really fast, really easy, and has room for easy tweaks (e.g. swap one color shade for another and things still looks good). Finally landed on this, and painted this guy in no time flat today. I can easily swap the green shade on the carapace for any other color in order to color match different units. I'm not necessarily looking forward to painting a thousand of these guys, but I really like how this guy turned out.
|
 #
?
Oct 7, 2018 22:32
#
?
Oct 7, 2018 22:32
|
|


|

|
| # ? May 9, 2024 16:44 |
|
|
 I'm doing these artillery guns and they came with these nice scenic bases. The area next to the stone walls is recessed a little, and I want to make it look like a little ditch full of drainwater. How would I go about making a dirty little 15mm scale stream? I've only ever done big rivers using water effects, that technique seems like it wouldn't work for something that small.
|
|
#
?
Oct 7, 2018 23:32
|
|

|
Geisladisk posted:
Slather Agrax Earthshade Gloss where you want the dirty water, and do multiple coats.
|
|
#
?
Oct 8, 2018 00:49
|
|

|
Agrax gloss on it might work, I would still use water effects if you apply it with a fine tool instead of pouring it in you can have plenty of precision and you can tint it any colour.
|
|
#
?
Oct 8, 2018 00:54
|
|

|
Geisladisk posted:
Why wouldn't it? I use those 2 part mixes for small portions of bases it works just fine. Just make sure block off any edges it would drip off so it settles correctly. If you want special effects like ooze or mud you can mix acrylic paint into it while your stirring the 2 parts.
|
|
#
?
Oct 8, 2018 01:58
|
|


|
IPA Regulations posted:Too much of a brown shade? Not really getting how that would create white. I've only ever seen it when I've gone a bit overboard and the pools take ages and ages to dry. I'm guessing that split you mentioned happens in that case
|
|
#
?
Oct 8, 2018 13:15
|
|


|
Not miniature painting but I'm painting a switch controller ; For the varnish. Is there a way to get this into a form I can airbrush, or is their a suitable alternative? 
|
|
#
?
Oct 8, 2018 20:04
|
|
|
goodness posted:Not miniature painting but I'm painting a switch controller ; Like, remove it from the spray can and put it into an airbrush? I wanna say no, not really. Most hobby/art stores will sell varnishes in various finishes that can be used in an airbrush, I use liquitex. Lots of companies that make hobby paints (vallejo, badger etc) also make varnishes that can be used with airbrushes. Why can't you just spray it from the can?
|
|
#
?
Oct 8, 2018 20:29
|
|
|
Decanting spray cans is a thing. I've done it with a can of dullcote, and I've heard of people doing it with tamiya spray cans. I'd recommend watching a video on how to do it, it's pretty simple. Chances are it will be airbrush ready after you let the propellant evaporate.
|
|
#
?
Oct 8, 2018 22:06
|
|


|
It�s been a long time. The scratch built vehicle portion of my inquisition army is done (except for 7 more standard transport rhinos, but those aren�t nearly as interesting), mostly meant for 40k and inq28. I batch-paint, so over the last few days days I went from having nothing done, to just about everything being finished, excluding needed touch-ups I notice after photographing, of course. I'm still debating on some aspects, the only notable ones being needing to make far too many tiny Purity Seals, and I'm trying to figure out the best way to add a checkered pattern to some armour panels (to get a bit more of the noble or knight idea across). I also have some sewing ahead of me for the banner on the battle podium. Probably just a checkered border, a giant sytlised I and/or a skull in black or red on white fabric. I have no idea how to condense this down better/hide the images to be expandable  The Battle Podium   The attachements for the front end weapons are magnetised, I currently have the weapons, or grey panels.  The back-end without the engine assembly.   Back-end with engine and lighting installed/lit.     The mule/command vehicle. I have much more stowage to add, but I�m unsure about the �best� way to attach it still. (tarps, bags, meal kits, ammo boxes/crates, etc)       Each walker is roughly 6.5� tall without base, using them as knight stand-ins.       Valdor Tank Hunter  Oversized dreads. 3-�� tall. Thankfully I realised that the scale is more in keeping with some of the art depicting dreads, so I kept and finished them instead of using for parts.  It looks neat, nevermind that the torque on the frame from attempting to turn would tear it apart.  Lifted from weirdingway, but they were a neat little design, and these were the first things I built as a bit of practice before doing the big stuff. That's it aside from some Exorcists I need to re-photo after realising I had forgotton to paint the fleur de lis anything.
|
|
#
?
Oct 8, 2018 23:41
|
|
|
I don't know whether to be more impressed with the model work or the painting. GD!!!
|
|
#
?
Oct 8, 2018 23:53
|
|
|
Airbrush talk... I've got a Badger Renegade Krome, and I'm having problems with it since swapping from the ultra-fine to the fine tip needle and nozzle. It just bubbles in the cup and won't spray any liquid, not even water. I've tried almost everything I can think of and I'm still having problems. I used the ultra fine tip nozzle without issue, but since I also got a Sotor 2020 I decided to swap the krome to the fine tip. I switched the nozzle and the needle but forgot the swap the regulator cap. When I hooked it up to the compressor it wouldn't shoot air at all. I took everything apart thinking it was the trigger, swapped back to the Ultra Fine tip and found that it worked again. Realized I didn't change the regulator cap so I swapped back to the fine tip nozzle, needle and cap. Now the brush will spray air but won't spray any paint or even water. It just bubbles in the cup. I've cleaned everything, verified that all the fittings are tight, but I can't get any liquid out of it. If I swap back to the Ultra Fine tip, it sprays but sputters a bit when first pulling the trigger, which is super annoying. I'm going to try getting some wax to make sure all the threads are air tight but that's the last thing I can think of. I'm afraid I might have damaged the nozzle somehow by using it with the wrong regulator but it looks fine. Anyone have any ideas?
|
|
#
?
Oct 9, 2018 03:36
|
|

|
VolatileSky posted:It�s been a long time. These look amazing. Great work. Thought about this project recently...saw the WIP last year and wondered what became of it!
|
|
#
?
Oct 9, 2018 04:14
|
|

|
goodness posted:For the varnish. Is there a way to get this into a form I can airbrush, or is their a suitable alternative? Symetrique posted:Decanting spray cans is a thing. ... Chances are it will be airbrush ready after you let the propellant evaporate. The thing is, what he's looking to spray isn't just varnish, but a 2k clear coat. As in, there's a little piece in the lid that forcefully pops into the bottom of the can, allowing the two parts of the varnish to mix together, and you have anywhere from 2-3 days tops to spray what you want before the stuff becomes unusable. TBQH, I have a can that I haven't touched yet for when I'm finished with some Gamecube controllers. Thing is, I know I don't have enough PPE for my own personal safety, and getting it is out of my price range at the moment. You want to talk "hazardous to your health", isocyanates (which are in most 2k clear coats, including that one) are loving horrific to expose yourself to. Do yourself a favor, and don't skimp on the PPE. Look at the symptoms, be aware of warning signs, and take care of yourself when using that poo poo.
|
|
#
?
Oct 9, 2018 04:21
|
|


|
So here's a weird sort of question/request for advice: what sort of path would you take in terms of improving your painting skill and tackling different projects? I know this is an odd thing to ask, but I was looking at one of the Imperial Knights, and I thought, "those look really cool, but they're expensive, and probably not something you do until you're really good." The Deathwing Terminators I'm doing are my first attempt at doing something that's not push-fit, and (provided I get the paints for it) something where I thought I'd try to attempt doing some highlighting and/or dry-brushing. From there, though, I don't know what would be the most appropriate step in terms of skill level. I thought maybe a vehicle like one of the Dreadnoughts, or a larger set like the Start Collecting boxes.
|
|
#
?
Oct 9, 2018 04:41
|
|
|
Aniodia posted:There is, but it's not cheap in any sense of the word. This is also assuming you can even get TCP to ship it to you, which is even more money. I didn't know it worked like that. Is there an easier to use alternative that is almost as good?
|
|
#
?
Oct 9, 2018 05:33
|
|
|
Max Wilco posted:So here's a weird sort of question/request for advice: what sort of path would you take in terms of improving your painting skill and tackling different projects? ed: Also, do that poo poo on single minis, not bigger than an ogre (unless you specifically want to try bigger models), it helps in not losing interest in the middle
Pierzak fucked around with this message at 18:52 on Oct 9, 2018 |
|
#
?
Oct 9, 2018 12:10
|
|
|
Got some updated pics of the Cheiftains for those interested, very nearly done now.    
|
|
#
?
Oct 9, 2018 14:06
|
|

|
goodness posted:I didn't know it worked like that. Is there an easier to use alternative that is almost as good? Not really. He might be able to find some that's not in a spraycan at an auto parts store, but a 2 part urethane clear coat is a million times stronger than anything we typically use for minis, and is probably required if he's sealing game controllers that will be handled all the time.
|
|
#
?
Oct 9, 2018 14:17
|
|
|
Pierzak posted:Paint different things (human vs monster vs machine vs terrain; paint vs bare metal vs organic; furry animal vs bird vs reptile, ethnic skin colors; etc etc) in different ways (glazing, NMM, OSL, blending, stark vs smooth shading/highlights, weathering, basing). Basically, force yourself to try out new stuff - find a mini of a kind you haven't painted yet and do that, or find a tutorial on some technique and try it out (it often turns out they're not as hard in practice as they seem), or come up with a different color scheme (colors can vary a lot wrt coverage/shading). One neat thing I was taught is to paint a whole mini with nothing but white and black, which forces you to pay a lot more attention to how you shade various materials - e.g. polished metal will reflect light differently from skin or cloth, and you don't have the easy way out of varying colors. This exactly. To grow you need to attempt different things and try to improve on existing. Painting the same model in the same way 100 times is not valuable. Force yourself to try things you haven't and are scared of doing. Learn to highlight using layering, then using glazes, then two brush blending, then just feathering, etc. Also, learn how to do different colors. There are colors you can just add white and black too, but there are many that doesn't work at all. Blue is pretty drat easy to shade and highlight, but red is more difficult. Colors like yellow and white can be a pain to work with, etc. Every miniature I do I'm going to try at least 1-2 new things on it. I need to get some stuff done too, but there will be some challenges put in there.
|
|
#
?
Oct 9, 2018 18:07
|
|
|
Bucnasti posted:Airbrush talk... The wax will probably do the trick. My Iwata would bubble like crazy, and I used a little Elmer's glue to seal between the nozzle and the brush. Solved the problem. But I am also very bad at airbrush maintenance, so please take anything I say with much suspicion.
|
|
#
?
Oct 9, 2018 20:32
|
|

|
Max Wilco posted:So here's a weird sort of question/request for advice: what sort of path would you take in terms of improving your painting skill and tackling different projects? Since it sounds like you want to paint space marines specifically, I would 1) find a model that you want to add to your army/collection 2) look at sites like coolminiornot/youtube/instagram or whatever and find a version of that mini that looks really cool 3) identify one or two things that makes it really cool, did they make the armor plates really pop with smooth blends and edge highlighting? do they do great freehand insignias? weathering? metallics? 4) Pick one or two of those things and take your time to try really nailing it on your next few miniatures. If you don't know where to start for achieving some effect there's a ton of tutorials on youtube, or you could just ask in this thread. Painting a broad array of subjects is a great way to improve your skills and become a better painter, but it sounds like you're pretty new and at that level the best way to get better at painting space marines is probably going to be painting space marines. I'm assuming you're interested in space marines since you mention them in your post, but generally the best thing to paint is something that you look at and think "I want to paint that". You'll get the best results when you're enthusiastic about what you're doing.
|
|
#
?
Oct 9, 2018 21:17
|
|
|
Any  goons have a good source for Winsor and Newton brushes that won't cost me an arm and a leg? goons have a good source for Winsor and Newton brushes that won't cost me an arm and a leg?I used Meeplemart in the past, but their customer service on my last order has me looking elsewhere.
|
|
#
?
Oct 9, 2018 23:18
|
|
|
Enentol posted:Any Not a leaf, and not W&N, but check out Rosemary and Co. My little bro got me two 0s and a 1 last Christmas, and they're loving phenomenal. With a little bit of some brush soap between painting sessions, they hold sharp tips like a motherfucker, and are decently sized so you're not having to constantly go back to the palette for more paint. Honestly, I only use other brushes when I'm painting if a) I want to drybrush, or b) I want to use actual metallics. Both of those will destroy brushes in their own special ways, so I swap out for other, older brushes (iirc I had a couple of Army Painter brushes from when I first started painting minis years ago), but for the most part I stick with a 0, maybe upping to the 1 if I need to cover more area (like the Dragon Prince's shield from my previous post, for an example).
|
|
#
?
Oct 10, 2018 04:44
|
|
|
  And the SoB Exorcists, now with painted Fleur de lis and missiles. Skails posted:saw the WIP last year and wondered what became of it! Thanks! And thanks goodness! It just takes forever to scratch build stuff like that, which gets even longer when I started getting Good Ideas� and was building 13 vehicles concurrently. Plus I batch paint, so it seems like nothing gets done for months on end, then everything is done over a few days. I also had to take a break from the grey and white plastic monotony and painted a couple dozen wraith guard I've had sitting for years. Only another 7 rhinos to go now! And another 3 turrets "just in case" And those cheiftians look great but I can't image trying to apply a transfer or mud at that scale.
|
|
#
?
Oct 10, 2018 05:00
|
|
|
I'm painting these Excoriators space marines who mark the date and place of damage done to their armor. Here is a step by step of how I'm doing impact crater/cracks on their armor. My thought was for the impact to resemble concrete or ceramic plates. A few visual images helped. Particularly the top right.  A couple tools that have been helpful in this process are (thanks to the posters in this thread!): -a good quality kolinsky sable brush that can hold a sharp point (Windsor Newton Series 7 #1) -reading glasses +2.5, these allow me to hold the mini closer to my face which is practically magnification. I'm using liquitex heavy body acrylics with a wet palette made from tupperware/paper towel/parchment paper. Burnt Umber looks close to Mournfang Brown, and the model has a basecoat of Unbleached Titanium which is close to Screaming Skull best I can tell.  1. Made a rough circle with burnt umber. 2. Added rays across circle of random length/spacing 3. Colored top half of circle with about a 1:1 mix of unbleached titanium and burnt umber, then bottom half with 1:1 mix of unbleached titanium and white 4. Added a spot of burnt umber near to middle of circle and connected the inside ends of rays to spot  5. Put a dot of black where the rays touch the circle and a dot near the middle 6. Here I put a line of white along the bottom edges of circle and rays (photo is unfortunately on blurry side, blame phone) 7. Did a mix of 1:1ish unbleached titanium and burnt umber- dabbed around top edge inside circle and top edge of bottom half of circle. also added a couple secondary cracks to rays. Final thoughts: The pictures look rough blown up to PC size, stretching the window smaller and re-pop the thumbnail to get a closer to model size look. The secondary cracks in step 7 aren't necessary, I like the look without them. The inside of the circle can also be broken up with more lines at random.
|
|
#
?
Oct 10, 2018 06:21
|
|
|
That's nuts; to further break up your circle, you could try doing the radiating ray lines first, and offset the curved lines between them. I don't think that throw off the process terribly much. The secondary cracks from step 7 could be saved for larger panels of armour. You're braver than I - don't think I'd attempt this on anything near as small, but the effect is worth it.
|
|
#
?
Oct 10, 2018 07:38
|
|
|
Seconding the Rosemary and Co. recommendation. I bought a couple of size 1 Series 33's a few years back and they held a point really well. I paint everything with a size 1, and the occasional size 2 for base coating as the points are really sharp and the extra bristle length holds more paint for fewer trips to and from the palette. A lot of people are recommending Broken Toad brushes, but availability seems pretty scarce.
|
|
#
?
Oct 10, 2018 08:10
|
|
|
richyp posted:Seconding the Rosemary and Co. recommendation. I bought a couple of size 1 Series 33's a few years back and they held a point really well. I paint everything with a size 1, and the occasional size 2 for base coating as the points are really sharp and the extra bristle length holds more paint for fewer trips to and from the palette. I recommend Rosemary as well. Although I need to buy some new brushes because I broke the spine on my size 0 and 1 so I've ended up using just my size 2 as my go to brush for almost everything.
|
|
#
?
Oct 10, 2018 11:22
|
|


|
VolatileSky posted:That's nuts; to further break up your circle, you could try doing the radiating ray lines first, and offset the curved lines between them. That's a good idea, I could also see doin the rays first and only doing semi-circles or arcs for a more crunched effect. I got a WN 7 series #00 on Amazon recently and put a couple hours in with it. It's nice for getting in tight spots but I find the paint dries much quicker on it than the #1. Will have to try out medium to see if I can extend its working time. I have a blick studio series sable brush in #4 size that holds a point well and is great for everything but detail. I''d like to try out some smaller sized of those at some point.
|
|
#
?
Oct 10, 2018 16:52
|
|
|
Aniodia posted:or b) I want to use actual metallics. Metallic paint is bad on brushes? Well, that would explain why some of my sable brushes have gone to poo poo. Leadbelcher and Balthasar Gold are a good 50% of my army's colors.
|
|
#
?
Oct 10, 2018 17:59
|
|
|
IPA Regulations posted:Sorry yeah that's the one I meant too. Forgot about all the rebranding. Coming back to this, spraying a very light coat of the varnish over the models has brought the worst of them from "horrendous mistake" to "basically alright if you don't look too closely," and most of them seem to be perfectly fine now. I'll post my first finished kill team and first models painted in years tomorrow, once I've had the time to sort out the flying bases, but thanks for the advice that helped me salvage my stealth suits.
|
|
#
?
Oct 10, 2018 18:29
|
|

|
VolatileSky posted:It�s been a long time. This is incredible. The battle podium is one of the coolest things I've seen made. The vibrancy of the red Inquisition symbol really makes all of these. Really great work.
|
|
#
?
Oct 10, 2018 20:35
|
|
|
The paintjobs are shonky and the varnish did some damage, but I'm reasonably happy with how my first painted models in years turned out, considering my inexperience and uncontrollable hand tremors.
|
|
#
?
Oct 10, 2018 22:43
|
|
|
Skails posted:I'm using liquitex heavy body acrylics with a wet palette made from tupperware/paper towel/parchment paper. You use heavy body paints? How do you thin them down to mini consistency?
|
|
#
?
Oct 11, 2018 00:37
|
|

|
Has anyone used the FW Pearlescent Inks? There's several packs of them up at Michael's and in thinking of trying them out for a model I have now, but you have to pick up the whole pack instead of the one or two colors you might need. It's still about $24 bucks with a 40% coupon.
|
|
#
?
Oct 11, 2018 01:24
|
|
|
Painting these Monsterpocalypse minis off of their bases is going to break my brain. It's the opposite of what I've been doing for like 15 years.
|
|
#
?
Oct 11, 2018 01:53
|
|

|
Serenade posted:You use heavy body paints? How do you thin them down to mini consistency? My cheapo wet palette almost gets them too thin with a freshly wet paper towel. I also use dropper bottle with a mix of something like 20:1 water to flow improver with a dash of satin glaze medium thrown in or something like that (its been a while since it was made). As the towel gets drier I add my dropper mix as needed until the palette really needs refreshed. The wet palette was a recent addition to my kit, before I was thinning the paint on a plastic palette with dropper mix and I had a decent feel for how thin it needed to be, but I was wasting paint every session.
|
|
#
?
Oct 11, 2018 03:58
|
|
|
Tips on getting plaster to stick to bases? I picked it up as a cheap texture for 6mm bases. Made some tests but the plaster flaked off after drying.
|
|
#
?
Oct 11, 2018 05:07
|
|
|

|
| # ? May 9, 2024 16:44 |
|
|
goodness posted:Tips on getting plaster to stick to bases? I picked it up as a cheap texture for 6mm bases. Made some tests but the plaster flaked off after drying. No idea, but Vallejo basing gels are like $10 for two full armies worth and wonderful, just use that instead.
|
|
#
?
Oct 11, 2018 05:32
|
|