


|
pseudorandom posted:
Nice! My second hand 600 was missing the bit of plastic insert to hold 120 flat so I can't scan any of that yet. I found a place online that sells film holders with variable heights for the 550 and 600 for dialing in perfect scan distance so I'll be picking up one of those next pay cheque. Wild EEPROM posted:Scan as a positive, 48 bit color Cool, I'll give that a shot. Was hoping I could do it all inside SilverFast.
|
 #
?
Jan 17, 2019 10:25
#
?
Jan 17, 2019 10:25
|
|


|

|
| # ? May 11, 2024 16:22 |
|
|
So I finally developed a couple rolls myself for the first time! Overall I'm pleased with the results, I mean, I was half expecting to gently caress it up completely. However, there's too much grain I think. Did I overdevelop?     
|
|
#
?
Jan 17, 2019 10:45
|
|


|
Megabound posted:Nice! My second hand 600 was missing the bit of plastic insert to hold 120 flat so I can't scan any of that yet. I found a place online that sells film holders with variable heights for the 550 and 600 for dialing in perfect scan distance so I'll be picking up one of those next pay cheque. This is just a 60x90 bit of plastic with rounded corners like a credit card, if you cut something like that from stiff paper, you'd have exactly the same thing. It slides into the end of the film holder and overlaps with the very end of the film to help flatten it.
|
|
#
?
Jan 17, 2019 15:04
|
|

|
Helen Highwater posted:This is just a 60x90 bit of plastic with rounded corners like a credit card, if you cut something like that from stiff paper, you'd have exactly the same thing. It slides into the end of the film holder and overlaps with the very end of the film to help flatten it. I don't know if it makes a difference at all, but mine is 6cm by 10cm. 
|
|
#
?
Jan 17, 2019 19:22
|
|


|
I'm an american. Can you please restate that in cubits?
|
|
#
?
Jan 17, 2019 19:29
|
|


|
notice from TheDarkroom, in case any of the rest of you use it:quote:Please be advised that optional 35mm e-6 slide mounting services will resume January 28, 2019. Due to the very high cost of having slide mounts produced, there will be an additional $3 charge per roll for this optional service. Please note that mounting services are only available at the time of original film processing.
|
|
#
?
Jan 17, 2019 20:00
|
|


|
Helen Highwater posted:This is just a 60x90 bit of plastic with rounded corners like a credit card, if you cut something like that from stiff paper, you'd have exactly the same thing. It slides into the end of the film holder and overlaps with the very end of the film to help flatten it. Sweet, I'll get something cut out this evening and start scanning some 120 then!
|
|
#
?
Jan 17, 2019 21:43
|
|
|
I finished my first attempt at developing film myself!  Surprisingly some of the roll actually came out fairly decent: Surprisingly some of the roll actually came out fairly decent: 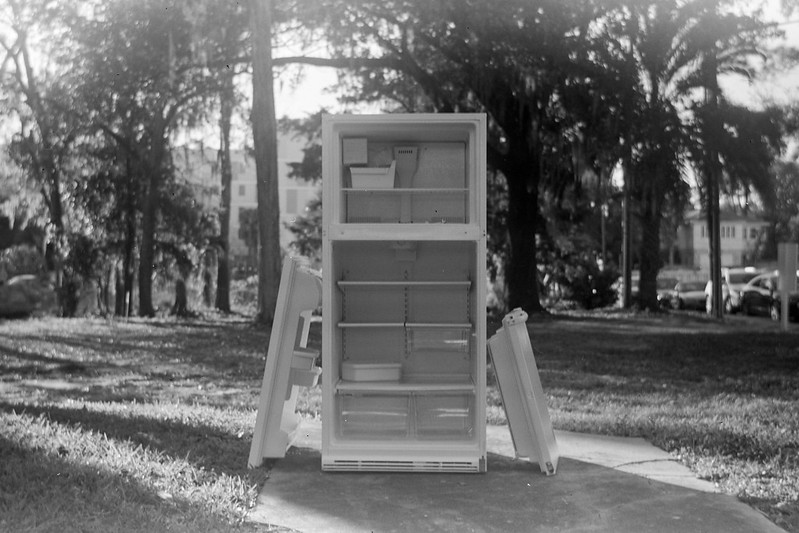  Some of it, less so.  bessa-hp5-120-6 bessa-hp5-120-6 bessa-hp5-120-3 bessa-hp5-120-3 bessa-hp5-120-5 bessa-hp5-120-5Honestly, for my first attempt at using this Bessa, and my first time using 120, I'm amazed I even got the shots in focus and decently exposed. As for the things that are wrong, I'll double check the negatives later, but I think the glowing on the edges is because the film is curled a little so I'm guessing that's coming from not scanning flat. Otherwise, for the latter three, even though I know there are many variables determining how these came out, are there any clues why they came out with so little contrast? Is it likely just them being over-/under-exposed? Note: all of these have been through some very quick adjustments in Lr.
|
|
#
?
Jan 18, 2019 07:13
|
|
|
look at the negatives themselves see if they are extra dark on the edges if they are then it's not that issue, it's something else do any of those bleed into the bit between the negatives? what is your process for development? eg presoak, pour in the chems, agitation at x time and every y minutes, stop, development time and temperature, etc. how are you agitating
|
|
#
?
Jan 18, 2019 07:37
|
|


|
Wild EEPROM posted:look at the negatives themselves see if they are extra dark on the edges Alright, just checked one of them. The glow is present in the negatives, so it's not the scan. By bleeding, do you mean does it appear to flow between negatives continuously (like along the film, rather than produced by the lens)? I'll check that tomorrow; I've already cut the negatives apart and will need more time to compare. My dev process was basically what's described in Helen Highwater's video; no-presoak, HP5+ 400 film with D-76 1:1 for 13 minutes, agitated every 30 seconds or so (I was not particularly disciplined with this and followed it more as a guideline than a rule). Temperature is  . I know I definitely need to work on this. I was trying to cool the warm developer after the initial mixing, so I left some of it by an open window to cool down. My impromptu thermometer doesn't have labels below 75F, but after extrapolating I'm guessing the final developer mixture was somewhere between 65F and 70F. Room temperature was also probably somewhere in that range. . I know I definitely need to work on this. I was trying to cool the warm developer after the initial mixing, so I left some of it by an open window to cool down. My impromptu thermometer doesn't have labels below 75F, but after extrapolating I'm guessing the final developer mixture was somewhere between 65F and 70F. Room temperature was also probably somewhere in that range. Agitation was 2 initial inversions, then 3-5 twists back and forth every 30 seconds or so (one direction being one "twist"). Like I said, I recognize there are a ton of things I didn't do perfectly (or even okay) here. I'm mostly hoping I can figure out some of the areas I should most focus on improving.
|
|
#
?
Jan 18, 2019 08:15
|
|
|
pseudorandom posted:Alright, just checked one of them. The glow is present in the negatives, so it's not the scan. How long did you fix for? Looks to me like it might not have been long enough?
|
|
#
?
Jan 18, 2019 09:28
|
|
|
Do the glowing edges get worse further into the roll? From frame 1 to frame 12 does it grow in size? You might have had a "fat roll". The film roll wasn't tight enough coming out of the camera and light leaked in around the edges. Your last image also seems to have streaks across it which could indicate areas that were not sufficiently exposed to chemistry. More vigorous agitation in the future might help. Sauer fucked around with this message at 12:35 on Jan 18, 2019 |
|
#
?
Jan 18, 2019 12:33
|
|

|
frogbs posted:How long did you fix for? Looks to me like it might not have been long enough? 3 minutes. Sauer posted:Do the glowing edges get worse further into the roll? From frame 1 to frame 12 does it grow in size? You might have had a "fat roll". The film roll wasn't tight enough coming out of the camera and light leaked in around the edges. It's hard to tell if it gets worse. It seems most noticeable in the middle frames--The fridge is frame 2, the others are the middle; I didn't post the last two frames. Though that's actually a good point. I thought it was secured, but it's definitely possible I didn't hold it wound tight enough when I removed the roll from the camera and thus got leaks on the edges. Thanks for the help guys!
|
|
#
?
Jan 18, 2019 20:31
|
|
|
3 minutes is not even close to long enough
|
|
#
?
Jan 18, 2019 22:27
|
|
|
Yeah, I bet you can clean those up some just by refixing and rewashing.
|
|
#
?
Jan 18, 2019 23:05
|
|


|
I�ve read five minutes minimum, up to ten.
|
|
#
?
Jan 18, 2019 23:16
|
|
|
President Beep posted:I�ve read five minutes minimum, up to ten. Huh. I'll try longer next time. Like I said, I mostly followed Helen Highwater's video in which he said 3 minutes. The fixer bottle itself said 2-5 minutes.
|
|
#
?
Jan 18, 2019 23:56
|
|
|
2-3 minutes in the fixer might be enough if it's fresh, but you wouldn't know for sure without doing a clearing time test. I tend to default to 6 minutes. To me those artifacts look like light leaks. The fact that some frames are more affected than others doesn't suggest a development issue to me.
|
|
#
?
Jan 19, 2019 00:26
|
|

|
pseudorandom posted:Huh. I'll try longer next time. Like I said, I mostly followed Helen Highwater's video in which he said 3 minutes. The fixer bottle itself said 2-5 minutes. I use three minutes for Fomafix and I throw it away when I've got through a full bottle of Fomadol developer - so by then it's been used 12 times or so. If you want to be absolutely sure that you get the right fix time, here's how you actually work it out. - When you're putting the film on the roll, cut off the leader (or cut off a thin strip of the beginning of the roll for 120). - Pour some of your fixer solution into a shotglass - While you are developing the film, put the cut off bit of film into your shot glass full of fixer and time how long it takes to go clear. - Double that time and that's the fixer timing.
|
|
#
?
Jan 19, 2019 13:11
|
|
|
I use Foma fixer. It indicates a pretty short time (like 2 or 3 minutes) in the instructions, and in my use experiences that's fine if you're breaking the seal and using it fresh and mixed with distilled water. I always go for 5 minutes though, since I reuse it. I also use a stop solution in between development and fixing. Foma chemicals are good and cheap.
|
|
#
?
Jan 19, 2019 17:37
|
|

|
I shot some Agfapan 400 last night at about a half stop over box speed, this morning I want to develop it but the Massive Dev Chart doesn't list it (it's the old 400 Professional pre APX type) and the data sheet in the box doesn't list times for my developer (LC29). Also, it expired in 1993. So, should I just use the timings for Rodinal? Develop at the normal time or give it a bit more?
|
|
#
?
Jan 21, 2019 03:25
|
|
|
LC29 is equivalent to HC-110, does the box give times for that? You could also stand develop it if you don't want to risk uncertain times. Rodinal 1:100 or LC29 1:120(ish), agitate for the first minute and just leave it sit there for an hour or more. Gently inverting the tank one time at about 30 minutes can help prevent drag.
|
|
#
?
Jan 21, 2019 04:16
|
|
|
The datasheet gives times for Atomal, Refinal, Rodinal. and Studional. Like I said, the film is 25 years out of date and so are the datasheets. A quick comparison of Rodinal 1+25 and LC29 1+19 seem to give the same results across a bunch of different film stocks so I guess I'll just go with the Rodinal timing and add a bit more to account for the expired film.
|
|
#
?
Jan 21, 2019 13:46
|
|
|
Anyone in here factor in exposure indices? I�m wondering if the techniques mentioned in this article are something I should eventually strive for. Seems a bit complex for me at the moment...
|
|
#
?
Jan 21, 2019 21:16
|
|
|
President Beep posted:Anyone in here factor in exposure indices? I�m wondering if the techniques mentioned in this article are something I should eventually strive for. I may have a fundamental misunderstanding of how the various exposure settings work together, but it sounds like this author is basically just suggesting to meter for shadows, under expose by 1 stop, and then only develop for ~85% of the recommended dev time. He says to set film speed to half of the box speed (200 for a 400 ISO film), and then meter for the "area that is the darkest area that you still would like some detail", and then "stop down 2 full stops". And then, when developing: quote:If the manufacturer data sheet says to develop at 6 minutes then develop for 5 or 5 1/2 minutes. Something in the range of 15% is the rule of thumb that I would suggest. Doesn't this calculate as adding +1 for the ISO, then -2 to for the stop down? Is this any different from just using the film ISO and under-exposing by 1 stop? I assume the only benefit of this complexity is that the ISO adjustment might help maintain a slightly faster shutter speed if you're trying to stick to a specific aperture.
|
|
#
?
Jan 21, 2019 23:40
|
|
|
Development times do actually change the emulsion in ways changing the exposure does not. It's somewhat complicated to explain, but it's all the zone system. As you develop film, each part of the negative gets more and more exposed as you develop it. This shifts the negative higher on the zone scale, making it lighter on the final print / darker on the negative. Higher zone areas are effected more strongly by development than lower zone areas, so by adjusting the development time you can adjust the contrast in a photo. If your exposure has lots of high contrast in it, you can lower the development time to compensate. The lower zone areas of the emulsion (the darker areas of the print) wont be effected by the under-development as strongly as the higher-zone areas, so while the very light parts of the print will be darkened significantly, the darker areas of the print will be hardly any different than if you developed normally. You can do the opposite for over-developing to get a higher-contrast image. If your image has low contrast to start with, over-developing won't lighten the darker areas significantly, but will make the lighter areas much much lighter. All this being said, it does sound like the guy is saying "expose for shadows, develop for highlights" which is basically an adage as old as the zone system itself.
|
|
#
?
Jan 22, 2019 02:57
|
|


|
i think its meter for +1 over exposure, meter shadows -2, develop -1 or -1/2 so shadows are still -2, to which i wonder why not just cut out the middle man and just expose the shadows at -1? reducing the development time could end up losing more shadow detail, wouldn't it? edit: Basically he's telling you to pull film? The Modern Sky fucked around with this message at 03:37 on Jan 22, 2019 |
|
#
?
Jan 22, 2019 03:14
|
|

|
The Modern Sky posted:Basically he's telling you to pull film? That�s what I took away from it too. Not sure what this whole exposure index concept is all about. I may have read something before about them being used to control for variables such as individual camera quirks and whatnot. Don�t quite remember though.
|
|
#
?
Jan 22, 2019 03:46
|
|
|
Zone system was really more for individual development of film sheets, which you could really have full control over the development variables of each sheet, as well as for how the final developed negative would be used to print onto paper. You can't really do that for film rolls unless you want to apply it for every frame in the roll. In general though, I don't think you really need to bother about this - "expose for shadows, develop for highlights" is about right for roll film.
|
|
#
?
Jan 22, 2019 09:53
|
|

|
So in practice, one would take a shot based on metering from the shadows but then shorten development time so that the highlights aren�t blown? It�s the second part that�s unclear to me.
|
|
#
?
Jan 22, 2019 13:16
|
|
|
President Beep posted:So in practice, one would take a shot based on metering from the shadows but then shorten development time so that the highlights aren’t blown? It’s the second part that’s unclear to me. Correct, as shortening development time will darken everything. However, the dark areas will darken only very slightly, while the light areas will darken significantly. This effectively lowers the contrast of a high contrast shot - you get the details of the shadows without obliterating the highlights. If the negative is too "dark" overall you could then in theory under-expose the print to lighten it up, or dodge some areas as needed. However I dunno if anyone here is exposing prints from negatives, and if you are then you're probably much more familiar with that stuff than I am, so what's more likely is you just scan the negative then lighten it up as needed in photoshop.
|
|
#
?
Jan 22, 2019 13:24
|
|
|
CodfishCartographer posted:Correct, as shortening development time will darken everything. However, the dark areas will darken only very slightly, while the light areas will darken significantly. This effectively lowers the contrast of a high contrast shot - you get the details of the shadows without obliterating the highlights. Very cool. Thank you. The next film camera I get will likely not have a meter, so it's probably time I step up my game a bit and actively try to better understand manual metering. Is there a good rule of thumb for shortening development times? Is it the same across processes?
|
|
#
?
Jan 22, 2019 15:00
|
|
|
President Beep posted:Very cool. Thank you. The next film camera I get will likely not have a meter, so it's probably time I step up my game a bit and actively try to better understand manual metering. Is there a good rule of thumb for shortening development times? Is it the same across processes? B&W has different dev times per film stock while C41 and E6 are the same regardless, so the timings will change for each. FOr B&W I've always just added about 20% per stop for pushing. Pulling woudl be about the same. You can also just look at the Massive Dev Chart and either use their formula for generic timings or look up the specific combo of film stock and developer that you are using and see if the table lists a different film rating For example the FP4 in Rodinal chart lists the timings for developing the film at box speed or at various alternate speeds. If you wanted to push the film a stop, you'd use the timing for ISO 200 and if you wanted to pull it a stop, you'd use the ISO 64 time.
|
|
#
?
Jan 22, 2019 15:18
|
|
|
Right, yeah. Forgot about C41, etc. not changing dev time based on film stock/speed. Does that mean you can't push/pull color film?
|
|
#
?
Jan 22, 2019 16:11
|
|
|
You can pull and push colour film but you'll get some colour shift in the shadows depending on the amount of the over/underdevelopment. You can go for anything between 30s and a full minute per stop for additional timing with the longer times creating a stronger push/pull and a correspondingly large colour shift. Note that, because the colour shift is mostly confined to the shadow detail, you can't cancel it out with global curves adjustments as you would for the base layer. You need to either use split toning or decidethat you're fine with funky colours.
|
|
#
?
Jan 22, 2019 16:36
|
|
|
I think I'll abstain from that for now. The last thing my color film pictures need is more hosed up colors. That being said, I took the trial version of Negative Lab Pro for a spin the other day. It's quite nice. I'll probably buy it soon.
|
|
#
?
Jan 22, 2019 16:43
|
|
|
I just take my film to the lab. who gives a poo poo
|
|
#
?
Jan 22, 2019 17:28
|
|
|
Not the good people at my local walgreens, that's for sure! That, or the equivalent, is all that's available around here. I think developing is kinda fun too.
|
|
#
?
Jan 22, 2019 17:33
|
|
|
You can send it in the mail and focus on taking good pictures instead of worrying about edge effects or agitation schedules
|
|
#
?
Jan 22, 2019 18:14
|
|
|

|
| # ? May 11, 2024 16:22 |
|
|
Never.
|
|
#
?
Jan 22, 2019 19:22
|
|