|
Also qq: are these still the go-to-brush primers in this day and age or have they been surpassed by other products? https://www.amazon.co.uk/Vallejo-Model-Color-Polyurethane-Primer/dp/B004BMZVMK/ref=pd_sbs_21_2/260-8051460-8344608 I was thinking about getting a black and a white one, since I'm currently just using regular AP colors for priming and the black is very thin, while the white is very dense.
|
|
 #
?
Feb 26, 2019 15:17
#
?
Feb 26, 2019 15:17
|
|

|

|
| # ? May 23, 2024 20:42 |
|
|
That Italian Guy posted:Also qq: are these still the go-to-brush primers in this day and age or have they been surpassed by other products? https://www.amazon.co.uk/Vallejo-Model-Color-Polyurethane-Primer/dp/B004BMZVMK/ref=pd_sbs_21_2/260-8051460-8344608 I prefer Badger myself.
|
|
#
?
Feb 26, 2019 15:30
|
|
|
That Italian Guy posted:Also qq: are these still the go-to-brush primers in this day and age or have they been surpassed by other products? https://www.amazon.co.uk/Vallejo-Model-Color-Polyurethane-Primer/dp/B004BMZVMK/ref=pd_sbs_21_2/260-8051460-8344608 They're fine, Vallejo vs Badger (stynylrez) is really just a matter of preference. I use both, depending on what color I'm using. The only one I don't like is Badger grey, because I legit can't tell the difference between the primer and grey sprue.
|
|
#
?
Feb 26, 2019 15:49
|
|


|
So I've been trundling along with my death guard and side project of crimson fists and I've finally finished actually painting some things. First up is my favourite little plague roomba, this has been my first 'big' model and I love the little guy.      At the same time I've been working on my first 'tank' kits and I wanted to go ham and try a bunch of weathering stuff. I'd say it looks better in person and I gave up trying to fit it on the bit of paper I was taking photos on. Still haven't hit them with a matt coat so they are glossy from the varnish. Not really happy with the lamps but it was an experiment so you live and learn.    I'm posting these guys because I want to see if anybody knows whats going on. I decided to try washing the crimson fists over a gloss varnish. I did the sarge with army painter dark tone+quickshade medium and the librarian with nuln oil+lahmian medium just to see what looked best, but the nuln oil combo has ended up a bit odd looking. It was fine when I applied it but having dried its left a wierd sort of silvering, I don't know how else to describe it. I intentionally took a really bad photo to emphasise it. Anyone know whats up? Will a matt coat make it go away? As an aside should I hit these guys with a matt varnish before carrying on regular painting anyway or is it fine going over the gloss?  
|
|
#
?
Feb 26, 2019 17:09
|
|

|
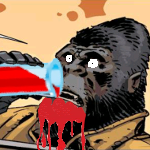
Quick question; do you think the model would look better if I swapped out the red targeter and vials on the backpack/gauntlet for more purple?
|
|
#
?
Feb 26, 2019 17:11
|
|


Whatever you decide to do, I think the red elements look very very nice in this picture:
|
|
|
#
?
Feb 26, 2019 17:14
|
|
|
That Italian Guy posted:Whatever you decide to do, I think the red elements look very very nice in this picture: I think there's enough feedback on both sides that I might keep it as-is. Those red elements were particularly fun since I wanted to get a sort of "glowing" effect in the middle of the vials. AP Red Tone is fantastic for blending and bringing things together.
|
|
#
?
Feb 26, 2019 17:27
|
|
|
That Italian Guy posted:I've opened up a box of (very old) GW Chaos Warriors since they have a lot of different surfaces (leather, metal, fur) and some nice flat areas to try some new stuff on. I've started painting the first one yesterday evening one "area" at a time (IE: the shield, the right kneepad, the right boot) instead of doing my usual "work on every solution with the same colors at the same time". When you first start out painting with glazes, it's really hard to achieve high contrast transitions. It's something you have to build towards as you get more skilled. The most important thing to keep in mind is the direction of the brush strokes. You deposit a higher amount of pigment at the end your stroke than the beginning, so you're ending the brush where you want the highlights or shadows. It's way easier to shade down than highlight up, so generally you want to start a couple shades lighter than your mid tone for ease. You'd think you could just start with your brightest highlight and shade down for ease, but you can't for completely unknown reasons. There's also just a bunch of idiosyncratic tics to doing painting in this way like how red is a super easy color to blend and blue is hard. That is to say doing proper painting is hard and a skill and don't get discouraged if you start off looking worse than a more traditional miniature painting route route. Color transitions are super fun and can make for really stunning miniatures, I'd advise you start with adjacent color wheel pairs and then work more ambitiously from there. If you scroll back through my posts in this thread you can find examples both.
|
|
#
?
Feb 26, 2019 18:14
|
|


|
 X-posting. Freehand step by step. Rose emblem on Warhound Titan carapace. Size 1 W&N Series 7 1. Sketch design 2. Transfer design to model 3. Rose base colour (VMC Burnt Red) 4. Highlight (VMC Carmine Red) 5. Define petals (VMC Carmine Red + GW Averland Sunset + White) 6. Leaves base colour (P3 Coal Black + VMC Medium Olive) 7. Highlight leaves (VMC Medium Olive + VMc Green Sky) 8. Define leaves (GW Averland Sunset) 9. Outline with white.
|
|
#
?
Feb 26, 2019 21:14
|
|

|
   Finished these two lads last night. Had a ball painting them up and trying to figure the flesh tones. A bit over washed, but hey!
|
|
#
?
Feb 26, 2019 21:35
|
|

Gareth Gobulcoque posted:Good advice. Thanks! I'm currently going through a ton of backlog in this very thread and it is pumping me up to try out a lot of new stuff. I've worked some more on the Chaos Warrior I've mentioned in my previous post and, even if I haven't tried everything I wanted to, I've taken a few WIP pictures at various stages, to ask for feedback and suggestions. Disclaimer: I'm taking camera pics on top of my working position, so pictures are a bit shite. For some reason the transitions look way more natural to the naked eye compared to what shows up on camera (or maybe it's just the "zoomed in" effect you get with a very closeup picture) but I guess that better for feedback anyway. This is where I left the miniature yesterday evening:   I've painted the shield starting with a midtone blue all over, followed by very thing layers of light blue on the edges, going towards the inside. I've added some blue wash in the recesses near the symbol and worked my way out in the opposite direction. I am not happy with the metallic color on the symbol; It's just black base > black+gold mid > gold with a little bit of red wash but I always seem to fail to have proper highlights on my metallic paints (more on this later, once I cover up that design and start over). Also, working with very thinned out metallic paints is a massive PITA, since every little mistake is amplified by how much it is visible and how difficult it is to cover it up (see the splotches around the smaller gold details). The other blue pieces (the knee and thigh protector, the round element) were painted with a completely different technique from the shield, something that I've improvised by mirroring a photoshop technique: I've painted them in shades of black > gray > white, then "added a semitransparent layer" in the form of a coat of AP blue tone wash. This is where I've picked things up today:   I've covered up the shield metallic element with A LOT of different things before settling for this look. It's 2 different metal (one darker, one lighter), with a purple wash and a bit of highlights in white. I'll repeat that I don't seem to have a good idea on how to work with metallic paints yet (and that's one of the reasons I've used normal acrylic paints instead for the longest time). What would be a good color to highlight that? I've used white but I'm not really satisfied with it - it mutes the metallic shine and is very evident. I've also tried to spice up the shield with some damage; I've done some weathering on bronze in the past and I've liked the result better that time. Here I wasn't sure if I wanted the shield to be wood or metal, at first; decided for the latter in the end. There is a better shot of the effect during the next batch of pics. I've also used the same technique I've used on the kneepad before on the rest of the visible armor, altough, I have to say, the contrast looks way more stark in the pics than it did when I was painting the mini. Also I've touched it up a little bit after this to make the transitions look softer especially on the helmet. This is where I am at the moment:     You can see that I've smoothed out the shading on the helmet in these pictures. I didn't know how to experiment with the fur; I've painted it by hand instead of using dry brush since I never do that, but at the end of the day the result is similar to the usual. Same for the chainmail, I've just added some grit tones towards the bottom to make it look dirtier but I assume good old dry brush would probably be equal if not better compared to the more fluid paint and washes I've used this time. I'd like to get some feedback on how to build better transitions, especially since I'm going to try and do the "2 color" transition on the next model!
|
|
|
#
?
Feb 26, 2019 22:17
|
|
|
That Italian Guy posted:Are there other popular techniques for painting fur or similar surfaces (IE: chainmail) aside from drybrush+wash? Drybrushing/overbrushing and the like are definitely the go to method for painting that kind of stuff unless you're going to go full tryhard and paint every little bit manually. Nothing wrong with that but it requires high precision/paint control and is a lot of work.
|
|
#
?
Feb 26, 2019 22:25
|
|
|
Eifert Posting posted:I would do blue for two reasons: I've heard that a base of silver (Stormhost Silver?) and GW's technical, jewel paints (Soulstone Blue in this case?) looks great, does anyone have any experience or recommendations? Also, thanks for the support for my first two models, I'm hoping to get to work on another one tomorrow! Edit: Another question, but I'll be using bionics quite a bit in my army. How can I achieve the sickly, pale flesh of this Iron Hands Sargent, and what would be a couple good colors for the wiring?  I assume a base of Abbadon, then Retributer, then shade Agrax would achieve the copper cable look... Professor Shark fucked around with this message at 01:30 on Feb 27, 2019 |
|
#
?
Feb 27, 2019 01:03
|
|
|
I spray vallejo model color Vermillion often enough that I'm thinking about buying the air color version to save some time. Does vallejo make colors match exactly between those lines despite having different names sometimes?
|
|
#
?
Feb 27, 2019 01:12
|
|

|
So I just finished up the start of a new army and my first foray into AoS, pretty pleased with how it turned out.
|
|
#
?
Feb 27, 2019 02:45
|
|

|
Professor Shark posted:Edit: Another question, but I'll be using bionics quite a bit in my army. How can I achieve the sickly, pale flesh of this Iron Hands Sargent, and what would be a couple good colors for the wiring? Pale skin with a purple wash generally does the trick. I did a more extreme version here, though I was aiming more for "bloated corpse," so I went a bit heavier than you likely want. Thin some Druchii Violet and put it on until you feel it looks right. A very slight yellow glaze on the skin can also really drive the unhealthy look.
|
|
#
?
Feb 27, 2019 02:58
|
|

|
This dude was fun to paint, but assembling his arms was terrible. :P
|
|
#
?
Feb 27, 2019 03:10
|
|

|
R0ckfish posted:So I just finished up the start of a new army and my first foray into AoS, pretty pleased with how it turned out. Hell to the yes, I just started a seraphon army too. They look great! Only bit of criticism I have is that you might consider painting the shields a different color from the back scales to break up the rider from the mount a bit more.
|
|
#
?
Feb 27, 2019 03:46
|
|

|
Mikey Purp posted:Hell to the yes, I just started a seraphon army too. They look great! Only bit of criticism I have is that you might consider painting the shields a different color from the back scales to break up the rider from the mount a bit more. I considered that but I was finding that any colour distinct enough was making the scheme too busy. I the end my thought is that they had to get the scales for the shields from somewhere, right?
|
|
#
?
Feb 27, 2019 04:50
|
|
|
Booyah- posted:I spray vallejo model color Vermillion often enough that I'm thinking about buying the air color version to save some time. Does vallejo make colors match exactly between those lines despite having different names sometimes? Looking at the color charts, it doesn't look like they make a match for vermillion in model air.
|
|
#
?
Feb 27, 2019 05:00
|
|
|
Have some more big dumb red bois.    
|
|
#
?
Feb 27, 2019 06:22
|
|
|
Booyah- posted:I spray vallejo model color Vermillion often enough that I'm thinking about buying the air color version to save some time. Does vallejo make colors match exactly between those lines despite having different names sometimes? I know that VGA and VGC Bonewhite are identical.
|
|
#
?
Feb 27, 2019 06:56
|
|
|
Professor Shark posted:I've heard that a base of silver (Stormhost Silver?) and GW's technical, jewel paints (Soulstone Blue in this case?) looks great, does anyone have any experience or recommendations? Yeah it looks pretty good. Very quick and easy effect too.
|
|
#
?
Feb 27, 2019 06:57
|
|
|
Thanks it seems like the game lines are designed to match but not the model lines, at least not in an obvious way.
|
|
#
?
Feb 27, 2019 07:14
|
|
|
Booyah- posted:Thanks it seems like the game lines are designed to match but not the model lines, at least not in an obvious way. Game color gunmetal vs game air gunmetal are miles apart. Don't try to make sense of it. Your paint may have a match or it may not. Definitely always check. In the case of gunmetal, the swatches are the same that they produce for carts/catalogues so you even need this tribal knowledge from someone else or the paint physically in your hand.
|
|
#
?
Feb 27, 2019 07:30
|
|
|
Tried getting some natural light pics of the WIP Chaos Warrior, but I'm at an en-passe: my current apartment has very wide, luminous windows on one side of the rooms...but all the windows/glass doors are on the same side. This means that if I want to use natural light, the camera has to be between the model and the light source, unless I take the pic from above or below it. I've taken this pics from one side, but you can clearly see that the light is coming from the right side, so it's not hitting the model uniformly. Are artificial lights (or outdoors pictures, I guess) my only chance, or is there some kind of photo-magic trick I don't know that I can use for this?    E: Also holy poo poo, open in a new tab for GARGANTUESQUE pics and god bless timg. That Italian Guy fucked around with this message at 13:18 on Feb 27, 2019 |
|
|
#
?
Feb 27, 2019 11:24
|
|
|
Your best bet is a desk lamp with a daylight bulb pointed at the other side of your guy.
|
|
#
?
Feb 27, 2019 12:52
|
|

|
That Italian Guy posted:Tried getting some natural light pics of the WIP Chaos Warrior, but I'm at an en-passe: my current apartment has very wide, luminous windows on one side of the rooms...but all the windows/glass doors are on the same side. This means that if I want to use natural light, the camera has to be between the model and the light source, unless I take the pic from above or below it. I've taken this pics from one side, but you can clearly see that the light is coming from the right side, so it's not hitting the model uniformly. Spend $10 on a cheap photo booth. They're small enough that you basically only fit one model but work great.
|
|
#
?
Feb 27, 2019 13:50
|
|
|
Darkoath Chieftain Finished up this guy for Goonbowl challenge. This is by far the most time/effort I've spent on a single mini. I decided to approach the project by doing lots of thin glazing and to really try out doing non metallic metals.      
|
|
#
?
Feb 27, 2019 18:47
|
|
|
Skails posted:Darkoath Chieftain That's the best NMM I have ever seen.
|
|
#
?
Feb 27, 2019 20:44
|
|
|
I really like the texture(?) of all the brush work! Maybe I've just been overexposed to it of late, but it's nice to see something really well-painted that doesn't just go with the "airbrushed fades" look that you get on Infinity models and such.
|
|
#
?
Feb 27, 2019 20:45
|
|

Skails posted:Darkoath Chieftain That's sweet AF! I've finished the Chaos Warrior (well mostly)...I love these old sculpts, even if the sword arm looks a bit stiff.    I still have to clean up the glove+sword and I would like to get some more color on it but I'm not sure A) which one B) where So I'm up for suggestions ")
|
|
|
#
?
Feb 27, 2019 21:25
|
|
|
That Italian Guy posted:That's sweet AF! I really love the shield and fur cloak.
|
|
#
?
Feb 27, 2019 21:32
|
|
|
Beer4TheBeerGod posted:That's the best NMM I have ever seen.
|
|
#
?
Feb 28, 2019 02:01
|
|
|
Z the IVth posted:
Very nice! Thank you for posting the process.
|
|
#
?
Feb 28, 2019 02:05
|
|

|
Looking for paints that are a similar color to Nihilakh Oxide but which won�t come out as chalky. Any suggestions?
|
|
#
?
Feb 28, 2019 02:32
|
|

|
Beer4TheBeerGod posted:That's the best NMM I have ever seen. Pierzak posted:I'm still not convinced that it's not metallic paint. Thanks, I nearly gave up on the NMM halfway through. Glad I stuck with it. Avenging Dentist posted:I really like the texture(?) of all the brush work! Maybe I've just been overexposed to it of late, but it's nice to see something really well-painted that doesn't just go with the "airbrushed fades" look that you get on Infinity models and such. Texture is the right word! I feel like building layers of texture is my key take away from this, and is specifically what I was playing with by the end. It goes a long way towards creating an illusion of real material, whether it's metal, wood, cloth etc. The brain knows what material the model is supposed to represent, and it doesn't have to be exact at this scale. It's the sort of thing I like seeing on other peoples models too, regardless of how fine tuned it is. Skails fucked around with this message at 06:39 on Feb 28, 2019 |
|
#
?
Feb 28, 2019 06:28
|
|
|
I wish I could find someone local who paints and learn from them in person. I essentially paint 1 - 2 figures a night and I don't feel like the quality of my painting is getting any better. 
|
|
#
?
Feb 28, 2019 08:37
|
|
|
I said come in! posted:I wish I could find someone local who paints and learn from them in person. I essentially paint 1 - 2 figures a night and I don't feel like the quality of my painting is getting any better. You've only been painting for a month or two right? That's still at the stage where the most important thing is just getting hours in to improve basic skills like brush control. That said, a good way to improve is to find a video demonstrating some technique you want to learn and try to replicate it.
|
|
#
?
Feb 28, 2019 11:12
|
|
|

|
| # ? May 23, 2024 20:42 |
|
|
The Moon Monster posted:You've only been painting for a month or two right? That's still at the stage where the most important thing is just getting hours in to improve basic skills like brush control. That said, a good way to improve is to find a video demonstrating some technique you want to learn and try to replicate it. This plus, though it may seem counterintuitive, taking a break for a bit and then going back to something I usually find I've improved more than I thought and some things just 'click'. I'm not sure if it's like meditating on the problem or what. Like a recent example for me was edge highlighting. Always thought it was beyond me. Then one day it just dawned on me that the angle I held my brush and the model at was super important and I'd somehow never really noticed despite skimming lots of videos where they show or even outright tell you just that. Then suddenly I could highlight.
|
|
#
?
Feb 28, 2019 12:36
|
|