


|
The book I'm following for making a staircase includes taking long-grain cuts from the tread material to use as end caps for the visible end of the tread. Other than aesthetics (i.e. people perhaps not liking the look of rounded over oak endgrain) is there a strong reason to do this? I'd prefer to just round it over.
|
 #
?
Oct 20, 2020 21:51
#
?
Oct 20, 2020 21:51
|
|


|

|
| # ? May 15, 2024 11:40 |
|
|
Jaded Burnout posted:The book I'm following for making a staircase includes taking long-grain cuts from the tread material to use as end caps for the visible end of the tread. End-cap, shmend-cap. Sometimes simplest is bestest. Round 'em, Billy! Uthor posted:After a series of missteps, I finally started on this. I ended up measuring once and cutting twice because I made the cabinet a tiny bit too narrow. Now the drawers and slides will fit, but I think I went a bit too wide. I figure I need to shim them ~1/16" (maybe a little less). I'd use something other than wood shims, as they are softwood and 1/16" is split city. If you have some hardwood you can rip down, that would still not be ideal, but better.
|
|
#
?
Oct 20, 2020 21:59
|
|


|
Mr. Mambold posted:End-cap, shmend-cap. Sometimes simplest is bestest. Round 'em, Billy! I always like to assume that, when endgrain is involved, there's something going on I don't know about!
|
|
#
?
Oct 20, 2020 22:05
|
|
|
Uthor posted:After a series of missteps, I finally started on this. I ended up measuring once and cutting twice because I made the cabinet a tiny bit too narrow. Now the drawers and slides will fit, but I think I went a bit too wide. I figure I need to shim them ~1/16" (maybe a little less). Shims will be hard to get them even all the way back. The slides need to be parallel with each other to open/close right. Most box stores have dimensional strips that you can cut down and glue to the side of the cabinet. Not sure if Lowe's Depot has 1/16", if not you can try online from Woodcraft/Rockler. If you need to, just do 1/8 on one side instead of 1/16 on both. Nobody but you will notice a 1/16 off.
|
|
#
?
Oct 20, 2020 22:27
|
|

|
Granite Octopus posted:I just watched the first episode of this new woodworking reality show The Chop: Britain's Top Woodworker. It was far, far better than I was expecting. Basically GBBO but for woodworking [...] Turns out the contestant with all the face tattoos is a neo-nazi (surprise!). Sky initially doubled-down on it saying the reason he had "88" tattooed on his face was to commemorate the year his father died (it wasn't). They've since deleted those tweets and now say they won't be airing any more episodes at this time. Maybe if you have a TV show featuring a guy with face tattoos in 2020 you should do a cursory check to see if he's a loving neonazi? Such a shame for what was otherwise a decent-looking show. https://twitter.com/HISTORYUK/status/1318602183428968448
|
|
#
?
Oct 20, 2020 22:44
|
|

|
Granite Octopus posted:Turns out the contestant with all the face tattoos is a neo-nazi (surprise!). Sky initially doubled-down on it saying the reason he had "88" tattooed on his face was to commemorate the year his father died (it wasn't). They've since deleted those tweets and now say they won't be airing any more episodes at this time. Maybe if you have a TV show featuring a guy with face tattoos in 2020 you should do a cursory check to see if he's a loving neonazi? Huh, I saw some talk on Twitter about face tattoos and 88 and the year a father died and had no idea it was referencing this show.
|
|
#
?
Oct 20, 2020 22:58
|
|

|
Jaded Burnout posted:The book I'm following for making a staircase includes taking long-grain cuts from the tread material to use as end caps for the visible end of the tread. It's worth remembering/considering that endgrain will take stain and oil/finish a bit differently (usually darker) than face grain
|
|
#
?
Oct 20, 2020 23:35
|
|

|
Kaiser Schnitzel posted:There is/was a definite old-school (and especially English) prejudice against endgrain as being ugly or unsightly. It shows up in antiques alot where a long-grain moulding will be nailed (or sometimes even glued) across the endgrain on a dresser top or w/e. It's a bad construction, especially if it's glued, and it often fails. I suspect this has alot to do with endgrain being considerably harder to get smooth and nice looking before power sanders/routers/shapers. Glued is the direction. Kaiser Schnitzel posted:It's worth remembering/considering that endgrain will take stain and oil/finish a bit differently (usually darker) than face grain Good note. I'll be doing a test anyway, but useful reminder.
|
|
#
?
Oct 20, 2020 23:54
|
|
|
Jaded Burnout posted:Glued is the direction.
|
|
#
?
Oct 21, 2020 00:05
|
|
|
Uthor posted:Huh, I saw some talk on Twitter about face tattoos and 88 and the year a father died and had no idea it was referencing this show. I watched it last night after seeing the original post here and saw the 88 tattoo. I was thinking there is no way they let a nazi on TV with obvious tattoos like that and I was going crazy. Like maybe the guy was dumb and didn�t realize what it meant when he got it and the tattoo person didn�t tell him. Turns out they are super dumb and put a Nazi on TV.
|
|
#
?
Oct 21, 2020 00:30
|
|

|
"Uh yeah '14 words' refers to the vows at my wedding.."
|
|
#
?
Oct 21, 2020 00:32
|
|
|
I wasn't watching closely enough to notice. Figured he had just abstract shapes like these people. https://www.wonderslist.com/10-tattoo-fanatics-you-cant-comprehend/
|
|
#
?
Oct 21, 2020 00:34
|
|
|
Uthor posted:I wasn't watching closely enough to notice. Figured he had just abstract shapes like these people. Completely off topic, but why the hell does this article insist on calling it the "Gunnies World Record?" Can they not spell Guinness (which is in one of the photos)?
|
|
#
?
Oct 21, 2020 01:04
|
|


|
I have no idea if anyone in the general woodworking thread will be interested in this, but I thought I would post here just in case. A few years ago I posted pretty much a full build log of my wooden ship build in the scale modeling megathread thread, but it's spread out over more than a years worth of posts in that rather large mega-thread. I was encouraged recently to put the entire build log together somewhere that doesn't require registration (modelshipworld.com) so I checked with the moderators of DIY about creating a project thread for an already completed project, and they said  so I have begun. so I have begun.https://forums.somethingawful.com/showthread.php?threadid=3944859 This will be a single thread where I will eventually have the entire build-log reposted, maybe even with more pictures and details than the first time around. It's going to be a long process as there are well over 100 posts in the build log buried in this thread, and 29 pages on modelshipworld. Feel free to make suggestions on making the log better this time around and as long as I still have the proper source material/photos I will do my best. Happy sanding!
|
|
#
?
Oct 21, 2020 01:51
|
|


|
JEEVES420 posted:Shims will be hard to get them even all the way back. The slides need to be parallel with each other to open/close right. Most box stores have dimensional strips that you can cut down and glue to the side of the cabinet. Not sure if Lowe's Depot has 1/16", if not you can try online from Woodcraft/Rockler. If you need to, just do 1/8 on one side instead of 1/16 on both. Nobody but you will notice a 1/16 off. I ended up with shims as Lowes didn't have the right strip, the drawers aren't exactly dimensionally even, and it gave me a little adjustment should stuff not be straight. I had plenty of access from the back, so that wasn't an issue. Worked great. It's functionally complete, though I wanna drive a handful of additional screws.     There's a bunch of ugly parts when you look close. I figure I'll either fix or remake in the future. I got the drawer slides and some router bits from McMaster. My mom gets a discount and $10/pair for the drawer slides was a steal! I need to use her for more of my tool purchases, especially consumables. Things I learned: -I'm just as bad at cutting straight with a circular saw as I am with a hand saw. -Building fencing is a necessity, but I need to get better at it. -I bought some 1" angle to use as fencing, but it was way too flexible to work. Shame, I thought it was a good idea. -I ended up buying a cheap router to make dados and it was super fun (and scary for one brief moment when it kicked on me). -That all the drawers came out square is a minor miracle. -I really want a tablesaw and should invest in one if I wanna do more like this in the future. I'm trying to decide on how to finish it. I have mostly black/dark bookcases from Ikea, so I'm thinking a really dark stain on the main cabinet. The issue is the exposed edges of the plywood: I think they may look ugly with stain. Does anyone have a good solution for this? Should I bother getting some trim pieces or something? I'm thinking about painting the drawers as I like the idea of having them white, at least on the inside. But that probably would look like poo poo with a stained cabinet. I'm probably going to be out of town for a while, so I have some time to think about it.
|
|
#
?
Oct 21, 2020 04:44
|
|
|
You are definitely going to want to put either a full backer piece on that or at least some little corner triangles to keep the whole cabinet from racking once you have some weight in there.
|
|
#
?
Oct 21, 2020 05:27
|
|


|
Word, I'll keep it in mind.
|
|
#
?
Oct 21, 2020 05:32
|
|
|
Ziggy Smalls posted:I'm a bit of a lurker but I love your red window and this animation rules. Everybody deserves a little recognition. Thank you! That made my day! Yooper posted:That's super sweet dude. More woodworking projects need exploded animated drawings. Thank you, and yeah I will try to do more explosions Granite Octopus posted:
Thanks! Blender isn't any more against the grain than 3ds max. I say use what you already know if you are familiar. As long as you can specify "this cube primitive should be 45mm x 95mm" and can make precise cuts and chamfers using numerical input, you're good to go. Centrist Committee posted:Unrelated but what is this kind of window called? A garden window, which is a subset of a bay window, so everyone is right. If a bay has 90 degree corners it's a garden window. I do have dual bay windows planned, a dream of mine to have a bay window since I was a teen. SimonSays posted:Well you definitely don't need a truck. I actually walk my lumber back, but I'm lucky to live nearly next door.  Here is my current project, building a 2x6 meter workshop, with a cantilevered car port, and a 90cm tall loft floor under the single slope roof to keep lumber and other materials. the poles are 15x15cm, 6 meters long, buried 1.7 meters deep, with 90kg of concrete collar around the base in the holes, then the long floor beams are 7x22cm (3x8s) six meters long. I'm using this book for all my construction and engineering, it's my second pole building. https://www.amazon.com/Practical-Pole-Building-Construction-Outbuildings/dp/0913589160/ 
|
|
#
?
Oct 21, 2020 12:51
|
|


|
Uthor posted:I ended up with shims as Lowes didn't have the right strip, the drawers aren't exactly dimensionally even, and it gave me a little adjustment should stuff not be straight. I had plenty of access from the back, so that wasn't an issue. Worked great. I love this set of drawers! I think I am starting to see the code of The Matrix because the first thing I noticed was the dado cut joinery. You say you are concerned about the edges. You have a router, would it have been possible to put a nice edge on that plywood before you assembled it? I donno, I've not worked with plywood (or a router  ) so I don't know if it would just turn into a mess or something. ) so I don't know if it would just turn into a mess or something.
|
|
#
?
Oct 21, 2020 13:13
|
|

|
Uthor posted:I ended up with shims as Lowes didn't have the right strip, the drawers aren't exactly dimensionally even, and it gave me a little adjustment should stuff not be straight. I had plenty of access from the back, so that wasn't an issue. Worked great. Might be worth considering putting a back on to counteract any racking. Looks good though.
|
|
#
?
Oct 21, 2020 15:16
|
|
|
Uthor posted:I ended up with shims as Lowes didn't have the right strip, the drawers aren't exactly dimensionally even, and it gave me a little adjustment should stuff not be straight. I had plenty of access from the back, so that wasn't an issue. Worked great. If the drawers fit, you must acquit. If it has a back, it will not rack.
|
|
#
?
Oct 21, 2020 16:12
|
|
|
Uthor posted:The issue is the exposed edges of the plywood: I think they may look ugly with stain. Does anyone have a good solution for this? Should I bother getting some trim pieces or something? You can get simple iron-on edge banding that will cover the edges like this: https://www.amazon.com/Preglued-Edge-Flexible-Application-Adhesive/dp/B075CSWCTC/ref=psdc_13399361_t1_B00HCLNGE2 The way you've constructed this, though, it might not look that great on the drawer fronts. I can see why you made them the way you did for easy screwing from the side, but you probably should have made the drawer fronts attach from the front so the edges are covered by the panel. These are often Dovetailed, but without doing any complicated joinery you could still just screw them from the front and just fill them in with wood filler or you could cover them with buttons or plugs  . .
|
|
#
?
Oct 21, 2020 16:46
|
|
|
Elysium posted:You can get simple iron-on edge banding that will cover the edges like this: https://www.amazon.com/Preglued-Edge-Flexible-Application-Adhesive/dp/B075CSWCTC/ref=psdc_13399361_t1_B00HCLNGE2 You can build the box and then screw a face to it from the back hiding the screw heads in the box.
|
|
#
?
Oct 21, 2020 17:11
|
|
|
I finally finished my first "real" woodworking project that wasn't just screwing Home Depot lumber together. Just a simple end grain cutting board out of purpleheart and hard maple for my wife. Learned a lot in the process like don't take someone's word that the blade on their table saw is straight/90 degrees. Don't use a 30 year old craftsman router without testing it thoroughly on scrap wood first because the collet may be broken which causes the bit to work out and put a huge gouge in your boards. The cuttin board ended up about an inch thick instead of two inches thick due to the various mishaps. Finally got it sanded and mineral oil put on it today. 
|
|
#
?
Oct 21, 2020 18:52
|
|
|
Obsoletely Fabulous posted:I finally finished my first "real" woodworking project that wasn't just screwing Home Depot lumber together. Just a simple end grain cutting board out of purpleheart and hard maple for my wife. Nice, that is some dark brown purple heart. I would of thought walnut and maple if you didn't say purple heart.
|
|
#
?
Oct 21, 2020 18:59
|
|
|
JEEVES420 posted:Nice, that is some dark brown purple heart. I would of thought walnut and maple if you didn't say purple heart. I took the picture like 30 seconds after I put the oil on. I'm hoping some of the purple comes back once it soaks in some. This is what it looked like before sanding/rounding the edges and oil. 
|
|
#
?
Oct 21, 2020 19:09
|
|
|
Shelf update: They're finished just haven't taken any pictures yet. Anyways, my friend's sister has a baby shower coming up and I thought I would make a couple toys. I'm pretty happy how this little car came out; going to try and make a rattle next (with no lathe)  Body is some mahogany scrap, wheels are slices from a 1.5" maple dowel I had lying around from an old project.
|
|
#
?
Oct 21, 2020 19:13
|
|

|
Obsoletely Fabulous posted:I finally finished my first "real" woodworking project that wasn't just screwing Home Depot lumber together. Just a simple end grain cutting board out of purpleheart and hard maple for my wife. Needs to be slightly longer for Courier Chess, but it's a fine Mastodon Chess board! http://mlwi.magix.net/bg/mastodonb.htm
|
|
#
?
Oct 21, 2020 19:19
|
|
|
Hey remember just over two years ago when I posted this?ColdPie posted:I made a thing. It's not done yet, still need to make and hang the doors. I'm commissioning a friend to do the glass panels for the doors, and I'll hook up with a blacksmith I know about the door pulls. But today I'm going to drill some holes through the back and play some goddamn video games. My friend who did the glass work had some personal stuff come up, so my project got back-burnered. But that's all been resolved now and for some weird reason she had a bunch of spare time this summer, so she was able to finish the glass for me! I got the doors hung this past weekend and spent today taking glamor shots. Credit where it's due, it is strongly inspired by a Mike Pekovich piece: https://www.instagram.com/p/BVCQ7pil9zF/?taken-by=pekovichwoodworks I wrote up a construction blog post. Short version is I'm super happy with how it turned out. It was my first time making and hanging doors and, other than a few mistakes with where I drilled the holes for the hinges, they turned out perfect. I think this is easily the nicest piece I've made. 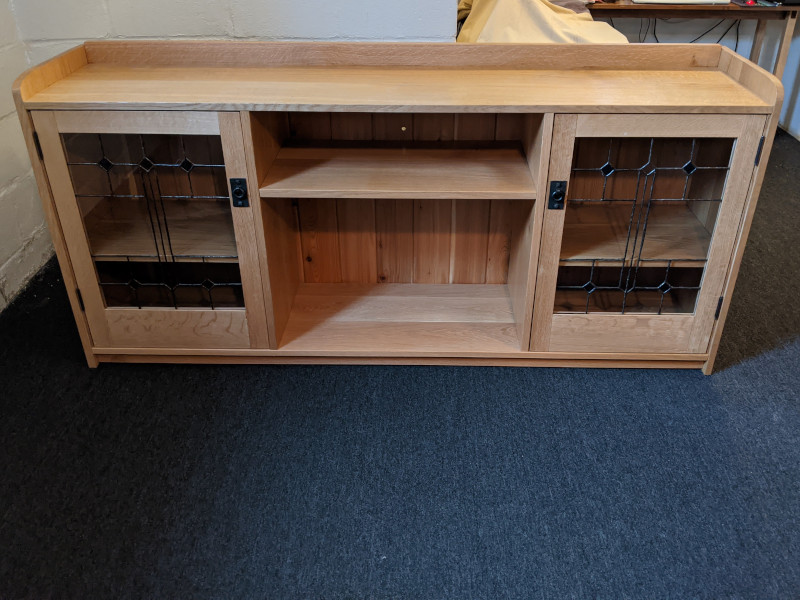 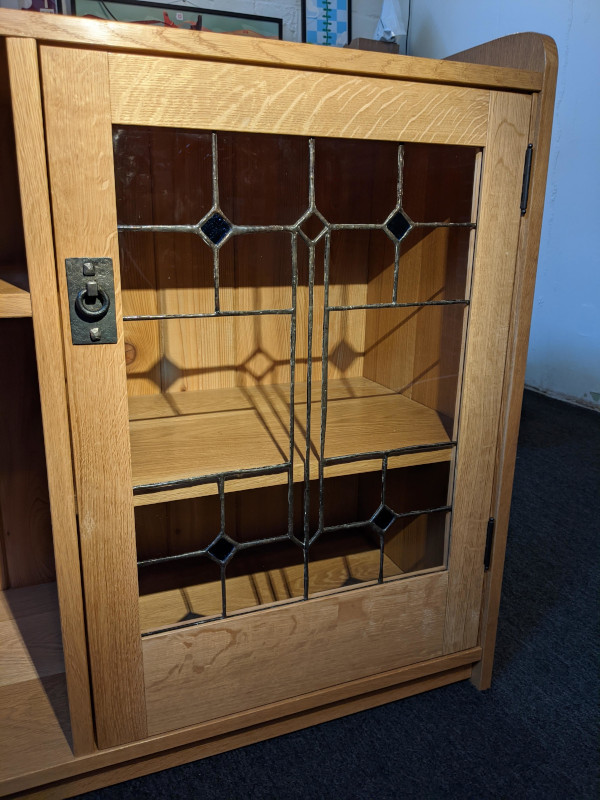 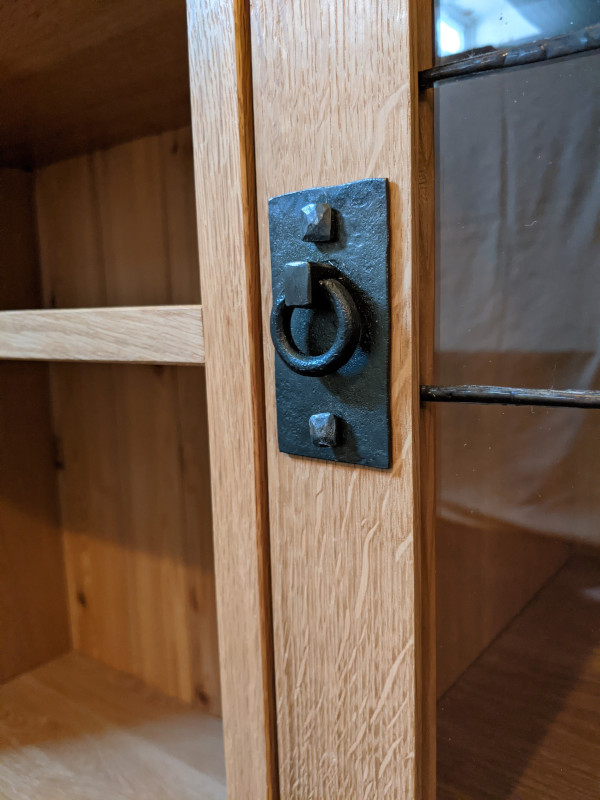  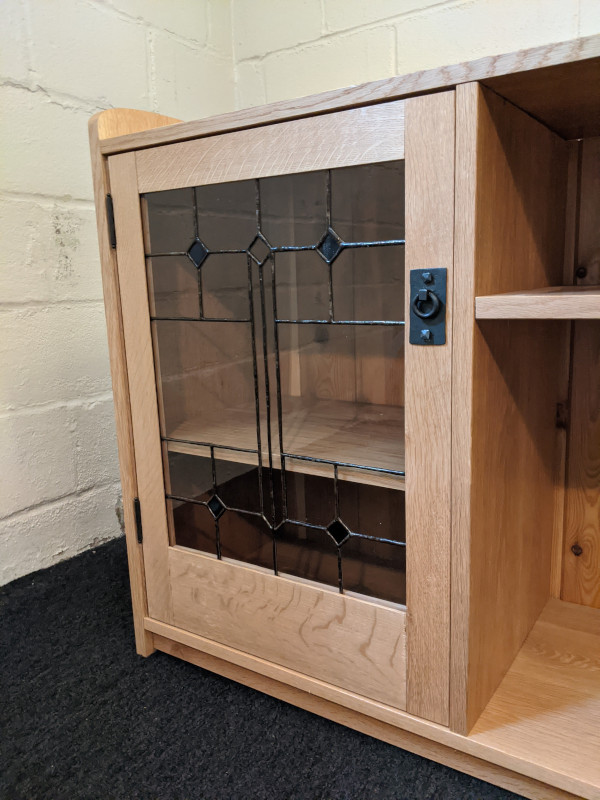 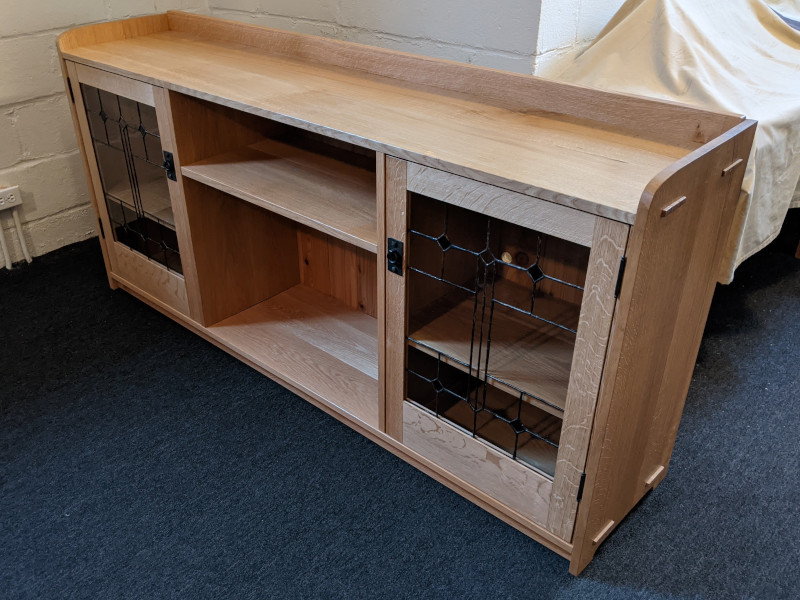 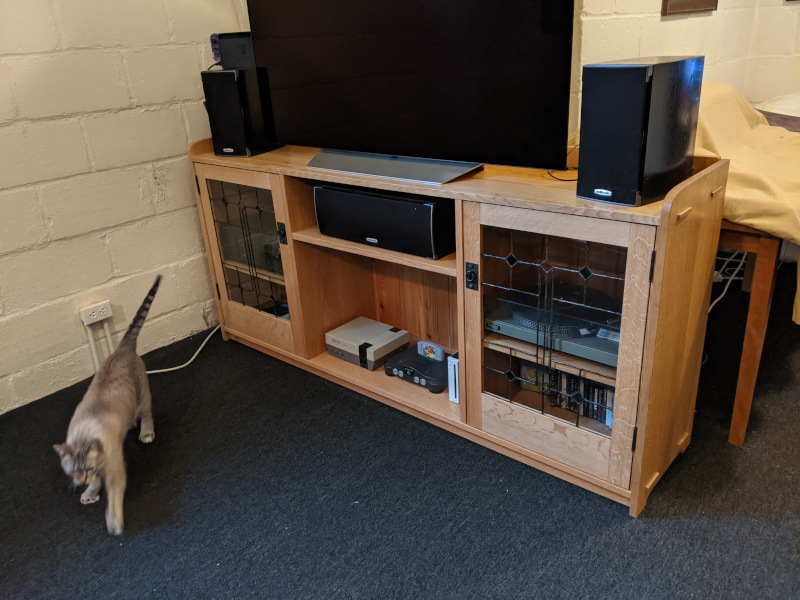
|
|
#
?
Oct 21, 2020 20:03
|
|


|
Super Waffle posted:Shelf update: They're finished just haven't taken any pictures yet. That's real cute. My daughter has a simple wooden duck that she loves that would be easy is make. It's on wheels like the car, but the rear wheels have a small peg on the inner edge that raise the wings up and let them drop as they turn, set 180 degrees apart so the wings alternate. It makes a crazy racket though so maybe don't give that as a gift if you want to remain on good terms with the parents.
|
|
#
?
Oct 21, 2020 20:05
|
|
|
ColdPie posted:Hey remember just over two years ago when I posted this? holy poo poo
|
|
#
?
Oct 21, 2020 20:15
|
|


|
ColdPie posted:Hey remember just over two years ago when I posted this? Hell to the yes. Nicely done quartersawn. The whole thing is 
|
|
#
?
Oct 21, 2020 20:22
|
|
|
ColdPie posted:awesomeness This is absolutely beautiful. Your friend does great work too. I thought it was going to be a bar to hold expensive liquor. Those windows look absolutely made for it. Then you put a nintendo on it. 
SouthShoreSamurai fucked around with this message at 21:25 on Oct 21, 2020 |
|
#
?
Oct 21, 2020 20:41
|
|


|
I mean, this is SA. It makes as much sense that it holds a NES as it would expensive liquor. Just  though. I think the whole project is just amazingly beautiful. It reminds me of some late 1800 built ins that a neighbor had. Especially when paired with those windows. Their colors were darker, but product of the times. though. I think the whole project is just amazingly beautiful. It reminds me of some late 1800 built ins that a neighbor had. Especially when paired with those windows. Their colors were darker, but product of the times.
|
|
#
?
Oct 21, 2020 20:56
|
|
|
Rutibex posted:Needs to be slightly longer for Courier Chess, but it's a fine Mastodon Chess board! meats vs the cheeses, winner eats all!
|
|
#
?
Oct 21, 2020 21:13
|
|
|
The fold down desk I made for my wife has legs that are just 1x3's that fold in. I want to put some feet on there for leveling. I got some that go into a 3/8ths hole, but I'm reconsidering that and may use ones that screw to the outside of the leg instead. This is a long-winded way of asking, what's the biggest hole you would feel comfortable drilling into the bottom of a 1x3 before worrying about it splitting? SouthShoreSamurai fucked around with this message at 21:51 on Oct 21, 2020 |
|
#
?
Oct 21, 2020 21:25
|
|
|
ColdPie posted:Hey remember just over two years ago when I posted this? (Ask me about the time I used hot hide glue to glue in the wooden stops and glued the glass to the door frame and split all the glass when the door styles shrunk a little)
|
|
#
?
Oct 22, 2020 00:14
|
|
|
Kaiser Schnitzel posted:This is really pretty and I really love the style of the glasswork. How did you hold the glass in? I'm not sure I've ever found a perfect way. Ouchie. I've seen these little padded brad thingies used that bend flush to the glass. I used to do small display cabinets for a collectibles company, and I used frame and panel style doors with a 1/8" cutter set I had specially fabricated. I pinned the bottom rail with small cabinet screws so you could remove it and insert the glass or plexi panel in after paint. Worked pretty well, looked clean.
|
|
#
?
Oct 22, 2020 01:06
|
|
|
Love it! I'm planning a kinda similar sideboard for my dining room, it's great to see someone else has finished one of these!
|
|
#
?
Oct 22, 2020 01:30
|
|


|

|
| # ? May 15, 2024 11:40 |
|
|
Kaiser Schnitzel posted:This is really pretty and I really love the style of the glasswork. How did you hold the glass in? I'm not sure I've ever found a perfect way. I want to hear their answer too, but one way to accomplish is to get window strips, which can come as thin as 1mm with adhesive backing. Just apply to the frame, put glass in, apply trim (also with gummy strip) to hold it in. This won't work for glass that is slid into place, only with trim held, that can be dropped in from front or back.
|
|
#
?
Oct 22, 2020 10:29
|
|