


|
Martytoof posted:Is there a rough guide on how to naturally finish a kit electric guitar body? I�m going to satisfy my project-lust with a thinline tele kit and I�d love to finish it in a natural gloss to match my natural Fender J-bass, but I�m not really sure what the process to finish a guitar body is, let alone all the steps to get from bare wood to decent looking finish. basically the order goes grain fill/sanding sealer/topcoat/level sand and buff there's practically infinite options as far as type of product and method of application goes at each stage and everyone's got opinions on which is best so it's hard to just say do this one thing and that's it some places like stewmac sell fairly pricey all in one kits that include more in-depth guides specific to their products if you're completely new to wood finishing in general
|
 #
?
Jan 1, 2021 00:17
#
?
Jan 1, 2021 00:17
|
|

")

|

|
| # ? Jun 8, 2024 15:56 |
|
|
That�s a good start; If you can believe it, I didn�t even know that much. I suppose the products to use depend entirely on the end results I want to achieve, and the wood/body that I end up buying so I�ll have to do a little research but that should be a good start, thanks!
|
|
#
?
Jan 1, 2021 00:26
|
|


|
If you have a woodcraft store nearby they should carry the mohawk line of lacquers which I belive is what StewMacs stuff is just relabled. If your getting a body from somewhere other than cutting it yourself out of a piece of wood it will probably come sealed already. If it's an open grain wood you will want to use grain filler to fill that in unless you like the look/ feel of the grain being sunken. Then more sealer think of it like primer just clear. It has more solids in it so it builds faster and sands easier. I've used the Deft brand sanding sealer a lot and it is excellent. Home Depot/ Lowes will usually carry the Deft stuff Minwax also makes a nitrocellulose lacquer that comes in spray cans that's pretty good but the Deft is good for that too. Buy a lot of sandpaper and some of those rectangle rubber erasers to use as a sanding block. If you really want to go hog wild get a set of micromesh pads. You'll also need some polishing compound. Lacquer takes awhile to get hard enough to wet sand/ polish most places say 30 days minimum. It shrinks as it cures so if you sand/polish too soon it will show the grain lines as it shrinks more. Hardware will leave marks on it, stands might leave a mark, or it might stick to the lining of a case. Make sure any stands you may use are labled nitro safe or wrap some t-shirt material around wherever it'll touch the body/ neck. Really the brand of finish or type of lacquer isn't important as long as you stay in the same general system. I've used the stuff from ReRanch, Deft, Minwax, Watco, even Krylon, and Rustoleum. The process is the same. I'll be refinishing an SG soon I'll do a step by step thing on it as I do it. I
|
|
#
?
Jan 1, 2021 01:21
|
|

|
Also, you don't have to spray if you don't have the space. There's a bunch of tutorials on YouTube for wipe on polys, I think Minwax is the popular one in the US. You can also go acrylic poly if (like me) you dislike using solvents for anything paint related. My long term project is a Danelectro/Red Special style explorer bass with a fabric top, so I'm experimenting with some acrylic floor poly, which seems to be doing fine. Which I'm just rolling on.
|
|
#
?
Jan 1, 2021 01:47
|
|

|
Also look into Tru-Oil
|
|
#
?
Jan 2, 2021 16:14
|
|

|
Okay, so I'm trying my hand at some mods/wiring in my bass. I pulled out the active electronics a couple weeks back: They're battery hungry and I didn't really like the sounds of strings and fingers clicking when turned on anyway. (The holes under the bridge are where the on switch and the double stacked tone knobs used to be. The LED is still in place because I haven't bothered to remove it yet.) Plus, I wanted to try wiring the pickups in series. This idea from talkbass interested me:  The old tangle of wires - pretty standard jazz stuff:  Tangled no more:  The earth to the bridge is solid core and fabric covered - is this usual practice? Everything else is/was stranded wire. The new pots, I realised too late, don't have the bushing the originals do. So to avoid filling and drilling holes, I found some tubing at bunnings to get them to stick in the larger existing holes.  The new wiring:  Back to three knobs: volume is the nude pot and tone for bridge and neck:  Okay, generally it all seems to have worked insomuch as the output is lounder, however: - there is still hum when the tone knobs are at different settings - when I turn the treble up on either knob, there is an audible "tic-tic-tic" noise. Neither is a huge issue, because I prefer a darker tone, so I'll probably leave the knobs rolled off anyway. I'd rather that I knew it was working properly, but not sure what I'd need to troubleshoot here. Has anyone done this before themselves?
|
|
#
?
Jan 2, 2021 18:03
|
|
|
Elissimpark posted:Okay, so I'm trying my hand at some mods/wiring in my bass. I pulled out the active electronics a couple weeks back: I don�t see why anyone would want to lose the flexibility of setting the pickup volume independently (which I know wouldn�t matter in series) for two tone controls instead. I think you would be better off with a standard VVT setup and a series/parallel switch. Also unless those are high output pickups you should consider 250K pots instead, they�ll be naturally a little darker sounding than 500s.
|
|
#
?
Jan 2, 2021 22:39
|
|

|
DrChu posted:I don�t see why anyone would want to lose the flexibility of setting the pickup volume independently (which I know wouldn�t matter in series) for two tone controls instead. I think you would be better off with a standard VVT setup and a series/parallel switch. Also unless those are high output pickups you should consider 250K pots instead, they�ll be naturally a little darker sounding than 500s. I realised a little while ago, that I don't really move the volume pots that much - basically neck full on and bridge backed off full a little. I wanted to do series solely (rather than series/parallel switch) mostly to minimise things to dick around with, knobwise, but I was also curious about tone capacitors and it seemed an interesting exercise in soldering too. The two tone knobs seem to work similarly to having volume pots, but without losing the bass boost. The original pots were linear 500k so I went with log 500ks just to minimise fiddling around with too many numbers at once, though I may try 250k pots when I clean up the soldering. I also noticed last night that turning the volume right down doesn't kill the signal - would this be a ground issue?
|
|
#
?
Jan 2, 2021 23:12
|
|
|
Is the third leg of the volume pot connected to the back of the pot, and then to ground? From that wiring diagram it seems both tone controls would impact both pickups, there doesn�t seem to be anything that isolates each. If you want to minimize hassle, how about a volume/blend/tone setup? The blend would only work in parallel mode, in series it would work as volume and tone only.
|
|
#
?
Jan 3, 2021 04:54
|
|
|
poo poo, maybe I wired it back to front, like what should be on lug one is attached to lug three and vice versa. Would that make a difference? The tone knobs work in isolation, but there is still hum when they're dialled differently, which means it's not bucking hum. Not sure if that's a shielding issue or my wiring. Maybe tone/vol would be the way - I'm happy to have permanent series wiring.
|
|
#
?
Jan 3, 2021 05:12
|
|
|
I built an acoustic panel recently. It is hella easy and instantly helped the sound of my room. Building another soon, and then a couple more (I a different colour!) for a different room. I can total what it all cost me but I think it came to around AU$200 for two panels, which is a lot cheaper than the multiple hundred for one panel it usually costs here.
|
|
#
?
Jan 3, 2021 05:52
|
|


|
Finally finished my layout for a Sunn Beta pre-amp board, now I've just gotta wait for parts.
|
|
#
?
Jan 3, 2021 07:25
|
|

|
Check out Mr Fancy Pants with the labeled test points! Looks great.
|
|
#
?
Jan 3, 2021 07:50
|
|

|
That is super cool.
|
|
#
?
Jan 3, 2021 12:06
|
|

|
Chalupa Joe posted:Finally finished my layout for a Sunn Beta pre-amp board, now I've just gotta wait for parts. Cant wait to see this finished!
|
|
#
?
Jan 3, 2021 12:17
|
|

|
Elissimpark posted:I realised a little while ago, that I don't really move the volume pots that much � I really only use the volume knob as an on/off switch. Makes me think maybe I should just replace it with one. I already got rid of the tone knob and replaced it with an arcade button kill switch.
|
|
#
?
Jan 3, 2021 23:52
|
|

|
Robot Arms posted:I really only use the volume knob as an on/off switch. Makes me think maybe I should just replace it with one. I already got rid of the tone knob and replaced it with an arcade button kill switch. Is that on a bass? I've been thinking about doing it for a lark, but not sure it would sound as cool as on a guitar. Do you have anything that affects the tone at all, or just straight to the volume and the jack?
|
|
#
?
Jan 4, 2021 03:58
|
|
|
Guitar. I just removed the tone pot and didn�t leave anything in its place. So it�s straight through the kill switch and volume to the jack. I probably do get more use out of the volume than I realize, but I also love to simplify.
|
|
#
?
Jan 4, 2021 05:09
|
|
|
Anyone know about circuit bending in here? I am eyeing a Yamaha pss-470, it runs on 5 or 6 C batteries. I heard these are popular among Circuit bending crowd. I thought it would be a first 'real' project. I know theres a MIDI mod that can be done, but I don't know much at all about circuit bending. Any resources?
|
|
#
?
Jan 6, 2021 03:43
|
|

|
Just open it up and start poking around. If you find something that sounds good/weird/bad/hosed up whatever put in some wires and decide how you want to control it. Controls can be knobs, buttons, light sensors, pieces of metal you mush your fingers against. You can build something like this LFO mod http://commonsound.com/swash/lfomod.pdf To splice into something you want to control.
|
|
#
?
Jan 6, 2021 04:05
|
|
|
my usual technique is just to short circuit random points and see what happens 
|
|
#
?
Jan 6, 2021 07:00
|
|

|
nishi koichi posted:my usual technique is just to short circuit random points and see what happens Yeah, 
|
|
#
?
Jan 6, 2021 07:34
|
|

|
Dumb question, but I can't get the wording right to Google a useful answer: if a tone pot has 500k ohm resistance, is the resistance 500k when dialled up (ie max treble) or down (max no treble)? Or am I completely thinking about this incorrectly?
|
|
#
?
Jan 7, 2021 16:42
|
|
|
Elissimpark posted:Dumb question, but I can't get the wording right to Google a useful answer: if a tone pot has 500k ohm resistance, is the resistance 500k when dialled up (ie max treble) or down (max no treble)? Or am I completely thinking about this incorrectly? Kind of apples and oranges, because there are multiple methods of wiring. The tone control doesn�t come from the resistance alone, it�s from the combination of resistance and capacitance that creates an �RC� circuit. https://octavedoctor.com/guitar-tone-circuits/ https://www.premierguitar.com/articles/29161-mod-garage-three-ways-to-wire-a-tone-pot
|
|
#
?
Jan 7, 2021 16:54
|
|


|
Elissimpark posted:Dumb question, but I can't get the wording right to Google a useful answer: if a tone pot has 500k ohm resistance, is the resistance 500k when dialled up (ie max treble) or down (max no treble)? Or am I completely thinking about this incorrectly? 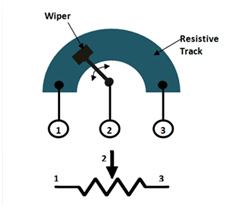 The resistance is the value of the resistive track from 1 all the way to 3. If you turn the wiper (2) all the way to 1, the resistance between 1 and 2 is zero and between 2 and 3 is the value of the pot. Edit: To answer the question you asked, it's the value at max treble: The resistance of the pot is preventing the high frequencies from bleeding to the electric ground through the tone cap. As you turn the tone down, the resistance is lowered and more signal makes it to the capacitor and ground. Siivola fucked around with this message at 17:13 on Jan 7, 2021 |
|
#
?
Jan 7, 2021 17:07
|
|


|
Siivola posted:
Ah thanks! I was having trouble visualising it, but that's partly because it's 3am Here and I should be sleeping. plester1 posted:Kind of apples and oranges, because there are multiple methods of wiring. The tone control doesn’t come from the resistance alone, it’s from the combination of resistance and capacitance that creates an “RC” circuit. This I know. I'm considering wiring my bass pickups in series straight to the jack as an experiment, but would like to keep it dark. Wiring a cap across the jack plugs would do this, but couldn't figure if I need to add a resistor too to simulate the tone being dialled down.
|
|
#
?
Jan 7, 2021 17:19
|
|
|
There is always a resistance however the load is varied across output and ground. Your pickups will always see a certain load when they reach the volume pot but the pot itself determines how much of the load is split between signal and ground.
|
|
#
?
Jan 7, 2021 18:15
|
|
|
Argh, this is breaking my brain. I wired my pickups in series (hot to ground) then used alligator clips to run the remaining ground and hot to the jack with a capacitor across the hot and ground. The issue is I don't think I could hear a tone difference between a .047 cap and a .1 cap, which is either because I have cloth ears or that there needs to be a resistor somewhere. Which doesn't seem to make sense, because a tone knob rolled off, unless I'm mistaken, should have next to no resistance. And from what I gather, the tone cap should only make a difference when the tone is rolled off or nearly rolled off. Is there something I'm missing here? The J pickups are humbucking and there is a bass boost, just don't understand why the caps seem to sound the same.
|
|
#
?
Jan 9, 2021 05:47
|
|
|
Okay, cap was working as replacing cap with 220k ohm resistor gave more treble but tictictic noise is back. No chargers or phones nearby - what else could cause a ticking noise? It's literally the pickups wired to the jack.
|
|
#
?
Jan 9, 2021 23:59
|
|
|
I'm building a pedal up from a PCB, and it calls for a 10uf capacitor. The only one I have on hand is a 'bi-directional 10uf audio capacitor', which is round, instead of square-ish, which the pcb calls for (i'm assuming box/film type?). Am I find using the fancy bi-directional one I have on hand?
|
|
#
?
Jan 10, 2021 07:50
|
|
|
frogbs posted:I'm building a pedal up from a PCB, and it calls for a 10uf capacitor. The only one I have on hand is a 'bi-directional 10uf audio capacitor', which is round, instead of square-ish, which the pcb calls for (i'm assuming box/film type?). Am I find using the fancy bi-directional one I have on hand? Yep. Good to go.
|
|
#
?
Jan 10, 2021 08:00
|
|
|
Dang It Bhabhi! posted:Yep. Good to go. Awesome, thank you! Now I�ve just got to figure out how to wire the jacks. Fingers crossed!
|
|
#
?
Jan 10, 2021 08:30
|
|
|
Here's a good page for that. http://beavisaudio.com/techpages/stompboxwiring/
|
|
#
?
Jan 10, 2021 16:34
|
|
|
When I first started building pedals 3PDT switches were really expensive so I just used DPDT switches and never bothered with LEDs or power jacks. When I was unpacking and setting up my new bench I found a big bag of 3PDT switches I forgot I had. I'm going through my old builds and converting them over to new switches and LEDs.  First one here is a Dan Armstrong Green Ringer clone. I probably went too big on the resistor for the LED but I can't be bothered to tear it back apart to change it again. The wah is just a standard crybaby but I removed the buffer and put a 3PDT switch and an LED in it too.
|
|
#
?
Jan 12, 2021 05:02
|
|
|
What kind of enclosure is the Green Ringer in?
|
|
#
?
Jan 12, 2021 06:41
|
|
|
frogbs posted:I'm building a pedal up from a PCB, and it calls for a 10uf capacitor. The only one I have on hand is a 'bi-directional 10uf audio capacitor', which is round, instead of square-ish, which the pcb calls for (i'm assuming box/film type?). Am I find using the fancy bi-directional one I have on hand? So I finished building this up today. It's the Kulk Void Fuzz. The pedal powers on, but instead of having a really heavy fuzz sound, it's just acting more like a boost or really weak overdrive pedal. My hunch is that I probably just ordered some wrong parts, but is there anything else I should look at? Also, should I not have connected the input jack to the dc/output ground? It said 'connect all grounds', but maybe I went too far. Here's what mine looks like right now:  Click for full size Here's a demo video of what the pedal should sound like, and here's the build doc:  
|
|
#
?
Jan 12, 2021 07:45
|
|
|
Double-check the values of R1, R2, R3, R9 and R10 are correct. Those set the bias and gain of each gain stage.
|
|
#
?
Jan 12, 2021 08:03
|
|
|
Looking at the photo on the Bandcamp page, C1 and C2 seem to be different values (the former is a green square one, the latter is a yellow spherical one). It seems odd the parts list has one as 47nF and the second as .47uF. Could a wrong value capacitor muck things up like that? As evidenced by my posts, I'm no electronics wizard, but that does look odd.
|
|
#
?
Jan 12, 2021 08:24
|
|
|
Elissimpark posted:What kind of enclosure is the Green Ringer in? An electrical junction box I powdercoated green. They are pretty good for cheap enclosures if you don't mind doing a little work. They have some extraneous holes that I filled in with JB Weld before finishing. They also make the ones in aluminum for like outside stuff that I've used in the past as well. e: Looking at your list there it says 470 nf and .47 uf they are the same value. See this chart for more details https://www.justradios.com/uFnFpF.html Thumposaurus fucked around with this message at 09:53 on Jan 12, 2021 |
|
#
?
Jan 12, 2021 09:47
|
|
|

|
| # ? Jun 8, 2024 15:56 |
|
|
Thumposaurus posted:An electrical junction box I powdercoated green. Cool. I understand why pedals tend to be in the generic boxes, but it's nice seeing unusual housings. I realise that they're the same value, it just seemed weird to write it down like that. Frogbs has used identical caps as per the build list, but the Kulk website photo has two different types of caps in those slots. I was more wondering if there was a typo. https://kulk.bandcamp.com/merch/void-fuzz-guitar-pedal
|
|
#
?
Jan 12, 2021 11:02
|
|