


|
i bought a badger 360. my airbrush compressor didn't come with a hose. I bought an airbrush hose with a 1/8" end and a 1/4" end and an adapter that purported to work for badger air brushes. it doesn't seem to fit the hose and I can't easily find what I need through Google--does anyone know off hand what I need to get going with this brush?
|
 #
?
Jun 1, 2021 16:52
#
?
Jun 1, 2021 16:52
|
|

|

|
| # ? Jun 12, 2024 13:59 |
|
|
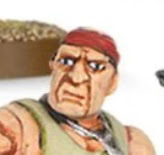
sassassin posted:The metal looks kind of backwards in places, like the silver is tarnishing the original rust-colour. Like on the sword the sharp bit would naturally have the rust knocked off where it's hitting things regularly (or being sharpened), while the thicker areas would stay rustier. While on the armour the edges would be where the rust is eating away most. Yes those are good points and I noticed the same problems. The issue was that I started off with the idea of using chipping medium. The silver and rust were below a pure steel color. When I chipped away, you couldn't really see the difference between the silver and the steel (and the rust added a level of chaos that made it even more difficult to read). So I said "gently caress it" and painted rust all over the steel to "fix" the mini. And then I had to edge highlight the silver again and clearly in places I did it wrong. That was a good lesson though. I think what I learned was that you don't use a chipping medium with colors that are pretty close (steel and silver both being true metal colors, the only difference really is their brightness I guess?). The effect just doesn't seem to work. For the next boi I'll use a much darker color (maybe some German Grey/Corvus Black or a darkened Thunderhawk/Midnight Blue) as the overlay and see if the chipping works better that way. Thanks for the feedback, very good eyes!
|
|
#
?
Jun 1, 2021 17:23
|
|

|
tips on making this better? So far i did a black base with white drybrushed pre-shading then i blocked out the colors, ink washed the recesses, re applied the block colors where necessary and tried to add some highlights. Still getting the hang of highlighting. I think im going to need to do an entire regiment where i really focus on my highlighting technique before i even begin to do it right.
|
|
#
?
Jun 1, 2021 17:24
|
|
|
punishedkissinger posted:tips on making this better? So far i did a black base with white drybrushed pre-shading then i blocked out the colors, ink washed the recesses, re applied the block colors where necessary and tried to add some highlights. Still getting the hang of highlighting. I think im going to need to do an entire regiment where i really focus on my highlighting technique before i even begin to do it right. Given all the folds and stuff I would have tried a very, very light dry brush, over and over until I get it right/to taste, rather than a highlight.
|
|
#
?
Jun 1, 2021 17:49
|
|
|
https://twitter.com/MonkstoneMinis/status/1381220580385521670 This guy has a rusted armor technique (explained in the tweet thread) that I tried out on my latest vampires- it's pretty fun to take for a spin and even though I'm not much a painter, it came out looking okay for me.
|
|
#
?
Jun 1, 2021 17:59
|
|
|
Vulpes Vulpes posted:https://twitter.com/MonkstoneMinis/status/1381220580385521670 Sweet, that's exactly the look I'd like to go for, thanks for sharing.
|
|
#
?
Jun 1, 2021 18:06
|
|
|
I used this method for my rusty Stormcast, though I swapped the secret weapon rust paints for AK equivalents since they're impossible to get in the UK it seems.
|
|
#
?
Jun 1, 2021 18:20
|
|
|
I love your Grimcast to the point that I made some of my own (still have to paint them). I was going to use them to practice rusty armor before I waded in with the vampires, but got impatient.
|
|
#
?
Jun 1, 2021 18:32
|
|
|
Ghislaine of YOSPOS posted:i bought a badger 360. my airbrush compressor didn't come with a hose. I bought an airbrush hose with a 1/8" end and a 1/4" end and an adapter that purported to work for badger air brushes. it doesn't seem to fit the hose and I can't easily find what I need through Google--does anyone know off hand what I need to get going with this brush? Man my current air hose is 3 different hoses I�ve cobbled together in a once-temporary attempt to use my compressor It�s something like 1/8�->1/4�male, 1/4� female->1/4� female, 1/4� male->Badger connector. I was going to grab a adaptor for my compressor the next time I was at princess auto, but that was almost a year ago.
|
|
#
?
Jun 1, 2021 18:36
|
|


|
Well I finally finished a unit of some alfs. Figure out a lot of stuff along the way. Even built a lovely lightbox, cobbeled together some lights (I need to buy better lights) and tried to teach myself some basic photography. It's fun where this hobby leads you. First one  After the first batch I switched from pure white as my highlight to a warm white and I like the look a lot better.  High Warden  And the whole gang 
|
|
#
?
Jun 2, 2021 01:31
|
|

|
punishedkissinger posted:tips on making this better? So far i did a black base with white drybrushed pre-shading then i blocked out the colors, ink washed the recesses, re applied the block colors where necessary and tried to add some highlights. Still getting the hang of highlighting. I think im going to need to do an entire regiment where i really focus on my highlighting technique before i even begin to do it right. Have you tried asking Annie if she's okay? 
|
|
#
?
Jun 2, 2021 01:36
|
|


|
    WIP on this tank with tank commander for my Valour Korps army. Still need some additional transfers, and I'll take another look at it with fresh eyes before moving forward on it.
|
|
#
?
Jun 2, 2021 02:41
|
|


|
I'm getting an airbrush. Besides the airbrush, hose, and compressor, I ordered one of those cleaning pots, and I'm going to pick up bottles of cleaner and thinner/flow aid. Anything else I'm missing?
|
|
#
?
Jun 2, 2021 03:17
|
|

|
Toebone posted:I'm getting an airbrush. Besides the airbrush, hose, and compressor, I ordered one of those cleaning pots, and I'm going to pick up bottles of cleaner and thinner/flow aid. Anything else I'm missing? respirator and gloves imo
|
|
#
?
Jun 2, 2021 03:19
|
|
|
Toebone posted:I'm getting an airbrush. Besides the airbrush, hose, and compressor, I ordered one of those cleaning pots, and I'm going to pick up bottles of cleaner and thinner/flow aid. Anything else I'm missing? You'll want some kind of spray booth to catch overspray and funnel the dried paint dust out a window or other ventilation This is a really common one that I have, though I have to say it kind of sucks and was only worth it at like 60 bucks before covid times probably spiked the price: https://www.amazon.com/Anesty-Bright-Lights-Filter-Portable/dp/B08RHWN398
|
|
#
?
Jun 2, 2021 03:21
|
|

|
Verisimilidude posted:
That thing looks great, is it 3D printed? If so how many pieces was it made of? Booyah- posted:You'll want some kind of spray booth to catch overspray and funnel the dried paint dust out a window or other ventilation Unfortunately, there�s a huge price gap between these $75 plastic booths and $400 professional booths. There�s nothing really in between.
|
|
#
?
Jun 2, 2021 05:07
|
|

|
Bucnasti posted:That thing looks great, is it 3D printed? If so how many pieces was it made of? What does the jump in price get you in quality and/or features?
|
|
#
?
Jun 2, 2021 05:36
|
|

|
apparently I bought the worlds only compressor with a 1/8" male BSP connector. hopefully this big bag of adapters I bought will help, the local hobby store had a whole wall of badger adapters and looked at my setup like it was from Mars.
|
|
#
?
Jun 2, 2021 06:09
|
|
|
Dreylad posted:Well I finally finished a unit of some alfs. Figure out a lot of stuff along the way.
|
|
#
?
Jun 2, 2021 08:35
|
|


|
punishedkissinger posted:respirator and gloves imo Yep, already have these for other mildly hazardous hobbies. Is a spray booth necessary if I'm using it in my workshop and don't really care if a bit of paint gets on things? Maybe I can DIY one with a fan, HVAC filter and some cardboard.
|
|
#
?
Jun 2, 2021 12:51
|
|
|
Toebone posted:Yep, already have these for other mildly hazardous hobbies. you still want decent ventilation and you want something that keeps the dust at least in one place. having a clean area to spray is critical imo.
|
|
#
?
Jun 2, 2021 13:33
|
|
|
Toebone posted:Yep, already have these for other mildly hazardous hobbies. If your space is well ventilated and you�re not going crazy you can get away without a booth. I spent a weekend with two dozen other guys nonstop airbrushing in a big well ventilated college classroom without booths and it was fine. You definitely want a booth if you�re spraying lacquer or something, but then if you�re doing that you also want a better booth than those plastic ones. Nunes posted:What does the jump in price get you in quality and/or features? Permanent sturdy construction, better, bigger more powerful and safer fans, larger area etc.
|
|
#
?
Jun 2, 2021 13:53
|
|
|
Toebone posted:Yep, already have these for other mildly hazardous hobbies. I airbrush in my hobby room with no spray booth, it isn't strictly necessary when spraying acrylics, but all that paint you spray turns into a lot of dust. However, I usually do not airbrush a ton at a time - If I was, say, priming a big batch of models, I'm sure it would be more of a problem. So you definitely want to have a booth, but you can get away with not having one so long as you don't mind creating some dust, which in a workshop I assume is fine.
|
|
#
?
Jun 2, 2021 18:03
|
|

|
Toebone posted:Yep, already have these for other mildly hazardous hobbies. A lot of people say you don't need one, but looking at my spray booth and the state of the filter after 6 months of use I'm not sure how I feel about that. I paint in my office, so I don't want to worry about my computer or other electronics getting filled with paint dust, so it really depends on your space. If you have a large, well-ventilated area that you're not concerned about, I'd say you don't need one (maybe put some paper down) but if you have a smaller area that's in close proximity to delicate electronics, I'd say definitely get one and keep it close to a window.
|
|
#
?
Jun 2, 2021 18:09
|
|
|
Verisimilidude posted:A lot of people say you don't need one, but looking at my spray booth and the state of the filter after 6 months of use I'm not sure how I feel about that. I paint in my office, so I don't want to worry about my computer or other electronics getting filled with paint dust, so it really depends on your space. If you have a large, well-ventilated area that you're not concerned about, I'd say you don't need one (maybe put some paper down) but if you have a smaller area that's in close proximity to delicate electronics, I'd say definitely get one and keep it close to a window. Also the whole paint in your lungs thing.
|
|
#
?
Jun 2, 2021 18:21
|
|


|
Virtual Russian posted:Also the whole paint in your lungs thing. That's why you wear a mask. I have a booth because I don't want to get paint and paint dust all over my office. If I ever needed to spray something larger than the booth I would take it outside or in the garage. The only time I really produce a lot of overspray and dust is when I'm priming, I tend to go full pigpen when priming and the booth helps a lot for that. Laying colors on a model doesn't usually produce much overspray because if I'm doing it right all the paint is going on the model where I want it.
|
|
#
?
Jun 2, 2021 19:38
|
|
|
If you're worried about getting airbrush spray all over the precious interior of your home, just do all your airbrushing in your car instead. https://www.youtube.com/watch?v=HxRcYMv82RU
|
|
#
?
Jun 2, 2021 20:15
|
|

|
Silhouette posted:Have you tried asking Annie if she's okay? This got a genuine lol.
|
|
#
?
Jun 3, 2021 03:13
|
|

|
Painted up an Ironjawz shaman, been proxying with my orks weirdboy for too long.    
|
|
#
?
Jun 3, 2021 04:46
|
|


|
Lasting Damage posted:Painted up an Ironjawz shaman, been proxying with my orks weirdboy for too long. Goddamn, that is a tidy paint job. Looks amazing.
|
|
#
?
Jun 3, 2021 06:22
|
|

|
Yeah that's a great paintjob. Just the way you painted his face he looks slightly worried.
|
|
#
?
Jun 3, 2021 13:29
|
|
|
Converted up a vampire for a Mordheim warband. Used Pious Vorne from blackstone fortress for the body, Sylvaneth spite-revenant for head. Cut halberd head out of sheet styrene. Hair is greenstuff and nose ring is a bit of wound wire from guitar string. The color palette is fairly limited- mostly greys and browns. His right side has some yellows mixed in and his left has some grey blue. Started from a brown prime and used a lamp shining directly from his right side to work out general light placement. Rather than doing base coats I started out by sketching in light grey where the light should be hitting. Not my normal approach but I feel like it�s good practice.   
|
|
#
?
Jun 3, 2021 15:25
|
|

|
Nice work on that conversion! The yellow highlights really help set a scene. Dreylad posted:Yeah that's a great paintjob. Just the way you painted his face he looks slightly worried. Yeah that's why I love this model, he's so expressive
|
|
#
?
Jun 3, 2021 17:47
|
|
|
A lot of great stuff on this page!!
|
|
#
?
Jun 3, 2021 18:30
|
|
|
Finished my 500pt Imperial Guard list. Everything was 3d printed on a Phrozen Sonic Mini 4k and painted over the last two weeks using speed painting techniques for the infantry. I used zenithal priming, underpainting and contrast paints to paint everything here except the metals and camo on the tank and shields. The infantry worked out to about 20 minutes per model, the bullgryns took about 3 hours, and the tank took about 3 hours as well. Overall cost of STL files was $50, total cost of resin was about $20. Really happy to have finished an army for the first time ever, even if it's only 500 points.
|
|
#
?
Jun 3, 2021 19:39
|
|
|
Verisimilidude posted:Finished my 500pt Imperial Guard list. Everything was 3d printed on a Phrozen Sonic Mini 4k and painted over the last two weeks using speed painting techniques for the infantry. I used zenithal priming, underpainting and contrast paints to paint everything here except the metals and camo on the tank and shields. The infantry worked out to about 20 minutes per model, the bullgryns took about 3 hours, and the tank took about 3 hours as well. Did you have to do any work after printing to clean up the minis? I am not well versed in the 3D printing side of things.
|
|
#
?
Jun 3, 2021 19:57
|
|
|
Verisimilidude posted:Finished my 500pt Imperial Guard list. Everything was 3d printed on a Phrozen Sonic Mini 4k and painted over the last two weeks using speed painting techniques for the infantry. I used zenithal priming, underpainting and contrast paints to paint everything here except the metals and camo on the tank and shields. The infantry worked out to about 20 minutes per model, the bullgryns took about 3 hours, and the tank took about 3 hours as well. Been following your stuff on Instagram, great work!
|
|
#
?
Jun 3, 2021 19:58
|
|
|
Nunes posted:Did you have to do any work after printing to clean up the minis? I am not well versed in the 3D printing side of things. Not really. I could've done more to prevent some of the scarring from where the supports tore away from bases and some weapons, but for the most part the files I used were very well designed and put most of the supports in areas you won't see. You'll notice little bumps on places like the bullgryn's weapons, and a few of the rifles, but overall the cleanup was negligible.
|
|
#
?
Jun 3, 2021 20:00
|
|
|
How many of you painting goons post things from here on Instaham? I recently started a public mini painting only account and I'd like to follow you guys.
|
|
#
?
Jun 3, 2021 21:30
|
|

|

|
| # ? Jun 12, 2024 13:59 |
|
|
AndyElusive posted:How many of you painting goons post things from here on Instaham? I'm on @buttcheeksio
|
|
#
?
Jun 3, 2021 21:57
|
|