


|
Enos Shenk posted:
wire ferrules are the way and the light OP shame on an IGA fucked around with this message at 12:59 on Oct 31, 2022 |
 #
?
Oct 31, 2022 12:56
#
?
Oct 31, 2022 12:56
|
|


|

|
| # ? May 26, 2024 11:45 |
|
|
shame on an IGA posted:wire ferrules are the way and the light OP Hell yah it is. Just be sure to get the concentric crimping tool. I've got ferrules from 2/0 all the way to 24ga or some poo poo. I think it's 3 different crimping tools. https://www.amazon.com/Ferrule-Crimping-Tools-Wire-Pliers/dp/B07WRQN45C/
|
|
#
?
Oct 31, 2022 15:29
|
|


|
Small gas and diesel engines: I need to hold an exhaust manifold on but I think that split type lock washers are not the right thing to keep the bolts from loosening because the multiple heat and cold cycles will eventually turn the split lock washer in to just a split washer. Correct? I know the answer is probably top lock nuts sometimes referred to as cone-lock nuts?
|
|
#
?
Nov 1, 2022 02:33
|
|


|
split lock washers are just garbage always
|
|
#
?
Nov 3, 2022 17:17
|
|
|
wesleywillis posted:Small gas and diesel engines: Distorted thread lock nut. Or center lock distorted lock nut. Single use only though.
|
|
#
?
Nov 3, 2022 17:25
|
|
|
Safety wire it!
|
|
#
?
Nov 3, 2022 19:13
|
|

|
Tack it on there, don't be a coward. Commit!
|
|
#
?
Nov 6, 2022 00:23
|
|


|
So i built this really beefy industrial looking scissor lamp for my living room a while back since I couldn't buy what I wanted. It's all in blued steel except for the axle shaft sitting bolted to the wall and the lampshade which I bought painted. The bolts holding it together are regular m12x1.5 hex bolts that I faced off and drilled out with a 7mm bit in the lathe (for the cable routing). I put most of these to the oxy torch to get rid of the zink and anneal them for easier drilling before blueing them. Others just got an acid bath but these were pretty hard to drill out. They all turned out alright in the end but not as good the other steel parts since polishing them right before blueing was a bridge too far - I don't have great equipment for the job. Not yet at least. The thing is that the lamp turned out great. It can be improved of course but it looks cool and is genuinely really good at being a lamp - mine has good reach around the sofa and coffee table and tucks away nicely when not in use. I'm thinking about building a few more and see if I can sell them for profit, just as a side hustle workshop alibi sort of thing. If I'm building more I want to streamline the process a fair bit to cut down on labor. Cold rolled steel this time and a few jigs made, for example. Some new tools are likely as well. I know there are bolts with a nice black finish at the specialty fastener store I sometimes frequent. I believe these are generally stronger than regular zinked bolts from the regular hardware stores. Would it be terribly painful to drill such bolts out for the cable routing? If so, can they be annealed without destroying the finish? It would be a small thing to just buy a few bolts and try it, and it might come to that, but I figured I might just ask the internet first.
|
|
#
?
Nov 6, 2022 17:19
|
|
|
Invalido posted:So i built this really beefy industrial looking scissor lamp for my living room a while back since I couldn't buy what I wanted. It's all in blued steel except for the axle shaft sitting bolted to the wall and the lampshade which I bought painted. The bolts holding it together are regular m12x1.5 hex bolts that I faced off and drilled out with a 7mm bit in the lathe (for the cable routing). I put most of these to the oxy torch to get rid of the zink and anneal them for easier drilling before blueing them. Others just got an acid bath but these were pretty hard to drill out. They all turned out alright in the end but not as good the other steel parts since polishing them right before blueing was a bridge too far - I don't have great equipment for the job. Not yet at least. That depends on the grade of the bolt. Some are hardened and that's gonna be a bad time 
|
|
#
?
Nov 6, 2022 17:35
|
|

|
Yeah, i figured. So what I want is cheese grade M12 hex bolts in black. Might not be available. Still, if I can source just washers and nuts already finished in black at a reasonable price it's still 4/5 fastener parts I don't have to worry about (provided the surface finish is reasonably close in the end) so that might still be very much worth doing
|
|
#
?
Nov 6, 2022 17:44
|
|
|
Invalido posted:I know there are bolts with a nice black finish at the specialty fastener store I sometimes frequent. I believe these are generally stronger than regular zinked bolts from the regular hardware stores. Is this a black oxide (matte) finish, or a black nickel/black chrome (shiny) plating? Black oxide doesn't last long. It's really just to keep rust off the fasteners while they're sitting in the bin. Probably fine for indoor use, but outdoor they will quickly start to corrode. The black plating options are much more durable, but I don't know what happens when you drill through them. I'd expect some cracking and flaking.
|
|
#
?
Nov 6, 2022 17:45
|
|


|
Sagebrush posted:Is this a black oxide (matte) finish, or a black nickel/black chrome (shiny) plating? It's the matte finish I'm thinking of. The lamp I have at home is cold blued with the common brand sold by a gunsmith. As I understand it that's just black oxide too. I was worried about corrosion and wear, but it's held up fine (indoors of course). It's a very attractive finish compared to paint IMO which is why I chose it. I'm a total bluing newbie but I know there are other finishes, some that go on hot. There are probably finishes better suited for the job worth looking into.
|
|
#
?
Nov 6, 2022 18:01
|
|
|
I just need to vent a bit about how much I despise CNC software. I got the medium-sized CNC at my makerspace working well, and set about finding some software. Really, all we need is silly basic stuff like text engraving, tracing vector images, very very basic CAM like "Make a 0.25 pocket 2x1" and I figured surely the state of software has evolved since last I was messing about with CNC. Hahaha gently caress no. It may be even scummier than before. We have educational access to Fusion 360, but we don't NEED that much complexity. In a few hours of searching around I found... A text engrave program that barely works, looks like it's from 1995, randomly set a Z-retract height to 50 loving inches, and they want $100+ for it. A "Totally 100% free!" CAM package that...Is only available bundled into a $600 CAD package. Python CAM that...Has no windows download link. Another open source package that doesn't seem to install everything it actually needs to work. GCode generators for Inkscape, that don't seem to work at all. Plus a fresh install of Inkscape can't even load its own extension manager without erroring. I think I finally tracked down just a basic engraving program that isn't $Ludicrous, crippled, or poo poo. But god drat. Is anyone even buying this poo poo, or are they all just thinking "One day, all the factories will buy our revolutionary software!"
|
|
#
?
Nov 8, 2022 00:50
|
|
|
I know you don't need the complexity of Fusion but why just not learn that? It works fine for basic stuff like that.
|
|
#
?
Nov 8, 2022 01:24
|
|

|
Enos Shenk posted:I think I finally tracked down just a basic engraving program that isn't $Ludicrous, crippled, or poo poo. But god drat. Is anyone even buying this poo poo, or are they all just thinking "One day, all the factories will buy our revolutionary software!" What exactly did you expect when looking for niche industrial software? It sounds like you are whining because you couldn't find something free that was perfect. CAM software is not cheap because there is not much market for it and vast complexity writing it. Fusion 360 is an amazing deal for what you get. Vectric Vcarve would probably meet your needs and is very reasonably priced. Expect to spend high 4 figures to low 5 figures a year for a professional CAM seat doing anything beyond basic 3 axis work.
|
|
#
?
Nov 9, 2022 02:39
|
|

|
When I was using vectric ten years ago, it was absolutely rad and very much fit the "easy button" for going from zero, to art, to gcode, all in one package. Highly recommend. To wit, here's a cut little sign I made a long time ago that hangs up in my kitchen, it's a bit tired from spending a couple years outside, but it was 100% created via vcarve: 
|
|
#
?
Nov 9, 2022 03:03
|
|


|
Enos Shenk posted:I just need to vent a bit about how much I despise CNC software. I got the medium-sized CNC at my makerspace working well, and set about finding some software. Really, all we need is silly basic stuff like text engraving, tracing vector images, very very basic CAM like "Make a 0.25 pocket 2x1" and I figured surely the state of software has evolved since last I was messing about with CNC. All true but fusion slaps especially if you have a free seat. The cad cam thread. Although I imagine a ton of crossover between this thread and that one. https://forums.somethingawful.com/showthread.php?threadid=3962532&pagenumber=28&perpage=40 Sounds like you're fighting engraving. The engrave tool path is poo poo in fusion. Use trace. Draw your stock as a rectangle, thickness doesn't matter, but make it a solid. Draw your engraving as a sketch on top. Trace will let you pick that sketch with tool center on the lines. If you have z control in the cnc (if it's a 3 axis) use axial offset under the passes tab to set its negative z value. In sketch if you want simple text use the .shx fonts. They show up as single lines. Top of the list. Idk about tracing vector stuff but of you're willing to do sketch hell vs an image google "fusion 360 import canvas" It's a LOT initially but you can set defaults for toolpaths, and feeds/speeds for different materials in a way that makes it easier and faster the more you use it.
|
|
#
?
Nov 9, 2022 03:08
|
|


|
OP says "...all we need..." and mentions a makerspace so I think maybe this is a vent about how there's nothing out there that the average maker/hacker/weekender can easily pick up to use the CNC for engraving, etc. Which is absolutely true. It isn't like the laser stuff or 3D printers where it's a whole product that just fuckin works even if it doesn't have advanced features; pick a vector or an STL, load the file and your material, press button, great success. With CNC and especially with DIY poo poo, either everyone has to take all the training classes & learn all the software, which is an impossible barrier for a lot of people, or you need one dedicated person that everyone else goes through for using the CNC, which is a huge bottleneck obviously. This is why a lot of CNC projects die pretty quick in makerspaces as soon as that one person moves on then you're dependent on the tribal knowledge to keep it running and teach new people. I might be projecting a bit... Also I have no solutions but vectric was what I've used previously.
|
|
#
?
Nov 9, 2022 03:22
|
|

|
Just a quick ancedote of me being a dumbass in case it helps somebody down the road. I needed to mount a steel plate that was cut from an old Jeep bumper to an aluminum plate. It was four holes at the corners. The final result would be 5/16" through-holes fastened with 1/4-20 bolts with a washer on one side and a nut on the other. I had to keep everything aligned during the drilling with the drill press so the holes lined up, so I decided to thread and screw the first two holes to clamp the pieces together with the idea that I would drill the second two holes with a 5/16" drill and then remove the screws and drill the original threaded holes out with that 5/16" to give me four (eight) perfectly aligned holes. I drilled the first hole, tapped it to 1/4-20 through both pieces and ran a short screw through both pieces while they were clamped tight to hold it in place, the flipped it around to drill and tap the opposite corner. To keep everything accurate, I drilled the first two holes with a #7 bit, then removed the bit and chucked up a 1/4-20 tap while the parts were still clamped to the table, then manually turned the chuck while pulling down on the lever to tap the hole. Worked like a charm. To speed things up, I reversed the drill press motor and did a quick on-off flick of the switch to back the tap out. First two holes were drilled, tapped, and screwed and everything was rock solid. Decided to go straight at the last two holes with the 5/16" drill without any pilot holes and barely dented the steel. I was pushing hard, it was getting hot, and I was only seeing a bit of dust coming from the tip of the drill bit. Maybe my 5/16 was dull. I decided to step it down and drill a 1/8" pilot hole with a new drill bit. Same result. I thought maybe there was some reason that steel was a lot harder at that point and maybe I heat/work hardened it even more, so I switched to a 1/16" carbide end mill and it broke it in short order. I don't know poo poo about heat treating metal other than what I've watched on youtube, but I hand nothing to lose at this point so I put the two pieces in a vise and went at it with two propane torches with the thought that I could temper it back to something softer and more drillable. Because of the 3/16" aluminum backing plate still being attached and acting like a huge heat sink, that didn't seem to work very well, but I decided to press on and see if it did any good. I had a 12 pack of 1/8" drills, so I chucked up another brand new one and got the same results. I flipped the switch to turn the drill press off and grabbed the chuck to slow it down with my hand brake and that's when I realized it was turning counter-clockwise. After backing out the tap many steps ago, I forgot to flip the polarity switch on the drill press motor, so the drill press was rotating backwards during the whole frustrating ordeal. 
|
|
#
?
Nov 9, 2022 04:32
|
|


|
SkunkDuster posted:Just a quick ancedote of me being a dumbass in case it helps somebody down the road. Classic rookie mistake, not switching to left-hand drills after taking out the tap
|
|
#
?
Nov 9, 2022 04:42
|
|

|
Wandering Orange posted:OP says "...all we need..." and mentions a makerspace so I think maybe this is a vent about how there's nothing out there that the average maker/hacker/weekender can easily pick up to use the CNC for engraving, etc. Which is absolutely true. Exactly, yeah. I know Fusion, I've used it. But I'm trying to assist the makerspace in setting up some more beginner-friendly stuff. Like, if some member wants to learn Fusion I'm happy to give them tips and help. It's just frustrating seeing the difference between the 3D Printing world where "Here's a slicer that works great, go nuts" and "Pay me $500 for some 1995 era kludgy crap" Seems like there'd be a good market for a resonably priced package that isn't the end-all-be-all but good enough for the basics.
|
|
#
?
Nov 10, 2022 18:18
|
|
|
SkunkDuster posted:After backing out the tap many steps ago, I forgot to flip the polarity switch on the drill press motor, so the drill press was rotating backwards during the whole frustrating ordeal. I've done this more than once with a hand drill but it never occurred to me that I could run my drill press backward and set myself up for an even more expensive and frustrating experience, lol.
|
|
#
?
Nov 10, 2022 18:40
|
|

|
Leperflesh posted:I've done this more than once with a hand drill but it never occurred to me that I could run my drill press backward and set myself up for an even more expensive and frustrating experience, lol. I'm not sure if that is a normal feature on drill presses. Mine is a ~1970 Craftsman that I got from my dad about 20 years ago and I'm pretty sure the polarity switch is something he installed. Also, I think this was the first time in 20 years of owning it that I ever used that switch.
|
|
#
?
Nov 10, 2022 18:51
|
|
|
Leperflesh posted:I've done this more than once with a hand drill but it never occurred to me that I could run my drill press backward and set myself up for an even more expensive and frustrating experience, lol. the first time you do it with a shell mell is a special day in the life of every machinist
|
|
#
?
Nov 10, 2022 18:54
|
|
|
shame on an IGA posted:the first time you do it with a shell mell is a special day in the life of every machinist The kind with like 90 inserts on it? Yah, you never quite forget it.
|
|
#
?
Nov 10, 2022 18:56
|
|
|
Enos Shenk posted:Exactly, yeah. I know Fusion, I've used it. But I'm trying to assist the makerspace in setting up some more beginner-friendly stuff. Like, if some member wants to learn Fusion I'm happy to give them tips and help. I don't think there is a market for such a package, actually. The fundamental problem is that CNC machining is still only really an industrial process. Yes, there are small hobbyist CNC routers and such now, but they're still very niche tools. Like there's probably a thousand desktop 3D printers out there for each desktop CNC, or even more. This means that there just isn't really an incentive to make the software better or cheaper: 1) Nearly everyone who uses this software will be using it with a $50,000+ machine that they use to make money selling expensive custom metal parts. In that context, 500 dollars up front is a pittance. Even $10,000 for a seat of MasterCAM is a fraction of the startup costs. 2) The operator will be doing this as a full-time job. He can learn to use the crappy interface and work around the bugs. And sending him on a $3000 weekend training session is, again, a relatively minor cost in the grand scheme. 3) Because the software is so niche and expensive, they don't really care about making it more user-friendly or cheaper. Being "the best" is not necessary when you are "the only." The other problem is that, because of the nature of the thing, the feature demands tend to rapidly expand. You make the simple software that does one thing well, and it's great for a while, but then people start going "oh, this meets all my needs except one, can you just add this one feature?" and everyone has a different one little feature that they need to make it perfect, and it snowballs until you're just back to developing a full featured CAM application. Fusion is great for what it is, and I don't believe it's that hard to use. You can streamline the process a lot by limiting people to a specific set of machining strategies and building a custom tool definition for each tool and material you have on hand. But your MakerSpace people should just get used to the idea that this is a complicated tool and they're going to have to put in some time to learn the software for it. It may even keep away the more careless folks who are going to break the machine or themselves.
|
|
#
?
Nov 10, 2022 20:31
|
|
|
Oh, and my left-handed drill experience was when I got a set of screw extractors and was using the drilling end to try to clean up the stripped screw head before using the extractor, and it just wasn't working at all. Pushing hard and barely cutting in at all. After several minutes of basically just burnishing the head, I looked closely at the tool and realized the cutting faces, like the extractor helix, were left-handed.  Reversed the drill direction and it started cutting beautifully and then the screw suddenly just unscrewed on its own from the drilling torque. Didn't even have to use the extractor half. doy VVv okay well yeah, that's what I meant. No market for another program that is "does less than Fusion does, costs more, but is a little less complicated" Sagebrush fucked around with this message at 20:57 on Nov 10, 2022 |
|
#
?
Nov 10, 2022 20:35
|
|
|
Sagebrush posted:I don't think there is a market for such a package, actually. There is, and Fusion is covering it. We've got local shops running super specialized CAM packages on multi million dollar machining centers, shops running Esprit, shops running Mastercam, and a lot of folks using Fusion. There is at least one place using BOBCAD  . One shop does zero cam and just does conversational poo poo on a Mazak and they turn out beautiful work, usually quicker than I could model it in Fusion. I use Fusion like 3 times a year for a lathe tool path, but now that my tool library is built it's like a 5 minute task to generate the code. . One shop does zero cam and just does conversational poo poo on a Mazak and they turn out beautiful work, usually quicker than I could model it in Fusion. I use Fusion like 3 times a year for a lathe tool path, but now that my tool library is built it's like a 5 minute task to generate the code. The major benefit 3d printing has is you have one tool (an extruder) and some different feeds, speeds, temperatures depending on filament. If every mill just used a 1/4" endmill then the world of CAM would adapt accordingly and it'd be stupid cheap to focus on that. The whole one layer at a time really simplifies it too. So now Prusa can make a slicer super optimized for one tool path style.
|
|
#
?
Nov 10, 2022 20:56
|
|
|
Yooper posted:There is, and Fusion is covering it. We've got local shops running super specialized CAM packages on multi million dollar machining centers, shops running Esprit, shops running Mastercam, and a lot of folks using Fusion. There is at least one place using BOBCAD Hey, I used to poo poo all over BobCAD like everyone else, but they already had it where I'm at now, and I'll be damned if it isn't a really solid product, at least for Wire EDM and the basic 3 axis milling we are doing. Especially at it's price point. Also, they don't seem to be run by their loving marketing department anymore so the sales call bullshit is pretty much zero.
|
|
#
?
Nov 10, 2022 21:07
|
|
|
A Proper Uppercut posted:Hey, I used to poo poo all over BobCAD like everyone else, but they already had it where I'm at now, and I'll be damned if it isn't a really solid product, at least for Wire EDM and the basic 3 axis milling we are doing. Especially at it's price point. I will stand corrected. I just remember the militant sales calls that were just ridiculous. Once I told them to gently caress off they just started calling someone else, then he told them to gently caress off, until they went through the whole shop. Blacksmithing question. My kiddo (12) is getting some blacksmithing tools from Centaur for Christmas. I'm looking for some good first project ideas. Ideally something that can be knocked out in an afternoon. He wants to make battleaxes and swords, but I'm thinking more fire pokers or coat hangers.
|
|
#
?
Nov 10, 2022 21:14
|
|
|
Is it possible to sunburn your eyes if you spend too much time looking at a (O&A) torch?
|
|
#
?
Nov 11, 2022 00:47
|
|
|
Yep. It doesn't produce as much UV as an electric arc, which is much hotter, but there is still a significant UV component.
|
|
#
?
Nov 11, 2022 01:11
|
|
|
Yooper posted:I will stand corrected. I just remember the militant sales calls that were just ridiculous. Once I told them to gently caress off they just started calling someone else, then he told them to gently caress off, until they went through the whole shop. High-carbon railroad spike knife is great and easy (basically, anneal RR spike, smash into approximately blade shape, maybe do a twist on the handle part, heat treat/grind until sharp), covers a few different tasks and should keep him interested because it is sharp and pointy. A really basic set of tongs out of flat bar is good too (twist 90 degrees, punch a hole, rivet the two halves together) and is useful. Also a fire poker/rake, especially if you are using a coal forge. I honestly found figuring out how to turn 'scavenged off the side of the RR track' coal into coke really engaging and fascinating and I love that smell. Those are what I remember my first 3 blacksmithing projects being when I was messing around with it, and I really wasn't much older than him, maybe 14-15?
|
|
#
?
Nov 11, 2022 04:08
|
|

|
Kaiser Schnitzel posted:High-carbon railroad spike knife is great and easy (basically, anneal RR spike, smash into approximately blade shape, maybe do a twist on the handle part, heat treat/grind until sharp), covers a few different tasks and should keep him interested because it is sharp and pointy. A really basic set of tongs out of flat bar is good too (twist 90 degrees, punch a hole, rivet the two halves together) and is useful. Also a fire poker/rake, especially if you are using a coal forge. I honestly found figuring out how to turn 'scavenged off the side of the RR track' coal into coke really engaging and fascinating and I love that smell. Those are what I remember my first 3 blacksmithing projects being when I was messing around with it, and I really wasn't much older than him, maybe 14-15? And today I learned that my railroad spikes might be made from 1045 and hardenable up to C60
|
|
#
?
Nov 11, 2022 07:56
|
|
|
Background: I am working on a go kart project, the wheel base is on the longer side at ~64 inches and it's a characture of 1920s open wheel F1 racers, so a main component of this is using 16 gauge (NOT 14 gauge, which is what most yards carry, had to special order this and wait three weeks) 3x1 rectangular tubing. Or however it's formally phrased. Anyways stylistically one of the key features is that it has a solid front axle that is leaf sprung on a ladder style frame. On a lot of these cars the front of the frame curls down to give proper clearance for the springs/axle assembly. How much it curls down is sort of like the beard or mustache of the car it imparts a lot of character of the car you're trying to build. This is what I am trying to emulate, at a characacture-level:  Bugatti's type 35 (probably what this car was patterned after) only curves down a tiny bit, this Ballot is probably 2-3 times that So there are two ways to do this, Option A, for the bugatti level of curve you can just notch the 1x3 where the curve starts, bend it down and trim to shape and line with 1" wide strip and tack/weld. I see a lot of guys doing that for minor curves, you don't need to cut extra stock you can just use what you have but you end up running a ton of extra welds and work   Option B is to cut extra 1x3 stock, weld it to the bottom and trace your pattern on there, line with a 1" wide stick and tack/weld (extremely crude ms paint example). You end up with a lot of extra metal (weight) in the frame rail though that's not doing much for you structurally  Option C I guess is, send a file over to send cut send and get the ends cut in 2D then weld them on the end and just trust the butt weld with no fish plates. Apparently not a lot of people report frame cracking as the all-up weight is only ~250 lbs + driver so even 16 gauge is ludicrous overkill for the task at hand. Options A and B at least have the "load bearing" part of the ~35 degree curve in virgin steel in line with the rest of the 90" frame rail
|
|
#
?
Nov 14, 2022 18:26
|
|


|
Basically I'm just looking for someone to be like, holy gently caress you're dumb, do it this way and stop overthinking it, please and thank you
|
|
#
?
Nov 14, 2022 23:48
|
|
|
Are you limited to square cuts? You can also create your radius with whats called a 'pie cut' technique. Its really common with car exhausts and complicated tubing layouts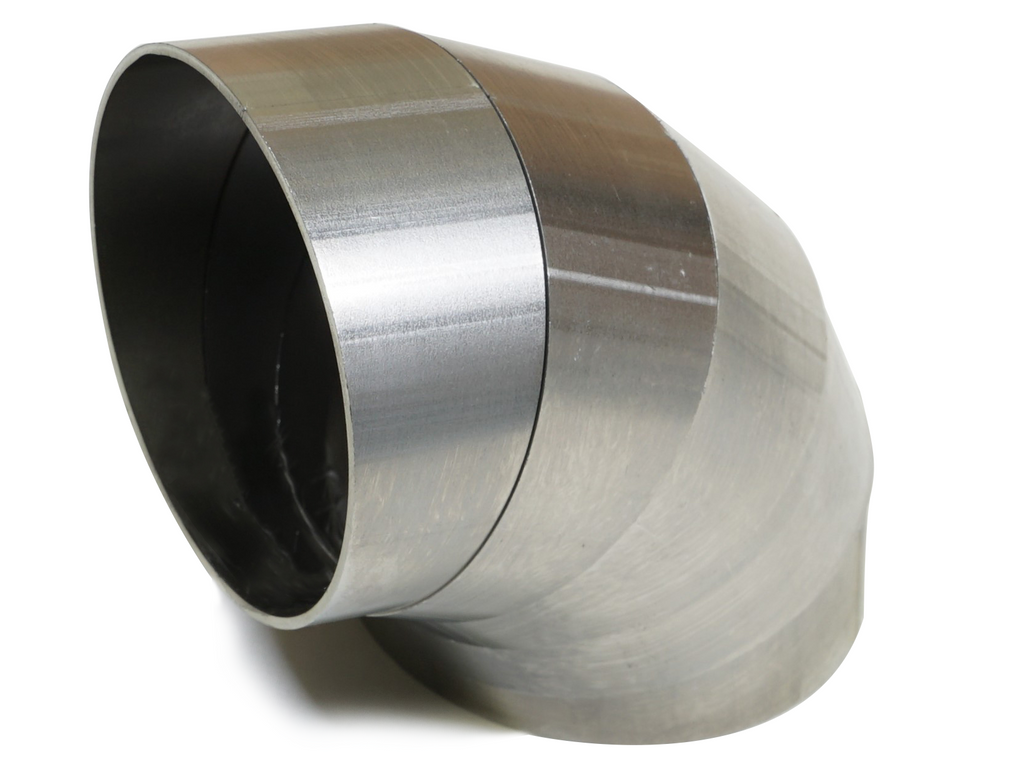 Just use some scrap material to get your cut angle right.
|
|
#
?
Nov 15, 2022 01:36
|
|

|
I would do option C. Cut the ends out of 16ga plate. Then weld a 1" strip between the edges to form the box section. In mild steel like this, a properly prepared butt weld will be just as strong as the rest of the channel. Adding backing plates in the weld area would be easy and would let you do a full penetration weld without issue. You only need to do the bit where it curves down as the tapered section can be done by cutting off the bottom and welding a new strip on. Could also be done by vee notching the length of the taper but this is harder to get even.
|
|
#
?
Nov 15, 2022 01:41
|
|
|
I can see something like using sendcutsend or cardboard aided design to make the side walls in the curve you want. Then cut away the side walls of tubing and form the tops and bottoms to the new side walls. Overlap the butt joint inside the tube. Might be easier to make the curved tube a sheet assembly and weld it to the end of tube. Blend and fill as needed.
|
|
#
?
Nov 19, 2022 03:26
|
|
|
|
| # ? May 26, 2024 11:45 |
|
|
I'm way out of my league here, but would it work to pack the tube with sand (to keep it from buckling) and use a bender?
|
|
#
?
Nov 20, 2022 22:33
|
|