


|
so I've been wanting to up how much I'm using my airbrush for painting, and find that my badger patriot has a bit of a big spray pattern and I tend to get speckling with it after a while. Is there something I should be doing with it to make it more detail oriented? or am I starting to hit the limits of the airbrush? Not sure if I should be tuning/maintaining/upgrading this thing, or getting a 2nd airbrush.
|
 #
?
Nov 30, 2022 20:24
#
?
Nov 30, 2022 20:24
|
|


|

|
| # ? May 29, 2024 10:57 |
|
|
Recently dove back into MCP a bit to start working on the back log. WIP shot of Magik!   (I know I missed a mold line, sorry)
|
|
#
?
Nov 30, 2022 21:10
|
|

|
w00tmonger posted:so I've been wanting to up how much I'm using my airbrush for painting, and find that my badger patriot has a bit of a big spray pattern and I tend to get speckling with it after a while. Make sure the needle's clean and the nozzle is clear of crud. After that, it's a matter of thinning your paints, reducing pressure, and moving closer to your model. Even with a big needle you can get a surprisingly sharp line out of a 105. Grab a piece of paper and practice making sharp, thin, steady lines by messing with the variables above. This will take a lot more effort than you might expect, so keep at it.
|
|
#
?
Nov 30, 2022 21:23
|
|

|
drybrushing isn�t useful for everything or everyone, but it is absolutely amazing at making you feel like poo poo for all the the mould lines you missed
|
|
#
?
Nov 30, 2022 21:23
|
|


|
So I smashed this guy's head trying to take it off for painting, but as Roboute Rossiman says there's no such thing as mistakes only happy accidents. Which of these alternatives should I go with?   free image hosting gallery
|
|
#
?
Nov 30, 2022 22:03
|
|
|
jesus WEP posted:drybrushing isn�t useful for everything or everyone, but it is absolutely amazing at making you feel like poo poo for all the the mould lines you missed I'm starting to think that dry brushing is a technique to add new mold lines to a model
|
|
#
?
Nov 30, 2022 23:00
|
|


|
Wrr posted:I'm starting to think that dry brushing is a technique to add new mold lines to a model 
|
|
#
?
Nov 30, 2022 23:12
|
|
|
Some sort of alchemical process seems to have transmuted my liquitex matte varnish into gloss varnish. This ever happened to anyone? Can I save it if I shake it for ten minutes or something, or is it just donezo?
|
|
#
?
Dec 1, 2022 02:12
|
|
|
The Moon Monster posted:Some sort of alchemical process seems to have transmuted my liquitex matte varnish into gloss varnish. This ever happened to anyone? Can I save it if I shake it for ten minutes or something, or is it just donezo?
|
|
#
?
Dec 1, 2022 03:16
|
|


|
The Moon Monster posted:Some sort of alchemical process seems to have transmuted my liquitex matte varnish into gloss varnish. This ever happened to anyone? Can I save it if I shake it for ten minutes or something, or is it just donezo? I had this happen with some Mecha Matte. Hit it with a stirring stick or an agitator and just blend the hell out of it.
|
|
#
?
Dec 1, 2022 03:57
|
|
|
Speaking of varnish, I�m in Canada for a bit and I need some local recommendations for a rattle can lacquer brand that�s readily available in hardware/hobby shops. Use Halfords stuff back home, I�ve seen plenty of acrylic varnish in hobby shops but drawing a blank on lacquers.
|
|
#
?
Dec 1, 2022 07:25
|
|

|
I don't have any fancy mixers, but I guess I'll try just shaking the hell out of it or stirring it with something. Thanks.Mr Teatime posted:Speaking of varnish, I�m in Canada for a bit and I need some local recommendations for a rattle can lacquer brand that�s readily available in hardware/hobby shops. Use Halfords stuff back home, I�ve seen plenty of acrylic varnish in hobby shops but drawing a blank on lacquers. Testors works great if you don't mind the miniscule cans. There might be something with way better cost effectiveness out there.
|
|
#
?
Dec 1, 2022 12:33
|
|
|
grassy gnoll posted:Make sure the needle's clean and the nozzle is clear of crud. After that, it's a matter of thinning your paints, reducing pressure, and moving closer to your model. Even with a big needle you can get a surprisingly sharp line out of a 105. anything I should be doing to clean my airbrush between uses? I have an ultrasonic cleaner but I'm not sure if I should be doing something to reset it more aggressively. swapped to a little battery powered compressor instead of my tank which surprisingly behaves much better(and is way more quiet), but does limit me to a fixed psi so Ill have to test it and see what can be done there. w00tmonger fucked around with this message at 16:09 on Dec 1, 2022 |
|
#
?
Dec 1, 2022 16:06
|
|
|
Just finished up my Tempestor Prime. Decided to go a little softer on the shading this time.   
|
|
#
?
Dec 1, 2022 22:01
|
|

|
My Spirit Otter posted:Just finished up my Tempestor Prime. Decided to go a little softer on the shading this time. I really like this. The simplicity of the coat really sets off the detail work. Gorgeous.
|
|
#
?
Dec 1, 2022 22:40
|
|


|
Yeah that pops in the thumbnail, so I'm sure it looks really cool on the table
|
|
#
?
Dec 1, 2022 22:58
|
|

|
Thanks, folks, much appreciated! Edit: im picking up a metal yarrick tonight, unfortunately he's painted, so what are some goon favorite methods for stripping paint on a metal model? My Spirit Otter fucked around with this message at 23:21 on Dec 1, 2022 |
|
#
?
Dec 1, 2022 23:18
|
|
|
My Spirit Otter posted:Edit: im picking up a metal yarrick tonight, unfortunately he's painted, so what are some goon favorite methods for stripping paint on a metal model? Simple Green, bet.
|
|
#
?
Dec 1, 2022 23:28
|
|

|
If it's a metal model and you don't mind gluing it back together, acetone (nail polish remover) will erase anything on the model
|
|
#
?
Dec 1, 2022 23:31
|
|
|
GW be damned, Yarrick lives on in my heart... and now definitely every imperial guard army i table
|
|
#
?
Dec 2, 2022 01:29
|
|
|
The Moon Monster posted:I don't have any fancy mixers, but I guess I'll try just shaking the hell out of it or stirring it with something. Thanks. Just make sure you get all the gunk off the bottom of the bottle. I shook my jacked-up matte bottle as-is for ages and didn't get anywhere until I tossed in an agitator, and nearly lost my poo poo at how much I was doing to get no progress whatsoever. w00tmonger posted:anything I should be doing to clean my airbrush between uses? I have an ultrasonic cleaner but I'm not sure if I should be doing something to reset it more aggressively. In between colors, or between long spray sessions of the same color, run a little water and cleaner through it until what comes out is clear. Once you're done for the day, make sure the cup and needle channel are empty of paint, pour your cleaner in and backflow it a bit so it's getting all around the spray chamber. Pull the needle out and wipe it down, moving base to point and being really careful not to bend the very tip. Clean of any stubborn paint you find on the needle or the work surfaces with a soft toothbrush or interdental brush, whichever's easier to work with based on what you're using. If you're getting really regular clogs, check the nozzle and give it a gentle clean, but you shouldn't have to do that too often if you're thinning your paints right and you're not leaving poo poo in the brush to dry.
|
|
#
?
Dec 2, 2022 01:49
|
|
|
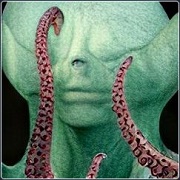
Here's one of the Kroot KT guys I painted. I don't think I posted them here, but if I did, forgive me!
|
|
#
?
Dec 2, 2022 02:08
|
|


|
You did and thats fine because its very well done.
|
|
#
?
Dec 2, 2022 02:48
|
|
|
My Spirit Otter posted:GW be damned, Yarrick lives on in my heart... and now definitely every imperial guard army i table Died heroically in defence if the perfectly manicured lawns of the hell world Armageddon
|
|
#
?
Dec 2, 2022 03:12
|
|
|
Lumpy posted:Here's one of the Kroot KT guys I painted. I don't think I posted them here, but if I did, forgive me! tbh I'm very happy to see it again
|
|
#
?
Dec 2, 2022 03:53
|
|

|
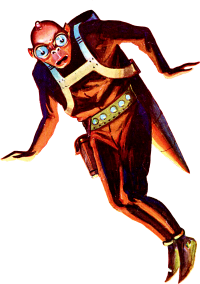
Another happy fella 
|
|
#
?
Dec 2, 2022 05:17
|
|

|
War and Pieces posted:Died heroically in defence if the perfectly manicured lawns of the hell world Armageddon HOAs confirmed for being tools of the devil.
|
|
#
?
Dec 2, 2022 07:16
|
|
|
I think the old school green-paint-and-flock base makes a pretty good statement on the model and is a funny poke in the eye of his off-screen death.
|
|
#
?
Dec 2, 2022 14:29
|
|


|
Goblin green is the one true base colour
|
|
#
?
Dec 2, 2022 17:59
|
|


|
I started painting terrain, so far so good, I�ll post results tomorrow, something came up on the first bit of terrain, how do I get a nice solid coat on something without brush strokes showing the undercoat or a calming effect happening when I add a second pass? This is most troubling when I add a bright color like yellow or red on an ork junk terrain What I did was:- -prime black. -zenithal grey on top -dry brush gunmetal -wash brownish tone -then try to add yellow or red on parts on top. Any advice? I�m looking for a solid rear end coat
|
|
#
?
Dec 2, 2022 18:52
|
|
|
Al-Saqr posted:I started painting terrain, so far so good, I�ll post results tomorrow, something came up on the first bit of terrain, how do I get a nice solid coat on something without brush strokes showing the undercoat or a calming effect happening when I add a second pass? This is most troubling when I add a bright color like yellow or red on an ork junk terrain Can you post any photos of the results you're getting? I'm having difficulty imagining what you're seeing. If you want to avoid brush strokes on larger flat panels, it's going to take several, like maybe four or more, layers of thinned paint to get a smooth result.
|
|
#
?
Dec 2, 2022 19:02
|
|

|
Al-Saqr posted:I started painting terrain, so far so good, I�ll post results tomorrow, something came up on the first bit of terrain, how do I get a nice solid coat on something without brush strokes showing the undercoat or a calming effect happening when I add a second pass? This is most troubling when I add a bright color like yellow or red on an ork junk terrain A calming effect? Not sure what you mean by that. If you are seeing brushstrokes you need to thin your paint a little more. Better to have to do multiple coats of a thin paint than have brush strokes. I would say as to your process, I'd add the yellow or red before the wash (and actually before the drybrush in a lot of cases). Reason being is that is weathering, and if you want the piece to look like its existed as a structure for some time weathering it all the same is a good way of doing that. So your structure made out of these different colours of metal has all had the paint chipped away in similar ways showing the metal beneath (metal drybrush), and its all been exposed to water and dirt in the same way (the same dark wash). Obviously if the red or yellow is cloth or wood dont drybrush that with gunmetal. But the same wash over the whole terrain piece can make it look like a cohesive part of a world. Now, you can get as fancy as you like (this bit is iron and corrodes with rust, but that copper and brass would have verdigris not rust, and over here this wood is going to get a green wash to look slimy, now where did I put my weathering powders to simulate sand and soot, but not on this bit because that bit of barricade has been added more recently....) but I'd say for a first piece "paint it, wash it and drybrush it" is a good solid start. If by calming you mean its being more washed out, I wouldnt worry too much about it, you can bring a lot of colour back with highlights if you want (and also a lot of people like their terrain a little subdued so it doesnt distract from the figures too much).
|
|
#
?
Dec 2, 2022 19:14
|
|


|
Sorry my stupid phone autocorrected I meant �Caking effect� where you can see mounds of paint caking the the section in a bad way and you can see detail being lost and brush strokes piling on. I�ll go home and upload photos as soon as possible
|
|
#
?
Dec 2, 2022 19:23
|
|
|
Al-Saqr posted:This is most troubling when I add a bright color like yellow or red on an ork junk terrain I'd hit the parts you want yellow with an off white or white undercoat. Leave some of the grungy metal base coat visible around panel edges like the paint has worn away. Then hit it with one or two coats of the yellow, again sometimes leaving a little of the yellow visible in irregular patterns in the bits where it's been worn away. It'll look like an actual undercoat/different layers of paint that have been scratched away. EDIT: SiKboy posted:I would say as to your process, I'd add the yellow or red before the wash (and actually before the drybrush in a lot of cases). Reason being is that is weathering, and if you want the piece to look like its existed as a structure for some time weathering it all the same is a good way of doing that. So your structure made out of these different colours of metal has all had the paint chipped away in similar ways showing the metal beneath (metal drybrush), and its all been exposed to water and dirt in the same way (the same dark wash).
|
|
#
?
Dec 2, 2022 19:25
|
|


|
I can't believe I still haven't tested this tip, but try mixing white into the red/yellow first, don't care about the resulting colour being wrong, then paint the pure red/yellow over the top. Then let me know how that goes because fatigue kinda sucks.
|
|
#
?
Dec 2, 2022 19:29
|
|


|
ok I'm back with pics I can post where I am and what problems I'm having:- overall pic for todays progress:-  This is the Terrain I completed:-   Overall, despite using a more limited color range (my metallic paint set and other paint sets is still in the mail), I think I succeeded in making something look like it's a pile of rust and metal junk that feels lived-in, where I failed however is in making colors and whites that are vibrant and that 'pop' and are clean and uniform, the areas I had the most problems with is are these two:-   The reds are really dull, and the yellows and whites no matter how many layers I pile on just wont get any more uniform and vibrant, worse the paint is just getting gunkier and gunkier and cakes on without making any difference vibrancy wise. also when I tried painting on orange flames onto the casings the orange immediately disappeared into the red, no opacity whatsoever. any advice or critiques? I would like to achieve a more uniform yellow/red paste like this guy here:- https://www.youtube.com/watch?v=KXMtQ1aQltA for reference, this is where I'm at currently for the next piece of terrain, primed and dry brushed:-  I'm currently using a mix of War Painter - Vallejo - Citadel starter paint kits, the rest are in the mail and should be here within the week Al-Saqr fucked around with this message at 21:09 on Dec 2, 2022 |
|
#
?
Dec 2, 2022 21:07
|
|
|
one thing that is pissing me off slightly though is that there are alot of tutorials on youtube that keep using citadel contrast paint and I dont have any other than Agrax Shade, I'd like to try and do as much as possible without them because I dont want to spend any more on paints and shipping.
|
|
#
?
Dec 2, 2022 21:11
|
|
|
thin your paints more, build it up with more layers (A yellow like that could easily be ~4 thin coats of paint), and you'll want some brighter layer style paints to pick up edges and other details to help make them pop. Doing pin washing can also help a lot. but it's totally fine as-is, especially for terrain
|
|
#
?
Dec 2, 2022 21:16
|
|

|
Chainclaw posted:thin your paints more, build it up with more layers (A yellow like that could easily be ~4 thin coats of paint), and you'll want some brighter layer style paints to pick up edges and other details to help make them pop. Doing pin washing can also help a lot. thanks for the good advice man man, what's pin washing? I'm doing my terrain first so I can figure out my issues before I start working on the actual troopers, I definitely will probably end up priming the miniatures grey then zenithalling them white, priming black is good for the terrain but it's a killer when it comes to making colors pop.
|
|
#
?
Dec 2, 2022 21:21
|
|
|

|
| # ? May 29, 2024 10:57 |
|
|
Al-Saqr posted:thanks for the good advice man man, what's pin washing? Often with regular washing you'll use a wash paint like GW's Nuln Oil and sort of just cover a surface. This is fine for complex surfaces, but you'll still end up wanting to touch up after. However, with surfaces with a lot of edges and flat parts, it looks bad to cover the flat surface in a wash, and it's kind of a waste of time to paint -> wash -> repaint if you can help it. Pin washing is to just go into the cracks, edges, and specific places with a wash. As an example with your terrain, you would apply wash to here where I've marked in green, and try to avoid the flat surfaces  Similarly, another thing you can do to really make things pop is to dab each bolt with some wash (darker blue highlight here). Then, go back once it's dry and apply a brighter color to the top of the bolt. Sometimes you might want to just use a metallic color for that, other times you might want to use a brighter color of the main color behind the bold.  Here's a quick mockup of what that could look like in practice on your model, the left is with the pin wash + highlighted bolts  The top two red bolts were especially sort of getting lost visually, so having the wash around the edges + the brighter color really makes them pop
|
|
#
?
Dec 2, 2022 21:43
|
|