


|
Just get a hose adapter, cheap ones on the zon, may be available at local hvac shop. Basically an elbow with a gasket that snap fits in place.
|
 #
?
Jul 24, 2023 18:36
#
?
Jul 24, 2023 18:36
|
|


|

|
| # ? May 16, 2024 08:57 |
|
|
deimos posted:Just get a hose adapter, cheap ones on the zon, may be available at local hvac shop. Basically an elbow with a gasket that snap fits in place.
|
|
#
?
Jul 24, 2023 18:45
|
|

|
Kaiser Schnitzel posted:That's what I had tried originally but it drips out of another place on the other side sometimes too. Current plan is a little plastic tray with hose barb and gasket etc. coming off it. I use one that looks like this one: https://a.co/d/dFKHDEK But yeah trays work as well, they are just more cumbersome.
|
|
#
?
Jul 24, 2023 18:56
|
|
|
Have you got like a separate conditioned office space set up on the other side?
|
|
#
?
Jul 24, 2023 22:15
|
|
|
Danhenge posted:Have you got like a separate conditioned office space set up on the other side?
|
|
#
?
Jul 25, 2023 01:41
|
|
|
I just had a bit of an idea, has anyone here combined ebonized and non-ebonized woods in a panel? I am wondering if the acetate or tannins would bleed between the panels, I may throw something together to try it out.
|
|
#
?
Jul 25, 2023 02:23
|
|
|
deimos posted:I just had a bit of an idea, has anyone here combined ebonized and non-ebonized woods in a panel? I am wondering if the acetate or tannins would bleed between the panels, I may throw something together to try it out. If you ebonized them before paneling, I don't see why they would. My guess is you'd need to soak the planks with enough water to wick from surface to surface in order for it to bleed. I could see the excess surface pigment getting smudged between dry surfaces though. Maybe make a test piece where you rinse surface of the ebonized planks before paneling? It sounds like a great idea, though. I'd love to see it when you try it out.
|
|
#
?
Jul 25, 2023 02:51
|
|

|
deimos posted:I just had a bit of an idea, has anyone here combined ebonized and non-ebonized woods in a panel? I am wondering if the acetate or tannins would bleed between the panels, I may throw something together to try it out. I have used black dyed string inlay mixed in with other woods and the black dye has not bled back out, even with water stain.
|
|
#
?
Jul 25, 2023 03:03
|
|
|
I'm thinking of building this sheet stock / cutoff storage bin from The Wood Whisperer. I don't stock a lot of either, so the capacity seems right for me. Has anybody built/used a storage system like this and have any opinions on it or suggestions on ways to improve it? https://www.youtube.com/watch?v=NSUwyMdPAEg&t=910s
|
|
#
?
Jul 27, 2023 01:36
|
|


|
i store my wood in a big pile with my wife
|
|
#
?
Jul 27, 2023 03:13
|
|


|
Tomorrow I'm driving with my wife to DC and while she's eating lunch, I'm going to check out some hardwood places out there and maybe buy some poplar for some face frames for a bookshelf/cat perch thing I'm making.
|
|
#
?
Jul 27, 2023 03:17
|
|
|
I feel like that thing should have at least one caster at the hinge end, so it's not relying solely on the hinges for support there.
|
|
#
?
Jul 27, 2023 04:19
|
|

|
Danhenge posted:Tomorrow I'm driving with my wife to DC and while she's eating lunch, I'm going to check out some hardwood places out there and maybe buy some poplar for some face frames for a bookshelf/cat perch thing I'm making. Where you stopping? Vienna Hardwoods in Fairfax is a weird experience, good prices (for the area). Skip Colonial Hardwoods, they're very expensive.
|
|
#
?
Jul 27, 2023 13:56
|
|
|
NomNomNom posted:Where you stopping? Vienna Hardwoods in Fairfax is a weird experience, good prices (for the area). Skip Colonial Hardwoods, they're very expensive. We were up in the Northwest, so I checked out Abernathy Sticks, which I guess is more of a trim shop than a lumber place, despite what their website might suggest. I didn't end up buying anything.
|
|
#
?
Jul 28, 2023 04:22
|
|
|
I�ve only been doing woodworking for a year, but I figure I�d share a few projects I made for friends and family here. Dumpster diving and woodworking go together great, a broken oak bed I found still made for some great material for projects.
|
|
#
?
Jul 28, 2023 04:59
|
|

|
LiterallyTheWurst posted:I’ve only been doing woodworking for a year, but I figure I’d share a few projects I made for friends and family here. Dumpster diving and woodworking go together great, a broken oak bed I found still made for some great material for projects. That's awesome. I started the same way. In my area there's a twice yearly hard waste collection, so I used to hire a trailer and collect old hardwood furniture by the tonne. Lots of oak, teak, and Australian hardwoods (jarrah, spotted gum, messmate, ironbark). Great way to get started and the wood is usually pretty straight to begin with.
|
|
#
?
Jul 28, 2023 11:02
|
|

|
I've also been working with wood I saved from the dump. I found an old couch frame being tossed out. Wish I had a better "before" picture but the wood looked like this:  I turned it into this:   I made an imgur post with the details if anyone's interested: https://imgur.com/a/CvnmQa4 (some of my comments aren't showing up but whatever) This was my second* real project, and the first involving actual joinery (I previously made an endtable with hairpin legs). Everything was made with hand tools (plus a powered drill). I'm very happy with the result, I learned a lot along the way. There were a few things I would do different but overall I consider it a success. *not counting a game board I made from mdf, and my work bench made with plywood/2x4s.
|
|
#
?
Jul 28, 2023 15:10
|
|
|
Danhenge posted:We were up in the Northwest, so I checked out Abernathy Sticks, which I guess is more of a trim shop than a lumber place, despite what their website might suggest. I didn't end up buying anything. They do have a decent sized lumber warehouse it's just, a big pile of lumber, if you want anything specific you have to crawl over the pallets of other lumber completely filling the floorspace and drag it out and it always feels like I'm gonna take out all their lights or start an avalanche doing so A Wizard of Goatse fucked around with this message at 15:42 on Jul 28, 2023 |
|
#
?
Jul 28, 2023 15:35
|
|

|
HappyHippo posted:I turned it into this:
|
|
#
?
Jul 28, 2023 16:05
|
|


|
HappyHippo posted:I've also been working with wood I saved from the dump. Looks great! Is your plow plane homemade?  And if not, where is it from/how do you like it? Reasonably priced but decent plow planes just don't seem to exist.
|
|
#
?
Jul 28, 2023 16:20
|
|
|
Hypnolobster posted:This is super nice, and really incredible for a first joinery project. drat good job. You're right, it's definitely ash too. Thanks! I was discouraged by how loose the dovetails were fitting at first but that peening technique described in the details really saved my rear end. Kaiser Schnitzel posted:Looks great! Man I hear you. Tracking down a decent (edit: and affordable) plow plane has become my white whale. I got this one from some guy on marketplace. It's not homemade, but I don't know if they still make them: https://www.woodcraft.com/products/mujingfang-rosewood-adjustable-plough-plane (edit: I think they have them on AliExpress?) As for how I like it: not a lot, but it can get the job done I guess. There's no adjustable depth stop, although the depth it plows to is ok. It's very had to set the iron correctly - you either get no shavings at all or it digs in hard. With a lot of patience I can get it to the sweet spot where it's nice to use. I looked up videos on how to set irons in wooden planes but they didn't seem to work. I think it's because the wedge is held in place with a metal bar which has dug an impression into it with use. The irons need to be sharpened by hand, which I'm personally fine with. There are no square angles on them to use a honing guide with - they taper back from the front. I guess with time that means they'll be cutting thinner and thinner grooves? You pull it towards you, instead of pushing it away from you, which I kinda like actually. The fence doesn't really stay put very well. My solution was to wedge a piece of wood between the fence and the body, that seemed to hold well. I got an old Stanley 45 from an estate sale that I'm trying to turn into a user. Most of the irons were missing, I think I'll just use Lee Valley ones for that. Other pieces I've been replacing myself. I probably should have just paid the extra dough for a complete one but whatever. HappyHippo fucked around with this message at 19:11 on Jul 28, 2023 |
|
#
?
Jul 28, 2023 16:38
|
|
|
A Wizard of Goatse posted:They do have a decent sized lumber warehouse it's just, a big pile of lumber, if you want anything specific you have to crawl over the pallets of other lumber completely filling the floorspace and drag it out and it always feels like I'm gonna take out all their lights or start an avalanche doing so They all seemed pretty busy and I didn't feel like hassling them for the tiny amount of wood I was likely to buy, basically. If I were going to go back regularly that would be one thing, but I wasn't.
|
|
#
?
Jul 28, 2023 17:04
|
|
|
Beardcrumb posted:That's awesome. I started the same way. In my area there's a twice yearly hard waste collection, so I used to hire a trailer and collect old hardwood furniture by the tonne. Lots of oak, teak, and Australian hardwoods (jarrah, spotted gum, messmate, ironbark). Great way to get started and the wood is usually pretty straight to begin with. Christ, people throw away teak and Australian hardwood.. That's almost worth dealing with all the things that try to kill you there.
|
|
#
?
Jul 28, 2023 19:03
|
|


|
I have this old exterior entrance door that I want to add Door Armor onto. But the spacing between the door frame and actual door is too narrow. Door Armor needs two quarters' spacing. I can barely fit one quarter. So I'm thinking of removing the door, and shaving off 1/16 of an inch off its edge just to create a wide enough gap between the door and the frame. While I'm at it I might strip and repaint the door. Tell me why this is a bad idea.
|
|
#
?
Jul 29, 2023 02:42
|
|

|
melon cat posted:I have this old exterior entrance door that I want to add Door Armor onto. But the spacing between the door frame and actual door is too narrow. Door Armor needs two quarters' spacing. I can barely fit one quarter. Stripping and repainting anything is a bad idea because it's always a miserable toxic process.
|
|
#
?
Jul 29, 2023 02:54
|
|


|
I made a half assed attempt at resawing with a rip fence and circular saw and it went about as well as you'd expect  I may be able to make something w the 1/4 slabs I might be able to salvage from my attempts but I won't be trying this again
|
|
#
?
Jul 29, 2023 04:07
|
|
|
Resawing with a circular saw sounds terrifying tbh
|
|
#
?
Jul 29, 2023 04:42
|
|
|
How many fingers do you have now
|
|
#
?
Jul 29, 2023 04:47
|
|


|
All of them, it was just a 1' x 1' chunk I had that was > 1" thick. I wanted to see if my rip fence would let me cut it in half accurately enough to finish with a hand saw. The answer is no
|
|
#
?
Jul 29, 2023 04:50
|
|
|
HappyHippo posted:I've also been working with wood I saved from the dump. I have a couch frame that looks like that. It is an old couch that has been in the family for 40 years. But it is beat up and probably not worth reupholstering(?). I think the frame is walnut. Long straight rails like in your pics. This is in Belmont, CA. PM me.
|
|
#
?
Jul 29, 2023 05:30
|
|

|
PokeJoe posted:All of them, it was just a 1' x 1' chunk I had that was > 1" thick. I wanted to see if my rip fence would let me cut it in half accurately enough to finish with a hand saw. The answer is no "Why hasn't anyone thought of this before? Oh poo poo this is why!" Don't worry, we've all been there.
|
|
#
?
Jul 29, 2023 07:10
|
|

|
ryanrs posted:I have a couch frame that looks like that. It is an old couch that has been in the family for 40 years. But it is beat up and probably not worth reupholstering(?). I think the frame is walnut. Long straight rails like in your pics. That sounds awesome but unfortunately a few thousand miles out of the way for me
|
|
#
?
Jul 29, 2023 13:29
|
|
|
How should I reattach these screws?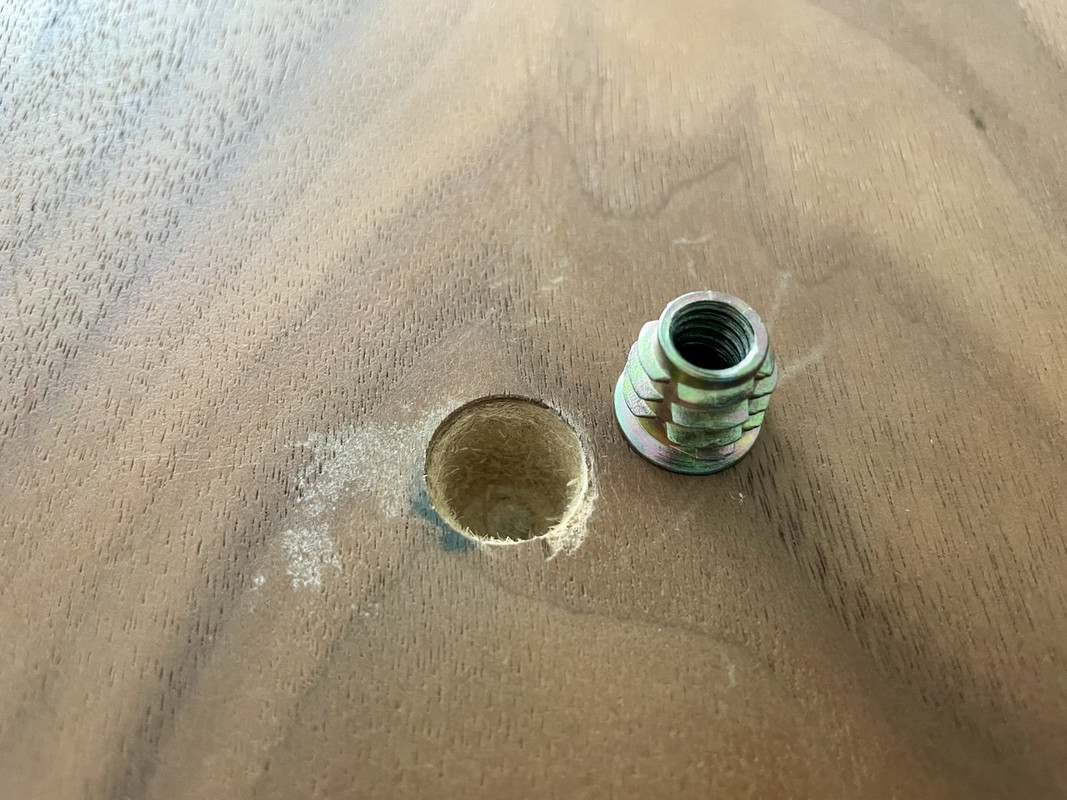 Inside is MDF if it wasn't clear. It's actually a screw mount (or whatever), and another bolt goes inside to attach it to a metal bracket. I need to make sure the inside threading for the additional screw isn't compromised because I need disassembly capability. PRADA SLUT fucked around with this message at 19:00 on Jul 29, 2023 |
|
#
?
Jul 29, 2023 18:57
|
|

|
Epoxy. Or epoxy an appropriately sized dowel in there and then drill it out for the threaded insert if you are equipped to do that. If you epoxy the insert straight in, wax the interior threads really well, wax the bolt well also and install the insert with the bolt run into the thread so the threads don't get gummed up with epoxy.
|
|
#
?
Jul 29, 2023 19:00
|
|
|
Can I get a link to like a specific product I should be looking at? I have a set of tools if needed, including a drill.
|
|
#
?
Jul 29, 2023 19:01
|
|
|
PRADA SLUT posted:Can I get a link to like a specific product I should be looking at? This is fine and widely available at big box stores: https://www.gorillatough.com/product/gorilla-epoxy/
|
|
#
?
Jul 29, 2023 19:17
|
|
|
A word on two-part epoxy, such as that linked by Kaiser Schnitzel: you need to mix the two parts thoroughly. The dual plunger system just serves to make sure you deposit equal quantities of the resin and hardener. What I recommend is that you deposit a blob of each onto a business card or other reasonably tough, disposable material (I use some scrap wood), mix it thoroughly with a toothpick, and then apply it to the surface you want it on using the toothpick.
|
|
#
?
Jul 29, 2023 20:27
|
|
|
Depending on the container it ships in, some 2-part epoxies are intended to be used in a caulking-gun type applicator with a mixing nozzle. They're a bit wasteful if you only need a tiny dab, and the tips are one-time use, but they're very convenient if you intend to use a lot of slow-setting epoxy.
|
|
#
?
Jul 30, 2023 00:02
|
|
|
Can also drill/file/scrape some "channels" inside the hole with a small drill bit so the epoxy has a bit more to grab, nothing too drastic, maybe two channels, doesn't need to be too far.
|
|
#
?
Jul 30, 2023 01:09
|
|
|

|
| # ? May 16, 2024 08:57 |
|
|
Kaiser Schnitzel posted:Epoxy. Or epoxy an appropriately sized dowel in there and then drill it out for the threaded insert if you are equipped to do that. This guy is right, just do this. It's easy and should only take a few mins. 2 part epoxy is magical stuff
|
|
#
?
Jul 30, 2023 01:13
|
|