


|
FWIW their dev team pointed out in one of their recent updates that they noticed how much people liked the DoI DLC concept and if I had to guess the next in line for a similar treatment are the Chinese.
|
 #
?
Jul 31, 2023 18:57
#
?
Jul 31, 2023 18:57
|
|


|

|
| # ? Jun 5, 2024 07:24 |
|
|
Azran posted:FWIW their dev team pointed out in one of their recent updates that they noticed how much people liked the DoI DLC concept and if I had to guess the next in line for a similar treatment are the Chinese. In b4 they make the Norman's into a civ
|
|
#
?
Aug 1, 2023 00:08
|
|

|
Sundjata - Part 2: The Sting of the Scorpion Mission 2 Starting Text "Sumanguru was a cruel tyrant and a sorcerer in command of powerful spirits. He was said to possess a magical balophon which would grant him victory if he played it. Whether or not Sumanguru had magical powers, he was above all an ambitious conqueror seeking to seize the lands of the old empire of Ghana, a golden kingdom of great wealth and sophistication lost to the desert. Sundjata knew that contesting such a man would be difficult. The Sosso had allied with other tribes in the north: the Jolof, the Diafanu, and others who profited immensely from Sosso control over the Saharan trade. With such powerful allies and their armies, no one dared to rise up against them. Sundjata had one advantage: he was still remembered as the crippled prince of the Mandinkas. As long as this was believed, the Sosso would dismiss him as inconsequential, and he could build his own alliances. To provide proof of his miraculous transformation from crippled boy to strong prince, he took up the baobab branch from his youth and began a journey. From people to people and kingdom to kingdom, he traveled to rally support and prove that he was strong enough to retake his ancestral lands from Sumanguru."  Scout: We face many enemies here, but if we can bring our holy relic to their towns, they will surely submit to our rule!  Scout: This is the cart carrying the baobab stick of our great commander. We should have units near it at all times so it doesn't fall into the wrong hands. Your mission is to bring the relic cart to a flagged area in each of the three towns to get them each to surrender. The cart has an HP bar, and pre-Definitive Edition could be killed. Now I think it can only be stolen. This only really mattered if you were trying to directly tower dive a Castle with the relic by itself or something like that and doesn't make too much of a difference to the mission overall.  Tabon: We have always been an ally of your family, and we shall honor that now as well.  Wagadugu: We stand by you, Sundjata, but you must protect us from our enemies. Tabon and Wagadugu are a pair of small towns in the center of the map that you acquire as allies when you get a unit close to them. Corresponding to the level of difficulty in obtaining them, they're not very helpful except for scouting purposes and serving as distractions to prevent the enemy factions from attacking your base directly.  After building up an economy and a moderate size army, I march over to Sangaran and...  Malian Soldier: Our relic cart has reached Sangaran. They have decided that they will oppose us no longer. Well, that's it really. Sangaran doesn't have functioning walls, so as long as you keep the Castle and a couple of Crossbowmen occupied, you can pretty much just walk right up to the flag and knock them out of the game.  Labe mounts an attack on Wagadugu, but it's just a raid rather than a full scale assault, and is easily repulsed.   Malian Soldier: The relic cart has reached the town of Labe and they have laid down their arms. I capitalize on Labe's failed offensive and batter down their Wooden Gates. From there, they only have a few Longswordsmen standing between me and their main Town Center, where the flag is located.  Unless Labe manages to reach a critical level of development, Niger is the only real threat in this scenario. But even then, they don't accomplish much: Niger tries for a rapid deployment of Siege on Tabon with Cavalry Archers and Battering Rams, but they lose their Cav Archers early and then have no real answer to Tabon just using Scouts to annihilate their Rams.   They're also the only enemy with real walls, and therefore take a bit more effort to break through in order to reach the heart of their base.  Malian Soldier: Our relic cart has reached Niger. Now they too will submit to Mali rule! With the transportation of the relic cart to Niger's flagged area, the last of the three enemy factions is subdued, and the scenario is now complete. Malian Soldier: Songaran, Labe and Niger send word that they shall submit to Sundjata, ruler of Mali. It seems the tide is turning in our favor! Mission 2 Ending Text "Sangaran, Labe, Niger, Tabon, and Wagadugu. One by one, the kingdoms of the south and the east rallied to Sundjata. But for every king who supported the Mandinka prince, it seemed that Sumanguru conquered three others. As successful as Sundjata had been, his coalition could not hope to defeat the Sosso just yet. Sundjata needed a better plan." The charitable perspective of this mission is that it might be fun to figure out how to speedrun, similar to Hand of a Princess from the Prithviraj campaign. The uncharitable perspective is that the devs couldn't stick the landing on the core concept of having the AI defend their defeat condition well, and so this is a really dumb scenario. Extra Slides Mission 2 - Intro Slide 1 Mission 2 - Intro Slide 2 Mission 2 - Intro Slide 3 Mission 2 - Intro Slide 4 Mission 2 - Intro Slide 5 Mission 2 - End Slide 1 Mission 2 - End Slide 2 Jossar fucked around with this message at 01:36 on Aug 2, 2023 |
|
#
?
Aug 2, 2023 01:33
|
|


|
Sundjata - Part 3: Djeriba Gold Age of Empires II: Definitive Edition - Booty and Kings Mission 3 Starting Text "A trader came to Sundjata from beyond the Sahara desert. He had a deep, thick Arabic accent and told of great gold deposits in Sumanguru�s lands. But Sumanguru did not permit the traders access to this gold. The tyrant gave his allies control over the gold and salt trades, leaving the merchants at their mercy. This trade was the flowing blood in the veins of these kingdoms. If the blood stops flowing, the body will wither. Sundjata thought about the merchant's words. The next day, he assembled a band of raiders. If trade was the blood of Sumanguru's empire, then Sundjata would drain it just as one drains an animal after the hunt."  Imam: Welcome, Malian riders. Some of your comrades have already set up camp nearby. You can find them to the south. This mission starts off with a small scout force under your control, with the goal being to cross the map and reach the southern corner where you have a small camp set up. From that camp you can train up a large enough force to raid the region in a serious capacity.   For the most part you want to try and avoid the local villages and their defenses as much as possible and just keep moving south. There will be some fights against wandering patrols of the Sosso Traders, but to some extent you can pick and choose your battles so you only face the small patrols instead of the sizable ones. Scattered along the map are a bunch of camels. It's useful to pick these up to save time for an optional side quest later if you can, but don't feel especially pressured to do.  Malian Horseman: This region has many villages loyal to Djenne. Let us raid them and disturb Djenne's precious trade routes before we commence the attack on the city itself. (after a few seconds) Djenne captured many of our villagers. If we free them, they can help us build a larger base. Once you reach the raiding camp, you get access to a few more preset units and the resources and buildings to train to around 40ish or so total. The game now actively wants you to go on the offensive, with the goal being to beat up enough of Djenne's Villages to have the Villagers and resources with which to transition to a base-building phase. At this point, I have to note several things that they changed about the scenario, which make it much harder than the original HD Edition version: You could originally use this area to provide healing for your troops because the pools would heal you, now you're stuck with the allied Imam all the way up to the north as your primary source of healing until you can create your own Monks. You used to get a bunch of special hero units for the scenario, now you just get some Camel Riders and Cavalry Archers. There's a side quest that was cut out entirely, and in this version you still can't advance to the Imperial Age. This is the last scenario for which this remains true though, and we'll finally get access to the Malians' full set of toys next time.  Arab Trader: The Sosso and their allies want to keep me out of their trade. Not if I have anything to say about it! If you bring me four camels, I will tell you where they keep their stockpiles and prisoners. (after bringing him the camels) Inshallah! As promised, I marked the locations of interest on your map. Once you have your raiding base, this merchant offers to sell you information in exchange for the Camels I've been collecting. I think Standard difficulty gives you most of the locations for free, but I don't want to risk him not assisting me in other ways if I don't complete this quest, so I hand over the Camels.  Villager: Mali raiders! Run for your lives! Malian Horseman: We have sacked one of their villages! Several of the villages have a small army and some Watch Towers guarding a Storage Depot. You want to beat up the army, destroy the storage, and get out as quickly as possible. This gives you access to a varying amount of resources depending on how big the village in question is.  Malian Horseman: These peasants offer to help us. Let us bring them back to our camp. Prison camps are more heavily guarded, though not onerously so, and require you to tear most of the place down before the villagers are freed. You really want to do most of your looting before you start liberating villagers, because...  Djenne: You think your raiders can destroy our villages and get away with it! You shall feel the wrath of the mighty city of Djenne! Once you do so, Djenne, in the center of the map activates. I found that they weren't particularly hostile as long as you were hiding off in the corners of the map, but the instant you got anywhere close to their doorstep they would start swarming like a hornet's nest, so still good to keep them under control for as long as possible.  Arab Trader: I like how you do business, so I would like to make another proposition. Send me 1,000 wood and I will build a market for your trade carts to visit. (after tributing the wood) Splendid! The market has been built. Send your trade carts to it to generate gold for your army. The map is pretty low on gold just sitting out in the open in locations that aren't likely to get attacked, but the game gives you a few ways to try and mitigate that. The first is that once the base building section starts, the merchant offers to be your trading partner. I'm not sure it's the most efficient way of generating gold, but it is the one that involves me going out of my way the least, so I take his offer.  Then it's back to smashing as many of the free resource villages as I can to try and slingshot my economy ahead.  Malian Horseman: An old siege workshop! We can use it to build siege engines to tear down Djenne's walls. While wandering alongside the western edge of the map, the game gives me a free Siege Workshop, some Houses, and a Blacksmith. Nice to have built for free, but none of these is otherwise disabled from being built in the scenario, so it's just a matter of saving time and wood.   I build a few production buildings to try and reinforce my raiding force, only to find that this counts as being too close to Djenne, which aggros the city's defensive garrison. Since they've already picked the fight, I decide to stop circling the map and just hunker down to start the siege on Djenne proper.   Unlike last scenario, Djenne is very well defended: having multiple layers of walls, a decent number of Towers, and training a large, active army that will vigorously oppose your progress throughout the entirety of the city. I had a couple moments where I had to fall back and regroup because their archers behind the walls were a little too good at their job. 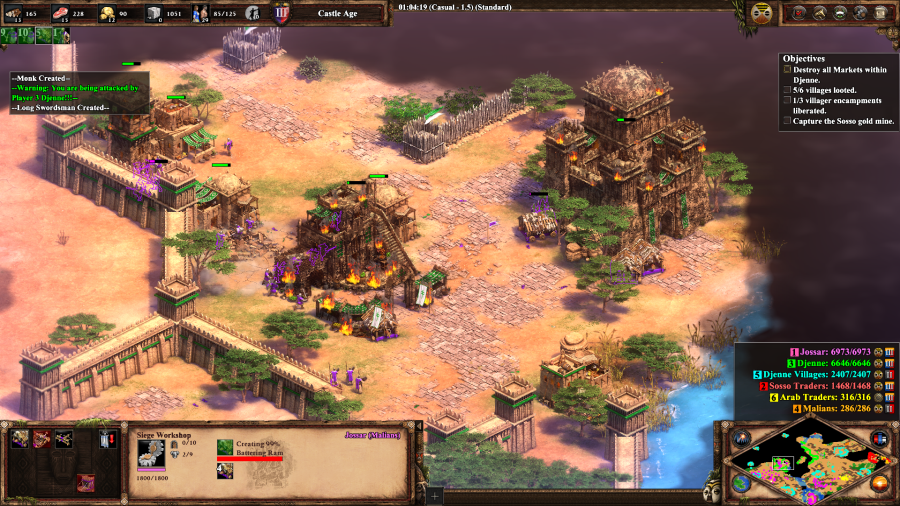  But with the walls cracked open, the dam breaks, making everything much easier. Djenne's army will still continue to fight the whole time, but by this point I can just flood the place with Longswordsmen and Rams. Once Djenne's four Markets go down, the scenario is complete. Malian Horseman: Djenne has been reduced to rubble and the Sosso will no longer be able to trade here. We will see how strong Sumanguru is without his precious gold. Mission 3 Ending Text "Sundjata raided with unbridled success. With trade diverted into Mandinka lands, allegiance to Sumanguru began to waver across his empire. Sundjata put the gold he gained to good use, assuring that his people and allies profited from the new riches. He had proven himself not only an able commander, but also an able king. With his newfound successes came greater attention though. Every city in West Africa bellowed the name of Sundjata the Lion, King of the Mandinkas, the King of Mali. Sumanguru could no longer afford to ignore the once-crippled prince. He assembled a vast armies for war." As opposed to the last scenario, I can't speak highly enough about this one. The raiding works for its portion of the scenario, but naturally transitions you to the base-building segment. The gold shortage means that even during the base-building part of the scenario, you're still actively engaged, especially if you take one of the more aggressive options to solving it. And finally, Djenne is a serious opponent that actually requires you to put some thought into defeating them. Paths Not Taken  Malian Horseman: If we destroy the Sosso towers defending these mines, the miners will produce gold for the Mali! To the east, there is a moderately well defended Sosso Traders' encampment. Destroying the Towers gets you regular tributes of gold from the miners.  Malian Horseman: The Sosso encampment up ahead has a lot of resources. We should destroy it and have our villagers collect the resources. To the north, the Sosso Traders have a main base with abundant resources. Destroying their base is probably the hardest thing in the mission except for attacking Djenne itself, but also allows you the freedom to build up a lot in a relatively defensible area until the time comes to take Djenne out. Extra Slides Mission 3 - Intro Slide 1 Mission 3 - Intro Slide 2 Mission 3 - Intro Slide 3 Mission 3 - Intro Slide 4 Mission 3 - End Slide 1 Mission 3 - End Slide 2 Mission 3 - End Slide 3 Jossar fucked around with this message at 16:13 on Aug 2, 2023 |
|
#
?
Aug 2, 2023 15:54
|
|
|
Sundjata - Part 4: Blood on the River Bank Mission 4 Starting Text "A beast is most dangerous when cornered. Sumanguru was no different. He struck southward into the Mandinka heartland, where he had slaughtered Sundjata�s family before. He was rumored to have brought his mystical balophon with him to summon victory, and griots were already singing that the war had been won by the sorcerer before it even began. Sundjata met him by the Niger River, at a place called Kirina. A long line of Sosso and Jolof soldiers stood tall, banging their shields and grinning at the soldiers of Sundjata�s coalition. Horses and camel brought to the field of battle kicked up enough sand to shroud the sun at noon. Sumanguru himself took the field in the dusty twilight, and Sundjata faced him from across the hot expanse. As the armies prepared to charge, the music of a balophon began to flow through the air. The decisive moment was at hand, and all of West Africa awaited the victor."  Malian Soldier: Sumanguru has brought his Sosso warriors to do battle against us! Let us teach this dog how we Mali soldiers fight!  Malian Soldier: There is very little wood in this region. The only way we can get more is by transporting it over the river, but the river is guarded by Sosso towers. We should destroy all five of them. (after the towers are destroyed) Excellent! All towers have been destroyed. Now all we have to do is protect the trade ships when they arrive. The gimmick of this mission is that you're playing on a map that's mostly desert and so there is a relatively limited supply of wood. The idea is to destroy these poorly defended guard towers in order to break Sumanguru's stranglehold on the river so that you can ensure a supply of wood coming in from other regions via a line of Trade Cogs. You only need a couple of upgrades to your starting Militia line units and a couple of extra units to accomplish this.  In practice, the map really has more wood than you will ever need unless you're trying to use Archers and Siege Units exclusively for some reason. But it's still useful to accomplish this task just to activate the next set of sub-missions. Each Trade Ship that makes it up to the central, allied Trader base provides you with 300 Wood. You can later pay 2500 Food to the Traders to boost this to 600 Wood per ship, if you so desire.  Mema: Great Sundjata, we want to throw off the Sosso yoke, but cannot do so while Sumanguru keeps my daughter hostage. Save her and we will fight for you.  Fakoli: We have grown tired of Sumanguru and will join your side, oh mighty Sundjata, for the mere sum of 1,000 gold. (after paying 1000 gold) Thank you for the gold. Now if you build a castle in our town so we can defend ourselves against Sumanguru, we will honor our agreement. You have 10 minutes. (after building a Castle in the flagged area) We knew we could trust you, Sundjata. Our spears and swords are yours! Once the towers are down, Sumanguru's allies all make offers to switch sides. Fakoli just asks for a bunch of gold and afterwards for you to build a Castle in their town. They're not very useful as allies, but it's worthwhile to do their relatively simple tasks just to get them out of the way.  Mema's task on the other hand is a bit more difficult. Fortunately though, we've finally managed to reach the Imperial Age and can bring the full might of the Malian army to bear. Although the Malians cannot research Paladins or Hussars, their Imperial Age unique tech, Farimba, gives all of their Cavalry units +5 attack, turning what was up until this point a mostly Infantry-based civilization into a late-game powerhouse Cavalry civilization. So after massing up a bunch of Cavaliers it's as simple as pointing them at the Sosso outpost and flattening it to the ground. Destroying the enclosure gives you the Mema Princess, and I walk her back through the ruins to the Mema Castle.  Mema: My precious daughter is back! You have made me a very happy man! We are with you, Sundjata.  Mema Princess: I am very grateful that you saved me, Sundjata. In return I want to offer you the help of my warrior sisters. Saving the Mema Princess not only grants you Mema as a permanent and active ally, but you also get 15 Gbetos for free with more spawning in at a regular rate as long as you're not at unit cap. Having 100 Gbetos at once gets you an achievement, but this is honestly not really that useful unless you're specifically going for the achievement, as you only have 125 pop cap and will likely have to wreck a good portion of your economy in the process.   All that's left to do at this point is sweep across the map and destroy the main Sosso encampment. Sumanguru has a pretty open layout for his primary base and a minimal amount of troops, so as long as you destroy the Castles and the occasional Shotel or Camel, there's not much standing in the way of victory. Malian Soldier: The Sosso have been utterly beaten and Sumanguru is on the run. We are victorious! Mission 4 Ending Text "The armies crashed against each other. They buckled and wrenched, bristling serpents coiling and writhing amidst the clamor of weapons and the rumble of hooves. Malian soldiers faltered, but at the critical moment Sundjata would ride across the lines to rally his men, inspiring them to push on and prevail. At long last, the Sosso onslaught slowed and their resolve began to fade. Sensing that the tide had turned, Sumanguru abandoned his men and fled into the mountains. At the sight of their leader in flight, the exhausted Sosso lines collapsed. The celebrations lasted for days, with the most bountiful feasts ever seen. All the kings of the coalition gathered to proclaim Sundjata their Mansa, the King of Kings. Mali had become an empire, and Sundjata its emperor." Sumanguru really should've been a lot more aggressive on this map. He did go and send a bunch of Shotel Warriors to burn down the Traders' Docks, but that didn't do all that much and even then it was too little, too late. Ah well, was fun to rescue the Princess on the way to victory at least. Extra Slides Mission 4 - Intro Slide 1 Mission 4 - Intro Slide 2 Mission 4 - Intro Slide 3 Mission 4 - Intro Slide 4 Mission 4 - Intro Slide 5 Mission 4 - End Slide 1 Mission 4 - End Slide 2 Mission 4 - End Slide 3 Jossar fucked around with this message at 20:02 on Sep 2, 2023 |
|
#
?
Sep 2, 2023 19:56
|
|
|
I can�t remember if it was part of Forgotten Empires, but I swear there�s some sort of colour filter effect added in certain maps for the remake that I don�t care for. That aside, the African Kingdoms is probably my favourite of the modern DLC, for aesthetics if nothing else. The architecture set is really distinct and makes for a nice contrast to the rest of the game, even if it can be a little strange to see European knights in full fifteenth century regalia standing in for every civilisation.
|
|
#
?
Sep 2, 2023 21:25
|
|

|
there used to be a funny bug in hd where the gbetos would spawn constantly and infinitely, going past the pop limit and lagging/crashing the game https://www.youtube.com/watch?v=OcAgtf3OeBg
|
|
#
?
Sep 3, 2023 00:39
|
|
|
Sundjata - Part 5: The Lion's Den Mission 5 Starting Text "Mali now dominated the land on both sides of the great Niger River. Mansa Sundjata reigned freely from the gold mines of Bambuk to the city of Gao, but more was needed to stabilize the empire. Sumanguru fled to his stronghold of Koumbi Saleh, still wreaking havoc wherever he could. As long as he lived, he would be a threat to the peace of the realm. Sundjata called upon his men once again and began a long siege of the mighty Sosso capital and former seat of the Ghana empire. Sundjata would not be denied his final victory."  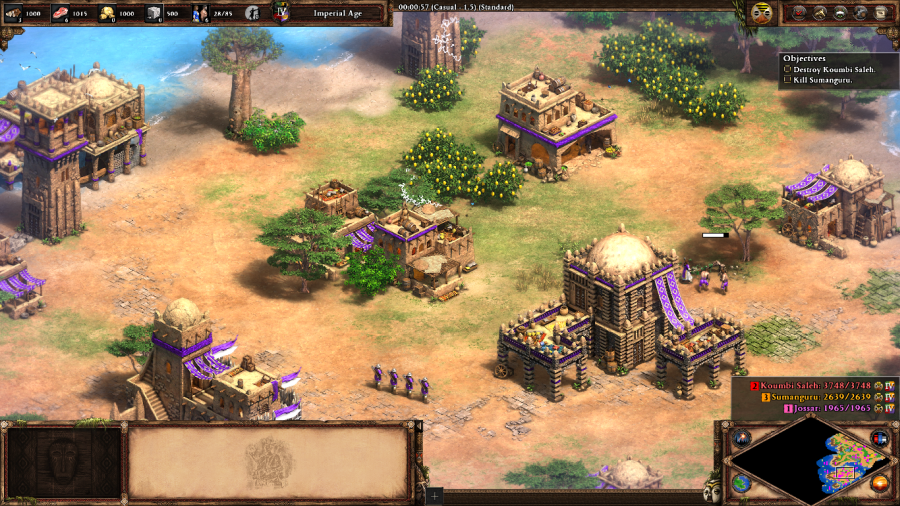 Malian Soldier: Sumanguru has taken refuge in the old Ghanaian capital of Koumbi Saleh. Let us finish this and be done with Sumanguru once and for all! You start this map with two bases, close to one another but separated by water. It's a simple enough mission, destroy Koumbi Saleh and kill Sumanguru in the process, but there's two different ways to approach it. The first is a wholly land-based approach, going around the long way to thoroughly destroy everything Koumbi Saleh has on route to the city. The second is an amphibious invasion, first destroying Koumbi Saleh's navy and then dumping all of your troops inside the city directly. In this case, I take the second option. Your base is vulnerable enough to attack by sea that you really don't want to give up the water to Koumbi Saleh and there are a lot of resource islands in the south of the map that you lose out on by ceding control of the water.   The islands are lightly guarded with a few towers and ships, but Koumbi Saleh's docks are fiercely contested, with a large navy and fortified positions containing towers with exceptionally long range and members of Sumanguru's personal guard who will take potshots at you. It's important to destroy as much as you can during this phase because it limits Koumbi Saleh's ability to project force to contest your landing, but they will keep trying to rebuild their docks, so if you choose this route you have to accept that to some extent you're going to be stuck playing whack-a-mole for most of the scenario.  Meanwhile, Koumbi Saleh also sends a light scouting force to probe my defenses by land, but it is easily repulsed. This is the only real attempt Koumbi Saleh makes for the rest of the game, mostly because they'll be too busy on defense from this point going forward.   Eventually I get a strong enough core of Farimba Cavaliers to land onto the city's now-cleared natural harbor and let them go to town, smashing the city's infrastructure and Sumanguru's personal guards (including the Sosso Guards, a set of Infantry Hero units) as they go.  At 45 minutes, Koumbi Saleh begins building a Wonder in the center of the city, which is right in the middle of my warpath and easily destroyed before it even really starts going up. The majority of Sumanguru's forces are concentrated here, along with the sorcerer-king himself as a unique Cavalry Hero unit. Killing him is one of the mission objectives and nets you an appropriately standard villain death line: Sumanguru: No, I cannot die! Not like this!   This would've been a great place for the mission to end, but... Koumbi Saleh really doesn't know when to quit. After trying to go any further than this, I'm met with a wall of Barracks units. It's so intense that I have to bring over a set of Villagers to build a camp near Koumbi Saleh's mineral stockpiles and Castle up to withstand a further onslaught as Koumbi Saleh tries to rush said forward camp.   This also reveals the weakness of Farimba Cavaliers: all your Cavalry bonuses are specifically geared towards offense, so if you find an opponent who is extremely tenacious on defense, then they're not as good as Paladins at standing up to a meatgrinder. Eventually, I have to make a bunch of trebs just to deal with the multiple fortified positions with super Towers/enemy Trebuchets/Arbalests (Sumanguru) and Castles/Tigui-reinforced Town Centers (Koumbi Saleh).  Even with the city burned to the ground, Koumbi Saleh doesn't surrender until I go back and destroy this isolated Castle and Town Center all the way in the north, and it might have just been because I forced them to do so via normal elimination rules. Malian Soldier: Koumbi Saleh is ours and Sumanguru's reign is over. Long live Sundjata, king of the newly founded Mali Empire! Mission 5 Ending Text "With peace in the empire and the deaths of his family avenged, Mansa Sundjata settled well into his role as the ruler of Mali. In peace he was as effective an emperor as he was in war, building markets and monuments across his lands. He was a model for all emperors to follow, making his country a center of learning and culture at the edge of the Sahara. And so I remain to tell his story. Balafasseke Kouyat� is my name, his humble family historian, a griot of superb bloodline and patronage. And this is Sumanguru's balophon, which I stole before the battle at Kirina, and played that day to inspire the victory of Sundjata!" I like most of this mission, especially the hybrid land/water focus, which works here in a way that it usually doesn't for a lot of these scenarios. But it really should've ended once you kill Sumanguru, everything after that is just obnoxious. On the whole, the Mali campaign was about average, but in the sense that there were very fun parts and there were very mediocre parts. The fight against Djenne in particular stands out from this campaign even now, just because of all the angles of attack you could take. Extra Slides Mission 5 - Intro Slide 1 Mission 5 - Intro Slide 2 Mission 5 - Intro Slide 3 Mission 5 - End Slide 1 Mission 5 - End Slide 2 Mission 5 - End Slide 3 Jossar fucked around with this message at 14:53 on Sep 3, 2023 |
|
#
?
Sep 3, 2023 14:47
|
|
|
Campaign Vote #18 A. Francisco de Almeida - Portuguese B. Yodit - Ethiopians C. Gajah Mada - Malay D. Suryavarman I - Khmer E. Bayinnaung - Burmese F. Le Loi - Vietnamese Voting lasts for 24 Hours from the time of this post. In the event of a tie, I will act as the tiebreaking vote between the two tied options. Please bold your vote in order for it to be counted, as well as noting if you are changing your vote from something else. I was a little worried that after vanishing for a month that there would be no one reading the thread, but there's enough people who have commented already that I feel comfortable going on with the post-campaign selection vote as usual.
|
|
#
?
Sep 3, 2023 14:56
|
|
|
Fun fact, the terrain of this particular map was modeled after the second mission of the Rise of Rome campaign in Age of Empires 1, just with a few more islands in the bay. That map featured the player fighting against Pyrrhus of Epirus.
|
|
#
?
Sep 3, 2023 15:24
|
|
|
Gonna go with B.
|
|
#
?
Sep 3, 2023 16:09
|
|

|
C. Gajah Mada I've been missing this LP. Thanks for coming back, Jossar!
|
|
#
?
Sep 3, 2023 18:58
|
|

|
As far as this game's narrator-was-secretly-in-the-campaign plot twists go, our historian/bard pilfering magical instruments is a pretty cute and well done one. Anyway, let's wrap up our campaigns with the sadly rare african architecture set with B: Yodit, and after that, finish this expansion by getting on a boat eastward, which will be a nice lead in to the next one.
|
|
#
?
Sep 3, 2023 19:47
|
|
|
B. Let's do the other African civ
|
|
#
?
Sep 3, 2023 20:42
|
|


|
Yodit, because the Ethiopian archer line is hilariously powerful. Glad to see this LP back.
|
|
#
?
Sep 3, 2023 23:15
|
|
|
D. Suryavarman I - Khmer
|
|
#
?
Sep 4, 2023 03:31
|
|


|
Vote's closed! A clear victory for Princess Yodit, may her wrath on her enemies be swift and long enduring!
|
|
#
?
Sep 4, 2023 15:53
|
|
|
Yodit - Part 1: Path of Exile Age of Empires II: Definitive Edition - Ethiopians Theme Very well, then let us begin, the tale of the queen of terrible vengeance.   Mission 1 Starting Text "Aksum � the heart of our empire and the cradle of the Ethiopian civilization. Even so, every time our caravan stops here to sell its wares, the city seems less grand; more roofs need thatching, fewer shops are open, and even the shouts of the hawkers are ever so slightly less audible. My son doesn't notice, of course. Ever since we entered the city, the boy has stared in awe at every building. This is a marvelous sight for a country lad living in the northern highlands. As we passed a church, a set of golden curtains caught his eye. 'Father, have you ever seen such a treasure? Why does nobody guard it � are they not afraid of thieves?' I could not help but smile. 'Why hire strong-arms when even the queen dares not take them?' A deep frown creased my son's brow. The boy apparently did not know the story of his ruler yet. 'Forty years ago, when our queen Yodit was but a princess, she discovered the very reason why those curtains do not need any guards...' 'Yodit was truly beautiful. Every lord in the empire contended for her hand, much to the displeasure of Gidajan, her nephew and the heir to the throne. Gidajan devised a plan to be rid of her: in the night he stole the golden curtains and hid them in her room.' 'When the palace guard discovered the treasure, she was locked in the deepest cells. Luckily, there were some who refused to believe the accusations. One loyal captain named Samuel helped her escape through a secret tunnel.'"  Samuel: It will not be long before Gidajan finds out about your escape. We should depart these lands immediately!  Samuel: Do not worry, there are only a few enemy guards. I will deal with them swiftly! (after killing the guards) I know of a small village whose inhabitants are loyal to you. We can plot your escape from there.  Ethiopian Soldier: There are three possible escape routes. Each is guarded by an encampment loyal to Gidajan. We must choose our opponents wisely. The first part of this mission is pretty straightforward, you have control of Princess Yodit, a hero Queen unit who must survive the scenario and has no offensive capacity and Samuel, a named Shotel Warrior with healing. Notably he is not considered by the game to be a Hero and his survival is not critical for completion of the scenario. Once he kills the guards, head into the village to begin the base building section. The primary objective for the rest of the mission is getting Yodit out of Ethiopia safely. There are three flagged locations that the game considers as satisfaction of this goal: corresponding to escape by a mountain route, a river route, or a plains route respectively. Entry to each is protected by a base belonging either to Gidajan directly, or one of the three enemy fort factions.  Ethiopian Soldier: Are you in need of our powerful rams? Pay us 500 gold and they are yours! Making things more difficult is that you're capped to a population of 100 and stuck in the Feudal Age. Fortunately, these fellows over here will sell you some rams, but if you lose them then things get much more difficult if you're trying to take a "straightforward" escape route.  Shotel Warrior: We will fight for you! Scattered around the map are a number of small groups of Shotel Warriors. If you bring either Yodit or Samuel to them, they will join you, along with their tent if they have one. They're a nice way to supplement your forces for the minimal investment of scouting them out.   While the other enemy forces are static, Gidajan is not, and he will periodically send troops to try and raid your town. These are generally not a threat if you've already managed to build up a sizable army, but without Monks, every little bit of damage starts to add up fast, even if you garrison damaged units.  Ferryman: If you pay me 500 gold, you may use my Transport ship. If things start getting hairy or you decide that you really don't want to deal with sieging opponents in the Feudal Age, you can pay this guy 500 gold to grab his boat and travel across the eastern river instead. There are enemy towers sitting on the river, so if you're absolutely terrible with micro then you may just end up sending Yodit to her death, but if you can make it across, it's a straight shot to the end. Honestly, it's probably one of the better ways to approach this mission, but in this case I wanted to have a bit more fun...  Ethiopian Soldier: The rams are at your disposal now. Use them well! So I buy the rams and then bulldoze the outermost forces of the Camp in the Forest while making a break for the river.   While doing so, I run into this well-fortified Gidajan camp, which is a centrally located catch-all fort to ensure that you don't manage to slip between all of the other ones without at least some kind of fight. Garrisoned Rams and Shotel Warriors batter everything down fairly quickly.   After that, it's just a quick hop, skip, and a jump over a river crossing full of crocodiles to make it to the boat waiting to take Yodit to safety. Ethiopian Soldier: The princess has escaped. There is still hope for Aksum! Mission 1 Ending Text "My son smiled when he heard of Yodit�s escape. 'As long as she stayed in the Aksumite Empire, however, Yodit would never be safe from prince Gidajan.' 'Her journey had merely begun...'" You don't want to get bogged down too much in this scenario, as being stuck in Feudal you don't have the tools for a long fight without this becoming miserable. The goal is to build up what you need, smash open enemy defenses, and get out as quickly as possible. Given those constraints, this is a really well designed mission. Gidajan is enough of a threat to encourage you to move quickly, but not so much of one that he crushes you before you're ready to make your escape. Meanwhile, the map rewards exploration with alternative ways to approach your objective if you want to pursue them, or just extra firepower if you want to keep things simple. Extra Slides Mission 1 - Intro Slide 1 Mission 1 - Intro Slide 2 Mission 1 - Intro Slide 3 Mission 1 - Intro Slide 4 Mission 1 - Intro Slide 5 Mission 1 - Intro Slide 6 Mission 1 - End Slide 1 Mission 1 - End Slide 2 Jossar fucked around with this message at 04:34 on Sep 6, 2023 |
|
#
?
Sep 6, 2023 04:23
|
|
|
The rare and elusive feudal scenario! I don't think we've seen one since The Battle of Stirling.
|
|
#
?
Sep 6, 2023 14:20
|
|
|
I honestly love the constraints in some of the campaign missions. A lot of people don't seem to like the 75 pop limit games, but I feel like it forcing you to do things a bit differently isn't bad at all.
|
|
#
?
Sep 7, 2023 02:45
|
|
|
Yodit - Part 2: The Right Partner Age of Empires II: Definitive Edition - Zuluha Mission 2 Starting Text "Despite the late hour, the market of Aksum was still crowded. Vendors shouted from several wooden stalls, describing their goods: bolts of silk from the Far East, olibanum incense from Arabia, bracelets made from Egyptian glass, our own Ethiopian ivory... Tired from browsing all of the stalls, we sat down on a low wall next to a shop.'Father', Daniel said. 'Will you please tell me the rest of Yodit's story?' Despite my fatigue, I decided to entertain the boy. 'Yodit traveled north for many years, searching for someone who could help her seek revenge for the humiliation she had suffered at the hands of Gidajan. Eventually, when making a camp near the border of Egypt, the princess heard a rumor that perhaps presented the opportunity she had been awaiting.' 'The Syrian prince Zanobis was traveling the region, looking for a suitable bride. But how could she, an exiled princess, convince such a powerful man?'"  Scout: Princess, the Syrian prince Zanobis is passing through this region. It would be wise for you to build yourself a reputation so that you might impress him.  This mission is kind of like the Genghis Khan starting mission on steroids. It is similarly a quest-based scenario where you have to complete tasks for several of the local Beja tribes in order to achieve impress Prince Zanobis and obtain victory. However, you also have to manage base-building, and your bases will be under constant assault from Raiders that are spawned onto the map and cannot be permanently defeated.  Merchant: The Beja rulers of Aydhab demand tribute that we cannot pay. If you could find two relics and bring them to their monastery, we would be in your debt. The closest village, more of a merchant camp really, wants you to bring two relics to the Monastery further to the east in the city of Aydhab. These guys are sufficiently close enough to my main base that I will be using their Market to trade, mostly because expanding out to where the gold piles are is too risky of an investment for the early part of this mission.  Beja Chief: Our ports are terrorized by endless swarms of pirates. Destroy their docks and you will have our eternal gratitude. Aydhab itself wants you to take out the four Docks belonging to the Arabian Pirates. They're a normal faction, but are supplemented by boats belonging to the Raiders, which makes this quest very difficult to accomplish early on unless you go all in sea presence. Given that the map is mostly land, it's not really worth it.  Beja Chief: Our village is open and exposed to enemy raids. If you could construct some fortifications to protect us, we would be most grateful. The village directly to the northwest of Aydhab wants you to build 5 Towers within its boundaries. A simple enough task in theory, but in practice that means having several hundred stone lying around and enough of a defensive force to protect your villagers from Raiders while they're building the Towers.  Beja Chief: My daughter Makeda has been kidnapped by raiders and taken north. Please, rescue her and bring her back to me! The northernmost village is a simple rescue mission, only hindered by the fact that the Hostile Beja Tribe forces are of moderate size and that their encampment is located right next to a Raider spawn point.  Ikshids: The Nobatians are our worst enemies. Sack their city of Qasr Ibrim and you will have our respect. Finally, you have a grudge between two kingdoms, resolved by picking one and sacking the city of the other. The Nobatian town is slightly less well fortified and easier to defeat, but they're of roughly equivalent difficulty overall.    The attacks begin in earnest, with the Raiders throwing an eclectic mix of everything in the Ethiopian lineup at you as well as Archers of the Eyes, for some reason. You can try and defend both camps if you're very good at micro, but most players will find defending the northern camp to be untenable and pull back to focus on fortifying the southern one.  And I mean fortifying. In most scenarios I find a few Castles to suffice for territory defense, but here the attacks are so constant that I really feel the need to fully wall up my base. I even built multiple layers outwards as part of expansions to cover the acquisition of new resources such as an extra wood line and mineral piles.  Eventually with my base sufficiently well-defended, I build up a bunch of Shotel Warriors and Crossbowmen and get to pushing outwards. Located in the middle of the desert are a number of static camps of Hostile Beja Tribes, usually guarding gold piles. This camp is particularly notable because it happens to be guarding one of the map's relics.  Beja Chief: Our village is now safe from enemy raids! In the process of trying to secure the center of the map, I also build the five towers that the village northwest of Aydhab requested. Fortunately, once a mission is complete, the game marks it as such and you aren't forced to go back and recomplete it in case something changes on the map.  Moving on from there, I find the camp where Makeda is located. This is a two for one deal as it also contains the other relic that I need to complete the merchant camp's quest. Do note that there are at least two other relics present on the map, so you don't have to go scouring the desert for the one I found before, although you probably want to grab this relic no matter what just because of its convenience factor.  Beja Chief: My daughter is alive! I do not know how I can possibly repay you.  Merchant: The tribute is paid. Many thanks, you have saved us! Getting all of these quest deliverables back to their proper homes is a bit more hazardous than it seems, because the Raider forces are constantly scouring the map. This part is particularly treacherous as the Raiders' naval units can try and attack you from the sea, and can do quite a lot of damage given the relatively fragile nature of a standard Ethiopian army.  Nobatians: It is war that you wish? Very well, so be it.  Ikshids: You have done us a great service. May the blessings of Allah be with you! Because you're considered to be allied with both factions until you pick a side, it is easily possible to slip into the city of your chosen victim in the Nobatian/Ikshid feud while pretending that you're considering working for them, and then just flip the switch and burn the city to the ground without having to go through the trouble of breaking through the city walls. You do have to break out through the walls on your own, but it's a small price to pay, especially since there won't be anyone to contest your exit apart from a few isolated groups of Raiders.   The only task that remains, then, is clearing up the Red Sea on behalf of Aydhab. Because the Raiders have been left uncontested at sea, it's a bit of a fight to secure a good Dock spot, but once the Castle goes up things get much easier.    Just focus on smashing the Arabian Pirates' fleet and then their Docks. Everything else is too much of a time investment to be worth your while, unless you were specifically hoping to clear a beachhead to retrieve the Relic at the eastern set of Docks (protected, funnily enough, by Eastern Swordsmen making a return as a custom scenario unit). I'm not a fan, but it does mean that you can just stick purely to mission objectives without having to go out of the way to find a Relic, if you want. In any event, that's the last of the quests, and the end of the scenario. Beja Chief: With the pirates destroyed, our trading vessels will be safe to cross the Red Sea. Many thanks, my friend! Ethiopian Soldier: Word of your exploits has spread far and wide, my Queen. Zanobis will surely choose you as his bride! Mission 2 Ending Text "'Of course, Zanobis was impressed by Yodit's achievements. He sought after this famous princess and asked her to marry him'. Daniel responded: 'Queen Yodit is truly a strong woman, Father, but how did she...' I quickly raised my hand to stop him: 'No, son. No more questions now.' 'It will soon be dark and we need to return to the inn. A meal will do us both much good. Perhaps I shall tell you about one of her great victories before going to bed.'" I dunno, I think by this point Yodit probably has enough credibility to just raise an army in her own name.  I'm of mixed minds on this scenario. It does feel very well organized, but every time I play it, the same spiral happens: I fail to defend the northern camp, then leading to an hours long grindfest. The good outweighs the bad, I think, so long as you have the time to sit and play through it. Extra Slides Mission 2 - Intro Slide 1 Mission 2 - Intro Slide 2 Mission 2 - Intro Slide 3 Mission 2 - Intro Slide 4 Mission 2 - End Slide 1 Mission 2 - End Slide 2 Jossar fucked around with this message at 06:39 on Sep 7, 2023 |
|
#
?
Sep 7, 2023 06:27
|
|
|
Yodit - Part 3: A Fallen Crown Mission 3 Starting Text "The trade mission in Aksum was quite successful. I sold all of my grain and bought some casks of wine, olive oil and spices. Those goods would be sure to fetch a good price at home. I looked up from the accounts and rubbed my eyes, tired from reading by the light of a single candle. 'Everything alright with the camels?' I said to greet the boy. He nodded. I offered him a cup of tea and responded: 'Let me tell you more about Yodit before we turn in.' 'After marrying Prince Zanobis, Yodit had to be patient for her vengeance. Her husband had to become king and build a larger army if they ever were to defeat the mighty Aksumite Empire.' 'Five years had passed since Zanobis had taken the throne when Yodit learned that the Aksumite king, Dagnajan, was planning a military expedition to the east. If she could send an elite force to ambush and kill Dagnajan, the Aksumite empire would be severely crippled.'"  Refugee: You are not soldiers of the Aksumite Empire? Thank God. We have no place to go - could you be so kind to help us? You start the scenario with a small number of troops and Villagers. Not enough to engage in any kind of serious operations, but enough to protect you from the occasional raid from Begemder while you build a base.  Ethiopian Soldier: This is the pass that Dagnajan's army will march through. We warned the Darginda, but they are poorly equipped. We had better not let Dagnajan's army come this far. Scout: Our spies report that Dagnajan's army will be on the move in 1 hour and 15 minutes. It is much faster than we expected, so we must hurry! And there's the mission objective. Dagnajan will march with an absolutely massive army 75 minutes in (less on higher difficulties). If he destroys the Darginda castle, we lose. If we manage to kill him during the fight, we win.  Alodian Trader: What are you doing here? Unless you are here to destroy the rebel camp up north, we suggest that you leave. In addition to giving you that time to boom and build an army of your own, the scenario provides you with a number of optional objectives to make the final fight against Dagnajan's army easier. Spoilers: the game bugs out and none of the ones that affect the unit composition of Dagnajan's army take effect. This doesn't mean I was entirely wasting my time, as I did kill a lot of units that otherwise would have joined Dagnajan's army, but it still sucks. I will nevertheless describe what each of these objectives is supposed to do. Also, if you manage to complete every side objective before Dagnajan shows up, you get an achievement. These guys are having a civil war, though unlike last time both factions start out hostile to you, and can only be convinced of your good intent by the destruction of their enemies. If you side with the Traders and defeat the Rebels, you get trading access to their Market. If you side with the Rebels and defeat the Traders, you can pay the Rebels 300 gold to conduct a raid on several of Dagnajan's minor military camps. You can do so multiple times. Neither option is really worth it to be honest - there's enough gold on the map that you don't need to deal with Trade Carts as a less efficient income source for gold, but it's also not so unlimited that you can just afford to spam raids left and right, and without doing that the Rebels won't accomplish much of use.   I destroy Begemder's forward base so they stop attacking me, but as it turns out, their main base is located fairly far from my location and it's really time consuming to get rid of all their individual military buildings, let alone defeat them entirely. Destroying Begemder's Castle is supposed to release the elephants in Dagnajan's army from their pens, removing all of the War Elephants from his army.   Dagnajan has several minor military camps concentrated in the center of the map along the river, along with a fishing village. Killing these guys means less on-map troops for the Aksumite king to recruit from when he makes his big push.  Ethiopian Soldier: The monastery up ahead is very important to the Aksumites. We should destroy it. Finally, there's this Wonder guarded by a bunch of Monks. Destroying it, or killing all the Monks, removes all Monks from Dagnajan's army.  Eventually, Dagnajan starts his march. Even if you manage to complete all the objectives (which I did not in any event), he still shows up with a ton of Shotel Warriors, Archer-line units, Trebuchets, and Rams. He moves to gather whatever troops still exist in the undestroyed military camps before marching for Darginda proper.   Initially, the fight seems equal, but eventually the sheer weight of numbers means that I am forced to retreat back to the Castle. With Darginda's help, I am able to break Dagnajan's army and win the...   Yeah no, that was just the first wave. Throughout the second part of this fight I'm panicking as I send a neverending stream of Shotels and Arbalests down from my base to reinforce the heavily battered defenses at Darginda.  But the thing is, no matter how large Dagnajan's army, he still has a fixed amount of troops, so eventually numbers turn things in my favor as I smash the last of the War Elephants and corner the Aksumite king in the midst of a battlefield littered with corpses and arrows. He's a powerful Elephant Archer Hero unit, with the most HP of any unit in the game to minimize your odds of sniping him during the fight, but deprived of his army to act as a buffer, Dagnajan goes down quickly. Ethiopian Soldier: The king of Aksum is dead! Without its leader, the empire will soon crumble before the power of Yodit, the rightful heir! Mission 3 Ending Text "'When the news of Dagnajan's death reached the city of Aksum, both of his sons tried to seize the throne for themselves.' 'A civil war broke out and the once-mighty empire began to crumble. Of course, Yodit...', a soft snoring drew my attention to my son. The lad was already sleeping." Honestly, I can't even be annoyed with the game, I played this one so poorly that I deserved to lose, and it's only by the heroic efforts of Darginda holding the line and the rapid deployability of Shotel Warriors that I managed to carry the day. Extra Slides Mission 3 - Intro Slide 1 Mission 3 - Intro Slide 2 Mission 3 - Intro Slide 3 Mission 3 - Intro Slide 4 Mission 3 - End Slide 1 Mission 3 - End Slide 2 Jossar fucked around with this message at 05:10 on Sep 8, 2023 |
|
#
?
Sep 8, 2023 05:00
|
|
|
Yodit - Part 4: Broken Stelae Mission 4 Starting Text "Outside the northern gate the camels groaned, irritated by the traders mounting the animals to begin the long journey back to the Ethiopian highlands. Drivers urged the long caravan forward with loud shouts and cracking whips. As I took my place next to my boy, the sun slowly began to rise along the hills. Not far from the gate, we passed a field of great stone stelae. Some stood tall, reaching for the sky, but most lay toppled, their pieces scattered over the ground. 'Father', Daniel asked, looking up at a towering stele, 'when we entered the city you told me that these stones marked the graves of the ancient kings. Is Dagnajan buried here as well?' I shook my head. 'No, my son. Those kings are long dead, and the body of Dagnajan was never recovered. His two sons were far too busy trying to slay each other.' 'While the Aksumite Empire was divided by civil war, Yodit ordered a fleet to be built. An invading force would cross the Red Sea and strike hard at Massawa, the most important harbor of the empire.'"  Ethiopian Soldier: We are approaching Massawa. Let us seize this land for Yodit! (Okay fine, technically this mission starts with an intro cutscene of a couple of Transports dropping your starting units off, but it's entirely pointless.) The substantive part of this mission starts you off with a base, a couple of Villagers, and some Shotel Warriors. Your objective is to destroy the city of Massawa to the north, but as with last mission there are a couple of sub-objectives to help you with that.  Seven stelae dot the map, and they operate under capture the flag logic - the last person to have had a military unit stationed by the flags at the base of the stela controls the stela, which gives a trickle of resources. Different stelae give different resources, indicated by a pile at the base of the stela. For instance, this one generates food. The resource trickle is nice, but it's not super critical. The main reason why you want to fortify these guys is because Gidajan is very interested in controlling the stelae, and will constantly send out troops to attack them. Fights around the stelae mean that Gidajan isn't attacking your base and you can set up killing fields to whittle down his troops/resources while you prepare for the big assault on Massawa. I found that holding all of the stelae was impractical and that some of the fights ended up being pretty touch and go, but I was able to eventually secure control of most of them.  There are three of Gidajan's Monasteries located on the map outside of Massawa itself. Each one you destroy gives you 1000 gold, which is useful because once your initial gold pile runs out, it starts becoming very hard to keep the gold flowing in. This postpones that problem for a long while.  Tribesman: We will fight for Yodit once you have visited all the other tribes. The last factor on the map are these Local Tribes. Even moreso than the stelae, these guys are the real marker of your progress throughout the mission. Getting to all eight villages means that you've managed to clear out Gidajan's forces enough to the point where with their help, you can start your offensive in earnest.  Genitour: Our holy temple was destroyed by Gidajan. We will join you so that we can have our revenge.  The one exception to the tribes not joining you until you have the full set is this group of Genitours, which will happily join you immediately. I use them to take over this stone stela and then promptly forget they exist.  The last two Monasteries are located pretty close to one another (the final one is just offscreen to the southwest), so if you think you have enough troops, it might be worth a quick smash and grab just to get all that sweet, sweet gold.  Otherwise, for a long while it's just a series of attacks and counterattacks centered on the stelae. Gidajan does a pretty good job at this, and even sends Villagers to build Towers on stelae he's captured to make them even more of a pain to retake.  Ethiopian Soldier: The local tribes pledge their allegiance to Queen Yodit! Use these men as you please.  Once you find all eight tribes, you get a whole bunch of Shotels and they convert to the active Ethiopian Rebels player. These guys are pretty darn effective: they independently attack Gidajan's forces at the stelae and join you for assaults you make on Massawa.  Speaking of which...    Massawa puts up a pretty solid defense, but really, once you've turned the tide in the field and brought the fight to them this mission is all but won. Ethiopian Soldier: We have razed Massawa! The road to Aksum lies open. Mission 4 Ending Text "'Although Gidajan had managed to kill his brother and take the throne in the meantime, he had also lost the north to Yodit. Soon she would advance to the capital for the final battle.' Before I could dispel Daniel�s youthful naivet� about warfare, shouts arose from the front of the caravan to stop for the night." This scenario definitely feels more like one of the intentionally game-like scenarios, which makes it all the weirder that you have an almost cinematic-style switch in the style of gameplay once you finish recruiting the local tribes. Extra Slides Mission 4 - Intro Slide 1 Mission 4 - Intro Slide 2 Mission 4 - Intro Slide 3 Mission 4 - Intro Slide 4 Mission 4 - End Slide 1 Mission 4 - End Slide 2 Jossar fucked around with this message at 05:37 on Sep 9, 2023 |
|
#
?
Sep 9, 2023 05:30
|
|
|
Yodit - Part 5: Welcome Home Mission 5 Starting Text "The caravan had stopped at the top of a hill after a long day of traveling. Some merchants sat around the campfire, sharing wineskins and roasting a goat. Others were already pitching their tents. Up here, the nights could be very cold. Daniel had just finished his portion of goat. 'Father, would you finally tell me how Yodit became the queen of Aksum?' Before I could respond, Tariku, an old, lean merchant with white hair, stood up. He stared fiercely at my son with his one eye. 'So you want to hear about our good queen, lad?' 'Tariku fought against Yodit's troops in Aksum', I whispered to my son. Daniel could only nod to the one-eyed man. 'Thirty years ago', Tariku began solemnly, 'I was patrolling the northern hills of Aksum when suddenly I saw a sea of banners in the distance.' 'The sun reflected upon rows of armored men. Yodit had finally arrived to destroy the cradle of Ethiopian civilization! I shivered, for her fury was legendary...'"   Ethiopian Rebel: Gidajan has made his last stand in Aksum! Let us conquer the city for queen Yodit! You start the mission with two bases in the eastern and western corners of the map, with the goal of breaking into the center of the map and destroying six of Aksum's Towers.  Ethiopian Soldier: We have found some locals that are willing to trade with us! Unlike most of the other missions in this campaign, there aren't really that many interesting things scattered around the map, just a few Markets belonging to an allied faction to make gold trading possible.   Gidajan's Soldier: Your series of victories will finally come to an end today. Never shall you succeed in conquering Aksum! Gidajan himself has bases in the northern and southern corners of the map, and will continually produce sizeable groups of troops to try and wreck your bases.  Once I build up a large enough army, I send it off to attack Aksum, intercepting one of Gidajan's attack forces on the way, which buys me a little bit more time to focus purely on offense.  Aksum is a pretty open city, making it easy to siege. Once each tower goes down, all of the troop producing buildings in that particular part of the city switch from being enemy-aligned to neutral, guaranteeing your uncontested control of the area in question.   Gidajan is smart enough to realize once you've switched to attacking Aksum and will redirect his forces accordingly, but if he wasn't strong enough to wipe me from the map before, he has no chance at this point. Aksum's own defensive units start out weak and isolated (or are just weak around the edges), but get increasingly more fierce and numerous either as time goes on or you fight your way towards the center of the city. By the time you're fighting in the streets, their Siege Workshop units can be a real pain, especially coupled with the likely foot-unit heavy composition of your own army and their having Torsion Engines - the Ethiopians' Imperial Age unique tech which boosts Siege Workshop units' blast radius/projectile width.  At about 40 minutes in, Gidajan will start building a Wonder, but by this point I've already destroyed 5 of the 6 towers in Aksum that I need to win, so it's too little, too late.  A few minutes later and despite being swarmed by Aksum's local defenders, I'm able to take down the last tower and bring a close to the scenario and the campaign. Ethiopian Soldier: The battle for Aksum is over, and so is Gidajan's reign of terror! Victory is ours! Mission 5 Ending Text "'I saw how Gidajan finally fell, his body covered with blood. He was wrong to kill his brother, yes, but he was the rightful heir to the throne! I tried to defend my homeland from disaster and lost my eye for it. A small price for such an honor.' 'Now you remember this well, boy. Yodit's rise to the throne was not some glorious adventure � it was a bloody mess.' The old man leaned back, sighing. Glancing at my son, I noticed that he suddenly seemed older than he had this morning. Nobody dared to whisper another word." Like the last mission, this one feels like it's designed around being an alternate game mode rather than a scenario. But this one's so straightforward that it just ends up falling flat. Which is a strange thing to say given how the rest of the campaign is designed: maybe it was rushed out the door to ensure that the expansion pack released on time? It does fit well with the ending of the story being: "then a lot of people died, and that was that." This is probably the campaign that I was most worried about completing outside of the Rajas' ones, at least based on what I knew at the start of the Let's Play. Most of the campaign involves you spending a lot of time playing defense, either because the goal is to defeat a super-army or the AI just won't stop raiding you. I'm also not a particular fan of the Ethiopians' playstyle because it primarily involves using a lot of Siege Workshop units and/or units with armor made of toilet paper. But if you can get around these hurdles, then you'll find a lot to love in the Yodit campaign, insofar as it is legitimately challenging and most of the scenarios reward you for taking the time to explore the map and accomplish side-objectives. Extra Slides Mission 5 - Intro Slide 1 Mission 5 - Intro Slide 2 Mission 5 - Intro Slide 3 Mission 5 - Intro Slide 4 Mission 5 - End Slide 1 Mission 5 - End Slide 2 Mission 5 - End Slide 3 Jossar fucked around with this message at 17:37 on Sep 9, 2023 |
|
#
?
Sep 9, 2023 17:30
|
|
|
Campaign Vote #19 A. Francisco de Almeida - Portuguese B. Gajah Mada - Malay C. Suryavarman I - Khmer D. Bayinnaung - Burmese E. Le Loi - Vietnamese Voting lasts for 24 Hours from the time of this post. In the event of a tie, I will act as the tiebreaking vote between the two tied options. Please bold your vote in order for it to be counted, as well as noting if you are changing your vote from something else.
|
|
#
?
Sep 9, 2023 17:32
|
|
|
A. Portuguese Let's finish off the "African" campaigns
|
|
#
?
Sep 9, 2023 17:50
|
|
|
A.
|
|
#
?
Sep 9, 2023 20:43
|
|
|
reading this lp was much more enjoyable than playing through yodit's campaign myself, I'll say that. the sudden swerve in the narrative of having this random guy show up to be like 'but actually war bad' felt strange- they kind of flirt with the idea that Yodit was exceptionally bloodthirsty but don't really show it A makes sense as a bridge between the two dlcs
|
|
#
?
Sep 10, 2023 00:01
|
|
|
Sure, let's see A. I like the ending at least in spirit, "and in practice it just meant the crows were well fed" is an important part of understanding a succession war.
|
|
#
?
Sep 10, 2023 13:09
|
|
|
Let's go to Portugal.
|
|
#
?
Sep 10, 2023 13:45
|
|

|
Vote's closed. Sorry for the late response, the poll got held up conquering kingdoms on the way to India with Francisco de Almeida.
|
|
#
?
Sep 10, 2023 21:16
|
|
|
Francisco de Almeida - Part 1: The Old World Age of Empires II: Definitive Edition - Ethiopians Theme Very well, then let us begin, the tale of the continent-spanning conquistador.   Mission 1 Starting Text "My captain is dead. Tell King Manuel that the red blood of Francisco de Almeida, conqueror of the Indies, stains a white beach at the edge of his empire. After braving Spanish knights, Berber horsemen, and Indian elephants, it was the king's lost faith in a devoted servant that took his life's breath. Lies they whispered in our king's ear! They called Dom Francisco mad with lust for power, riches, and glory. Those jackals! Those men who had never set foot on a swaying caravel in a monsoon or felt the heat of the African sun sting upon a reddened neck! Was not my captain's devotion measured in the sweat and blood he poured across three continents and three oceans? I was a boy when the battlefield of Toro birthed the legend of Dom Francisco. While the last of the Moors held in Granada, the Christian kingdoms of Iberia warred for the throne of Castile. King Henry had died, leaving his kingdom to his daughter Juana, wife of King Afonso of Portugal. The union of the two lands was celebrated in our country but, for the ambition of a queen, it was not to be... Queen Juana's twenty-five-year-old aunt, Isabella, sought the throne for herself. Her powerful husband, the king of Aragon, led his army into Castile to seize the crown for his wife and unite that kingdom with his own. The armies of Aragon and Portugal met near the city of Toro to decide the fate of three kingdoms..."  Prince Juan: Francisco! My father's army is broken and the Aragonese approach Toro! We must defend the city! Sao Jorge!  You start this mission controlling forces belonging to Prince Juan (a Cavalry Hero unit) and Francisco (not appearing on the map as a unit). The Aragonese Army attacks the city shortly thereafter and I lose everyone except Prince Juan, but the city is saved. (I'm not sure why, but I always found this to be a really difficult fight no matter what you do, even if you try to abuse the Tower and Toro's Monk. It certainly reinforces the theme of the mission, but I'm not sure you're supposed to end up having to build yourself back up from only Prince Juan.)  Francisco: We cannot hide in Toro like rats! Our enemies have three camps between here and Zamora that we must destroy! (after a few seconds) We have few men but many soldiers are hiding in the wilderness. If Prince Juan goes to them, they will find their courage! And there's the main mechanic for the first part of this mission - you can't build an army, but Prince Juan can recruit soldiers he finds hiding in the countryside into what will hopefully be a formidable enough force to destroy all the Aragonese military camps dotted around the countryside.  Francisco: The soldiers report the Duke of Alba and Cardinal Mendoza are patrolling nearby. Capturing them would fetch a large ransom. (after unhorsing the Duke of Alba) Capturing the Duke of Alba has fetched us a sizable ransom! While running around the countryside, you get a message that there are two priority targets that you can capture in order to get a ransom of 500 gold a piece. They're technically optional, but in practice you'll run into the Duke of Alba (a Cavalry Hero unit) as part of the exploration process anyway and Cardinal Mendoza (a Monk Hero unit) is located in the middle of one of the forts. Won't complain about free gold though.  All of the orange Aragonese Army units are scripted, but the yellow Aragonese Army can produce new troops, which they will send to try and attack you at your last "known" location. There was one time when this resulted in them running right past my army to look for it where it had already been, but otherwise it combines with the limited number of recruitable troops on the map to stop you from getting too complacent.  Eventually, I decide I have enough troops and attack one of the forts, making sure to lure a few troops outside the walls to their death first. Prince Juan remains a great tank, especially for things like Tower fire, and having acquired a Battering Ram in the countryside the razing goes fairly quickly.  As an easter egg, there's this Blind Lame Priest randomly sitting on the map who will heal you. This guy looks and sounds like an Age of Empires I Priest and is a reference to a hero unit from the last scenario of the Yamato campaign from AoEI. I don't catch it on-screen, but there is another hidden unit on the map behind impenetrable forest, a nominally recruitable Hunting Wolf.   Francisco: Mendoza pays us well to spare his life. The second camp is mostly notable for having a couple more Missionaries and Monks than the others, so between them and Cardinal Mendoza, there are a lot of conversion attempts going on. More dangerous than usual, because of your limited supply of troops!   The third and final camp puts up a surprisingly stirring defense, compounded by that band of units from the Aragonese Army that I mentioned getting lost before turning around and attacking me during the final part of my assault. My troops are run ragged, but the camp goes down and the Aragonese Army is defeated for good.   Francisco: We have achieved a great victory over Aragon! But do not rest, men! The treacherous followers of Isabella still divide Zamora! Of course, that doesn't mean the mission's over. Queen Isabella of Castille's local supporters still refuse to surrender and remain in control of the bottom half of Zamora. To drive them out, you're given control of Toro as a resource production center and the northern half of Zamora as a military production center, along with some more troops.   Confident that their half of the city will be protected by a fortress located on the Pe�as de Santa Marta, the Isabelistas immediately charge over the bridge dividing the two halves of the city. I beat them up and then advance forward just enough to take out the fortress before waiting for production on additional troops. There are two ways that you can win the mission at this point - destroying all of the military buildings in the city center of Zamora or destroying all of the Mills on the outside of the city to the south. Because the Isabelistas contested the bridge, as I suspect they usually do, I decided to go the city-fight route. After all, by the time I stopped them, I'd already established a beachhead in the southern part of the city proper anyways.    As I work my way through Zamora's barricades, more Isabelista troops start showing up, but so do the first of my Organ Guns. From this point, they do most of the work in shooting enemy units to pieces while the rest of my army tears down the remaining military buildings, eventually triggering the Isabelistas' defeat. Francisco: Zamora is freed from the Isabelistas! We have stolen victory from certain defeat! Mission 1 Ending Text "Despite the successes of Dom Francisco and Prince Juan, the Battle of Toro was indecisive. After three more years of war, a compromise was reached. Isabella was crowned Queen of Castile, joining that kingdom with Aragon into a unified Spain. In exchange, the wise King Afonso, attuned to the changing times, received Spanish assurances that the African coast and the waters and lands to the East were a Portuguese dominion." Aka, "we had you do this mission to explain the context behind the rest of the missions, and so you'd get a chance to punch the Spanish at least once." It's a fun mission though, so I don't mind. Extra Slides Mission 1 - Intro Slide 1 Mission 1 - Intro Slide 2 Mission 1 - Intro Slide 3 Mission 1 - Intro Slide 4 Mission 1 - Intro Slide 5 Mission 1 - Intro Slide 6 Mission 1 - End Slide 1 Mission 1 - End Slide 2 Jossar fucked around with this message at 01:15 on Sep 11, 2023 |
|
#
?
Sep 11, 2023 01:05
|
|
|
Francisco de Almeida - Part 2: Lion of Africa Mission 2 Starting Text "I began my journey with Dom Francisco two decades ago in Morocco. Thirteen years had passed since the Battle of Toro and the grizzled soldier had risen to be an esteemed counselor to King Juan. Courtly life did not suit my captain well, however. He convinced the king to send him to Africa to fight the Moors. King Afonso had conquered the Tangier coast before the war with Aragon but Portugal's hold on Muslim Africa was tenuous. Barbary pirates menaced the coast and Berber tribesmen emerged from the lifeless deserts in fierce raids. Against these predator stood a fragile outpost of Christendom on an island in the Loukkos River. The garrison was led by a soldier named Afonso de Albuquerque whose path would cross with ours again in a different world. My captain set sail to take command of this garrison and re-establish Portugal's hold on Tangier. It would not be the last time that Dom Francisco carried the flag of Portugal to the dangerous edges of the Christian world."  Francisco: Pirate sails! Defend the fort!  You start the mission with your island fortress under attack by the Barbary Pirates in a multi-pronged assault. Fortunately, you have a number of troops and ships to fend them off, including Afonso de Albuquerque, a Hero Conquistador unit. After doing so, Francisco remarks: Francisco: We cannot remain holed up on this island like galley rats! The emir controls the estuary. He must be made to understand our position. At which point, you are instructed to send five units off to the fortress of the local Emir to bully him into assisting you.  Emir: Intimidation is not friendship, Francisco. Bring an organ gun to my kasbah for my engineers to study and I will fight with you against the pirates. (after delivering the Organ Gun) Excellent. My engineers will study this cannon and use it in our own designs. You are a worthy friend against the pirates. Said emir is not impressed, but on the other hand would very much like to take advantage of Portguese guns to bolster his own forces. Whether or not you do so is probably one of the biggest choices in the mission - if you do leave him alone, then nothing happens, but you're left to fight the Barbary Pirates on your own. Give him the guns, and he will upgrade to use gunpowder (including producing Organ Guns, which he normally can't do as Saracens), help you fight the Pirates, but then turn on you after they're defeated. The thing about AoEII is that you're always at your weakest at the beginning of the scenario, so I found it to be worth giving the Emir the guns and building him up as a long term threat, just to get the Barbary Pirates (especially their navy) off my back.   Apart from the main enemies on the map, there are a number of smaller ones. The two Banu Arous tribes exist to get in the way of gold and stone piles. Like last mission's Aragonese Army, the orange group is fixed and the yellow group will spawn new units and also try to actively attack you. Destroy their camps to be able to mine safely and stop the raids. Off to the west of the map, hidden on a bunch of islands, are the Guanches, who also defend a very large set of mineral piles. I don't engage with them because the map is generous enough with resources that it doesn't seem worth pursuing them compared to dealing with the Banu Arous.  Meanwhile, the Emir is doing a pretty good job of dealing with the Barbary Pirates on his own. I don't know if he can win fully on his own, but he can certainly destroy most of the Pirates' outlying infrastructure, without assistance, within a reasonable timeframe.  Francisco: Pereira has found the relics of ancient Carthage! (after delivering the Relic Cart to the fortress) I will take a few of the relics to enrich the garrison. To the west of the land part of the map is a lost Portuguese expedition under the command of Duarte Pacheco Pereira, another Conquistador Hero unit. This group also comes with a Relic Cart that gives 500 gold in looted artifacts if you bring it to your starting Castle on the island.  With the final defeat of the Banu Arous, I have the space and materials to build up to a full-scale Imperial Age army.    Francisco: The pirates will threaten Portugal no more! At which point I sweep through the lands of the Barbary Pirates and tear them asunder. They're not really a great threat at this point...  Emir: Diplomacy is a game of cunning, Francisco. No treaty will survive when the stakes are guns, gold, and God. Once I crush you, no European will threaten my land or my faith. But the Emir and his forces are. You want to make sure they're at least contained enough at sea that they don't knock down all of your static defenses and destroy the Castle, causing you to lose the mission.   Apart from that it's a fairly tough fight through a well-mixed group of Saracen and Portuguese units and static defenses until the point at which you break through the Emir's gates. At that point, you've most likely broken his momentum and are free to clear out space for some siege units before attacking the Castle at the base's northern edge. Once it goes down, the mission's won. Francisco: The treacherous emir is dead and his castle sacked! The Moors will not soon forget the might of Portugal! Mission 2 Ending Text "While we fought the centuries-old war against the Moors in North Africa, other sons of Portugal were the pioneers of a new age. On small leaky caravels, they took the first daring steps from Europe and lifted the shroud that had obscured our understanding of the wider world for a millennium. The world was vast, far vaster than we had ever imagined, but men like Bartolomeu Dias and Vasco da Gama reached distant shores and gave us the glimmers of a coming global empire. The Turks and Moors might flash their scimitars over the Mediterranean, but they wore no armor on their backs. There, in the Indian Ocean, an ancient trade flourished to the enrichment of the Muslim world. Armed with cannons and ships built to withstand the storms of the Atlantic, the sons of Portugal would fall upon this world like a famished lion in the fold." Trying to think of a use-case for conquering those islands with the Guanches on it. Maybe in Hard mode you really need the extra resources? Extra Slides Mission 2 - Intro Slide 1 Mission 2 - Intro Slide 2 Mission 2 - Intro Slide 3 Mission 2 - Intro Slide 4 Mission 2 - End Slide 1 Mission 2 - End Slide 2 Mission 2 - End Slide 3 Mission 2 - End Slide 4 Jossar fucked around with this message at 06:14 on Sep 13, 2023 |
|
#
?
Sep 13, 2023 06:04
|
|
|
Francisco de Almeida - Part 3: Ruins of Empires Mission 3 Starting Text "It was five years ago that I went with Dom Francisco to the Indies. His appointment to the Viceroyship of India by the young King Manuel had shocked the Portuguese court. Dom Francisco was the champion of King Juan, the deceased cousin of the recently crowned king, and the Almeidas had favored a rival claimant to the Portuguese throne. The king's intentions were the topic of many hushed whispers. We sailed for many months across the edge of the world, preyed upon by pirates, storms, and disease. But as our leaky ships rounded the southern cape of Africa, we saw the first glimmers of the riches of the Orient. Three mighty citadels guarded the lucrative trade waters of the Swahili coast where merchants traded ivory, gold, spices, and jewels from the innards of Africa to the fringes of faraway China. Weathered by the long voyage, Dom Francisco sought trade and hospitality from the first of these citadels, but her stubborn ruler, a usurper who had slain the rightful sultan, arrogantly closed his gates to us. Finding an exiled African prince with ties to a rebel army, my captain cunningly hatched a plan to take the Swahili coast by fire and steel."  Francisco: The rebel prince promises us an army to conquer Kilwa, but he could also make an effective bribe to gain the city's trust. You start the mission with a number of troops on an island in the Indian Ocean, including Louren�o de Almeida (another Conquistador Hero unit) and special guest star Muhammad ibn Rukn ad Din (a Genitour Hero unit). You can either support his claim to the throne of Kilwa or hand him over to the city for a gruesome execution. Killing the Prince lets you skip ahead to the next part of the mission, so to speak, but automatically turns both Zanzibar and Mombasa hostile to you. Kilwa stays allied but will turn on you if you ever put any other troops in the middle of the city... unfortunately, the mission objectives will require you to backstab them eventually. Since Kilwa's Castle has to be destroyed no matter what, I decide to bite the bullet and just make them my enemy from the start. On this path, Zanzibar never turns hostile unless you declare war on them and Mombasa holds off on becoming your enemy until you've defeated Kilwa. In either path, Muhammad has to stay alive until you finish the objective or else you lose the mission, though this is of course, much easier in the path where you're just dumping him off to be executed.   Floating around the Indian Ocean are a bunch of supplemental boats and troops. It's crucial to find as many of these guys as possible, especially since one of the Transports contains a Bombard Cannon.   Francisco: We have thrown the dice behind the rebel prince! Kilwa will burn! For the moment, Kilwa isn't a particular priority. Right now we have to be focused on defeating a number of Bantu troops and the occasional Tower occupying four of the surrounding Swahili Villages. Doing so frees the villages, as well as granting you resources, some of the buildings, and an eclectic mix of troops from Shotel Warriors to Gbetos, and even a War Elephant!  Of course, just because we don't consider Kilwa a priority, doesn't mean they think the same. Every couple of minutes they'll send out a bunch of troops to try and hunt your army down. Since they have to cross river chokepoints to reach your army in most cases, this is a good opportunity to use Caravels floating in the rivers to thin out most of the enemy ranks.    After freeing all 4 villages, there's nothing left to do but wheel my army back around towards Kilwa. After smashing their main army on the way to the city gates, I let the Bombard Cannon do most of the work in tearing down the city's defenses and Castle.  Francisco: The cowardly emir flees half-naked into the forest! His silk caftans alone will finance our war with Mombasa! (a few minutes later) Zanzibar profits from the peace we have brought to Africa. It would please our king to collect his just due from Zanzibar's merchants. And there's the final goal of the mission, destroying Mombasa's Wonder. Despite Francisco's commentary here, you never need to engage with Zanzibar in order to claim victory, but sinking their Trade Cogs will give you 100 gold a piece. It's not really worth annoying them if you don't have to though, the map is pretty flush with relics and it's easy enough to pick up 4-5, which, combined with some other things later, will cover all of your gold income. This base is the one you get no matter which path you take, although you end up with an additional base located on the islands as part of the Execution Path. But you don't get access to buildings in Kilwa (and easy access to several of the map's relics) until you destroy the Castle, which is faster on the Rebel Army path.   As before, even though Mombasa is your nominal opponent, most of your immediate problems will be caused by attacking Bantu troops. Here, the first faction controls all the units present on the map, while the second faction controls all the huts that spawn more Bantu troops. I make sure to absolutely destroy the hut player to stop additional spawns, and also because the Swahili Villages give you a 400 gold bounty per set of huts destroyed. I also try to take out most of the standing Bantu units, but don�t grab them all since a scattered few are out of the way of my immediate warpath.  Back at my base, I build a couple of Feitorias. These are a Portuguese unique building which trades a bunch of population space in exchange for a free trickle of resources. It's not a complete replacement for having Villagers, but the building has a couple of key advantages such as being more difficult to raid and limiting the amount of late game economy micro that you have to do.    Eventually, with a large enough army built, I begin the march on Mombasa. The most notable thing about this particular siege is that Mombasa seems to love using Monks on defense. I generally don�t research the conversion resistance techs like Faith and Heresy since it�s a lot of resources spent for very little gain, but here I explicitly went out of my way to do so, since Mombasa�s Monks were so gung-ho on trying to convert everything in sight. The Wonder you need to destroy is on a separate island from the rest of the city, but can be reached from Mombasa�s main base by Trebuchet, so you don�t need to worry about building up a navy just to bring the mission to a close. Francisco: The Swahili coast is ours! We have seized the riches of Africa and flung open the gates to the Indies with fire and steel! Mission 3 Ending Text "Empires are built on the ruins of dead empires. The pile of burnt stone we left in Mombasa, once a palace, was the foundation for the new Empire of Portugal. Our conquest of the Swahili coast sent waves across the Indian Ocean to the wealthy trading cities of Zanzibar, Mogadishu, Calicut, and others. We were met with either fearful gifts or the closed gates of those with the foolishness to challenge our cannons. Few would continue to make that mistake." A bit of a tough one as to whether I wish Zanzibar was more closely integrated into the core goals of the scenario. On the one hand it seems really weird that they�ve been included as this big city on the map if they�re going to play such a limited role, but on the other hand, requiring you to deal with them as well as Kilwa and Mombasa would have made this scenario drag on forever. Net positive as it is, I think, but could go either way. Extra Slides Mission 3 - Intro Slide 1 Mission 3 - Intro Slide 2 Mission 3 - Intro Slide 3 Mission 3 - Intro Slide 4 Mission 3 - Intro Slide 5 Mission 3 - Intro Slide 6 Mission 3 - End Slide 1 Mission 3 - End Slide 2 Mission 3 - End Slide 3 Jossar fucked around with this message at 13:25 on Sep 14, 2023 |
|
#
?
Sep 14, 2023 13:21
|
|
|
Mission 2 I found a lot of fun, having a competent ally is refreshing and the inevitable betrayal is prepable
|
|
#
?
Sep 14, 2023 13:32
|
|


|
Aaaaaand that's it for Africa and it's architecture set, the continent might appear in the corner of a map hosting some Berber pirates sometimes but both the Malians and Ethiopians will be joining the Mesoamerican civilizations in the pile of stuff that only appears in the expansion it was introduced and will not show up anywhere else in the game again.
Asehujiko fucked around with this message at 00:34 on Sep 15, 2023 |
|
#
?
Sep 15, 2023 00:26
|
|
|
Francisco de Almeida - Part 4: Estado da India Mission 4 Starting Text "After months at sea, we reached our goal: the rich Malabar coast of India, land of a thousand gods, and a haven for spices, gold, and silver. In the brackish lagoons of Kerala, among temples dedicated to strange serpent gods, we established our trading posts in the cities of Cannanore and Cochin. From these cities, my captain and his son Lourenco cunningly manipulated the feuding rajas and sultans. They maneuvered through the politics of spice and faith, always with an eye for the most profitable outcome. One Hindu prince, however, defied us. This nameless ruler of Calicut, known only by the title 'the Zamorin', threatened to break the carefully crafted deals and rivalries from which Portugal profited. By sword and shrewd tongue, giving no credence to differences of religion or race, he gained allies in the rajas, in the sultans, and in rulers as far away as Egypt and Venice. Even our own allies among the Indians fell for his intrigue. The treacherous Kolathiri Raja, prince of Cannanore, betrayed us for the Zamorin's gold. Surrounded by enemies, it seemed that the hands of fate had turned so quickly against us."  Francisco: They have broken through! Fight for Portugal and Sao Jorge! (after defeating the assault) It is good that the gate is broken. No one will accuse us of hiding behind walls! Better to die burning their city than cower like cornered dogs! The mission starts with your base under attack by the forces of the Kolathiri Raja. After defeating the initial assault, you are tasked with either defeating him and the Zamorin or building and defending a Wonder. If you're really quick about it, the former is the faster option, but defending the Wonder is the easier/less messy option. Of note is that while you do start with a few Villagers for building, you don't get access to any economic buildings except for Markets and Feitorias. You cannot gather resources with villagers the normal way and the majority of this map's resources come from your army razing enemy buildings.  Francisco: Spies report that the Zamorin employs Italian engineers to arm his ships with cannons. We must destroy the ships before they set to sea! A couple of minutes in, you get this message from Francisco and a countdown timer starts, 20 minutes on the clock on Standard, 10 minutes on the other two difficulties. You have to destroy two Cannon Galleons sitting in the Zamorin's harbors before the timer reaches zero or else he gains the ability to build them permanently. You really don't want this to happen as these are the only units that the Zamorin trains en masse that are a threat to your static defenses.    At one point the Zamorin sends forward some of his Thirisadai (the Dravidians' unique ship, Imperial Age only, fires multiple arrows) to assault my base but they get dashed on the rocks as a result of my Castle and Bombard Towers. Since he's overextended his units, I take the opportunity to sail my own fleet forward, smash Cannanore's fleet, and destroy the Cannon Galleons. This pretty much marks the end of the mission, as there is now nothing the enemy factions can do to seriously threaten my position. The rest of it is just a rampage across Cannanore while waiting for the Wonder to go up. The rhythm pretty much looks something like this...  Send troops out to destroy buildings and the occasional set of troops patrolling the area.    The Zamorin and the Kolathiri Raja take turns sending assault waves at my base, which proceed to get shot to pieces. Repeat for as long as necessary.  There's an island of pirates to the west that give you a quest to convert this Thirisadai, which gives you the pirate units and a bonus to gold from looting buildings. Or you can just kill them all for extra resources. I didn't bother. Might be worth it if you're playing the more active path to this mission and need a boost right from the beginning, but honestly, it's pretty out of the way for extra resources when this mission seems pretty generous with them as is.  Francisco: A fortress worthy of Sant' Angelo!   The wonder goes up, but by this point my base is secure enough that I don't feel the need to actively defend it and instead go out and try to destroy as much of Cannanore as I can before the timer runs out. Francisco: The Zamorin flees in a flurry of robes on a mangy camel! But I do not think this victory has ended our war... Mission 4 Ending Text "Though the Zamorin limped away from Cannanore bloodied, his resolve was untouched by our cannons. In driving men to war, gold can be more powerful than God. For centuries, the wealth of the Indies had passed through the Indian Ocean, carried by Arab, Indian, and Somali merchants to the port cities of Arabia, Egypt, and Africa. From there, endless caravans carried wealth across the desert to Alexandria, and then to Istanbul, Venice, and Genoa. By rounding Africa, Portuguese traders had upset the traditional balance of this world. With our forts in India, we cut the trade that had enriched the Muslim sultans and the Venetian doge alike. Dom Francisco held a knife to the throats of our enemies and as the lion fed, vultures and jackals appeared." A neat little mission, but it's almost more like a musou game with how much it encourages you to engage in rampant destruction after you've otherwise clearly won. Extra Slides Mission 4 - Intro Slide 1 Mission 4 - Intro Slide 2 Mission 4 - Intro Slide 3 Mission 4 - Intro Slide 4 Mission 4 - End Slide 1 Mission 4 - End Slide 2 Mission 4 - End Slide 3 Jossar fucked around with this message at 04:33 on Sep 16, 2023 |
|
#
?
Sep 16, 2023 04:24
|
|
|
Francisco de Almeida - Part 5: A Son's Blood Mission 5 Starting Text "We had taken the other side of the world by storm but our old enemies followed. As the Zamorin beat his war drums, Ottomans and Egyptians rallied to him. Their ships were carried over the desert and rebuilt by treacherous Venetians. In India, an unlikely Russian renegade called Malik Ayyaz raised the Muslim armies of Gujarat in defense of the Hindu Zamorin. Gold had truly become more powerful than God. As this coalition of Hindus, Muslims, and Christians descended on us, liars and jackals flocked to the court of King Manuel. They filled his ears with lies that Dom Francisco had betrayed Portugal and convinced the young king to dispatch an Armada led by Afonso de Albuquerque to relieve my captain of the Viceroyship. Dom Francisco, however, was in no mood for politics. Tragedy struck off the coast of Chaul. In a heroic naval battle, my captain's beloved son Lourenco was slain by Amir Husain, admiral of the Mamluk fleet of Egypt. Though he deeply loved his son, Dom Francisco did not shed tears for his death. In repayment, my captain vowed to shed blood."  Afonso: By order of His Majesty, you are to be relieved as Viceroy of India and to return to Portugal for inquiry into your activities in the Indies. (after Afonso leaves) Francisco: The king does not know the pain of a son's death! Send the priests to Albuquerque's men to promise them God and gold if they follow me. Not even the king will deny me my vengeance! In this mission, Francisco de Almeida is  The first part of this mission involves you going down to Afonso's foraging camps and using Monks and Missionaries to isolate and convert a bunch of his soldiers. Be careful because you're only allowed to kill 15/10/6 of them (depending on difficulty), or the game will declare it an automatic fail state as you've wasted too many men to stage an effective coup of the Portuguese forces in India and still have enough to fight the anti-Portuguese alliance. Speaking of which, you can't take too long on this section as you only have a 30/25 minute timer until everybody else gets fed up with you and starts attacking. Afonso's troops are pretty passive by default and it's recommended that if you bring any troops other than Monks to keep them on No Attack stance, so they don't cause a huge mess.  Francisco: Send a priest to Albuquerque to seal my command with God's grace! After converting 10 of Afonso's men, the game tasks you with converting Afonso himself (returning after we last saw him in the second scenario of the campaign). This is slightly more complicated as he's holed up in the middle of his base and won't come out. You are going to have to break through the gates of Afonso's fort to reach him, but if you lead with a Ram and otherwise stay passive/out of sight, no one other than the Towers and maybe a Conquistador or two will shoot at you.  Francisco: Send Albuquerque away! Malik Ayyaz plans to execute our brothers in Diu! We have little time to defeat him!  You can then rush your Monks to convert Afonso, who is standing by some tents near the Dock. Converting Afonso does a lot of things all at once: removing him from the map, granting you his base to supplement your already existing one from the start of the scenario, ending the truce with the anti-Portuguese forces no matter how much time is left on the clock, and granting you access to Docks and the ability to tech up to the Imperial Age. If you manage to convert Afonso without a single of his units killed, the game gives you an achievement. (I had a badly executed attempt where I did not try for this and Afonso, appropriately enough, gets incredibly annoyed if you kill any of his troops. Afonso: This is madness, Francisco! We stand at the heathen's gate and you kill your fellow Christians! For what? For your own vanity?)    Your first intended target is Diu, where Malik Ayyaz is building a Wonder. My initial fleet tried to take on Diu's navy, but it was a little larger than I expected and I had to retreat back to my Dock and build a few more Fire Ships before pressing back outwards and finishing the job. With Diu's navy clear, it only takes a few Cannon Galleons to trash the Wonder.  Francisco: Build our defenses! We will make our stand against the Turks and the Egyptians over the ruins of India! Destroying the Wonder grants you control of the island where it was being built and unlocks the final set of objectives for the mission: like the last one, your goal is to either destroy most of the enemies on the map or build a Wonder. Like last time, it's a choice between the potentially fast and messy way or the slow and steady turtle.    No matter which route you choose, all three enemies will up the intensity of their raids, although I never really found that they got to the point of being too unmanageable. Ottomans were probably the most annoying, between their Janissaries, Bombard Cannons, and Hussars.  With a Wonder up and running, I am free to run out the clock, but also like last time, where's the fun in that?    Off I go to smash the Ottomans, the scenario concluding with my Organ Guns doing a drive-by shooting of the Turkish Pasha. (All three enemy bases have a Hero unit as a leader, the killing of which weakens their respective faction. Honestly, unless you do a very expensive decapitation strike, by the time you get to the leader, you've probably already bulldozed the faction in question. Francisco does comment on each of them though. Here's the one for the pasha: Francisco: If the Turkish sultan wishes for more of his pashas to die, he will send them to me!) Mission 5 Ending Text "With his son's death avenged, Dom Francisco surrendered the viceroyship of India and wrote his final chapter. He would not return to this beloved Portugal. Landing in southern Africa to collect water, his party was ambushed by the Khoikhoi natives. We found his body on that forsaken white beach. In the five years since we departed Lisbon, we followed Dom Francisco to the edge of the earth. We fought ebony-skinned warriors in the jungles and savannahs of Africa, battled Mamluk sailors on the decks of galleys heaving in the monsoon waves, and struggled against armies of elephants and camels in the sprawling cities of India. Our caravels had taken us to the distant shores unknown to our ancestors and awoken Europe to a world beyond our dreams." This mission is mostly just the last mission, but replacing the resource gimmick with extra quests at the beginning. The Monk one is pretty unique though, especially if you're trying to go for a pacifist run. The Portuguese campaign feels a lot like the Inca campaign in that it's fun to play, but the highs aren't really that high. A little bit more creative overall, so points for that. The framework of the campaign is a bit awkward, but I think you're supposed to understand that the narrator has drunk Francisco de Almeida's kool aid, even though by the last scenario the conquistador is clearly unhinged as a result of his son's death and there's a bit too many instances of "We're Here To Get Rich, But Those Other Guys Always Shot First, I Swear." I could be wrong, but a 100% unironic "here's why conquering the Indies was awesome, guys" lens feels out of place given that the other stories in the expansion pack all have themes about how unworthy rulers always seem to end up turning things into terrible quagmires. And that's the end of African Kingdoms. I'd say it's not my favorite expansion pack, but we're starting to run into the problem here that everything post-Forgotten or even post-Age of Conquerors doesn't benefit from nostalgia in the same way that the earlier stuff does, and it was still pretty good. There's definitely a lot more room for other African campaigns to pop up in the future as part of a theoretical "sequel" pack. Extra Slides Mission 5 - Intro Slide 1 Mission 5 - Intro Slide 2 Mission 5 - Intro Slide 3 Mission 5 - Intro Slide 4 Mission 5 - Intro Slide 5 Mission 5 - End Slide 1 Mission 5 - End Slide 2 Mission 5 - End Slide 3 Jossar fucked around with this message at 17:25 on Sep 16, 2023 |
|
#
?
Sep 16, 2023 16:43
|
|
|
Campaign Vote #20 A. Gajah Mada - Malay B. Suryavarman I - Khmer C. Bayinnaung - Burmese D. Le Loi - Vietnamese Voting lasts for 24 Hours from the time of this post. In the event of a tie, I will act as the tiebreaking vote between the two tied options. Please bold your vote in order for it to be counted, as well as noting if you are changing your vote from something else. Did you know that Rajas is the last AoEII-only expansion pack to have four campaigns? From this point on until Return of Rome (and then only because people complained), all future expansion packs only have three campaigns each.
|
|
#
?
Sep 16, 2023 16:46
|
|
|

|
| # ? Jun 5, 2024 07:24 |
|
|
B. Suryavarman I - Khmer
|
|
#
?
Sep 16, 2023 18:18
|
|