


|
effika posted:Does the foot pedal suck? Yes. I�m running in to this with my wife�s machine (bernette b05 academy). I press the foot, it makes a humming noise but no movement, then when I depress it another hair it�s immediately in  mode and goes way too fast. mode and goes way too fast.Not sure if it�s the machine having a bit of static friction or the foot being kinda poo poo. The foot is definitely terrible. It�s jumpy/not smooth, no ability to change sensitivity, and is really light weight plastic so it kinda flops around on the floor. But it could just be the machine. I think the humming sound is the motor trying to engage, but not being able to. I can often get it to slow down once it goes really fast, but I can�t seem to get it to start off very slow. The sweet spot on the pedal is super tiny too and almost impossible to hit, possibly just because the pedal is terrible. I don�t think my wife has ever serviced it since buying it a few years ago so I�ll have to give it a go. Maybe a bit of lube in the right places will make it more graceful.
|
 #
?
Feb 12, 2024 05:29
#
?
Feb 12, 2024 05:29
|
|


|

|
| # ? May 13, 2024 10:22 |
|
|
Eeyo posted:I’m running in to this with my wife’s machine (bernette b05 academy). I press the foot, it makes a humming noise but no movement, then when I depress it another hair it’s immediately in Oh hey that's the Singer HD4432 clone! Some good news, if they kept the foot pedal design: open up the foot pedal to find if there's a resistor knob you can adjust. It'll give you a little bit more room on the slow end before it launches into the stratosphere. Here's how (great channel, btw). The humming before sewing thing is a product of the AC motor these mechanicals use; a machine that uses DC current with servos and stepping motors won't have that problem as the power curve is different to get the motor moving. The motors will respond with less power, which the AC motors are not able to do. Once going the AC motor is able to slow back down pretty well, as you've discovered, but the DC motors get to start slow.
|
|
#
?
Feb 12, 2024 14:56
|
|
|
Yeah I opened it up a few nights ago, looks pretty similar and has the same trim pot (the speed adjustment). Weirdly mine also has a microswitch in it. I guess it's there to turn on/off the power when the foot is up? I tried tweaking that so it clicked earlier but it didn't help. I'll try the adjustment dial and do some cleaning an oiling and hopefully that will help. Thanks! Also I don't think I'll play with it while it's plugged in, that could get pretty spicy lol. 
|
|
#
?
Feb 12, 2024 18:19
|
|
|
Alright I oiled it up and tweaked the dial, it did help out. A bigger help was switching it from the �snail� mode to the �rabbit� mode. Our machine has 2 modes with different top speeds. But for some reason the slow mode has no response on the bottom end, so it starts at a really high speed when the motor kicks in. But in the fast mode it�ll actually start sewing much sooner and I can control it at slower speeds much better. Funny how that works!
|
|
#
?
Feb 17, 2024 22:44
|
|
|
Alright I'm going to make some pajamas for my wife and I. First set will be flannel pajamas for me. It's pretty thicc flannel. I was able to do a straight stitch through it ok. I'm thinking about doing a bound seam finish with some double gauze (since it's so nice and soft), but the tape I made out of double gauze is much harder to work with than my wife's quilting fabric. I had difficulty sewing on the edge of the bias tape - the tape kept buckling a little bit right before the presser foot, and the presser foot would pick up the fabric in its central slot as it sewed. I can probably make it work if I make some wider tape and sew a little farther from the edge. I'm planning on sewing my wife's pajamas with some french terry fabric. I tried sewing on a swatch I ordered and gently caress it's way harder than the thin knits I worked with earlier. It keeps stretching out as I sew it, so doing a bound finish is probably a bad idea. Like the seam will end up like 10 or 20% longer than as cut. Any tips to help out with buckling/stretching of seams? I tried my wife's walking foot and that seemed to help quite a bit, but it's still not super great.
|
|
#
?
Mar 3, 2024 03:39
|
|
|
Use glue stick to hold the seams together.
|
|
#
?
Mar 3, 2024 10:54
|
|


|
You might also try some wash-away stabilizer with the trickier seams; French Terry just loves to be difficult. For the seam binding, just lots and lots of pins or clips is my advice. There's a special foot you can buy that's supposed it help but it didn't do much for me that pins didn't. You might also think about another seam finish that's less bulky (zig-zagged and the faux-overlock stitch have both been good to me with linen and flannel). Or zig-zag, press to one side, and top-stich, which is what I do when I forget to alter my seam allowances for easier flat-felling.
|
|
#
?
Mar 4, 2024 01:59
|
|
|
Yep. Glue stick is just cheapo wash-away stabilizer. It's kind of a convenient width for seams though.
|
|
#
?
Mar 4, 2024 05:20
|
|
|
Glue sticks are fantastic for temporarily stabilizing applique as well, especially with stretch fabric.
|
|
#
?
Mar 4, 2024 07:11
|
|

|
Wouldn't glue gunk up the needle?
|
|
#
?
Mar 4, 2024 14:51
|
|

|
That�s what I was thinking. I also searched it and some people just use elmer�s glue (the white stuff), which sounds a bit easier to apply
|
|
#
?
Mar 4, 2024 15:44
|
|
|
I use glue sticks when I'm pattern matching when piecing quilt backs and gunking up needles has never been a problem for me. The glue dries really quickly (and yes, the purple ones really do dry clear), and you can set it with a dry iron for good measure. I'd never thought about using it specifically as a stabilizer, which is a great idea!
|
|
#
?
Mar 4, 2024 16:35
|
|
|
While we're on stabilizer chat, a quilt kit I just splurged on says to use a lightweight stabilizer on the corners of a few bias cut edges. Would a wash away stabilizer be an okay choice for this? Would it mostly dissolve after I wash the finished quilt?
|
|
#
?
Mar 4, 2024 16:56
|
|


|
Elmer's washable school glue (sticks or diluted liquid), when dry, don't gunk up my needles. I've been using it for years. You can also try Fabrisolvy, which is usually meant for embroidery, but I've used it for regular sewing too. I like to draw my buttonholes out on a strip of it, clip it to my buttonband, and then know exactly where I'm supposed to sew buttonholes! The extra stabilizer helps them look nicer, too. deety posted:While we're on stabilizer chat, a quilt kit I just splurged on says to use a lightweight stabilizer on the corners of a few bias cut edges. Would a wash away stabilizer be an okay choice for this? Would it mostly dissolve after I wash the finished quilt? You probably could, and it's probably dissolve, or you could go with something like a very lightweight iron-on interfacing instead. Wawak sells rolls of them in various widths and weights and I like snipping a bit off for seams. Though I've been foundation paper piecing my current quilt and love how I don't have to worry over bias stretching-- and if I am (like a big corner) I just tack it down with a glue stick.
|
|
#
?
Mar 4, 2024 19:40
|
|
|
Thanks for the tip! This probably isn't a project I'll be starting any time soon because it's a bit out of my comfort zone, but I got lured in by a last day discount at QuiltCon.
|
|
#
?
Mar 4, 2024 21:37
|
|
|
deety posted:Thanks for the tip! This probably isn't a project I'll be starting any time soon because it's a bit out of my comfort zone, but I got lured in by a last day discount at QuiltCon. Nice! A friend of mine was at quiltcon and posted pics
|
|
#
?
Mar 5, 2024 06:09
|
|

|
Does it matter much where I shorten pants? Got a pajama pattern that doesn't look too bad, but I'll have to cut off about 3 or 4 inches off it and it doesn't have a shorten line.
|
|
#
?
Mar 11, 2024 21:29
|
|
|
Eeyo posted:Does it matter much where I shorten pants? Got a pajama pattern that doesn't look too bad, but I'll have to cut off about 3 or 4 inches off it and it doesn't have a shorten line. Usually you shorten at the ankle. Messing with the waist or crotch will drastically change When you say you need to cut off 3-4 inches, what did you measure? You'll want the inseam, and to adjust the leg length according to that (allowing for the hem and where you want it to sit.) (I've had to do the same but opposite to a pattern for my 3YO, who is pretty narrow, so the size with a waist that fits him needs a few inches added to the leg.)
|
|
#
?
Mar 11, 2024 21:40
|
|
|
So my iron just died, after lasting surprisingly long (15 years) for something mid-range and made in China. What's the consensus on irons these days? I get the impression that they're all equally disposable and nobody offers more than a one year warranty. Even the high-end Rowenta irons are apparently hot garbage now. So it's a matter of getting the not garbage that can at least get the job done before it dies... I've been thinking one of those Hamilton Beach CHI irons?
|
|
#
?
Mar 11, 2024 21:44
|
|
|
Eeyo posted:Does it matter much where I shorten pants? Got a pajama pattern that doesn't look too bad, but I'll have to cut off about 3 or 4 inches off it and it doesn't have a shorten line. Shorten it at the ankle, but don't just cut it 3 inches shorter. If you do that, and the legs are tapered, the cuff will be too large (and it won't fit the separate cuff piece if you have one). Instead, move the line for the bottom of the cuff up as far as you want it to go, then redraw the lines for the inseam and outseam connecting the crotch and hip to the cuff's new location. The taper angle will be very slightly less. I would draw a picture of it but I'm posting from my phone.
|
|
#
?
Mar 11, 2024 21:47
|
|


|
Lead out in cuffs posted:So my iron just died, after lasting surprisingly long (15 years) for something mid-range and made in China. I use an dry iron and spray bottle mister per some shirt-making book�s recommendation. The one I have was made by Knapp-Monarch, which isn�t available anymore, but Black & Decker seems to make an identical one. It�s not perfect, and I�m not sure this technique would work for every fabric, but I prefer it to a steam iron due to it having fewer failure points.
|
|
#
?
Mar 11, 2024 22:54
|
|
|
Lead out in cuffs posted:Usually you shorten at the ankle. Messing with the waist or crotch will drastically change Yeah, I'm a bit confused by the inseam, since it kinda depends on where the band sits and how deep the crotch is for that measurement. I'm basing this off of a current pair of pajamas that I know are too short. If I lay down the top piece of my extant pants on top of the pattern it matches up pretty well around the waist, but the pattern is very long compared to the pants. I'll have to shrink it by a bit to get it where I want the ankle hem to sit, assuming the waist/hip area sits where I like it to. Sagebrush posted:Shorten it at the ankle, but don't just cut it 3 inches shorter. If you do that, and the legs are tapered, the cuff will be too large (and it won't fit the separate cuff piece if you have one). Instead, move the line for the bottom of the cuff up as far as you want it to go, then redraw the lines for the inseam and outseam connecting the crotch and hip to the cuff's new location. The taper angle will be very slightly less. The pattern calls for just a hem on the bottom, no cuffs. The pattern looked strange to me at first glance, it tapers to a waist at the bottom, then the hem flares back out a bit. 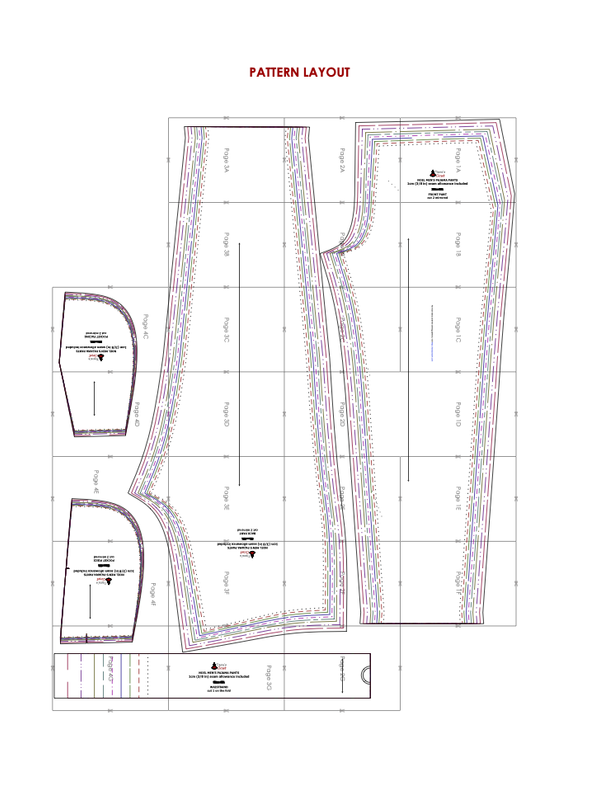 So I guess I'll keep that flared hem part the same, move it up however many inches, then draw a line from the edges towards the top?
|
|
#
?
Mar 12, 2024 00:01
|
|
|
Yep that "flare" is just so the hem sits straight. And that is correct - keep the flared bit, then redraw the long straight lines that connect to it. (Note that the straight lines don't go all the way to the crotch or waist.)
|
|
#
?
Mar 12, 2024 00:56
|
|
|
Oh right, so when you fold it the inseam matches and there�s no extra material, got it. I was probably going to do a double fold hem since I don�t have a serger, so I�ll make a copy of that piece and attach it upside down to the bottom, so it�ll fold right.
|
|
#
?
Mar 12, 2024 01:52
|
|
|
https://www.quiltinaday.com/shoponline/notion/Reliable-Velocity-One-Temp-Steam-Iron/237783 I have this one temperature iron and like it a lot. I mostly use it on quilting cotton, but I've also used it on thick wool and thin polyester satin and it worked well on those too.
|
|
#
?
Mar 14, 2024 04:46
|
|

|
HelloIAmYourHeart posted:https://www.quiltinaday.com/shoponline/notion/Reliable-Velocity-One-Temp-Steam-Iron/237783 Thanks! I was looking at Reliable, since they seem well-regarded. But unfortunately that model doesn't seem to be available in Canada. (I'm also suspicious of their fancier models being like $200 but only coming with a one-year warranty.) I'll probably just go with the CHI, which is $60, and if that dies too soon, switch to a dry iron.
|
|
#
?
Mar 14, 2024 07:49
|
|
|
Finished up my pajamas. They turned out nice and soft, and I like how the pockets turned out. The waistband is just slightly too loose though, oops. I also didn't realize that the pocket piece actually makes up part of the waistband. I ended up just finishing the seams with the overlocking stitch, which was pretty quick.
|
|
#
?
Mar 17, 2024 01:33
|
|
|
Oh yeah with waist elastic it can be a good idea to test out a loop of the elastic before finalizing the size.
|
|
#
?
Mar 17, 2024 03:57
|
|
|
You could pop in a drawstring pretty easily if you wanted
|
|
#
?
Mar 17, 2024 19:12
|
|
 i like nice words
|
I don't have a massive amount of space, but I'd like to buy my wife an overlocker. I know less than nothing about such things, can i just buy the Brother 2104 D that Ebay is shoving at me, or is that way too much overlocking power?
|
|
#
?
Mar 28, 2024 22:02
|
|

|
I wanted to shorten the sleeves on my western shirt but it has these snaps that I'd probably have to remove. Is it possible to do it non-destructively? I checked a few videos on youtube but it seems like they might get deformed pretty bad.
|
|
#
?
Mar 29, 2024 15:35
|
|

|
mobby_6kl posted:I wanted to shorten the sleeves on my western shirt but it has these snaps that I'd probably have to remove. Is it possible to do it non-destructively? I checked a few videos on youtube but it seems like they might get deformed pretty bad. It's not going to be worth it. Just accept that the snaps aren't coming out well, and the fabric may be damaged under them. Even if you did get them out, I'm not sure I'd trust them to go back in well. Once you've shortened the sleeve, pearl snaps are easy to install (I like them over buttons for many applications) if you get a few tools. The plier tool is fine, but if you find you like snaps getting a hammer & die or a table press from Goldstar Tools is the way to go. (If you can get a Snapsource Snapsetter kit, it's my favorite of the non-expensive tools. They went out of business though.)
|
|
#
?
Mar 29, 2024 17:57
|
|
|
effika posted:It's not going to be worth it. Just accept that the snaps aren't coming out well, and the fabric may be damaged under them. Even if you did get them out, I'm not sure I'd trust them to go back in well. ")
|
|
#
?
Mar 29, 2024 18:36
|
|
|
Torquemada posted:I don't have a massive amount of space, but I'd like to buy my wife an overlocker. I know less than nothing about such things, can i just buy the Brother 2104 D that Ebay is shoving at me, or is that way too much overlocking power? I'm allergic to money so I got a serger recently, so here's what I've been reading. The used machines can be good, but people seem to think they can be a little more dicey than used sewing machines. There's more to go wrong, in particular the timing of the machine can be off. IDK what's involved with fixing that but it's at the very least more specialized than fixing a sewing machine. My general reading is that the brother machines tend to be favorably reviewed. Over here in the states the common basic model is the 1034D, idk if you get that in Europe(?). I don't know much about the particular models. Juki machines were also well-regarded and the feeling seemed to be that they were a bit more robust than the brothers. The common ones are the 644DE and 654DE (the latter one can do heavier stuff, is slightly easier to thread, and can take more needle types I think). They're more expensive than the brothers, but since they have a reputation for being more robust may be a good option for used. Looking at the price of the 2104 and the features that's about what you'd expect for a base machine. For features you want at a minimum: 2/3/4 thread operation Differential feed (this does great things for difficult fabrics) Foot pressure adjustment Retractable knife Adjustable stitch length The basic models are all compact like the 2104. They're like half the footprint of my sewing machine. You should also avoid old models that you can't buy new knives for. You need to replace the knife occasionally and if you can't source it then it won't cut well.
|
|
#
?
Mar 29, 2024 19:08
|
|
|
Eeyo posted:I'm allergic to money so I got a serger recently, so here's what I've been reading. The used machines can be good, but people seem to think they can be a little more dicey than used sewing machines. There's more to go wrong, in particular the timing of the machine can be off. IDK what's involved with fixing that but it's at the very least more specialized than fixing a sewing machine. This is extremely helpful and exactly what I was looking for, thanks so much.
|
|
#
?
Mar 29, 2024 20:35
|
|
|
Oh two more things. The primo feature that�s on the top end models is �air threading�. Basically it pulls a vacuum and sucks the thread through the machine to thread it automatically. Then there are some machines that are combo serger/coverstitch machines. The coverstitch is a bit different, that�s the really common stitch on ready-to-wear clothes, for example on hems. That�s the two threads on top and the loopy poo poo on the bottom. The combo machines cost more and IDK much about them or coverstitches. So if you want a basic serger those would be the big features to avoid.
|
|
#
?
Mar 29, 2024 21:26
|
|
|
I'm 100% sure that a lot of older sergers end up being sold/donated because people can't figure out how to thread them. My mom's old serger came with a VHS showing how to do it and even still she changed thread colors by tying the old color to the new one. The self threading ones are like magic.
|
|
#
?
Apr 1, 2024 02:29
|
|
|
I got my 1034D like-new for cheap on Amazon because the seller received it as a gift and had no idea how to use it. I manually thread it every time because that trick of tying the new threads on never seems to work for me.. 
|
|
#
?
Apr 1, 2024 09:19
|
|


|
An update! Thanks to effika's advice, I ended up going with the cs7000x, which has been really solid for me. The only time it's struggled is when I was trying to sew through, uhh...8 layers of cotton and 4 layers of interfacing. I made a bucket hat for my kid, then got a bit hung up on this tote bag pattern. Made a couple for gifts (and screwing them up lol) before doing a supersized one that I also screwed up but it wasn't in the construction, so I'm very proud of it.     Also, hanging out at a quilting store with an infant strapped to chest is an excellent way to get people to have conversations started with you. I suspect the fact that i'm a dude only multiplies the effect.
|
|
#
?
Apr 3, 2024 12:13
|
|


|

|
| # ? May 13, 2024 10:22 |
|
|
Boxman posted:An update! Thanks to effika's advice, I ended up going with the cs7000x, which has been really solid for me. The only time it's struggled is when I was trying to sew through, uhh...8 layers of cotton and 4 layers of interfacing. I'm glad the cs7000x is working out for you! Those are some great first projects.
|
|
#
?
Apr 3, 2024 15:05
|
|